Akai APC64 User manual

User Guide
English
Manual Version 1.0.0

2
Table of Contents
1.0 Introduction ...................................... 3
1.1 Box Contents ...................................... 3
1.2 Support................................................ 3
1.3 About This User Guide ...................... 3
2.0 Setup ................................................. 4
3.0 Features............................................. 5
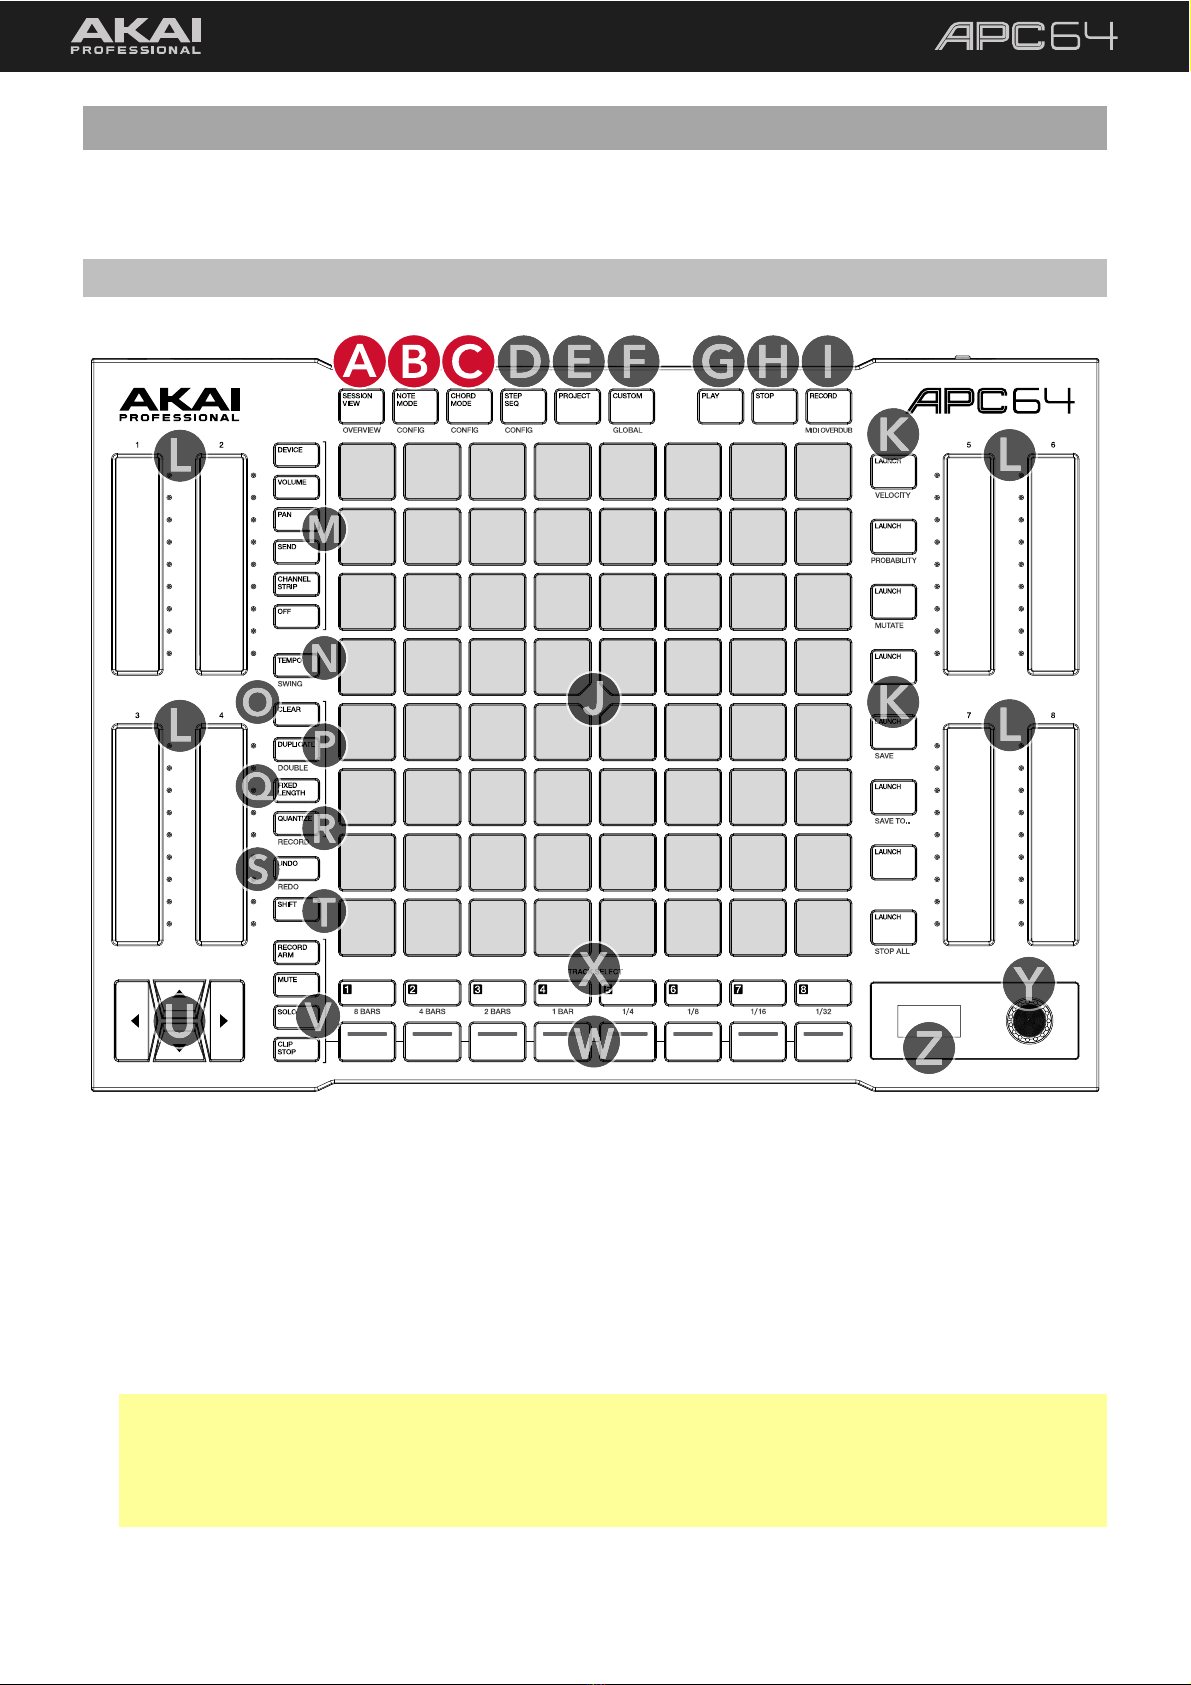
3.1 Top Panel ............................................ 5
3.2 Rear Panel ......................................... 11
4.0 Tutorial ............................................12
5.0 Operation........................................18
5.1 Session View..................................... 19
5.1.1 Overview Mode .................................. 20
5.1.2 Launching Clips .................................. 21
5.1.3 Recording Clips .................................. 22
5.1.3.1 Fixed Length ............................................. 23
5.1.4 Quantization........................................ 24
5.1.3 Managing Clips................................... 25
5.2 Note Mode and Chord Mode......... 26
5.2.1 Configuration ...................................... 26
5.2.2 Playing Notes and Chords ................ 29
5.2.3 Drum Tracks in Note Mode............... 29
5.3 Step Sequencer ................................30
5.3.1 Configuration ......................................30
5.3.2 Note Input Pads ..................................32
5.3.3 Step Pads .............................................33
5.3.4 Modifer Pads .......................................34
5.3.5 Recording Sequences ........................35
5.3.6 Editing Sequences..............................37
5.3.7 Send to Clip .........................................38
5.4 Project Mode.....................................39
5.4.1 Managing Projects..............................41
5.5 Touch Faders.....................................42
5.6 Global Menu .....................................46
5.7 Custom Mode ...................................50
5.7.1 Using the APC64 Project Editor
Software .............................................................50
5.7.1.1 Download and Installation.......................50
5.7.1.2 Setup and Overview .................................51
5.7.1.3 Editing ........................................................52
5.7.1.4 Managing Presets .....................................58
5.7.1.5 Global Settings..........................................60
5.8 CV Operation ....................................62
5.8.1 CV Connection Examples ..................63
5.8.1.1 Standalone Connections .........................63
5.8.1.2 Connections with Ableton Live...............64
6.0 Appendix.........................................65
6.1 Technical Specifications ..................65
6.2 Trademarks & Licenses....................65

3
1.0 Introduction
1.1 Box Contents
APC64
USB-C® Cable
USB-C®-to-USB-A Cable
31/8”-to-5-pin MIDI Adapters
Software Download Card
Quickstart Guide
Safety & Warranty Manual
1.2 Support
For the latest information about this product (documentation, technical specifications, firmware updates, etc.),
visit akaipro.com.
For additional product support, visit akaipro.com/support.
For product registration and account access, visit profile.inmusicbrands.com.
1.3 About This User Guide
This manual should help you get familiar with using your APC64. For consistency, the terminology throughout is
based on the Ableton Live nomenclature. We also used specific formatting to indicate particular topics of
significance:
Important/Note/Tip: Important or helpful information on a given topic.
Names of buttons, controls, parameters, settings, and other options are written in bold characters throughout the
manual.
Examples:Press the CLIP STOP button to set the function of the Control Row.
Hold SHIFT and use the cursors to move the 8x8 focus by eight rows or columns at a time.
The display will show Sending… as it prepares the clip, and then Done! once it has completed.
If the configuration has been set to Show Non-Scale Notes, these will be unlit.
Some parts of this manual refer to other relevant chapters or sections, which are cited in bold, italic blue
characters. Click the text to skip immediately to that section.
Examples:See 5.1 Operation > Session View for more information.
When in 5.3 Step Sequencer mode, press this button to set the Note Modifer pads to control
Velocity.
Use the Clear button, as described in the following section.
You can also click on certain images to jump to specific sections of the manual.

4
2.0 Setup
Important: From time to time, we may update APC64’s firmware to add exciting new features and improvements.
Visit akaipro.com and go to the APC64 product page to check for available updates.
1. Make sure you have downloaded and installed the latest version of Ableton Live (11 or newer) on your
computer. Then, open Ableton Live.
2. Use the included USB cable to connect APC64's USB Port to an available USB 3.0 port on your computer
(powered on).
Note: If connecting to a USB hub, make sure a powered hub is used.
3. In Ableton Live, open the Preferences menu.
4. Click the Link/MIDI tab.
5. Click an available Control Surface drop-down menu and select
APC64.
6. Click an available Input drop-down menu and select APC64.
7. Click an available Output drop-down menu and select APC64.
8. The remainder of the MIDI port settings should automatically be
selected according to the image shown. If you are having issues,
ensure the settings are still set to these defaults.
Note: MPE should not be enabled with APC64.
9. Close the Preferences window. You can now use APC64 with
Ableton Live.
For an overview of APC64’s controls, proceed to the following 3.0 Features section.
For a walkthrough of using APC64 with Ableton Live, proceed to the 4.0 Tutorial section.
For a complete breakdown of all of APC64’s features and functions, proceed to the 5.0 Operation section.

5
3.0 Features
Click on the picture to jump directly to the selected control.
3.1 Top Panel
A. SESSION VIEW / OVERVIEW: Press this button to cycle between Session View, which displays the clip matrix
on the Pad Grid, and Overview, which provides a snapshot of your entire project.
While in either Session View or Overview, you can press and hold this button to momentarily access the other
view. When you release this button, you will return to the previous view.
See 5.1 Operation > Session View for more information.
B. NOTE MODE: Press this button to enable the Pad Grid to play configurable scales of MIDI notes.
C. CHORD MODE: Press this button to enable the Pad Grid to play configurable MIDI Chords.
Note: For both NOTE MODE and CHORD MODE, press either button a second time, or press and hold
SHIFT and then press either button, to open Note and Chord Modes Configuration. You can also momentarily
view the Configuration mode by pressing and holding either button. When you release, you will return to
Note Mode or Chord Mode.
See 5.2 Operation > Note Mode and Chord Mode for more information.

6
D. STEP SEQ: Press this button to enable the Pad Grid to function as a Step Sequencer.
Press this button a second time, or press and hold SHIFT and then press this button, to open the Step
Sequencer configuration. You can also momentarily view the configuration mode by pressing and holding
this button. When you release, you will return to the Step Sequencer.
See 5.3 Operation > Step Sequencer for more information.
E. PROJECT: Press this button to view, save, and load APC64 projects, which contain step sequence patterns,
device parameters, and custom mode assignments.
See 5.4 Operation > Project Mode for more information.
F. CUSTOM / GLOBAL: Press this button to open the custom control layout, where you can access modified
control functions assigned using the APC64 Project Editor Software. See 5.7 Operation > Custom Mode for
more information.
Press this button a second time to open the Global Menu. You can also momentarily view the Global Menu
by pressing and holding this button. When you release, you will return to Custom Mode. See 5.6 Operation
> Global Menu for more information.
G. PLAY: Press this button to start or restart playback.
Press and hold SHIFT and this button to pause playback or resume playback from the paused point.
H. STOP: Press this button to stop playback.
Double-press this button to stop playback and return to the start of the arrangement.
I. RECORD: Press this button to begin recording in Ableton Live.
Press SHIFT and this button to enable MIDI overdub recording in Ableton Live.

7
J. Pad Grid: This 8x8 grid of LED backlit touch-sensitive pads displays active clips or notes based on the mode
selected. The columns represent tracks, and the rows represent scenes. Use the cursors to change the 8x8
view in focus when using Ableton Live, represented by a red outline.
K. Scene LAUNCH Buttons: Press these buttons to launch the adjacent scene.
Press and hold SHIFT and press the Scene Launch button with the following written below to access
additional features:
VELOCITY: When in 5.3 Step Sequencer mode, press this button to set the Note Modifer pads to control
Velocity.
PROBABILITY: When in 5.3 Step Sequencer mode, press this button to set the Note Modifer pads to
control Probability.
MUTATE: When in 5.3 Step Sequencer mode, press this button to set the Note Modifer pads to control
the Mutate function.
SAVE: Press this button to save the device settings to the currently selected Project.
SAVE TO…: Press this button to open the Save As dialog on the display to save the device settings to a
Project slot.
Note: Saved projects are for internal device settings only. Ableton Live projects must be saved from the
software. See 5.4 Operation > Project Mode for more information.
STOP ALL: Press this button to stop all playing clips in all tracks.

8
L. Touch Faders: Slide your finger up and down these touch-sensitive strips to control selected session
parameters. Touching a spot on the fader will set the parameter to that level immediately. The current fader
position is represented by a white dot in the LEDs next to each fader. When automation has been recorded
to a touch fader, the white dot will turn red. The remaining LEDs will be lit according to the track color and
the current position of the parameter relative to its default value.
Press and hold SHIFT and touch a fader to finely adjust the selected parameter.
M. Touch Fader Controls: Use these buttons to set the control parameter for the Touch Faders:
DEVICE: Device controls. While holding this button, use the up and down cursors to cycle between
banks of controls in a device. Use the left and right cursors to switch focus between multiple devices on
one track.
VOLUME: Track volume.
PAN: Track stereo panning.
SEND: Track Sends. Press this button again to cycle between Send channels when more than one is in use.
CHANNEL STRIP: Combination of Volume, Pan, and Sends for the selected track.
OFF: Disables the touch faders.
See 5.5 Operation > Touch Faders for more information.
N. TEMPO: Press this button in time with the desired tempo to enter a new tempo.
Press and hold to view session tempo on the display and then use the encoder to adjust it.
Press and hold SHIFT and this button and then use the encoder to adjust the SWING percentage of the
internal Step Sequencer, as shown on the display.

9
O. CLEAR: Press and hold this button and then press a pad, scene launch button, step, touch fader, or project
to clear it.
P. DUPLICATE: Press and hold this button and then press a pad containing a clip to duplicate it into the next
available clip slot.
Press and hold SHIFT, then press and hold this button and press a pad containing a clip to DOUBLE the
length of the selected clip.
Q. FIXED LENGTH: Press to enable fixed length recording. This will stop recording once the set length has been
reached.
Press and hold this button and then use the encoder to change the fixed length recording size, as shown in
the display. See 5.1.3.1 Operation > Recording Clips > Fixed Length for more information.
R. QUANTIZE: Press and hold this button and then press a pad containing a clip to apply quantization to its
notes.
Press and hold this button and then turn the encoder to set the quantization value, as shown in the display.
Press and hold SHIFT and then press this button to enable or disable RECORD Quantization. When enabled,
notes will be quantized to the set value as you record.
Note: Record Quantization values must be set in Ableton Live; the SHIFT functionality only turns Record
Quantization on and off.
S. UNDO: Press to undo the last action performed in Ableton Live.
Press SHIFT and this button to REDO the last action.

10
T. SHIFT: Press and hold this button to access secondary button functions, printed below the buttons.
U. Cursors: Use these directional buttons as a cursor to navigate tracks and scene banks on the Pad Grid, as
well as device parameters in DEVICE touch fader mode.
V. Control Row Function Select: Press one of these four buttons to set the function of the Control Row buttons:
RECORD ARM: Arm the selected track for recording.
MUTE: Mute the selected track.
SOLO: Solo the selected track.
CLIP STOP: Stop clips in the selected track.
W. Control Row: Press to perform selected Control Row Function on the corresponding track only.
X. TRACK SELECT: Press to select the corresponding track.
Press and hold SHIFT and press these buttons to set the launch quantization value.
Y. Encoder: Turn this knob to select options on the display screen and push it to select.
Note: When connected to Ableton Live, pressing this encoder will also enable or disable the metronome if
you are not in another editing menu.
Z. Display: This screen shows track and device information from your Ableton Live session and information
about the device’s controls.

11
3.2 Rear Panel
A. Power Switch: Use this switch to power APC64 on and off.
B. USB Port: Connect the included USB cable here and connect the other end to your computer’s USB 3.0 port
to use APC64 with Ableton Live or send MIDI data over USB. You can also connect this port to a standard USB
power adapter (sold separately) to power the unit for standalone use.
C. CV/Gate Outputs: Insert a 1/8” (3.5 mm) TS cable into one of eight outputs and connect to an external
device’s CV input to send CV/Gate signals from APC64 to the connected device. See 5.8 Operation > CV
Operation for more information.
D. MIDI Input: Use the included 1/8” (3.5 mm)-to-MIDI adapter and a standard 5-pin MIDI cable (not included)
to connect APC64 to another MIDI controller.
E. MIDI Outputs: Use the included 1/8” (3.5 mm)-to-MIDI adapter and a standard 5-pin MIDI cable (not
included) to connect to an external device to send MIDI messages to.
Note: The two MIDI Output ports are mirrored and send the same data.
F. Kensington®Lock Slot: You can use this slot to secure your APC64 to a table or other surface.

12
4.0 Tutorial
This chapter describes basic terminology and how to get started doing basic tasks using your APC64. To get the
most out of this chapter, we recommend reproducing each of the described steps in order.
To start using APC64 with Ableton Live, first make sure you have downloaded and installed the latest version of
Ableton Live (11 or newer).
Connect your APC64 hardware to your computer running Ableton Live using one of the included USB-C cables,
and set the Power Switch to On. By default, APC64 will power on in Ableton Live Device Mode. If you are having
issues connecting to Ableton Live, make sure this setting has not been changed in the Global Menu.
Ensure that APC64 has been selected as a Control Surface and MIDI Input and Output source in Ableton Live’s
Preferences, as described in 2.0 Setup.
APC64 will begin with SESSION VIEW in focus. This display mode gives you an overview of your project, which
is represented by a red outline in Ableton Live. Use the cursor buttons to move the current view of the pad grid
by one row or column at a time.
Each column in Session View represents a track. Tracks can be used to hold audio samples, drum kits, instrument
plugins and more. Use the TRACK SELECT buttons to select the track in focus.
Session View in Ableton Live, showing MIDI and Audio tracks (left side) and Send and Master tracks (right side)
Track Select Buttons on APC64

13
Each track is made up of clips, which are short sequences of audio or MIDI. Only one clip in a track can play at a
time. When a pad has a clip loaded to it, press it to launch it. Let’s start by adding a sample from Ableton Live’s
library to a track and launching it.
1. Use the Ableton Live Browser to find a sound from the Samples Category.
2. Add this to an available Audio Track in the first clip slot.
3. Once the clip has been loaded, you will see the corresponding pad on APC64 light up.
4. Press the pad to launch the clip. You will hear the sample playing, the PLAY button will light up, and the pad
will begin pulsing green to indicate playback is active.
5. To stop playback of the project, press the STOP button. The pad will continue to pulse green, meaning it will
relaunch once playback is resumed. To stop clip playback, press the CLIP STOP button, and then press the
TRACK SELECT button for the track containing the audio clip.
Clips that are aligned in the same row are called a scene. You can trigger clips in a scene at the same time by
pressing the LAUNCH button on the right side of the row. Let’s try loading another clip to another Audio Track.
1. Use the Ableton Live Browser to find another sound from the Samples Category.
2. Add this clip to a second Audio Track in the same clip row as your first sample.
3. Press the row 1 LAUNCH button to launch both clips at the same time. Now both pads will pulse green and
both samples will play.
4. To stop both clips from playing at the same time, press and hold SHIFT and then press the row 8 LAUNCH /
STOP ALL button.
A clip added in Session View.
Two clips launched together.
Press SHIFT+STOP ALL to stop both clips.

14
In addition to loading audio samples, you can create your own clips using MIDI instruments. Let’s start a new clip
recording. We’ll begin by adding and recording a drum track.
1. Use the Ableton Live Browser to load a kit from the Drums Category. Add this to an available MIDI track.
2. Press the NOTE MODE button, and then select the MIDI track using the TRACK SELECT button.
APC64’s pad grid will change, and the bottom-left quadrant of pads will be lit. You can now use these pads
like a traditional 4x4 drum pad layout to play samples.
3. When a MIDI track is selected from APC64, the selected track’s track arm button in Ableton Live will turn light
red to indicate it has been automatically record-armed. This allows you to immediately play the pads and
hear the sample playback.
You can also manually arm the track for recording by pressing RECORD ARM button on APC64, and then
pressing the Control Row button for the MIDI track. The track arm button in Ableton Live will then be lit
bright red to indicate the track is armed, and it will stay armed even if you navigate away from the track.
4. Press the encoder to enable the metronome while you record.
5. Press the RECORD transport button. A new clip will be created on the track and begin recording immediately.
6. Tap out a drum pattern on the pads to record it.
7. When you are finished, you can press RECORD again and the clip will begin playback. You can edit the clip
in Ableton Live as needed.
Note Mode for a Drum Track.
Arming the track for recording.
Playing back the recorded clip.

15
Next, let’s continue to build out the track by adding a melodic bass line.
1. Use the Ableton Live Browser to load a bass melodic instrument from the Instruments Category. Add this to
a second MIDI track.
2. Press the NOTE MODE button, and then select the MIDI track using the TRACK SELECT button. APC64’s pad
grid will change to a melodic note layout. The root notes will be lit according to the track color.
3. Press NOTE MODE a second time to configure the Note Mode settings. Use the pads or the encoder to
adjust the root note, scale, and pad layout as needed. Press NOTE MODE a second time to return to the
melodic pad layout.
4. Once you are ready to record, ensure that the track is armed for recording, and then press the RECORD
transport button. A new clip will be created on the track and begin recording immediately.
5. Tap out a bass line on the pads to record it.
6. When you are finished, you can press RECORD again and the clip will begin playback. You can edit the clip
in Ableton Live as needed.
Note Mode for a Melodic Track.

16
Finally, let’s add harmonic chords to tie everything together.
1. Insert a new MIDI track into your Ableton Live project as needed.
2. Use the Ableton Live Browser to load a harmonic instrument like a synth pad from the Instruments Category.
Add this to a third MIDI track.
3. Press the CHORD MODE button, and then select the MIDI track using the TRACK SELECT button. APC64’s
pad grid will change to the same melodic note layout as Note Mode, but this time each pad plays multiple
notes simultaneously to create a chord.
4. Press CHORD MODE a second time to configure the Chord Mode settings. The Chord Mode configuration
shares its scale and mode settings with Note Mode configuration to ensure your tracks are harmonically
synced. Use the pads or the encoder to adjust the chord type as needed. Press CHORD MODE a second
time to return to the melodic pad layout.
5. Once you are ready to record, ensure that the track is armed for recording, and then press the RECORD
transport button. A new clip will be created on the track and begin recording immediately.
6. Tap out a chord progression on the pads to record it.
7. When you are finished, you can press RECORD again and the clip will begin playback. You can edit the clip
in Ableton Live as needed.
These steps give you the basic building blocks to launch clips and create clips in Ableton Live using your APC64.
Try recording a few more clips with variations, and then experiment with launching different clips or scenes.
Chord Mode.

17
As you play your project, you can also begin using APC64 for editing and mixing using other controls on the
device. Try using the Touch Fader Controls for hands-on adjustments to various track parameters:
1. By default, the touch strips will be set to DEVICE control, with this button lit on APC64.
2. Select a track with a MIDI device or effect using the TRACK SELECT buttons.
3. Try adjusting one of the touch faders. The device parameter being adjusted will be shown in APC64’s display,
and you will see the parameter being adjusted in Ableton Live.
You can change the active Touch Fader Control by pressing the VOLUME, PAN, SEND, or CHANNEL STRIP
buttons. Try selecting another control and making further adjustments, like turning the track volume up or down
or adjusting a track’s Send control to add an effect.
For an in-depth review of APC64’s features and functions, proceed to the following 5.0 Operation chapter.
Device control mode for the Touch Faders.

18
5.0 Operation
This chapter describes APC64’s functions. Click a link below to jump directly to that section:
5.1 Session View – Create, launch, organize, and edit clips.
5.2 Note Mode and Chord Mode – Play configurable notes, chords, and drum pads.
5.3 Step Sequencer – Create sequence patterns.
5.4 Project Mode – Create and manage project templates.
5.5 Touch Faders – Adjust track parameters.
5.6 Global Menu – Adjust APC64 internal settings.
5.7 Custom Mode – Edit the MIDI assignments of APC64 using the Project Editor.
5.8 CV Operation – Connect to and control external CV devices.

19
5.1 Session View
Session View in Ableton Live is where clips are organized and launched. This view is
great for developing ideas before recording to an arrangement, or for live and on-the-
fly performances.
Note: Session View is only available when connected to Ableton Live. When using
APC64 as a standalone controller, this button will be deactivated.
To open Session View mode on the pads, press the SESSION VIEW button.
The current focus of APC64’s 8x8 pad grid in Ableton Live will be shown by a red outline. The eight columns of
APC64’s pad grid will correspond to the available tracks in Ableton Live, including the Return tracks and the
Master track. The TRACK SELECT buttons will be lit up in the same color of the track in Ableton Live. If you have
less than eight tracks, including Returns, unused columns will have their TRACK SELECT buttons dimmed, and
the Master track will automatically be mapped to the eighth column.
To select a track, press the TRACK SELECT buttons. The selected track’s button will be lit white. The display
will also show the track name (highlighted by the track color), device name (if one is loaded), and current
device bank (if a device is loaded).
Track Name
Device Name
Device Bank
The eight rows of APC64’s pad grid correspond to eight scenes of clips. See 5.1.2 Launching Clips for more
information on launching clips and scenes.
As your project grows, you may have more tracks and scenes than can
be shown on the pad grid.
To move the 8x8 focus by one track or scene at a time, press
the cursor keys. As you move, the red outline will also move in
Ableton Live’s Session View.
To move the 8x8 focus by eight tracks or scenes at a time,
press and hold SHIFT and press the cursor keys.

20
5.1.1 Overview Mode
In very large projects, you may have more than the eight tracks and eight scenes that
are immediately visible on APC64’s pad grid while in Session View. Although you
can move the current 8x8 focus in Session View using the cursors, Overview mode
provides another way to quickly and easily navigate between large amounts of tracks
and scenes and give a snapshot of the current clip statuses.
To open Overview mode, press SESSION VIEW / OVERVIEW while in Session
View. Alternatively, press and hold SESSION VIEW / OVERVIEW while in
Session View to temporarily view Overview mode. When you release the button,
the pad grid will return to Session View.
In Overview mode, each pad on the pad grid (starting in the upper-left corner)
represents a block of eight tracks and eight scenes in your session. This is represented
by the red outline in Ableton Live.
To move between 8x8 blocks, press a lit pad in Overview mode. The number of
pads available will depend on the size of your project.
For instance, in the image to the right, you could press the pads to access the following:
Pad 1 (amber):Tracks 1–8, Scenes 1–8
Pad 2 (red):Tracks 9–16, Scenes 1–8
Pad 3 (green):Tracks 1–8, Scenes 9–16
The pads in Overview mode will also change color depending on the the current 8x8
block in focus and the behavior of clips in each block:
Amber: The current 8x8 block in focus.
Green: An 8x8 block where clips are currently playing.
Red: An 8x8 block where no clips are playing.
Off: Empty 8x8 blocks.
1 2
3
Table of contents
Other Akai Music Mixer manuals
Popular Music Mixer manuals by other brands

STK Professional Audio
STK Professional Audio VM11T-DRV owner's manual

DX Engineering
DX Engineering DXE-CC-8A manual

Crest Audio
Crest Audio X-RACK XR-20 - owner's manual

Mackie
Mackie D8B3.0 owner's manual

PIONEER DJ
PIONEER DJ DJM-250MK2 operating instructions

Emtech Electronics
Emtech Electronics IA-250 Quick start installation guide