AKRO-MILS 30812 User manual

A
x
2B
x
2
C
x
12
D
x
4
J
x
16
M
x
48
N
x
1
P
x
2
O
x
1
L
x
16
BASE ASSEMBLY
ENSAMBLE DE LA BASE
ASSEMBLAGE DE BASE
F
x
1G
x
1
H
x
16
K
x
16
1/4"- 20 X 3/4 HEX HEAD BOLT
PERNO DE CABEZA HEXAGONAL DE 1/4"- 20 X 3/4
BOULON À TÊTE HEXAGONALE 1/4 PO – 20 X 3/4
CROSS BAR
BARRA CRUZADA
TRAVERSE
HORIZONTAL BRACE
REFUERZO HORIZONTAL
SUPPORT HORIZONTAL
E
x
4
WORK TOP
MESA DE TRABAJO
PLAN DE TRAVAIL
HANDLE
AGARRADERA
POIGNÉE
VERTICAL BAR
BARRA VERTICAL
BARRE VERTICALE
FIXED CASTER
RUEDA FIJA
ROULETTE FIXE
SWIVEL CASTER W/BRAKE
RUEDA GIRATORIA CON FRENO
ROULETTE PIVOTANTE AVEC FREIN
SWIVEL CASTER
RUEDA GIRATORIA
ROULETTE PIVOTANTE
5/8"-14 HEX HEAD SHEET METAL SCREW
TORNILLO AUTORROSCANTE DE CABEZA HEXAGONAL #14 X 5/8"
VIS À TÔLE, TÊTE HEXAGONALE N° 14 X 5/8 PO
5/16"-18 X 3/4 HEX HEAD BOLT
PERNO DE CABEZA HEXAGONAL DE 5/16"- 18 X 3/4
BOULON À TÊTE HEXAGONALE
1/4" LOCK WASHER
ARANDELA DE SEGURIDAD DE 1/4"
RONDELLE FREIN
1/4"- 20 NUT
TUERCA DE 1/4"- 20
ÉCROU PO – 20
I
x
16
5/16"-18 NYLON LOCK NUT
TUERCA DE SEGURIDAD DE NAILON DE 5/16"- 18
CONTRE-ÉCROU EN NYLON 5/16 PO – 18
WORK TOP BRACE
REFUERZO DE LA MESA DE TRABAJO
SUPPORT DU PLAN DE TRAVAIL
Assembly Instructions
Bin Cart Model No. 30812
Rubber Mallet
Mazo de goma
Maillet en caoutchouc
Goggles
Gafas
Lunettes de protection
Phillips Screwdriver
Destornillador Phillips
Tournevis Phillips
Notice:
NOTICE: We recommend using a 3/8" drive reversible ratchet, 7/16" open
end wrench, screwdriver, and appropriate sockets to assemble the unit.
Nota: El uso de la plataforma para el cubo en el carrito es opcional.
Comience a armar el carrito en el Paso 2 si no desea usar la plataforma
para el cubo. Esta se puede agregar cuando así lo desee después de que
el carrito esté ensamblado por completo.
Remarque:
L’utilisation de la plate-forme pour seaux située sur le Bin Cart est
facultative. Dans le cas où l’on ne souhaite pas utiliser la plate-forme pour
seaux, commencer le montage du chariot à l’étape 2. La plate-forme pour
seaux peut être ajoutée à n’importe quel moment une fois le chariot
entièrement monté.
Cordless Drill with
Phillips attachment
Taladro sin cable con
accesorio Phillips
Perceuse sans fil avec
accessoire cruciforme
TOOLS:
HERRAMIENTAS:
OUTILS :
PARTS:
PARTES:
PIÈCES:
Instrucciones de ensamblaje
Carrito móvil con recipientes
Modelo 30812
Instructions d’assemblage
Chariot pour bac mobile
Modèle 30812

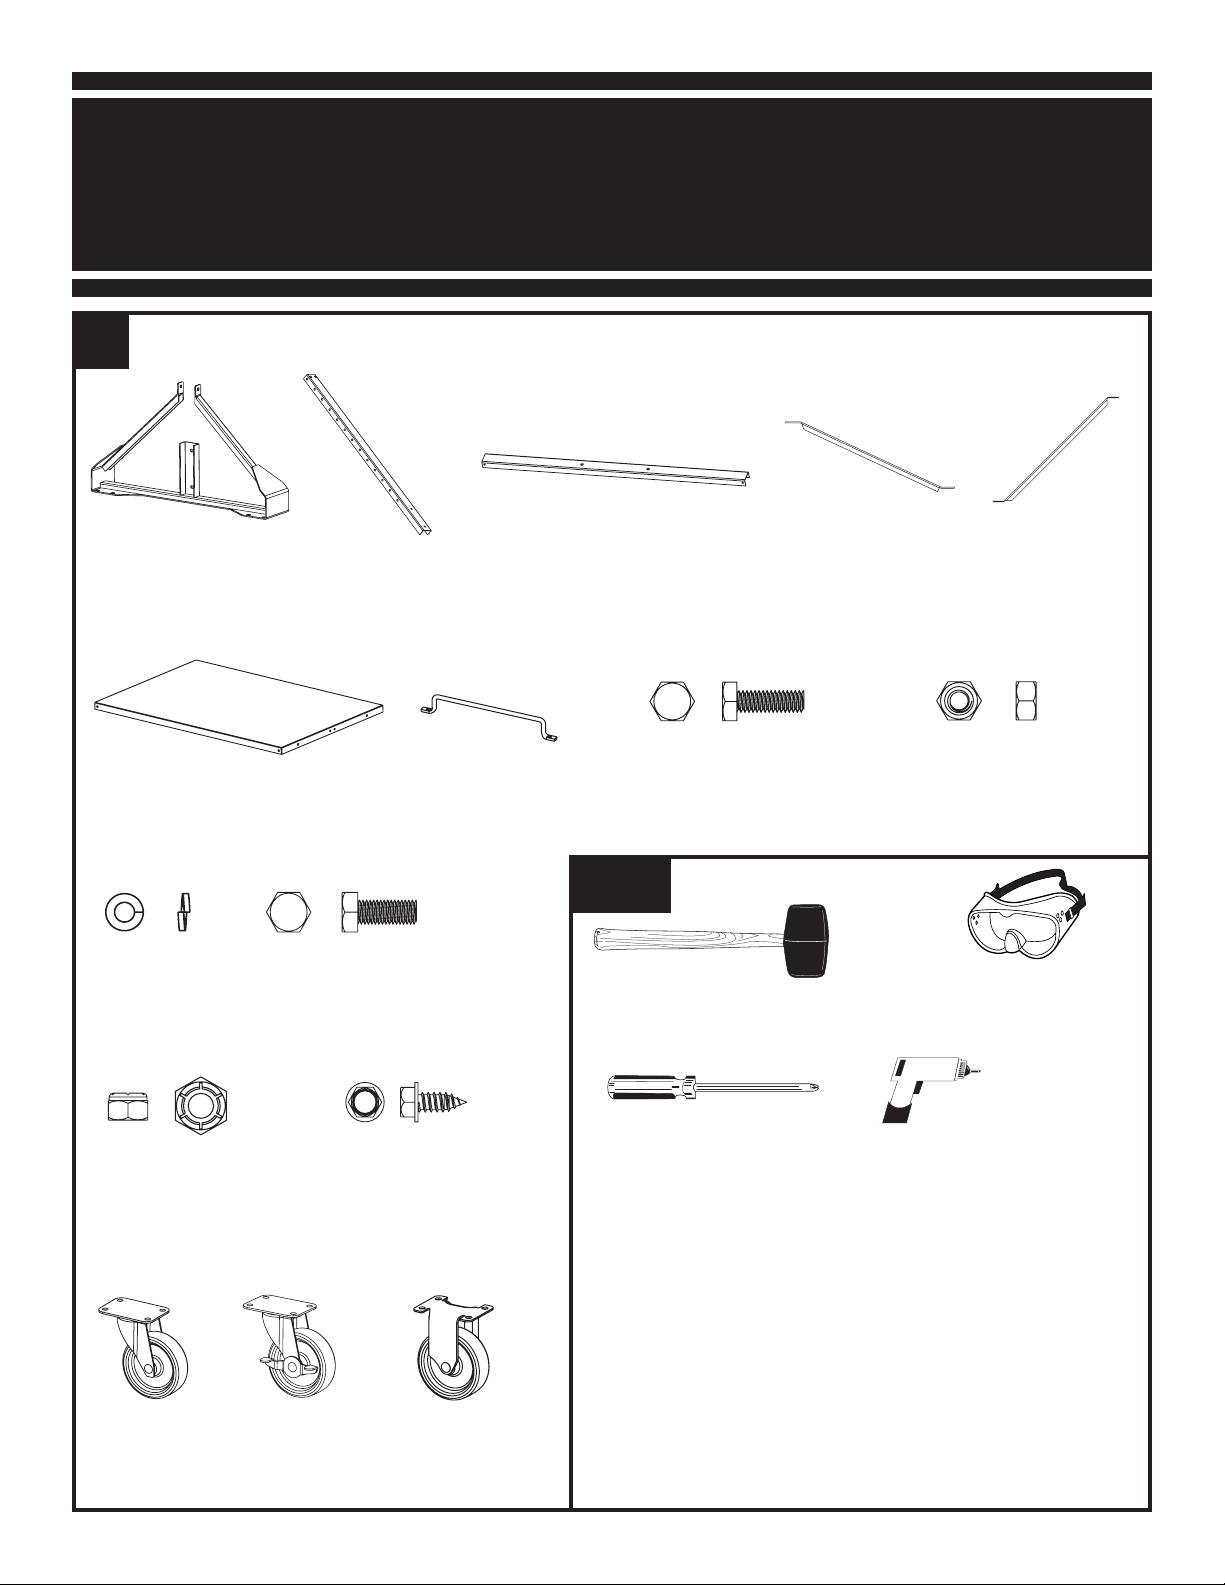
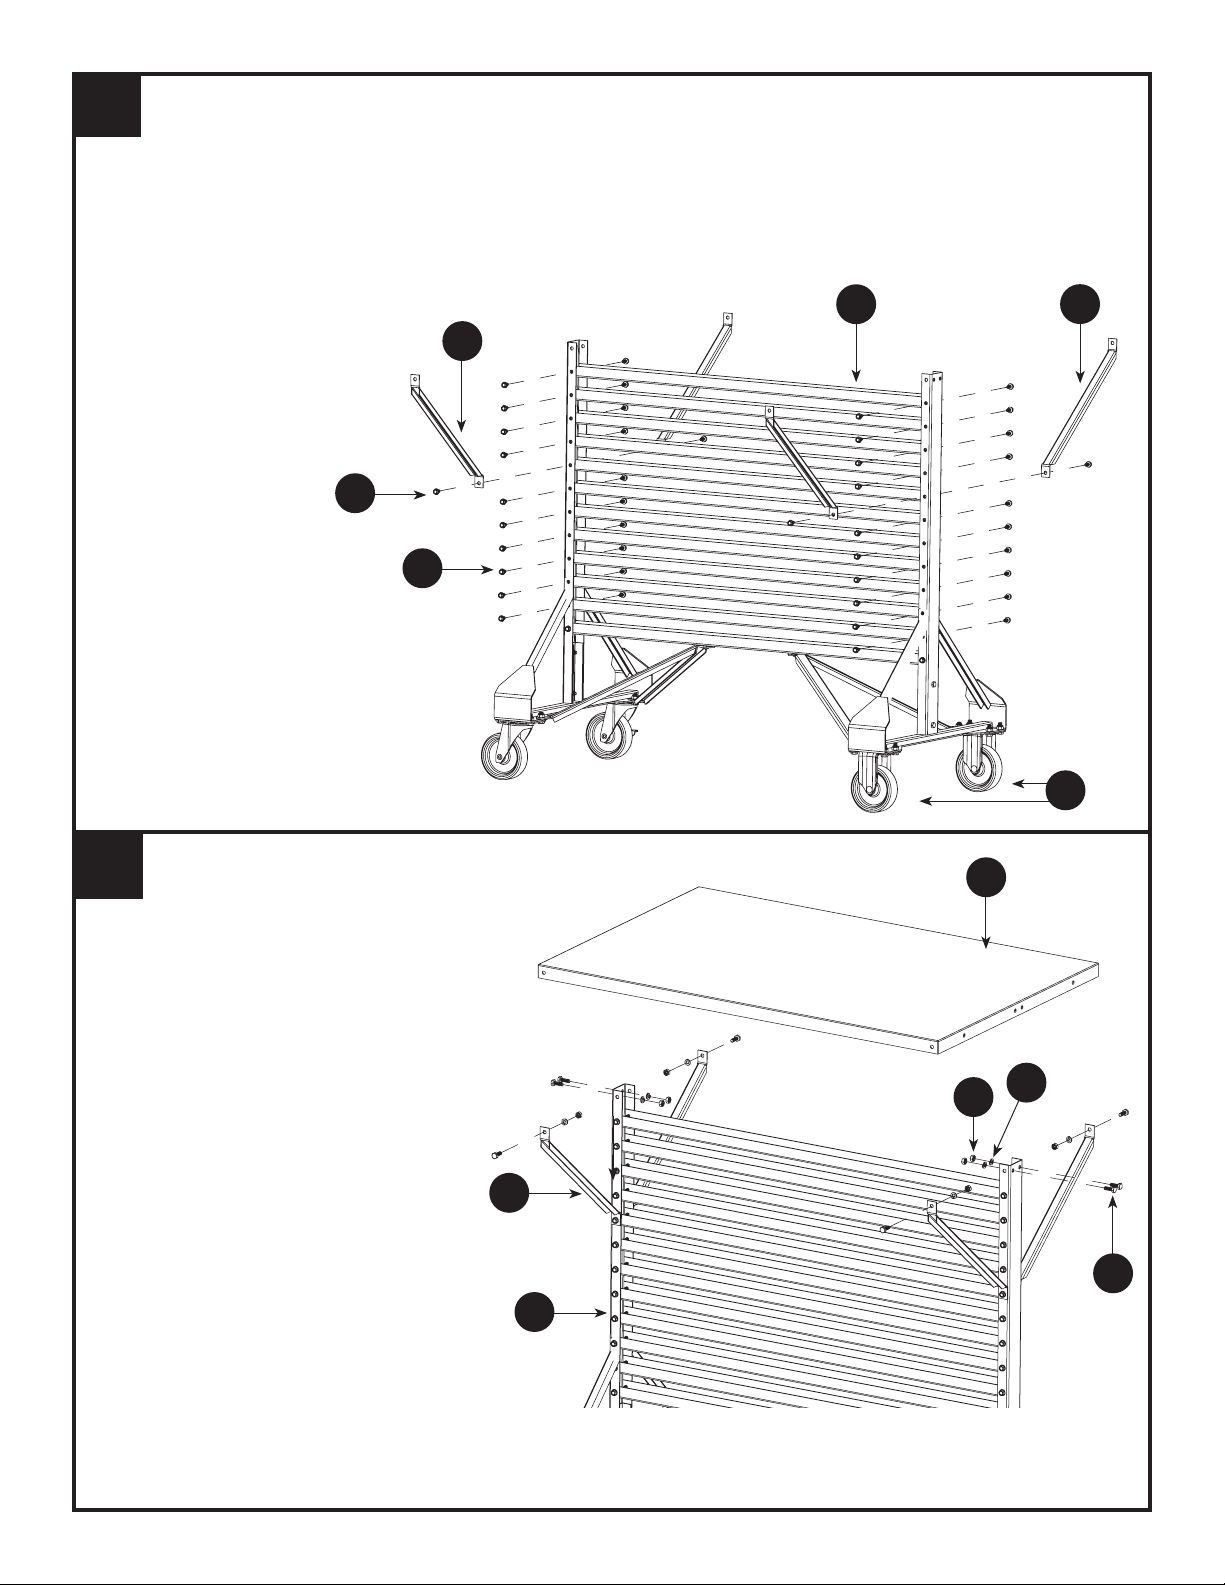
1Attach a vertical bar (B) to each base
assembly (A) using hex head bolts (H), lock
washers (J), and nuts (I).
Sujete una barra vertical (B) a cada uno de
los ensambles de la base (A) utilizando
pernos de cabeza hexagonal (H), arande-
las de seguridad (J) y tuercas (I).
Attacher une barre verticale (B) à chaque
assemblage de base (A) en utilisant les
boulons à tête hexagonale (H), les
rondelles frein (J)
et les écrous (I).
2Attach the lowest cross bar (C) using four #14 sheet metal
screws (M). The open side of the cross bar faces up.
Sujete la barra cruzada mas baja (C) utilizando cuatro
tornillos autorroscantes #14 (M). El lado abierto de la barra
cruzada debe estar hacia arriba.
Attacher la traverse la plus basse (C) en utilisant quatre vis à
tôle n° 14 (M). Le côté ouvert de la traverse doit être orienté
vers le haut.
M
C
A
B
J
I
H
3Attach the two swivel casters (N) and (O) and two
horizontal braces (D) using 5/16" bolts (K) and nylon
lock nut (L). Both horizontal braces attach to the
crossbar (C) with a hex head bolt (H), lock washer
(J), and nut (I). Repeat this step to install two fixed casters
(P) to the opposite end of the cart.
Sujete las dos ruedas giratorias (N) y (O) y dos refuerzos
horizontales (D) utilizando pernos de 5/16" (K) y tuercas de
seguridad de nailon (L). Ambos refuerzos horizontales se
sujetan a la barra cruzada (C) con un perno de cabeza
hexagonal (H), arandela de seguridad (J) y tuerca (I).
Repita este paso para instalar dos ruedas fijas (P) a los
extremos opuestos del carrito.
Attacher les deux roulettes pivotantes (N) et (O) et deux
supports horizontaux (D) en utilisant les boulons 5/16 po
(K) et les contre-écrous en nylon (L). Les deux Supports
horizontales s’attachent à la traverse (C) avec un boulon
à tête hexagonale (H), une rondelle frein (J) et un écrou (I).
Répéter cette étape pour installer deux roulettes fixes (P)
aux extrémités opposées du chariot.
C
KH
D
L
O
N

4Working from the bottom up, attach the eleven remaining cross bars (C) and the four
work top braces (E) using sheet metal screws (M). The work top braces attach at the
eighth cross bar up from the bottom.
Comenzando de la parte de abajo y siguiendo hacia arriba, sufete las once barras cruzadas
restantes (C) y los cuatro refuerzos de la mesa de trabajo (E) utilizando tornillos autor-
roscantes (M). Los refuerzos de la mesa de trabajo se sujetan a la octava barra cruzada,
contando de abajo hacia arriba.
En commençant par le bas et en allant vers le haut, attachez les onze traverses (C) restantes
et les quatre supports du plan de travail (E) en utilisant les vis à tôle (M). Les supports du plan
de travail s’attachent à la huitième traverse à
parti du bas. CE
E
M
M
P
F
5Attach the worktop (F) to the vertical bars (B)
and work top braces (E) using hex head bolts
(H), lock washers (J), and nuts (I). The vertical
bars and work top braces attach to the inside
of the work top. See illustration #6 for details.
Sujete la mesa de trabajo (F) a las barras verticales (B)
y a los refuerzos de la mesa de trabajo (E) utilizando
los pernos de cabeza hexagonal (H), arandelas de
seguridad (J) y tuercas (I). Las barras verticales y los
refuerzos de la mesa de trabajo se sujetan al lado inte-
rior de la mesa de trabajo.Vea la ilustración #6 para
mayor detalle
Attacher le plan de travail aux barres verticales (B)
et aux supports du plan de travail (E) à l’aide des
boulons à tête hexagonale (H), des rondelles
frein (J) et des écrous (I). Les barres verticales
et les supports du plan de travail s’attachent
au fond du plan de travail. Voir les
illustrations pour les détails. E
H
J
I
B

Attach the handle (G) to the work top
(F) using hex bolts (H), lock washers
(J), and nuts (I). Attach the handle to
the same end of the cart as the swivel
casters (N) and (O).
Sujete la agarradera (G) a la mesa de
trabajo (F) (E) utilizando los pernos de
cabeza hexagonal (H), las arandelas
de seguridad (J) y tuercas (I). Sujete la
agarradera al mismo extremo del car-
rito adonde instalo las ruedas girato-
rias (N) y (O).
Attacher la poignée (G) au plan de
travail (F) (E) en utilisant les boulons à
tête hexagonale (H), les rondelles frein
(J) et les écrous (I). Attacher la
poignée à la même extrémité du
chariot que les roulettes pivotantes (N)
et (O).
6
GI
J
H
©2013 Akro-Mils/Myers Industries #AKM327 03/13
Akro-Mils, 1293 South Main St., Akron, Ohio 44301 • 800-253-2467 • Fax: 330-761-6348 • akro-mils.com • [email protected]
Akro-Mils prides itself in providing
your best value in storage, organization and
material handling products. If you have
any questions, comments or need assistance
with this product please call our
toll-free service number:
800 -863-5817
Service representatives are available weekdays
from 8 a.m. to 5 p.m. Eastern Time to assist
you (outside normal business hours, leave a
message and we’ll get back to you).