Akrobat STORMER PLUS User manual

INSTALLATION AND USER MANUAL
> STORMER PLUS
10 ft, 12 ft, 14 ft and 480 cm
100 % made in Europe 2.5 million
jumps guarantee
62.7 % softer
bounce absorption

2 3
INSTALLATION AND USER MANUAL - STORMER PLUS
1. WARNINGS!
Maximum user weight is defined by the size of the trampoline:
10 ft / 305 cm 100 kg
12 ft / 366 cm 130 kg
14 ft / 427 cm 130 kg
480 cm 150 kg
Read this manual carefully before assembling and using your
trampoline. Keep this manual for future reference.
The responsibility of the owner is to ensure that all users of the product are fully
informed about the proper use of this trampoline and all safety precautions.
• Adult supervision and instruction required at all times.
• Use gloves to protect your hands from pinch points and sharp points
during assembly.
• Do not apply excessive force during assembly that will cause damage
to the product.
• The trampoline has to be assembled by an adult and cautiously
inspected before first use.
• Make sure the safety net and the enclosure poles are correctly and
securely positioned. Replace any worn, defective, or missing parts.
• Minors must be supervised by an adult person regardless of their
skills or training. Be sure to prevent access to and use of the
trampoline without proper supervision.
• Check the trampoline before each use. Regular maintenance check-
ups of the trampoline and trampoline parts are advisable to prevent
user injuries. Keeping the trampoline impeccable will prolong the
lifetime of your trampoline.
• This trampoline is for outdoor use only.
• Not suitable for children under 36 months - small parts, choking
hazard.
• Wear clothing free of drawstrings, hooks, loops or anything that
could get caught while using the trampoline/enclosure and result in
entanglement. Do not attach anything to the enclosure that is not a
manufacturer-approved accessory or part of the enclosure system.
• Properly secure the trampoline/enclosure when not in use. Protect
it against unauthorized use.
• Do not allow a child or other persons under the trampoline.
• Jumping on the trampoline is not recommended during pregnancy.
• Do not use the trampoline under the influence of alcohol, drugs or
heavy medication.
• Serious injury, paralysis or even death can occur if the trampoline is
not used properly.
• Keep all sources of heat and flames away from the product as it will
burn.
• Always close the enclosure door before jumping.
• No animals should be allowed on the trampoline as they can damage
both the frame pad and the jumping mat.
• The jumping mat should be kept clean and dry. Jumping on a wet
jumping mat is prohibited in order to avoid slips and falls.
• Remove footwear before jumping on the trampoline.
• Empty your pockets before using the trampoline.
• Do not eat food, sweets or chew gum when bouncing.
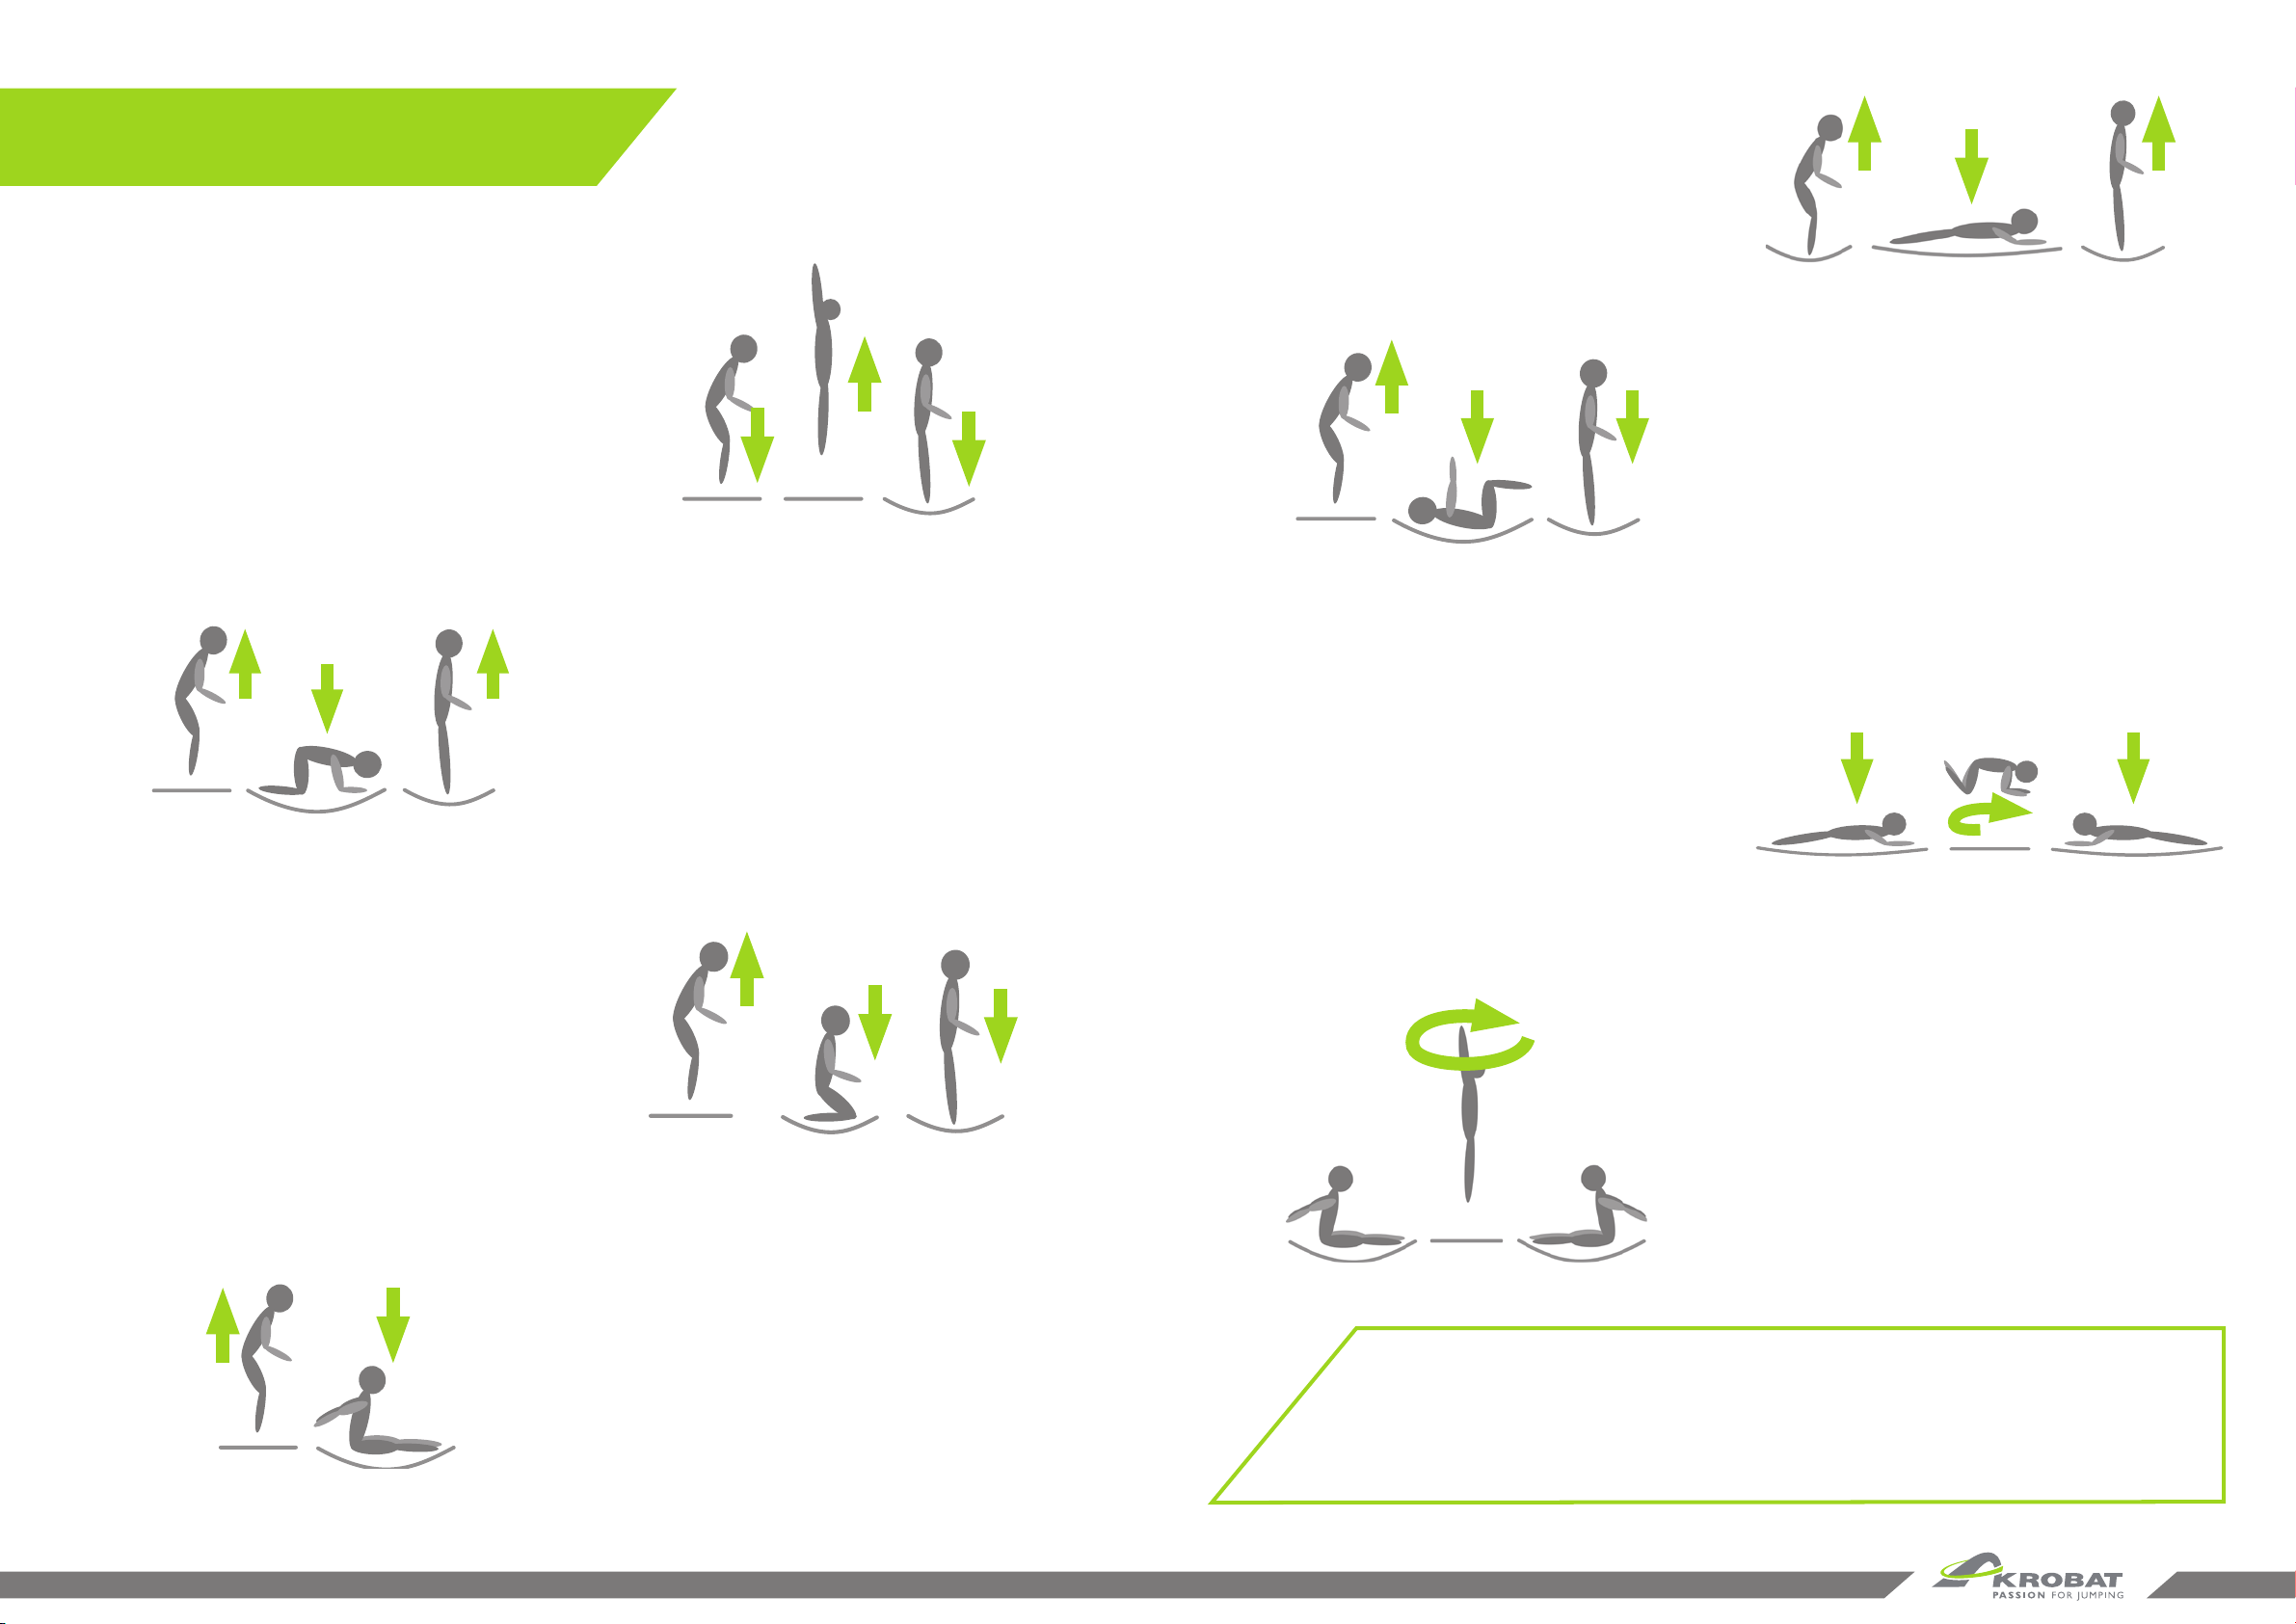
• Bounce in the center of the mat.
• Stop bouncing by flexing the knees as feet come in contact with the
trampoline bed. Learn this skill before attempting other jumps.
• Do not jump off the mat – always walk on and off. It is a dangerous
practice to jump from the trampoline to the floor or ground when
dismounting, or to jump onto the trampoline when mounting. Do
not use the trampoline as a springboard to other objects. Do not
jump from other objects, buildings, or surfaces, onto the trampoline,
or into or over the trampoline enclosure.
• Avoid bouncing too high or for too long, make regular breaks. Stay
low to control your bounce and repeat landing in the center of the
trampoline.Always control your bounce. Control is more important
than height.
• Do not attempt or allow somersaults. Landing on the head or neck
can cause serious injury, paralysis, or death,even when landing in the
middle of the bed.
• No more than one person is allowed to use the trampoline at a time.
Collision hazard: multiple jumpers increase the chances of loss of
control and this can result in serious injury.
• Misuse and abuse of the trampoline is dangerous and can result in
serious injury.
• Glasses, jewellery and similar objects should be taken off before
entering the trampoline. Empty your pockets and keep your hands
free when jumping. Always jump on the middle of the jumping mat.
• Do not sit on the trampoline safety pad and do not stand on the
edge while another person is jumping.
• Keep small children away from the trampoline while others are
bouncing on it, because the edge can move in and out vigorously.
• Trampoline should be placed on a leveled grass surface or soft
surface such as sand or bark.Do not use trampoline on hard surfaces
as asphalt, concrete or some other similar surfaces. Do not place
trampoline around swimming pools, swings, slides, climbing walls etc.
• Do not use the trampoline in windy weather.
• Remove all hard objects around and under the trampoline. There
should be no objects – such as fences,roofing,tree branches,laundry
ropes,electrical cables etc. – anywhere near or above the trampoline.
Clear the surroundings for at least 2 metres in every direction.
• Ensure there is sufficient head space above the trampoline.
• Each modification made to the trampoline must be approved by the
manufacturer.
• When moving the trampoline, disassemble it in reverse order of
assembling. Move to desired location and re-assemble according to
these instructions.
• In our commitment to customer’s satisfaction and safety, please
check our website regularly for important customer updates and all
trampoline specifications.
• For additional information concerning the trampoline equipment,
please contact the manufacturer or regularly check our website for
important customer updates.
Thank you for choosing Akrobat Trampoline!
Your trampoline is so much more than just another outdoor toy. It was designed to provide engaging
playtime, create fun memories and active exercise to all members of the family, no matter what age.
Akrobat trampolines are built to last. Made of best quality European materials and as a result of skilled
craftmanship, your trampoline will serve you for years to come.
Safety comes first! In order to achieve the best trampolining experience that will keep you fit and energised,
please read these assembly instructions and safety recommendations thoroughly to minimize any chances
of injuries.

4 5
INSTALLATION AND USER MANUAL - STORMER PLUS
2. TRAMPOLINE PARTS
Stormer 10ft
(305 cm)
Stormer 12ft
(366 cm)
Stormer 14ft
(427 cm)
Stormer
480 cm
Part A Frame part without
sockets 4 pcs 4 pcs 4 pcs 5 pcs
Part B Frame part with sockets 4 pcs 4 pcs 4 pcs 5 pcs
Part C Leg extension 8 pcs 8 pcs 8 pcs 10 pcs
Part D Trampoline leg 4 pcs 4 pcs 4 pcs 5 pcs
Part E Junction part 8 pcs 8 pcs 8 pcs 10 pcs
Part F Jumping mat 1 pc 1 pc 1 pc 1 pc
Part G Springs 64 pcs 80 pcs 96 pcs 104 pcs
Part H Frame pad 1 pc 1 pc 1 pc 1 pc
Part I Frame pad elastics 16 pcs 16 pcs 16 pcs 20 pcs
Part J Ladder 1 pcs 1 pcs 1 pcs 1 pcs
Safety net assembly parts
Part K Poles for safety net 7 pcs 7 pcs 7 pcs 9 pcs
Part L Safety net 1 pc 1 pc 1 pc 1 pc
Part M Fiberglass Rods 8 pcs 8 pcs 8 pcs 10 pcs
Part N Caps for safety net 8 pcs 8 pcs 8 pcs 10 pcs
3. ASSEMBLY AND INSTALLATION
We recommend at least two people to assemble the trampoline. Use gloves to protect your hands from pinch points and
sharp points during assembly. Do not apply excessive force during assembly that will cause damage to the product.
The parts are made for assembly without screwing with a simple AkroClick system.
The frame of your trampoline is now assembled
and you can place it on the desired location.
Continue by joining the frame legs with the
frame parts – start with the frame part with
T-socket (as shown on the image). Make sure
the free part of the junction part is turned
to the outside of the frame circle. Continue
assembling the frame, alternating the frame
parts with and without sockets to form a circle.
Assembling the frame
Place the trampoline frame (Parts C, D and
E) flat on the ground.This way you will have a
better overview.
Place the leg extensions on the trampoline legs
(Part C into Part D).
Next,add the junction part to the leg extension
(Part D and Part E). The part with closed
bottom is the part where the safety net poles
will be set.
1
2
3
Important:
The trampoline legs could sometimes
be slightly tight to fit – it is intended
this way to serve as additional strength
for the trampoline.

6 7
INSTALLATION AND USER MANUAL - STORMER PLUS
Lay the mat flat inside the frame. Make sure the
logo is facing upwards. In order to make the
installation of the jumping mat easier, locate the
four rings in the 12, 3, 6 and 9 o’clock position
directly opposite each other and attach four
springs on these locations first.Then continue by
attaching springs to every eighth ring, followed
by every fourth and so on until all springs are
attached.
At first, it may look like the mat won’t fit, it will
however stretch to the correct size when you
finish attaching all springs.
Fitting the mat and installing the springs
4
Attaching the frame pad
Lay the frame safety pad on top of the trampoline, aligning the pad section joints with the joints of the
frame and the eyelets facing up. Feed the elastic toggles through the eyelets so the loop end of the tie faces
outwards and the toggle end is on the inside.
5
Important:
The frame pad must cover the
entire frame and all springs.
Finally, attach the frame pad with the elastics.
Pull the elastic band around the frame, insert
the toggle into the loop,then rotate the toggle
inwards to secure it.Repeat with all frame pad
elastics.
Installation of the safety net
First,place the enclosure pole that is attached to
the net into the junction part. on the right from
the warnings sign on the frame pad.
Then start inserting the rest of the enclosure
poles into junction parts. Make sure you place
each enclosure pole first through the loop on
the bottom net edge then into the junction part.
Insert the fiberglass rods into the flaps on the
top edge of the safety net Push all the fiber glass
rods together and connect them into a ring.
Now push the obtained ring into the plastic caps on the
top of each enclosure pole into the position shown on the
picture below.
6
7
8
AKROBAT HINT:
Springs can be hard to attach, you will need a little force. Help
yourself by using one spring to pull another towards the frame
holes. Do not forget to wear gloves!
Important: Be sure all spring hooks
are well attached to the frame.
When flipping the frame pad over, align the pad
according to where the safety net entrance will
be placed:
The opening of the net should be positioned
between two trampoline legs and the frame pad
section with the warnings print should mark this
entrance. Before attaching the elastic toggles,
make sure the pad section joint at the enclosure
pole junction part is set about 1 cm to the left of
the junction part as shown on the picture.
9In order to fix the fiberglass rods in place, put
the velcro tape across the fiberglass and attach
it to the pole on the other side of the cap.

8 9
INSTALLATION AND USER MANUAL - STORMER PLUS
Your Akrobat trampoline is now ready to be used. Enjoy!
If this is your first trampoline, we advise you to start by learning the basic jumps described in this manual.
CONGRATULATIONS!
Next, stretch the elastic band and attach it with
the hook onto the spring under the trampoline
frame. Repeat with all elastic bands.
The final step of the installation is setting the entrance of your trampoline.The strapping at the bottom corner
of the net at the entrance goes through the hole under the safety pad flap and should be attached to the leg of
the trampoline.
11
Cleaning the trampoline:
All Akrobat trampoline mats and frame pads are made of durable high-quality materials and should not be cleaned with
any aggressive cleaning products! Trampoline surfaces are best cleaned with mild soapy water and thoroughly rinsed
with water afterwards.
4. TRAMPOLINE MAINTENANCE
Check your trampoline before each season thoroughly – particularly the frame, frame pad, springs, jumping mat and
safety net.We advise regular check-ups during the season as well. In contrary, damaged parts could be overlooked,
which may result in severe accidents or injuries.
Your check list should include following points:
• All parts are well attached.
• All springs are well secured to the frame and the rings on the jumping mat.
• The trampoline has no damages, such as rips, holes, sharp, twisted or broken parts. If you notice any damage, change
the parts immediately.
• Check the safety net and the poles for potential damages and replace the safety net every 2 years.
For the best maintenance of your trampoline, also make sure no animals are allowed on the trampoline as they could
damage both the frame pad and the jumping mat.
The trampoline should be disassembled and withdrawn from use at once in case of any damage or missing parts until
the defects are repaired or parts replaced.
Extreme weather conditions can impact the trampoline materials, therefore follow these recommendations:
• Disassemble the safety net in case of strong wind and weigh the trampoline down.Store the safety net in a safe place.
• Remove the jumping mat during winter season as the weight of the snow could damage the mat.
• Protect the trampoline from direct heat, fire, sparks and fireworks.
• Protect your trampoline from heavy rain and snow as well.
PLEASE KEEP THIS MANUAL FOR LATER USE.
Remember, the trampoline should only be used by one person at the time!
User weight must not exceed:
10 ft / 305 cm 100 kg
12 ft / 366 cm 130 kg
14 ft / 427 cm 130 kg
480 cm 150 kg
Attach the bottom edge of the net with the
elastics bands to the frame. Pull the elastics
through the hole in the frame pad.
10

10 11
INSTALLATION AND USER MANUAL - STORMER PLUS
5. TRAMPOLINE ACCESSORIES 6. JUMPING INSTRUCTIONS
Each jumper must start by learning slow and controlled jumps.Safe landings are the base of trampoline jumping skills and are
important to learn at the beginning. Lack of these skills may result in severe injuries and damage.
Both jumper and instructor should keep in mind that steady balance at each jump represent the base of successful trampoline
jumping.
The stopping technique is equally important as jumping. Correct stopping represents one of the most important
safety precautions in trampoline jumping.When losing control of the jump and/or balance the jumper has to react quickly to
prevent injuries. In order to achieve this, the jumper should simply bend their knees before landing on the jumping mat.This
is the safest way to stop the jump and prevent accidents.
While learning and training trampoline jumping, it is advised four persons stand around the trampoline in order to help the
jumper if needed.Trampoline jumping is a physical strain and shouldn’t last too long.A tired jumper can easily succumb to
errors in jumping thus highly increasing risk of injury.
High trampoline jumps are considered advanced jumps and should not be allowed to inexperienced jumpers. It is extremely
important to be sure that the height of the jump corresponds to the experience of the jumper.
PLEASE NOTE:
Beginners should learn the basic body positions and practice the basic bounces described in this manual.
To learn how to balance and jump, stand in the middle of the jumping area and bounce softly up and
down to control the movement. Increase the intensity gradually, returning to the same position on the
jumping mat with each bounce.
Focus on the jumping mat when jumping, failing to do so may quickly result in losing balance and falling.
Do not perform somersaults without supervision! Somersaults should be carried out only by experienced
jumpers under supervision of an expert and using appropriate safety measurements.
Akrobat trampoline weather cover
Akrobat trampoline shoe mat
Akrobat UV pvc protectant spray
Providing year-round maximum protection from damage
caused by weather and debris, Akrobat trampoline
cover increases the lifespan of your trampoline and adds
durability for countless jumping moments. It is made of
UV-resistant high-quality PVC and available for all sizes
and shapes of Akrobat trampolines.
The shoe mat helps you to stand comfortable, while
taking the shoes off. It also helps keeping the trampoline
nice and tidy.
All weather conditions and UV-radiation PVC trampoline protectant spray leaves an
enduring dirt resilient finish, keeping PVC surfaces clean of soil, sweat, body oils and
other. It will protect your frame pad from UV rays and extend the lifetime of PVC
trampoline parts. It is safe to use on all PVC parts.
Akrobat trampoline socks
Durable trampoline socks with high quality grips ensure a higher level of safety. The
traction material used on the soles of the socks provides friction that reduces sliding and
can decrease the likelihood of accidents. In case of numerous users, the socks also help
control the spreading of microbes which can be exchanged between bare feet.

12 13
INSTALLATION AND USER MANUAL - STORMER PLUS
7. BASIC TRAMPOLINE JUMPS
THE JUMPING JACK:
1. Start from a standing position with feet in shoulder
width, head up and eyes on the trampoline mat.
2. Swing your hands forward, above your head and back
in a circular motion.
3. Bring your feet together in mid-air and point your toes.
4. Land back on the center of the mat with your feet in
shoulder width (the same as the starting position).
THE FRONT DROP:
1. Start by softly bouncing up and down a few times.
2. Jump upwards and land with your hands and knees
forward.
3. Push yourself off with your hands and jump back to the
upright position.
THE PRAYING MANTIS:
1. Start with a low bounce.
2. Land on your knees in shoulder width, keeping your
back straight and keep your arms stretched out to
maintain balance.
3. Bounce back to the starting position by using the
bounce momentum and swinging your arms upwards.
BOTTOM BOUNCE:
1. Start with a basic starting position. Jump up, aiming to
the center of the jumping mat.
2. Land with your legs stretched in front of you, with
hands on both side of your hips and keep your back
straight
3. Push yourself up with your hands to rebound to the
starting position.
THE PANCAKE DROP:
1. Start off with a soft, low jump upwards.
2. Let yourself fall on your front, placing your hands on
the jumping mat in front of you.
3. Push yourself up to the starting position.
THE TURTLE DROP:
1. Start with a soft upwards jump.
2. Land on your back, keeping your chin close to your
chest and your knees bent. Keep your chin towards
your chest as you land.
3. Kick your legs forward in order to jump up and land in
the starting position.
You now master the basic jumps and are ready to jump even higher!
But remember to always stay in control of your jumps.
ENJOY IN PURSUING YOUR PASSION FOR JUMPING!
THE ROLLING STONE:
1. Start from the front drop position and push to the left
or right with your arms to start turning.
2. Turn your head and shoulders in the direction that
your body is turning.
3. Keep your back parallel with the jumping mat and your
head straight.
4. Return to the lying position to finish the jump, lying in
the opposite direction as at the beginning.
THE FLYING BALLERINA:
1. Start with the sitting position.
2. Jump and turn your head left or right and swing your
hands in the same direction to turn in the air.
3. Follow the motion with your hips to complete the turn.
4. Land in the sitting position to complete the jump.

www.akrobat.com
www.trampoline-park.eu

Črmošnjice 5b
8000 Novo mesto
Slovenia
E: info@akrobat.com
T: +386 730 800 60
www.akrobat.com
www.trampoline-park.eu
Table of contents
Other Akrobat Accessories manuals
Popular Accessories manuals by other brands

Siemens
Siemens 6DR4004-6NN Series operating instructions

Airzone
Airzone AZ DAMPERZMR Series operating instructions

Philips
Philips CRP381 brochure

Honeywell
Honeywell RPW204A Mounting instruction

Weihai Systems
Weihai Systems JXBS-3001-EC instruction manual

Sound Devices
Sound Devices KASHMIR MixPre Series user guide