manuals.online logo
Brands
  1. Home
  2. •
  3. Brands
  4. •
  5. Akura
  6. •
  7. LCD TV
  8. •
  9. Akura AV1506LCD User manual

Akura AV1506LCD User manual

AV1506LCD
OPERATING INSTRUCTIONS
15" LCD TV COLOUR TELEVISION
If you experience any difficulty in setting up or operating this product
please contact the Help line on 01422203676 (standard rates apply).
- 1 -
Contents
Preparation ...................................................................................................................................................... 2
Safety Precautions .......................................................................................................................................... 2
Before Switching On Your TV ........................................................................................................................ 3
Remote Control Buttons ................................................................................................................................... 4
LCD TV ............................................................................................................................................................ 4
Switching The TV ON/OFF .............................................................................................................................. 5
Navigating the Menu System ........................................................................................................................... 5
Menu Map ....................................................................................................................................................... 6
Menu System ................................................................................................................................................... 7
Other Features .............................................................................................................................................. 10
Teletext .......................................................................................................................................................... 11
Connect Peripheral Equipment ...................................................................................................................... 12
Specifications ................................................................................................................................................ 13
Connect Peripheral Equipment ...................................................................................................................... 14
Peripheral Equipment Connections ............................................................................................................... 14
Important Instruction ...................................................................................................................................... 15
ENG-1506-1243UK-17MB20-(WO PC)-50095307.p65 16.11.2006, 19:171
- 2 -
Safety Precautions
Please read the following recommended safety pre-
cautions carefully for your safety.
1. Power
 Always use the provided AC adaptor.
 Operate only from the power source specified on
the AC adaptor.
 In using, the AC adaptor gets heat on the surface of
the case. It is normal, not defective.
 Do not cover the case of AC adaptor with any mate-
rial while it is in operation. Leave 15 cm space (mini-
mum) around the AC adaptor.
 The rating information and safety caution of the AC
adaptor are on its case.
Warning: When the device is not in use for a long
time, disconnect from power.
2.Power Cord
Do not place the set, a piece of turniture, etc. on the
power cord (mains lead) or pinch the cord. Handle
the power cord by the plug Do not pull out the plug by
tugging the cord and never touch the power cord
when your hands are wet as this could cause a short
circuit or electric shock Never make a knot in the cord
or tie it with other cords. The power cords should be
placed in such a way that they are not likely to be
stepped on A damaged power cord can cause fire or
give you an electric shock. When it is damaged and
need to be changed, it should be done by qualified
personnel.
3. Moisture and Water
Do not use this equipment in a humid and damp place
(avoid the bathroom, the sink in the kitchen, and near
the washing machine). Do not expose this equipment
to rain or water, as this may be dangerous and do not
place objects filled with liquids, such as flower vases,
on top of the set.Avoid from dripping or splashing. If
any solid object or liquid falls into the cabinet, unplug
the set and have it checked by qualified personnel
before operating it any further.
4. Cleaning
Before cleaning, unplug the adaptor from the wall
outlet. Do not use liquid or aerosol cleaners. Use soft
and dry cloth.
5. Ventilation
The slots and openings on the back cover are in-
tended for ventilation and to ensure reliable opera-
tion. To prevent overheating, these openings must not
be blocked or covered in anyway.
6. Heat and Flames
The set should not be placed near to naked flames
and sources of intense heat, such as an electric
Preparation
For ventilation, leave a space of at least 10 cm free all
around the set. To prevent any fault and unsafe situ-
ations, please do not place any objects on top of the
set.
Use this apparatus in tropical and/or moderate cli-
mates.
Features
 Remote controlled colour television.
 100 programmes from VHF, UHF bands or cable
channels can be preset.
 It can tune cable channels.
 Controlling the TV is very easy by its menu driven
system.
 It has a Scart socket for external devices (such as
video, video games, audio set, etc.)
 Stereo sound system (German+Nicam).
 Full function Teletext .
Fastext (7 Pages), TOP text.
 Favorite Channel
 Channel Lock
 Headphone connection.
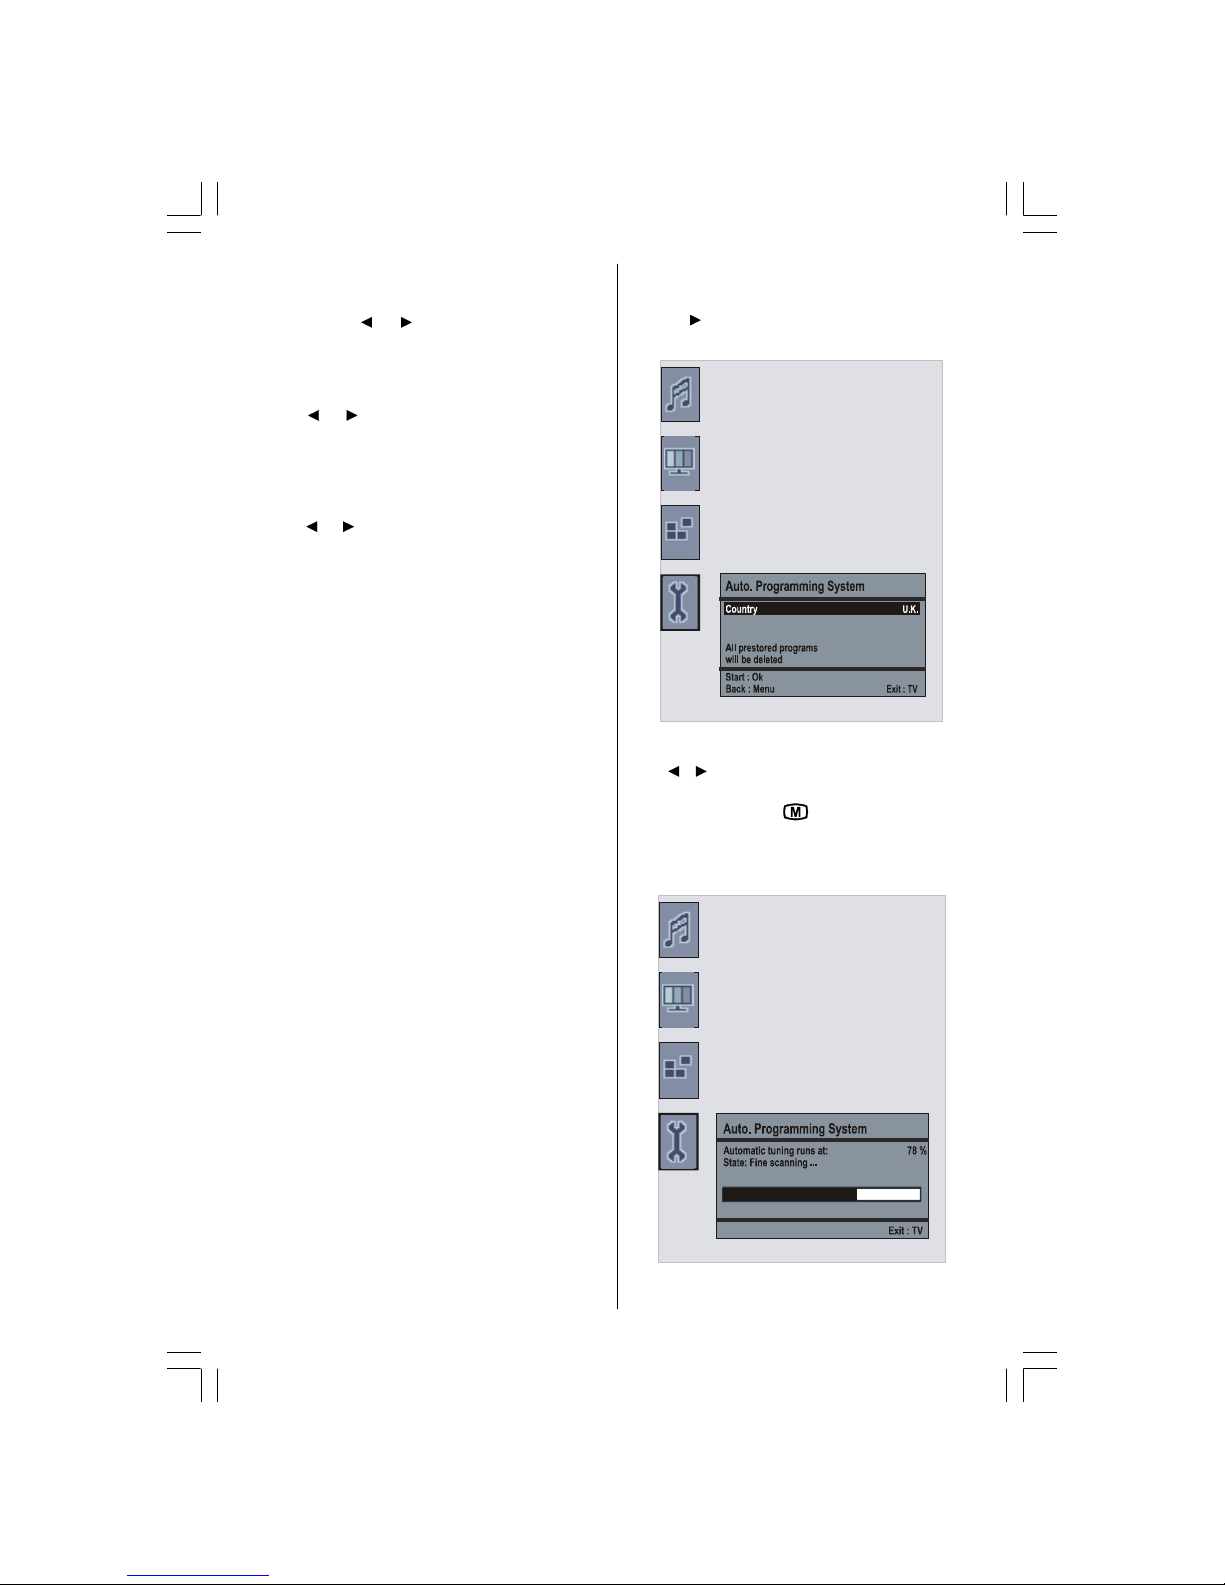
 A.P.S. (Automatic Programming System).
 All programmes can be named.
 Forward or backward automatic tuning.
 Sleep timer.
 Child Lock.
 Automatic sound mute when no transmission.
 NTSC Playback.
 AV in and S-Video are available.
 AVL (Automatic Volume Limiting)
 When no valid signal is detected, after 5 minutes the
TV switches itself automatically to stand-by mode.
 PLL (Frequency Search)
 Audio Line Out
ENG-1506-1243UK-17MB20-(WO PC)-50095307.p65 16.11.2006, 19:172
- 3 -
heater. Ensure that no naked flame sources, such as
lighted candles, are placed on top of the set.
7. Lightning
In case of Lightning a Thunderstorm or when going
on holiday. Disconnect the mains supply and aerial (if
external).
8. Replacement Parts
When replacement parts are required, be sure the ser-
vice technician has used replacement parts which are
specified by the manufacturer or have the same speci-
fications as the original one. Unauthorised substitutions
may result in fire, electrical shock, or other hazards.
9. Servicing
Please refer all servicing to qualified personnel. Do
not remove the cover yourself as this may result in an
electric shock.
Instructions for waste disposal:
 Packaging and packaging aids are recyclable and
should principally be recycled. Packaging materi-
als, such as foil bag, must be kept away from chil-
dren.
 Battery, including those which is heavy metal-free,
should not be disposed of with household waste.
Please dispose of used battery in an environmen-
tally sound manner. Find out about the legal regu-
lations which apply in your area.
 Cold cathode fluoresant lamp in LCD PANEL con-
tains a small amount of mercury, please follow lo-
cal ordinates or regulations for disposal.
The mains plug of the power supply is used
as disconnect device and therefore shall re-
main readily operable.
Warning: To prevent injury, this device must be se-
curely attached to the floor/wall in accordance with
the installation instructions.
"The LCD panel is very high technology product with
about a million thin film transistors, giving you fine
picture details. Occasionally, a few non-active pixels
may appear on the screen as a fixed point of blue,
green or red. Please note that this does not affect the
performance of your product."
DO NOT LEAVE YOUR TVAT STAND-BY OR OPER-
ATING WHEN YOU LEAVE YOUR HOUSE
Before Switching On Your TV
Power Connection
IMPORTANT : The TV set is designed to operate on
100-240V AC. For this, an adaptor is used which
gives an output voltage of 12V DC.
Connections To The Aerial Input Socket
 Connect the aerial plug to the Aerial input socket
located at the rear of the Tv. You may also connect
other apparatus such as VCR's DVB's and games
to this socket.
9+)8+)

5($52)7+(79
&$%/(79
Inserting Batteries In The Remote
Control Handset
WARNING : Remote control is battery included. A plas-
tic protector is used to disconnect the batteries in
order to prevent the battery life from reducing. Please
remove the plastic protector before the first use.
IMPORTANT. THIS APPERATUS HAS A CLASS ONE POWER SUPPLY. ENSURE
THAT IT IS PROPERLY EARTHED. ONLY USE THE MAINS LEAD SUPPLIED.
ENG-1506-1243UK-17MB20-(WO PC)-50095307.p65 16.11.2006, 19:173
- 4 -
LCD TV
Remote Control Buttons
92 /80 (
0(18 3&K
32:(5
63($.(5
/('
,1)5$5('5(&(,9(5
0(18 92/80(3&K
92/80(
0(18
3&K
)227723&29(5
= Stand By
0 - 9 =Direct Programme
= Menu
- - = Double Digit
V + / - = Volume +/ -
P + / - = Programme +/ -
= Cursor Up
= Cursor Right
= Cursor Left
OK = Okay (Store)
= Cursor Down
MUTE: Mute
AV = External Source
(TV, EXT1, EXT2, SVHS)
TV = TV / Quit Menu
TXT = Teletext
Red button = Sound
Green button = Picture
Yellow button = Feature
Blue button = Install
ENG-1506-1243UK-17MB20-(WO PC)-50095307.p65 16.11.2006, 19:174
- 5 -
Inserting The Battery In The Remote
Control Handset
 Remove the battery cover located on the back of the
handset by gently pulling backwards from the indi-
cated part.
 Insert two AA/R03 or equivalent type batteries in-
side. Place the batteries in the right directions.
 Replace the battery cover.
Note: Remove the battery from remote control hand-
set when it is not to be used for a long period. Other-
wise it can be damaged due to any leakage of battery.
Switching The TV ON/OFF
To switch the TV on:
Your TV will switch on in two steps:
1- Connect the power supply cord to the system.
Press Power On/Off button.Then the TV switches
itself to stand-by mode (Optional).
2- To switch on the TV from stand-by mode either:
Press a digit button on the remote control so that a
programme number is selected, or Press the "-P/CH"
or "P/CH+" button on the TV or press the P- or
P+ button on the remote control, so that last mode
switched off is selected.
By either method the TV will switch on. When the TV
is operated for the first time, the following screen
appears:
For more information on this process, see Install
Menu section.
To switch the TV off:
 Press the  (stand-by) button on the remote con-
trol or On/Off switch on the TV, so the TV will switch
to stand-by mode.
To power down the TV completely, press Power On/
Off button or unplug the power cord from the mains
socket.
Navigating the Menu System
)RUGLVSOD\LQJ
PHQXRSWLRQV
)RUQDYLJDWLRQ
7RFRQILUPFKRLFHV
1- Press to display the menu.
2- Press 
b
 or 
a
 button to select an icon. Press

`
 for more options.
3- Use 
b
 or 
a
 button to highlight.
4- Press 
_
 or 
`
 buttons to change the settings.
Press OK to set as default.
5- To exit the menu or return from sub-menu screen,
press .
You can select the all option in the menu system. To
select options, use Navigating The Menu Sys-
tem.
ENG-1506-1243UK-17MB20-(WO PC)-50095307.p65 16.11.2006, 19:175
- 6 -
Menu Map
,167$//
3URJUDPPLQJ
$36
7[WUHJLRQ :HVW(XURSH
3URJUDP7DEOH
%DFN0HQX ([LW79
)($785(6
6OHHS7LPHU 2II
/DQJXDJH (QJOLVK
&KLOG/RFN 2II
0HQX&RORXU *UD\
)DYRXULWH0RGH 2II
%DFN0HQX ([LW79
3,&785(
3LFWXUH0RGH %ULJKW
%ULJKWQHVV
&RQWUDVW
&RORXU
6KDUSQHVV
%DFN0HQX ([LW79
6281'
9ROXPH
%DODQFH 
6RXQG0RGH 6WHUHR
$9/ 2Q
(IIHFW 2II
%DFN0HQX ([LW79
6281'0(18 3,&785(0(18
)($785(60(18 ,167$//0(18
9ROXPH
%DODQFH
6RXQG0RGH
$9/
(IIHFW
(TXDOL]HU
0RGH
6WRUH
3LFWXUH0RGH
%ULJKWQHVV
&RQWUDVW
&RORXU
6KDUSQHVV
&RORXU7HPS
5RRP/LJKWQLQJ
3LFWXUH]RRP
6WRUH
6OHHS7LPHU
/DQJXDJH
&KLOGORFN
0HQX&RORXU
)DYRULWH0RGH
3URJUDPPLQJ
3URJUDPPH
%DQG
&KDQQHO
6WDQGDUG
&RORXU6\VWHP
6HDUFK
9&50RGH
'HFRGHU
6WRUH
$36
$XWR3URJUDPPLQJ6\VWHP
7[W5HJLRQ
3URJUDP7DEOH
A menu map is provided above. For details of the items,
refer to relevant explanations in the MENU SYSTEM.
ENG-1506-1243UK-17MB20-(WO PC)-50095307.p65 16.11.2006, 19:176
- 7 -
Menu System
Sound Menu
Volume
 By pressing
a
/
b
select Volume.
 Press
_
/
`
button to change the level of the volume.
Balance
 By pressing
a
/
b
select Balance.
 Press
_
/
`
button to change the level of the
balance.Balance level can be adjusted between -
32 and 32.
Sound Mode
 By pressing
a
/
b
select Sound Mode.
 Press
_
/
`
button, you can select Mono, Stereo,
Dual I or Dual I I mode, only if the selected channel
supports that mode.
AVL
 By pressing
a
/
b
select AVL.
 Press
_
/
`
button to set the AVL as on or off.
Effect
 By pressing
a
/
b
select Effect.
 Press
_
/
`
button to set Effect as on or off.
Equalizer
 By pressing
a
/
b
select Equalizer.
 Press
_
/
`
button to change the Equalizer setting.
In equalizer menu, the mode can be changed to Flat,
Speech, Music, Personal and Jazz. Select the
desired frequency by
a
/
b
button and increase
or decrease the frequency gain by pressing
_
/
`
button.
Note: Equalizer menu settings can be altered only
when the Sound Mode is in Personal.
Store Program
 By pressing
a
/
b
button, select Store.
 Press
`
or OK button to store the adjustments.
Stored will be displayed on the screen.
Picture Menu
Picture Mode
 By pressing
a
/
b
button, select Picture Mode.
 Press
_
/
`
button to choose from one of these
options: Bright,Standart, Soft and Manual.
Brightness/Contrast/Colour/Sharpness/Tint
 By pressing
a
/
b
button, select the desired Op-
tion.
 Press
_
/
`
button to set the level.
Hint: Tint (Hue) is displayed in picture menu when
the TV receives an NTSC signal.
Colour Temp
 By pressing
a
/
b
button select Colour Temp.
 Press
_
/
`
to choose from one of these options:
Cool, Normal and Warm.
Room Lightning
 By pressing
a
/
b
button select Room Lightning.
 By pressing / button, you can select one of
these options: Normal, Bright and Movie.
Picture Zoom
 By pressing
a
/
b
button select Picture Zoom.
 Use
_
/
`
buttons, to change picture zoom to Auto,
4:3 and Wide.
Store Program
 By pressing
a
/
b
button select Store.
 Press
`
or OK button to store the adjustments.
Stored will be displayed on the screen.
ENG-1506-1243UK-17MB20-(WO PC)-50095307.p65 16.11.2006, 19:177
- 8 -
Features Menu
Sleep Timer
 By pressing
a
/
b
select Sleep Timer.
 Press
_
/
`
button to set the Sleep Timer.
The timer can be programmed between Off and 120
minutes in steps of 10 minutes.
Language
 By pressing
a
/
b
button, select Language.
 Use
_
/
`
button to select the language.
Child Lock
 By pressing
a
/
b
select Child Lock.
 Press
_
/
`
button to set the Child Lock on or
off.When on is selected, the TV can only be con-
trolled by the remote control handset. In this case
the control panel buttons, except the Standby but-
ton, will not work. Hence, if one of these buttons is
pressed, Child Lock On will be displayed on the
screen.
Menu Colour
 By pressing
a
/
b
select Menu Colour.
 Use
_
/
`
button to change menu background to
Transparent or Gray.
Favourite Mode
 By pressing
a
/
b
select Favourite Mode.
 Use
_
/
`
button to set Favourite mode on or off (See
Channel List menu Favourites).
Install Menu
Programming
 By pressing
a
/
b
select Programming.
 After pressing   button, programming menu ap-
pears on the screen.
Programme
 By pressing
a
/
b
select Programme.
 By pressing   /   button, you can select the
program number.You can also enter a number via
digit buttons on the remote control. There are 100
program storage between 0 and 99.
ENG-1506-1243UK-17MB20-(WO PC)-50095307.p65 16.11.2006, 19:178
- 9 -
Band
 By pressing
a
/
b
select Band.
By pressing   /   button, you can change the
channel type to C or S.
Channel
 By pressing
a
/
b
select Channel.
 Use   /   buttons to change the channel num-
ber. You can also enter a number via digit buttons on
the remote control.
Standard
 By pressing
a
/
b
select Standart.
 Use   /   button to change the standard to B/G,
D/K, I or L/L'.
Colour System
By pressing
a
/
b
select Colour System.
 Use
_
/
`
button to change the colour system to
PAL, SECAM or AUTO.
Search
 By pressing
a
/
b
select Search.
 Press
_
/
`
button to start search. The search will
stop when a signal is found.
Note: If you press the buttons with one-step moves,a
frequency of 0.25 Mhz will be advanced.However if
you press the buttons all at once,it will advance
automatically. To stop searching at a certain time,
you may press
a
/
b
buttons.
VCR Mode
 By pressing
a
/
b
select VCR mode.
 Use
_
/
`
buttons to set VCR Mode on or off.
Hint: If you want to watch a DVD , then you have to
set this item as off.
Decoder
You can use this mode to connect any decoder to
your TV.
 By pressing
a
/
b
select Decoder
 Press the
_
/
`
buttons to turn it ON or OFF.
When you switch the Decoder setting to OFF, EXT1
output will be muted. In this case, EXT1 output will not
be available to display video. If it is switched ON, the
EXT-1 output will be the selected video source. Any
decoder can be connected to EXT1 to unscramble
required video signal.
Hint: Decoder setting should be stored separately
for each programme.
Store
 By pressing
a
/
b
button select Store.
 Press
`
or OK button to store the adjustments.
Stored will be displayed on the screen.
A.P.S.
 By pressing
a
/
b
button select A.P.S.
 Press   button to enter the A.P.S. menu. A.P.S.
menu appears on the screen.
A.P.S. (Auto Programming System) Country
Press / button to select your country. If you want
to exit from A.P.S. function, press the TV button.
For going back, press  .
When you press OK button for starting APS, all stored
programs will be erased and the following screen
will be displayed.
Whenever you press the TV button, A.P.S. function
stops and Channel table appears on the screen.
ENG-1506-1243UK-17MB20-(WO PC)-50095307.p65 16.11.2006, 19:179
- 10 -
If you wait until the end of A.P.S., Channel table is
displayed with the programmes found and located.
Teletext Region
 By pressing
a
/
b
button select Teletext Region.
 Using
_
/
`
buttons in the Install menu, select your
Teletext region. There are five options to select :
West Europe, East Europe, Turk/Gre, Cyrillic
and Arabic/Hebrew.
Install menu in AV modes
The following screen appears in the install menu:
,167$//
3URJUDPPLQJ
7[W5HJLRQ :HVW(XURSH
%DFN0HQX ([LW79
Programming
 By pressing
a
/
b
select Programming Mode.
 After pressing   button, programming menu ap-
pears on the screen.
352*5$00,1*
&RORXU6\VWHP 3$/
9&50RGH
6WRUH 2II
%DFN0HQX ([LW79
Colour System
 By pressing
a
/
b
select Colour System.
 By pressing   /   button, you can change the
colour system to PAL, SECAM or AUTO.
Program Table
3
3%%&
3&
3 3
3
3
3 3
3 3
3 3
3 3
3 3
3 3
3 3
3URJUDP7DEOH
'HOHWH
1DPH
0RYH
$36
([LW79
By moving the cursor in four directions you can reach
20 programmes in the same page. You can scroll the
pages up or down by pressing the navigation buttons
to see all the programmes in TV mode (except the AV
mode). By cursor action, programme selection is done
automatically.
Name:
To change the name of a programme, select the
programme and press the YELLOW button.
The first letter of the selected name will be highlighted.
Press
a
/
b
button to change that letter and
_
/
`
button to select the other letters. By pressing the
YELLOW button, you can store the name.
Move:
Select the programme that you want to insert by
navigation buttons. Press the GREEN button. By navi-
gation buttons, move the selected programme to the
decided programme space and press the GREEN but-
ton again.
Delete:
To delete a programme, press the RED button. Press-
ing the RED button again erases the selected
programme from the programme list, and the prog-
rammes below shift one up.
APS (Auto Programming System)
When you press the BLUE button for APS, Auto Pro-
gramming System Menu will appear on the Screen.
Favourite Mode:
You can set various channels as favourites so that
only the favourites are navigated. To set a favourite,
use navigation buttons to select a channel and then
press the TXT item. The channel selected as a
favourite appears in the Program Table with a
favourites icon ( ) againstthe channel name. For
removing a favourite, carry out the same operation.
To exit, press MENU.
Other Features
TV Status
Programme Number, Programme Name,
Sound Indicator and Zoom Mode are displayed
on the screen when a new programme is entered.
Mute Indicator
It is placed in the upper side of the screen when
enabled.
To cancel mute, there are two alternatives; the first
one is pressing the MUTE button and the second one
is increasing/decreasing the volume level.
ENG-1506-1243UK-17MB20-(WO PC)-50095307.p65 16.11.2006, 19:1710
- 11 -
AV Modes
By pressing the AV button you can switch your TV to
AV modes (except being in teletext). Pressing this
button consecutively will switch the TV in one of the
optional AV modes: TV, EXT1, EXT2, SVHS. To re-
move source osd from screen press TV or  
button. In order the quit the AV Mode, press the TV or
the P+, P- button.
Personal Preference
By pressing this button, you may adopt the previous
settings that you had stored before.
Menu System in AV Modes
6285&(
79
(;7
(;7
69+6
Sound/Picture/Features/Install Menu
The items in these menus are described at Sound,
Picture, Features and Install Menu explained in
Menu System.
Teletext
(This information only applies if your TV is
equipped to receive TELETEXT) (optional)
Teletext is an information system that displays text on
your TV screen. Using the Teletext information sys-
tem you can view a page of information on a subject
that is available in the list of contents (index).
On screen display is not available in text mode.
Contrast, brightness or colour control is not available,
but volume control is available in text mode.
To operate Teletext
 Select a TV station on which Teletext is being trans-
mitted.
 Press (TELETEXT) TXT button. Usually the list of
contents (index) is displayed on the screen.
To select a page of Teletext
 Press the appropriate digit buttons for the required
Teletext page number.
The selected page number is displayed at the top left
corner of the screen. The Teletext page counter
searches until the selected page number is located,
so that the desired page is displayed on the screen.
 Press P+ button to move the Teletext screen for-
ward one page at a time.
 Press P- button to move the Teletext screen back-
ward one page at a time.
Fastext
Your TV supports the 7 page Teletext system. When the
page number of any of the 7 pages in memory is en-
tered, the system will not search for the requested page;
instead it will display the page automatically. If the re-
quested page is not in memory, the system will search
for the requested page number and save the 7 pages
including the requested page into memory after finding it.
 Press the
a
button to move the Teletext screen
forward one page at a time.
 Press the
b
button to move the Teletext screen
backward one page at a time.
For Fastext
The subject-heading for the information may have a
particular colour.
 Press an appropriate RED, GREEN, YELLOW or BLUE
button in order to reach the relevant page quickly.
TOP text
TOP text mode of operation will be activated automati-
cally according to the transmission.
 If TOP text transmission is present, colour coded
buttons will appear in status row.
 If TOP text transmission is not present, status row
will not appear.
The subject-heading for information may be located in
colored box.
In Top mode the -P or P+ commands will request
the next or previous page respectively. If TOP text
transmission is not available, in case of operation of
these commands, wraparound occurs. For example
page 100 appears to be one greater than page 199.
ENG-1506-1243UK-17MB20-(WO PC)-50095307.p65 16.11.2006, 19:1711
- 12 -
Connect Peripheral Equipment
Via The Scart
The TV has a Scart sockets. If you want to connect
peripherals (e.g. video, decoder, etc.) which have
Scart sockets to the TV, you can use SCART socket
of the TV.
Note: If an external device is connected via the Scart
sockets, the TV will automatically switch to AV mode.
Via Aerial Input
If the device you want to connect does not have a
Scart socket, you should connect it to the Aerial input
of the TV.
If the VCR is connected via Aerial input, it is
suggested to use Programme 0.
Decoder
If you are subscribed to cable TV offers, the
organisation will supply you a corresponding decoder
unit to allow the programmes to be unscrambled.
For further information consult your dealer.
Connect a decoder with an aerial socket to
the TV
 Connect the aerial cable.
Connect a decoder without an aerial socket
to the TV
 Connect the decoder to the EXTERNAL socket of
TV with a RCA cable. Through the SCART/RCA
socket of the decoder, you may attain a better dis-
play resolution.
TV And Video Recorder
 Connect the aerial cables.
Better picture quality can be obtained if you also con-
nect a Scart cable to SCART sockets.
Playback NTSC
 Connect NTSC VCR player to a Scart socket of the
TV.
Then, press the AVbutton to select EXT1.
Camera And Camcorder
To Connect To AV Input
Connect your camera or camcorder to EXT2 input of
the TV.
 Connect your equipment to the TV via VIDEO (yel-
low), AUDIO R (red) and AUDIO L (white) inputs.
You must connect the jacks into the input with the
same colour.
Connection to S-Video Input.
Connect your camera or Camcorder to the S-Video
input of the Tv.
Connect the video to the S- Video input and the sound
to the AV audio input.
Connect The Decoder To The Video
Recorder
Some video recorders have a special Scart socket
for decoder.
 Connect a Scart cable to the Scart socket of your
decoder and to the special Scart socket of your
video recorder. Refer to the booklet of your video
recorder.
Connecting Headphones
Use the stereo headphone socket of the TV, to con-
nect headphones.
Note: If you want to connect more equipment to your
TV, consult your dealer.)
Audio Lineout
To connect the external speakers to your TV, use the
Line Out of the TV.
Care Of The Screen
Clean the screen with a slightly damp, soft cloth. Do
not use aprasive solvents as they may damage the
TV screen coating layer.
ENG-1506-1243UK-17MB20-(WO PC)-50095307.p65 16.11.2006, 19:1712
- 13 -
Help Guide
Should you have problems or the Tv malfunction, please consult the guide below before calling the Customer
Help Line.
6\PSWRP 3RVVLEOH&DXVH 5HPHG\

'HDG1ROHGOLW 
1RSRZHUWRWKH7Y &KHFNDOOFRQQHFWLRQVDQG
HQVXUHWKHPDLQVVXSSO\LV
WXUQHGRQDQGWKH7YSRZHU
EXWWRQLVWXUQHGRQ
1R3LFWXUH/HGLV5HG 7YLQVWDQGE\ 8VHWKH33EXWWRQVRQWKH
7YRUWKH5HPRWHFRQWURORU
XVHDQXPHULFEXWWRQ
6HOHFW7YLI7YLVUHTXLUHGRU
$9LIDQH[WHUQDOLQSXWLVEHLQJ
XVHG


1R3LFWXUH/HGLV*UHHQ
,

,QFRUUHFWLQSXWVHOHFWHG (QVXUHWKHH[WHUQDODSSDUDWXV
LVWXUQHGRQ
9ROXPHVHWORZ
7XUQWKH9ROXPHXSZLWKWKH
9EXWWRQ
0XWHLV21
7XUQ0XWH2))ZLWKWKH
UHPRWHFRQWURO


3LFWXUH2N1RVRXQG
,QFRUUHFWVRXQGV\VWHP
VHOHFWHG ,QWKH8.³,´PXVWEHVHOHFWHG

3LFWXUHLVQRLV\RUJKRVWLQJ 
3RRUDHULDOVLJQDO &KHFNDOODHULDOFRQQHFWLRQV
,IXVLQJDQLQGRRUDHULDO\RX
PD\QHHGDQRXWGRRUDHULDO
7HOHWH[WIUHH]LQJRUEUHDNLQJ
XS $VDERYH $VDERYH
1RRULQWHUPLWWHQW5HPRWH
FRQWUROIXQFWLRQV %DWWHU\H[KDXVWHG 5HSODFHEDWWHU\LQKDQGVHW

If you are still having difficulty please call the Technical help line. Ring 01422 203676 (Normal rates apply).
Opening hours Mon-Fri 8 am  8pm. Sat 9 am  4pm. Sun 11am  4pm Bank holidays as Sun
Specifications
AUDIO
German+Nicam Stereo
AUDIO OUTPUT POWER (WRMS.) (%10 THD)
2 x 2
POWER CONSUMPTION (W)
40W
0,6 W (Stand-by)
PANEL
4:3 display, 15 Screen Size
DIMENSIONS (mm)
:HLJKWNJ
:LWKIRRW
:LWKRXWIRRW
'/+
',0(16,216
PP

 


 

TV BROADCASTING
PAL/SECAM B/G D/K K' I/I' L/L'
RECEIVING CHANNELS
VHF (BAND I/III)
UHF (BAND U)
HYPERBAND
CABLE TV (S1-S20/ S21-S41)
NUMBER OF PRESET CHANNELS
100
CHANNEL INDICATOR
On Screen Display
RF AERIAL INPUT
75 Ohm (unbalanced)
OPERATING VOLTAGE
12V DC.
ENG-1506-1243UK-17MB20-(WO PC)-50095307.p65 16.11.2006, 19:1713
- 14 -
Connect Peripheral Equipment
Peripheral Equipment Connections
$17,1
$8',2,1
5/
9,'(2,1
,1 287
,1 287
+($'3+21(
$8',2
9,'(2
6$7(//,7(5(&(,9(5
$17(11$
&$0&25'(5
DC 12 V
9 9
9 9
VIDEO INPUT
AUDIO INPUT (L, R)
S-VIDEO
HEADPHONE
SCART
ANTENNA
LINE OUT (L, R)
ENG-1506-1243UK-17MB20-(WO PC)-50095307.p65 16.11.2006, 19:1714
- 15 -
CAUTION
TO PREVENT ELECTRIC SHOCK DISCONNECT FROM THE MAINS BEFORE REMOVING COVER. NO
USER SERVICEABLE PARTS INSIDE. REFER SERVICING TO QUALIFIED SERVICE PERSONNEL.
SAFETY PRECAUTION
THIS EQUIPMENT MUST BE DISCONNECTED FROMTHE MAINS WHEN NOT IN USE. DO NOTALLOW
THIS UNIT TO BE EXPOSED TO RAIN OR MOISTURE.
MAINS (AC) OPERATION
The wires in the mains lead are coloured in accordance with the following code :
IMPORTANT
As the colours of the wires in the mains lead of this appliance may not correspond with the coloured
markings identifying the terminals in your plug, proceed as follows:
The wire which is coloured green and yellow must be connected to the terminal which is marked with
the letter E, or by the earth symbol, or coloured green or green and yellow.
The wire which is coloured blue or black must be connected to the terminal which is marked with the
letter N or coloured Black.
The wire which is coloured brown or red must be connected to the terminal which is marked with the
letter L or coloured Red.
For continued protection against risk of fire, replace only with same type and rating of fuse (ASTA
approved 5A 250VAC fuse).
If your product is fitted with a moulded plug which requires replacement please cut off and dispose
of safely, then rewire as shown above.
Important Instruction
For your own safety read following instruction carefully before attempting to connect this unit to the mains
supply.
BLUE
(Neutral)
BROWN
(Live)
FUSE
GREEN
&
YELLOW
(Earth)
ENG-1506-1243UK-17MB20-(WO PC)-50095307.p65 16.11.2006, 19:1715

Other manuals for AV1506LCD

1

Other Akura LCD TV manuals

Akura SP 7050 User manual

Akura

Akura SP 7050 User manual

Akura AT 1503L CD User manual

Akura

Akura AT 1503L CD User manual

Akura AX1515W-ID User manual

Akura

Akura AX1515W-ID User manual

Akura APLDVD1968UCR User manual

Akura

Akura APLDVD1968UCR User manual

Akura APLDVD1368 User manual

Akura

Akura APLDVD1368 User manual

Akura AV47751-FHDID User manual

Akura

Akura AV47751-FHDID User manual

Akura APL1668U User manual

Akura

Akura APL1668U User manual

Akura AV42751-HD User manual

Akura

Akura AV42751-HD User manual

Akura ALEDVD1601V (MSD306) User manual

Akura

Akura ALEDVD1601V (MSD306) User manual

Akura APL21668FD User manual

Akura

Akura APL21668FD User manual

Akura APL15668 User manual

Akura

Akura APL15668 User manual

Akura AV32751-HDID User manual

Akura

Akura AV32751-HDID User manual

Akura APL3221W-HDID User manual

Akura

Akura APL3221W-HDID User manual

Akura AV42720-HD User manual

Akura

Akura AV42720-HD User manual

Akura APL1621W-HDID User manual

Akura

Akura APL1621W-HDID User manual

Akura APL21668FD User manual

Akura

Akura APL21668FD User manual

Akura APL15668 User manual

Akura

Akura APL15668 User manual

Akura APLDVD1368 User manual

Akura

Akura APLDVD1368 User manual

Akura AAMT15LCD User manual

Akura

Akura AAMT15LCD User manual

Akura APLDVD15668 User manual

Akura

Akura APLDVD15668 User manual

Akura APLCD15-S User manual

Akura

Akura APLCD15-S User manual

Akura SP 7050 User manual

Akura

Akura SP 7050 User manual

Akura APLDVD1968UCR User manual

Akura

Akura APLDVD1968UCR User manual

Akura AV42720-HDID User manual

Akura

Akura AV42720-HDID User manual

Popular LCD TV manuals by other brands

iLO CIWL3706 owner's manual

iLO

iLO CIWL3706 owner's manual

Sony WEGA KLV-27HR3 operating instructions

Sony

Sony WEGA KLV-27HR3 operating instructions

Zenith Z32LC2D Specifications

Zenith

Zenith Z32LC2D Specifications

Sony KDL-32S3000R - 32" Class Bravia S-series Digital Lcd... Specifications

Sony

Sony KDL-32S3000R - 32" Class Bravia S-series Digital Lcd... Specifications

Sharp AQUOS LC-40LE830U Operation manual

Sharp

Sharp AQUOS LC-40LE830U Operation manual

Westinghouse SK-32H640G user manual

Westinghouse

Westinghouse SK-32H640G user manual

Philips 42HF7443/10 user manual

Philips

Philips 42HF7443/10 user manual

Sanyo LCD-22XR9DKH Service manual

Sanyo

Sanyo LCD-22XR9DKH Service manual

Orion TV19PL110D A operating instructions

Orion

Orion TV19PL110D A operating instructions

Closley C32HDIB instruction manual

Closley

Closley C32HDIB instruction manual

Sharp AQUOS LC-80LE646E Operation manual

Sharp

Sharp AQUOS LC-80LE646E Operation manual

Sony KDL-40V3000, KDL-46V3000 Specifications

Sony

Sony KDL-40V3000, KDL-46V3000 Specifications

Sylvania LC220SS2 quick start guide

Sylvania

Sylvania LC220SS2 quick start guide

Noblex 42LC816F Service manual

Noblex

Noblex 42LC816F Service manual

Digimate DGL3704M user manual

Digimate

Digimate DGL3704M user manual

Vizio M420SV quick start guide

Vizio

Vizio M420SV quick start guide

Symphonic STL1504 Service manual

Symphonic

Symphonic STL1504 Service manual

Sony BRAVIA KDL-32S3000 Mode d'emploi

Sony

Sony BRAVIA KDL-32S3000 Mode d'emploi

manuals.online logo
manuals.online logoBrands
  • About & Mission
  • Contact us
  • Privacy Policy
  • Terms and Conditions

Copyright 2025 Manuals.Online. All Rights Reserved.