AL-KO 38 VLB COMBI CARE User manual

38 VLB COMBI CARE
INFORMATION I MANUALS I SERVICE
470 635_a I 10/2009
GB
F
I
SLO
DK
N
PL
SK
D
NL
E
H
HR
S
FIN
CZ
QUALITY FOR LIFE
User Manual
RO
RUS
UA
P
BG
TR

238 VLB COMBI CARE
D: Gebrauchsanleitung 6
GB: Instructions for Use 10
NL: Gebruikshandleiding 14
F: Mode d’emploi 18
E: Instrucciones de uso 22
P: Introdução 26
I: Libretto di istruzioni 30
H: Használat 34
DK: Brugsanvisning 38
S: Bruksanvisning 42
N: Bruksanvisning 46
FIN: Käyttöohjeet 50
PL: Instrukcja obsługi 54
CZ: Návod k použití 58
SK: Návod na použitie 62
RUS: Руководство по использованию 66
UA: Інструкція щодо використання 70
SLO: Navodilo za uporabo 74
HR: Upute za uporabu 78

3
470 635_a
RO: Instrucţiuni 82
BG: Ръководство за ползване 86
TK: Kullanım kılavuzu 90
ETK: 112543 94
ETK: 112550 / 112571 96

438 VLB COMBI CARE
7
K
×
10
PUSH
PRIMER
×
6
PUSH
PRIMER
OIL
SAE 10W-30
0,25 l
PUSH LEVEL
1
LEVEL
5
5mm
FUEL
UNLEADED

5
470 635_a
Technische Daten
1110 x 1070 x 570 mm 1,3 kW
ca. 21 kg 6100 -100 min-1
5 x LPA = 90dB (A)
cm
370 mm
avhw = 10 m/s2
ISO 20643
cm
360 mm
Art.Nr.: 112 383
ca. 55 l
38 VLB COMBI CARE
Art.Nr.: 112 543 / 112550
K
1
Loctite 243
©2345 67
8
RUN
STOP
LM
NO
K
RUN
STOP
LM
NO

6Original Gebrauchsanweisung
Einleitung
Lesen Sie diese Dokumentation vor der Inbetrieb-
nahme durch. Dies ist Voraussetzung für sicheres
Arbeiten und störungsfreie Handhabung.
Beachten Sie die Sicherheits- und Warnhinweise in
dieser Dokumentation und auf dem Gerät.
Diese Dokumentation ist permanenter Bestandteil
des beschriebenen Produkts und sollte bei Veräu-
ßerung dem Käufer mit übegeben werden.
Zeichenerklärung
Achtung!
Genaues Befolgen dieser Warnhinweise kann Per-
sonen- und / oder Sachschäden vermeiden.
Spezielle Hinweise zur besseren Verständlich-
keit und Handhabung.
Symbole am Gerät
Vor Inbetriebnahme
Gebrauchsanleitung lesen!
Dritte aus dem Gefahrenbereich
fernhalten!
Vor Arbeiten am Schneidwerk
Zündkerzenstecker ziehen!
Achtung Gefahr! Hände und Füße
vom Schneidwerk fernhalten!
Schutzbrille tragen!
Gehörschutz tragen!
Bestimmungsgemäße Verwendung
Dieses Gerät ist zum Auflockern und Lüften eines
Rasenbodens (Vertikutieren) im privaten Bereich
bestimmt und darf nur auf abgetrocknetem, kurzge-
schnittenem Rasen eingesetzt werden.
Eine andere, darüber hinausgehende Anwendung gilt
als nicht bestimmungsgemäß.
Achtung!
Das Gerät darf nicht im gewerblichen Einsatz betrie-
ben werden.
Sicherheitshinweise
Gerät nur in technisch einwandfreiem Zustand
benutzen
Sicherheits- und Schutzeinrichtungen nicht außer
Kraft setzen
Schutzbrille und Gehörschutz tragen
Lange Hose und festes Schuhwerk tragen
Hände und Füße vom Schneidwerk fernhalten
Dritte aus dem Gefahrenbereich fernhalten
Fremdkörper im Arbeitsbereich entfernen
Beim Verlassen des Gerätes:
Motor ausschalten
Stillstand des Schneidwerks abwarten
Zündkerzensstecker abziehen
Gerät nicht unbeaufsichtigt lassen
Kinder oder andere Personen, die die Betriebs-
anleitung nicht kennen, dürfen das Gerät nicht
benutzen
Örtliche Bestimmungen zum Mindestalter der Be-
dienungsperson beachten
Sicherheits- und Schutzeinrichtungen
Sicherheits-Schaltbügel
Das Gerät ist mit einem Sicherheits-Schaltbügel aus-
gestattet, der beim Loslassen das Gerät stoppt.
Heckklappe
Das Gerät ist mit einer Heckklappe ausgestattet.
Optische Sicherheitsanzeige (Bild I)
Die optische Sicherheitsanzeige zeigt die Fixierung
der Arbeitswelle an. Bei sichtbarer grüner Markierung
(5mm) ist die Arbeitswelle richtig fixiert.
Montage
Gerät laut Bildteil (Bild A-F) montieren.
Achtung!
Das Gerät darf erst nach vollständiger Montage be-
trieben werden.

7
470 635_a
D
38 VLB COMBI CARE
Inbetriebnahme
Achtung!
Vor Inbetriebnahme immer eine Sichtkontrolle
durchführen. Mit losem, beschädigten oder abge-
nutzten Schneidwerk und/oder Befestigungsteilen
darf das Gerät nicht benutzt werden.
Landesspezifische Bestimmungen für die Betriebs-
zeiten beachten
Immer die mitgelieferte Bedienungsanleitung des
Motorenherstellers beachten
Sicherheit
Warnung!
Brandgefahr!
Benzin ist hochgradig entflammbar!
Benzin nur in dafür vorgesehenen Behältern auf-
bewahren
Nur im Freien tanken
Beim Tanken nicht rauchen
Den Tankverschluss bei laufendem oder heißem
Motor nicht öffnen
Beschädigten Tank oder Tankverschluss austau-
schen
Tankdeckel immer fest schließen
Wenn Benzin ausgelaufen ist:
Motor nicht starten
Zündversuche vermeiden
Gerät reinigen
Warnung!
Motor nie in geschlossenen Räumen laufen lassen.
Vergiftungsgefahr!
Auftanken
Vor der ersten Inbetriebnahme Öl und Benzin einfül-
len.
Benzin: Normalbenzin bleifrei
Motoröl: siehe Bedienungsanleitung des
Motorenherstellers Öl: SAE 10W-30,
Füllmenge: 0,25l
Öl einfüllen (Bild G)
Ölmess-Stab herausschrauben und Einfüllhilfe1. einstecken.
Öl einfüllen.2.
Einfüllstutzen entfernen und Ölmess-Stab wieder3. einschrauben.
Benzin einfüllen (Bild H)
Der Tankdeckel befindet sich auf dem Ben-
zintank und ist mit dem Symbol „Zapfsäule“
(Tankstelle) versehen.
Arbeitstiefe einstellen (Bild I)
Achtung!
Die Arbeitstiefe nur bei abgeschaltenem Motor und
stillstehender Messerwelle einstellen.
Die Arbeitstiefe der Messerwelle an der Wählscheibe
einstellen.
Vertikutierer am Holm nach hinten kippen.1.
Drehschalter nach unten drücken und auf Stufe2. „2“ drehen.
Positionen auf der Wählscheibe:
1 - 5 = Einstellung der Arbeitstiefe
Bei neuen Messern die Wählscheibe max. auf
Position 2 stellen!
Die richtige Arbeitstiefe richtet sich nach:
dem Rasenzustand
der Messerabnutzung
Bei falscher Arbeitstiefe:
bleibt der Vertikutierer stehen
zieht der Motor nicht durch
In diesem Fall Wählscheibe auf geringere Arbeitstiefe
zurückdrehen.
Vor dem Vertikutieren den Rasen immer mä-
hen.

8Original Gebrauchsanweisung
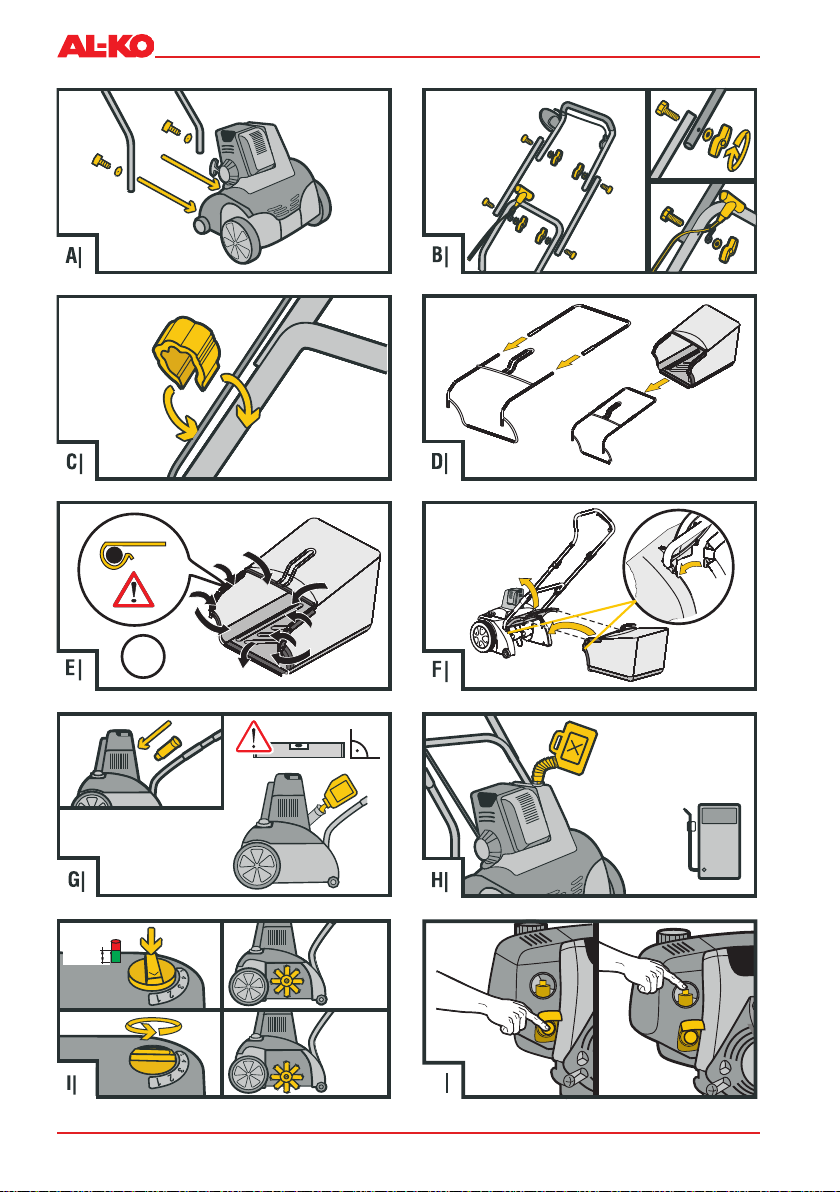
Motor starten
bei Neustart, längeren Stillstandszeiten und Tempera-
turen unter 10°C:
Primerknopf „1. a“ 6x drücken. (Bild K).
Primerknopf „2. b“ 10x drücken. (Bild K).
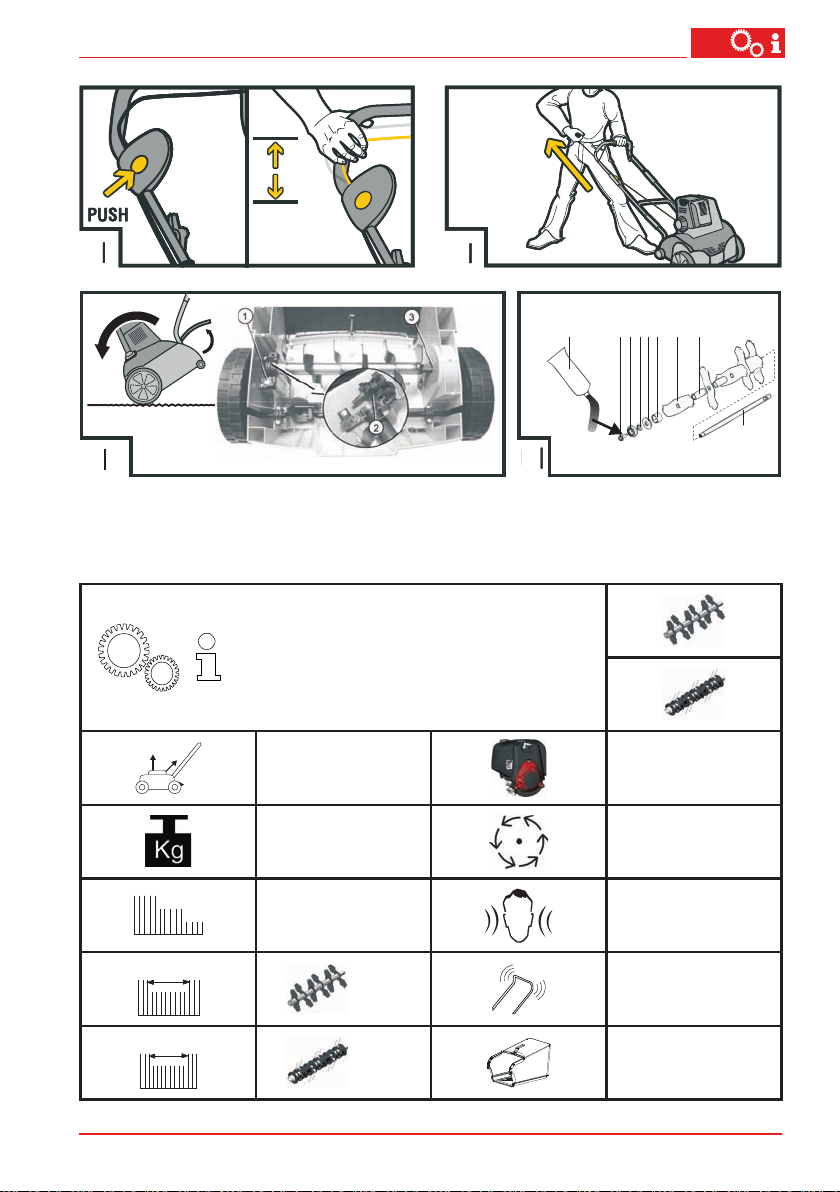
Schalterknopf eindrücken und gleichzeitig3. Motorschalterbügel zum Oberholm herziehen und
festhalten (Bild L).
Motorschalterbügel während des Betriebes fest-
halten.
Starterseil zügig herausziehen und danach lang-4. sam wieder aufrollen lassen (Bild M).
Motor warmlaufen lassen.5.
Bei betriebswarmem Motor müssen die
Primerknöpfe nicht betätigt werden.
Der Motor hat eine Festgaseinstellung.
Eine Drehzahlregulierung ist nicht möglich.
Motor ausschalten
Motorschalterbügel loslassen (Bild L).1.
Gefahr durch Schnittverletzungen!
Messerwelle läuft nach! Nach Abschalten nicht
sofort unter das Gerät fassen.
Fangbox ein-/aushängen
Vor dem Ein-/Aushängen der Fangbox den Motor1. ausschalten.
Stillstand der Messerwelle abwarten.2.
Allgemeine Hinweise zum Betrieb
Zum Starten des Gerätes muss das Schneidwerk
vollständig freigängig sein
Hände und Füße nicht in die Nähe rotierender Teile
bringen
Das Gerät nur am Führungsholm steuern. Dadurch
ist der Sicherheitsabstand vorgegeben
Auspuff und Motor sauber halten
An Abhängen auf sicheren Stand achten
Immer quer zum Hang vertikutieren
Nie an steilen Abhängen vertikutieren
Vertikutierer nur im Schritt-Tempo führen
Gerät nie mit laufendem Motor kippen oder trans-
portieren
Vom Fachmann prüfen lassen:
nach Auffahren auf ein Hindernis
bei sofortigem Stillstand des Motors
bei verbogenem Messer
bei verbogener Messerwelle
bei defektem Keilriemen
Wartung und Pflege
Gefahr!
Verletzungsgefahr an der Messerwelle.
Schutzhandschuhe tragen!
Vor allen Wartungs- und Reinigungsarbeiten den
Zündkerzenstecker ziehen!
Gerät nicht mit Wasser abspritzen!
Eindringendes Wasser (Zündanlage, Vergaser...)
kann zu Störungen führen.
Das Gerät nach jedem Gebrauch reinigen (Spach-
tel, Lappen etc.).
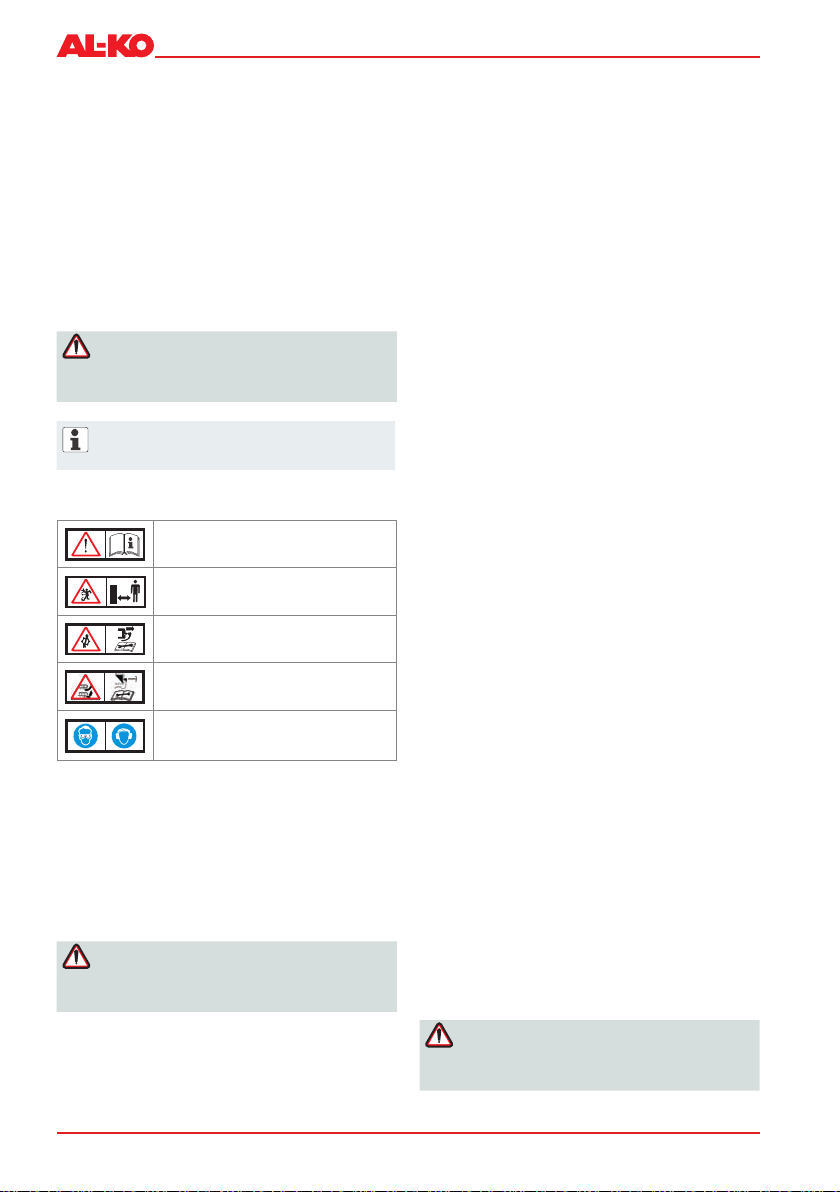
Vertikutierwalze ausbauen (Bild N)
Schraube (1) des Lagers herausschrauben.1.
Lagerhälfte (2) hochklappen.2.
Vertikutierwalze aus der unteren Lagerhälfte heben3. und aus der Antriebseite (3) herausziehen.
Der Einbau erfolgt in umgekehrter Reihenfolge.
Lüfterwalze ausbauen
Die Lüfterwalze ausbauen und die Stahlfederzinken er-
neuern erfolgt analog zur Vertikutierwalze.
Messer ausbauen (Bild O)
Vor dem Ausbau der Messer auf deren Einbau-
lage achten!
Skt.-Schraube (1) herausschrauben.1.
Kugellager (2) vorsichtig von der Welle (8)2. abziehen.
Druckring(3), Scheibe (4) und kurze Distanzhülse3. (5) von der Welle abziehen
Messer (6) und lange Distanzhülsen nacheinander4. abziehen.
Der Zusammenbau erfolgt in umgekehrter Reihenfolge.

9
470 635_a
D
38 VLB COMBI CARE
Motorpflege
Luftfilter
Zündkerze
Ölwechsel
Das Altöl bei warmem Motor ablassen. Warmes
Öl läuft schnell und vollständig ab.
Zum Auffangen des Öls einen geeigneten Behälter1. unter den Motor stellen.
Ölmess-Stab herausschrauben.2.
Einfüllhilfe einstecken.3.
Gerät am Holm nach hinten kippen bis der Holm4. am Boden liegt. Öl vollständig ablaufen lassen.
Gerät aufstellen und Öl (SAE 10W-30, Füllmenge:5. ca. 0,25l) einfüllen.
Einfüllstutzen entfernen.6.
Ölmess-Stab einschrauben.7.
Gebrauchtes Motoröl umweltfreundlich entsor-
gen!
Wir empfehlen, Altöl in einem geschlossenen
Behälter beim Recycling-Center oder einer
Kundendienststelle abzugeben.
Altöl nicht
in den Abfall geben
in Kanalisation oder Abfluss schütten
auf die Erde schütten
Hinweise in der Bedienungsanleitung des Motorenher-
stellers beachten.
Gerät lagern
Achtung - Brand- / Explosionsgefahr!
Motor nicht vor offenen Flammen oder Hitze-
quellen lagern.
Motor auskühlen lassen.
Vertikutierer in einem trockenen Raum lagern.
Zum platzsparenden Aufbewahren Flügelmuttern
am Oberholm herausdrehen und diesen abklappen.
Hilfe bei Störungen
Störung Hilfe
Motor springt
nicht an
Benzin auftanken
Motorschalterbügel zum
Oberholm drücken.
Zündkerzen prüfen, eventuell
erneuern.
Luftfi
lter reinigen.
Geringere Arbeitstiefe wäh-
len.
Walze dreht nicht Kundendienstwerkstatt aufsuchen
Motorleistung
lässt nach
Geringere Arbeitstiefe wäh-
len.
Abgenutzte Messer austau-
schen.
Rasen mähen (Rasenhöhe
zu hoch).
schlechte Verti-
kutierleistung
geringere Arbeitstiefe wählen.
abgenutzte Messer austau-
schen.
Unruhiger
Lauf
Gerät vi-
briert
Schadhafte Messer.
Kundendienstwerkstatt auf-
suchen.
Störungen, die mit Hilfe dieser Tabelle nicht behoben
werden können müssen in einer autorisierten Fach-
werkstatt behoben werden.

10 Translation of original user instructions
Introduction
Read the documentation completely before com-
missioning. This is necessary to ensure a safe and
trouble-free operation.
Observe the safety instructions and warning noti-
ces in this documentation and on the equipment.
This documentation is integral part of the de-
scribed product. It should be handed over to the
purchaser at the time of purchase.
Legend
Warning!
Strictly observe the warning notices to prevent inju-
ries and damage.
Special indications for a better understanding
and use.
Symbols on the device
Before commissioning read the
instructions for use!
Keep other people out of the danger
area!
Remove the spark plug connector
before working on the cutting unit!
Danger! Keep hands and feet away
from the cutting unit!
Wear protective glasses!
Wear hearing protection!
Intended use
The equipment is designed to scarify and aerate
(thatch) your home lawn. It should be used only on
dry and short grass.
Any different use does not constitute an intended use.
Warning!
The equipment is intended for domestic use only.
Safety instructions
The equipment should be used only if in good or-
der and condition
Do not deactivate safety and protection devices
Wear protective glasses and hearing protection
Wear long trousers and sturdy shoes
Keep hands and feet away from thecutting unit
Keep other people out of the danger area
Remove all foreign objects from the work area
Before leaving the equipment unattended:
Turn the engine off
Wait for the cutting unit to stop
Remove the spark plug connector
Do not leave the equipment unattended
Children and other persons who are unfamiliar
with the operating instructions must not operate
the machine.
Observe local regulations regarding minimum age
requirements for operating the machine.
Safety and protection devices
Safety control bar
The equipment is equipped with a safety control bar.
When this bar is released, the equipment immediately
stops.
Back cover
The equipment is equipped with a back cover.
Visual safety indicator (picture I)
The visual safety indicator shows whether shaft is
properly fitted and secured. When the green mark is
visible (5 mm), the shaft is properly secured.
Assembly
Assemble the equipment as shown in the illustration
section (picture A-F).
Warning!
The equipment can be used only after complete as-
sembly.

11
470 635_a
GB
38 VLB COMBI CARE
Commissioning
Warning!
Always make a visual inspection of the equipment
before using it. The equipment should not be used
if the cutting unit and/or mounting components are
loose, damaged or worn.
Comply with any national regulations regarding
operating times.
Always observe the operating instructions sup-
plied by the engine manufacturer.
Safety
Warning!
Fire danger!
Petrol is highly flammable!
Store petrol in designated containers only.
Only refuel in open air.
Never smoke while refilling!
Do not open the tank cap while the engine is run-
ning or if the machine is hot.
Replace a damaged petrol tank and/or tank cap.
Always close the tank cap.
If petrol has been spilt:
Do not start the engine
Do not start the equipment
Clean the equipment
Warning!
Never leave an engine running in an enclosed space.
Toxic hazard!
Refilling
Before switching on the machine for the first time, fill
it up with oil and petrol.
Petrol: unleaded regular-grade petrol
Engine
oil: observe the operating instructions
supplied by the engine manufacturer.
Oil: SAE 10W-30, capacity: 0,25 l
Oil filling (picture G)
Remove the oil dipstick.1.
Screw in the filler neck.2.
Fill oil.3.
Remove the filler neck.4.
Screw in the oil dipstick.5.
Petrol filling (picture H)
The tank cap is on the petrol tank. It is marked
with the symbol "petrol station".
Setting the cutting height (picture I)
Warning!
The cutting height can be adjusted when the engine
is not running and the cutter spindle is stopped.
Adjust the cutting height of the cutter spindle with the
knob.
Push the beam downwards and tilt the scarifier.1.
Push the knob downwards and rotate to position „2“.2.
Knob positions:
1 - 5 = cutting height settings
With new blades, turn the knob to position 2
max.!
The correct cutting height depends on:
lawn conditions
blade wear
In case the cutting height is not correct:
the scarifi
er stands still
the engine does not pull through
In this case, set the knob to a lower cutting height.

12 Translation of original user instructions
Starting the engine
Starting the engine
Starting with a cold engine, after longer periods of sto-
rage and temperatures under 10°C:
Press pimer button “a” 6 times. (Ill. K).1.
Press pimer button “b” 10 times. (Ill. K).2.
Press control button and simultaneously pull engine bar3.
up to handle bar and hold it there (Ill. L).
You must hold the engine control bar tight du-
ring use.
Quickly pull out the starter cord and then allow it to4.
slowly roll up (Ill., M).
Let the engine run until it is warm.5.
Do not press primer buttons when engine is warm.
Engine speed (rpm value) is fixed.
Engine speed cannot be adjusted.
Turn the engine off
Release the control bar (picture L).
Danger!
The cutter spindle does not stop turning immediate-
ly. Do not touch the bottom of the equipment shortly
after switching off.
Installing and removing the grass catcher
Turn the engine off before installing/removing the
grass catcher.
Wait until the cutter spindle has come to a complete stop!
General operation instructions
To start the equipment, the cutting unit must be
freely movable.
Keep hands and feet away from rotating parts.
Control the equipment only through the handle.
Thus the safety distance is guaranteed.
Keep exhaust and engine clean.
Always ensure you have a good foothold on slopes.
Move across slopes, never up or down.
Do not use on steep slopes.
Guide the machine at walking pace.
Never tilt or transport the device with the engine
running.
Have a professional check:
after bumping against an obstacle
if the engine stops suddenly
if the blade is bent
if the cutter spindle is bent
if the belt is damaged.
Maintenance and care
Danger!
Risk of injury at the cutter spindle.
Wear protective gloves!
Remove the spark plug connector before any
maintenance or cleaning jobs!
Do not spray water on the equipment!
Water infiltration (ignition system, carburetor) can
cause faults.
Clean the equipment after each use (spatula, cloth).
Removing the scarifier roller (picture N)
Remove the bearing screw (1).1.
Tilt the bearing halves (2) upwards.2.
Lift the scarifier roller from the lower bearing half and3.
extract it out from the drive side (3).
Assembly is carried out in reverse order.
Removing the aerating roller
Removal of the aerating roller and replacement of steel
spring hooks are similar to scarifier roller.
Removing the blades (picture O)
Before removing the blades observe the moun-
ting position!
Unscrew the hexagonal bolt (1).1.
Carefully remove the ball bearing (2) from the spindle (8).2.
Remove thrust collar (3), washer (4) and short spacer3. sleeve (5) from the spindle
Remove the blades (6) and the long spacer sleeves one4. after another.
Assembly is carried out in reverse order.

13
470 635_a
GB
38 VLB COMBI CARE
Care of the engine
Air filter
Spark plug
Oil change
Drain used oil when the motor is warm. Warm
oil drains quickly and completely.
To collect oil, place a suitable container under the engine.1.
Remove the oil dipstick.2.
Screw in the filler neck.3.
Push the beam downwards and tilt the equipment, until4.
the beam touches the floor. Drain the oil completely.
Pull the equipment up and fill with oil (SAE 10W-30,5.
quantity: 0,25l)
Remove the filler neck.6.
Screw in the oil dipstick.7.
Dispose of used engine oil in a manner that is
compatible with the environment!
We recommend to collect the used oil in a
closed container and to deliver it to a suitable
recycling or service station.
Used oil should not be
disposed of with domestic rubbish
poured into the sewage water system or
drain pipes
poured on the ground
Observe the operating instructions supplied by the en-
gine manufacturer.
Storage
Caution!
Do not store motor near open flames or heating
sources - Burn and/or explosion danger!
Let the engine cool down.
Store the scarifier in a dry place.
To save storage space, unscrew the butterfly nuts
on the beam and fold it in.
Faults and remedies
Fault Remedy
The engine
does not start Fill up with petrol
Pull the control bar towards
the handle.
Check the spark plugs and
replace if necessary.
Clear the air fi
lter.
Set a lower cutting height.
The roller does
not turn See a service station
Engine power
reduced Set a lower cutting height.
Replace the worn blades.
Mow the lawn (the grass is
too high).
Poor scarifi
er
performance Set a lower cutting height.
Replace the worn blades.
Rough run-
ning
Strong vi-
brations
Damaged blades.
See a service station.
Faults that cannot be rectified with the aid of this table
must be eliminated by an authorised workshop only.
Other manuals for 38 VLB COMBI CARE
1
This manual suits for next models
2
Table of contents
Languages:
Other AL-KO Irrigation System manuals
Popular Irrigation System manuals by other brands

Tyco Fire Product
Tyco Fire Product TY-B Series instruction manual

Perrot
Perrot VZR 22-3VDE operating instructions

Viking
Viking FREEDOM VK486 Technical data

Orbit
Orbit HOSE END WATERING FLOWERBED AND SHRUB KIT instruction manual

Tyco Fire Product
Tyco Fire Product CENTRAL BV-EC instruction manual

Munters
Munters Green Field user manual