manuals.online logo
Brands
  1. Home
  2. •
  3. Brands
  4. •
  5. Albero Bambino
  6. •
  7. Indoor Furnishing
  8. •
  9. Albero Bambino M206RA User manual

Albero Bambino M206RA User manual

ARMADIO / WARDROBE
ARMOIRE / SCHRANK
ARMARIO / ARMÁRIO
(16x)
M(16x)
N
istruzioni per il montaggio leggere attentamente
econservare per un utilizzo futuro.
assembly instructions read carefully and retain
for future reference.
instructions de montage lire attentivement
et stocker pour une utilisation future.
anleitung zur montage
sorgfältig lesen
und für zukünftige verwendungen aufbewahren.
instrucciones para su montaje lea atentamente
yconservar para su uso futuro.
instruções para amontagem leia atentamente
eguarde para uso futuro.
Ferramenta
Hardwares
Ironmongery
Eisenwaren
Ferreteria
Ferragens I(38x) (5x)
L (4x) (4x)
(2x)
O(12x)
RP
S
(6x)
Q
G
H2
H1
E
Schienale / Back-panel / Panneau arrière
Rückwand / Panel trasero / Painel traseiro
D1
Anta sinistra / Left door / Porte gauche
Linken Tür / Puerta izquierda / Porta esquerda
A1
Fianco sinistro / Left side / Côté gauche
Linken Seite / Lateral izquierdo / Lado esquerdo
A2
Fianco destro / Right side
Côté droit / Rechten Seite
Lateral derecho / Lado direito
C
Cappello / Top
Oben / Superior
D2
Anta destra / Right door
Porte droit / Rechter Tür
Puerta derecha / Porta direita
B
Base
Base shelf
Étagère de base
Basis Regal
Repisa base
Prateleira de base
Ripiano inferiore / Lower shelf
Étagère inférieure / Unteren Regal
Repisa inferior / Prateleira inferior
R
Appendiabiti / Clothing rack / Rack de vêtements
Kleiderständer / Perchero / Cremalheira
Divisorio
Partition
Partition
Trennwand
Partición
Divisória
Ripiano superioreUpper shelf
Étagère supérieure / Oberes Regal
Repisa superior / Prateleira de cima
F
Albero Bambino Srl
via Provinciale 83
50038 Scarperia e San Piero
(Firenze, Italy)
Tel./Fax: +39 050 643111
info@alberobambino.it
www.alberobambino.it
Appoggiare il anco A1a terra e inserire i pioli I(14x) e M (8x)
Place side A1 on the oor and insert pegs I(14x) and M (8x)
Placer côte A1 à terre et insérer des chevilles I(14x) et M (8x)
Setzen die seitenschrank
A1
am Boden und fügen Pöcke
I(14x)
und
M (8x)
Poner el lateral A1 en el suelo y insertar clavijas I(14x) y M (8x)
Apoiar o lado A1no chão e inserir dos cavilhas I(14x) e M (8x)
1
2 3
A1
A1
A1
B
B
Avvitare N (2x) B
Screw in N (2x) B
Visser N (2x) B
Einschrauben N (2x) B
Atornillar N (2x) B
Parafusar N (2x) B
Inserire B A1
Insert B A1
Inserér B A1
Einfügen
B A1
Insertar B A1
Inserir B A1
Orientamento corretto del foro.
Correct orientation of the hole.
Orientation correcte du trou.
Korrekte Ausrichtung des Loches .
Correcta orientación del agujero.
Correta orientação do furo.
6
45
A1
B
A1
B
F
A1
B
F
H1
A1
B
F
7
Inserire I B(5x) / Insert I B(5x)
Insérer I B(5x) /
Einfügen
I B(5x)
Insertar I B(5x) / Inserir I B(5x)
Inserire L F(5x) / Insert L F(5x)
Insérer L F(5x) /
Einfügen
L F(5x)
Insertar L F(5x) / Inserir L F(5x)
89
G
H1
H1
A1A1
BB
F
F
H1
H2
B
F
G
A1
10
G
H1
A1
B
F
11
Inserire I G(5x)
Insert I G(5x)
Insérer I G(5x)
Einfügen
I G(5x)
Insertar I G(5x)
Inserir I G(5x)
13 Inserire E nell’apposito canale del anco A1
Insert Einto the side A1 channel
Insérer Edans le canal latéral de A1
Legen Sie Ein den A1 Seitenkanal
Inserte Een el canal lateral de A1
Insira
Epara o canal lateral de A1
E
G
H1
H2
B
F
A1
AttENzIONE: sul retro dello schienale E,l’alto è indicato da una freccia.
WARNING: behind the backrest E, the high is indicated by an arrow.
AvERtISSEMENt: derrière le fond E, le haut est indiqué par une èche.
WARNuNG: hinter der Rückenlehne E, das Hoch ist durch einen Pfeil angedeutet.
ADvERtENCIA: detrás del respaldo E, el alto, está indicado por una echa.
AvISO: por trás das costas E, o alto, está indicada por uma seta.
G
H1
H2B
F
12
A1
Avvitare: NF (2x) N G (2x)
Screw in: NF (2x) N G (2x)
Visser: NF (2x) N G (2x)
Einschrauben:
NF (2x) N G (2x)
Atornillar: NF (2x) N G (2x)
Parafusar: NF (2x) N G (2x)
15 E
G
H1
H2
F
A1
C
Avvitare NC (2x)
Screw in NC (2x)
Visser NC (2x)
Einschrauben
NC (2x)
Atornillar NC (2x)
Parafusar NC (2x)
E
G
H1
H2
B
F
A1
C
14
IInserire C E
Insert C E
Insérer C E
Einfügen
C E
Insertar C E
Inserir C E
II Inserire C A1
Insert C A1
Insérer C A1
Einfügen
C A1
Insertar C A1
Inserir C A1
A2
17
18
Inserire il anco A2
Insert side A2
Insérer le côte A2
Einfügen
die seitenschrank A2
Insertar el lateral A2
Inserir o lado A2
A2
EGH1
H2
F
B
C
Avvitare: NC (2x) NG (2x) NF (2x) N B (2x)
Screw in: NC (2x) NG (2x) NF (2x) N B (2x)
Visser: NC (2x) NG (2x) NF (2x) N B (2x)
Einschrauben:
NC (2x) NG (2x) NF (2x) N B (2x)
Atornillar: NC (2x) NG (2x) NF (2x) N B (2x)
Parafusar: NC (2x) NG (2x) NF (2x) N B (2x)
16
Appoggiare il anco A2a terra e inserire i pioli I(14x) e M(8x)
Place side A2 on the oor and insert pegs I(14x) and M(8x)
Placer côte A2 à terre et insérer des chevilles I(14x) et M(8x)
Setzen die seitenschrank
A2
am Boden und fügen Pöcke
I(14x)
und
M(8x)
Poner el lateral A2 en el suelo y insertar clavijas I(14x) y M(8x)
Apoiar o lado A2no chão e inserir dos cavilhas I(14x) e M(8x)
Orientamento corretto del foro.
Correct orientation of the hole.
Orientation correcte du trou.
Korrekte Ausrichtung des Loches.
Correcta orientación del agujero.
Correta orientação do furo.
(2x) (2x) (2x) (2x)
G F BC
A2
20
Avvitare: QD1(3x)
QD2(3x)
Screw in: QD1(3x)
QD2(3x)
Visser: QD1(3x)
QD2(3x)
Einschrauben:
QD1(3x)
QD2(3x)
Atornillar: QD1(3x)
QD2(3x)
Parafusar: QD1(3x)
QD2(3x)
D2
D1
21
Q(x 12)
R
D1
A1
C
I
II
SS
22 Montare le maniglie SD1 S D2
Attach the handles SD1 S D2
Fixez les poignées SD1 S D2
Bringen Sie die Grie SD1 S D2
Acope las asas SD1 S D2
Coloque as alças SD1 S D2
D1D2
P
D1/D2
SP
Unire: D1 A1 D2 A2
Fix: D1 A1 D2 A2
Fixer: D1 A1 D2 A2
Befestigen:
D1 A1 D2 A2
Arreglar: D1 A1 D2 A2
Fixar: D1 A1 D2 A2
19
Ribaltare l’armadio
Straighten the wardrobe
Redresser l’armoire
Schrank umstürzen
Enderezar l’armario
Endireitar o armàrio
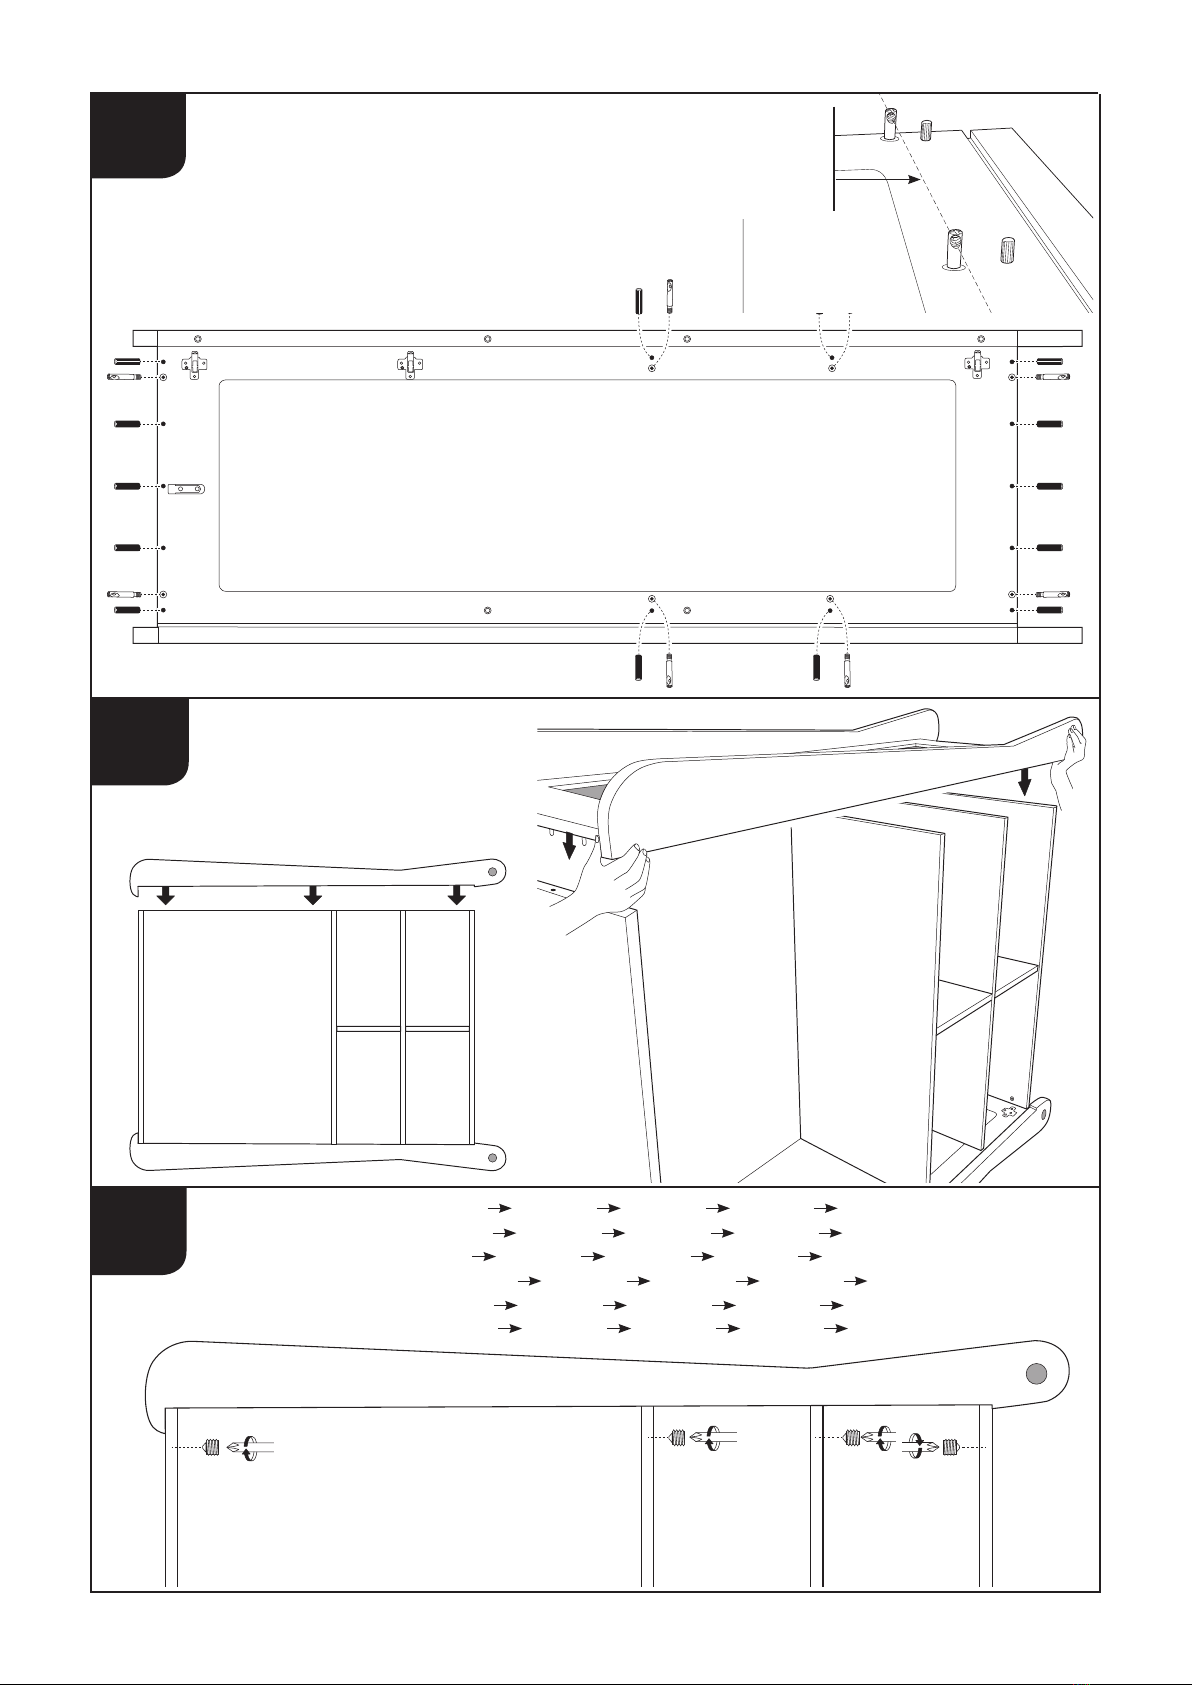
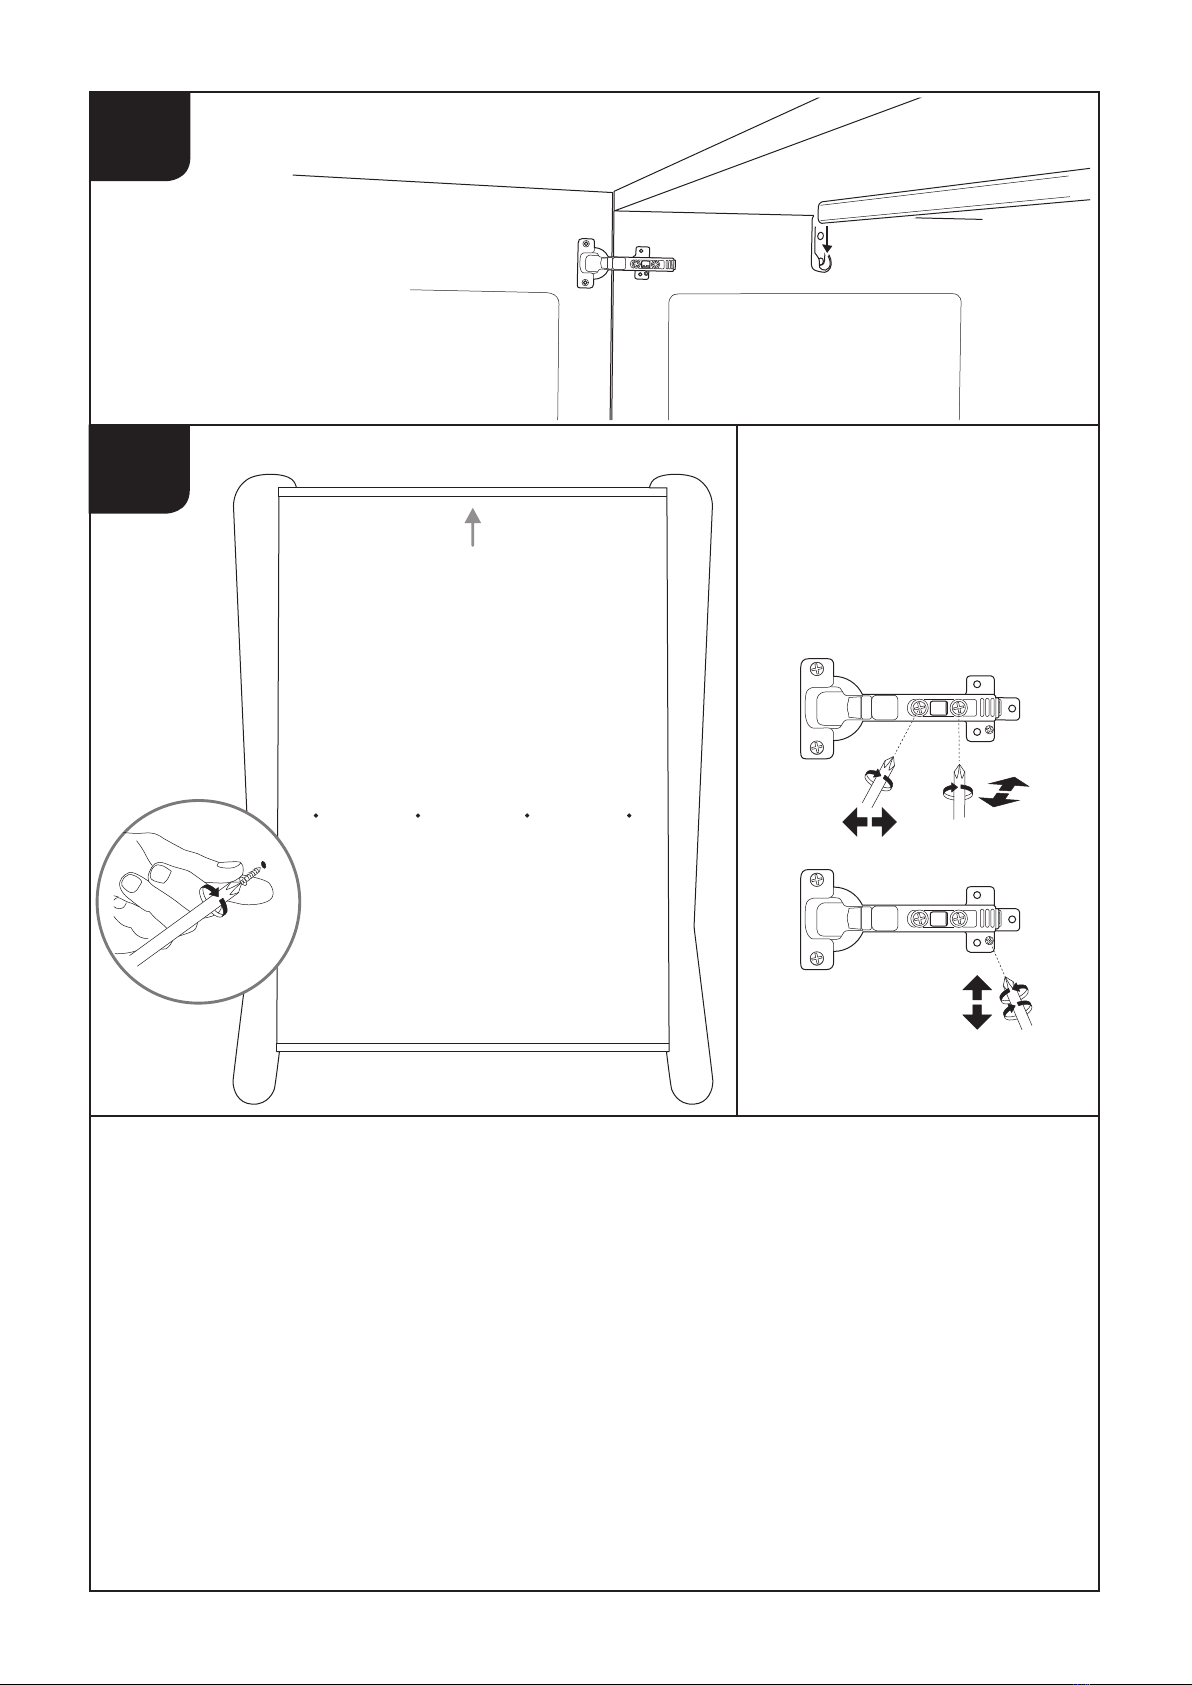
Svitare, regolare e riavvitare
Loosen, adjust and screw
Desserrez, ajuster et visser
Lösen Sie, justieren und Schraube
Aoje, ajuste y apriete
Afrouxe, ajuste e aperte
23
24
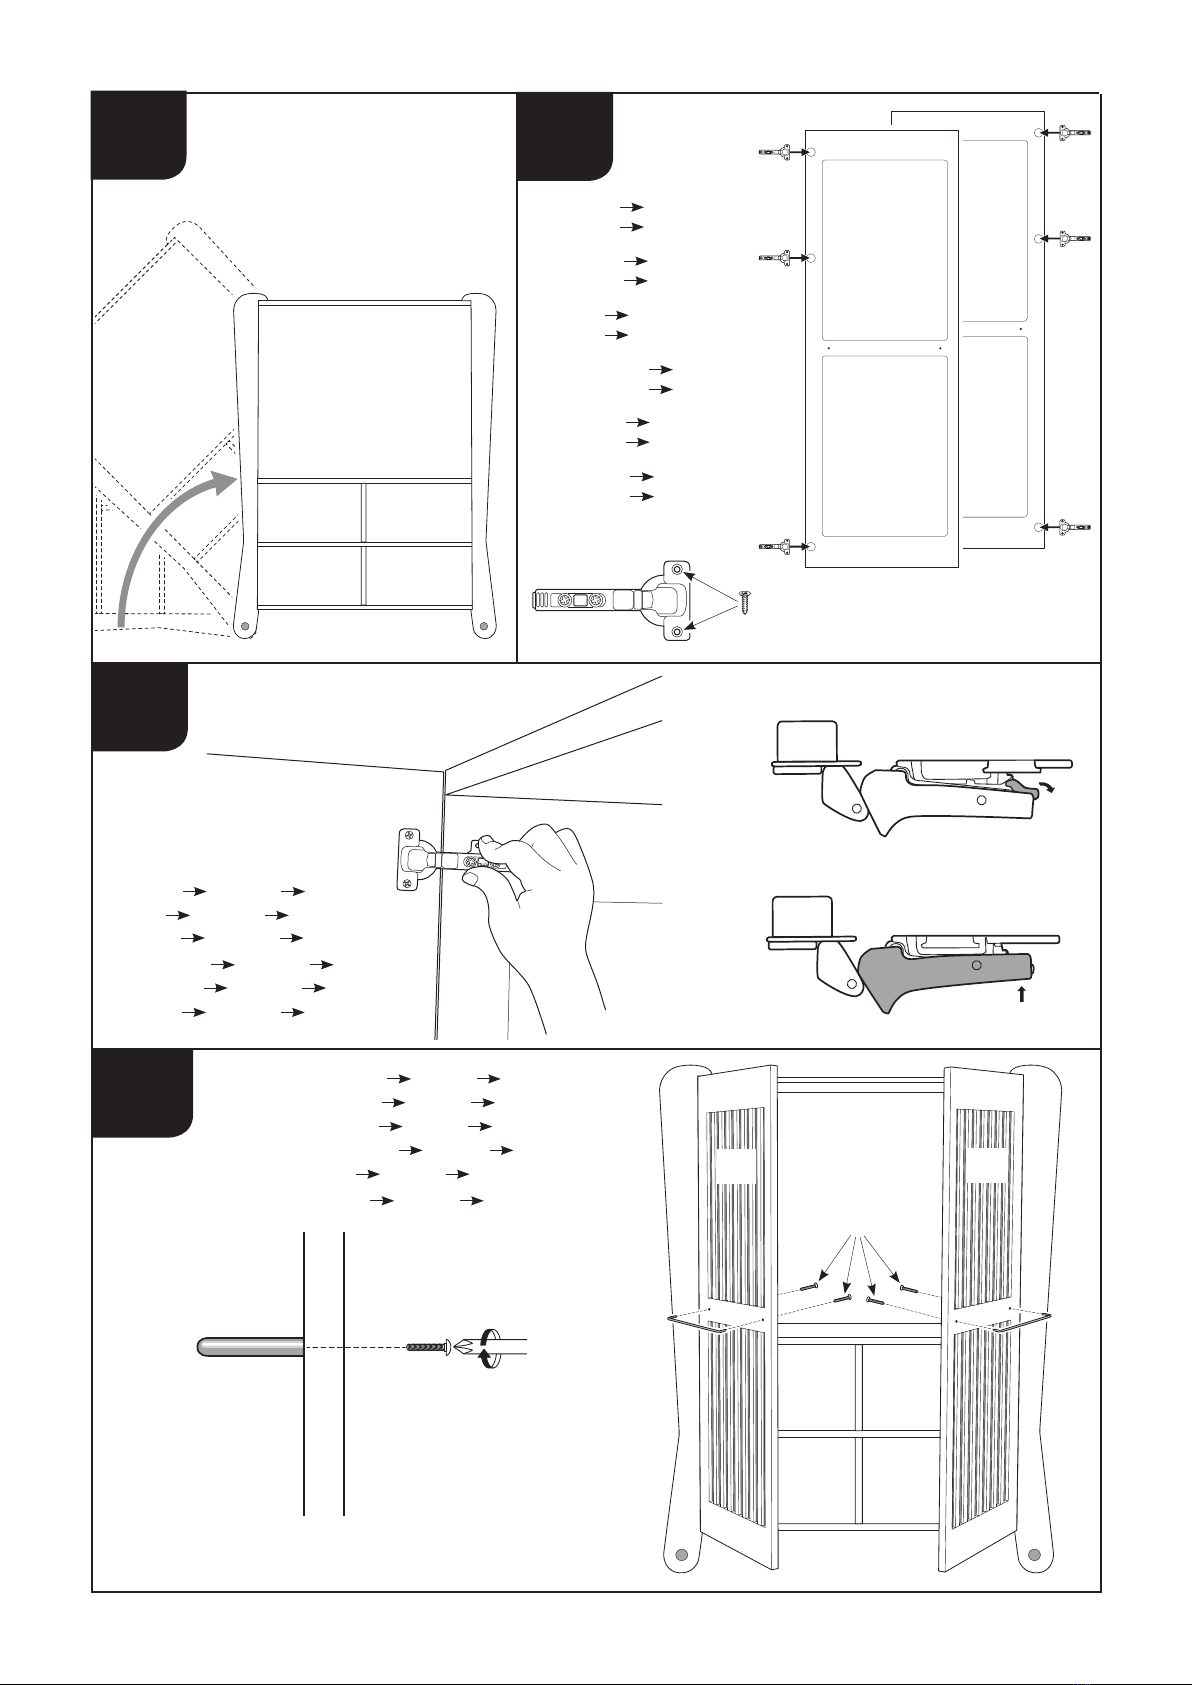
Inserire R / Insert R / Insérer R
Einfügen
R / Insertar R / Inserir R
GARANZIA: Albero Bambino Srl, garantisce i propri prodotti da difetti di fabbricazione per un periodo di due anni dalla data di acquisto. I
difetti di fabbricazione devono essere comunicati al venditore entro due mesi dalla loro scoperta, pena la decadenza della garanzia stessa.
La garanzia, non copre i costi di trasporto, eventualmente necessari, per la riparazione del prodotto stesso.
WARRANty: Albero Bambino Srl, warrants its products against manufacturing defects for a period of two years from date of purchase.
The manufacturing defects must be reported to the seller within two months of their discovery, penalty invalidation of the guarantee.The
warranty does not cover transportation costs for the repair of the product itself.
GARANtIe: Albero Bambino Srl, garantit ses produits contre les défauts de fabrication pendant une période de deux ans à compter de la
date d’achat. Les défauts de fabrication doivent être signalés au vendeur dans les deux mois de leur découverte, invalidation des pénalités
de la garantie. La garantie ne couvre pas les frais de transport pour la réparation du produit lui-même.
GARANtIe: Albero Bambino Srl, garantiert für einen Zeitraum von zwei Jahren ab Kaufdatum, dass die Produkte frei von Herstellungs-
fehlern sind. Die Herstellungsfehler müssen dem Verkäufer innerhalb von zwei Monaten seit Feststellung mitgeteilt werden, sonst verfällt
der Anspruch auf Garantie. Die Garantie deckt nicht die Transportkosten ab, die eventuell für die Reparatur des Produkts erforderlich sind.
GARANtíA: Albero Bambino Srl, garantiza sus productos contra defectos de fabricación por un período de dos años a partir de la fecha de
compra. Los defectos de fabricación deben ser reportados al vendedor dentro de los dos meses de su descubrimiento, pena invalidación
de la garantía. La garantía no cubre los gastos de transporte para la reparación del producto mismo.
GARANtIA: A Albero Bambino Srl, garante seus produtos contra defeitos de fabricação por um período de dois anos a partir da data de
compra. Os defeitos de fabrico devem ser comunicados ao vendedor no prazo de dois meses a partir da sua descoberta, pena, invalidação
da garantia. A garantia não cobre os custos de transporte para a reparação do próprio produto.
Avvitare O sul retro di E (4x)
Screw in O at the back of E (4x)
Visser Oà l’arrière de E (4x)
Schraube
O
auf der Rückseite
der E (4x)
Atornillar
O en la parte posterior de E (4x)
Parafusar
O na parte de trás do E (4x)
E
R
Per regolare gli sportelli agire sulle cerniere come nelle
illustrazioni sotto.
To adjust the doors, act on hinges as in the illustrations
below.
Pour régler les portes, agissent sur charnières comme dans
les illustrations ci-dessous.
So passen Sie die Türen, wirken auf die Scharniere wie in
den Abbildungen unten.
Para ajustar las puertas, actuar sobre las bisagras como en
las ilustraciones siguientes.
Para ajustar as portas, agir sobre as dobradiças como nas
guras abaixo.

This manual suits for next models

7

Popular Indoor Furnishing manuals by other brands

Manhattan Comfort Vernon 62.99 quick start guide

Manhattan Comfort

Manhattan Comfort Vernon 62.99 quick start guide

Woood TEUN manual

Woood

Woood TEUN manual

CHITA DC71261 Assembly manual

CHITA

CHITA DC71261 Assembly manual

Coaster 100771 Assembly instructions

Coaster

Coaster 100771 Assembly instructions

Jysk 5207291 installation instructions

Jysk

Jysk 5207291 installation instructions

IKEA Alrik manual

IKEA

IKEA Alrik manual

Wren Kitchens Vogue BASE UNIT 1000 Base Shallow Assembly guide

Wren Kitchens

Wren Kitchens Vogue BASE UNIT 1000 Base Shallow Assembly guide

Lightolier Lytecaster 1128T specification

Lightolier

Lightolier Lytecaster 1128T specification

IKEA METOD Assembly manual

IKEA

IKEA METOD Assembly manual

Turnstone A la carte TS 301A Series manual

Turnstone

Turnstone A la carte TS 301A Series manual

Home Decorators Collection ROCCO 20126-VS61EW-CB Assembly instructions

Home Decorators Collection

Home Decorators Collection ROCCO 20126-VS61EW-CB Assembly instructions

BENE BUG User information

BENE

BENE BUG User information

tayco Kip installation guide

tayco

tayco Kip installation guide

Politorno BAHAMAS 160789 Assembly Intructions

Politorno

Politorno BAHAMAS 160789 Assembly Intructions

MENU Stick System Series manual

MENU

MENU Stick System Series manual

BOMBAY Sherborne Ottoman manual

BOMBAY

BOMBAY Sherborne Ottoman manual

BOPITA LYNN instruction manual

BOPITA

BOPITA LYNN instruction manual

Next CAMBRIDGE 876502 Assembly instruction

Next

Next CAMBRIDGE 876502 Assembly instruction

manuals.online logo
manuals.online logoBrands
  • About & Mission
  • Contact us
  • Privacy Policy
  • Terms and Conditions

Copyright 2025 Manuals.Online. All Rights Reserved.