Alcovisor Mercury User manual

DOT
Alcovisor®Mercury
Operating Manual
PAS Systems International, Inc.
215 Southport Dr. Suite 400
Morrisville, NC 27560
www.pasintl.com
(800) 660-SNIF · (540) 372-3431
Copyright© 2010 by PAS Systems International Inc., All Rights Reserved


Table of Contents
Introduction.............................................................................................................................................1
Principles of Operation ...........................................................................................................................2
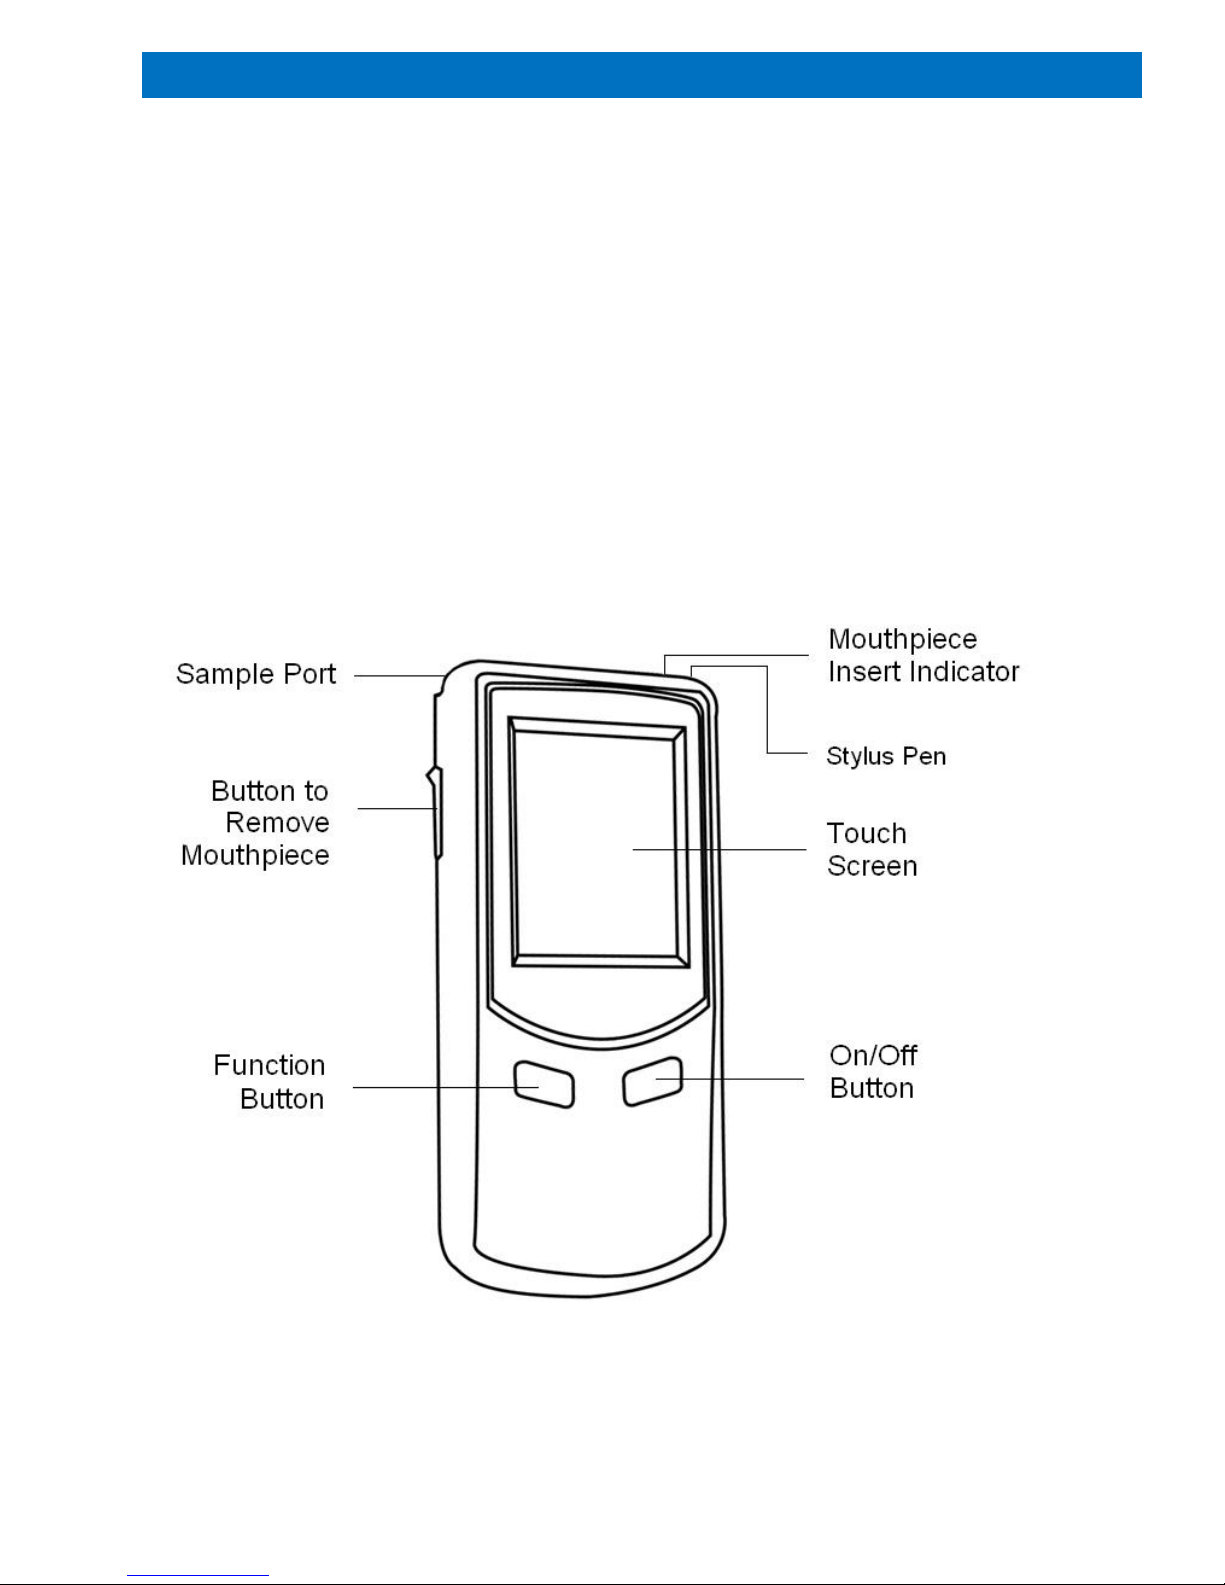
Instrument Features................................................................................................................................2
Preparing the Mercury............................................................................................................................3
Installing the Batteries.........................................................................................................................3
Turning On & Off .................................................................................................................................3
Touch-Screen Calibration.......................................................................................................................3
Icon Descriptions....................................................................................................................................4
Performing a Breath Test........................................................................................................................5
Conditions for Test Site.......................................................................................................................5
Conditions for Test Subject .................................................................................................................5
Attaching a Mouthpiece.......................................................................................................................5
Performing an Air Blank Test...............................................................................................................6
Measuring BrAC/BAC.............................................................................................................................6
Passive Test........................................................................................................................................6
Standard Test......................................................................................................................................7
Manual Override Test..........................................................................................................................8
Test Records..........................................................................................................................................8
Settings...................................................................................................................................................9
Printer...................................................................................................................................................10
Accuracy Checking and Calibration......................................................................................................12
Wet Bath Accuracy Checking...............................................................................................................12
Dry Gas Accuracy Checking.................................................................................................................13
Dry Gas at High Altitude....................................................................................................................14
High Altitude Correction Chart..............................................................................................................14
Quality Assurance Plan ........................................................................................................................15
Troubleshooting....................................................................................................................................16
Technical Specifications.......................................................................................................................17
Safety, Maintenance & Warranty..........................................................................................................18

1
INTRODUCTION
The Mercury is the latest in the C4 Technology line of affordable, professional,
handheld quantitative breath alcohol testing instruments. It can be used for law
enforcement, schools, workplace safety or medical purposes. The Mercury features an
easy-to-use automatic sampling or manual sampling with a user-friendly touch-screen
display and an optional wireless printer.
The Mercury is accurate and reliable, allowing a complete breath test procedure to be
conducted in about 30 seconds or less.
This manual describes the operation, maintenance, calibration check, and calibration
adjustment of the Mercury. This manual should be read completely and fully
understood by each operator prior to testing. It is further recommended that operators
practice the breath testing process before giving an actual “in the field” test.
NHTSA APPROVED
EVIDENTIAL BREATH ALCOHOL TESTING DEVICE (EBT)

2
PRINCIPLES OF OPERATION
The Mercury uses an electrochemical fuel cell containing two platinum electrodes to
detect and measure the concentration of alcohol vapor in expired breath. When breath
is drawn into the fuel cell by the sampling system, a small voltage is generated
proportionate to the breath alcohol concentration. This voltage is then fed to an
electronic amplifier and displayed on the screen.
The instrument is simple to operate and may be used as often as required provided that
a suitable delay is allowed between successive tests. This time delay allows the fuel
cell to clear itself of alcohol and prevents the possibility of additive readings. If no
alcohol is present in a test, a second test may be analyzed immediately, since the fuel
cell voltage is already at zero. Unless the breath alcohol level of the subject is very
high, the instrument will generally be clear enough to receive and analyze a second
sample in less than two minutes.
INSTRUMENT FEATURES
1. DISPOSABLE MOUTHPIECE: For sanitary reasons, each mouthpiece is
individually packaged and sealed. A new mouthpiece should be used for each
test.
2. SAMPLING CUP: A sampling cup is reusable. Attach to the sample port and do
not allow subject to touch the sampling cup while providing a breath sample.
Remove and clean with a mild disinfectant (alcohol-free) for the next use.
3. LEVER TO REMOVE MOUTHPIECE: For sanitary reasons, the mouthpiece can
be ejected by pushing up on the lever on the left side of the Mercury.
4. TOUCH SCREEN DISPLAY: A user-friendly touch-screen displays instructions
and test results. Select the icons and buttons on the screen by using the attached
stylus pen located on the top of the instrument behind the sample port.
5. EXTERNAL POWER CONNECTORS: The 12V wall adapter can be used to
charge the printer battery. If rechargeable AA batteries are being used in the unit,
these can be recharged using the 12V auto adapter.
6. USB CONNECTOR: A USB cable can be used to download stored test records
from the Mercury onto a PC.

3
PREPARING THE MERCURY
Before using the Mercury, batteries must be installed and the unit turned on.
Installing Batteries
The Mercury is powered using 4 (AA) alkaline batteries.
To insert the batteries:
1. Remove the lower half of the back cover by sliding it down.
2. Insert the 4 batteries according to the plus (+) and minus (-) directions in the
instrument. Be sure to keep the ribbon underneath the batteries.
3. Replace the back cover.
To recharge batteries:
1. If you inserted Rechargeable AA batteries into the Mercury, they can be
recharged while inside the unit using the auto power adaptor.
2. Plug the USB end of the adapter into the right side of the Mercury and the
other end into the car.
CAUTION: Be certain there are Rechargeable Batteries in the instrument before
attempting to recharge them.
Turning On/Off
ON
Press and hold the On/Off button (right button) for 2 –3 seconds.
OFF
Press and hold the On/Off button for 2 - 3 seconds.
Note: You can choose to have the Mercury shut off automatically after 1, 2, 5 or 10
minutes of inactivity to conserve battery power.
TOUCH SCREEN CALIBRATION
If the touch screen does not appear to be responding correctly, it may need calibration.
With the instrument off, press and hold the On/Off button (right button) and then press
the Function button (left button) immediately. Follow the on screen instructions by
tapping the arrows and plus signs as accurately as possible to calibrate the screen.

4
I
ICON DESCRIPTIONS
1
Weekday Indicator
6
Standard Test
2
Time Indicator
7
Test Records
3
Date Indicator
8
Settings
4
Battery Indicator
9
Number of Tests Indicator
5
Passive Test
10
Last Calibration Date
Previous Screen/Cancel Next Screen/Confirm Main Screen
Print Repeat Test

5
IPERFORMING A BREATH TEST
Before performing a breath test, several conditions for the test site and the test subject
must be verified
Conditions for Test Site
•The ambient air should be free from alcohol, solvent vapors, and thick tobacco
smoke.
•Working temperature of the Mercury should be between 14°F to 122°F (-10ºC to
50ºC).
Note: Do not allow an unrealistically high ethanol concentration to reach the sensor,
since this can reduce the life expectancy of the unit.
Conditions for Test Subject
•The person being tested must abstain from drinking, eating, chewing gum,
chewing tobacco, smoking tobacco, using mouth spray, or taking any medications
for at least 15 minutes prior to providing a sample. (If a positive sample is given
in workplace testing, a minimum 15 minute waiting period must occur after the
initial screening test.)
•The person being tested must breathe evenly and normally before the test. The
person must also avoid repeated deep breaths (hyperventilation) as this will
temporarily cool down the breath and may lead to a false reading.
•Should the person have diminished lung capacity and cannot activate the Auto
Test, a manual override method is provided.
Note: Rinsing out the mouth with water or non-alcoholic drinks does not substitute for
the 15 minute interval between a screening test and a confirmation test.
Attaching a Mouthpiece
•Remove the disposable mouthpiece from its wrapper, making sure not to touch
the end into which the subject will be blowing.
•Snap the disposable mouthpiece onto the top of the Mercury to ensure a secure
fit.
•After use, the mouthpiece can be removed from the Mercury by using the lever on
the left of the instrument. Slide this lever up to disengage the mouthpiece without
needing to touch it.

6
Performing an Air Blank Test
The Mercury performs an Air Blank test to determine if ethanol is present in the ambient
air or if any residual alcohol is remaining from prior testing. An Air Blank test should be
performed if there is suspicion that the ambient air contains alcohol vapor, or prior test
carryover is suspected, or before a confirmatory test. The Mercury automatically
performs an air blank every time the Standard Test Icon is selected and before going
into Test Mode.
If a reading greater than 0.000% is noted on the Air Blank Result, return to the Main
Menu, wait 2-3 minutes, then select the Standard Test Icon again and check the Air
Blank Result.
MEASURING BREATH ALCOHOL CONCENTRATION (BrAC/BAC)
Passive Test:
1. Attach a sampling cup onto the sample port.
2. When Mercury displays “Please Blow”, instruct subject to take a deep
breath and blow towards the sampling cup until the beep tone changes.
3. “Alcohol Detected” or “No Alcohol” will display on the screen.
4. A manual override can be performed by selecting “Manual” while the subject
is blowing.
5. Select to start another test.
6. If alcohol is detected, use a mouthpiece to perform a standard test to obtain
an accurate reading.
7. The sampling cup should be cleaned with an alcohol-free mild disinfectant.
Screening Test results can be printed and/or stored in the test records of the
device. You can elect to save Screening Test Results, by selecting the
“Screening Results Saved” option in the Advanced Settings.
NOTE: The Screening Test (Passive Test) is used only for screening purposes to
determine if alcohol is on the breath sample. An accurate test can only be obtained
by using a Standard Test.

7
Standard Test:
1. Attach a disposable mouthpiece onto the sample port.
2. Select the Standard Test Icon on the Main Menu.
3. Instrument will display Air Blank Processing as it checks for residual alcohol
in the air or in the fuel cell.
4. Instrument will display the results of the Air Blank on screen for 6 seconds.
The time of this Air Blank will be printed with the Test Result.
5. Input information by a stylus pen, if this feature is active. (NOTE: 16
characters maximum for each input). Identifying fields, such as name,
license number, etc can be chosen by the operator and are found under the
Advanced Settings.
6. Instrument will then automatically go into Test Mode and display the next
Test Record Number.
7. When Mercury displays “Please Blow”, have subject take a deep breath and
blow until the beep tone changes. You will notice the Time (T) and Volume
(V) indicators count up from 0% to 100%.
8. Test Result displays on the screen.
9. If subject did not blow within 30 seconds, operator can select “Refuse” to
confirm the subject refused to do the test. Or operator can select “Test
Again” to allow subject to do the test again.
10. If subject failed to give a valid breath sample, operator can select
“Discontinue” to confirm, or select “Test Again” to allow subject to test again.
The Mercury will also detect if the subject attempts to suck air back through
the mouthpiece. In this case, the Mercury will display “Discontinue” or “Test
Again” instead of displaying a test result.
11. Upon completion of the test, push up on the lever on the left side of the
Mercury to remove the mouthpiece.
12. Select to print the test result, if optional wireless printer is available.
13. To take another test, attach a new mouthpiece and select . The
instrument will perform another Air Blank before going back into Test Mode
and displaying a new Test Record Number.

8
Manual Override Test:
This method can be used with either the Standard or Passive test mode when the
test subject has a diminished lung capacity and cannot activate the Automatic
Sampling system.
1. In either the Standard or Passive Test mode, when the Mercury displays
“Please Blow”, instruct the person being tested to breathe in deeply and
blow evenly into the mouthpiece for a minimum of 4 seconds.
2. While the person is blowing and after a minimum of 4 seconds, select
“Manual”.
3. After a few seconds, the measured value will display.
TEST RECORDS
1. Select the Test Records icon to view test records. Up to 16,000 test
records can be stored, depending on the length of the records.
2. Individual test records can be printed by selecting .
3. Use or to move to the previous or next record.
Connect to PC/Download Test Record:
1. Test records can be downloaded onto a PC for analysis.
2. Connect the Mercury to a PC using the USB cable.
3. Please refer to the Download to PC Instruction Booklet for downloading the
test records.

9
SETTINGS
1. Time Setting
Set correct Date and Time and select “Update” to confirm. Checking the “Use
MDY” box will record your test date in month, day, year format. You must
restart your device for this change to take effect.
2. Auto Off
Select the time limit to turn off the device automatically if it is inactive, select
to confirm.
3. Print
a. Select “Auto Print” to have a test result print automatically after each test
without having to select “print” (if the optional printer is available).
b. Select the number of copies to print for each test and select to confirm.
4. Cal. (this selection is password protected)
a. When the screen displays “Calibration Needed”, send the device in for
calibration or, if qualified, proceed to the Calibration Section in the
Advanced Settings Manual.
b. A password is needed for calibration.
5. Advanced (this selection is password protected)
Please refer to the Advanced Settings Manual.
6. Brightness
Adjusts the brightness level of the screen.
7. Bluetooth:
Your Mercury unit and its’ printer are matched at the factory prior to shipping.
Bluetooth connection will automatically be made between the unit and printer
when they are both powered on.
NOTE: The keyboard box, at the bottom of the Settings menu, must be
selected to allow for information to be input into the fields such as name,
license number etc.

10
PRINTER
Paper Handle
Paper
Power Button
Printer Operation
Battery Installation:
1. Remove the battery cover from the back of the printer by pressing the tab and
pulling it away.
2. Insert the rechargeable battery pack.
3. Replace the battery cover.
Recharging the Battery:
1. The battery can be charged while it is in the printer by connecting either the wall
or auto adapter to the corresponding connection port on the end of the printer.
2. The LED indicator light will be red while charging and will turn green when the
battery is fully charged.
Loading Printer Paper:
1. To load more printer paper in the printer, open the cover by gently lifting the half-
moon piece until the cover pops open.
2. Remove any remaining paper that may be left in the unit.
3. Unroll 1-2 inches of paper from the new roll and drop into the printer (with glossy
side up) so the paper will easily feed through.
4. Close the cover.

11
Turning On/Off:
1. Turn on the printer by pressing the power button ( ) for a few seconds until the
green light comes on.
2. Turn off the printer by pressing and holding the power button ( )until the green
light goes out.
Printing Test Results:
1. Be sure the printer is on. (Printer will shut off after several minutes of inactivity)
2. Turn on the Mercury and take an automatic or manual sample (see above).
Once the Mercury is wirelessly connected to Printer, you will see the Bluetooth
Symbol displayed near the battery indicator on screen.
3. To Print Results after a test, touch the Print Icon at the bottom of the screen
to start printing.
4. To Print from Memory:
a.Choose the Main Menu Icon
b.Highlight and Choose the Test Records Icon
c.The most recent record will appear first, to review prior records, touch the
the left arrow to click through until you find the record you want.
d.With the record to be printed showing on screen, touch the Print Icon .
e.Results will print immediately.
After results have printed, gently pull paper towards the power button to remove.
TROUBLESHOOTING (Printer):
PROBLEM CAUSE SOLUTION
Paper is blank Paper was inserted Remove paper and
after printing. incorrectly. re-insert with glossy side up.
Paper is still Printer malfunction. Return to PAS Systems Intl.
blank after switching
sides.
Printer will not Power supply to printer Recharge printer battery
turn on. has been exhausted. with charger.

12
ACCURACY CHECKING AND CALIBRATION
Accuracy testing should be performed at least once per month to ensure that BAC
readings are reliable. If the result of the accuracy test is not within the acceptable
range, the unit must be re-calibrated by PAS Systems International, Inc. or by persons
who have been properly trained for alcohol detector calibration.
Due to the sensitive nature of BAC testing, it is extremely important to keep detailed
records of both accuracy tests and recalibrations for each Mercury unit. Procedures for
recording this information are covered in BAT training and documentation when
provided.
PAS recommends all Mercury units be calibrated annually or whenever an accuracy
test shows that BAC readings are no longer within tolerance limits. Because precise
calibration is crucial, it can be performed only by PAS Systems International or by
persons who have been properly trained for alcohol detector calibration. (Calibration of
the Mercury must be performed using a NHTSA-approved wet bath simulator or
certified dry gas standard.) Successful completion of calibration should be recorded in
a calibration log. Please refer to the Quality Assurance Plan (QAP) documentation in
the next section for additional calibration requirements.
WET BATH ACCURACY CHECKING
Using wet bath simulators for accuracy checking has been the accepted method for
many years. Breath alcohol simulators are specially designed water-alcohol
instruments which provide equilibration of alcohol between water and air at a controlled
temperature.
Accuracy checking of the Mercury should be performed by authorized persons using
any NHTSA approved breath alcohol simulator.
To perform a wet bath accuracy check:
1. Pour 500 ml of 0.080% Certified Solution into the glass jar.
2. Attach a piece of tubing (6 - 8” long) to simulator inlet. Attach a regular or check-
valve mouthpiece to the end of this tubing.
3. Attach a 1 - 2” piece of tubing to the simulator outlet. Attach a mouthpiece to the
other end of this shorter tubing. Make sure the connection is air-tight.
Note: The length of tubing connected to the simulator outlet should not be longer than 2” in
order to prevent condensation.
4. Plug Simulator in and turn switch to the ON position.

13
5. Allow the solution to heat.
6. After 15 - 20 minutes, check the thermometer. The thermometer should read
34ºC when ready.
7. Attach instrument to the mouthpiece. (The opaque moisture trap can be used
should condensation appear in the mouthpiece).
8. Switch on the Mercury. Choose the icon to perform a Standard Test and wait for
instrument to perform the Air Blank test.
9. Forcefully blow into the simulator for several seconds and then press the “Maual”
button on the screen.
After a few seconds, the measured value will be displayed. The display should read
0.08% +/-0.005.
NOTE: If the result is not within published specifications for the Mercury, conduct another accuracy
check. Verify that the seal on the simulator is air-tight and that the outlet tube and mouthpiece are free
of condensation. If the measurement is still not within specifications (+/- 0.005), the unit must be
removed from service until an internal calibration can be conducted.
DRY GAS ACCURACY CHECKING
When using dry gas for accuracy testing (PAS recommends 0.080% dry gas
concentration), the alcohol concentration printed on the label of the gas cylinder must
be corrected to account for altitude when conducting tests at or above an altitude of 250
feet above sea-level. Please refer to the “Dry Gas at High Altitude” section below for
instructions on how to make the appropriate corrections for high altitude testing.
To perform the accuracy test:
1. Attach a new mouthpiece.
2. Turn on the Mercury. Select the Standard Test icon and wait for instrument to
perform the Air Blank Test. Always pre-purge the valve for a few seconds before
delivering a sample for testing.
3. Connect the Mercury to the regulator/valve of the gas cylinder (the regulator must
provide a gas flow of at least 1.5 liters per minute).
4. Depress the regulator button and allow gas to flow for 8 seconds. While the gas
is still flowing, press the “Manual” button on the screen (manual test).

14
5. After a few seconds, the measured value will be displayed. If the measured value
is within +/-0.005 BrAC of the altitude-adjusted concentration value, the Mercury
is working accurately.
Note: Suitable Dry Gas Standards and Regulators are available from PAS Systems
International, Inc. (800-660-7643)
Dry Gas at High Altitude:
The Concentration of alcohol in a dry gas standard is carefully controlled to give the
correct vapor concentration when the cylinder is at sea level. At higher elevations
(altitudes), the concentration of the alcohol in the vapor leaving the cylinder will be less.
This change in concentration at sea level is negligible, but at higher altitudes significant
errors would result if corrections were not made. Simply multiply the standard
concentration on the gas cylinder label by the factor shown for the appropriate local
altitude listing in the High Altitude Correction Chart. For example, if you have a dry gas
standard of 0.045% and you are using it at 500 feet, you would multiply the value at sea
level by the correction factor. The corrected value would be 0.045 x 0.981 = 0.044%
BAC.
HIGH ALTITUDE CORRECTION CHART
Elevation from Sea Level
Correction Factor
Corrected Value for 0.080% Dry
Gas
0
1
0.080
500
0.981
0.078
1000
0.962
0.077
1500
0.943
0.075
2000
0.925
0.074
2500
0.907
0.073
3000
0.889
0.071
3500
0.872
0.070
4000
0.854
0.068
4500
0.837
0.067
5000
0.820
0.066
5500
0.804
0.064
6000
0.787
0.063
6500
0.771
0.062
7000
0.755
0.060
7500
0.740
0.059
8000
0.724
0.058

15
QUALITY ASSURANCE PLAN (QAP)
Under the U.S. Department of Transportation workplace testing program (see 49 CFR, Part 40),
transportation employers are required to test employees working in certain safety sensitive positions for
alcohol under certain conditions. The DOT workplace testing program requires that breath test instrument
manufacturers provide employers with this Quality Assurance Plan, which together with the operation
instructions provided with the Mercury Evidential Breath Tester (EBT), will assist in assuring that breath
testers are calibrated to the required degree of accuracy.
QAP:
1. Allowed Calibration Units: Any wet bath simulator listed on the NHTSA Conforming Products List of
Calibration Units for Breath Alcohol Tests. When calibration or re-calibration (not an accuracy
check) is needed the simulator should be used with a certified BAC solution with a concentration
between 0.035% and 0.100%, following the operating manual provided by the wet bath simulator
manufacturer. Alternatively, a dry gas standard with a concentration between 0.035% and 0.100%,
which has been approved by NHTSA, may also be used.
2. External Calibration Check Interval: Calibration Checks (Accuracy Checks) should be performed:
a. Once a month (every 30 days);
b. After a positive confirmation test;
c. If the unit fails to air blank to 0.000 after 2 attempts;
d. After the unit has undergone repairs.
There is no limitation on the number of tests that may be conducted between calibration checks,
providing the monthly checks are completed.
3. External Calibration Check Tolerance: +/- 0.005%
4. Intervals for Periodic Inspection: Self-diagnostics and visual inspection by operator before every
use. Routine maintenance and service recommended every 2 years. Calibration when 2 consecutive
calibration (accuracy) checks fail (out of tolerance).
5. Events which require instrument be taken out of service: Self-diagnostics failure or indication by
error code. The power supply is not providing necessary power to the Mercury. The Mercury does
not display “Please Blow” after selecting a Standard or Screening test icon.
6. For other information regarding quality assurance unique to this instrument, see the Mercury
Calibration Manual as set forth in the Mercury Operating Manual.
Follow the operating instructions provided by the dry gas manufacturer for proper procedure to use dry
gas for calibration checks.
Instruments indicating any of the above ERRORS should be returned to PAS Systems International, Inc. for
repair. Please call PAS Systems International, Inc. Technical Service Team to describe the problem & for
more information on sending the unit in for service. Please have the serial number of the unit.
This QAP is subject to change and should neither be considered a final requirement nor a contractual
term in any agreement to purchase the Mercury.
Contact: PAS Systems Intl, Inc
215 Southport Dr. Suite 400
Morrisville, NC 27560
800-660-7643 Effective: July 2013

16
TROUBLESHOOTING
The troubleshooting table that follows is provided to help eliminate confusion and
prevent downtime by supplying corrective procedures. If problems persist, call PAS
Systems International, Inc. technical service at 800-660-7643.
PROBLEM
Touch Screen is dimly lit or slow to
respond.
CAUSE
Power supply to the unit is
completely exhausted.
SOLUTION
Change batteries.
PROBLEM
Mercury does not display “Please
Blow” when a standard or
screening test is chosen.
CAUSE
Instrument malfunction.
SOLUTION
Contact PAS Systems
International, Inc. at 800-660-
7643.
PROBLEM CAUSE SOLUTION
Mercury activates a different Touch-screen needs Follow instructions on page 14
Icon than what stylus pen touches calibration. to recalibrate the touch-screen

17
TECHNICAL SPECIFICATIONS
Product Name: Alcovisor - Mercury
Sensor: Platinum Electrochemical Fuel Cell
Accuracy: Meets DOT specifications +/- 0.005% up to 0.100 % BrAC and
+/- 5% above 0.100% BrAC
Sample Accuracy: 0.001 %
Detection Range: 0.00 to 0.400 BrAC
Response Time: 5 seconds or less
Recovery Time: Less than 1 minute
Start-up Delay: Less than 1 minute
Sampling System: Automatically takes deep lung sample or tests manually.
Breath Sample Time: Up to 10 seconds continuous breath –minimum 2.5 seconds
Unit of Measure: % BrAC, mg/l, mg/100ml, or any other units.
Working Temperature: 14º to 122º F(-10º to +50ºC)
Storage Conditions: -13º to 158º F (-25º to +70º C); 15% to 90% relative humidity.
Touch Screen Size: 2” x 1.5” touch screen (5.1 cm x 3.8 cm)
Dimensions 5.5” X 2.5” X 1.5” (13.9 cm X 6.3 cm X 3.8 cm)
Weight 0.56 lbs (254 g)
Self Diagnostics: Programmed self-check assures unit is operational upon power up.
Power Supply 4 AA batteries.
Battery Life: Not less than 500 tests
Memory: 16,000 test results.
Pump: Automatically actuated electronic pump –No cocking required.
Mouthpiece: Affordable, sanitary, and individually wrapped.
Calibration: Annually with monthly accuracy checks. Use Wet Bath or Dry
Gas.
Printer: Wireless Printer. Paper size 6cm x 1000cm.
USB Computer interface connection.
Other manuals for Mercury
1
This manual suits for next models
1
Table of contents
Other Alcovisor Test Equipment manuals

Alcovisor
Alcovisor Mercury User manual

Alcovisor
Alcovisor Saturn User manual

Alcovisor
Alcovisor Jupiter User manual

Alcovisor
Alcovisor BAC-100 User manual

Alcovisor
Alcovisor Jupiter User manual

Alcovisor
Alcovisor Satellite User manual

Alcovisor
Alcovisor Alpha User manual

Alcovisor
Alcovisor Deimos User manual

Alcovisor
Alcovisor Beta User manual

Alcovisor
Alcovisor Jupiter User manual