All Things Garage Tote Slide User manual

Tote%Slide!"#$%&''&%()#!*+(,-!%
!
!
./01"2345!%
%
%
Please%read%through%all%installation%instructions%before%beginning%installation%of%your%Tote%Slide.%%
%
We%recommend%you%always%use%safety%glasses/goggles%when%installing%Tote%Slide.%%
%
Only%use%totes%that%have%a%straight%sides%and%snap-on,%folding,%or%locking%lid.%Your%totes%need%to%
have%an%unobstructed%lip%that%extends%at%least%3/8”%from%the%sides.%(See%below).%
%
%

DO%NOT%use%any%totes%with%sides%that%are%rounded%or%bowed,%or%that%have%interference%along%
the%sides%underneath%the%lip,%or%any%totes%or%lids%that%are%cracked.%
%
%
%
6&78!1)%-!4'(,-!$9$%-:!(#7'+,-$5!!
%
2%–%74”%Support%Rails:%
%
%
4%–%88”%Slide%Rails:%
%

8%–%Sliding%Strut%“T”%Nuts:%
%
8%–%5/16”%–%18%UNC%x%3¼”%Grade%5%Bolts:%
%
5/16”%Flat%Washers:%
%
8%–%¼”%x%3”%Grade%5%Lag%Screws:%
%

8%–%¼”%Flat%Washers:%
%
%
1))'$5!%
To%install%Tote%Slide,%you%will%need:%%
•%Measuring%tape%%
•%8%foot%Ladder%%
•%Stud%finder%%
•%Marking%pencil%%
•%1/2%inch%wrench%%
•%Electric%drill%with%a%1/8%inch%drill%bit%%
•%Electric%screwdriver%with%a%7/16%socket%%
•%Safety%glasses/goggles%
%
"#$%&''&%()#!"#$%;+7%()#$5!
!
%
<= To%begin,%select%a%mounting%area%on%your%ceiling%of%approximately%7%feet%by%8%feet,%with%
an%additional%24%inches%of%open%space%on%one%side%for%loading%and%unloading%totes.%(See%
example%below).%%
%
%

Tote%Slide%can%be%mounted%anywhere%with%enough%vertical%clearance,%even%over%a%garage%
door.%The%amount%of%clearance%you%will%need%will%be%the%height%or%depth%of%your%tote,%plus%4%
inches.%
%
%
%
The%support%rails%can%be%mounted%perpendicular%(across)%the%trusses:%
%
Or%parallel%(along)%the%trusses:%

%
%
%
%
It’s%even%possible%to%offset%the%support%rails%so%that%your%slide%rails%are%at%an%angle,%creating%an%
infinite%number%of%ways%to%organize%and%access%your%totes.%
%
%
%
>= Locate%your%overhead%support%structure%to%hold%the%weight%of%the%Tote%Slide%and%your%
totes.%Use%your%stud%finder%to%locate%the%position%and%direction%of%all%trusses%within%the%
mounting%area%you%selected%and%mark%them%with%your%pencil.%%
%

%
%
./01"235!Only%mount%the%Tote%Slide%onto%a%wooden%structure.%?2!321!attempt%to%mount%onto%
any%metal%structure,%drywall%or%any%material%that%may%need%a%molly%or%anchor.%DO%NOT%load%
more%than%500%lbs.%on%to%your%Tote%Slide%and%no%more%than%35%lbs.%per%tote.%
%
%
%
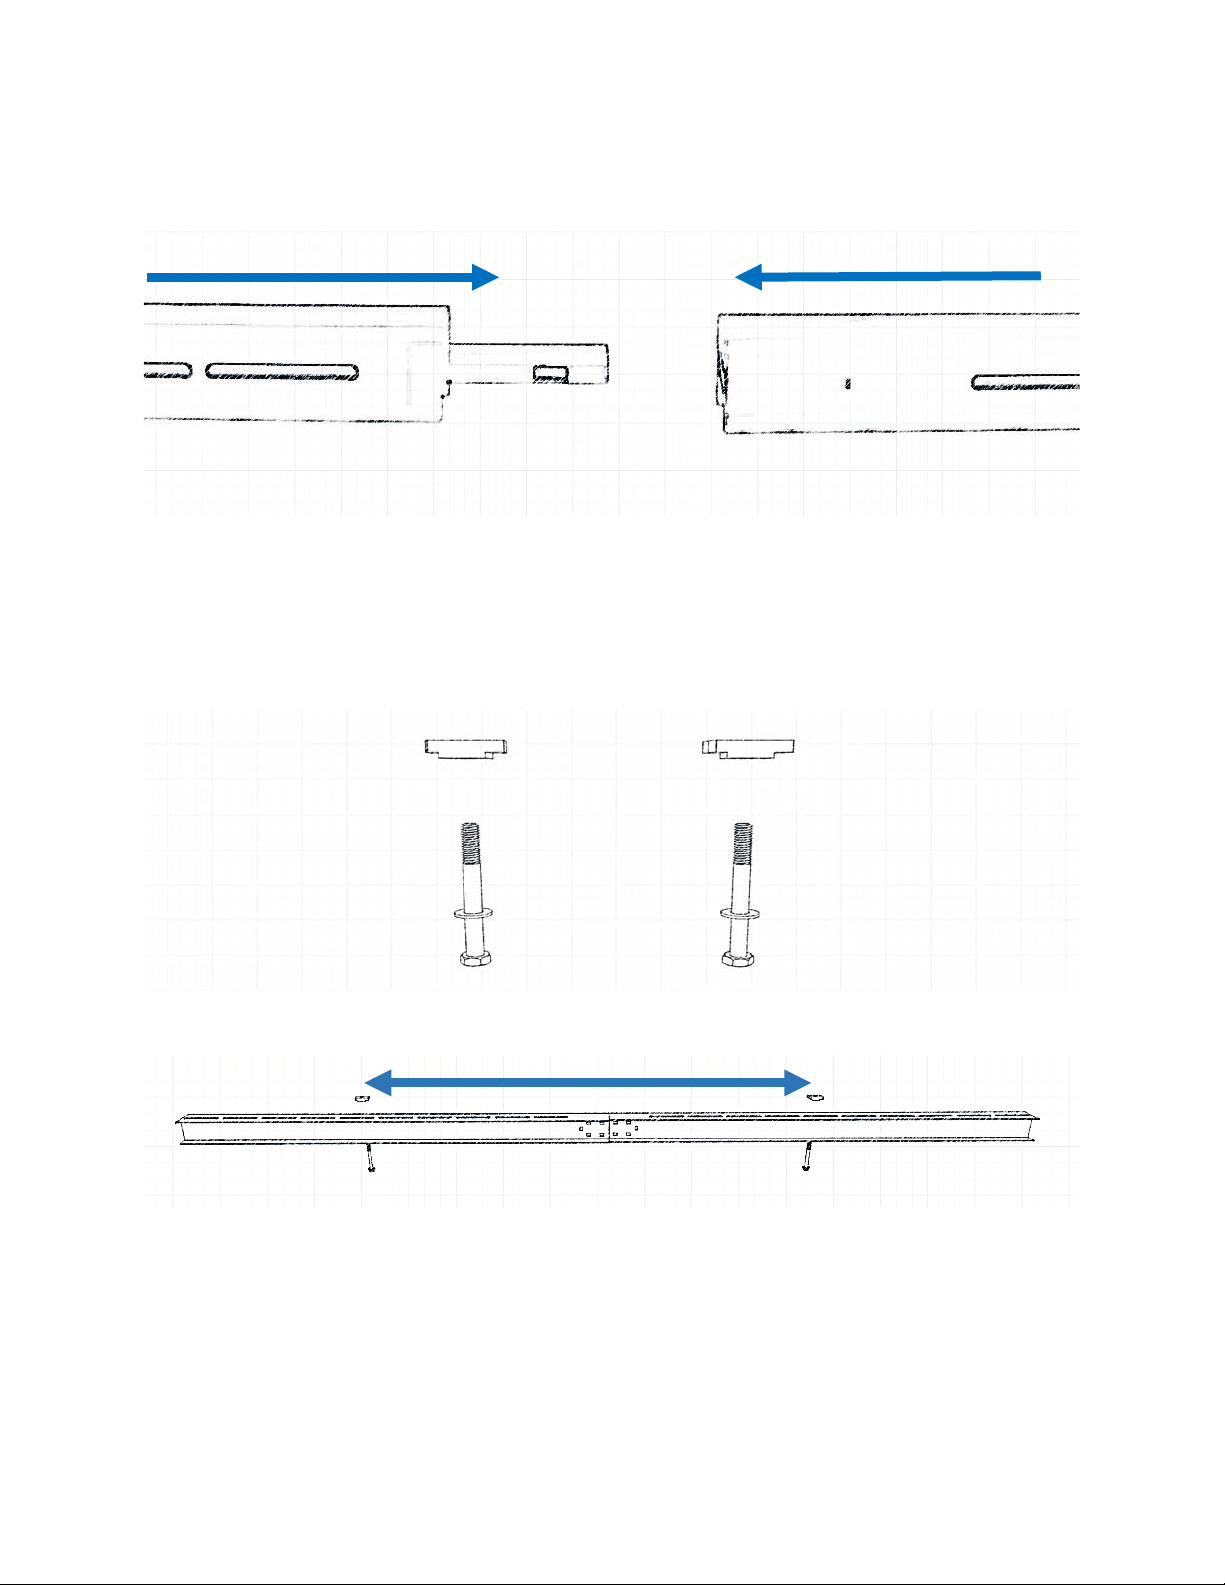
@= Assemble%both%sets%of%support%rails%by%sliding%the%male%end%of%one%rail%into%the%female%
end%of%the%other.%%
%
%
Tap%the%ends%of%the%rails%into%place%with%a%hammer%or%by%carefully%tapping%them%on%the%ground.%%

%
Decide%which%direction%you%will%want%to%slide%your%tote%bins%in%and%out.%The%support%rails%must%
be%A-;A-#,(7+'&;%to%the%direction%you%want%to%slide%your%totes.%
%
%
%
Make%sure%you%have%about%24%inches%of%empty%ceiling%on%the%open%end%that%you%will%use%to%load%
your%totes%into%the%Tote%Slide.%
%
%
Use%the%4%lag%screws%B(%8!CD!E'&%!B&$8-;$%to%secure%each%of%the%support%rails%to%the%ceiling%
trusses.%Start%with%the%screws%near%each%end.%%
%
The%lag%screws%should%be%equally%spaced%as%possible%along%the%support%rail,%with%the%first%and%
last%screws%no%more%than%6%inches%from%the%end.%

%
%
%
F= Measure%and%mark%where%each%of%the%end%lag%screws%will%be%placed%before%pre-drilling%
both%holes%with%a%1/8%inch%drill%bit.%Have%someone%assist%you%by%holding%the%opposite%
end%of%the%support%rail%as%you%drive%in%the%first%lag%screw.%Drive%the%second%lag%screw%in%at%
the%other%end%of%your%support%rail,%then%pre-drill%and%drive%in%the%two%in%the%middle.%G-!
$+;-!%)!A'&7-!&''!%8-!'&H!$7;-B$!,(;-7%'9!(#!%8-!7-#%-;!)E!9)+;!$+AA);%!%;+$$I%Failure%to%
secure%all%lag%screws%directly%into%the%center%of%your%support%truss%may%result%in%damage%
and/or%injury.%
%
%
J= Now%install%your%second%support%rail%parallel%to%the%first.%%
%
%
Measure%about%44%to%52%inches%of%space%from%your%first%rail,%depending%on%the%spacing%of%your%
overhead%support%trusses.%/H&(#K!L-!$+;-!%)!A'&7-!&''!%8-!'&H!$7;-B$!,(;-7%'9!(#!%8-!7-#%-;!)E!
9)+;!$+AA);%!%;+$$I%Again%start%by%pre-drilling%for%the%two%end%lag%screws.%Mount%the%support%
rail%and%drive%in%the%lag%screws%at%each%end.%Then%pre-drill%and%drive%in%the%two%middle%screws,%
just%like%you%did%for%the%first%support%rail.%
%
M= Now%assemble%all%four%sets%of%slide%rails.%Using%the%same%gentle%tapping%method%as%
before,%insert%the%male%end%of%each%rail%into%the%female%end%of%its%matching%rail.%Do%not%
insert%into%the%end%with%a%slot.%Insert%into%the%end%with%the%notch%(see%example%below).%
%
%
N= Next,%measure%the%distance%between%your%support%rails.%%
Install%2%sets%of%bolts,%washers%and%strut%“T”%nuts%roughly%the%same%distance%apart%as%
your%support%rails.%
%
%
%
% % % % % Width%of%Support%Rails%
%
Place%each%bolt%with%the%washer%through%the%bottom%of%the%slide%rail%and%loosely%hand-tighten%it%
into%the%strut%“T”%nut.%
At%this%point,%we%suggest%installing%the%hardware%into%all%four%slide%rails%using%the%same%spacing.%
%

%
%
O= Once%the%bolts%are%attached,%mount%the%first%slide%rail%to%the%support%rails%by%twisting%the%
strut%“T”%nuts%90%degrees%and%pushing%them%up%into%the%support%rails.%Now%turn%them%
clockwise%90%degrees%and%let%the%strut%“T”%nut%rest%in%the%support%rail.%
%
P= Before%tightening%the%bolt,%measure%from%the%wall%or%from%the%end%of%the%support%rail%
and%move%the%slide%rail%so%that%both%ends%are%perpendicular%to%the%support%rails.%Tighten%
the%bolts%to%secure%the%slide%rail%in%place.%Be%cautious%that%you%don’t%bend%or%distort%the%
slide%rail%when%tightening.%%
%
%
<Q= Before%mounting%your%second%slide%rail,%determine%how%far%apart%the%slide%rails%should%be%
by%measuring%your%tote%at%the%position%shown,%just%below%the%lip.%%
%
%

%
<<= %Now%mount%your%second%slide%rail%using%the%same%method%you%did%for%the%first.%Using%
the%measurement%from%your%tote,%position%your%second%rail%the%correct%distance%from%
your%first%slide%rail.%%
%
Measure%the%distance%between%the%first%and%second%slide%rails%at%each%end%and%adjust%the%
slide%rail%to%the%correct%measurement.%Tighten%down%both%bolts,%again%making%sure%that%you%
don’t%bend%or%distort%the%slide%rail%when%tightening.%
%
<>= Check%that%your%rails%are%parallel%and%the%correct%distance%apart%by%sliding%a%tote%
between%them.%Without%any%play%from%side%to%side,%your%tote%should%be%able%to%slide%
back%and%forth%easily.%%
*Hint:%We%recommend%using%an%empty%tote%to%test%that%the%tote%slides%snugly%yet%
freely%along%slide%rail.%%
%
<@= Repeat%these%steps%for%the%next%two%slide%rails.%Check%that%all%the%bolts%are%tight%without%
distorting%the%rails%and%confirm%that%your%rails%are%properly%spaced%so%that%your%totes%fit%
snuggly.%%
Now%you’re%ready%to%start%using%your%new%Tote%Slide!%We%hope%your%Tote%Slide%provides%years%of%%
value%and%is%just%one%of%the%many%fine%products%you%utilize%from%the%%‘All%Things%Garage’%brand%
product%line.%%Our%goal%is%to%assist%our%valued%customers%in%getting%and%staying%organized,%‘From%
ceiling%to%floor%and%a%whole%lot%more!’%
%
%
<ROMMR@><RQOQP!
Popular Storage manuals by other brands
Arrow Storage Products
Arrow Storage Products EG1412AB owner's manual

Imation
Imation Atom 1GB specification

QNAP
QNAP QTS+Android TAS-168 manual

Seagate
Seagate IRONWOLF PRO NAS ST16000NE000 product manual

Seagate
Seagate Skyhawk Surveillance 512E product manual

Seagate Technology
Seagate Technology BARRACUDA ST5000LM000 product manual


