RAIDAGE EAGE1040TG-SAU3 User manual

EAGE8402TG-SAU3
EAGE540TG-SAU3
EAGE1040TG-SAU3
EAGE4402TG-SAU3

USB 3.0 Series|EAGE8402TG-SAU3|EAGE4402TG-SAU3User’s Manual 1
EAGE8402TG-SAU3 EAGE4402TG-SAU3
■Content
page
1
2
3
4
5
6
7
8
9
10
2.5” HDD
EAGE8402TG-SAU3 & EAGE4402TG-SAU3
A. Product Overview -Front
B. Product Overview -Rear
C. Switching Power Supply Voltage
D. Install 2.5” Hard Drive
E. Power ON/OFF System
F. Locking and Unlocking Door
G. Connect to Your Computer
H. iStarUSAcare
3.5” HDD
EAGE1040TG-SAU3 & EAGE540TG-SAU3
A. Product Overview -Front
B. Product Overview -Rear
C. Switching Power Supply Voltage
D. Install 3.5” Hard Drive
E. Power ON/OFF System
F. Locking and Unlocking Door
G. Connect to Your Computer
H. iStarUSAcare

USB 3.0 Series|EAGE8402TG-SAU3|EAGE4402TG-SAU3User’s Manual 2
1
4
5
6
6
4
8
12
3
1
2
3
2
7
9
9
8
7
9
8
7
5
3
POWER LED
HDD ON/OFF SWITCH & LED
KEY LOCK
4
5
6
POWER SWITCH
AC INLET
110V/220V SWTICH
7
8
eSATA CONNECTOR
60mm FAN
9USB 3.0 (type B) CONNECTOR
LED Behavior
Color
Solid Green
POWER LED
System Power ON
System Power OFFOff
Status
Color
Solid Blue
HDD LED
*please note: some of SSDs (Solid-State Drive) do not support access (read/write) signal.
HDD Power ON
Drives Working (Read/Write)Blinking Blue
HDD Power OFFOff
Status
EAGE8402TG-SAU3 EAGE4402TG-SAU3 EAGE8402TG-SAU3 EAGE4402TG-SAU3
AProduct Overview - Front BProduct Overview - Rear

USB 3.0 Series|EAGE8402TG-SAU3|EAGE4402TG-SAU3User’s Manual 3
CSwitching Power Supply Voltage
115
230
1. Switch to right voltage setting before turning on power switch
*CAUTION:
Ensure the power supply voltage selector switch is correctly set for
your region before use
Wrong voltage setting will cause damages on devices
1. Turn the key clockwise to lock the door
2. Turn the key counterclockwise to unlock the door
*CAUTION:
To prevent drive failures or data loss,
unmount the device in OS before powering off hard disk bay
2
3
2. Tighten two hand screws to secure HDD tray
3. Push individual power buttons to power on each hard drive
4. Push power buttons again to power off hard drives
1. Make sure power switch in the back of chassis is in ON position
1
EPowering ON/OFF System
FLocking and Unlocking Door
DInstalling 2.5” Hard Drive
1
23
1. Pull HDD tray out
2. Install 2.5 HDD onto tray
3. use four M3 screws to secure 2.5” HDD to tray

USB 3.0 Series|EAGE8402TG-SAU3|EAGE4402TG-SAU3
4
User’s Manual
GConnect to Your Computer by USB 3.0
EAGE8402TG-SAU3
EAGE4402TG-SAU3
Two USB 3.0 (type B to type A) cables are required.
one for disk 1~4, second for disk 5~8.
One USB 3.0 (type B to type A) cable is required.
*please make sure all the cable connectors are secured (locked) properly.
eSATA Cable
USB 3.0 (type B to type A) Cable
eSATA Cable
GConnect to Your Computer by eSATA
EAGE8402TG-SAU3
EAGE4402TG-SAU3
Raid Control Card
Two eSATA cables are required.
one for disk 1~4, second for disk 5~8.
One eSATA cable is required.
*please make sure all the cable connectors are secured (locked) properly.
EAGE8402TG-SAU3 requires a controller that supports Port
Multiplier function with two eSATA connectors.
EAGE4402TG-SAU3 requires a controller that supports Port
Multiplier function with one eSATA connector.
USB 3.0
Please use USB 3.0 cables to ensure maximum data transfer
performance when connected to a compatible USB 3.0
port. The devices will also work when connected to a USB
2.0 or 1.1 port, but the performance will be limited to their
respective transfer rates.

USB 3.0 Series|EAGE8402TG-SAU3|EAGE4402TG-SAU3
5
User’s Manual
iStarUSAcare
H
We will help you navigate our website to find the information that you
need. Go to www.istarusa.com , and click on live chat bubble above the
Search Bar.
Our technicians are standing by to take your questions.
Visit http://istarusa.com/support/ , and you will receive a technical
support ticket to help track your requests from the beginning to the end.
Or you can contact us @888-989-1189
Copyright:
Copyright © 2014 by iStarUSA Global, all rights reserved. No part of this publication may be repro-
duced, transmitted, transcribed, stored in a retrieval system, translated into any language, in any
form or by an means or otherwise, without the prior written permission of iStarUSA Global. 727
Phillips Dr., City of Industry, CA 91748.
iStarUSA Global reserves the right to make modification and additions to this product and manual
without notice or taking any liability.
Disclaimer:
iStarUSA Global assumes no liability for errors or omissions in this document. Nor does iStarUSA
Global make any commitment to update the information contained herein. Pictures in this docu-
ment are for demonstration purpose only and may not be the same as the actual product.

USB 3.0 Series|EAGE1040TG-SAU3|EAGE540TG-SAU3User’s Manual 6
EAGE540TG-SAU3EAGE1040TG-SAU3
■Content
page
6
7
8
9
10
3.5” HDD
EAGE1040TG-SAU3 & EAGE540TG-SAU3
A. Product Overview -Front
B. Product Overview -Rear
C. Switching Power Supply Voltage
D. Install 3.5” Hard Drive
E. Power ON/OFF System
F. Locking and Unlocking Door
G. Connect to Your Computer
H. iStarUSAcare

USB 3.0 Series|EAGE1040TG-SAU3|EAGE540TG-SAU3User’s Manual 7
EAGE1040TG-SAU3 EAGE540TG-SAU3 EAGE1040TG-SAU3 EAGE540TG-SAU3
1
2
3
1
2
3
POWER LED
HDD ON/OFF SWITCH & LED
KEY LOCK
4
5
6
120mm FAN
eSATA CONNECTOR
POWER SWITCH
7
8
AC INLET
USB 3.0 (type B) CONNECTOR
9110V/220V SWTICH
LED Behavior
Color
Solid Green
POWER LED
System Power ON
System Power OFFOff
Status
Color
Solid Blue
HDD LED
*please note: some of SSDs (Solid-State Drive) do not support access (read/write) signal.
HDD Power ON
Drives Working (Read/Write)Blinking Blue
HDD Power OFFOff
Status
AProduct Overview - Front BProduct Overview - Rear
2
3
1
6
4
4
5
5
6
7
7
4
9
8
8
9
8
5

USB 3.0 Series|EAGE1040TG-SAU3|EAGE540TG-SAU3User’s Manual 8
CSwitching Power Supply Voltage EPowering ON/OFF System
FLocking and Unlocking Door
DInstalling 3.5” Hard Drive
1
2 3
1. Pull HDD tray out
2. Install 3.5 HDD onto tray
3. use four #6-32 screws to secure 3.5” HDD to tray
1. Turn the key clockwise to lock the door
2. Turn the key counterclockwise to unlock the door
1. Switch to right voltage setting before turning on power switch
*CAUTION:
Ensure the power supply voltage selector switch is correctly set for
your region before use
Wrong voltage setting will cause damages on devices
115
230
*CAUTION:
To prevent drive failures or data loss,
unmount the device in OS before powering off hard disk bay
2. Tighten two hand screws to secure HDD tray
3. Push individual power buttons to power on each hard drive
4. Push power buttons again to power off hard drives
1. Make sure power switch in the back of chassis is in ON position
3
2
1

USB 3.0 Series|EAGE1040TG-SAU3|EAGE540TG-SAU3User’s Manual 9
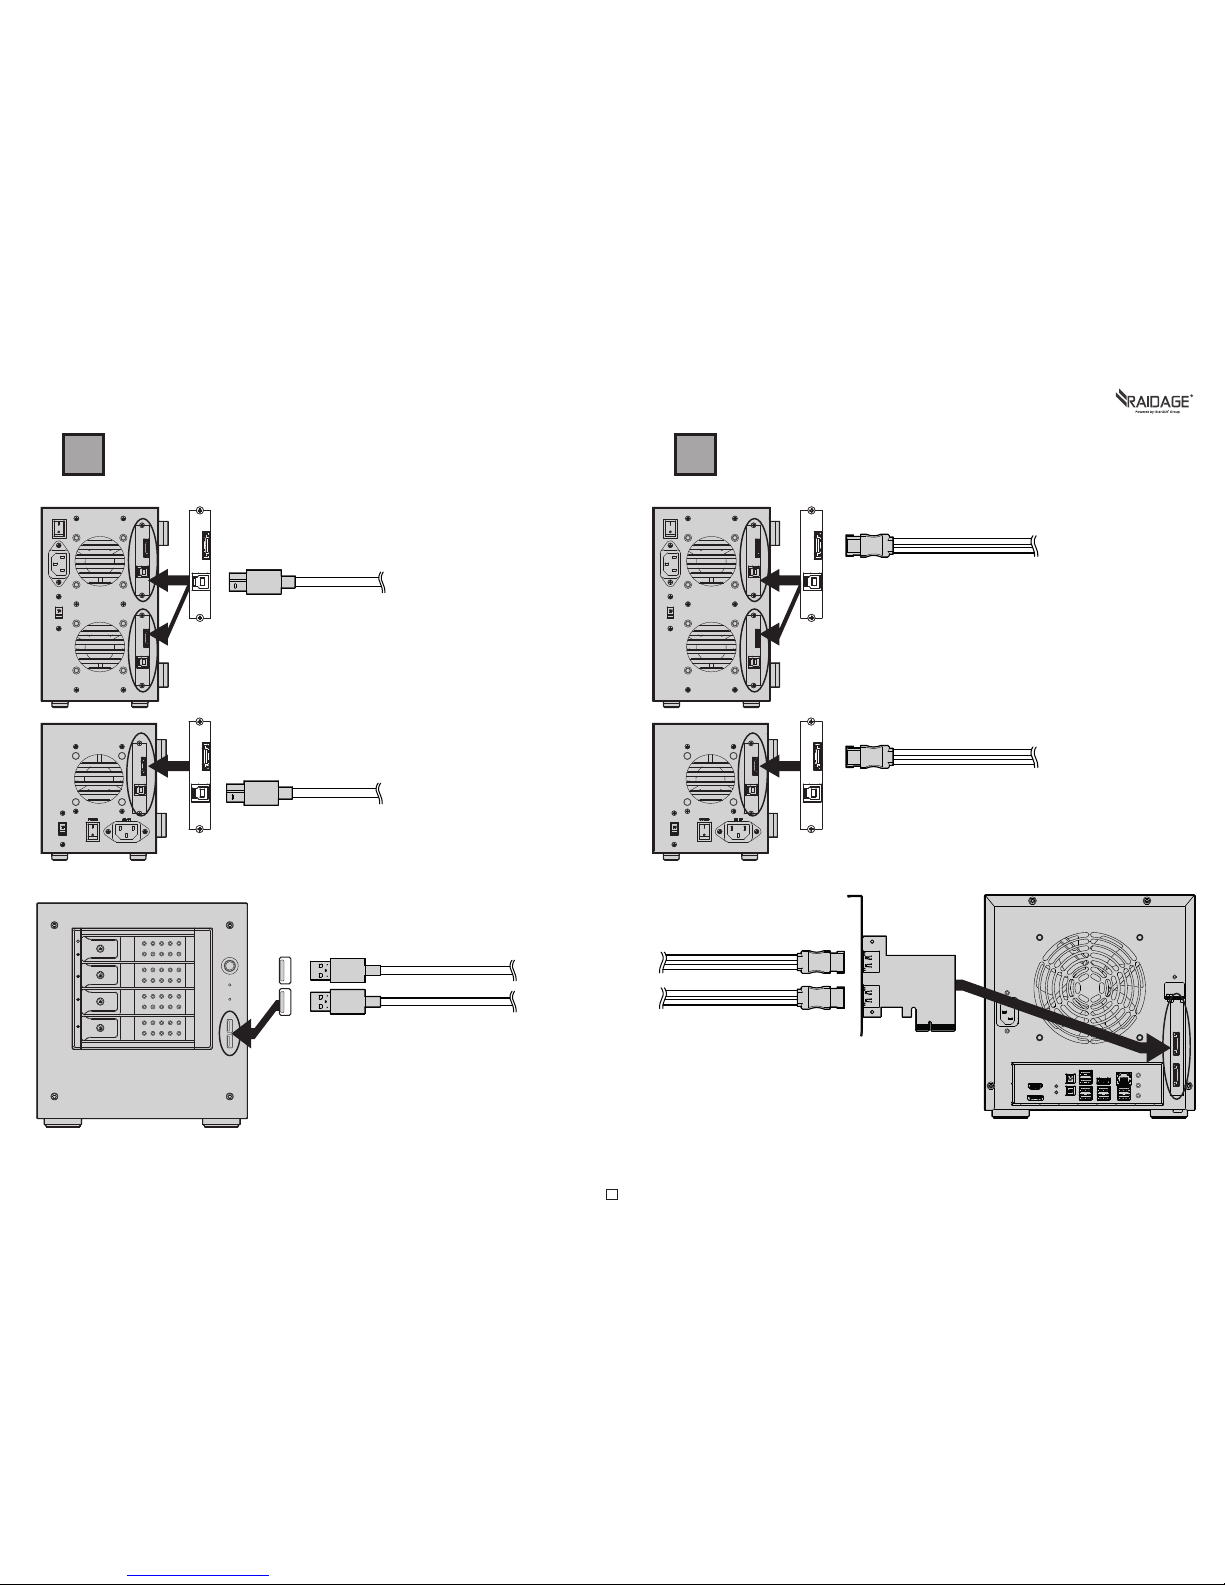
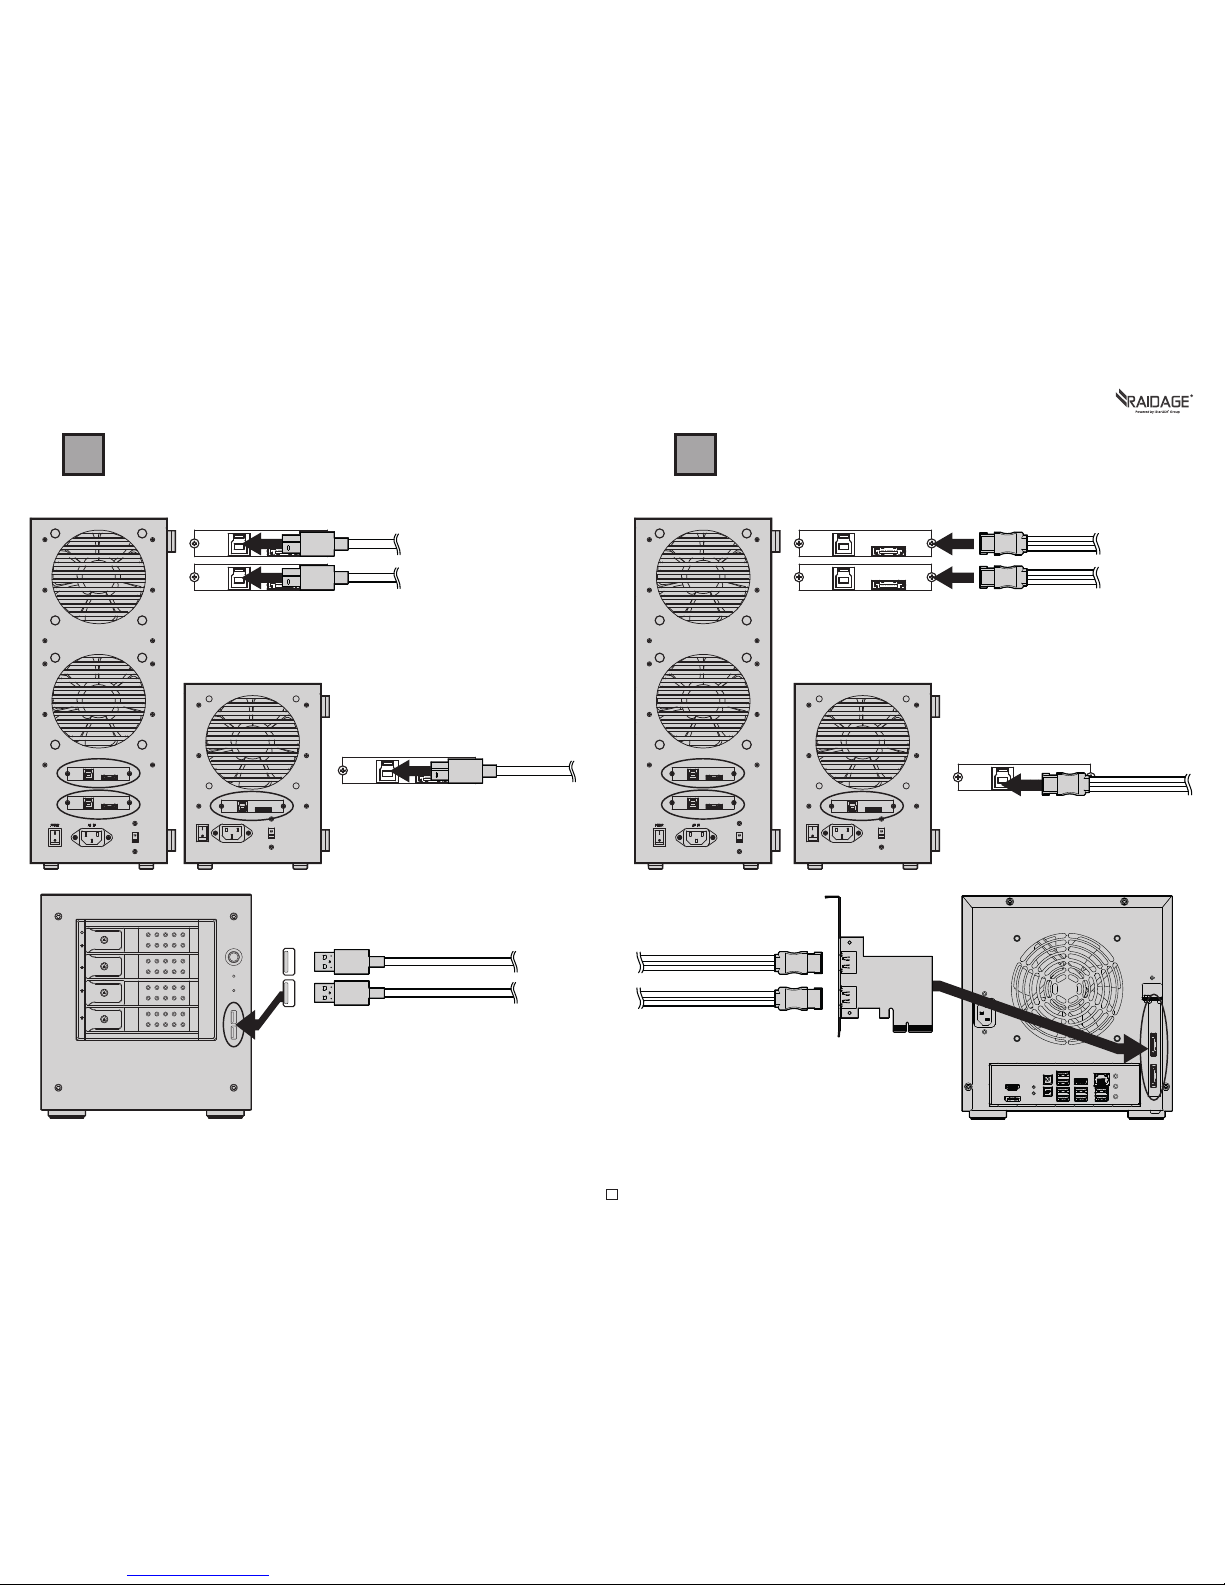
GConnect to Your Computer by USB 3.0 GConnect to Your Computer by eSATA
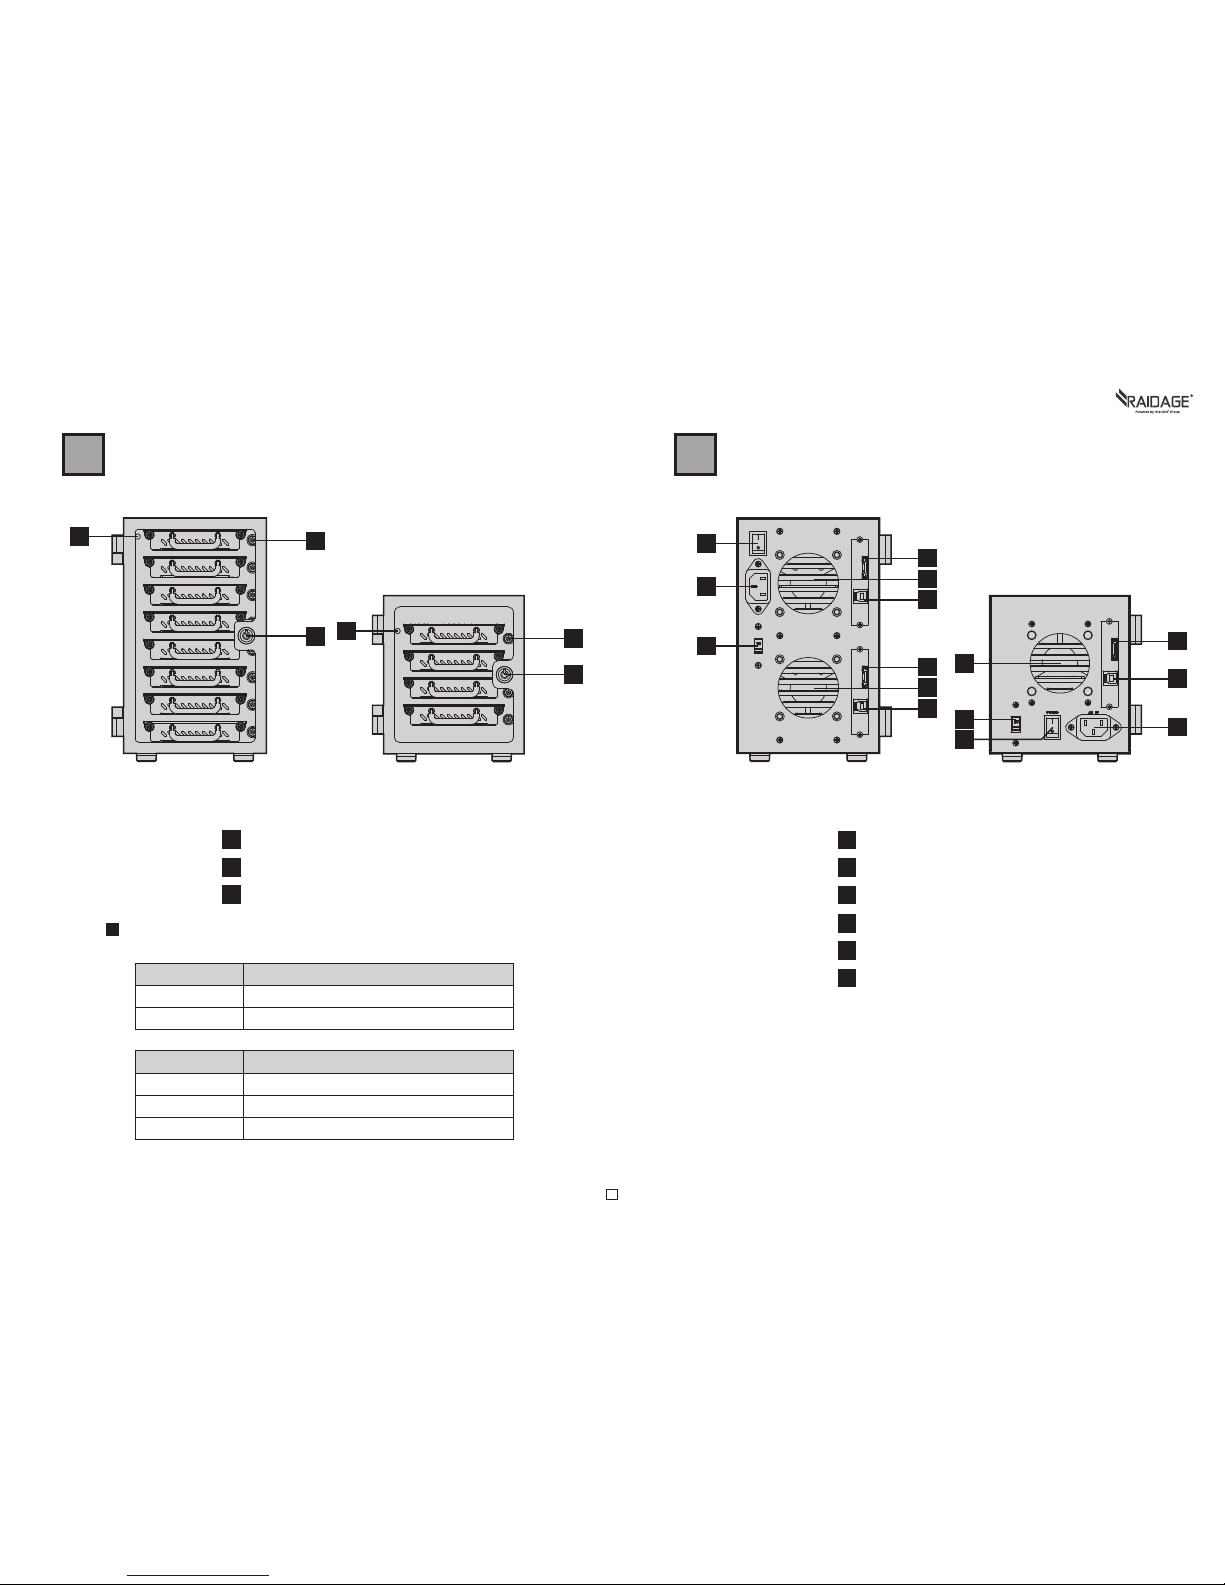
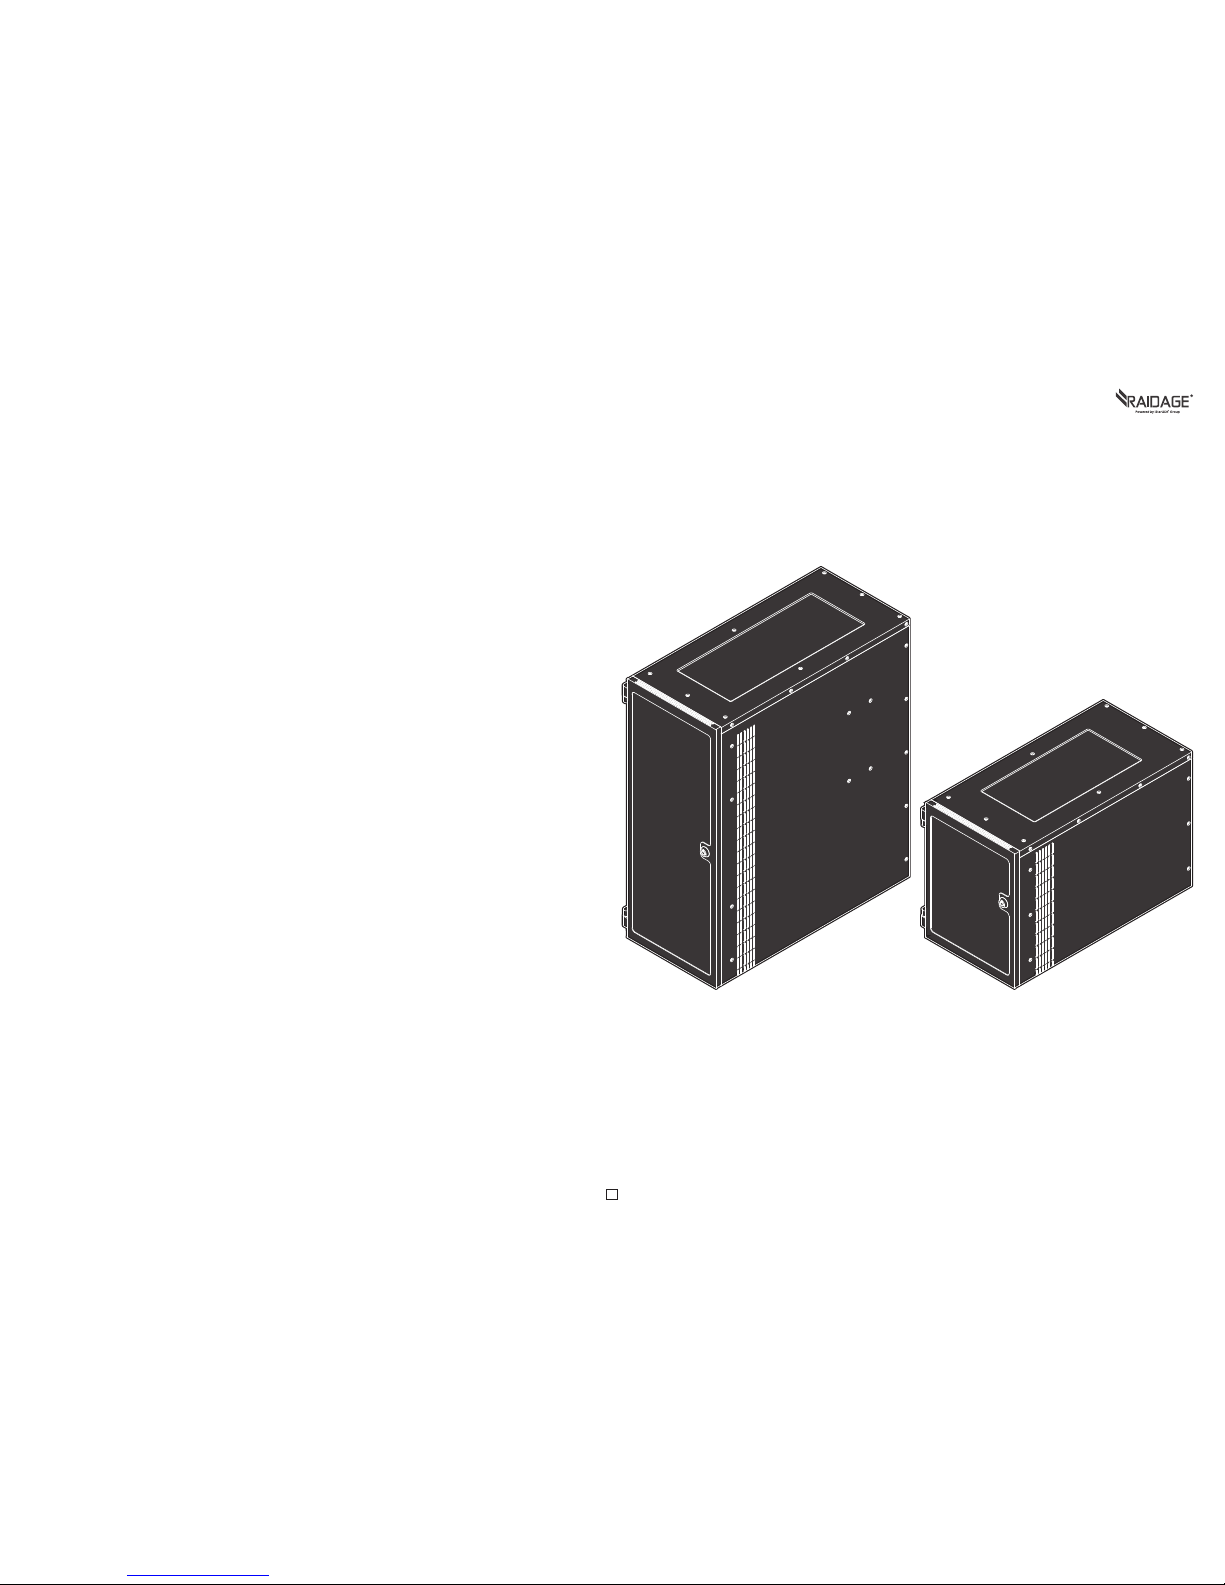
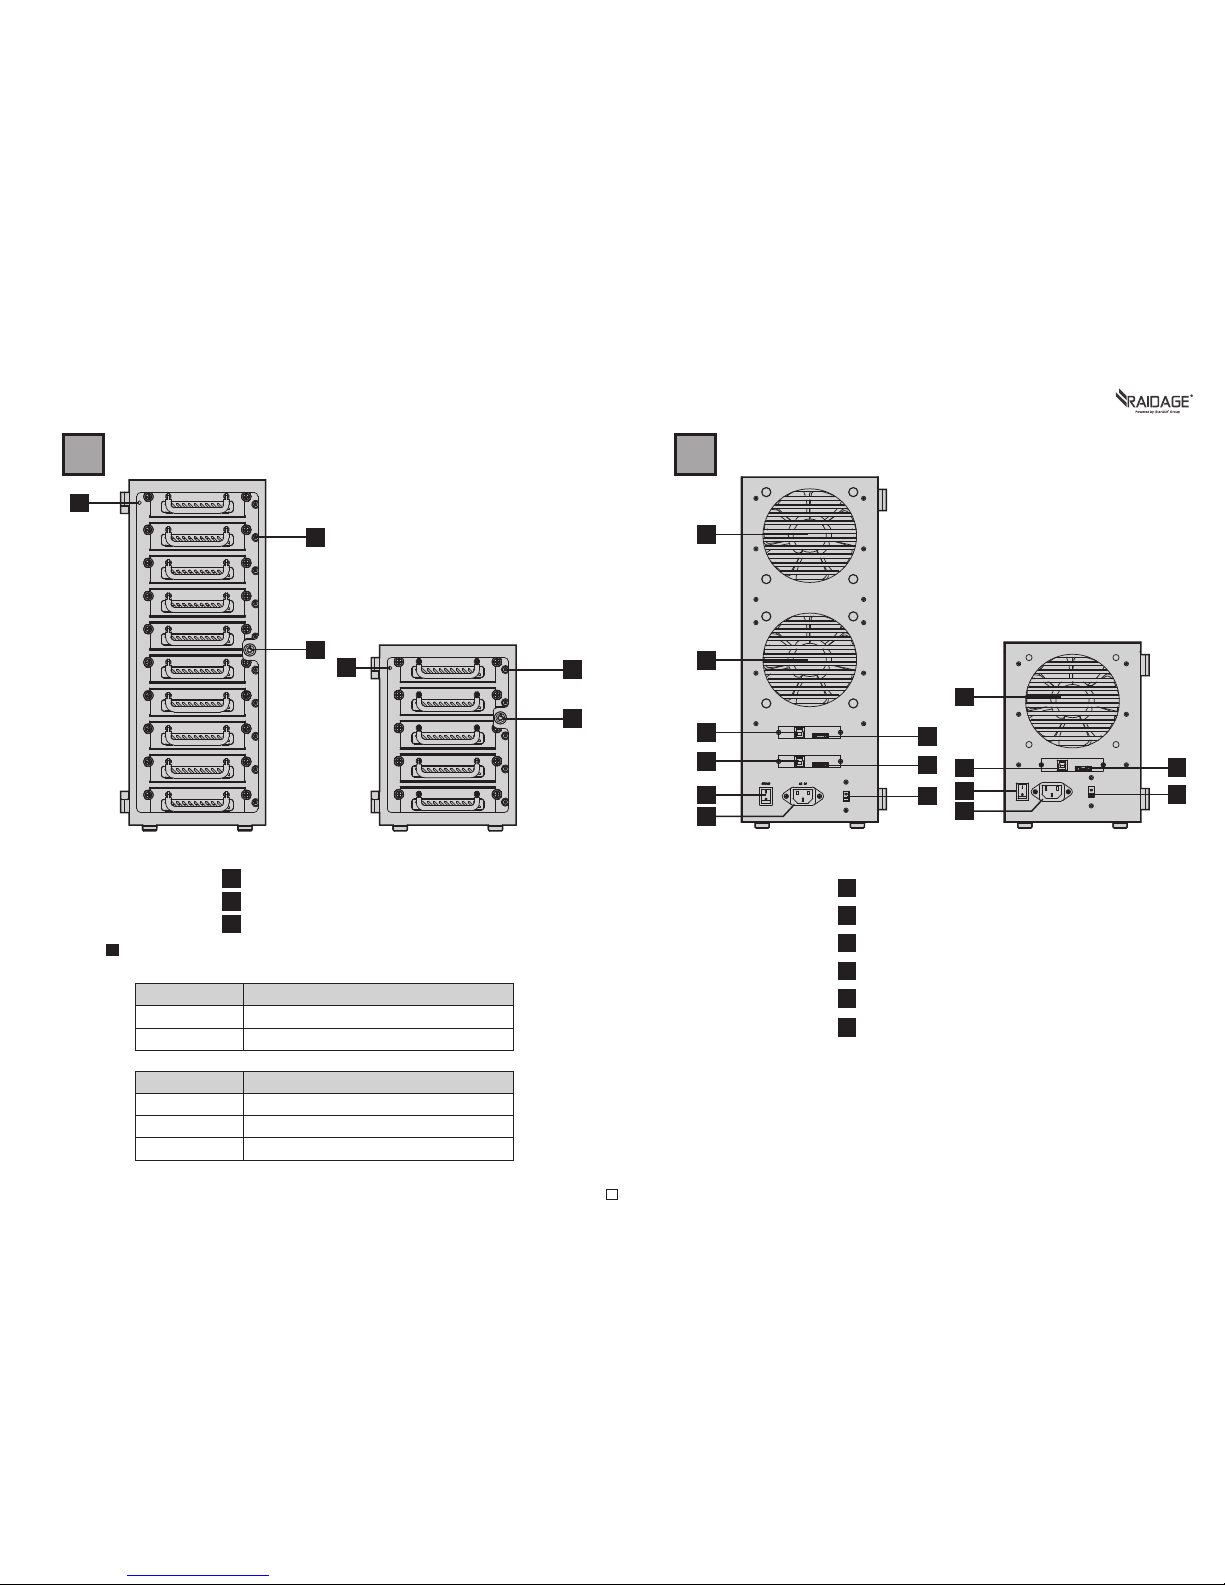
EAGE1040TG-SAU3
EAGE540TG-SAU3
Raid Control Card
eSATA Cable
Two eSATA cables are required.
one for disk 1~5, second for disk 6~10.
One eSATA cable is required.
*please make sure all the cable connectors are secured (locked) properly.
EAGE1040TG-SAU3 requires a controller that supports Port
Multiplier function with two eSATA connectors.
EAGE540TG-SAU3 requires a controller that supports Port
Multiplier function with one eSATA connector.
eSATA Cable
eSATA Cable
EAGE1040TG-SAU3
EAGE540TG-SAU3
Two USB 3.0 (type B to type A) cables are required.
one for disk 1~5, second for disk 6~10.
One USB 3.0 (type B to type A) cable is required.
USB 3.0
*please make sure all the cable connectors are secured (locked) properly.
Please use USB 3.0 cables to ensure maximum data transfer
performance when connected to a compatible USB 3.0
port. The devices will also work when connected to a USB
2.0 or 1.1 port, but the performance will be limited to their
respective transfer rates.
USB 3.0 (type B to type A) Cable

USB 3.0 Series|EAGE1040TG-SAU3|EAGE540TG-SAU3User’s Manual 10
H
We will help you navigate our website to find the information that you
need. Go to www.istarusa.com , and click on live chat bubble above the
Search Bar.
Our technicians are standing by to take your questions.
Visit http://istarusa.com/support/ , and you will receive a technical
support ticket to help track your requests from the beginning to the end.
Or you can contact us @888-989-1189
Copyright:
Copyright © 2014 by iStarUSA Global, all rights reserved. No part of this publication may be repro-
duced, transmitted, transcribed, stored in a retrieval system, translated into any language, in any
form or by an means or otherwise, without the prior written permission of iStarUSA Global. 727
Phillips Dr., City of Industry, CA 91748.
iStarUSA Global reserves the right to make modification and additions to this product and manual
without notice or taking any liability.
Disclaimer:
iStarUSA Global assumes no liability for errors or omissions in this document. Nor does iStarUSA
Global make any commitment to update the information contained herein. Pictures in this docu-
ment are for demonstration purpose only and may not be the same as the actual product.
iStarUSAcare
This manual suits for next models
3
Table of contents
Popular Storage manuals by other brands

Proware
Proware SB-1413-UA Installation and configuration manual

HP
HP AJ765A - StorageWorks RDX Removable Disk Backup... release note

ATTO Technology
ATTO Technology FastStream SC 5300 Performance Benchmark

QNAP
QNAP TVS-951 Series user guide

Sony
Sony HD-B1 operating instructions

iStorage
iStorage diskAshur SSD user manual

HP
HP VS80 - StorageWorks DLT VS 80 Tape Drive Getting started guide

WiebeTech
WiebeTech RT5E User manual addendum

Synology
Synology DiskStation DS423 product manual

MicroNet
MicroNet apple Hardware guide

Hitachi
Hitachi 88-06-0x Hardware reference guide

Seagate
Seagate ST936701LC - Savvio 36.7 GB Hard Drive datasheet