allen Domestic User manual


1 2
43
5
6
7c
7b
7a 7
7d
Page 1

Page 2
Page 3
A
OFF
ON
E
H
I
D
C
B
F
G
816
9
10 11
12
151413
17
18 19

Page 4
Page 5
1
2
3
1
1
2
3
3
4
5
6
7
8
9
10
8
10
10
11
11
15
12
13
14
16 17
18
19
20
21
22
25
23
24
20 21
23 24
22

Page 6
Page 7
Read the user instructions carefully to make sure that you understand all of the controls and
what they do.
Always keep the lawntrimmer on the ground when mowing. Lifting or tilting the lawntrimmer
may cause objects to be thrown out.
Disconnect spark plug, before replacing any spare parts and when unit is put away for storage.
Keep bystanders at a safe distance. Do not mow whilst people, children or pets are in the
mowing area.
The wearing of sensible footwear is recommended
The wearing of ear defenders is recommended
Warning
PARTS LIST and EXPLANATION OF
WARNING SIGNS
ASSEMBLING THE UNIT
Ref Part No. Description Qty
1 H292276 Grip Handlebar 2
2 H290321 Upper Handlebar 1
3 H190139 Kit-Throttle Securing 1
4 H292397 Cable Assembly 1
5 H290322 Lower Handlebar 1
6 H192204 Handwheel 2
7 H292026 U Bolt 2
8 H290265 Upstop Securing 1
9 H290219 Footstop 1
10 H290097 Kit: Lower Handle Securing 2
11 H290267 Kit: Engine securing 1
12 H290003 Kit: Engine mounting 1
13 H292279 Setscrew M4 2
14 H292269 Upstop bracket 1
15 H290325 Deck assembly - Grey 1
16 H290004 Kit: Engine frame to deck 1
17 H292329 Woodruff key 1
18 H192267 Drive hub 1
19 H192268 Impeller 1
20 H192270 Large spacer 1
21 H192025 Small spacer 2
22 H292401 Safeway disc 1
23 H192272 Blade spigot 1
24 H292018 Head retaining bolt 1
26 H190210 Blade spanner 1
27 H295089 Warning label 1
28 H295128 Allen label 1
29 H295129 Allen A label 1
30 H295178 Domestic label 1
31 H295109 Year of Manufacture label 1
32 H295175 Serial number label 1
33 H295173 Warranty registration card 1
34 H295181 Instruction manual 1
35 H190118 Oil seal Protector: Engine 1
25a H292385 Safety blade line: 0.5kg as reqd
25b H292384 Safety blade line: 2kg as reqd
Guide to General features of the unit [fig 8]:
A Throttle assembly
B Handwheel
C Recoil handle
D Oil filler cap
E Upper handle assembly
F Lower handle assembly
G Fuel tank cap
H Fuel ON/OFF tap
I Cover
Opening the box:
• Place box with the title “Allen” upright. Slit the tape see fig 1
• Remove staples with a screwdriver see fig 2
• Open out box fully see fig 3
• Lift out top packing assembly see fig 4
• Check box contents see fig 5
Assembling the unit:
• Fit the LOWER HANDLE first, and position the
white bushes as shown see fig 6
• Place lower handle between bushes, with
KICK STOP assembly on correct side see fig 7b
• Attach lower handle using fixings see fig 6
• Position UPPER HANDLE assembly and line up holes see fig 7
• Fix top and bottom handle assemblies using U-bolts
and handwheels see fig 7c
• Attach throttle assembly see fig 7a
• Secure throttle cable, using ties supplied see fig 7d

Page 8
Page 9
Starting the unit:
• Lock the handles in the upright position
• Slide the throttle from “STOP” to “START” see fig 15
• Turn on the fuel supply tap see fig 11
• Connect the spark plug see fig 10
• Place foot and tilt machine see fig 12
and pull starting cord.
• Gently tip the machine back onto the level.
• When the engine is warm, slide
the throttle to the “RUN” position see fig 14
Stopping the unit:
• Tip the trimmer slightly, as in fig 12
• Slide the throttle to “STOP” see fig 13
• DO NOT PLACE the unit back on the level
Until the engine has stopped.
• Close the fuel supply tap see fig 11
• Disconnect the spark plug [IT MAY BE HOT!] see fig 10
IMPORTANT
UNDER NO CIRCUMSTANCES SHOULD ANY THREAD-LOCKING MATERIAL BE USED ON FIXINGS HOLDING
ENGINE TO FRAME AND FRAME TO DECK, OR ANY FIXING COMING INTO CONTACT WITH PLASTIC
PARTS. THE ONLY EXCEPTION IS THE DRY LOCTITE PATCH APPLIED TO HANDLE TO DECK FIXING BOLTS.
FAILURE TO OBSERVE WILL LEAD TO SERIOUS WEAKENING OF PLASTIC PARTS.
Remember! Blades continue to rotate for a short time after the engine has been turned off!
Changing the cutter height:
1) Stop Machine.
2) Remove Spark Plug
3) Tilt machine on side [see fig 18] with air filter upper most, and support it to avoid it falling over.
IMPORTANT - DO NOT TURN THE MACHINE UPSIDE DOWN
(Also, do not leave the machine like this, return it to level ground as soon as possible)
4) Remove bolt (p5, item 24)
5) HEIGHTS: There are three heights available, using combinations of the spacers - see fig 20.
6) To change the line (3.5mm Flexi Blade): pull out old line, pulling it out towards centre of disk, see fig 21.
The line can be changed with the head fitted to the machine.
7) Insert new line, pushing it in and pulling it through - see fig 21.
Cutting the grass:
Please read the following instructions before using the trimmer.
ALWAYS MAKE SURE THE GRASS IS CLEAR OF STONES, STICKS AND SIMILAR OBJECTS BEFORE MOWING.
We recommend the method of operation as shown in fig. 16 to obtain the maximum cutting performance from your
trimmer. It is better to cut round your lawn from the outside to the inside, rather than straight up and down as you
may have done up till now.
Start at the outside border of the lawn and go round the borders in a clockwise direction, working towards the
centre. Always control the trimmer with two hands and keep it flat on the grass.
Do not PULL the trimmer to cut grass. It should always be pushed.
It is normally recommended never to cut more than one third of the length of the grass at one time.
Never allow the trimmer to struggle continuously in difficult conditions. This will only occur in long tough grass with
the blade set too low.
When cutting long tough grass, always have the blade at its highest setting, using a gentle ‘pecking’ motion and not
forcing the trimmer through the grass.
If used on undulating ground set the blade at a height so that it does not ‘scalp’ the lawn.
If cutting wet grass for a prolonged period ensure that there is not a build up of grass on the underside of the deck.
If the build up becomes too great, SWITCH OFF THE ENGINE, WAIT FOR THE BLADE TO STOP ROTATING,
disconnect the spark plug lead, then tip the trimmer on it’s side, keeping the carburettor uppermost, and scrape
away the damp grass.
As a general practice, try to avoid using the trimmer in these conditions, as it can be detrimental to the condition of
your lawn.
The Handles
The handles on your trimmer automatically lock when placed upright; this is a “stationary” or “parking” position.
The handles must be released from this position when starting the engine.
To release from any limit position, depress the footstop.
STARTING, STOPPING and
CHANGING THE CUTTING HEIGHT
CUTTING THE GRASS
PLEASE REMEMBER:
WHEN TILTING THIS UNIT, HAVE THE CARBURETTOR UPPERMOST, OTHERWISE OIL WILL DRAIN FROM
THE BREATHER PIPE. THIS WILL MAKE RE-STARTING DIFFICULT, AND LOSS OF OIL WILL DAMAGE THE
ENGINE.
Before starting the
engine, read the
manufacturer’s
instructions carefully,
paying particular
attention to levels of oil
in the crankcase, and
ensure there is sufficient
fuel in the tank.
See figs 22 & 9

Page 10
Page 11
If not used correctly
this lawn trimmer can
be dangerous; it can
cause serious injury
to the operator and
others.
The warnings and safety
instructions must be
followed to ensure
reasonable safety and
efficiency.
The operator is
responsible for
following the warning
and safety instructions
in this manual and on
the lawn trimmer.
DANGER: Petrol is highly flammable – see engine manufactures instructions for fuel recommendations.
(a) Always wear protective clothing when handling any fuels and lubricants.
(b) Keep fuel in containers, which are specially intended for that purpose.
(c) Always fill the fuel tank out of doors. Never smoke when filling the tank.
(d) Avoid contact with skin. If affected, wash liberally with soap and water.
(e) Store fuel in a cool place, in a container specifically designed for the purpose.
(f) Use fresh, clean, regular unleaded petrol.
(g) Wipe dirt and grass clippings from fuel tank filler cap to avoid getting dirt into fuel tank.
(h) Fuel should be added before starting the machine. Never remove the lid from the tank or add petrol when
the engine is running or still hot.
(i) If petrol has overflowed from the tank, do not attempt to start the engine. Remove the machine from the
area where the petrol is present and avoid creating a source of ignition until the petrol vapour has
dissipated.
Instructions:
Read the instructions carefully. Familiarise yourself with the controls and with the
correct operation of the equipment. Never allow the trimmer to be used by children
or by persons who are unfamiliar with these instructions.
Never trim when people, and in particular children or animals, are in the vicinity.
Never operate the lawntrimmer when you are tired, ill or under the influence of
alcohol, drugs or medicine.
Preparation:
Strong and sensible footwear that covers the whole foot must be worn when cutting.
Long trousers must be worn when cutting.
Do not use trimmer barefoot or wearing sandals.
The use of ear protection is recommend.
Use:
1) Never operate the machine with a damaged enclosure deck.
2) Do not operate the engine in a confined space, where exhaust fumes (carbon monoxide) could accumulate.
3) Use the trimmer only in daylight or under good artificial lighting.
4) The use of the equipment on grass that is wet should be avoided where possible.
5) Always ensure that your feet have a good grip when working on slopes.
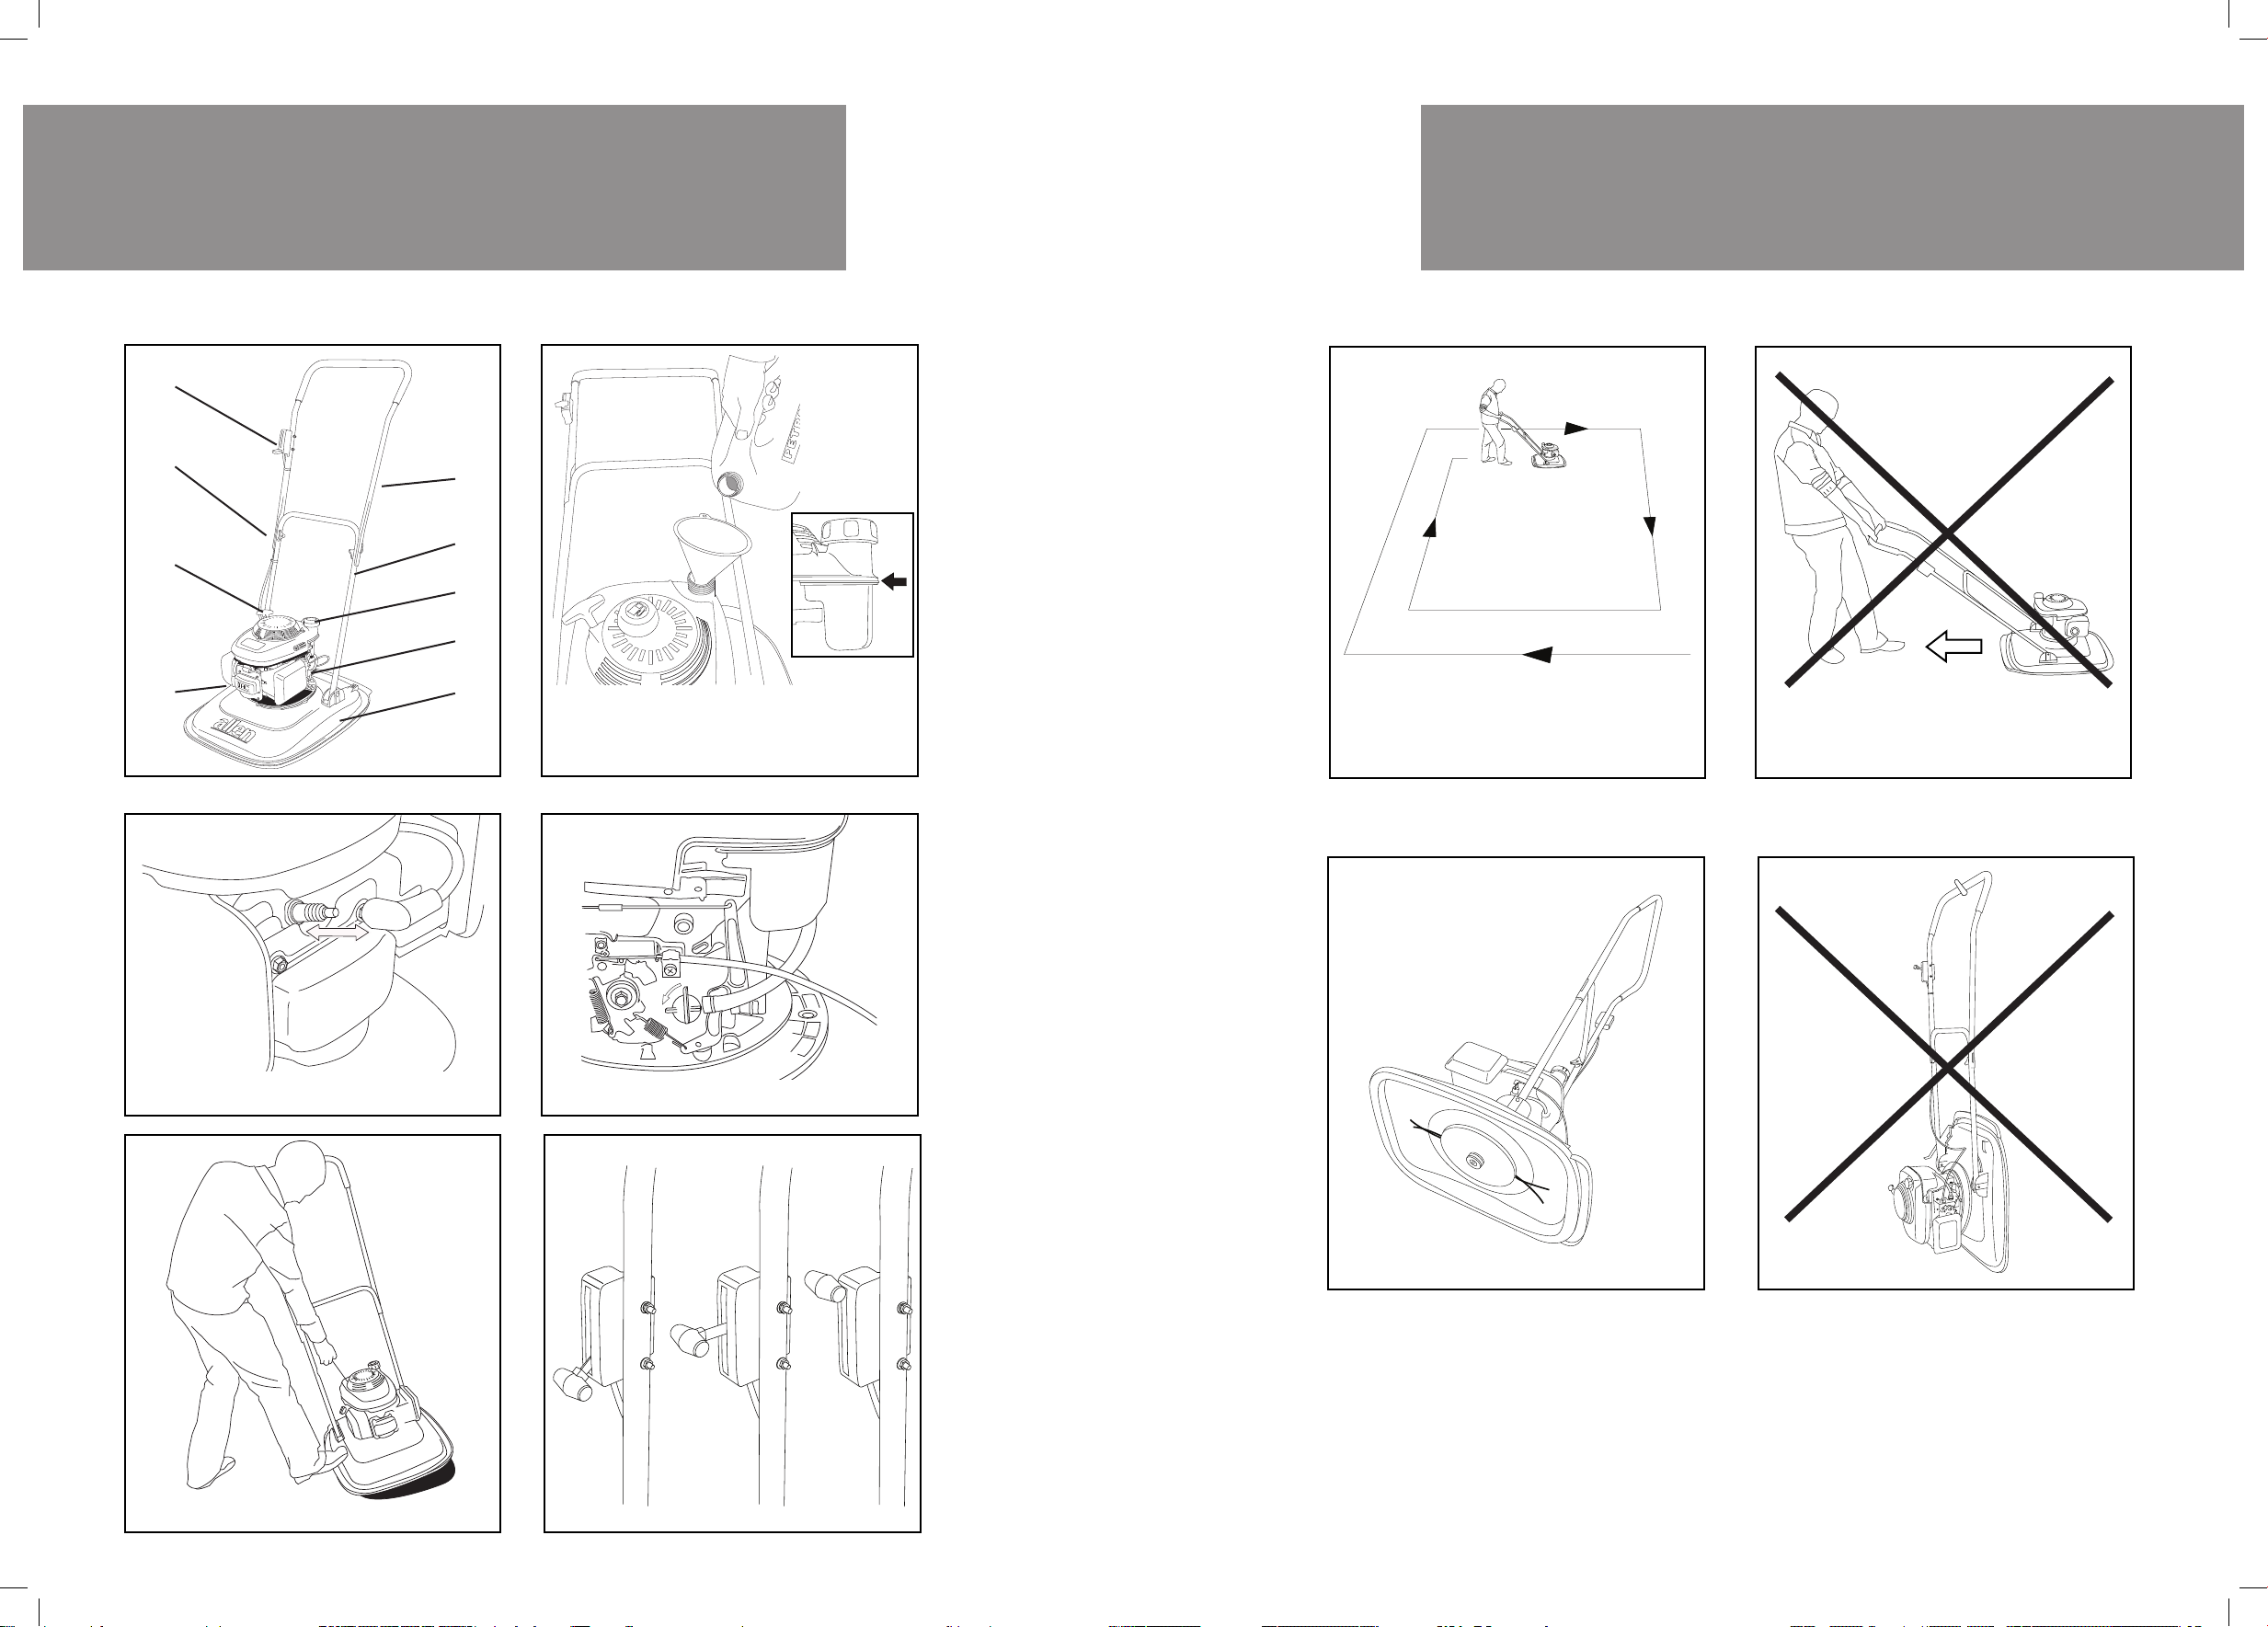
6) Do not walk backwards when in use; you could trip. Walk – Do not run. [fig. 17]
7) Cut across slopes, never up and down.
8) Exercise great care when changing directions on slopes.
9) Use the trimmer with the greatest of care, when pushing it. Never pull it when cutting the grass. [fig. 17]
10) To stop the engine, move the throttle control lever to stop position. [fig. 13]
11) The cutters must be stopped if the trimmer is to be transported over areas without grass, and when it is
being brought to the area which is to be mown.
12) Never vary the settings of the engine speed regulator or run the engine at an excessive speed.
This is dangerous and shortens lawntrimmer life.
13) Exercise care when starting the engine, keeping feet and hands well away from the cutting area.
14) When starting the engine do not tilt the trimmer more than necessary and raise only the part which is
furthest from the operator. [fig. 12]
15) Do not put hands and feet near or beneath the rotating components.
20) NEVER lift or carry the unit when the engine is running.
SAFETY PRECAUTIONS
This product is intended for domestic [home owner] use for the
trimming of grass areas up to a maximum incline of 20 degrees.
Note:
Stop the engine and disconnect the sparking plug lead: [figs 13 & 10]
a. before cleaning out any obstructions,
b. before checking, cleaning or repairing the trimmer,
c. after having collided with a foreign body (inspect the unit for any damage, and repair before re-starting.),
d. if the trimmer begins to vibrate in an abnormal manner (a check must be made immediately).
Stop the engine and disconnect the sparking plug lead:
a. before leaving the trimmer unattended;
b. before refilling the fuel tank;
c. before adjusting the height of the cut.
Remember! Blades continue to rotate for a short time after the engine has been turned off.
SAFETY & MAINTENANCE
Maintenance and Storage
1) Ensure that all nuts, bolts and screws are kept tight in order to be certain that the machine is in sound
working order.
2) Replace worn or damaged parts for safety.
3) Always replace faulty silencers and spark plugs.
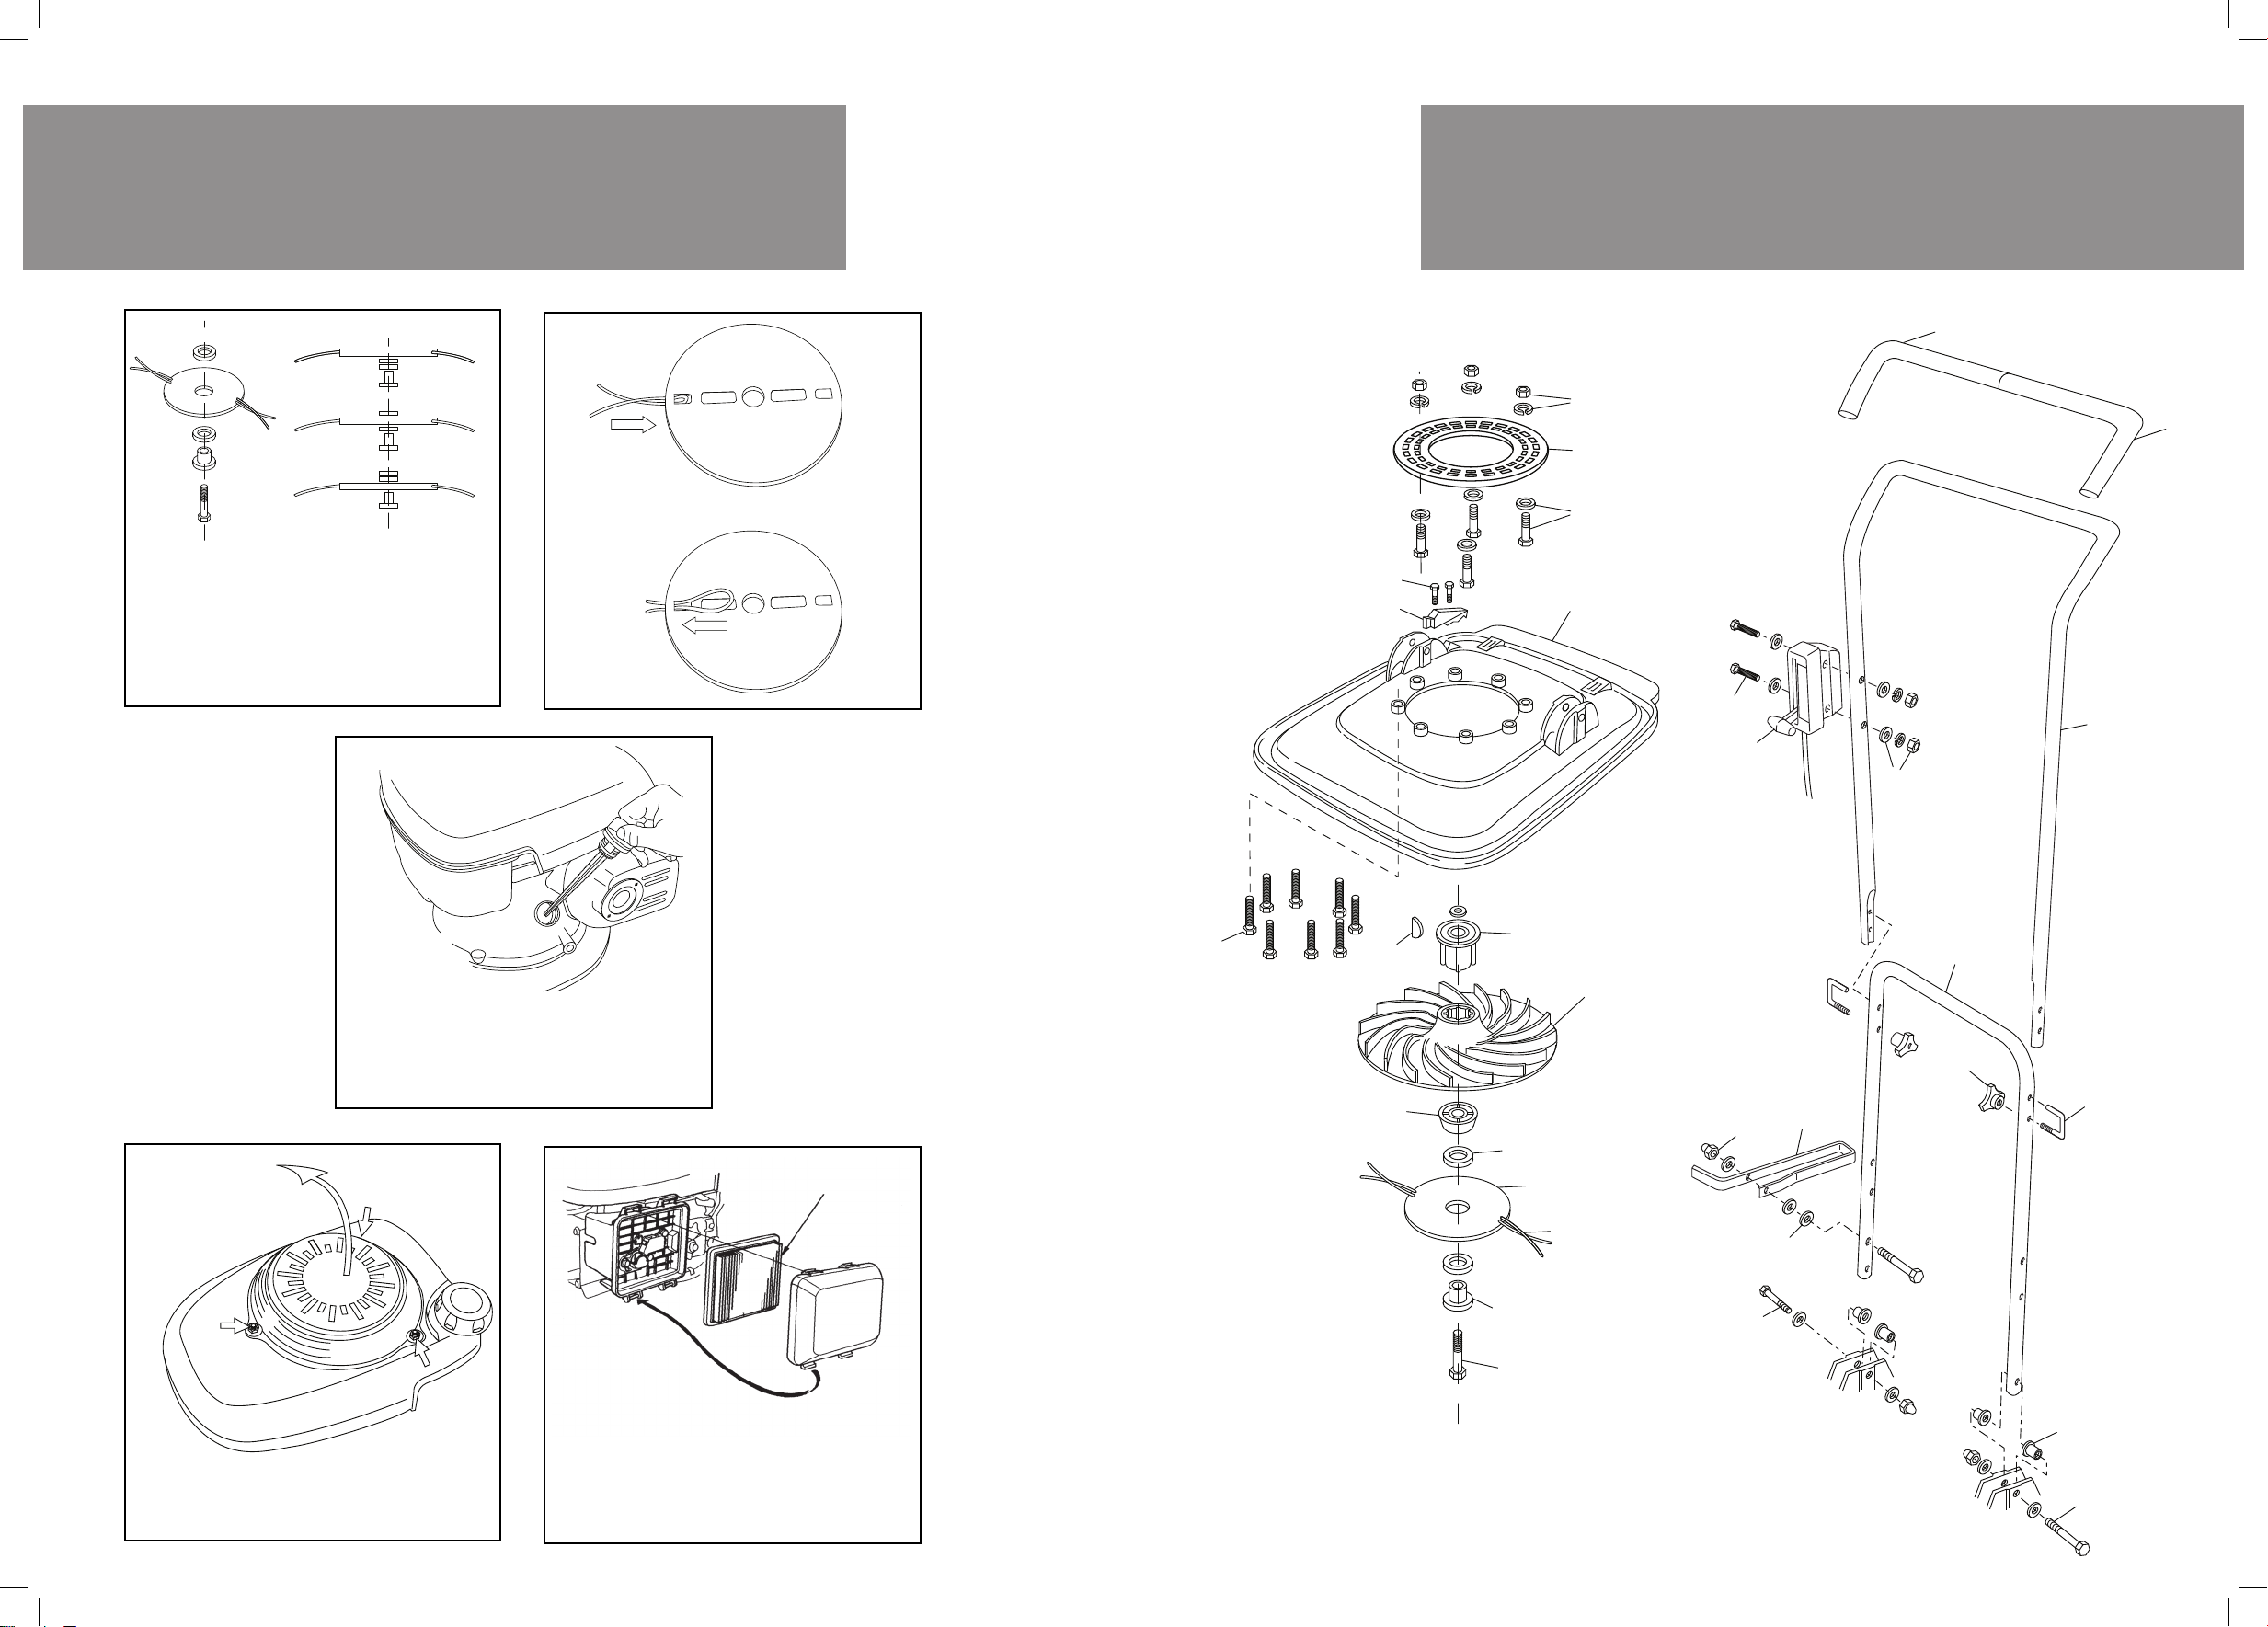
4) Only use the replacement disk, cutting lines, spacers, and impeller specified for this product.
5) The machine must never be stored with petrol in the tank inside any building in which a flame or a spark
could be reached.
6) The engine must be allowed to cool down before being placed inside any kind of container.
7) In order to reduce the risk of fire, the engine and the silencer should be kept free of any grass, leaves or
grease.
8) If the fuel tank has to be drained, this should be done outdoors.
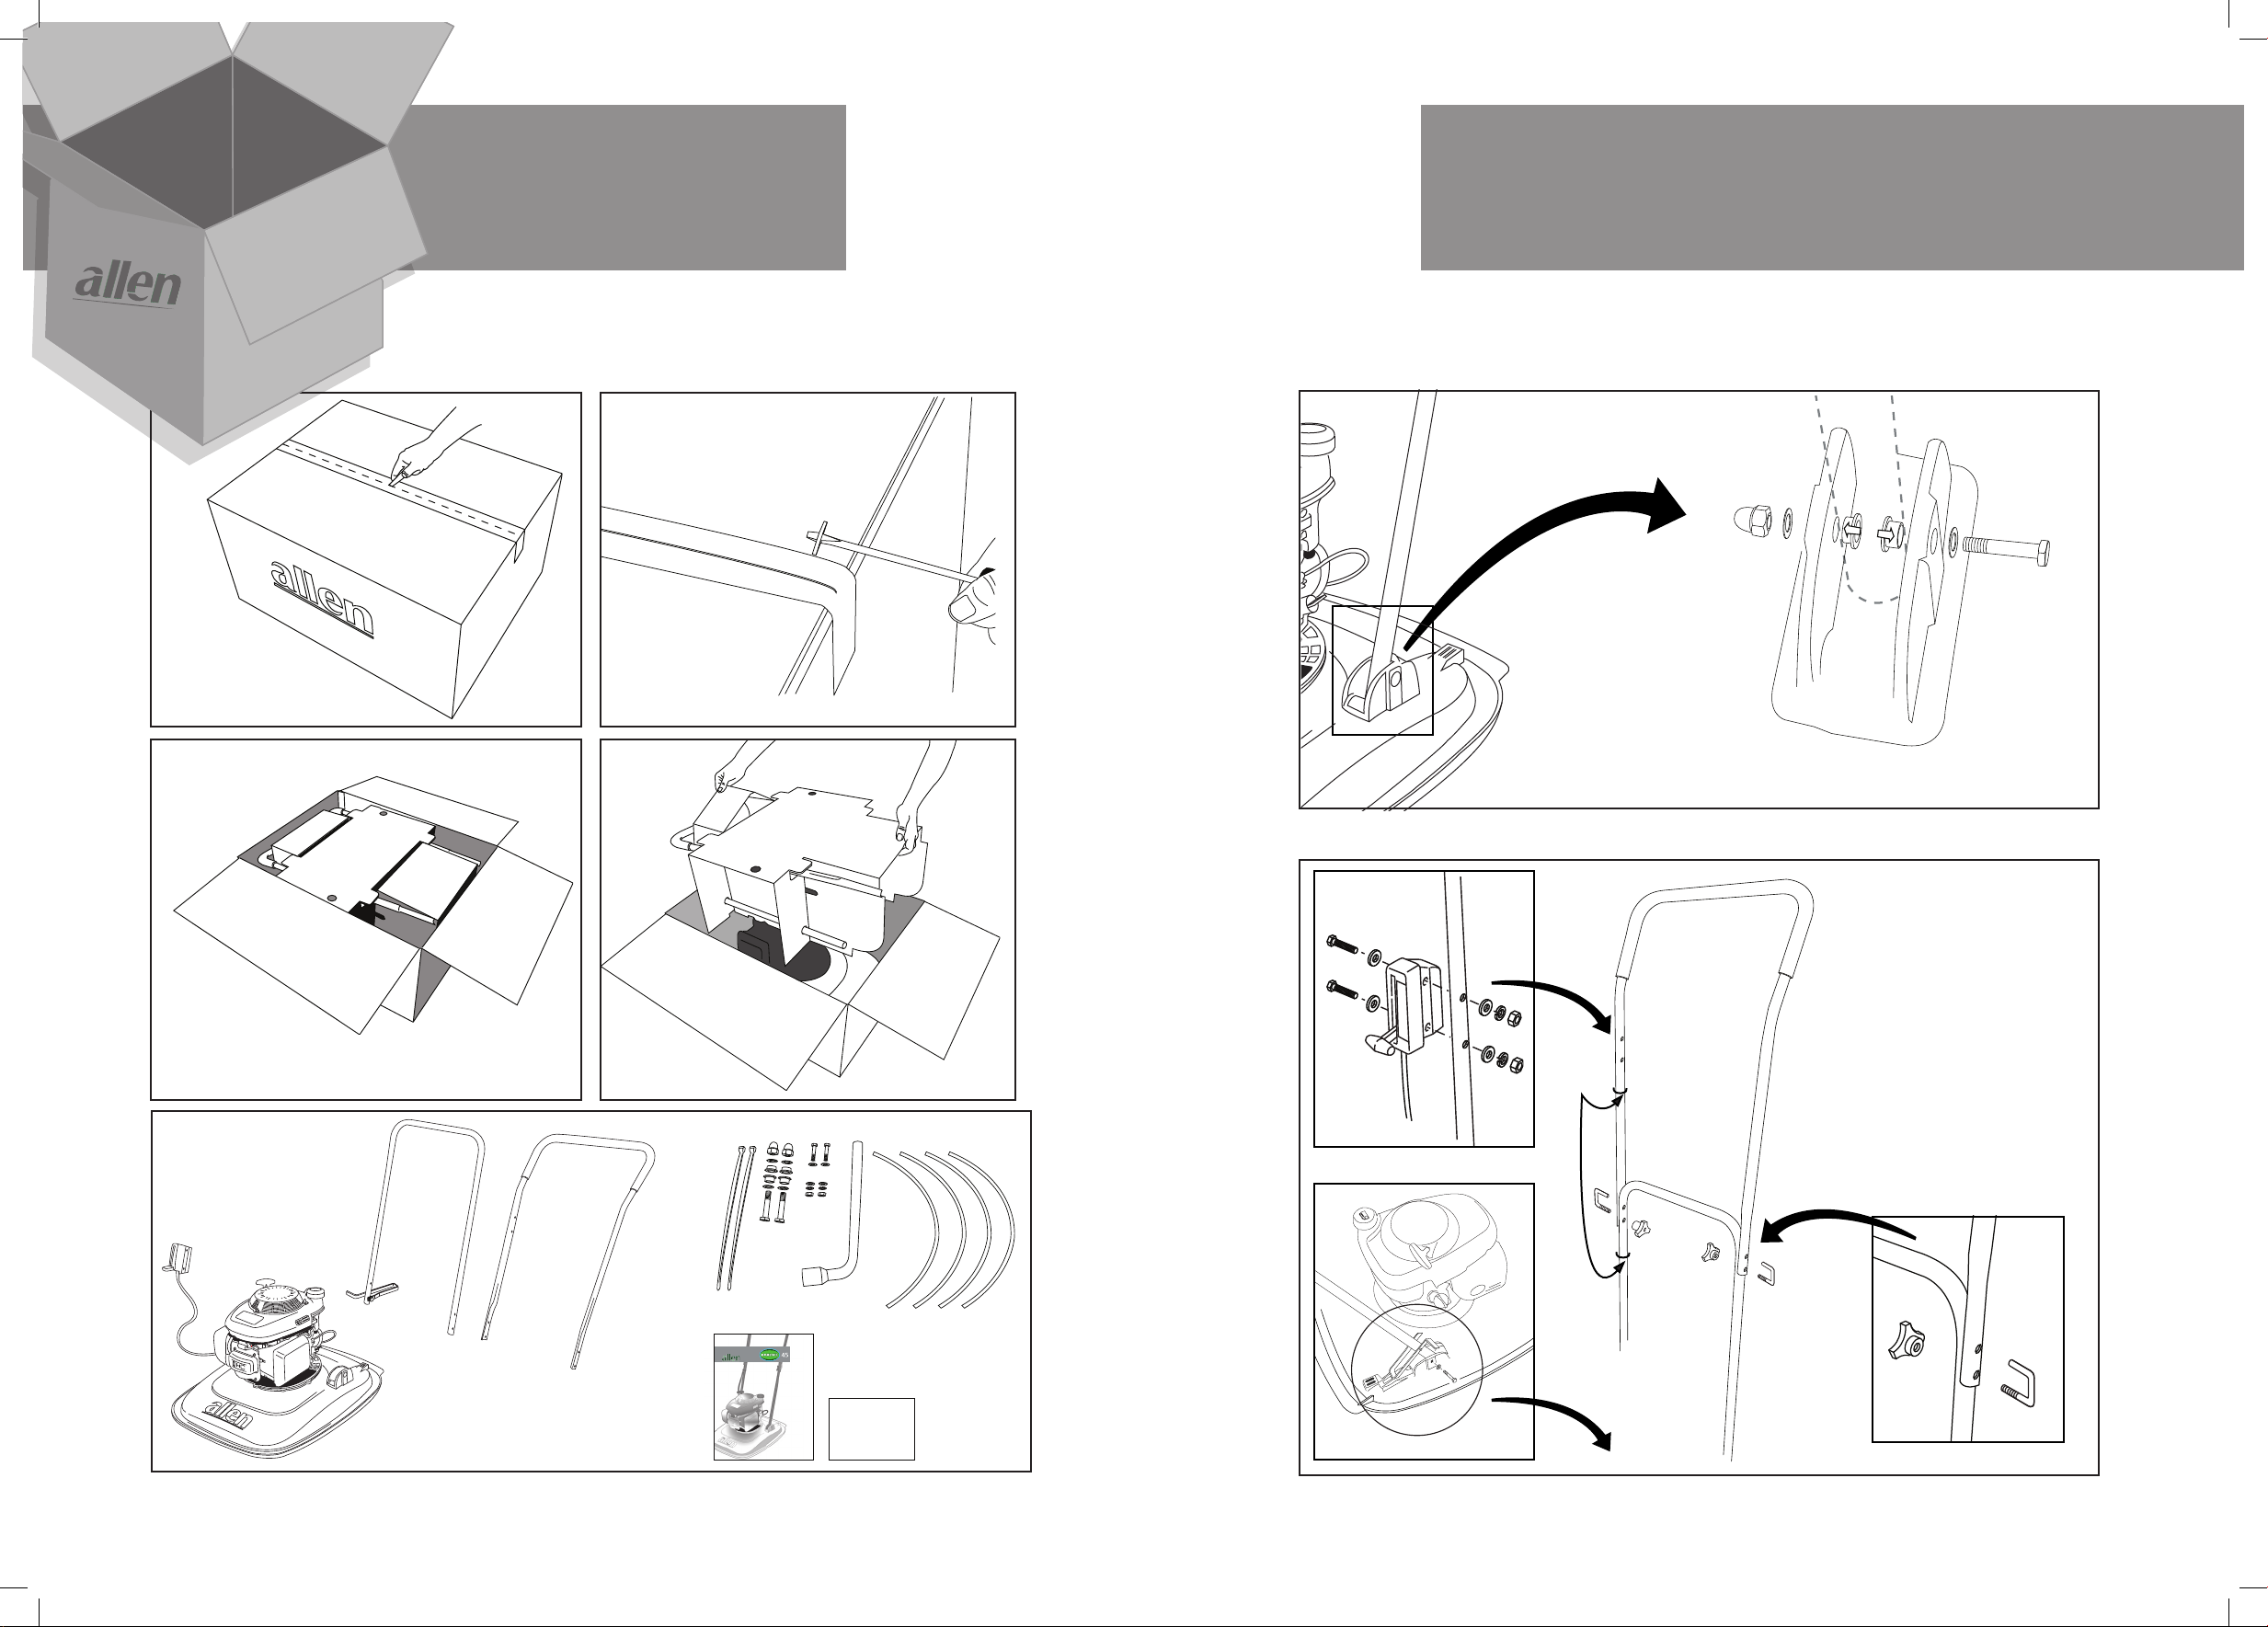
9) Use a funnel when filling the fuel tank to avoid spillage on to the trimmer. [fig. 9]
Routine Maintenance
A few minutes spent after every mowing session will ensure that your trimmer is in a good state of repair.
Please ensure that the engine maintenance is carried out as recommended by the manufacturer, paying particular
attention to the air cleaner system.
FAILURE TO DO THIS MAY RESULT IN PREMATURE ENGINE FAILURE AND WILL RENDER THE GUARANTEE VOID.
Ensure the engine cooling fins, carburettor and impeller air vents are clear.
Regularly check that there is no grass build up under the re-coil cover [see fig 23]. To clear it out, remove the cover
by undoing the screws and clearing away the debris.
Always keep the underneath deck clean, this will ensure that the trimmer operates efficiently.
Check that the cutting disk is tightly bolted and not damaged, the spacers are correctly fitted and that the impeller
has sustained no damage. An out of balance cutting disk causes vibration and may damage the engine.
In the event of your unit hitting an obstruction and damaging either the cutting assembly, the impeller, or both,
please replace before further use.
DO NOT OPERATE THE TRIMMER WITH AN OUT OF BALANCE CUTTING ASSEMBLY or IMPELLER.
Check all nuts and bolts occasionally and tighten when necessary.

Page 12
Page 13
EC Declaration of conformity
Responsible authority in a member state
where a copy of this declaration has been sent
United Kingdom
DTI
PO box 1302
Bristol
BS99 2GB
Manufacturer or responsible person established in
the community
Allen Power Equipment Ltd
The Broadway
Didcot
Oxfordshire
OX11-8ES
Name, and if different the address of person holding
the technical documentation.
Service & Technical Manager
Description of Equipment:
Category/Article: - Hover Grass trimmer
Cutter- width: 446mm Type- flexible line
Model/Type: Domestic 45
Net installed power or other noise - related Value:
3.4kW (4.5)hp
Measured sound power level:
dB (A) 96.9 dB(A)
Guaranteed Sound power level
dB (A) 98 dB(A)
Conformity assessment procedure and name and
address of notified body if appropriate;
Assessment procedure: 2000/14/EC (Annex V)
Address: Intertek ETL SEMKO
Davy Avenue
Knowhill
Milton Keynes
MK5-8NL
Vibration measured at:
I the undersigned certify that the product complies with:
The requirements of the Standards/Directives.
ISO 11806 (2000/14/EC)
ISO 10518 : 1991 (98/37/EC)
ISO 14982 : 1998 (89/336/EC)
Particulars of the signatory authorised to sign the declaration
Place and date of the declaration
Service and Technical Manager
Allen Power Equipment Ltd
December 2005
Certificate of conformity
Fault finding:
Poor Starting
1. Make sure the petrol tap is open.
2. If the engine is COLD the throttle control should be in the START [fig 15] position.
If WARM, in the RUN [fig 14] position.
3. If the trimmer has been out of use the petrol may be stale. Drain and replace.
4. Check the air filter for excessive oil. If this is the case, fit a new filter [see fig. 24].
5. The engine may be flooded with fuel, in which case, remove and dry the spark plug. Before replacing, crank
the engine to remove excess fuel.
6. Check the plug for spark by placing the end of the plug (with lead connected) against the engine casing and
away from the plughole.
DO NOT HOLD THE PLUG OR LEAD BY HAND.
Crank the engine and watch for a spark at the plug points. If there is no spark, the plug should be replaced.
7. Make sure the cutting disk is correctly fitted and tight.
If none of the above steps solve the problem - see your local dealer.
Poor hovering
1. Check that the cutting disk is fitted firmly.
2. Check that the impeller air vents are not blocked.
3. Check that the underside of the deck is really clean.
4. Check that the engine is running at the correct speed - see your local dealer.
Excessive vibration
1. Check cutting disk and spacers are fitted correctly.
2. Check all screws and bolts are tight.
3. If the blade has hit a heavy object the impeller crankshaft may be damaged. (See dealer.)
Engine Overheating
1. Make sure the engine cooling fins are dirt-free.
Ordering parts
When ordering a part please state is for the Allen Domesitic 45.
The serial number may be needed - it is located on the sticker shown on p13.
There are two stickers located on your trimmer beneath the handlebars behind the engine.
Allen Power Equipment Limited
Model: 45 Domestic
Serial No:________________
3.4kW @ 3100rpm
The Broadway Didcot
Oxfordshire OX11 8ES
Made in England
Serial no.: ..................................................................................................
Date of purchase: ....................................................................................
Purchased from: .......................................................................................
......................................................................................................................
Winter storage:
We recommend your lawn trimmer is serviced by your local dealer after the last cut of the season,
before storage.
Before storing, carry out the following:
1. Ensure the petrol is drained from the tank.
2. Then run the engine until it uses up the remaining fuel.
3. Close the fuel tap - see fig 11.
4. Disconnect the spark plug lead - see fig 10.
5. Drain and replace the engine oil. [See manufacturers handbook]
6. Store the machine so that the deck and engine are horizontal to the ground.
N.B. - Stale fuel is a major cause of non-starting at the beginning of a season.
EC Declaration of Conformity

Thank you for purchasing an Allen Domestic trimmer.
If you are in any doubt about anything contained in these instructions - please contact your dealer
HAYTER LTD,
Spellbrook,
Bishop’s Stortford,
Herts
CM23 4BU
A subsidiary of Hayter Limited
Table of contents