1
Carton Contents
IMPORTANT! Please check the contents of the carton are correct BEFORE assembling your new Flymo product.
IF ANY PARTS ARE MISSING CONTACT:
Husqvarna UK Ltd. Customer Service Department direct
Telephone: 0344 844 4558 UK 1800 882 350 ROI FAX: 01325 302530
Safety
General
1.
This product may be used under supervision,
or if instruction regarding the safe use of the
product has been provided and the resulting
dangers have been understood, by children
aged 8 and above, as well as by persons with
physical, sensory or mental disabilities or a
lack of experience and knowledge. Children
must not be allowed to play with the product.
Cleaning and user maintenance must not be
performed by children without supervision.
The use of this product by young people
under the age of 16 is not recommended.
2. Never allow children or people unfamiliar with the
instructions to use the machine.
3. Stop using the machine while people, especially
children, or pets are nearby.
4. Only use the trimmer in the manner and for the
functions described in these instructions.
5. Never operate the trimmer when you are tired, ill or
under the influence of alcohol, drugs or medicine.
6. The operator or user is responsible for accidents or
hazards occurring to other people or their property.
Battery
Cordless Battery Powered Products require special
care.
1. AVOID ACCIDENTAL STARTING. KEEP HANDS
AND FINGERS AWAY FROM THE SWITCH LEVER
WHILE CARRYING THE TRIMMER.
2. Always charge the product indoors and store in a
cool dry place – out of the reach of children.
3. Use only the charger provided with your unit.
Use of any other charger could permanently
damage the battery and the trimmer.
4. Use the charger with standard domestic household
electrical outlets only.
5. Do not abuse the charger or charger cord.
6. Do not use the charger if the charger or charger
cord is damaged.
7. Use the charger indoors only.
WARNING. When using the product the safety rules must be followed. For your own safety and
that of bystanders please read these instructions before operating the product. Please keep the
instructions safe for later use.
Explanation of Symbols on the product
Warning
Read the user instructions carefully to make
sure you understand all the controls and
what they do.
Keep others, including children, pets and
bystanders outside the 10 metre hazard
zone. Stop the trimmer immediately if you
are approached.
Wear eye protection
To avoid the possibility of electric shock,
do not use in damp or wet conditions.
Switch off! Remove battery pack before
adjusting or cleaning.
Warning: The cutting line continues to rotate after the
machine has been switched off.
10m
2
8. Do not use the charger outdoors.
9. Store and charge this unit in a cool, dry well
ventilated location and out of the reach of children.
10. Do not charge the battery or use the unit in an
explosive or corrosive environment. Avoid areas
where flammable liquids or gases are present to
avoid creating a fire or explosion.
11. Do not attempt to repair the unit including the
battery. Nylon line replacement and cleaning the
unit are the only items suitable for user maintenance.
12. Do not insert any object into the motor area.
Keep free of debris to avoid overheating.
13. Do not incinerate or mutilate the battery. Batteries
contain hazardous chemicals. Dispose of properly.
Preparation
1. While using your product always wear eye protection,
substantial footwear and long trousers. Do not operate
the equipment when barefoot or wearing open sandals.
2. Before using the machine and after any impact, check
for signs of wear or damage and repair as necessary.
3. Inspect the area to be cut before each use.
Remove all objects such as stones, broken glass,
nails, wire, string etc, which can be thrown or
become entangled in the trimmer head.
4. Before use, inspect the area for wildlife, especially
hedgehogs.
5. Check that the cutting head, spool and cap are
fitted correctly.
Use
1. Use the trimmer only in daylight or good artificial light.
2.
Avoid operating your trimmer in wet grass, where feasible.
3. Take care in wet grass, you may lose your footing.
4. On slopes, be extra careful of your footing and
wear non-slip footwear.
5. Do not walk backwards when trimming, you could
trip. Walk, never run.
6. Never operate the trimmer with damaged guards or
without guards in place.
7. Never fit metal cutting elements.
8. Keep hands and feet away from the cutting means at
all times and especially when switching on the motor.
9. Keep cutting head below waist level.
10. Do not lean over the trimmer guard whilst trimming or
edging – objects may be thrown by the cutting line.
11.
Beware of cut-off pieces of nylon line ejected during use.
12. If you hit an object, do not use your trimmer until
you are sure that the entire trimmer is in a safe
operating condition.
13. If the trimmer starts to vibrate abnormally, check
immediately. Excessive vibration can cause injury.
Maintenance and storage
1. Keep all nuts, bolts and screws tight to be sure the
trimmer is in safe working condition.
2. Replace worn or damaged parts for safety.
3. Only use the replacement cutting line specified for
this product.
4. Only use replacement parts and accessories
recommended by Husqvarna UK Ltd.
5. After any maintenance in dealing with the cutting
line, always return the product to its normal
operating position before switching on.
6. To avoid the risk of injury keep fingers and hands clear
of the line cutter on the leading edge of the guard.
7. Clean unit with a dry cloth. Never use metal
objects to clean the unit.
8. Inspect and maintain the trimmer regularly. Any
repairs must be carried out by an authorised repairer.
9. Store the product in a cool, dry place and out of reach
of children. Do not store the product outdoors.
10. Allow the product to cool for at least 30 minutes
before storing.
Battery Pack
Battery Pack Care
1. If over a period of time the Battery Pack quickly
runs down after a full 6 hour charging period, a
replacement Battery Pack is needed.
2. There will be some charge present in the Battery
Pack but to ensure maximum running time, charge
your Battery Pack for 6 hours before first use.
3. To prevent permanent Battery Pack damage, never
store in a discharged condition.
4. Contact your local approved service centre/dealer/
distributor for a replacement Battery Pack and for
safe disposal of your old Battery Pack.
5. Battery
24 Volt 1.6 AmpHour "High Power"
Sealed for Life No maintenance required
• IMPORTANT
DISPOSE OF YOUR OLD BATTERY PACK SAFELY
DO NOT CUT OPEN, BURN OR INCINERATE.
Winter Storage
1. Fully charge for 6 hours before winter storage.
2. Re-charge the Battery Pack every 3 to 4 months for
a full 6 hour charging period to top up the battery
charge during winter storage.
3. Avoid extended storage without re-charge.
4. Store in a cool dry place.
For further information on Battery Pack
replacement contact Husqvarna UK Ltd. Customer
Service direct:
Telephone: 0344 844 4558 UK 1800 882 350 ROI
Fax: 01325 302530
5857337-02
If any part is found to be defective due to faulty manufacture
within the guarantee period, Husqvarna UK Ltd., through
its Authorised Service Repairers will effect the repair or
replacement to the customer free of charge providing:
(a) The fault is reported directly to the Authorised Repairer.
(b) Proof of purchase is provided.
(c) The fault is not caused by misuse, neglect or faulty
adjustment by the user.
(d) The failure has not occurred through fair wear and tear.
(e) The machine has not been serviced or repaired, taken
apart or tampered with by any person not authorised by
Husqvarna UK Ltd..
(f) The machine has not been used for hire.
(g) The machine is owned by the original purchaser.
(h) The machine has not been used commercially.
* This guarantee is additional to, and in no way diminishes the
customers statutory rights.
Failures due to the following are not covered, therefore it is important
that you read the instructions contained in this Operator’s Manual
and understand how to operate and maintain your machine:
Failures not covered by guarantee
* Replacing Nylon Line.
* Failures as a result of not reporting an initial fault.
* Failures as a result of sudden impact.
* Failures as a result of not using the product in accordance
with the instructions and recommendations contained in this
Operator's Manual.
* Machines used for hire are not covered by this guarantee.
* The following items listed are considered as wearing parts
and their life is dependent on regular maintenance and are,
therefore not normally subject to a valid warranty claim:
Nylon Line, Spool and Line.
* Caution!
Husqvarna UK Ltd. does not accept liability under the
warranty for defects caused in whole or part, directly or
indirectly by the fitting of replacement parts or additional
parts that are not either manufactured or approved by
Husqvarna UK Ltd., or by the machine having been modified
in any way.
Guarantee & Guarantee Policy
Service Recommendations
• Your product is uniquely identified by a silver and black product rating label.
• We strongly recommend that your product is serviced at least every twelve months, more often in a
professional application.
EC Declaration of Conformity
Husqvarna AB, S-561 82, Huskvarna, Sweden
Declare under our sole responsibility that the product(s);
Designaion....................................Lawn Trimmer
Designation of Type(s)..................CCTE25
Identification of Series...................See Product Rating Label
Year of Construction......................See Product Rating Label
Conforms to the essential requirements & provisions of the following EC Directives:
2006/42/EC, 2006/95/EC, 2004/108/EC, 2000/14/EC, 2011/65/EU
based on the following EU harmonized standards applied:
EN 60335-1, EN 60335-2-91, EN 60335-2-29, EN 62233, EN 55014-1, EN 55014-2
The maximum A weighted sound pressure level LpA at the operator’s position, measured according to EN60335-2-91 is given in the
table.
The maximum hand / arm vibration weighted value ahmeasured according to EN 60335-2-91 on a sample of the above product(s) is
given in the table.
2000/14/EC: The Measured Sound Power LWA & Guaranteed Sound Power LWA values are according to the tabulated figures.
Conformity Assessment Procedure............... Annex VI
Notified Body................................................. Intertek, Davy Avenue,
Knowlhill,
Milton Keynes,
Bucks, MK5 8NL,
England
Ulm, 05.11.2013
P. Lameli
Chief Technical Officer
Keeper of technical documentation
Type
Width of Cut (cm)
Speed of Rotation of Cutting Device (rpm)
Measured Sound Power LWA (dB(A))
Guaranteed Sound Power LWA (dB(A))
Sound pressure LpA (dB(A))
Uncertainty KpA (dB(A))
Hand / arm vibration ah(m/s2)
Uncertainty Kah (m/s2)
Weight (Kg)
Our policy of continuous improvement means that the specification of products may be altered from time to time without prior notice.
Copyright © 2015 Flymo S.A. All rights reserved. Flymo®and other product and feature names are registered or unregistered
trademarks of Flymo S.A.
Husqvarna AB
S-561 82 Huskvarna
Sweden
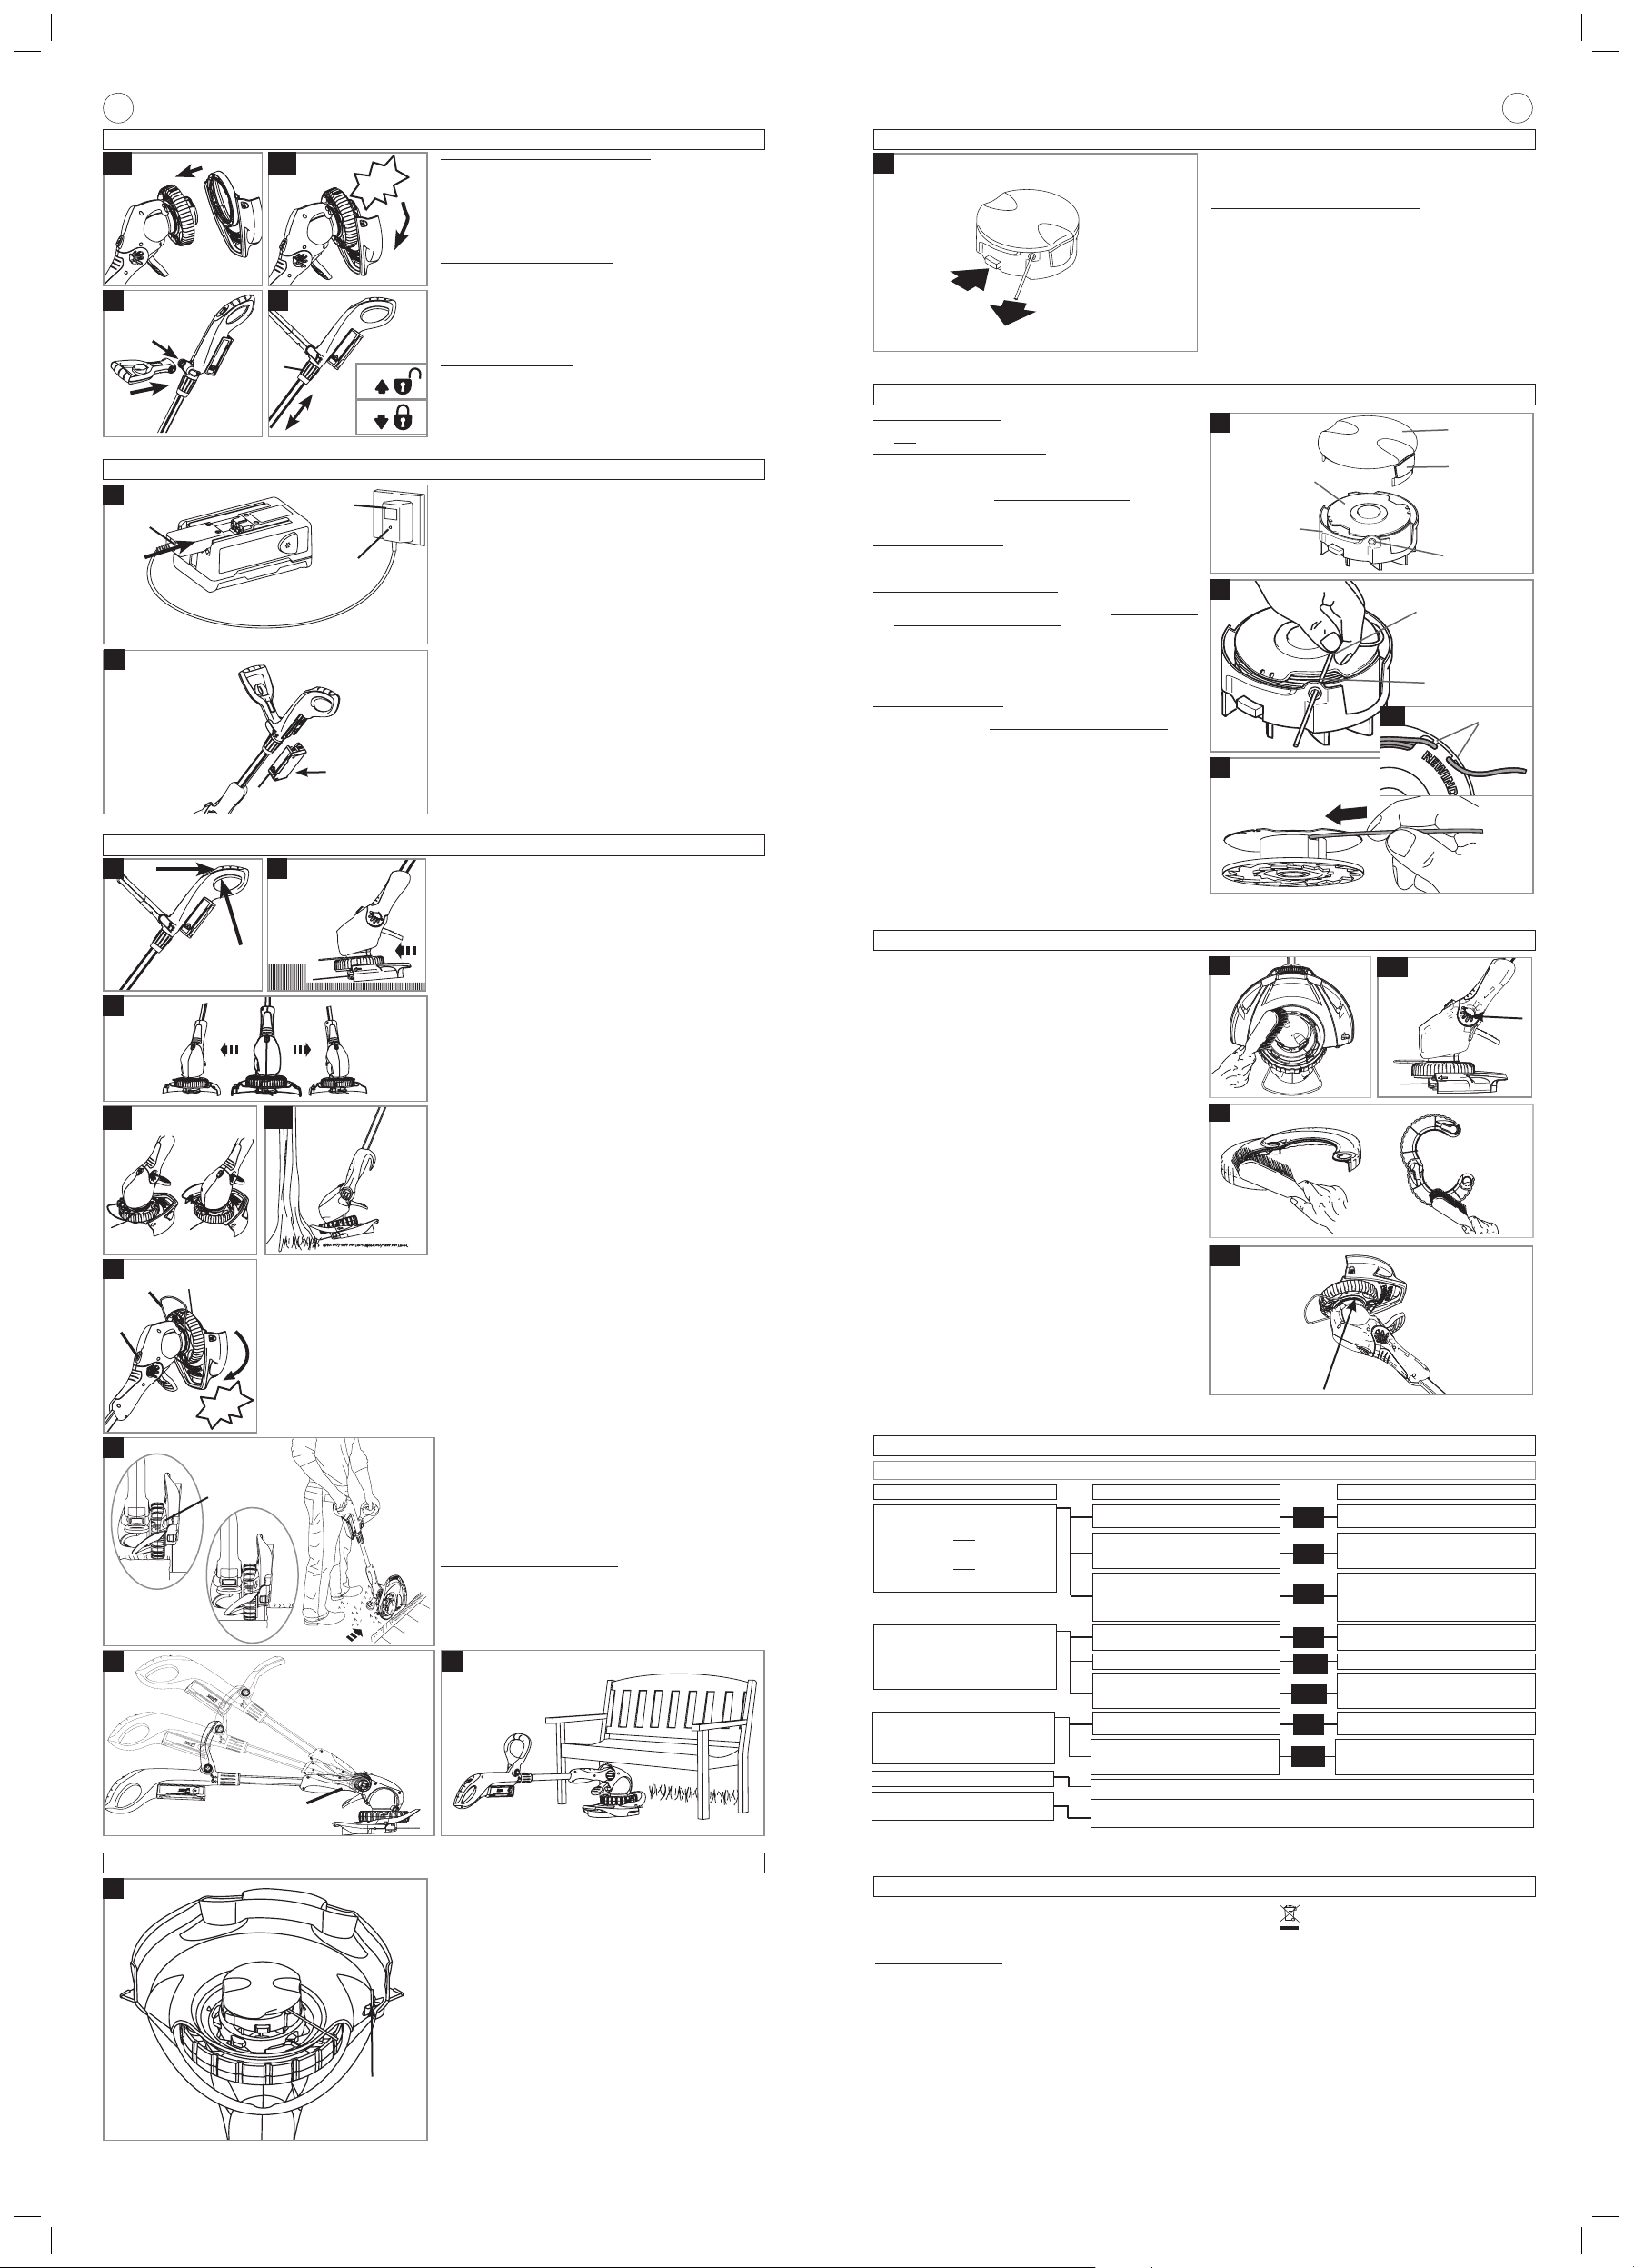
Assembly Instructions
Assembly of Switch Handle to Tube (A1)
• Ensure that the internal cable is not twisted.
1. Insert the tube into the switch handle.
2. Push until it clicks into position.
• ENSURE THAT THE TUBE IS FULLY LOCATED
BY ATTEMPTING TO REMOVE IT.
Assembly of Trimmer Head to Tube (A2)
• Ensure that the internal cable is not twisted.
1. Insert the tube into the trimmer head.
2. Push until it clicks into position.
• ENSURE THAT THE TUBE IS FULLY LOCATED
BY ATTEMPTING TO REMOVE IT.
Wheel Assembly (B1) & (B2)
1. Attach the wheel to the trimmer making sure that it
is located into the BOTTOM groove on the trimmer
head as illustrated in fig B1.
2. Clip the wheel together on each side making sure it
is secure (B2).
3. The wheel should turn freely.
Plant Guard Assembly (B3) & (B4)
1. Open the plant guard as illustrated in fig. B3 and
place into the TOP groove on the trimmer head.
Rotate the plant guard clockwise until it CLICKS into
its parked position (B4).
A1 A2
CLICK!
CLICK!
B1
B3
B2
B4
Replacement Parts
Spool and Line
Reference no.: FLY047 Part no.: 510747890
0344 844 4558 UK
1800 882 350 ROI
®
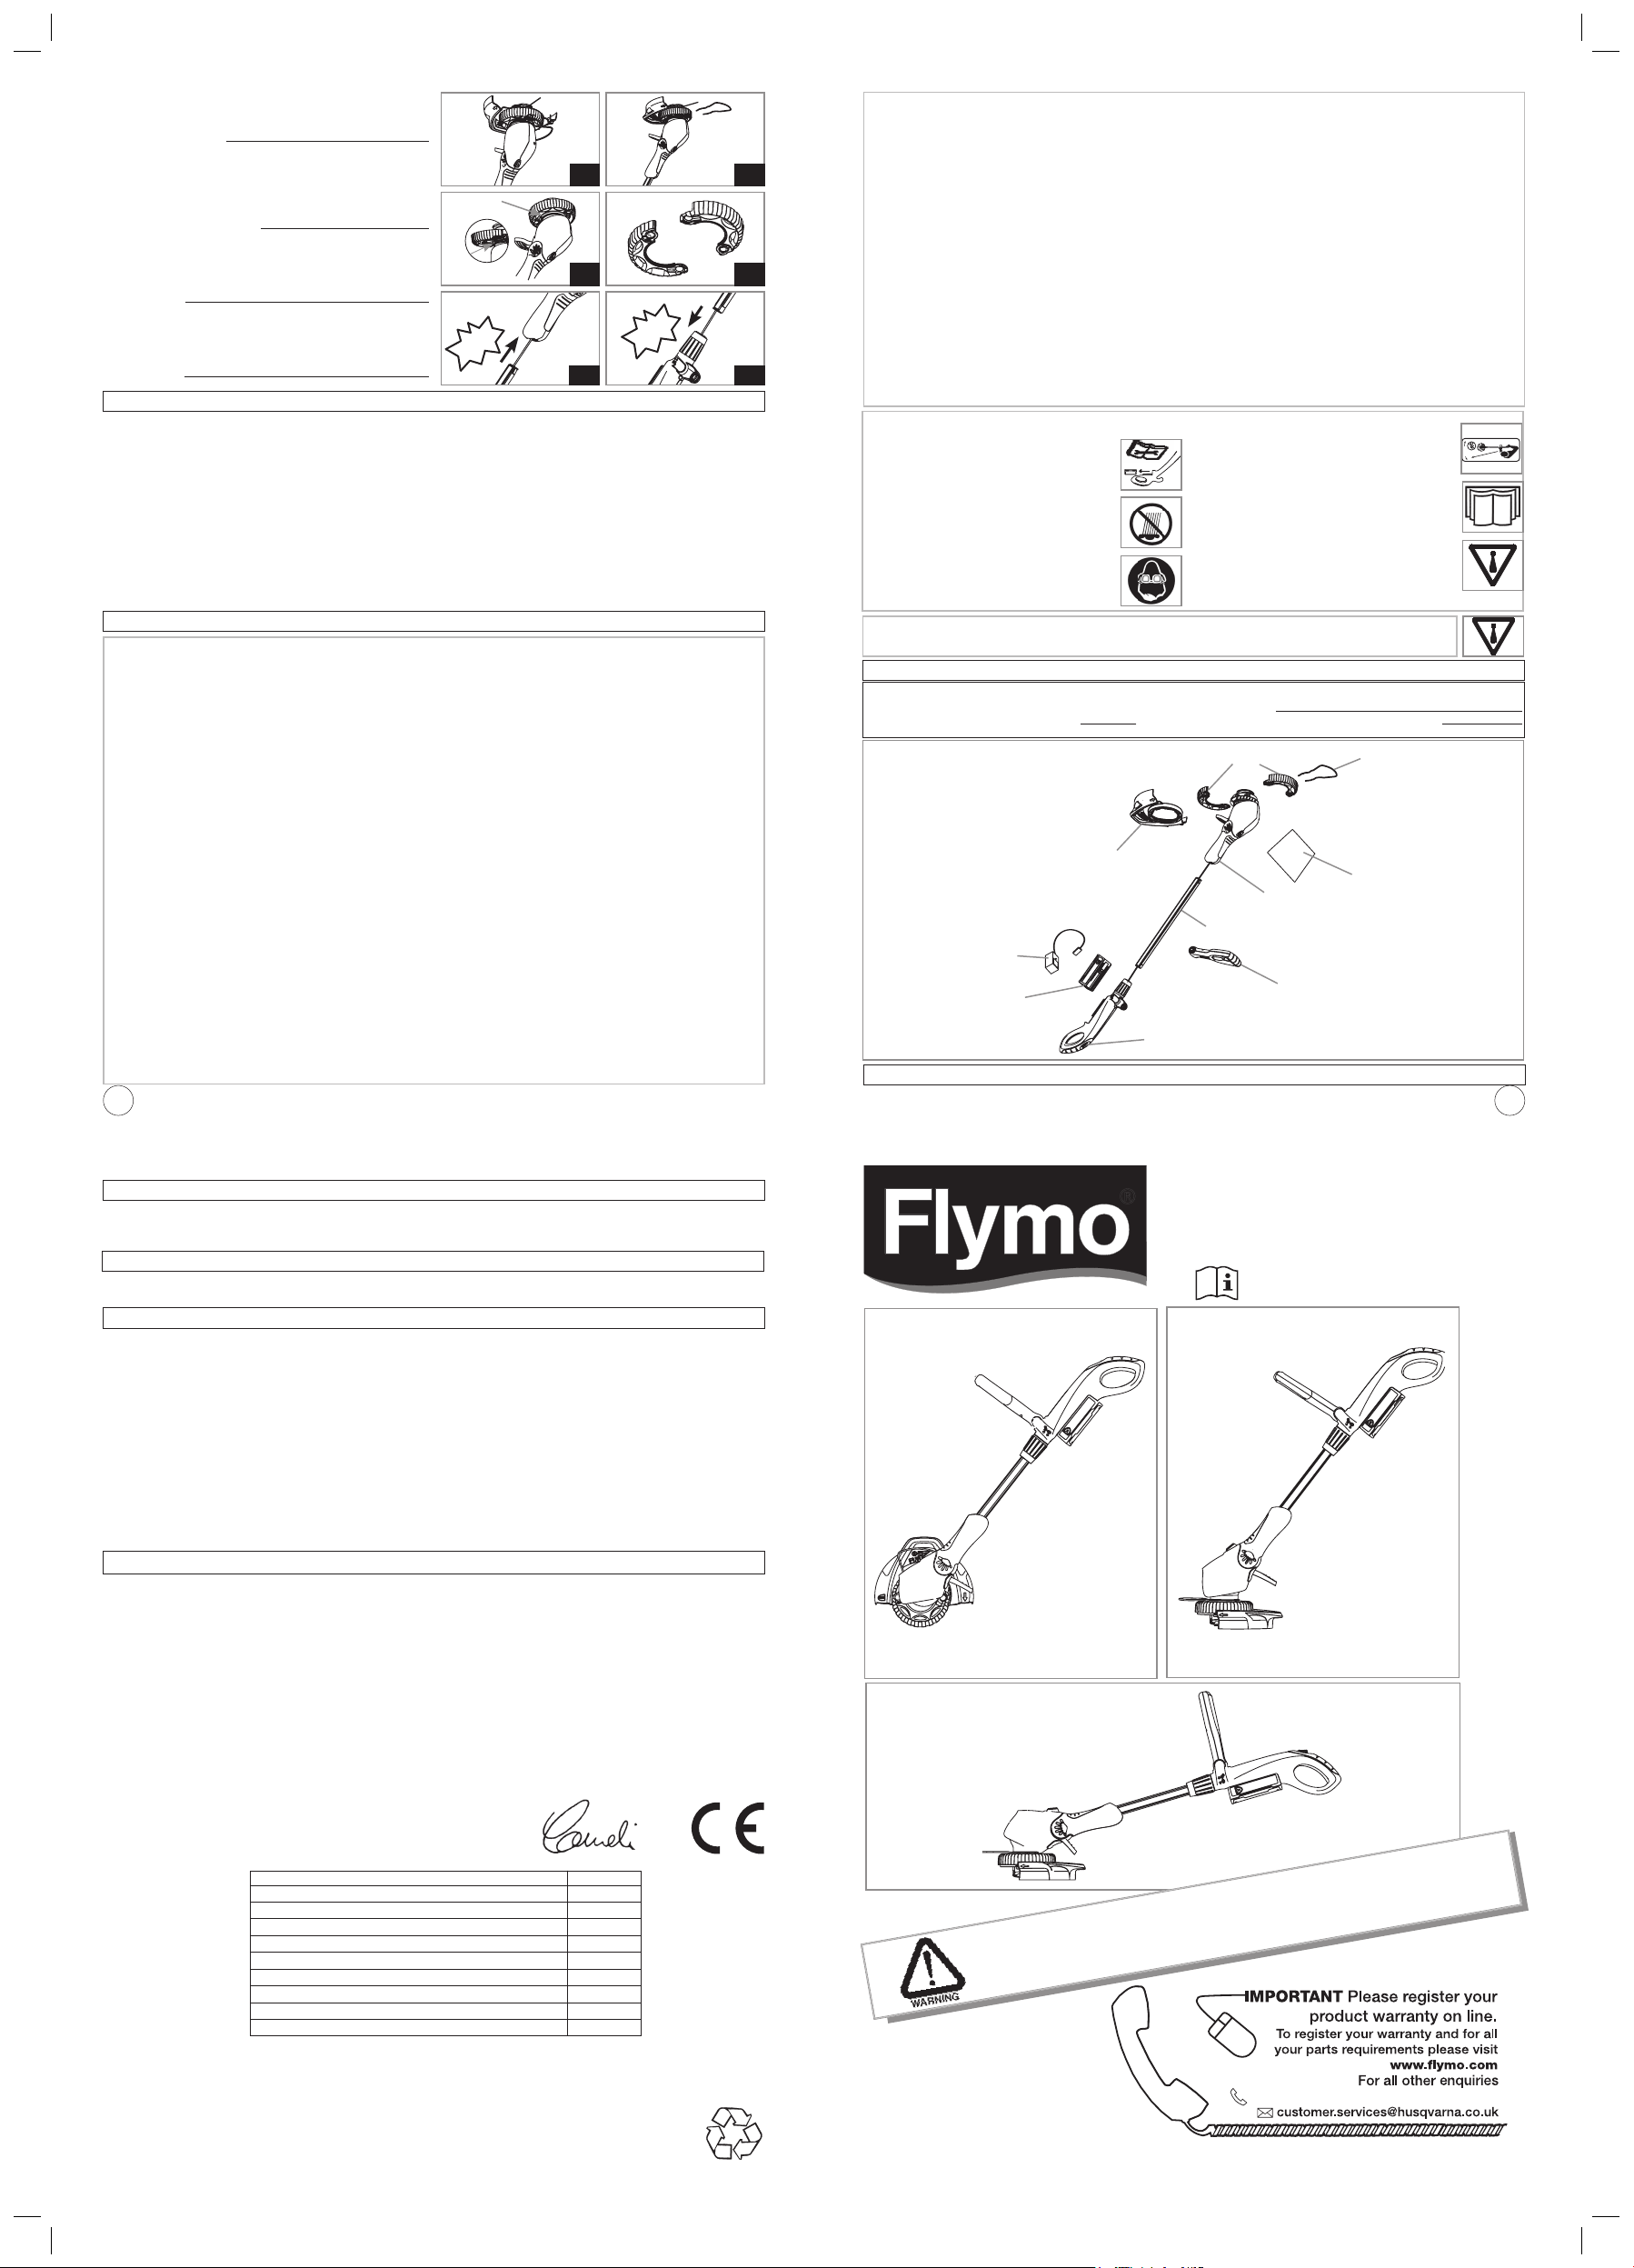
Original Instructions
IMPORTANT INFORMATION
Read before use
& retain for future reference
Contour Cordless
24 V
Upper Shaft
Guard
Instruction
Manual
Lower Shaft
Steady Handle
WheelPlant Guard
Safety Lock-off Switch
Battery Pack
Battery Charger
CCTE25
25
8,500
82
96
74.4
2.5
1.8
1.5
3.2
10/2015
5857337-02 Contour Cordless 24V UK.indd 1 16.10.15 08:56