Allmatic RK3 User manual

RK3
TASTIERA RADIO ROLLING CODE
Manuale d’uso

ITA ENG FRA ESP DEU POR
6-1622368 REV.2 26/06/2014 2 /12
1 2 3
4 5 6
7 8
1. Caratteristiche tecniche
Riferimento RK3
Tasti Policarbonato retroilluminato.
Canali 10
Codice Master programmazione 1
Codici utente 99
Impostazione tempo trasmissione da 1 a 10 secondi
Compatibilità Con tutti i prodotti Rolling Code Allmatic
Memoria EEPROM (mantiene la programmazione intatta anche nel caso di mancanza di corrente)
Portata 120 mt in campo libero
Led verde Pressione tasto / segnale errore e conferma / trasmissione in corso
Led rosso Indicatore tastiera sbloccata
Led ambra Ingresso nel menu di configurazione
Buzzer 1
Alimentazione input 12/24V AC/DC e/o Batteria 9V
Consumo massimo 27mA in trasmissione con alimentazione batteria 9V
120mA in trasmissione con alimentazione 24Vac
Grado IP 65
Dimensioni (mm) 119,5x83,5x40
2. Montaggio
3 (8x30 CSK)
2 (M3x6mm) viti per sicurezza

ITA ENG FRA ESP DEU POR
6-1622368 REV.2 26/06/2014 3 /12
3. Codice Master
ATTENZIONE: Prima di effettuare qualsiasi operazione applicare nello spazio sottostante l’adesivo presente sul
retro della tastiera (come indicato nel disegno) con riportato il codice master impostato di fabbrica.
ATTENZIONE: In caso di reset totale del dispositivo, il codice master tornerà ad essere quello indicato. La
perdita di questo codice renderà quindi inutilizzabile la tastiera.
Incollare l’adesivo o scrivere
qui il codice master
XXXX
CODICE MASTER
1
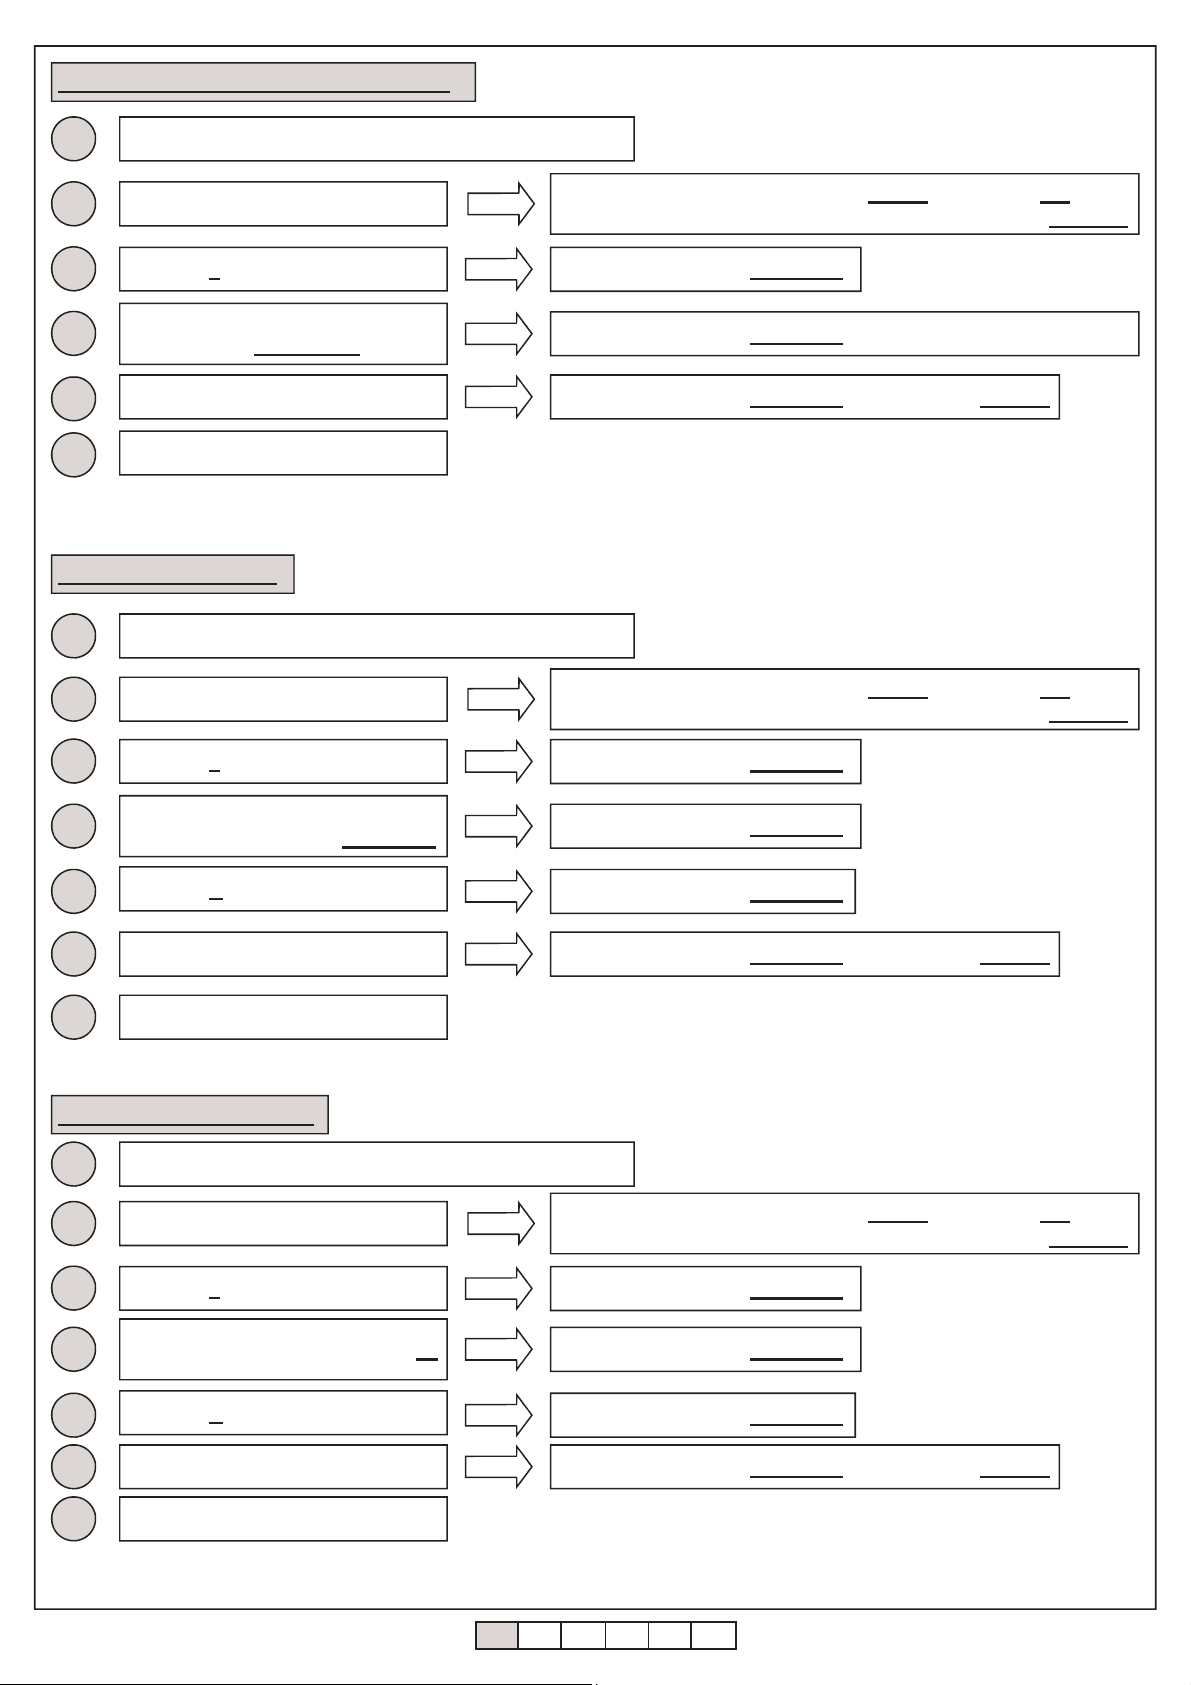
4 Cambiare il codice Master
Inserire il codice MASTER (1-8 cifre). Vedi paragrafo 3
2
Convalidare premendo il tasto B• Bip lungo + led AMBRA accesso FISSO - Convalida OK
• Serie di bip brevi + lampeggio led AMBRA - Convalida NON OK
3
Premere 0
4
Digitare la locazione di memoria del
master00
5
Digitare il nuovo codice MASTER
da 1 a 8 cifre
6
Premere A (solo se il codice di
accesso è inferiore ad 8 cifre)
7
Premere B per uscire dal menu dal
La tastiera emette un Bip lungo
La tastiera emette un Bip lungo
La tastiera emette un Bip lungo
La tastiera emette un Bip lungo + led ambra si spegne
8
Cambio codice terminato
Il codice master viene utilizzato solo per la fase di programmazione.
Si consiglia in caso di cambio del codice master di riportarlo nell’apposito spazio sottostante.
NUOVO CODICE
MASTER
Se il codice è uguale a 8 cifre, la tastiera emette un Bip lungo
per indicare la memorizzazione del codice.

ITA ENG FRA ESP DEU POR
6-1622368 REV.2 26/06/2014 4 /12
Se il codice è uguale a 8 cifre, la tastiera emette un Bip lungo
per indicare la memorizzazione del codice.
1
5 Memorizzare un codice Utente
Inserire il codice MASTER (1-8 cifre). Vedi paragrafo 3
2
Convalidare premendo il tasto B• Bip lungo + led AMBRA accesso FISSO - Convalida OK
• Serie di bip brevi + lampeggio led AMBRA - Convalida NON OK
3
Premere 0
4
Digitare la locazione di memoria dell’u-
tentedamemorizzare 01 a 99
5
Digitare il nuovo codice da 1 a 8
cifre per l’accesso dell’utente
6
Premere A (solo se il codice di
accesso è inferiore ad 8 cifre)
7
Premere B per uscire dal menu dal
La tastiera emette un Bip lungo
La tastiera emette un Bip lungo
La tastiera emette un Bip lungo
La tastiera emette un Bip lungo + led ambra si spegne
8
Memorizzazione terminata
La tastiera associa automaticamente il canale di trasmissione 1 ad ogni nuovo utente
Si consiglia di compilare il registro degli utenti per facilitare futuri interventi di modifica o di cancellazione.
1
6 Assegnare i canali di trasmissione
Inserire il codice MASTER (1-8 cifre). Vedi paragrafo 3
2
Convalidare premendo il tasto B• Bip lungo + led AMBRA accesso FISSO - Convalida OK
• Serie di bip brevi + lampeggio led AMBRA - Convalida NON OK
3
Premere 3
4
Digitare la locazione di memoria
dell’utente da abilitare 01 a 99
5
Premere i canali da abilitare da 1 a
10 (0)
6
7
Premere B per uscire dal menu dal
La tastiera emette un Bip lungo
La tastiera emette un Bip lungo
La tastiera emette un BIP ad ogni abilitazione
La tastiera emette un Bip lungo
La tastiera emette un Bip lungo + led ambra si spegne
8
Assegnazione terminata
Premere Aper memorizzare
La tastiera associa automaticamente il canale di trasmissione 1 ad ogni nuovo utente
Si consiglia di compilare il registro degli utenti per facilitare futuri interventi di modifica o di cancellazione.
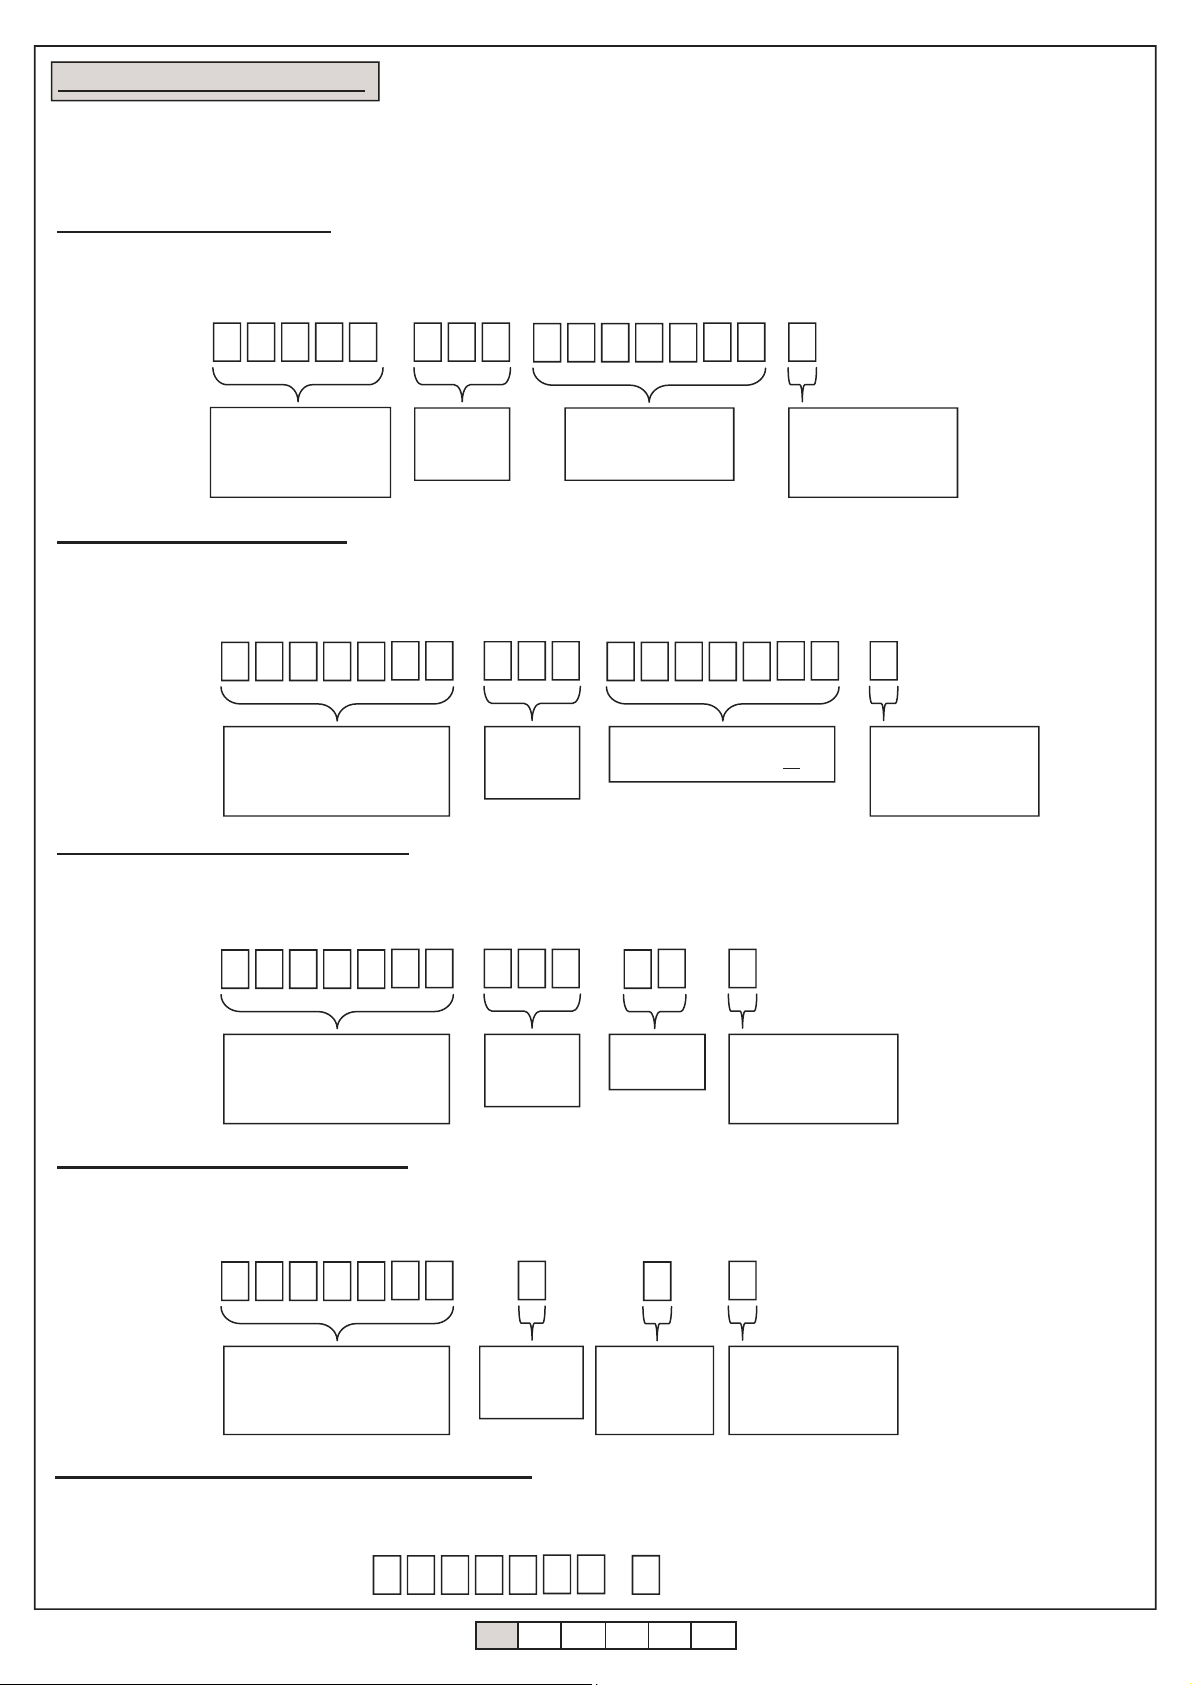
9 8 7 6 A
Introduzione codice
utente + A per
conferma
1
Pressione sul canale
abilitato dell’utente
Esempio sequenza attivazione tastiera ( il codice utilizzato 9876 è casuale) e trasmissione con canale 1
ITA ENG FRA ESP DEU POR
6-1622368 REV.2 26/06/2014 5 /12
1
7 Impostare la durata della trasmissione
Inserire il codice MASTER (1-8 cifre). Vedi paragrafo 3
2
Convalidare premendo il tasto B• Bip lungo + led AMBRA accesso FISSO - Convalida OK
• Serie di bip brevi + lampeggio led AMBRA - Convalida NON OK
3
Premere 1
4
5
Inserire la durata della trasmissione
da abilitare da 1s a 10s (0)
6
Premere B per uscire dal menu
La tastiera emette un Bip lungo
La tastiera emette un Bip lungo e memorizza il tempo inserito.
La tastiera emette un Bip lungo + led ambra si spegne
Impostazione terminata
Come impostazione predefinita, la durata della trasmissione è impostata a 2 secondi.
Il tempo di trasmissione impostato è valido per TUTTI gli utenti e per TUTTI i canali di trasmissione
1
8 Cancellare un utente
Inserire il codice MASTER (1-8 cifre). Vedi paragrafo 3
2
Convalidare premendo il tasto B• Bip lungo + led AMBRA accesso FISSO - Convalida OK
• Serie di bip brevi + lampeggio led AMBRA - Convalida NON OK
3
Premere 9
4
Digitare la locazione di memoria
dell’utente da cancellare da 01 a 99
6
7
Premere B per uscire dal menu
La tastiera emette un Bip lungo
La tastiera emette un Bip lungo
La tastiera emette un Bip lungo
La tastiera emette un Bip lungo + led ambra si spegne
8
Cancellazione terminata
Premere Aper confermare
1
9 Cancellare tutti gli utenti
Inserire il codice MASTER (1-8 cifre). Vedi paragrafo 3
2
Convalidare premendo il tasto B• Bip lungo + led AMBRA accesso FISSO - Convalida OK
• Serie di bip brevi + lampeggio led AMBRA - Convalida NON OK
3
Premere 8
4
Digitare la locazione di memoria 99
6
7
Premere B per uscire dal menu
La tastiera emette un Bip lungo
La tastiera emette un Bip lungo
La tastiera emette un Bip lungo
La tastiera emette un Bip lungo + led ambra si spegne
8
Cancellazione totale terminata
Premere Aper confermare
Si consiglia di aggiornare il registro degli utenti
Si consiglia di aggiornare il registro degli utenti

ITA ENG FRA ESP DEU POR
6-1622368 REV.2 26/06/2014 6 /12
Codice Master
(1-8 cifre)
Convalidare
con B
Convalida
OK? Serie di bip brevi + lampeggio
led AMBRA
FINE
Bip lungo + led AMBRA
accesso FISSO
Memorizzazione di un
codice Utente
Premere 0
+
Digitare la locazione di
memoria dell’utente da
memorizzare da 01 a 99
Cambiare il codice
master
Premere 0
+
Digitare la locazione di
memoria del codice
master 00
Impostare la durata
della trasmissione
Premere 1
+
Digitare la durata della
trasmissione
da 1s (1) a 10s (0)
Cancellare tutti gli
utenti
Premere 8
+
Digitare 99
Digitare il nuovo
codice da 1 a 8 cifre
Cancellare un utente
Premere 9
+
Digitare la locazione di
memoria dell’utente da
cancellare da 01 a 99
Assegnare i canali di
trasmissione
Premere 3
+
Digitare la locazione di
memoria dell’utente da
01 a 99
Premere i canali da
abilitare da 1 a 10 (0)
A? Salvataggio dati
B?
B?
Convalida con B.
Il led ambra si spegne
FINE
SI
SI
SI
Vedi Paragrafo 3
SI
NO
10. Riassunto programmazione

ITA ENG FRA ESP DEU POR
6-1622368 REV.2 26/06/2014 7 /12
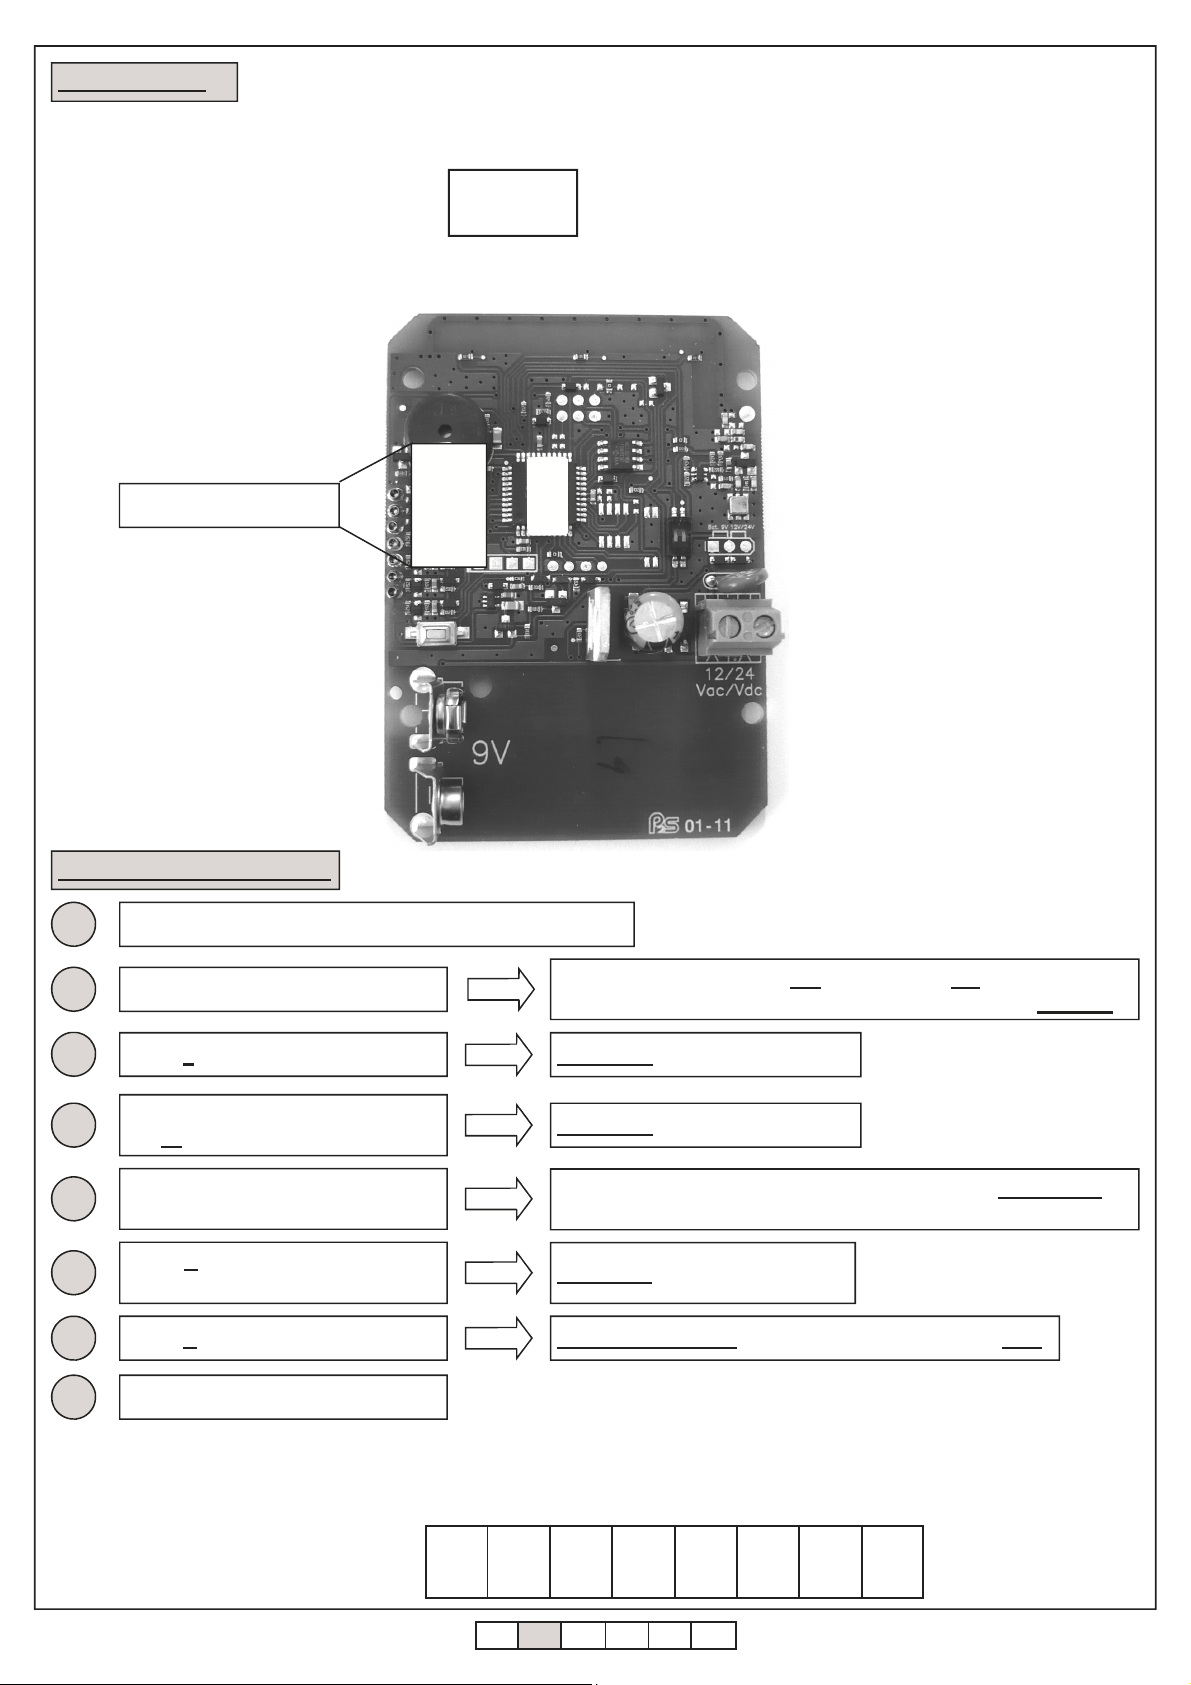
11. Impostazione DIP-SWITCH
Sulla parte posteriore della scheda è presente un DIP-SWITCH che permette di attivare / disattivare il buzzer e la
retroilluminazione della tastiera.
Per le operazione di impostazione è consigliato di attivare il buzzer.
1 2
ON
DIP SWITCH 1
On: retroilluminazion ATTIVA
Off:retroilluminazion DISATTIVA
DIP SWITCH 2
On: Buzzer ATTIVO
Off: Buzzer DISATTIVO
In caso di funzionamento a batteria, una volta terminata la programmazione si consiglia se possibile di mettere entrambi i
dip-switch in posizione OFF per consentire un risparmio energetico maggiore ed aumentare cosi la durata di vita della
batteria.
1
12 Reset totale dispositivo
Premere e mantenere premuto il tasto di reset.
2
La tastiera emette un BIP
3
La tastiera emette due BIP
4
5
La tastiera emette tre BIP
6
La tastiera emette un BIP continuo
Reset totale terminato
ATTENZIONE: IN CASO DI RESET TOTALE DEL DISPOSITIVO, TUTTI GLI UTENTI VENGONO CANCELLATI, IL
CODICE MASTER (VEDI PARAGRAFO 3) E TUTTE LE IMPOSTAZIONI TORNANO AD ESSERE QUELLE
IMPOSTATE DI FABBRICA.
NON rilasciare il tasto
NON rilasciare il tasto
NON rilasciare il tasto
Rilasciare il tasto
ITA ENG FRA ESP DEU POR
6-1622368 REV.2 26/06/2014 8 /12
13 Esempio di programmazione
Questo esempio riporta la programmazione del dispositivo con il codice utente “123456” abilitato a trasmettere sul canale
“4” con una durata di trasmissione di 6 secondi. Il codice master impostato di fabbrica per questo esempio è “9876”.
Si consiglia sempre di modificare il codice master impostandone uno proprio.
1. Cambio del codice Master
Qui sotto viene riportato la sequenza da introdurre per cambiare il codice master (nel nostro esempio “9876”) con il
codice “456789” (questo codice deve essere scelto dal cliente, vedi paragrafo 3 e 4)
9 8 7 6 B
Menu programmazione
aperto.
Bip lungo + Led ambra
accesso fisso.
0 0 0
Modifica
Utente
master
4 5 6 7 8
Inserimento nuovo
codice master e
memorizzazione (A)
9 A B
Uscita dal menu di
programmazione
Bip lungo + Led
ambra spento
2. Impostazione codice utente
Qui sotto viene riportato la sequenza da introdurre per creare un utente sull’allocazione di memoria “01” con il codice di
accesso “123456”. Vedi paragrafo 5.
4 5 6 7 8
Menu programmazione
aperto.
Bip lungo + Led ambra
accesso fisso.
9 B 0 0 1
Modifica
Utente
01
1 2 3 4 5
Inserimento codice utente in
posizione memoria 01
6 A B
Uscita dal menu di
programmazione
Bip lungo + Led
ambra spento
3. Impostazione canale trasmissione
Come impostazione predefinita, ad ogni nuovo utente il dispositivo assegna automaticamente il canale 1.
Qui sotto viene riportato la sequenza da introdurre per abilitare il canale di trasmissione “4” all’utente posizionato alla
allocazione di memoria 01.Vedi paragrafo 6.
4 5 6 7 8
Menu programmazione
aperto.
Bip lungo + Led ambra
accesso fisso.
9 B 3 0 1
Modifica
Utente
01
4
Abilitazione
canale 4
A B
Uscita dal menu di
programmazione
Bip lungo + Led
ambra spento
4. Impostazione durata trasmissione
Come impostazione predefinita, la durata della trasmissione è impostata a 2 secondi.
Qui sotto viene riportato la sequenza da introdurre per impostare la durata di trasmissione a 6 secondi per TUTTI i canali
e TUTTI gli utenti. Vedi paragrafo 7.
4 5 6 7 8
Menu programmazione
aperto.
Bip lungo + Led ambra
accesso fisso.
9 B 1
Modifica
durata
trasmissione
6
Impostazione
durata
trasmissione a
6 secondi
B
Uscita dal menu di
programmazione
Bip lungo + Led
ambra spento
5. Memorizzazione della tastiera sull’automazione
Entrare in modalità apprendimento sulla centralina/ricevitore in uso, inserire il codice utente (es.123456) sulla tastiera
RK3, premere il tasto A e successivamente premere il tasto del canale (es.4) che si desidera memorizzare.
1 2 3 4 5 6 A 4

ITA ENG FRA ESP DEU POR
6-1622368 REV.2 26/06/2014 9 /12
Posizione
memoria Codice utente Nome Cognome Canali attivi
1 2 3 4 5 6 7 8 9 0
01
02
03
04
05
06
07
08
09
10
11
12
13
14
15
16
17
18
19
20
21
22
23
24
25
26
27
28
29
30
31
32
33
Registro utenti

ITA ENG FRA ESP DEU POR
6-1622368 REV.2 26/06/2014 10 /12
Posizione
memoria Codice utente Nome Cognome Canali attivi
1 2 3 4 5 6 7 8 9 0
34
35
36
37
38
39
40
41
42
43
44
45
46
47
48
49
50
51
52
53
54
55
56
57
58
59
60
61
62
63
64
65
66

ITA ENG FRA ESP DEU POR
6-1622368 REV.2 26/06/2014 11 /12
Posizione
memoria Codice utente Nome Cognome Canali attivi
1 2 3 4 5 6 7 8 9 0
67
68
69
70
71
72
73
74
75
76
77
78
79
80
81
82
83
84
85
86
87
88
89
90
91
92
93
94
95
96
97
98
99
GARANZIA - La garanzia del produttore ha validità a termini di legge dalla data stampigliata sul prodotto ed è limitata alla riparazione o sostituzione
gratuita dei pezzi riconosciuti dallo stesso come difettosi per mancanza di qualità essenziali nei materiali o per deficienza di lavorazione. La garanzia
non copre danni o difetti dovuti ad agenti esterni, deficienza di manutenzione, sovraccarico, usura naturale, scelta del tipo inesatto, errore di montaggio,
o altre cause non imputabili al produttore. I prodotti manomessi non saranno né garantiti né riparati.
I dati riportati sono puramente indicativi. Nessuna responsabilità potrà essere addebitata per riduzioni di portata o disfunzioni dovute ad interferenze
ambientali. La responsabilità a carico del produttore per i danni derivati a chiunque da incidenti di qualsiasi natura cagionati da nostri prodotti difettosi,
sono soltanto quelle che derivano inderogabilmente dalla legge italiana.

ALLMATIC S.r.l
32020 Lentiai - Belluno – Italy
Via dell-Artigiano, n°1 – Z.A.
Tel. 0437 751175 – 751163 r.a. Fax 0437 751065
RK3
ROLLING CODE RADIO KEYBOARD
Manual

ITA ENG FRA ESP DEU POR
6-1622368 REV.2 26/06/2014 2 /12
1 2 3
4 5 6
7 8
1. Technical features
Reference RK3
Keys Backlit polycarbonate
Channels 10
Programming Master Code 1
Users codes 99
Relays time setup 1 to 10 seconds
Compatibility With all Allmatic’s Rolling Code products
Memory EEPROM (keeps programming safe even in case of power cut)
Range 120 mt in open space
Green led Key pressure / error and confirmation signal / transmission in progress
Red led Keypad unlocked indicator
Amber led Configuration menu entrance
Buzzer 1
Power supply 12/24V AC/DC input and/or 9V battery
Max absorption 27mA in transmission with 9V battery power supply
120mA in transmission with 24Vac power supply
IP rating 65
Dimensions (mm) 119,5x83,5x40
2. Mounting
3 (8x30 CSK)
2 (M3x6mm) security screws
ITA ENG FRA ESP DEU POR
6-1622368 REV.2 26/06/2014 3 /12
3. Master Code
ATTENTION: Before making any operation, take the adhesive you find on the back of the keyboard and put it on
the space here below (as shown in the drawing) where it is written the master code set by the factory.
ATTENTION: In case of total reset of the device, the master code will come to be the one indicated. The loss of
this code will make the keyboard unusable.
Attach here the adhesive or
write the master code
XXXX
MASTER CODE
1
4 Changing the master code
Enter the MASTER code (1-8 figures). See Paragraph 3
2
Confirm by pressing the B• Long Beep + Amber led FIX ON - Confirm OK
• Series of short Beeps + Amber led flashing - Confirm NOT OK
3
Press 0
4
Enter the memory location of the ma-
ster 00
5
Enter the new MASTER code from
1 to 8 figures long
6
Press A (only if the access code is
shorter that 8 figures)
7
Press B to exit
Long Beep emitted bythekeyboard
Long Beep emitted bythekeyboard
Long Beep emittedbythekeyboard
Long Beep emitted by the keyboard + amber led OFF
8
Code changing terminated
The master code is used only for programming.
In case of changing of the master code, it is suggested to write it down here below.
NEW MASTER
CODE
If the code is 8 figures long, the keyboard emits a Long Beep to
indicate that the code is memorized

ITA ENG FRA ESP DEU POR
6-1622368 REV.2 26/06/2014 4 /12
If the code is 8 figures long, la the keyboard emits a Long Beep
to indicate the memorizing of the code.
1
5 Memorizing a new user code
Enter the master code (1-8 figures). See paragraph 3
2
Confirm by pressing B• Long Beep + Amber led FIX ON - Confirm OK
• Series of short Beeps + Amber led flashing - Confirm NOT OK
3
Press 0
4
Enter the memory location of the user
tobememorize 01 to 99
5
Enter the new code from 1 to 8
figures long for the user access
6
Press A (only if the access code is
shorter that 8 figures)
7
Press B to exit
Long Beep emitted bythekeyboard
Long Beep emitted bythekeyboard
Long Beep emittedbythekeyboard
Long Beep emitted by the keyboard + amber led OFF
8
Memorizing terminated
The keyboard automatically associates the transmission channel 1 to every new user
It is suggested to fill the users book in order to facilitate the future maintenance for changing or cancellation.
1
6 Assigning the transmission channels
Enter the master code (1-8 figures). See paragraph 3
2
Confirm by pressing B• Long Beep + Amber led FIX ON - Confirm OK
• Series of short Beeps + Amber led flashing - Confirm NOT OK
3
Press 3
4
Enter the memory location of the user
tobeenabled01 to 99
5
Enter the channels to be enabled
from 1 to 10 (0)
6
7
Press Bto exit
Long Beep emitted bythekeyboard
Long Beep emitted bythekeyboard
The keyboard emits a Beep for every abilitation
Long Beep emittedbythekeyboard
Long Beep emitted by the keyboard + amber led OFF
8
Assigning terminated
Press Ato confirm
The keyboard automatically associates the transmission channel 1 to every new user
It is suggested to fill the users book in order to facilitate the future maintenance for changing or cancellation.
9 8 7 6 A
Digit user cod + A to
confirm
1
Press on the user’s
enabled code
Example of keyboard activation sequence (il code 9876 is random) and trasmission with channel 1

ITA ENG FRA ESP DEU POR
6-1622368 REV.2 26/06/2014 5 /12
1
7 Transmission duration setup
Enter the master code (1-8 figures). See paragraph 3
2
Confirm by pressing B• Long Beep + Amber led FIX ON - Confirm OK
• Series of short Beeps + Amber led flashing - Confirm NOT OK
3
Press 1
4
5
Enter the transmission time to be
enabled from 1s to 10s (0)
6
Press B to exit
Long Beep emitted bythekeyboard
Long Beep emitted by the keyboard and memorize the time entered
Long Beep emitted by the keyboard + amber led OFF
Setup terminated
The transmission time is set to 2 seconds by default.
The transmission time setting applies to ALL users and ALL transmission channels
1
8 Deleting one user
Digit the master code (1-8 figures). See paragraph 3
2
Confirm by pressing B• Long Beep + Amber led FIX ON - Confirm OK
• Series of short Beeps + Amber led flashing - Confirm NOT OK
3
Press 9
4
Enter the memory location of the
user to be delated from 01 to 99
6
7
Press B to exit
Long Beep emitted bythekeyboard
Long Beep emitted bythekeyboard
Long Beep emitted bythekeyboard
Long Beep emitted by the keyboard + amber led OFF
8
Deleting terminated
Press Ato confirm
1
9 Deleting all users
Digit the master code (1-8 figures). See paragraph 3
2
Confirm by pressing B• Long Beep + Amber led FIX ON - Confirm OK
• Series of short Beeps + Amber led flashing - Confirm NOT OK
3
Press 8
4
Enter the memory location 99
6
7
Press B to exit
Long Beep emitted bythekeyboard
Long Beep emitted bythekeyboard
Long Beep emitted bythekeyboard
Long Beep emitted by the keyboard + amber led OFF
8
Total deleting terminated
Press Ato confirm
It is suggested to update the user register
It is suggested to update the users book

ITA ENG FRA ESP DEU POR
6-1622368 REV.2 26/06/2014 6 /12
Master code
(1-8 figures)
Confirm by
pressing B
Confirma-
tion OK? Series of short beeps + AMBER
led flashing
END
Long beep + AMBER led fix ON
Memorizing a new
user code
Press 0
+
Enter the memory
location of the user to
memorize from 01 to 99
Changing the master
code
Press 0
+
Enter the memory
location of the master
code 00
Transmission
duration setup
Press 1
+
Enter the duration of
the transmission
from 1s (1) to 10s (0)
Deleting all users
Press 8
+
Enter 99
Enter the new code
from 1 to 8 figureslong
Deleting one user
Press 9
+
Enter the memory
location of the user to
be deleted from 01 to
99
Assigning the
transmission channels
Press 3
+
Enter the memory
location of the user
from 01 to 99
Press the channels to be
enabled from 1 to 10 (0)
A? Save data
B?
B?
Confirm by pressing B.
The amber led goes off
END
Yes
Yes
Yes
See paragraph 3
YES
NO
10. Programming summary

ITA ENG FRA ESP DEU POR
6-1622368 REV.2 26/06/2014 7 /12
11. DIP-SWITCH setup
On the back side of the card there is a DIP-SWITCH that allows to enable / disable the buzzer and the backlighting of the
keyboard.
It is suggested to enable the buzzer during the setup operation.
1 2
ON
DIP SWITCH 1
On: backlighting ENABLED
Off: backlighting DISABLED
DIP SWITCH 2
On: Buzzer ENABLED
Off: Buzzer DISABLED
In case of battery supply, once the programming is terminated it is suggested to turn both the dip-switch OFF in order to
improve the efficiency and increase the lifetime of the battery.
1
12 Device Total Reset
Keep reset key pressed
2
Beep emittedbythe keyboard
3
Two Beeps emittedbythe keyboard
4
5
Three Beeps emittedbythekeyboard
6
Thekeyboardkeeps onBeeping
Total Reset terminated
ATTENTION: IN CASE OF TOTAL RESET ALL THE USERS ARE DELETED, THE MASTER CODE (SEE
PARAGRAPH 3) AND ALL THE SETTINGS RETURN TO BE THOSE SET BY THE FACTORY.
DO NOT release thekey
DO NOT release thekey
DO NOT release thekey
Release the key

ITA ENG FRA ESP DEU POR
6-1622368 REV.2 26/06/2014 8 /12
13 Programming example
This is an example for programming the device with user code “123456” enabled to transmit on channel “4” with a
transmission duration of 6 seconds. The master code set by the factory in this example is “9876”.
It is suggested to modify the master code in order to set a new one.
1. Change of the master code
Here below it is shown the sequence to enter to change the master code (in this example it is “9876”) with the code
“456789” (this code must be choosen by the client, see paragraph 3 and 4)
9 8 7 6 B
Programming menu
open.
Long beep + amber led
ON fix.
0 0 0
User ma-
ster editing
4 5 6 7 8
Entering new master
code and memorizing
(A)
9 A B
Exit programming
menu.
Long beep + Amber
led OFF
2. User Code Setup
Here below it is shown the sequence to enter to create a new user on the memory location “01” with the access code
“123456”. See paragraph 5.
4 5 6 7 8
Programming menu open.
Long beep + amber led ON
fix.
9 B 0 0 1
Edit
User
01
1 2 3 4 5
Enter user code in memory
location 01
6 A B
Exit programming
menu.
Long beep + Amber
led OFF
3. Transmission channel setup
As default settings, the device assigns channel 1 to every new user.
Here below it is shown the sequence to enter to enable the transmission channel “4” to the user on memory location 01.
See paraghaph 6.
4 5 6 7 8
Programming menu open.
Long beep + amber led ON
fix.
9 B 3 0 1
Edit
User
01
4
Enabling
channel 4
A B
Exit programming
menu.
Long beep + Amber
led OFF
4. Transmission Duration Setup
As default settings, the transmission duration is set to 2 seconds.
Here below it is shown the sequence to enter to set the transmission duration to 6 seconds for ALL channels and ALL
users. See paragraph 7.
4 5 6 7 8
Programming menu open.
Long beep + amber led ON
fix.
9 B 1
Edit tran-
smission
duration01
6
Set
transmission
duration to 6
seconds
B
Exit programming
menu.
Long beep + Amber
led OFF
5. Learning the keypad on the installation
Enable the learning mode on the control unit/receiver used, press on the RK3 the user code (ex.123456), press A and
after press the key of the channel (ex.4) you want to memorize.
1 2 3 4 5 6 A 4
Other manuals for RK3
1
Table of contents
Languages:
Other Allmatic Keypad manuals


