AllPetSolutions AUTO-D1-CAM-WIFI User manual
User Guide

2
Thank you for purchasing the All Pet Solutions®Automatic Pet
Feeder.
This User Guide is intended to provide you with guidelines to
ensure that operation of this product is safe and does not pose
risk to the user.
Any use that does not conform to the guidelines described in
this User Guide may void the limited warranty.
Please read all directions before using the product and retain
this guide for reference. This product is intended for household
use only.
This product is covered by a limited one-year warranty.

3
Control Panel
Top Cover
Body
MIC
Photo Sensor
Food Outlet
Lock
Camera
Night Light
Food Tray
Connection Indicator
Power IndicatorReset
DC Power Socket Power Switch Battery Compartment
Alarm Indicator

4
• Do NOT use this device for puppies and kittens under 7
months.
The automatic feed dispenser is only suitable for dry food (5 –
15 mm in size).
• Do NOT immerse control panel in water. The base of the unit
should NOT be submerged in water at anytime, as this may
damage electronic components.
• Do NOT place anything on top of the pet feeder.
• Dispose of all packaging materials properly. Some items may
be packed in polybags; these bags could cause suocation;
keep away from children and pets.
• To reduce the risk of injury, close supervision is necessary
when an appliance is used by or near children.
• Intended for use with dogs or cats only.
• Do NOT use outdoors. FOR INDOOR HOUSEHOLD USE ONLY.
• For dry food use only.
• Do NOT use wet, canned or moist food.
• Pet feeder should be placed on a level surface.
• Before leaving for extended time, always replace batteries
with new batteries.
• Do NOT disassemble the pet feeder other than components
as instructed in this operating guide.
• Do NOT unplug by pulling on power cord. To unplug, grasp
the plug, not the power cord.
• Do NOT operate if it has a damaged power cord or plug.
• Do NOT place or store the feeder where it can fall or be
pulled into a tub or sink.
• Examine the pet feeder before installation. Do NOT plug in if
there is water on the power cord or plug.

5
• To avoid tripping, always position power cord out of the way.
Caution
• Do NOT allow pets to chew on or swallow any parts.
• Do NOT attempt repairs on the pet feeder yourself.
• Do NOT install or store pet feeder where it will be exposed to
weather or temperatures below 5°C.
• Do NOT lift pet feeder by lid. Lift and carry feeder using both
hands and hopper base, while keeping unit in upright position.

6
Before using the automatic feed dispenser:
1. Plug the feeder into a power outlet with the mains plug.
Optionally, you can put in 3 x C batteries to ensure the device
continues working in case of a power failure.
Please note: Online access via the app is only possible if your
feeder is plugged in at the mains.
2. Switch on the main power switch at the bottom so that
POWER shows a red light.
3. The lid is released by pressing the button on the lock. The
feed container as well as the control panel are underneath the
lid.
4. Fill the automatic feed dispenser with dry food. Insert the
bowl including the tray into the bottom of the automatic feed
dispenser. By pressing the buttons next to the bowl it can be
inserted or removed again.
5. To congure your Smart Pet Feeder, you’ll need to
download the Tuya App. Available on the Apple App
Store and Google Play.
6. Ensure you are using 2.4GHz signal for conguration. Follow
the steps below to check if you need to change the band on
your router.

7
How can I tell if my Wi-Fi is 2.4 GHz?
The All Pet Solutions®Automatic Pet Feeder is engineered
to work on the 2.4 GHz frequency band because 2.4 GHz
has better range than the 5 GHz frequency band. During the
sync process, both your smartphone and your feeder need to
connect to the 2.4 GHz signal.
Android users
Navigate to Settings>Connections>WiFi
iPhone users
Navigate to Settings>WiFi
You’ll now see a list of available WiFi connections. The
WiFi you’re connected to will be shown in the list and have
“connected” next to it (Android) or a tick (iPhone). Look at the
name of your Wi-Fi network:
A 2.4 GHz network may have “24G”, “2.4”, or “24”
appended to the end of the network name. For example:
“Myhomenetwork2.4”.
A 5 GHz network may have “5G” or “5” appended to the end of
the network name, for example “Myhomenetwork5”.
If you have a router that sends out 2.4 GHz as well as 5 GHz,
you have to make sure you choose the right frequency band.
Some dual-band routers use a joint SSID (name of the network)
for both frequencies. If that is the case, the coupling will only
work if your rst separate both frequency bands in the settings
of your router and assign a separate SSID for both frequencies.

8
How do I change the band on my router to 2.4GHz?
Every router has a conguration page where the user can
change and alter settings to personalize their wireless network.
Every router has an IP address (internal Protocol) that can be
entered into a web browser’s address bar.
The most common universal IP addresses are:
192.168.0.1 OR 192.196.1.1
After you entered one of those two addresses, a username and
password box will show up.
Please note that dierent network providers might use
dierent IP addresses to access the settings page. For
example, if your network is BT you need to enter 192.168.1.254
into the address bar.
The default login information should be located on a sticker on
the actual router. Typically, it will be :
Username: admin
Password: blank or admin
Once you have logged in, head to “Wireless” and make sure
your 5GHz wireless conguration is not synced with 2.4GHz.
This step may vary between the providers. Please contact
your internet provider if you require further assistance with
separating your SSID.

9
Pairing your smartphone with the feeder
Open the app and click on REGISTER to create an account.
To ensure you are able to pair your smartphone successfully
check that:
- The feeeder is switched on and the camera inidcator is slowly
blinking. If this is not the case, press “SET” button for 5 seconds
to reset the feeder.
- You are using 2.4G WiFi for conguration.
Adding new device
To add device manually, follow the steps below:
1. Click Security & Sensor > Smart Camera
2. Click Other Mode/Next Step
1. 2.
10
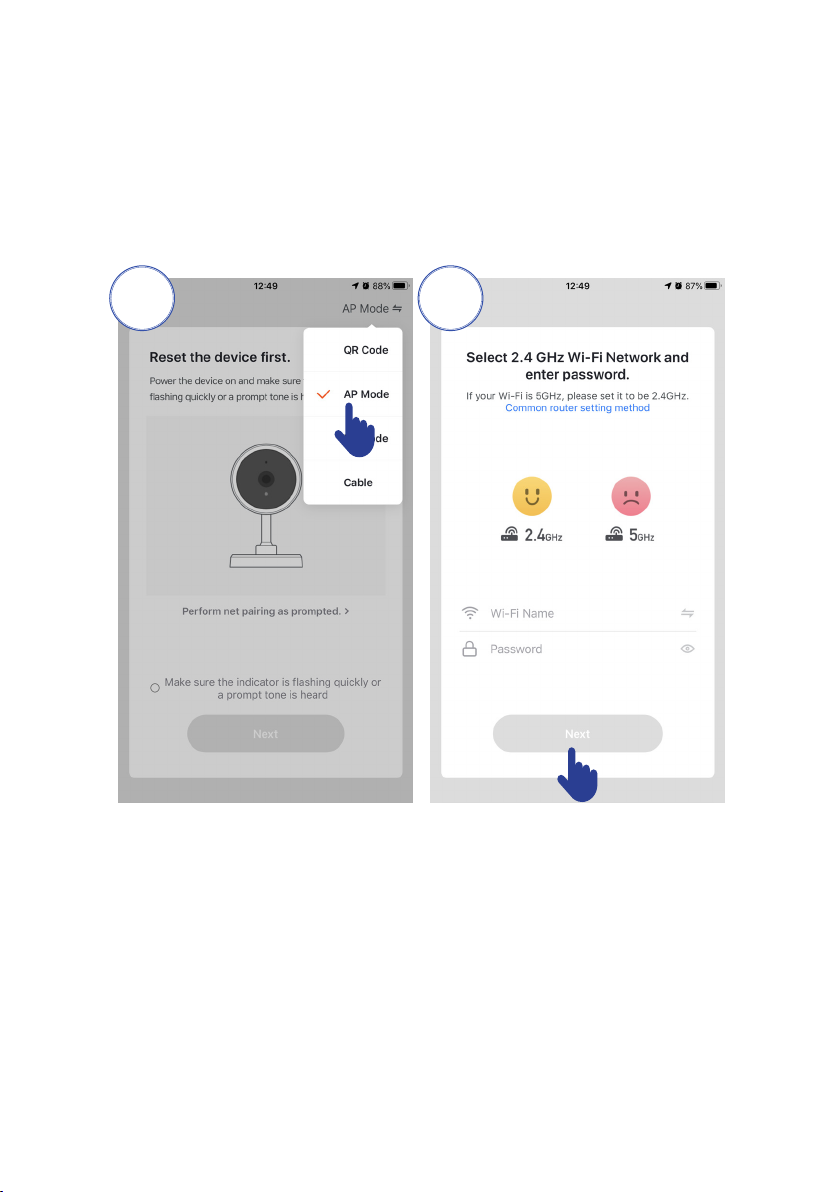
3. Choose AP Mode and click next.
4. Change network to 2.4GHz WiFi network and enter your
WiFi name and password to connect to your network. If your
smartphone is connected to WiFi network, its name will be
automatically displayed.
3. 4.
Enter your WiFi network password and click ”Next”.
5. Find and connect your smartphone to “SmartLife-XXXX”
network. The “XXXX” will be numbers.
6. The app will begin the coupling process and should connect
to the feeder after a short wait.
11
The pet feeder should be placed near (max. distance 3
m) your router while the connection is established. At the
same time, your smartphone should be quite close
(max. distance 1 m) to the feed dispenser.
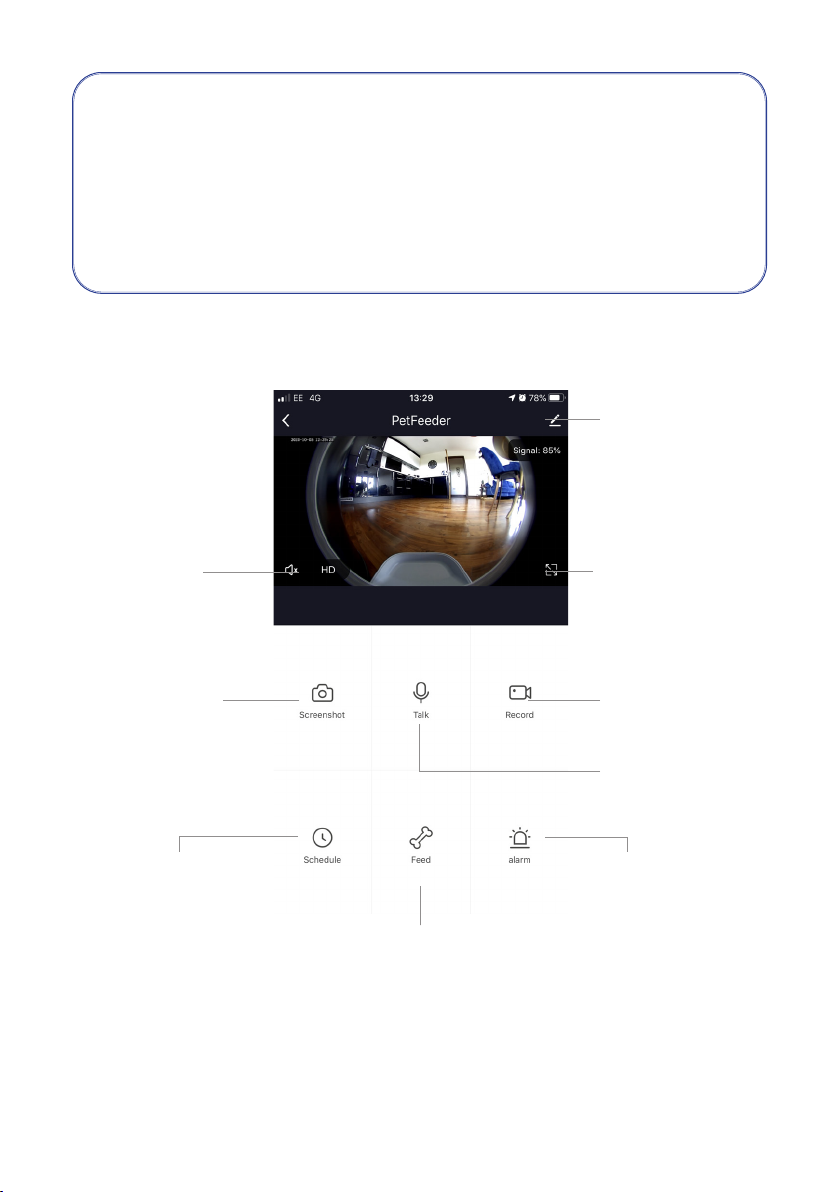
How to use the app to control your feeder
Record Videos
Full Screen
Settings
Talk to Your Pet
Take Photos
Listen to
Your Pet
Schedule Feeds
Manual Feed
Please note: the one way talking is a default factory setting.
This can be changed in the settings menu.
Motion Detection
Notication
12
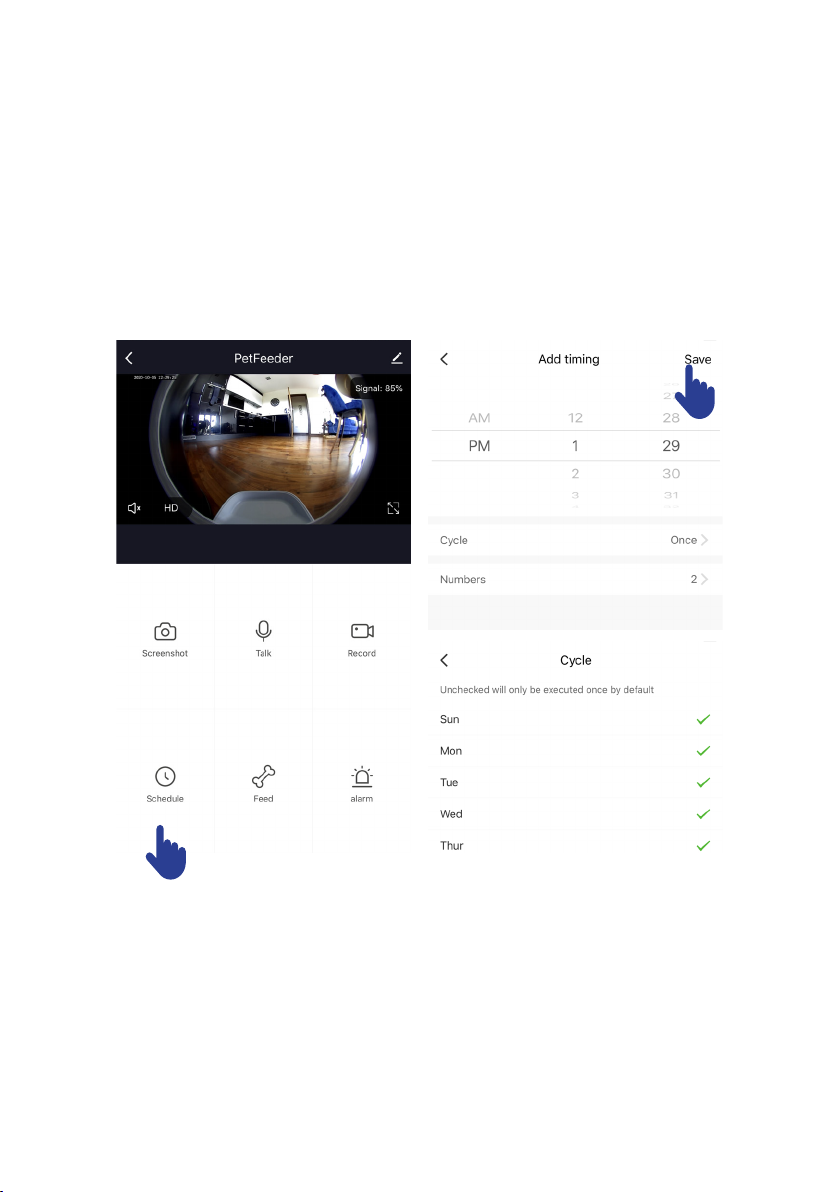
Programming the feeding times
Click “Schedule” to add feeding times. Here you can set
dierent feeding times and portions. You can set up to 4 meals
and 10 portions per meal.
In the overview of all feeding times, you can simply activate or
deactivate individual feeding times.
Manual feeding
Press “Feed” and choose the number of portions that you
want to give out right now.
2. By pressing “Short Record” you can record a 10-second long
audio message. This is played at meal time to get your pet’s
attention.

13
3. Under “Feed Record” you can see all previous feeding times.
Motion detection
Under “Alarm” you can activate the motion detection of your
camera to receive notication when your pet approaches the
dispenser.
Other settings
You can access additional features by going into the settings
menu. These are:
- Checking the feeder’s status.
- Activating IR (night) vision
- Activating and deactivating motion detection
- Flipping the display on the screen
- Sharing your device with others
- You can also set the audio mode to one-way or two-way
14
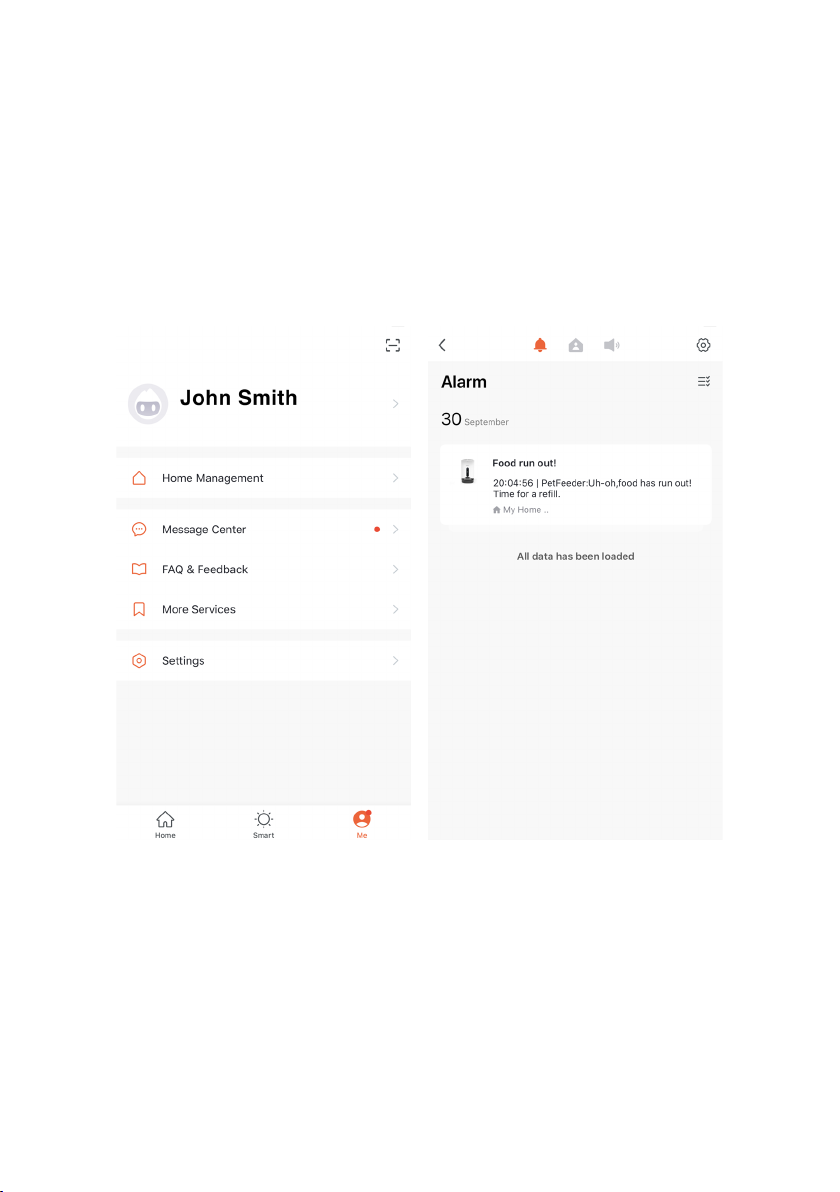
Notications centre
Under “Me” and “Message Centre” you can activate or
deactivate notications and manage these.
If you activate notications, you get messages at each feeding
time or if the feed container is empty, and also when your pet
approaches the feeder.

15
1. Be sure the unit is turned o and power is disconnected
before attempting to clean.
2. Wipe the feeder’s body with a soft cloth dipped in a small
amount of soapy water. Do not use a fully soaked cloth.
3. The food tray can be removed for cleaning. To do that, press
the buttons on the right and left to release the bowl. Pull the
feed container out upwards.
Please note: this part is not dishwasher safe.
4. Never submerge the base of this unit in water as it contains
vital electronics and may short circuit.
5. Ensure that all parts are clean and fully dry before
attempting to operate or re-ll the food compartment.
All Pet Solutions Ltd, 203 Riverside Way,
Uxbridge, UB8 2YF, United Kingdom
www.allpetsolutions.co.uk
Other AllPetSolutions Pet Care Product manuals


