Allsaints Single time User manual

T H E W A T C H C O L L E C T I O N - I N S T R U C T I O N S

E N G L I S H 3 - 9
E S P A Ñ O L 10 - 17
F R A N Ç A I S 18 - 25
D EU T S C H 26 - 33
I T A L I A N O 34 - 41
T H E W A T C H C O L L E C T I O N
S E T T I N G T H E T I M E
1. Pull out the crown to position II.
2. Turn the crown until you reach the
correct time.
3. Push the crown back to position I.
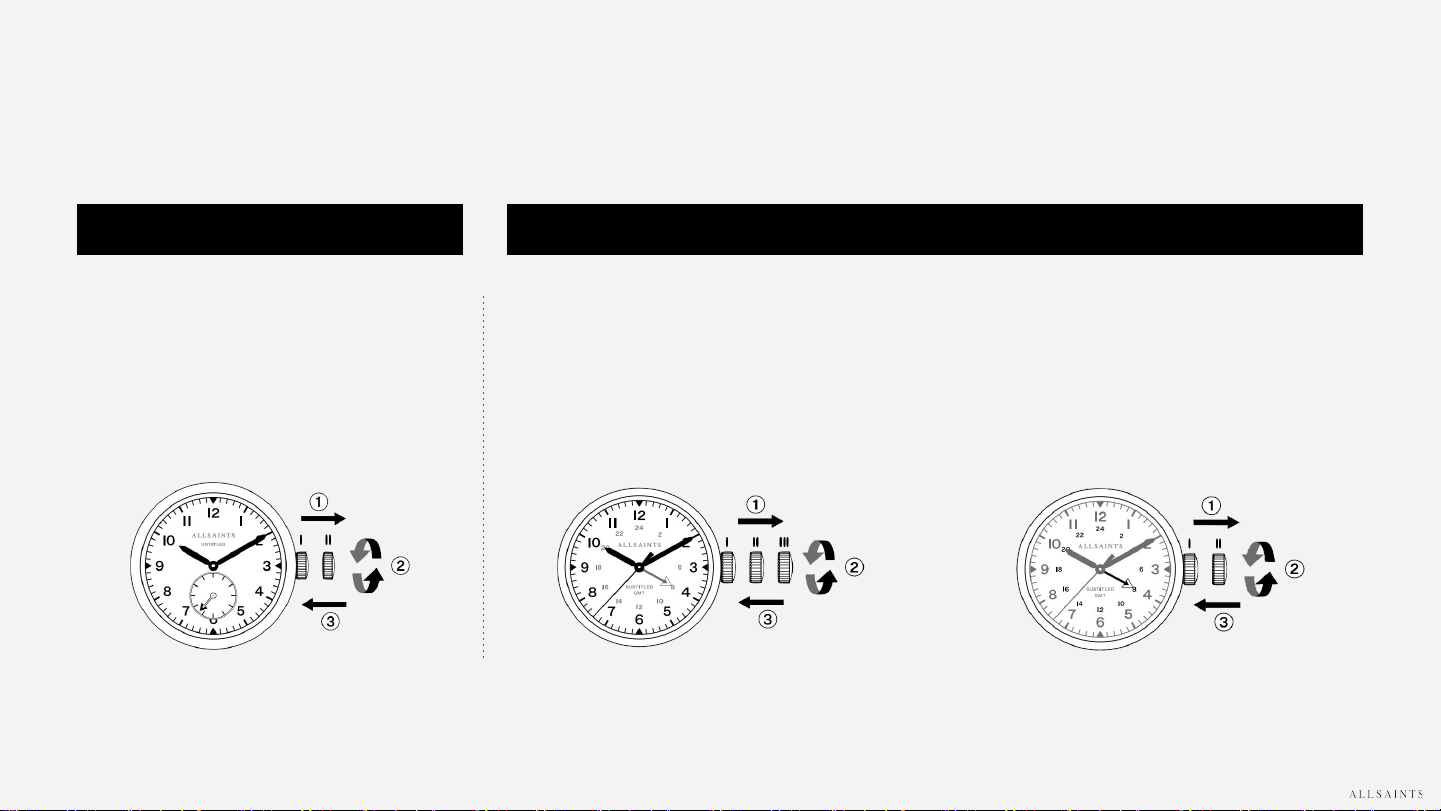
I N S T R U C T I O N S - S I N G L E T I M E M O D E L S
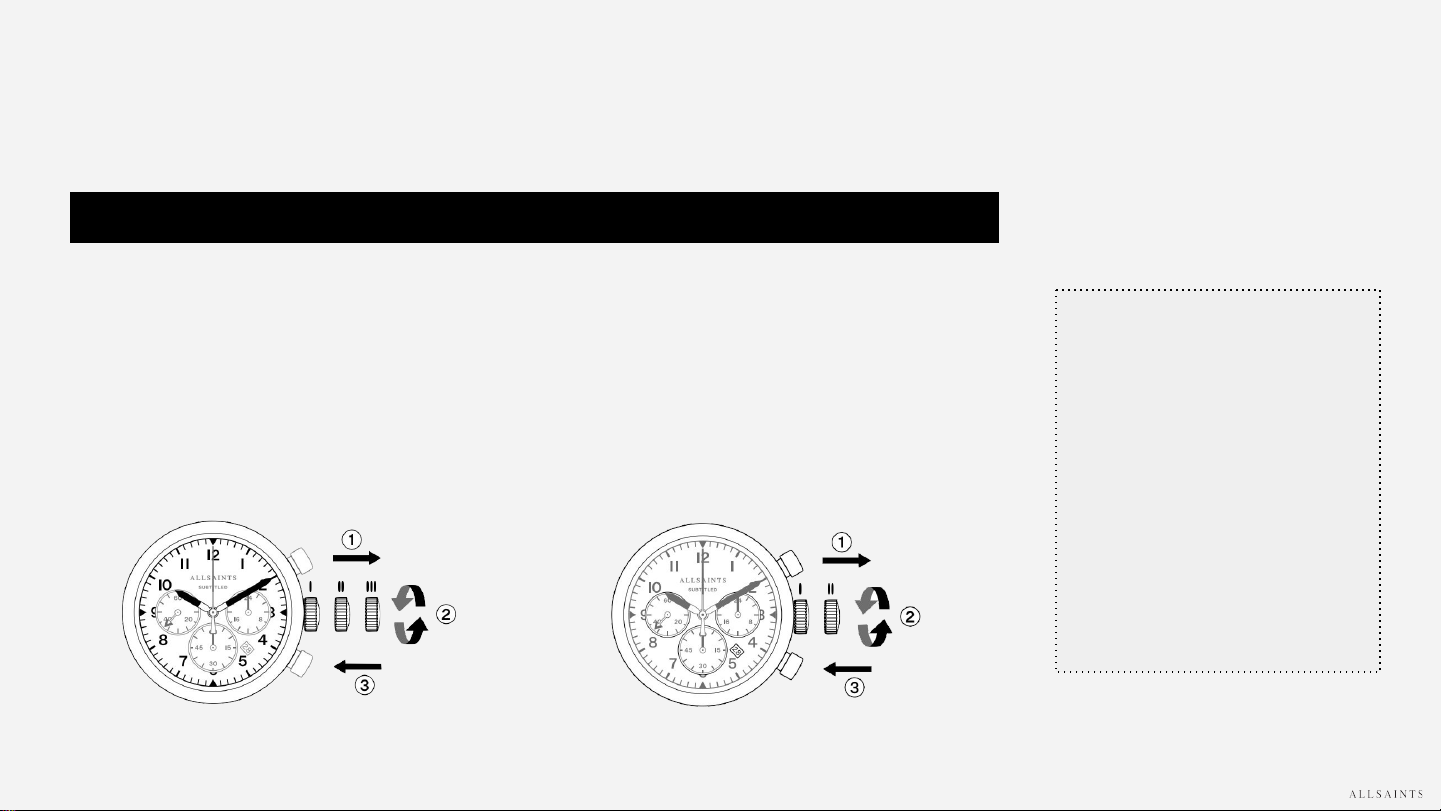
S E T T I N G T H E T I M E
1. Pull out the crown to position III.
2. Turn the crown until you reach the correct
time.
3. Push the crown back to position I.
S E T T I N G T H E 2 4 - H O U R I N D I C A T O R
1. Pull out the crown to position II (The watch
continues to run.)
2. Turn the crown counterclockwise until you
reach the correct time.
3. Push the crown back to position I.
S U B T I T L E D G M T M O D E LU N T I T L E D M O D E L

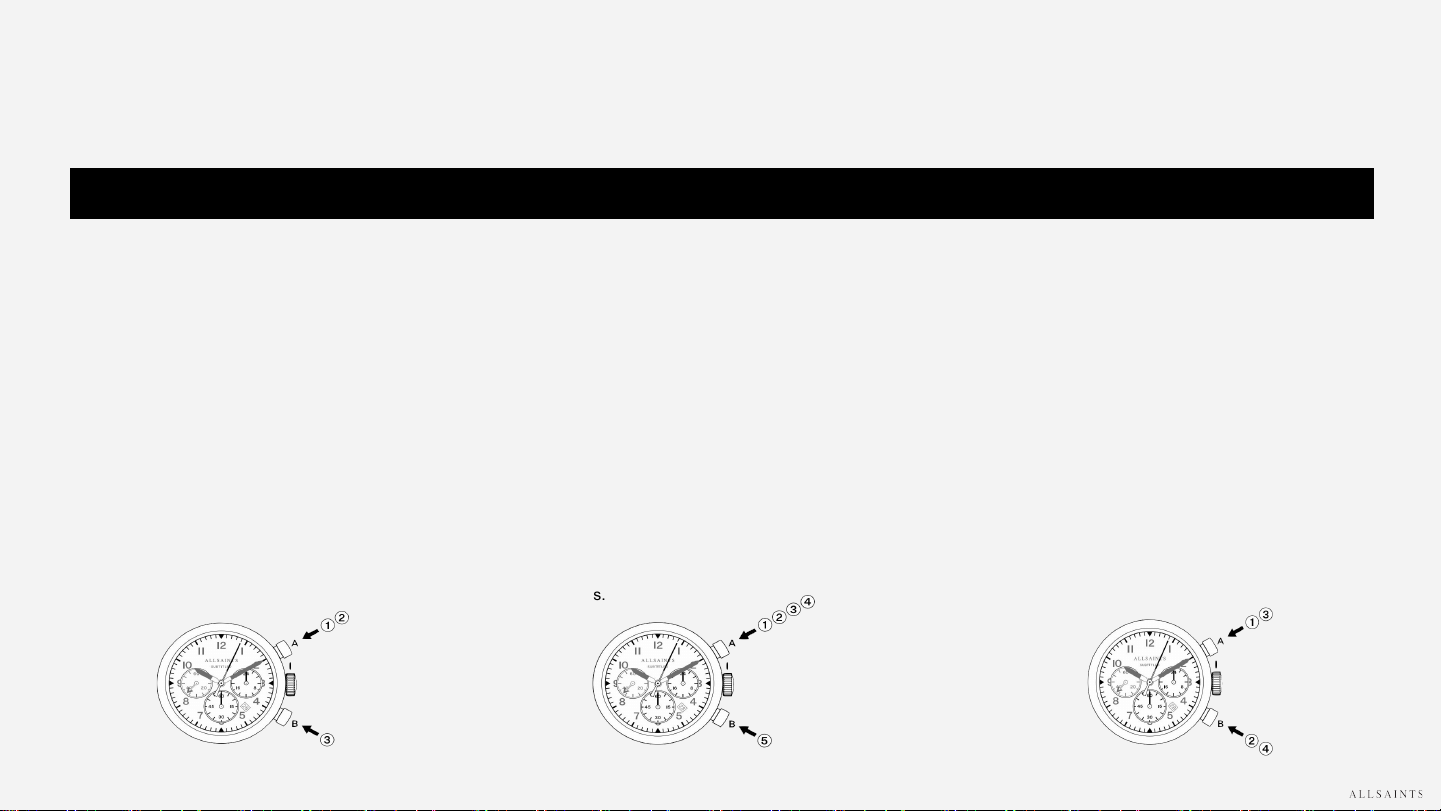
I N S T R U C T I O N S - C H R O N O G R A P H M O D E L S
P L E A S E N O T E :
Before using the chronograph functions,
please ensure that:
• The crown is in position I (normal
position).
• The three chronograph hands are
precisely positioned at zero following
activation of the push-button.
If the hands are not precisely at zero,
their positions must be adjusted. (See the
instructions for ADJUSTING THE
CHRONOGRAPH HANDS TO ZERO).
S E T T I N G T H E T I M E
1. Pull out the crown to position III (the watch stops).
2. Turn the crown until you reach the correct time.
3. Push the crown back to position I.
S U B T I T L E D M O D E L
S E T T I N G T H E D A T E
1. Pull out the crown to position II (the watch will
continue running.)
2. Turn the crown clockwise until you reach the
correct date.
3. Push the crown back to position I.

I N S T R U C T I O N S - C H R O N O G R A P H M O D E L S
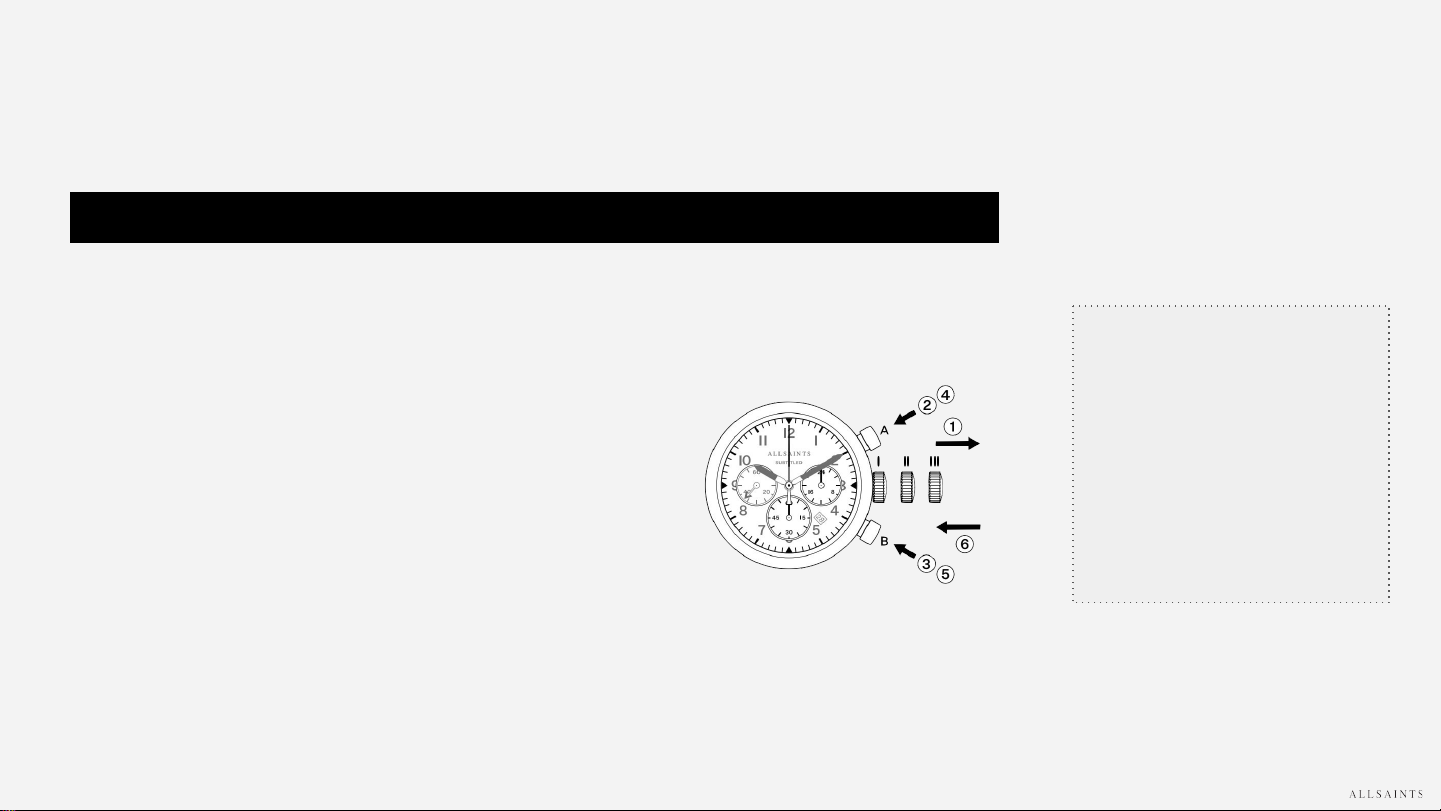
A D J U S T I N G T H E C H R O N O G R A P H H A N D S T O Z E R O
1. Pull the crown out to position III. (All three chronograph hands are in
their correct or incorrect zero position.)
2. Push and hold button A depressed for at least 2 seconds. The minute
chronograph hand (6 o’clock eye) rotates a full round - corrective mode
is now activated.
3. Press push-button B to single step the minute chronograph hand to the
‘0’ position.
4. Push and hold button A depressed for at least 2 seconds. The ⅕ second
chronograph hand (large center hand) rotates a full round - corrective
mode is now activated.
5. Press push-button B to single step the 1/5 second counter hand.
6. Return the crown to position I.
When performing a quick date setting
(as described further under the sections
SETTING THE DATE), the time
indicated by your watch should not be
between 9:30 p.m. and 3:00 a.m. This is
because, as the hands approach
midnight on the watch during its normal
operation, gears begin to engage with
the date wheel and lock into place.
Manually setting the date during that
particular period of time could possibly
result in damage to the small teeth on
the gears.
S U B T I T L E D M O D E L
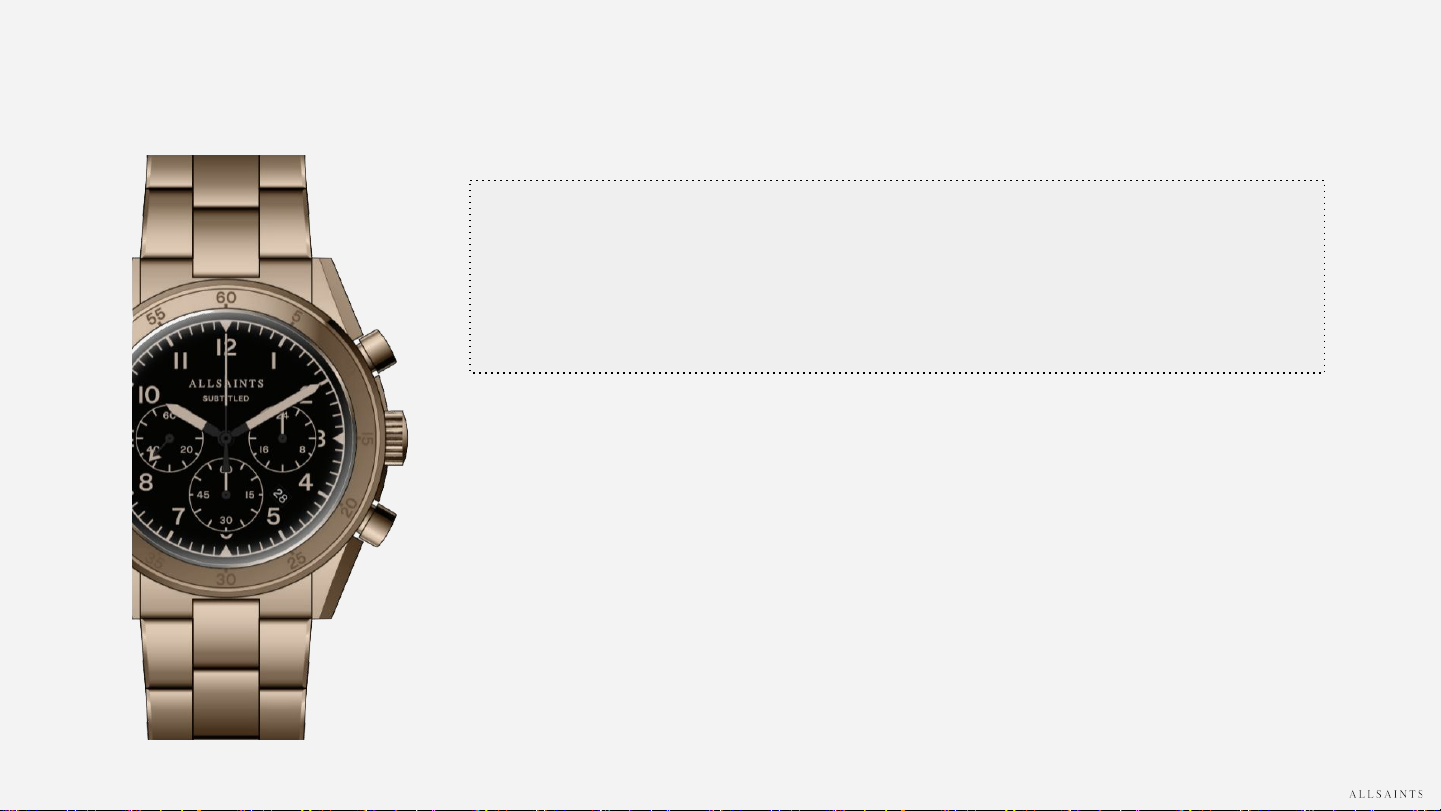
I N S T R U C T I O N S - C H R O N O G R A P H M O D E L S
S U B T I T L E D M O D E L
B A S I C F U N C T I O N E X A M P L E :
(START / STOP / RESET)
1. Start: Press push-button A.
2. Stop: To stop the timing, press push-button
A again and read the chronograph
counters: minutes / 1/5th seconds.
3. Reset: Press push-button B. (The 2
chronograph hands will be reset to their
zero positions.)
A C C U M U L A T E D T I M I N G E X A M P L E :
1. Start: Start timing by pressing push-button A.
2. Stop: Stop by pressing push button A again after
e.g,15 min.
3. Restart: Restart timing by pressing button A. Timing is
resumed.
4. Stop: Stop by pressing button A again after e.g, 13
min, 5 sec. The accumulated time = 28 min, 10 sec.
5. Reset: Press push-button B to reset. The 2
chronograph hands are returned to their zero
positions.
I N T E R M E D I A T E O R I N T E R V A L
T I M I N G E X A M P L E :
1. Start: Start timing by pressing push-button A.
2. Display interval: Activate split timing by pressing
push-button B. e.g, 10 min, 10 sec. Timing
continues in the background. Measuring split time
can be repeated by pressing push-button B again.
3. Stop: Stop by pressing push-button A. e.g, 28
min, 10 sec.
4. Reset: Reset by pressing push-button B. The 2
chronograph hands are returned to their zero
positions.
P V D C O A T I N G
PVD is a process used to deposit layers of material atom-by-atom or molecule-by-molecule on to a solid surface.
Whether the vapor source is a liquid or solid, the process is called physical vapor deposition (PVD).
PVD coatings are often harder and more corrosion resistant than coatings applied by the electroplating process.
Most coatings have high temperature and good impact strength, resulting in excellent abrasion resistance.
AllSaints PVD comes in a variety of finishings and colours. These finishes were specifically developed under
AllSaints guidance to achieve the most iconic looks and finishes.
S U P E R T U M B L E D :
The unique ‘worn in’ finish is achieved by tumbling the bracelet and case with a special mix of materials.
S U P E R M A T T E :
The matte finish is achieved by sand blasting the case with a fine blend of different sand particles.

W A T E R R E S I S T A N C E
It is important not to attempt to adjust the position of the
crown while the timepiece is in contact with water. Water
can enter the case causing damage to the movement.
For timepieces with screw-down crowns, it is important to
ensure the crown is in the proper position and completely
locked before contact with water.
For timepieces with chronograph functions, do not engage
the chronograph under water, as water may leak into the
case and cause damage to the movement.
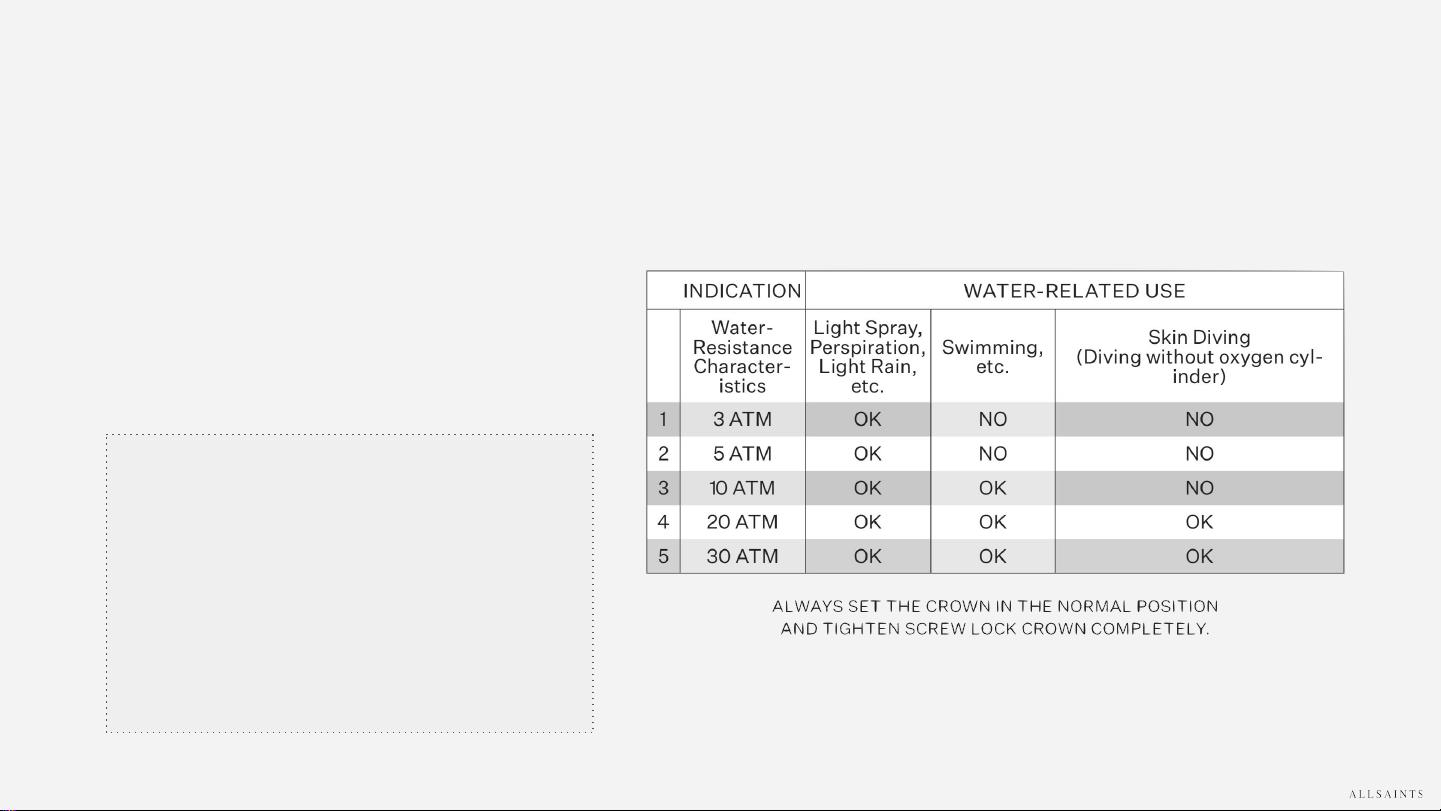
W A T E R R E S I S T A N C E
All of AllSaints’ timepieces are designed with a minimum water
resistance rating of 3ATM (100ft/30m). The water-resistance of a
timepiece protects the movement from dust, moisture and risk of
damage to the movement, should it be immersed in water.
Please see the chart for guidelines on the recommended
exposure of various water ratings.
C A R E & P R E C A U T I O N S
W A T C H C A R E
● Clean your watch with a soft cloth and water only. Do not submerge your watch under water
unless it is water rated.
● After saltwater use, rinse your watch under tap water and wipe dry with a soft cloth.
● Metal bracelets should be cleaned periodically. Clean with a soft brush dipped in mild soapy
water and dry thoroughly with a soft cloth.
● We advise having the timepiece serviced every 18 – 24 months to ensure long use and trouble
free operation.
P R E C A U T I O N S
Due to the complex integration of parts within the timepiece, it is important to avoid the following
conditions: extreme heat or cold, as well as prolonged periods of exposure to direct sunlight and
exposure to wet conditions exceeding your watches water rating (see chart).
The timepiece should not be affected by magnetic fields generated by household items such as;
televisions and stereos. Avoidance of other strong electric fields or static electricity, which may interrupt
the mechanism is suggested. It is also important to avoid extreme shock or impact.
P O W E R S A V I N G M E C H A N I S M
In order to extend the battery life of your watch when it’s not
in use, gently pull the movement stem/crown out until you
feel it click, this will reduce battery power consumption by
70%. Please note that this is the same stem/crown position
that is used to perform a quick TIME SETTING. If your
watch features a screw-down crown, follow the instructions
at the beginning of this manual to release the crown before
pulling it out all of the way.

E S P A Ñ O L - I N S T R U C C I O N E S

C Ó M O A J U S T A R L A H O R A
1. Tire de la corona hasta colocarla en la
posición II.
2. Gire la corona hasta la hora deseada.
3. Empuje la corona de vuelta a la
posición I.
I N S T R U C C I O N E S - M O D E L O S D E C R O N Ó M E T R O
C Ó M O A J U S T A R L A H O R A
1. Tire de la corona hasta colocarla en la
posición III.
2. Gire la corona hasta colocar las agujas en
la hora deseada.
3. Empuje la corona de vuelta a la posición I.
C Ó M O A J U S T A R E L I N D I C A D O R 2 4 H
1. Tire de la corona hasta colocarla en la
posición II (el reloj continúa funcionando.)
2. Gire la corona en el sentido contrario a las
agujas del reloj hasta alcanzar la hora
deseada.
3. Empuje la corona de vuelta a la posición I.
M O D E L O S U B T I T L E D G M T M O D E L O U N T I T L E D
I N S T R U C C I O N E S - M O D E L O S D E C R O N Ó G R A F O
T E N G A E N C U E N T A :
Antes de usar las funciones del
cronógrafo, por favor asegúrse de:
• La corona está colocada en posición I
(posición normal).
• Las agujas de las tres esferas del
cronógrafo están colocadas en cero tras
la activación del botón.
Si las agujas no se encuentran colocadas
en la posición cero, debe ajustar su
posición (Vea las instrucciones para
AJUSTAR LAS AGUJAS DEL
CRONÓGRAFO A LA POSICIÓN CERO)
C Ó M O A J U S T A R L A H O R A
1. Tire de la corona hasta colocarla en la posición III
(el reloj se parará).
2. Gire la corona hasta colocar las agujas en la hora
deseada.
3. Empuje la corona de vuelta a la posición I.
M O D E L O S U B T I T L E D
C Ó M O A J U S T A R L A F E C H A
1. Tire de la corona hasta colocarla en la posición
II (el reloj continuará funcionando).
2. Gire la corona en el sentido contrario a las
agujas del reloj hasta alcanzar la fecha
deseada.
3. Empuje la corona de vuelta a la posición I.
I N S T R U C C I O N E S - M O D E L O S D E C R O N Ó G R A F O
C Ó M O A J U S T A R L A S A G U J A S D E L C R O N Ó G R A F O A L A P
O S I C I Ó N C E R O
1. Tire de la corona hasta colocarla en la posición III. (Las tres agujas del
cronógrafo están en posición correcta o incorrecta.)
2. Presione y mantenga pulsado el botón A durante al menos 2 segundos.
La esfera de los minutos (a las 6) dará un giro completo y el modo de
corrección se habrá activado.
3. Presione el botón B para ajustar la esfera de los minutos en pequeños
incrementos hasta llegar a la posición ‘0’.
4. Presione y mantenga pulsado el botón A durante al menos 2 segundos.
La manecilla de ⅕ de segundo (aguja larga del centro) dará un giro
completo y el modo de corrección se habrá activado.
5. Presione el botón B para colocar la manecilla de ⅕ de segundo en
pequeños incrementos.
6. Empuje la corona de vuelta a la posición I.
Evite ajustar la fecha de su cronógrafo
(como se indica en la sección AJUSTAR
LA FECHA), entre las horas 21:30 y las
3:00. Durante este período los
engranajes de las agujas horarias y la
rueda de la fecha han comenzado a
interactuar de manera automática para
realizar el cambio de fecha. Si usted
realiza el cambio de manera manual
durante estas horas podría dañar los
mecanismos o los dientes de los
engranajes.
M O D E L O S U B T I T L E D

I N S T R U C C I O N E S - M O D E L O S D E C R O N Ó G R A F O
M O D E L O S U B T I T L E D
E J E M P L O - F U N C I Ó N B Á S I C A
(COMENZAR / PARAR / REINICIAR)
1. Comenzar: Pulse el botón A.
2. Parar: Pare el cronometraje pulsando de
nuevo el botón A y obtenga lectura en las
esferas del cronógrafo: minutos / ⅕
segundos.
3. Reiniciar: Pulse el botón B. Las 2 agujas
del cronógrafo volverán a la posición cero.
E J E M P L O - T I E M P O A C U M U L A D O :
1. Comenzar: Comience pulsando el botón A.
2. Parar: Pare el cronometraje pulsado de nuevo el
botón A tras un periodo por ej. de 15’ 5’’.
3. Reanudar: Para reanudar, vuelva a pulsar el botón A.
El cronometraje continuará.
4. Parar: Pare pulsando el botón A de nuevo tras 13’ 5’’.
El tiempo acumulado será = 28’ 10’’.
5. Reiniciar: Pulse el botón B. Las 2 agujas del
cronógrafo volverán a la posición cero.
E J E M P L O - I N T E R V A L O O T I E M P O
I N T E R M E D I O
1. Comenzar: Comience pulsando el botón A.
2. Intervalo: Active el tiempo de intervalo pulsando el
botón B ej. 10’ 10’’. El cronómetro continúa
midiendo en segundo plano. Mida el siguiente
intervalo pulsando el botón B de nuevo.
3. Parar: Pare pulsando el botón A. ej, 28’ 10’’.
4. Reiniciar: Pulse el botón B. Las 2 agujas del
cronógrafo volverán a la posición cero.

R E C U B R I M I E N T O P V D
El Recubrimiento PVD es un proceso usado para depositar capas de material átomo a átomo o molécula a molécula
sobre una superficie sólida. Si la fuente de vapor es un líquido o un sólido el proceso es llamado deposición física
de vapor (PVD por sus siglas en inglés).
Los recubrimientos PVD son normalmente más duros y resistentes a la corrosión que los recubrimientos aplicados
mediante métodos de galvanización. La mayoría de los recubrimientos son muy resistentes a las altas temperaturas
y a los impactos, resultando en una resistencia excelente a la las abrasiones.
El recubrimiento PVD de los relojes AllSaints se ofrece en una amplia gama de acabados. Estos acabados han sido
desarrollados específicamente bajo la supervisión de AllSaints para la obtención de aspectos y colores únicos.
S U P E R B A T I D O :
El acabado único “vintage” se consigue batiendo la caja y el brazalete con una mezcla especial de materiales.
S U P E R M A T E :
El acabado mate se consigue mediante un proceso de pulido de la caja a base de chorro de arena con una mezcla
seleccionada de distintas partículas de arena.
R E S I S T E N C I A A L A G U A
Es importante evitar el ajuste de la corona cuando el reloj
esté en contacto con agua. El agua podría penetrar en el
interior del mecanismo y dañar el movimiento.
Para los relojes con coronas de rosca, es importante
asegurarse que la corona se encuentra en la posición
adecuada y completamente enroscada antes de ponerlo en
contacto con el agua.
Para los relojes con funciones de cronógrafo, no use
ninguna de las opciones de cronógrafo cuando el reloj esté
sumergido en agua ya que podría penetrar en la caja y
causar daños en los mecanismos.
R E S I S T E N C I A A L A G U A
Todos los Relojes de AllSaints están diseñados con un grado de
resistencia al agua mínimo de 3ATM (30 m / 100 piés). El grado
de resistencia al agua de un reloj protege sus mecanismos del
polvo, la humedad o el riesgo de daño en caso de ser sumergido
en agua. Por favor consulte la tabla adjunta con las
recomendaciones de uso y exposición para las distintas
graduaciones.

C U I D A D O S & P R E C A U C I O N E S
C Ó M O C U I D A R D E S U R E L O J
● Limpie su reloj con un paño suave y agua sólamente. No sumergir en agua salvo que haya
sido testado y esté marcado como tal.
● Si es expuesto al agua salada, aclárelo bajo el grifo y séquelo con un paño seco y suave.
● Los brazaletes de metal deben ser limpiados de manera periódica. Límpielo con un cepillo
suave humedecido con una solución jabonosa suave y séquelo con un paño seco y suave.
● Le recomendamos una revisión periódica de su reloj cada 18 - 24 meses para asegurar su
funcionamiento a largo plazo.
P R E C A U C I O N E S
Debido a la compleja integración de las piezas en el interior de su reloj, le recomendamos evitar las
siguientes condiciones: frío o calor extremo, así como períodos prolongados de exposición a la luz solar
directa y la exposición a condiciones de humedad que excedan su grado de resistencia al agua (ver el
cuadro).
Su reloj no debería verse afectado por los campos magnéticos generados por electrodomésticos
comunes; por ejemplo televisores o estéreos. Evite el contacto con otros elementos que generen campos
magnéticos más potentes o electricidad estática que puedan interrumpir el normal funcionamiento de los
mecanismos. También es importante protegerlo contra choques o impactos extremos.
M E C A N I S M O D E A H O R R O D E E N E R G Í A
Para prolongar la vida útil de la batería de su reloj cuando
no esté en uso, tire de la corona ligeramente hasta que
sienta un clic; el consumo de la pila se reducirá hasta un
70%. Por favor tenga en cuenta que ésta es la misma
posición de la corona para realizar CAMBIOS DE HORA. Si
su reloj posee una corona de rosca, siga las instrucciones
que encontrará al inicio de este manual para aflojar la
corona antes sacarla del todo.

F R A N Ç A I S - I N S T R U C T I O N S

R É G L E R L’ H E U R E
1. Tirez la couronne en position II.
2. Tournez la couronne jusqu’à ce que
l’heure soit correcte.
3. Replacez la couronne en position I.
I N S T R U C T I O N S - M O D È L E S À Q U A D R A N S I M P L E
R É G L E R L’ H E U R E
1. Tirez la couronne en position III.
2. Tournez la couronne jusqu’à ce que l’heure
soit correcte.
3. Replacez la couronne en position I.
R É G L E R L’ A I G U I L L E G M T
1. Tirez la couronne en position II (la montre
continue de fonctionner).
2. Tournez la couronne dans le sens inverse des
aiguilles d’une montre jusqu’à ce que l’heure
soit correcte.
3. Replacez la couronne en position I.
M O D È L E S U B T I T L E D G M T M O D È L E U N T I T L E D

I N S T R U C T I O N S - M O D È L E S À C H R O N O G R A P H E S
N O T A B E N E :
Avant d’utiliser les fonctions du
chronographes, veuillez vous assurer
que :
• La couronne est en position I (position
normale).
• Les trois aiguilles des chronographes
sont précisément positionnées sur zéro
lors de l’activation du bouton de réglage.
Si les aiguilles ne sont pas positionnées
sur zéro, leurs positions doivent être
ajustées. (Voir les instructions pour
AJUSTER LES AIGUILLES DU
CHRONOGRAPHE À ZÉRO).
R É G L E R L’ H E U R E
1. Tirez la couronne en position III (la montre s’arrête).
2. Tournez la couronne jusqu’à ce que l’heure soit
correcte.
3. Replacez la couronne en position I.
M O D È L E S U B T I T L E D
R É G L E R L A D A T E
1. Tirez la couronne en position II (la montre
continue de fonctionner).
2. Tournez la couronne dans le sens des aiguilles
d’une montre jusqu’à ce que la date soit
correcte.
3. Replacez la couronne en position I.
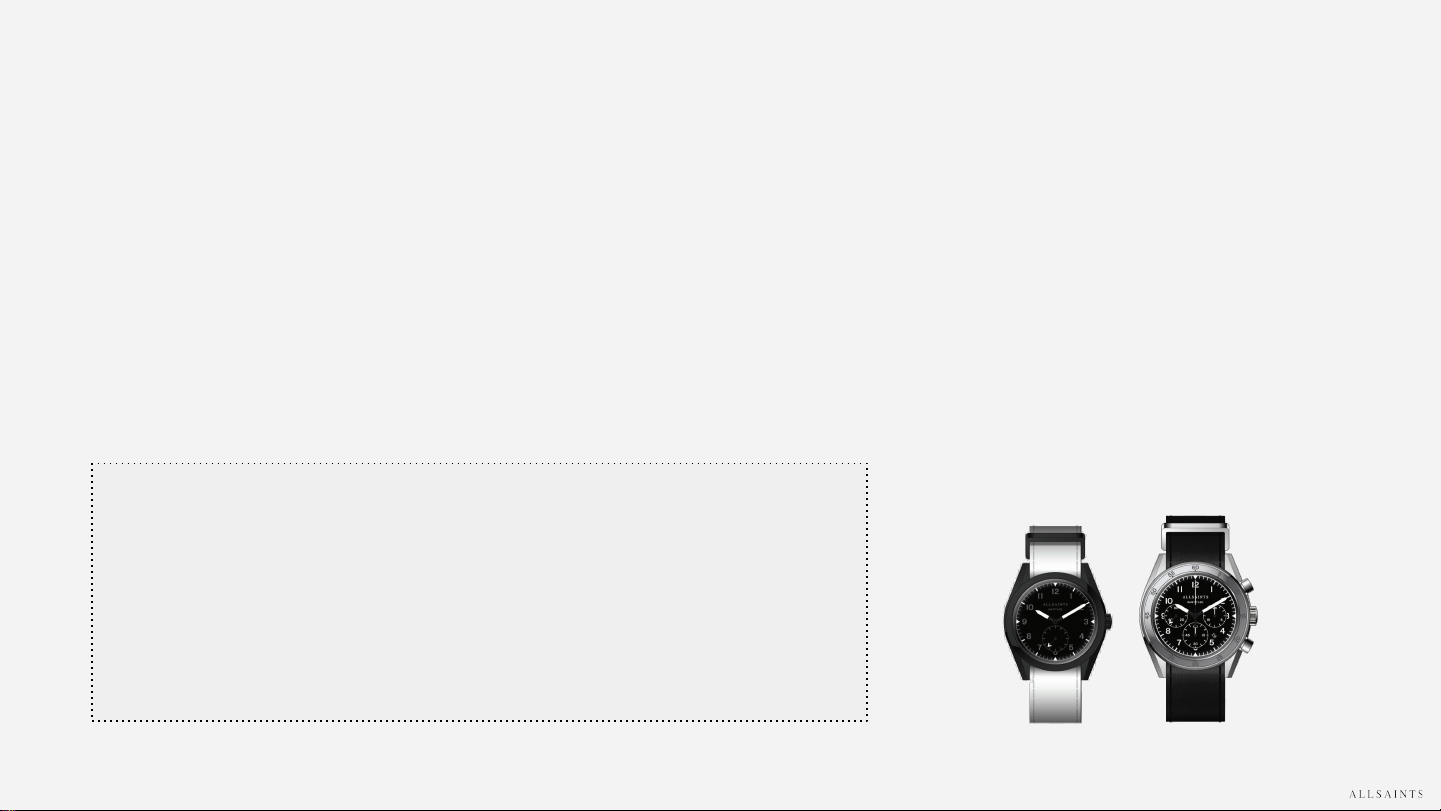
This manual suits for next models
1
Table of contents
Languages:


