Allview Gyro User manual

1 EN
2.4G Voice remote control / 2.4G Air Mouse
User guide
En………………………….2
Ro………………………….5
Hu………………………….8
Pl…………………………..11

2 EN
IR Learning
1. Keep pressing the “Power” button.
The RC enters in IR learning mode when the LED flashes slowly.
2. Press the “Power” button when you aim the RC to the IR transmitter.
RC received the code successfully if LED lights up.
3. If the LED flashes, it means that the RC has finished learning.
4. Data will be saved automatically and the product will exit learning more.
5. Press and Hold “OK” + “DEL” to clean up the code.
RC has two levels of pointer speed
From slow to fast:
- Press and hold “OK” and “Volume +” buttons.
- The speed adjusts one level when the LED is ON.
From fast to slow:
- Press and hold “OK” and “Volume –” buttons.
- The speed adjusts one level when the LED is ON.
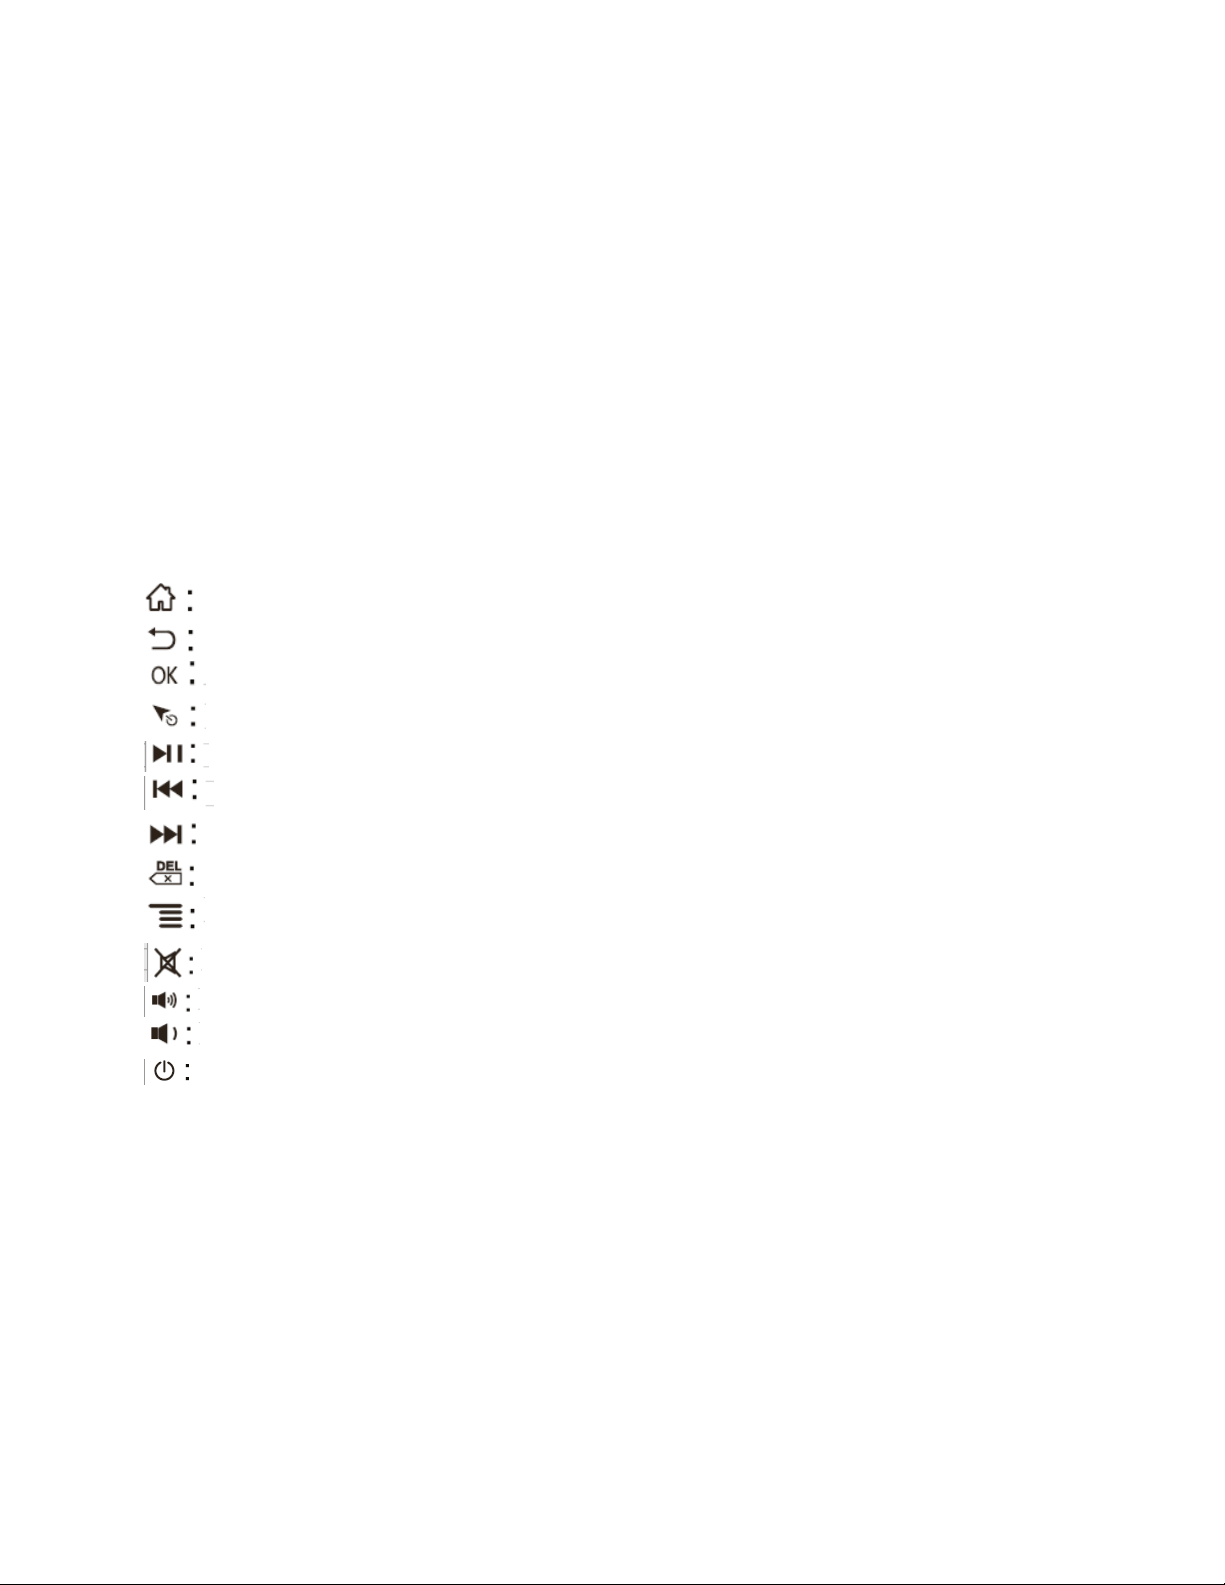
Function keys :
Press and hold 3 seconds to go back to Home
Go back to previous screen
Confirm action or insert pointer
Press to lock the RC , press againg to unlock
Play/Pause Multimedia
Show previous; if you press and hold, you will activate the fast backward function
Show next ; if you press and hold, you will activate the fast forward function
Backspace
Menu
Mute
Volume up
Volume down
Power on/off
Voice Switch:
Press and hold “Voice switch” to turn on the voice channel.
Release the key to turn off the voice channel.
Low battery reminder:
The red light flashes slowly when the battery power is bellow 2V.
This means the battery must be replaced.
Sensor Calibration
Automatic calibration:
The changes of voltage and temperature may cause the pointer to drift. In this case, put the RC on a desk and keep
it still.
You can complete the calibration by pressing any key to activate it when it is in standby mode.

3 EN
How to use
Initially, plug an USB receiver into to the USB port of device and wait 20 –60 sec to install driver. Move the RC and
if the RC pointer can move on the screen, it means that the pairing is successful.
If it is unsuccessful, press and hold “OK” and “HOME” buttons, and the LED will begin to flash. Pairing is successful
when the LED stops flashing.
Note:
1. Non-professionals are prohibited to use the test mode of the product.
Under normal use, re-install the battery to restore if red light is always lighting
2. The IR learning function is only for the „Power” button
3. This product has a gyroscope version and a gyroscope free version.
Gyroscope version: Swing your wrist to control the direction and movement of the pointer.
Gyroscope free version: Move the pointer by pressing the buttons “up”, “down”, “left” and “right” on the RC.
Învățare IR
1. Țineți apăsat butonul „Power”. Telecomanda intră în modul de învățare IR când LED-ul luminează încer
intermitent.
2. Apăsați butonul „Power” când îndreptați telecomanda spre transmițătorul IR. Telecomanda a primit codul
când se aprinde LED-ul.
3. Dacă LED-ul se aprinde intermitent, înseamnă că telecomanda a terminat procesul de învățare.
4. Datele se vor salva automat și dispozitivul va ieși din modul de învățare.
5. Țineți apăsate butoanele „OK” + „DEL” pentru a șterge codul.
Telecomanda are două nivele de viteză a cursorului
De la încet la rapid:
-Țineți apăsate butoanele „OK” și „Volume +”
-Viteza se ajustează cu un nivel când LED-ul este aprins.
De la rapid la încet:
-Țineți apăsate butoanele „OK” și „Volume -”
-Viteza se ajustează cu un nivel când LED-ul este aprins.
Funcțiile tastelor:
Țineți apăsat 3 secunde pentru a vă întoarce în meniul principal
Reveniți la pagina anterioară
Confirmați acțiunea sau inserați cursorul
Apăsați pentru a bloca telecomanda, apăsași din nou pentru deblocare
Redare/pauzare multimedia
Redați fișierul anterior; dacă țineți apăsat veți activa funcția de derulare rapidă
Redați fișierul următor; dacă țineți apăsat veți activa funcția de avansare rapidă
Înapoi
Meniu
Silențios
Mărire volum
Micșorare volum
Pornire/Oprire
Comutare Voce:
Țineți apăsat butonul „Voice Switch” pentru a activa funcția vocală.
Eliberați butonul pentru a închide funcția vocală.
Notificare de baterie scăzută:
Becul roșu va lumina încet cât puterea bateriei este sub 2V.
Asta înseamnă că bateria trebuie înlocuită.
Senzor de Calibrare
Calibrare automată
Schimbările de voltaj și temperatură pot cauza devieri ale cursorului. În acest caz, puneți telecomanda pe o masă și
țineți-o nemișcată.
Puteți termina calibrarea apăsând orice tastă pentru a o activa atunci când este în modul standby.
4RO

Cum se utilizează:
Întâi, conectați un transmițător USB în portul de USB al dispozitivului și așteptați 20-60 de secunde pentru
instalarea driver-ului. Mișcați telecomanda și dacă mișcă și cursorul pe ecran, înseamnă că asocierea a reușit.
Dacă nu a reușit, mențineți apăsate butoanele „OK” și „HOME”, iar LED-ul va începe să lumineze intermitent.
Asocierea a reușit când LED-ul nu mai luminează intermitent.
Notă:
1. Modul de test al produsului este recomandat exclusiv profesioniștilor.
În condiții de utilizare normală, reinstalați bateria dacă becul roșu este mereu aprins.
2. Funcția de învățare este doar pentru butonul „Power”.
3. Produsul are versiune cu giroscop și versiune fără giroscop.
Versiune cu giroscop: Mișcați încheietura mâinii pentru a controla direcția și mișcarea cursorului.
Versiune fără giroscop: Mișcați cursorul apăsând butoanele „sus”, „jos”, „stânga” și „dreapta” de pe telecomandă.
5RO

IR Memória
1. Tartsa nyomva a “Bekapcsoló gombot”.
A távirányító belép a memória üzemmódba, ha a fény lassan villog.
2. Nyomja meg a “Bekapcsoló gombot”, a távirányítót az eszköz IR vevőjére irányítva.
Ha a jelzőfény felgyullad, a behangolás sikeresen megtörtént.
3. Ha a LED villog, azt jelenti, a memorizálás befejeződött.
4. Az adatok automatikusan mentésre kerülnek, az eszköz kilép a memória üzemmódból.
5. Nyomja meg hosszan az “OK” + “DEL” gombokat, a beállítás törléséhez.
A kurzor sebesség beállítása
Lassúról gyorsra váltás:
- Nyomja meg hosszan az “OK” és a “Hangerő +” gombokat.
- A LED bekapcsol a beállítás mentésekor.
Gyorsról lassúra:
- Nyomja meg hosszan az “OK” és a “Hangerő -” gombokat.
- A LED bekapcsol a beállítás mentésekor.
Funkció billentyűk :
Nyomja hosszan a fő képernyőre való visszalépéshez
Vissza az előző képernyőre
Művelet jóváhagyása, kurzor előhívása
Nyomja meg a távirányító lezárásához, újbóli megnyomásával oldhatja fel
Lejátszás/Szünet
Ugrás az előzőre; nyomva tartva tekerhet vissza
Ugrás a következőre; nyomva tartva tekerhet előre
Vissza
Menü
Némítás
Hangerő fel
Hangerő le
Bekapcsoló gomb
Hang:
Nyomja hosszan a “Hang” gombot a hang csatorna bekapcsolásához.
Engedje fel a gombot a kikapcsoláshoz.
Alacsony töltöttségi szint jelzés:
A piros led lassan villog, ha az akkumulátor 2V alá merül.
Cserélje az akkumulátort a használat folytatásához.
Érzékelő beállítás
Automatikus kalibráció:
A váltakozó feszültség, vagy hőmérséklet okozhatja a mutató pontatlanságát. Ebben az esetben tegye vízszintes
felületre a készüléket, és hagyja mozdulatlanul egy kis ideig.
A kalibrációt készenléti módban bármely gomb lenyomásával aktiválhatja.
6HU

Használat
Csatlakoztasson USB vevőt a készülék USB csatlakozójában és várjon 20 –60 másodpercet a szoftver telepítésre.
Mozgassa a távirányítót, ha a mutató mozog a képernyőn a párosítás sikerült.
Amennyiben nem sikerült, nyomja hosszan az “OK” és a “HOME” gombokat, a jelzőfény villogni kezd. A párosítás
sikerül, ha a villogás befejeződik.
Megjegyzés:
1. A készülék teszt üzemmódjának használata tilos.
Ha a piros lámpa folyamatosan ég, cserélje az akkumulátort a használat folytatásához.
2. A memória funkció a bekapcsoló gombra vonatkozik.
3. Az eszközből létezik giroszkóppal rendelkező, és a nélküli verzió.
Giroszkópos verzió: Forgassa a távirányítót a mutató irányának vezérléséhez.
Giroszkóp nélküli verzió: Mozgassa a kurzort a fel, le, balra jobbra gombokkal.
7HU

Nauka podczerwieni
1. Naciskaj przycisk „Zasilanie”.
Pilot wchodzi w tryb uczenia się na podczerwień, gdy dioda LED miga powoli.
2. Naciśnij przycisk „Zasilanie”, kiedy celujesz pilotem w nadajnik podczerwieni.
Pilot odebrał kod z powodzeniem, jeśli zapali się dioda LED.
3. Jeśli dioda LED miga, oznacza to, że pilot RC zakończył naukę.
4. Dane zostaną automatycznie zapisane i produkt przestanie się uczyć.
5. Naciśnij i przytrzymaj „OK” + „DEL”, aby wyczyścić kod.
Pilot ma dwa poziomy prędkości wskaźnika
Od wolnego do szybkiego:
- Naciśnij i przytrzymaj przyciski „OK” i „Głośność +”.
- Prędkość reguluje jeden poziom, gdy dioda LED jest włączona.
Od szybkiego do wolnego:
- Naciśnij i przytrzymaj przyciski „OK” i „Głośność -”.
- Prędkość reguluje jeden poziom, gdy dioda LED jest włączona.
Klawisze funkcyjne :
Naciśnij i przytrzymaj 3 sekundy, aby wrócić do strony głównej.
Wróć do poprzedniego ekranu.
Potwierdź akcję lub wstaw wskaźnik.
Naciśnij, aby zablokować pilota , naciśnij ponownie , aby odblokować
Play/Pause Multimedia
Pokaż poprzednie; jeśli naciśniesz i przytrzymasz, uaktywnisz funkcję szybkiego przewijania do tyłu
Pokaż następny; jeśli naciśniesz i przytrzymasz, uruchomisz funkcję szybkiego przewijania do przodu
Powrót
Menu
Wyciszenie
Głośniej
Ciszej
Włącz/Wyłącz
Przełącznik głosu:
Naciśnij i przytrzymaj „Przełącznik głosowy”, aby włączyć kanał głosowy.
Zwolnij klawisz, aby wyłączyć kanał głosowy.
Przypomnienie o niskim stanie baterii:
Czerwona lampka miga powoli, gdy moc baterii spadnie poniżej 2V.
Oznacza to, że bateria musi zostać wymieniona.
Kalibracja czujnika
Automatyczna kalibracja:
Zmiany napięcia i temperatury mogą spowodować dryft wskaźnika. W takim przypadku umieść pilot na biurku i
zatrzymaj go.
Możesz ukończyć kalibrację naciskając dowolny klawisz, aby ją aktywować, gdy jest w trybie gotowości.
8PL

Jak używać
Najpierw podłącz odbiornik USB do portu USB urządzenia i odczekaj 20 - 60 sekund, aby zainstalować sterownik.
Przesuń pilot i jeśli wskaźnik pilota będzie poruszać się po ekranie, oznacza to, że parowanie zakończyło się
powodzeniem.
Jeśli nie powiedzie się, naciśnij i przytrzymaj przyciski „OK” i „HOME”, a dioda LED zacznie migać. Parowanie
zakończy się powodzeniem, gdy dioda LED przestanie migać.
Uwaga:
1. Nieprofesjonalistom zabrania się korzystania z trybu testowego produktu.
Przy normalnym użytkowaniu ponownie zainstaluj baterię, aby przywrócić zasilanie, jeśli świeci się czerwone
światło
2. Funkcja uczenia podczerwieni jest tylko dla przycisku „Zasilanie”
3. Ten produkt ma wersję żyroskopu i darmową wersję żyroskopu.
Wersja żyroskopu: Obróć nadgarstek, aby kontrolować kierunek i ruch wskaźnika.
Wersja wolna od żyroskopu: przesuń wskaźnik, naciskając przyciski „w górę”, „w dół”, „w lewo” i „w prawo” na
pilocie.
9PL

SPECIFICATIONS/SPECIFICAȚII/ MŰSZAKI ADATOK/ DANE TECHNICZNE
Transmission method / Metodă de transmisiune /
Átviteli mód / Metoda transmisji
2.4 G RF Wireless
Number of keys / Număr de taste / Gombok
száma / Liczba kluczy
18
Range / Distanță / Hatótáv / Zasięg
<10m
Battery type / Tip de baterie / Akku típusa / Typ
baterii
2xAAA
Size / Dimensiune / Méret / Rozimar
160x45x20 mm
Weight / Greutate / Súly / Waga
60g
10
Table of contents
Languages:


