Alteme Sensonic EDR User manual

Bedienungsanleitung
Mode d’emploi
Istruzioni per l’uso
Operating instructions
Sensonic EDR

32
PROGRAMMIERUNG SOLLWERT
Aktion Beschreibung Status Bedienpanel
Schritt 1
5 Sek.
3
+
2
Taste 2 und 3 zusammen 5 Sekun-
den gedrückt halten.
Die Taste 1 leuchtet konstant orange.
Die Tasten 3 und 4 (bei 4er Tastenfeld)
blinken orange.
Schritt 2
od.3 4
1
Einstellen des gewünschten Soll-
werts durch langen Druck auf Taste
3 oder 4. Jeder neue Tastendruck
wechselt die Dimmrichtung. Mit
kurzem Druck auf Taste 1 wird der
Wert des zuletzt eingestellten Direk-
lichtfeldes auf das andere Lichtfeld
übernommen.
Schritt 3
2
Kalibrierung und Speichern des
eingestellten Sollwerts durch Druck
auf Taste 2.
Während der Kalibrierung blinkt die
Taste 2 für ca. 3 Sekunden schnell
Leuchte ausschalten
Leuchten-
zustand
Tasten-
zustand Aktion Beschreibung Folgezustand Leuchte
2
Taste 2 kurz drücken. Die Leuchte ist temporär AUS.
Die Leuchte bendet sich im so-
genannten «Invers-Modus», d.h.
solange der Bewegungsmelder
Bewegung registriert, bleibt die
Leuchte ausgeschaltet – wenn
länger als 5 Minuten keine
Bewegung wahrgenommen
wird, wechselt die Leuchte in
den «AUTO-EIN Bereitschafts-
modus» und wird durch erneute
Bewegung wieder eingeschal-
tet.*
Ausschalten durch Präsenz-
automatik.
Wenn im Erfassungsbereich
des Bewegungsmelders keine
Bewegung registriert wird,
schaltet sich die Leuchte nach
der denierten Abschaltzeit
automatisch AUS.
Die Leuchte hat alle möglichen
Automatikfunktionen aktiviert,
und bendet sich im sogenann-
ten «AUTO-EIN Bereitschafts-
modus».
*Hinweis: Der Invers-Modus wird am Bedienfeld durch orange atmende LEDs der Taster 1, 3 und 4 angezeigt – die
Taste 2 ist aus.
DE
BEDIENUNG LICHTSTEUERUNG
Leuchte einschalten
Leuchten-
zustand
Tasten-
zustand Aktion Beschreibung Folgezustand Leuchte
2
Taste 2 kurz drücken.
Die Helligkeit wird gemäss dem
denierten Sollwert automa-
tisch eingestellt.
Die Leuchte ist EIN und alle
möglichen Automatikfunktionen
sind aktiv.
Die Leuchte hat alle möglichen
Automatikfunktionen aktiviert,
und bendet sich im sogenann-
ten «AUTO-EIN Bereitschafts-
modus».
Durch Bewegung im Erfas-
sungsbereichs des Bewe-
gungssensors schaltet sich
die Leuchte automatisch EIN,
wenn die aktuelle Helligkeit dies
erfordert. Das bedeutet, sollte
sich die Leuchte nicht einschal-
ten, ist z.B. das Fremdlicht,
resp. Tageslicht, welches auf
den Tisch fällt, höher als der
eingestellte Sollwert.
SYMBOLE
Kurzdruck der
Bedientaste
Langdruck der
Bedientaste
LED «Atmen»
LED-Anzeige AUS
LED-Anzeige EIN
«AUTO Modus»
Status Leuchte
EIN/AUS
DE
AUTO
1
2
3
Bedienpanel 3 Tasten ECO
S 1er-Arbeitsplatz-Version
AUTO
2
3
4
1
Bedienpanel 4 Tasten PLATO
und ECO S 2er- und 4er-
Arbeitsplatz-Version
Lichtfeld indirekt
EIN/AUS AUTO
Lichtfeld direkt
rechts
Lichtfeld direkt
links
Lichtfeld indirekt
EIN/AUS AUTO
Lichtfeld direkt

54
AUF WERKSEINSTELLUNG
ZURÜCKSETZEN
1. Netzstecker ziehen
2. Die ersten drei Tasten (1, 2 und 3) des Bedienpanels gleichzeitig
drücken und halten
3. Netzstecker einstecken und die drei Tasten weiterhin gedrückt
halten
4. Nach ca. 5 Sekunden blinken alle Taster ca. 3 Sek. zur Bestäti-
gung und die Tasten können losgelassen werden
5. Werkszustand wieder hergestellt
Folgende Einstellungen werden auf Werkseinstellung zurückge-
setzt:
– Alle User-Einstellungen
– Alle HCL-Kurven
– Alle Funktaster (eventuell angelernte Taster werden gelöscht)
– Alle Schaltzeiten
– Alle Netzwerkeinstellungen
– User-Passwort wird auf «1234» zurückgesetzt
Tasten-
zustand Aktion Beschreibung Folgezustand
Taster Folgezustand Leuchte
Lichtfeld dimmen
od.134od.
Taste des entspre-
chenden Kanals
(1, 3 oder 4) so
lange drücken, bis
die gewünschte
Dimmstufe erreicht
ist. Jedes Los-
lassen des Tasters
kehrt die Dimm-
richtung um.
Die entsprechende
Taste leuchtet
orange.
Das entsprechende
Lichtfeld bendet sich
in der «Handsteue-
rung» und wird nicht
mehr durch die Auto-
matik gesteuert.***
***Hinweis: Wenn bei der Stehleuchte PLATO nur ein Direktlichtfeld temporär übersteuert wird, bleibt das andere im
Automatikbetrieb – dies wird durch eine zusätzlich weiss leuchtende Taste 2 angezeigt. Wenn beide Direktlichtfelder
in der «Handsteuerung» sind, wechselt die gesamte Leuchte in die «Handsteuerung» – die weisse LED in Taster 2
ist AUS. Bei der Stehleuchte ECO S bleibt das nicht übersteuerte Lichtfeld auf dem Dimmlevel, in dem es vor dem
Eingriff war. Die Leuchte geht komplett in den «Handsteuerungmodus».
Farbtemperatur anpassen
(Optionale Funktion)
2
Taste 2 so lange
drücken, bis die
gewünschte Farb-
temperatur erreicht
ist. Jedes erneute
Drücken der Taste
ändert die Rich-
tung, in der die
Farbtemperatur
geregelt wird (von
kalt zu warm oder
umgekehrt).
Die LED-Anzeige
der Taste 2 ist aus.
Die Leuchte bendet
sich in der «Handsteu-
erung» der Farbtempe-
raturregelung. D.h. die
Farbtemperatur bleibt
x auf dem eingestell-
ten Wert und folgt nicht
mehr der deniertem
Farbtemperatur-Kur-
ve.****
****Hinweis: Als Standardeinstellung ist eine manuelle Anpassung der Farbtemperatur nur im Direktlicht möglich.
Das Indirektlicht folgt auch bei manuell übersteuerter Farbtemperatur der denierten Farbtemperaturkurve. So soll
vermieden werden, dass innerhalb eines Raumes unterschiedliche Farbtemperaturen an der Raumdecke sichtbar
sind.
WEBLINK
Montage-/Bedienungsanleitungen, FAQs
sowie Link zur App für die drahtlose
Leuchtensteuerung und Konguration.
DE
ERWEITERTE BEDIENUNG
Mit diesen Funktionen besteht die Möglichkeit, dass der User einzelne Lichtfelder temporär übersteuern kann. D.h.
wenn vorübergehend eine spezische Lichtsituation eingestellt werden soll, können die einzelnen Lichtfelder einzeln
ein- oder ausgeschaltet oder auf die gewünschte Helligkeit gedimmt werden.
Tasten-
zustand Aktion Beschreibung Folgezustand
Taster Folgezustand Leuchte
Lichtfeld ausschalten
134od. od.
Taste des entspre-
chenden Kanals
(1, 3 oder 4) kurz
drücken.
Die entsprechende
Taste leuchtet
orange.
Das enstprechende
Lichtfeld bendet sich
in der «Handsteue-
rung» und wird nicht
mehr durch die Auto-
matik gesteuert.*
*Hinweis: Wenn bei der Stehleuchte PLATO nur ein Direktlichtfeld temporär übersteuert wird, bleibt das andere im
Automatikbetrieb – dies wird durch eine zusätzlich weiss leuchtende Taste 2 angezeigt. Wenn beide Direktlichtfelder
in der «Handsteuerung» sind, wechselt die gesamte Leuchte in die «Handsteuerung» – die weisse LED in Taster 2
ist AUS. Bei der Stehleuchte ECO S bleibt das nicht übersteuerte Lichtfeld auf dem Dimmlevel, in dem es vor dem
Eingriff war. Die Leuchte geht komplett in den «Handsteuerungmodus».
Lichtfeld einschalten
134od. od.
– Taste 2 «atmet»
– Taste des ent-
sprechenden
Kanals (1, 3 oder
4) kurz drücken
Die entsprechende
Taste «atmet»
orange.
Das enstprechende
Lichtfeld bendet sich
im «Handsteuerung In-
vers-Modus» und wird
nicht mehr durch die
Automatik gesteuert. **
**Hinweis: Wenn nur ein Direktlichtfeld temporär übersteuert wird, bleibt das andere im Automatikbetrieb – dies wird
durch eine zusätzlich weiss leuchtende Taste 2 angezeigt. Wenn beide Direktlichtfelder in der «Handsteuerung» sind,
wechselt die gesamte Leuchte in die «Handsteuerung» – die weisse LED in Taster 2 ist AUS.
PROGRAMMIERUNG ABSCHALTZEIT BEWEGUNGSMELDER (BWM)
Aktion Beschreibung Status Bedienpanel
ACHTUNG: Die Programmierung Abschaltzeit kann nicht ohne speichern eines Wertes verlassen werden. Allfällige
benutzerspezische Anpassungen werden überschrieben.
Schritt 1
5 Sek.
2
+
1
Taste 1 und 2 zusammen 5 Sekun-
den gedrückt halten.
Taste 1-3 blinken. Die Taste, welche
der aktuell eingestellten Abschaltzeit
entspricht, leuchtet konstant.*
*Hinweis: Wurde die Abschaltzeit in der App benutzerspezisch konguriert, leuchtet keine der Tasten konstant.
Schritt 2
od.
123od.
1 = Auf 30 Minuten einstellen
2 = Auf 15 Minuten einstellen
3 = Auf 5 Minuten einstellen
**
Während der Speicherung blinkt die
Taste 2 für ca. 3 Sekunden schnell.
**Hinweis: Allfällige kundenspezischen Einstellungen werden durch die Abschaltzeit Programmierung überschrieben
DE

76
FR
PROGRAMMATION DE LA VALEUR DE CONSIGNE
Action Description État du panneau de commande
Étape 1
5 sec.
3
+
2
Maintenir les touches 2 et 3 enfon-
cées ensemble pendant 5 secondes.
La touche 1 est orange en perma-
nence.
Les touches 3 et 4 (sur le pavé de 4
touches) clignotent en orange.
Étape 2
ou3 4
1
Réglage de la valeur de consigne
souhaitée en appuyant longuement
sur la touche 3 ou 4. Chaque nou-
velle pression sur une touche modi-
e le sens de variation. En appuyant
brièvement sur la touche 1, la valeur
du dernier champ d’éclairage direct
réglé est transférée à l’autre champ
lumineux.
Étape 3
2
Étalonnage et enregistrement de la
valeur de consigne réglée par pres-
sion sur la touche 2.
Pendant l‘étalonnage, la touche 2
clignote rapidement pendant env. 3
secondes.
Éteindre le luminaire
État du
luminaire
État des
touches Action Description État consécutif du luminaire
2
Appuyer brièvement sur la
touche 2.
Le luminaire est temporairement
éteint. Le luminaire se trouve
en «mode inversé», c’est-à-di-
re que tant que le détecteur
de mouvement enregistre un
mouvement, le luminaire reste
éteint - Si aucun mouvement
n’est perçu pendant plus de
5 minutes, il passe en «mode
veille AUTO-MARCHE» et
est rallumé par tout nouveau
mouvement.*
Arrêt par la détection automati-
que de présence.
Si aucun mouvement n’est dé-
tecté dans la zone de détection
du détecteur de mouvement,
le luminaire s’éteint automati-
quement après le temps d’arrêt
déni.
Le luminaire a activé toutes les
fonctions automatiques possi-
bles et se trouve en mode veille
«AUTO-MARCHE».
*Remarque: le mode inversé est signalé sur le panneau de commande par des LED variables orange sur les bou-
tons 1, 3 et 4 – la touche 2 est éteinte.
COMMANDE DE L’ECLAIRAGE
Allumer le luminaire
État du
luminaire
État des
touches Action Description État consécutif du luminaire
2
Appuyer brièvement sur la tou-
che 2. La luminosité est réglée
automatiquement en fonction
de la valeur prédénie.
Le luminaire est allumé et toutes
les fonctions automatiques
possibles sont actives.
Le luminaire a activé toutes
les fonctions automatiques
possibles et se trouve en mode
veille «AUTO-MARCHE».
Un mouvement dans la zone
de détection du détecteur de
mouvement allume automa-
tiquement le luminaire si la
luminosité actuelle l’exige. Cela
signie que le luminaire ne s’all-
ume pas si la lumière externe
ou la lumière du jour qui arrive
sur la table par ex. est supér-
ieure à la valeur prédénie.
SYMBOLES
Brève pression de la
touche
Pression longue de la
touche
LED «Variable»
Afchage LED éteint
Afchage LED en mode
«AUTO»
État luminaire
MARCHE/
ARRÊT
Champ lumineux
indirect
AUTO
1
2
3
AUTO
2
3
4
1
MARCHE/ARRÊT
AUTO
Champ lumineux
direct à droite
Champ lumineux
direct à gauche
Champ lumineux
indirect
Champ lumineux
direct
Panneau de commande
4 touches PLATO et ECO
S, version 2 et 4 postes
de travail
Panneau de commande
3 touches ECO S, ver-
sion 1 poste de travail
MARCHE/ARRÊT
AUTO
FR

98
FR
RESTAURATION DES PARAMETRES PAR
DEFAUT
1. Débrancher la che secteur
2. Appuyer simultanément sur les trois premières touches (1, 2 et 3) du
panneau de commande et les maintenir enfoncées
3.
Brancher la che secteur tout en maintenant les trois touches enfoncées
4. Après env. 5 secondes, tous les boutons clignotent pendant env. 3
secondes pour conrmation et les touches peuvent être relâchées
5. Restauration de l‘état par défaut
Les réglages d’usine suivants sont réinitialisés:
– Tous les paramètres utilisateur
– Toutes les courbes HCL
– Tous les boutons-poussoirs radiocommandés (les boutons-poussoirs
avec un éventuel apprentissage sont supprimés)
– Toutes les durées de commutation
– Tous les paramètres réseau
– Le mot de passe utilisateur est réinitialisé sur «1234»
État des
touches Action Description État consécutif
bouton
État consécutif du
luminaire
Variation du champ lumineux
ou134ou
Appuyer sur la
touche du canal
correspondant (1,
3 ou 4) jusqu’à
obtenir le niveau
de variation sou-
haité. Le sens
de variation est
inversé à chaque
relâchement du
bouton.
La touche corre-
spondante s’all-
ume en orange.
Le champ lumineux
correspondant se
trouve en «commande
manuelle» et n’est plus
contrôlé par le mode
automatique.***
***Remarque: si, sur le luminaire PLATO, un seul champ lumineux direct est temporairement contrôlé par l‘utilisateur,
l’autre champ reste en mode automatique – cet état est signalé par une touche 2 allumée en blanc. Lorsque les
deux champs lumineux directs sont en «commande manuelle», tout le luminaire passe en «commande manuelle»
– la LED blanche du bouton 2 est éteinte. Dans le cas du luminaire ECO S, le champ lumineux non contrôlé par
l‘utilisateur reste au niveau de variation auquel il était avant l’intervention. Le luminaire passe entièrement en «mode
de commande manuelle».
Modier la température de couleur
(Fonction en option)
2
Appuyer sur la
touche 2 jusqu’à
obtenir la tempé-
rature de couleur
souhaitée. Chaque
fois que vous ap-
puyez à nouveau
sur la touche, la
température de
couleur change
de direction (de
froid à chaud ou
inversement).
L’afchage LED
de la touche 2 est
éteint.
Le luminaire est en
«commande manuelle»
du réglage de la tem-
pérature de couleur.
Cela signie que la
température de couleur
reste xe sur la valeur
réglée et ne suit plus la
courbe de température
de couleur dénie.****
****Remarque: par défaut, une modication manuelle de la température de couleur n’est possible qu’en lumière
directe. La lumière indirecte suit la courbe de température de couleur dénie, même lorsque la température de
couleur est contrôlée manuellement. L‘objectif est d’éviter que différentes températures de couleur soient visibles au
plafond à l’intérieur d’une pièce.
LIEN INTERNET
Instructions d‘installation, Instruc-
tions de montage, FAQ et lien vers
l‘application pour la commande sans
l des luminaires et les congurations
avancées.
COMMANDE AVANCEE
Ces fonctions permettent à l’utilisateur de prendre le contrôle temporaire de certains champs lumineux. Cela signie
que pour régler temporairement une situation d’éclairage spécique, il est possible d’allumer ou d’éteindre les
différents champs lumineux individuellement ou de régler la luminosité souhaitée.
État des
touches Action Description État consécutif
bouton
État consécutif du
luminaire
Éteindre le champ lumineux
134ou ou
Appuyer briè-
vement sur la
touche du canal
correspondant (1,
3 ou 4).
La touche corre-
spondante s’all-
ume en orange.
Le champ lumineux
correspondant se
trouve en «commande
manuelle» et n’est plus
contrôlé par le mode
automatique.*
*Remarque: si, sur le luminaire PLATO, un seul champ lumineux direct est temporairement contrôlé par l‘utilisateur,
l’autre champ reste en mode automatique – cet état est signalé par une touche 2 allumée en blanc. Lorsque les
deux champs lumineux directs sont en «commande manuelle», tout le luminaire passe en «commande manuelle»
– la LED blanche du bouton 2 est éteinte. Dans le cas du luminaire ECO S, le champ lumineux non contrôlé par
l‘utilisateur reste au niveau de variation auquel il était avant l’intervention. Le luminaire passe entièrement en «mode
de commande manuelle».
Allumer le champ lumineux
134ou ou
– La touche 2
«varie»
– Appuyer briè-
vement sur la
touche du canal
correspondant
(1, 3 ou 4)
La touche corre-
spondante «varie»
en orange.
Le champ de luminaire
correspondant est en
«mode commande ma-
nuelle inversé» et n’est
plus piloté par le mode
automatique.**
**Remarque: si un seul champ lumineux direct est temporairement contrôlé par l‘utilisateur, l’autre champ reste en
mode automatique – cet état est signalé par une touche 2 allumée en blanc. Lorsque les deux champs lumineux
directs sont en «commande manuelle», tout le luminaire passe en «commande manuelle» – la LED blanche du
bouton 2 est éteinte.
PROGRAMMATION DU TEMPS D‘ARRET DU DETECTEUR DE MOUVEMENT (DM)
Action Description État du panneau de commande
ATTENTION: la programmation de temps d‘arrêt ne peut pas être quittée sans enregistrer de valeur. Les éventuelles
modications spéciques à l’utilisateur sont écrasées.
Étape 1
5 sec.
2
+
1
Maintenir les touches 1 et 2 enfon-
cées ensemble pendant 5 secondes.
Les touches 1-3 clignotent. La touche
correspondant au temps d‘arrêt
actuellement réglé est allumée en
permanence.*
*Remarque: si le temps d‘arrêt a été conguré en fonction de l’utilisateur dans l’application, aucune des touches
n’est allumée en permanence.
Étape 2
ou
123ou
1 = Régler sur 30 minutes
2 = Régler sur 15 minutes
3 = Régler sur 5 minutes
**
Pendant l’enregistrement, la touche 2
clignote rapidement pendant environ
3 secondes.
**Remarque: les éventuels réglages spéciques au client sont écrasés par la programmation du temps d‘arrêt.
FR

1110
PROGRAMMAZIONE DEL VALORE NOMINALE
Azione Descrizione Stato pannello di controllo
Passaggio 1
5 sec.
3
+
2
Tenere premuti insieme i pulsanti 2 e
3 per 5 secondi.
Il pulsante1 si illuminerà con una luce
arancione ssa.
I pulsanti 3 e 4 (nel pannello di con-
trollo a 4 pulsanti) lampeggeranno con
una luce arancione.
Passaggio 2
o3 4
1
Impostare il valore nominale deside-
rato premendo a lungo il pulsante 3
o 4. La direzione di dimmerazione
cambia ogni volta che si preme il
pulsante. Premendo brevemente il
pulsante 1, il valore dell’ultimo cam-
po di illuminazione diretta impostato
viene trasferito all’altro campo di
illuminazione.
Passaggio 3
2
Calibrazione e salvataggio del valore
nominale impostato premendo il
pulsante 2.
Durante la calibrazione il pulsante
2 lampeggia rapidamente per ca. 3
secondi.
Spegnere la lampada
Stato della
lampada
Stato dei
pulsanti Azione Descrizione Stato successivo della lampada
2
Premere brevemente il
pulsante 2.
La lampada è temporanea-
mente SPENTA. La lampada si
trova nella cosiddetta «modalità
inversa», vale a dire che nché il
sensore di movimento rileva un
movimento, la lampada rimane
spenta. Se il sensore non rileva
alcun movimento per più di 5
minuti, la lampada passa in
«modalità stand-by AUTO-ON»
e si riaccenderà solo quando
sarà rilevato nuovamente un
movimento.*
Spegnimento tramite rilevatore
automatico di presenza.
Se il sensore di movimento non
rileva alcun movimento nella
sua zona di rilevamento, la
lampada si spegne automa-
ticamente dopo l’intervallo
di tempo predenito per lo
spegnimento.
La lampada ha attivato tutte le
funzioni automatiche possibili e
si trova nella cosiddetta «moda-
lità stand-by AUTO-ON».
*Nota: la modalità inversa è indicata sul pannello di controllo dai LED dei pulsanti 1, 3 e 4 che si accendono a inter-
mittenza in modo progressivo con una luce arancione – il pulsante 2 resta spento.
COMANDO DELLE LUCI
Accendere la lampada
Stato della
lampada
Stato dei
pulsanti Azione Descrizione Stato successivo della
lampada
2
Premere brevemente il pulsante
2. La luminosità sarà impostata
automaticamente in base al
valore nominale denito.
La lampada è ACCESA e tutte
le possibili funzioni automatiche
sono attive.
La lampada ha attivato tutte le
funzioni automatiche possibili e
si trova nella cosiddetta «mo-
dalità stand-by AUTO-ON».
Quando qualcosa si muove
all’interno della zona di
rilevamento del sensore di
movimento, la lampada si
accende automaticamente, se
ritenuto necessario sulla base
delle condizioni di luminosità
dell’ambiente. Ciò signica che,
se la lampada non si accende,
la luce articiale o la luce diurna
che illumina il tavolo è maggiore
del valore nominale impostato.
SIMBOLI
Breve pressione del
pulsante di controllo
Lunga pressione del
pulsante di controllo
LED in modalità
«respiro»
Spia LED OFF
Spia LED ON modalità
«AUTO»
Stato lampada
ON/OFF
Campo luminoso
indiretto
Campo luminoso
diretto da destra
Campo luminoso
diretto da sinistra
Campo luminoso
indiretto
Campo luminoso
diretto
Pannello di controllo a
4 pulsanti PLATO ed ECO S
versione per postazione di
lavoro da 2 e da 4 posti
Pannello di controllo a
3 pulsanti ECO S versione
per postazione di lavoro
singola
AUTO
1
2
3
AUTO
2
3
4
1
ON/OFF AUTO ON/OFF AUTO
IT IT

1312
IT
RIPRISTINARE LE IMPOSTAZIONI DI FABBRICA
1. Staccare il connettore di rete
2. Premere e tenere premuto contemporaneamente i primi tre pulsanti
(1, 2 e 3) del pannello di controllo
3. Inserire il connettore di rete e continuare a tenere premuti i tre pulsanti
4. Dopo ca. 5 secondi tutti i pulsanti lampeggeranno per ca. 3 secondi
per confermare che l’operazione è andata a buon ne e sarà quindi
possibile rilasciarli
5. Stato di fabbrica ripristinato
Le seguenti impostazioni saranno resettate alle impostazioni di fabbrica:
– Tutte le impostazioni utente
– Tutte le curve HCL
– Tutti i pulsanti radio (gli eventuali pulsanti memorizzati saranno can-
cellati)
– Tutti i tempi di commutazione
– Tutte le impostazioni di rete
– La password utente sarà ripristinata a «1234»
Stato dei
pulsanti Azione Descrizione Pulsante Stato
successivo
Stato successivo della
lampada
Dimmerare il campo luminoso
o134o
Premere il pulsante
del canale corri-
spondente (1, 3 o
4) no a quando
non si raggiunge il
livello di intensità
desiderato. Ogni
volta che si rilascia
il pulsante, si
inverte la direzione
di dimmerazione.
Il pulsante corri-
spondente si illumi-
na di arancione.
Il campo di illumina-
zione corrispondente
si trova in modalità
«controllo manuale» e
non è più controllato
dal sistema automa-
tico.***
***Nota: se nelle piantane PLATO si prende il controllo temporaneo di un solo campo di illuminazione diretta, l’altro
resta in modalità automatica – questa condizione è segnalata anche dal pulsante 2 che si accende ed emette una
luce bianca. Se entrambi i campi di illuminazione diretta sono in modalità «controllo manuale», tutta la lampada
passa in modalità «controllo manuale» – il LED bianco del pulsante 2 è SPENTO. Nelle piantane ECO S, il campo di
illuminazione non controllato manualmente rimane al livello di dimmerazione precedente all’intervento dell’utente. La
lampada passa completamente in «modalità controllo manuale».
Regolare la temperatura di colore
(funzione opzionale)
2
Premere il pulsante
2 no a quando
non si raggiunge
la temperatura di
colore desiderata.
La direzione in
cui viene regolata
la temperatura di
colore (da freddo a
caldo o viceversa)
cambia ogni volta
che si preme nuo-
vamente il pulsante.
La spia LED del
pulsante 2 è
spenta.
La lampada è in moda-
lità «controllo manuale»
della regolazione della
temperatura di colore:
la temperatura di
colore rimane ssa sul
valore impostato e non
segue più la curva della
temperatura di colore
denita.****
****Nota: come impostazione predenita è possibile regolare manualmente la temperatura di colore solo per la luce diretta.
La luce indiretta segue la curva denita della temperatura di colore anche quando la temperatura di colore è controllata
manualmente. In questo modo si evita che all’interno di un ambiente siano visibili diverse temperature di colore sul softto.
WEBLINK
Istruzioni per l’uso, Istruzioni di
montaggio, FAQ e link all‘app per il
controllo wireless delle lampade e
per le congurazioni avanzate.
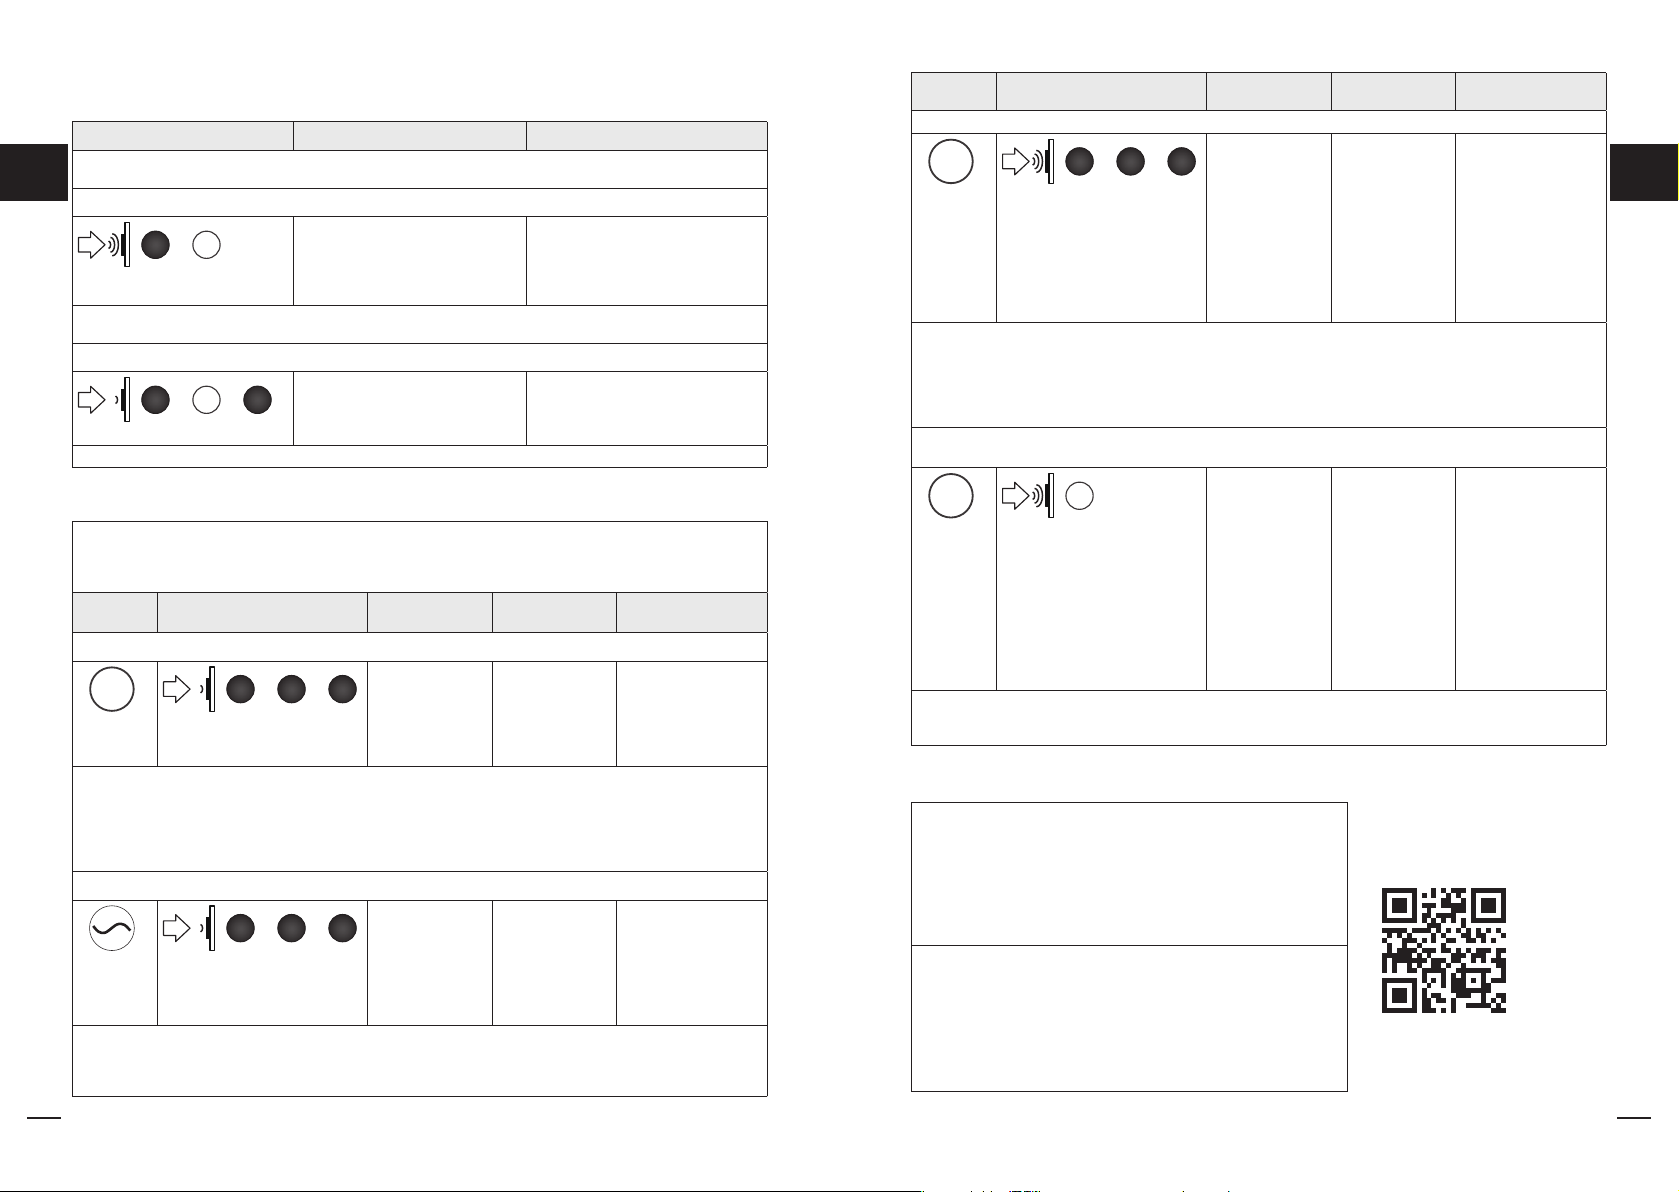
COMANDI AVANZATI
Queste funzioni consentono all’utente di prendere il controllo e modicare temporaneamente i singoli campi lumino-
si. Ciò signica che, qualora fosse necessario impostare temporaneamente una specica situazione di illumina-
zione, sarà possibile accendere o spegnere singolarmente i singoli campi luminosi, oppure regolarli alla luminosità
desiderata.
Stato dei
pulsanti Azione Descrizione Pulsante Stato
successivo
Stato successivo della
lampada
Spegnere un campo luminoso
134o o
Premere breve-
mente il pulsante
del canale corri-
spondente (1, 3
o 4).
Il pulsante corri-
spondente si illumi-
na di arancione.
Il campo di illuminazio-
ne corrispondente è
ora nella modalità «con-
trollo manuale» e non
è più controllato dal
sistema automatico.*
*Nota: se nelle piantane PLATO si prende il controllo temporaneo di un solo campo di illuminazione diretta, l’altro
resta in modalità automatica – questa condizione è segnalata anche dal pulsante 2 che si accende ed emette una
luce bianca. Se entrambi i campi di illuminazione diretta sono in modalità «controllo manuale», tutta la lampada
passa in modalità «controllo manuale» – il LED bianco del pulsante 2 è SPENTO. Nelle piantane ECO S, il campo di
illuminazione non controllato manualmente rimane al livello di dimmerazione precedente all’intervento dell’utente. La
lampada passa completamente in «modalità controllo manuale».
Accendere campo luminoso
134o o
– Pulsante 2 in
modalità respiro
– Premere breve-
mente il pulsante
del canale cor-
rispondente (1,
3 o 4)
Il pulsante
corrispondente
si accende a
intermittenza in
modo progressi-
vo con una luce
arancione.
Il campo di illumina-
zione corrispondente
si trova in «modalità
controllo manuale
inversa» e non è più
controllato dal sistema
automatico.**
**Nota: Se si prende temporaneamente il controllo di un solo un campo di illuminazione diretta, l’altro campo resta
in modalità automatica – questa condizione è segnalata anche dal pulsante 2 che si accende ed emette una luce
bianca. Se entrambi i campi di illuminazione diretta sono in modalità «controllo manuale», tutta la lampada passa in
modalità «controllo manuale» – il LED bianco del pulsante 2 è SPENTO.
PROGRAMMAZIONE INTERVALLO DI TEMPO PER LO SPEGNIMENTO DEI
SENSORI DI MOVIMENTO (SM)
Azione Descrizione Stato pannello di controllo
ATTENZIONE: non è possibile uscire dalla programmazione dell’intervallo di tempo per lo spegnimento senza aver
prima impostato un valore. Eventuali modiche personalizzate saranno sovrascritte.
Passaggio 1
5 sec.
2
+
1
Tenere premuti insieme i pulsanti 1 e
2 per 5 secondi.
Uno dei pulsanti da 1 a 3 lampeggia.
La luce del pulsante che corrisponde
all’intervallo di tempo per lo speg-
nimento impostato al momento si
accende e resta accesa.*
*Nota: se l’intervallo di tempo per lo spegnimento è stato congurato dall’app in modo personalizzato da un
utente, non si accenderà nessun pulsante.
Passaggio 2
o
123o
1=spegnimento impostato dopo 30 min.
2=spegnimento impostato dopo 15 min.
3=spegnimento impostato dopo 5 min.
**
Durante il salvataggio delle impostazio-
ni, il pulsante 2 lampeggia rapidamen-
te per circa 3 secondi.
**Nota: questa procedura di impostazione dei tempi di spegnimento sovrascrive eventuali impostazioni personalizzate
IT

1514
EN
PROGRAMMING THE SET POINT
Action Description Control panel status
Step 1
5 sec.
3
+
2
Press and hold down buttons 2 and
3 together for 5 seconds.
Button 1 is constantly lit orange
Buttons 3 and 4 (in the case of the
4-button panel) ash orange.
Step 2
or3 4
1
Set the desired set point by means
of a long press of button 3 or 4.
Each new press of the button chan-
ges the dimming direction. Press
button 1 briey to transfer the value
of the most recently set direct light
eld to the other light eld.
Step 3
2
Calibrate and save the set point by
pressing button 2.
During calibration, button 2 ashes
rapidly for approx. 3 seconds
Switching off the light
Light
status
Button
status Action Description Light follow-up status
2
Briey press button 2. The light is temporarily OFF.
The light is in «reverse mode»,
i.e. as long as the motion
detector detects movement,
the light remains switched off.
If no movement is detected for
more than ve minutes, the light
switches to «AUTO ON standby
mode» and will be switched
back on again when movement
is detected once more.*
Switch-off with automatic
presence system.
If no movement is detected
in the detection area of the
motion detector, the light auto-
matically switches OFF after the
selected switch-off time.
The light has activated all possi-
ble automatic functions and is in
«AUTO ON standby mode».
*Note: Reverse mode is indicated on the control panel by orange breathing LEDs on buttons 1, 3 and 4 – button 2
is off.
OPERATING THE LIGHT CONTROL SYSTEM
Switching on the light
Light
status
Button
status Action Description Light follow-up status
2
Briey press button 2. The
brightness is set automatically
according to the dened set
point.
The light is ON and all possible
automatic functions are active.
The light has activated all pos-
sible automatic functions and is
in «AUTO ON standby mode».
If there is movement in the
motion sensor’s detection area,
the light switches ON automa-
tically when required according
to the current brightness level.
This means that if the light does
not switch on, the external light
or daylight falling on the table,
for example, is brighter than the
set point.
SYMBOLS
Short press of the
control button
Long press of the
control button
«Breathing» LED
LED display OFF
LED display ON,
«AUTO mode»
Status light
ON/OFF
Indirect light eld
AUTO
1
2
3
AUTO
2
3
4
1
ON/OFF AUTO
Righthand
direct light eld
Lefthand direct
light eld
Indirect light eld
ON/OFF AUTO
Direct light eld
3-button control panel,
ECO S single work-
station version
4-button control panel
PLATO and ECO S 2 and
4 workstation version
EN

1716
EN
RESETTING TO FACTORY SETTINGS
1. Pull out the mains plug
2. Simultaneously press and hold down the rst three buttons (1, 2
and 3) on the control panel
3. Plug in the mains plug and continue to hold down the same
three buttons
4. After about 5 seconds, all buttons will ash for about 3 seconds
as conrmation and the buttons can be released
5. Factory settings restored
The following settings are reset to the factory settings:
– All user settings
– All HCL curves
– All radio buttons (any pre-sets may be deleted)
– All switching times
– All network settings
– User password will be reset to «1234»
Button
status Action Description Button follow-up
status
Light follow-up
status
Dimming the light eld
or134or
Press the button
for the correspon-
ding channel (1,
3 or 4) until the
desired dimming
level is reached.
Every time the but-
ton is released, the
dimming direction
is reversed.
The corresponding
button lights up
orange.
The corresponding
light eld is in «manual
control» and is no
longer controlled by the
automatic system.***
***Note: If only one direct light eld is temporarily overridden in the case of the PLATO oor luminaire, the other
remains in automatic mode – this is indicated by button 2 which is additionally illuminated in white. When both direct
light elds are in «manual control», the entire light switches to «manual control» – the white LED in button 2 is OFF.
With the ECO S oor luminaire, the light eld which has not been overridden remains at the same dimming level it
was in before the action was taken. The light switches completely to «manual control mode».
Adjusting the colour temperature
(Optional function)
2
Press button 2
until the desired
colour temperature
is reached. Each
further press of the
button changes
the direction in
which the colour
temperature is
regulated (from
cold to warm or
vice versa).
The LED display of
button 2 is off.
The light is in «manual
control» of the colour
temperature control.
This means that the
colour temperature
remains permanently
at the set value and no
longer follows the de-
ned colour temperature
curve.****
****Note: As the default setting, manual adjustment of the colour temperature is only possible with direct light. The
indirect light follows the dened colour temperature curve even when the colour temperature is manually overridden.
This should prevent different colour temperatures from being visible on the ceiling within a room.
WEBLINK
Operating instructions, assembly instruc-
tions, FAQs and link to app for wireless
light control and expanded congurati-
ons.
ENHANCED OPERATION
These functions allow users to temporarily override individual light elds. This means that if a specic lighting situa-
tion is to be temporarily adjusted, the individual light elds can be switched on or off individually or dimmed to the
desired brightness.
Button
status Action Description Button follow-up
status
Light follow-up
status
Switching off the light eld
134or or
Briey press the
button for the
corresponding
channel (1, 3 or 4) .
The corresponding
button lights up
orange.
The corresponding
light eld is in «manual
control» and is no
longer controlled by the
automatic system.*
*Note: If only one direct light eld is temporarily overridden in the case of the PLATO oor luminaire, the other
remains in automatic mode – this is indicated by button 2 which is additionally illuminated in white. When both direct
light elds are in «manual control», the entire light switches to «manual control» – the white LED in button 2 is OFF.
With the ECO S oor luminaire, the light eld which has not been overridden remains at the same dimming level it
was in before the action was taken. The light switches completely to «manual control mode».
Switching on the light eld
134or or
– Button 2 «bre-
athes»
– Briey press the
button for the
corresponding
channel (1, 3
or 4)
The corresponding
button «breathes»
orange.
The corresponding
light eld is in «manual
control reverse mode»
and is no longer con-
trolled by the automatic
system.**
**Note: If only one direct light eld is temporarily overridden, the other remains in automatic mode – this is indicated
by button 2 which is additionally illuminated in white. When both direct light elds are in «manual control», the entire
light switches to «manual control» – the white LED in button 2 is OFF.
PROGRAMMING THE SWITCH-OFF TIME FOR THE MOTION DETECTOR
Action Description Control panel status
CAUTION: Switch-off time programming cannot be exited without saving a value. Any user-specic adjustments are
overwritten.
Step 1
5 sec.
2
+
1
Press and hold down buttons 1 and
2 together for 5 seconds.
Buttons 1-3 ash. The button which
corresponds to the currently-set
switch-off time is constantly lit.*
*Note: If the switch-off time has been congured for the user in the app, none of the buttons will remain constant-
ly lit.
Step 2
or
123or
1 = Set to 30 minutes
2 = Set to 15 minutes
3 = Set to 5 minutes
**
While the setting is being saved,
button 2 ashes rapidly for approx. 3
seconds.
**Note: Any customer-specic settings are overwritten by the switch-off time programming.
EN

Alteme Licht AG
Gysulastrasse 21
CH-5000 Aarau
A006780 21/08
Table of contents
Languages:
Other Alteme Lighting Equipment manuals
Popular Lighting Equipment manuals by other brands

Clevertronics
Clevertronics L10 Ultrablade Pro LUBPRO-SM Series Installation & Maintenance Instruction Manual

Collingwood Lighting
Collingwood Lighting Photocell Kit installation instructions

FireWare
FireWare Phoenix Silkflame user manual

Beamz
Beamz LED PAR 4X 8W Quad Linkable Manual guide

Laserworld
Laserworld PL-12.000G manual

ADJ
ADJ ENCORE BURST UV IP user manual