manuals.online logo
Brands
  1. Home
  2. •
  3. Brands
  4. •
  5. Altinex
  6. •
  7. Media Converter
  8. •
  9. Altinex SR208-100 User manual

Altinex SR208-100 User manual

SR208
SR208SR208
SR208-
--
-100 PC to PC Video Scaler
100 PC to PC Video Scaler100 PC to PC Video Scaler
100 PC to PC Video Scaler
User’s Guide
400-0560-001
1
Welcome!
We greatly appreciate your purchase of the SR208-100 Scaler We are sure
you will find it reliable and simple to use Superior performance for the right
price, backed by solid technical and customer support is what ALTINEX has
to offer
We are committed to providing our customers with Signal Management
Solutions
®
to the most demanding audiovisual installations at competitive
pricing and we welcome you to join the ranks of our many satisfied
customers throughout the world
1. Precautions and Safety Warnings
Please read this manual carefully before using your SR208-100 Keep this
manual handy for future reference These safety instructions are to ensure
the long life of your SR208-100 and to prevent fire and shock hazards Please
read them carefully and heed all warnings
1.1 General
•Qualified ALTINEX service personnel or their authorized
representatives must perform all service
1.2 Installation Precautions
•To prevent fire or shock, do not expose this unit to water or moisture
Do not place the SR208-100 in direct sunlight, near heaters or
heat-radiating appliances, or near any liquid Exposure to direct
sunlight, smoke, or steam can harm internal components
•Handle the unit carefully Dropping or jarring can cause damage
•Do not pull any cables that are attached to the SR208-100
1.3 Cleaning
•Clean only with a dry cloth Never use strong detergents or solvents
such as alcohol or thinner Do not use a wet cloth or water to
1.4 FCC Notice
•This device complies with Part 15 of the FCC Rules Operation is
subject to the following two conditions: (1) This device may not cause
harmful interference, and (2) this device must accept any interference
received, including interference that may cause undesired operation
•This equipment has been tested and found to comply with the limits
for a Class A digital device, pursuant to Part 15 of the FCC Rules
These limits are designed to provide reasonable protection against
harmful interference when the equipment is operated in a commercial
environment This equipment generates, uses, and can radiate radio
frequency energy and, if not installed and used in accordance with the
instructions found herein, may cause harmful interference to radio
communications Operation of this equipment in a residential area is
likely to cause harmful interference in which case the user will be
required to correct the interference at his own expense
•Any changes or modifications to the unit not expressly approved by
ALTINEX, Inc could void the user’s authority to operate the
equipment
2. Installation Procedures
Note: Download and read the entire online manual for detailed specifications and instructions
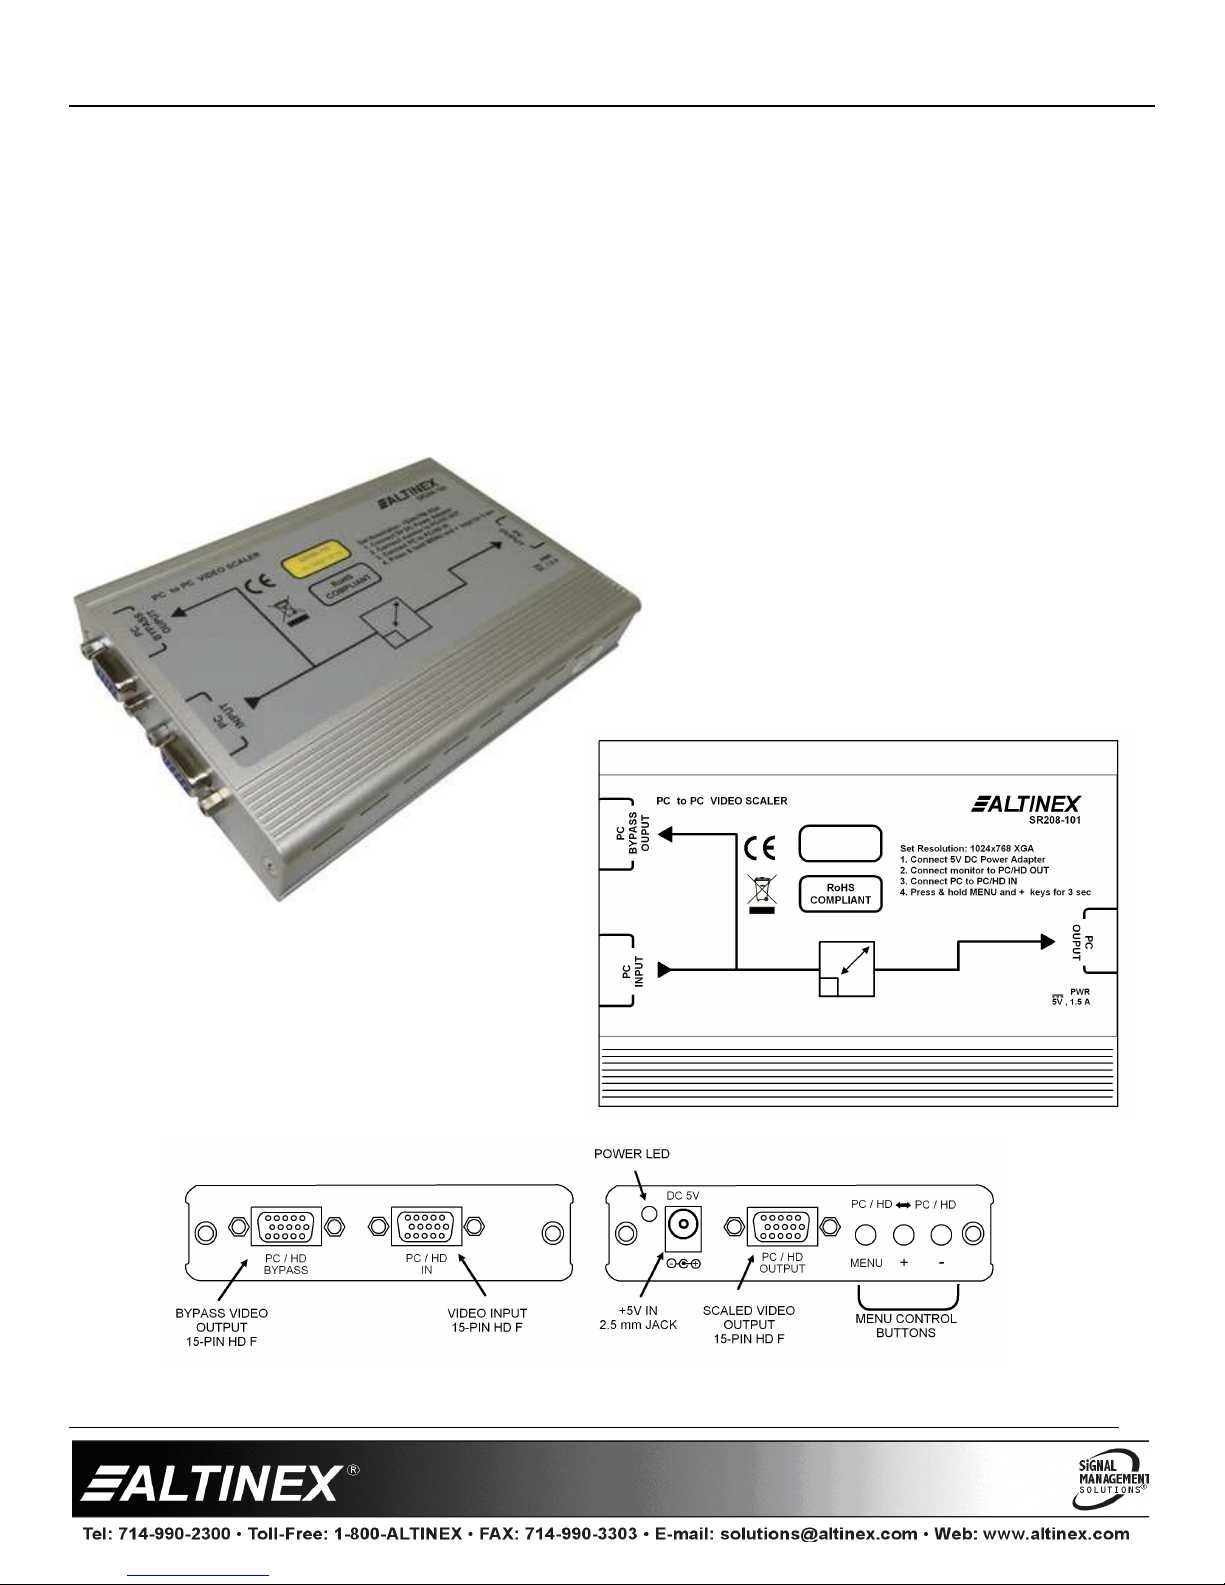
Step 1 Remove all the accessories included with the SR208-100 scaler
Step 2 Select the AC plug adapter for your installation and snap into the power adapter
Plug in the power adapter and connect to the SR208-100; power LED turns ON
Step 3 At the computer side, disconnect the cable connecting the computer to the monitor
Step 4 Use the VGA cable provided to connect your computer to the PC/HD IN connector
Step 5 Connect the cable from the monitor to the PC/HD OUTPUT of the scaler
Step 6 Set the scaler to a known starting resolution
Press MENU and PLUS buttons simultaneously to switch to XGA (1024x768)
Press MENU and MINUS buttons simultaneously to switch to 480p
Step 7 Use the MENU button and on-screen display to make further image property changes
Menu Adjustments: Press MENU to view the on-screen menu
Use the PLUS and MINUS buttons to highlight a property, text turns green
Press the MENU to select the highlighted property; value text turns red
Use the PLUS and MINUS buttons again to change the property value
Press the MENU button when done with adjustments
The on-screen menu will timeout after about 10 seconds
Note: Some menu items are direct adjustments and others are divided into submenus
3. Limited Warranty/Return Policies
Please see the ALTINEX website at www altinex com for details on warranty and return policies
On
OnOn
On
-
--
-
Screen Menu
Screen MenuScreen Menu
Screen Menu
Contrast
Brightness
Finetune
Phase
Clock
H-pos
V-pos
Color
Red
Green
Blue
Size (aspect ratio)
Output (resolutions)
OSD
H-pos
V-pos
Timer
Background
Display
SR208
SR208SR208
SR208-
--
-100
100100
100
User’s Guide
400-0560-001
2
4. Technical Specifications
Specifications are subject to change See www altinex com for up-to-date information
Features/Description SR208-100 Description
General
Inputs
Video Input 15-pin HD F (1)
Power, +5VDC 2.5 mm DC Jack (1)
Outputs
Video Output 15-pin HD F (1)
Bypass Output 15-pin HD F (1)
Compatibility
Input Signal Types RGBHV
Output Resolutions
VGA (640x480),
SVGA (800x600),
XGA (1024x768),
SXGA (1280x1024),
UXGA (1600x1200),
WXGA (1280x800),
WSXGA (1600x1024),
WUXGA (1920x1200)
480i, 480p,
576i, 576p,
720p
@
50Hz, 720p
@
60Hz
1080i
@
50Hz, 1080i
@
60Hz
1080p
@
50Hz, 1080p
@
60Hz
Agency Approvals
Power Supply UL/CE/FCC
Scaler CE/FCC
Accessories Included
VGA Cable M-M 15-pin HD M-M (1)
Power Adapter +5 VDC, 2.6 A (1)
Table 1. SR208-100 General
Mechanical SR208-100 Mechanical
Material/Color Al/Silver
Height 0.98 in (25 mm)
Width 4.02 in (102 mm)
Depth 6.18 in (157 mm)
Weight 0.8 lb (0.4 kg)
T°Operating 0°C-40°C
T°Maximum 75°C
Humidity 90% non-condensing
MTBF (calc.) 38,000 hrs
Table 2. SR208-100 Mechanical
Electrical SR208-100 Electrical
Video Output Signals
Impedance Analog 75 ohms
Analog Signal Level 1.5 Vp-p max.
Sync Output Signals
Signal Level 3 - 5 Vp-p TTL
Power (from adapter)
+5V 1.5 A max.
Total Power 7.5 W max.
Table 3. SR208-100 Electrical
SR208
SR208SR208
SR208-
--
-100
100100
100
User’s Guide
400-0560-001
3
5. About Your SR208-100
The SR208-100 is a PC to PC Scaler and is designed to upscale (or downscale) a standard PC video input to any of several popular PC/HD resolutions In
applications where there are many different input sources such as laptops interfacing with a fixed monitor or projector, the SR208-100 converts any of these
sources to a single output resolution that is best for the display device The output resolutions available are as follows:
VGA SVGA XGA SXGA UXGA WXGA WSXGA WUXGA
480i 480p 576i 576p 720p 1080i 1080p
In addition to scaling video, the SR208-100 has built-in setup menus that are accessible using 3 push buttons on the output side of the chassis These menus allow
image adjustments for color levels, contrast, brightness, output resolutions, aspect ratio, horizontal and vertical positioning, etc
A bypass output is provided for use with a local monitor or other device The bypass output is a buffered output and is equivalent to the PC input for resolution
and refresh rate The bypass output is not scaled
SR208
SR208SR208
SR208-
--
-100
100100
100
User’s Guide
400-0560-001
4
6. Application Diagrams
Diagram 1: Typical Setup
SR208
SR208SR208
SR208-
--
-100
100100
100
User’s Guide
400-0560-001
5
7. Operation
7.1 Getting Started
The SR208-100 ships with the output resolution set to XGA (1024x768) In
order to change the output resolution, use the MENU, PLUS, and MINUS
buttons on the side of the unit
7.2 Menu Adjustments
Press the MENU button to view the on-screen menu Use the PLUS and
MINUS buttons to highlight a property Press the MENU button again to
select the highlighted property; the selection text changes color
Use the PLUS and MINUS buttons again to change the selected value Press
the MENU button when done with adjustments or wait for the on-screen
menu to timeout; about 10 seconds
Note: Some menu items are direct adjustments and others are divided
into submenus
7.3 Reset
The SR208-100 has 2 easy to set resolutions that do not require the
on-screen display In the event a resolution that cannot be displayed is
selected and the on-screen display cannot be viewed, these settings return
the scaler to a known resolution that can be displayed on almost all
displays
Press MENU and PLUS simultaneously to switch to XGA (1024x768)
Press MENU and MINUS simultaneously to switch to 480p
7.4 Menu Adjustments
Contrast 0~100
Brightness 0~100
Finetune
Hue 0~100
Saturation 0~100
Sharpness 0~100
Color
Red 0~100
Green 0~100
Blue 0~100
Size Full,
Overscan,
Underscan,
Letterbox,
Panscan
Output VGA~WUXGA,
480i ~ 1080p
OSD
H-pos 0~100
V-pos 0~100
Timer 5~100
Background 0~100 (percent transparency)
Display on/off
SR208
SR208SR208
SR208-
--
-100
100100
100
User’s Guide
400-0560-001
6
8. Troubleshooting Guide
We have carefully tested and have found no problems in the supplied SR208-100 However, we would like to offer suggestions for the following:
Switcher
Symptom Resolution
LED on Scaler Is OFF 1 Make sure the unit is plugged into a working AC outlet and the DC plug is inserted all the way into the switcher
2 Use only the power adapter provided
No Display on Projector
1 Check the source and make sure there is a signal present
2 Make sure the projector has power and is turned on
3 Try resetting the output resolution of the scaler to 1024x768; press MENU and PLUS buttons simultaneously
Poor Output Image 1 The scaler output resolution may not be set to the optimal resolution for the display Use the MENU, PLUS, and
MINUS buttons to select a better resolution for the display

Other Altinex Media Converter manuals

Altinex AP445-401 User manual

Altinex

Altinex AP445-401 User manual

Altinex Video Scaler Card MT106-103 User manual

Altinex

Altinex Video Scaler Card MT106-103 User manual

Altinex MT306-501 User manual

Altinex

Altinex MT306-501 User manual

Altinex VP500-101 User manual

Altinex

Altinex VP500-101 User manual

Altinex VP500-100 User manual

Altinex

Altinex VP500-100 User manual

Altinex HDTV/DVD/Component Video to RGBHV Transcoder... User manual

Altinex

Altinex HDTV/DVD/Component Video to RGBHV Transcoder... User manual

Popular Media Converter manuals by other brands

Kramer WP-789R quick start guide

Kramer

Kramer WP-789R quick start guide

Atlona AT-HDR-M2C installation guide

Atlona

Atlona AT-HDR-M2C installation guide

Microwave Radio DVC 4000 Operator's guide

Microwave Radio

Microwave Radio DVC 4000 Operator's guide

JTS UA-960 instruction manual

JTS

JTS UA-960 instruction manual

ANTAIRA FCU-1802P Series user manual

ANTAIRA

ANTAIRA FCU-1802P Series user manual

Atop AF100-2 user manual

Atop

Atop AF100-2 user manual

S&S SLC-1010 quick start guide

S&S

S&S SLC-1010 quick start guide

Smart view DS-912F user manual

Smart view

Smart view DS-912F user manual

Blackmagicdesign Blackmagic Web Presenter Installation and operation manual

Blackmagicdesign

Blackmagicdesign Blackmagic Web Presenter Installation and operation manual

Celabs QMPro 1100 instruction manual

Celabs

Celabs QMPro 1100 instruction manual

Crestron Electronics DM NVX Series product manual

Crestron Electronics

Crestron Electronics DM NVX Series product manual

Planet GTP-802 user manual

Planet

Planet GTP-802 user manual

Delta LTC3780 user manual

Delta

Delta LTC3780 user manual

Ntron SER-485-FXC quick start guide

Ntron

Ntron SER-485-FXC quick start guide

Planet ICS-100 user manual

Planet

Planet ICS-100 user manual

red lion GCM23201 quick start guide

red lion

red lion GCM23201 quick start guide

Cloner Alliance HDML-Cloner Evolve Box CA-1180E user manual

Cloner Alliance

Cloner Alliance HDML-Cloner Evolve Box CA-1180E user manual

Oriental motor NETC01-CC user manual

Oriental motor

Oriental motor NETC01-CC user manual

manuals.online logo
manuals.online logoBrands
  • About & Mission
  • Contact us
  • Privacy Policy
  • Terms and Conditions

Copyright 2025 Manuals.Online. All Rights Reserved.