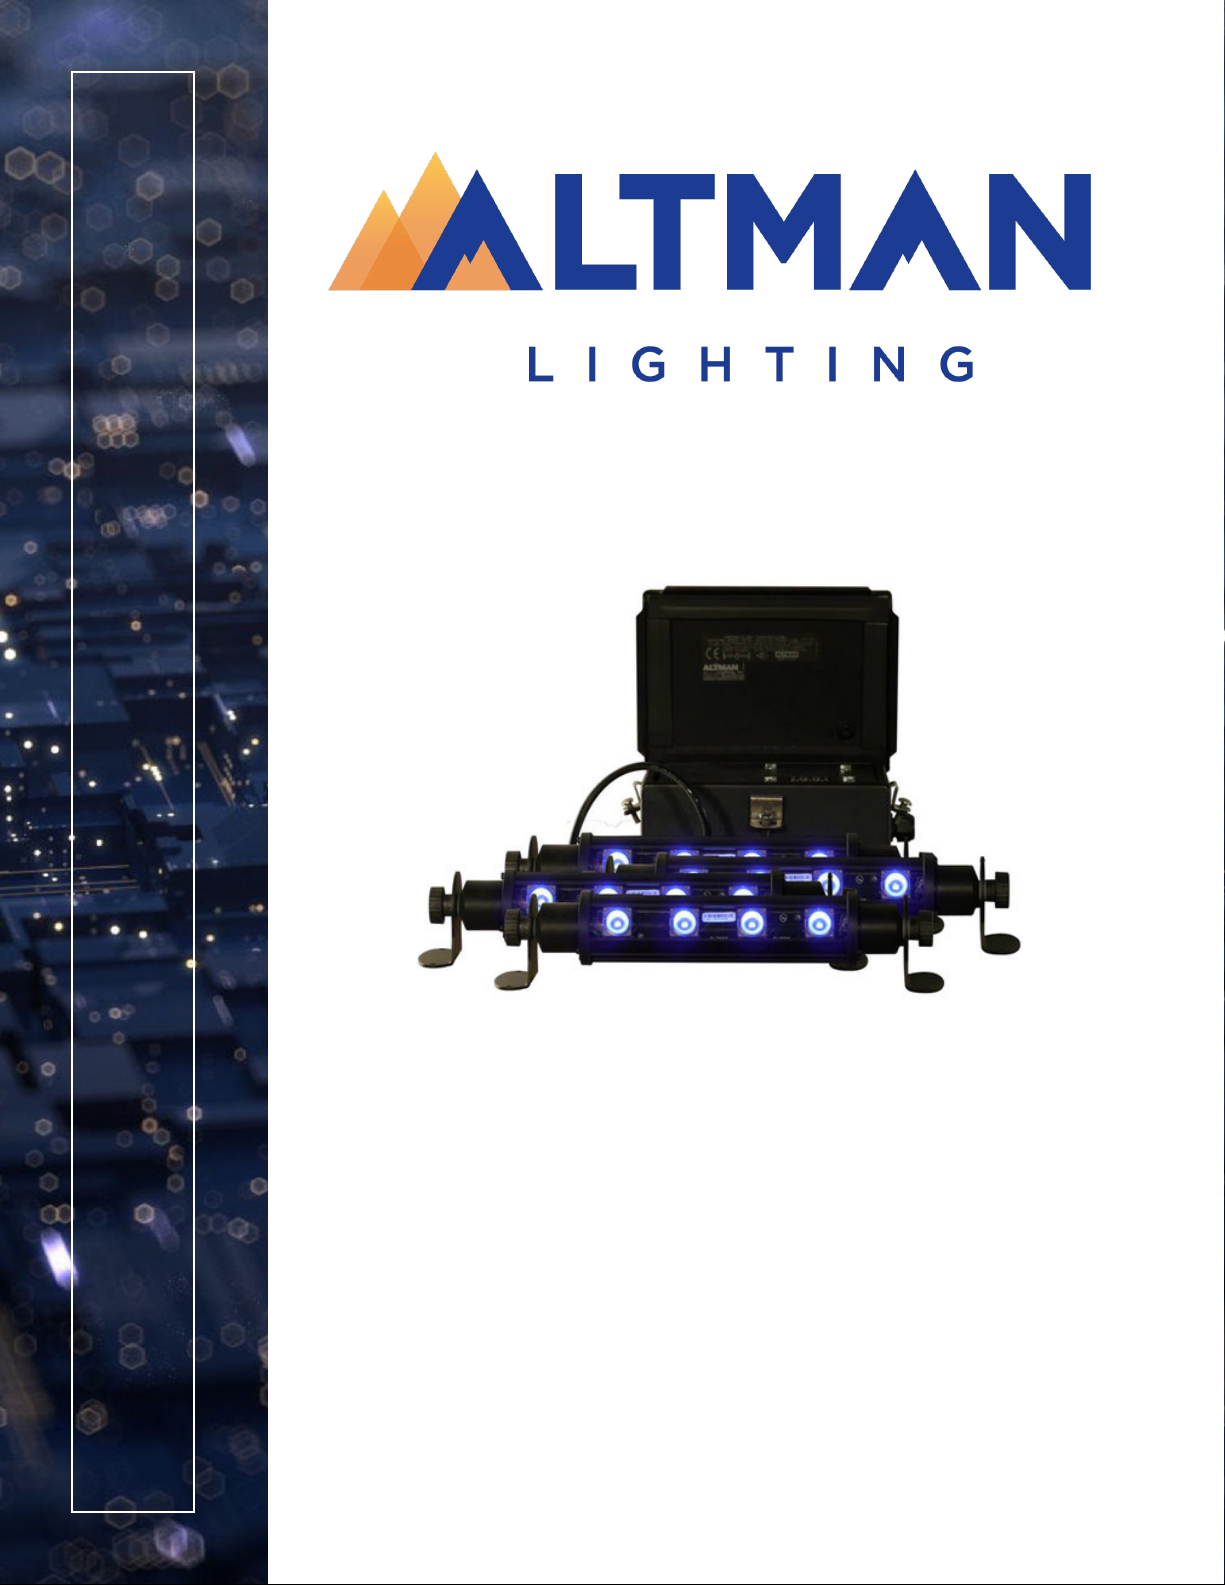
Altman SPECTRA Series User manual

USER’S MANUAL
SSUV40_USERS_MANUAL_REV_20200720
SS-UV40 SPECTRA SERIES UV LED

Page 2
SS-UV40 Installation & Users Manual
Have a question regarding this manual?
Note: Information contained in this document may not be duplicated in full or in part by any person without prior
written approval of Altman Lighting Its sole purpose is to provide the user with conceptual information on the
equipment mentioned. The use of this document for all other purposes is specifically prohibited.
The material in this manual is for information purposes only and is subject to change without notice. Altman
Lighting assumes no responsibility for any errors or omissions which may appear in this manual. For com-
ments and suggestions regarding corrections and/or updates to this manual, please visit the Altman Lighting
web site at www.altmanlighting.com or contact your nearest Altman Lighting Regional Manager.
El contenido de este manual es solamente para información y está sujeto a cambios sin previo aviso. Altman
Lighting no asume responsabilidad por errores o omisiones que puedan aparecer. Cualquier comentario, sug-
erencia o corrección con respecto a este manual, favor de dirijirlo a la oficina de Altman Lighting más cercana.
Der Inhalt dieses Handbuches ist nur für Informationszwecke gedacht, Aenderungen sind vorbehalten. Alt-
man Lighting uebernimmt keine Verantwortung für Fehler oder Irrtuemer, die in diesem Handbuch auftreten.
FürBemerkungen und Verbesserungsvorschlaege oder Vorschlaege in Bezug auf Korrekturen und/oder Aktual-
isierungen in diesem Handbuch, moechten wir Sie bitten, Kontakt mit der naechsten Altman Lighting Nieder-
lassung aufzunehmen.
Should you have a suggestion or question regarding your Altman Lighting product, we would love to hear
from you.
You can reach us at:
Altman Lighting
1400 East 66th Ave.
Denver, CO. 80229
+1 (303) 500-7072
www.altmanlighting.com
Preface
The document provides basic information on installation and operational instruc-
tions for a qualified, trained installer. These instructions provide information for
the following product:
SS-UV40 SPECTRA SERIES UV LED
Additional product information can be found on our web site at
www.altmanlighting.com or by scanning the QR code to the right.

Page 3
SS-UV40 Installation & Users Manual
SS-UV40 Luminaire Installation & User’s Manual
©2020 Altman Lighting. All rights reserved.
Document Number:
Version as of: 2020-07-20
Altman Lighting continually engages in research related to product improvement. New materials, production
methods and design refinements are introduced into existing products without notice as a routine expression
of the philosophy. For this reason any current Altman Lighting product may differ in some respect from its
published description, but will always equal or exceed the original design specifications unless otherwise noted.
Our Commitment

Page 4
SS-UV40 Installation & Users Manual
When using electrical equipment, basic safety precautions should always be followed including the following:
1. READ AND FOLLOW ALL SAFETY INSTRUCTIONS.
2. Do not mount near gas or electric heaters.
3. Equipment should be mounted in locations and at heights where it will not readily be subjected to tampering by
unauthorized personnel.
4. The use of accessory equipment not recommended by the manufacturer may cause an unsafe condition.
5. Do not use this equipment for other than intended use.
6. Refer service to qualified personnel.
SAVE THESE INSTRUCTIONS.
WARNING: You must have access to a main circuit breaker or other power disconnect device before installing
any wiring. Be sure that power is disconnected by removing fuses or turning the main circuit breaker off before
installation. Installing the device with power on may expose you to dangerous voltages and damage the device. A
qualified electrician must perform this installation.
WARNING: Refer to National Electrical Code® and local codes for cable specifications. Failure to use proper cable
can result in damage to equipment or danger to personnel.
WARNING: This equipment is intended for installation in accordance with the National Electric Code® and local
regulations. It is also intended for installation in indoor applications only. Before any electrical work is performed,
disconnect power at the circuit breaker or remove the fuse to avoid shock or damage to the control. It is recom-
mended that a qualified electrician perform this installation.
WARNING: This Lighting Fixture IS NOT for residential installation or use.
WARNING: The structure where fixture(s) is to be mounted must be capable of supporting the weight of the fixture
and its accessories. This fixture is for temporary, portable mounting only.
WARNING: The light source contained in this luminaire shall only be replaced by the manufacturer, an approved
service agent or a similar qualified person.
THIS PRODUCT MUST BE INSTALLED IN ACCORDANCE WITH THE APPLICABLE INSTALLATION CODE BY A PER-
SON FAMILIAR WITH THE CONSTRUCTION AND OPERATION OF THE PRODUCT AND THE HAZARDS INVOLVED.
CE PRODUIT DOIT ÊTRE INSTALLÉ SELON LE CODE D’INSTALLATION PERTINENT, PAR UNE PERSONNE.
CONSULT A QUALIFIED ELECTRICIAN TO ENSURE CORRECT BRANCH CIRCUIT CONDUCTOR. CONSULTER UN
ÉLECTRICIEN QUALIFIÉ POUR VOUS ASSURER QUE LES CONDUCTEURS DE LA DÉRIVATION SONT ADÉQUATS.
Product Safety Notices
Warnings
Important Information

Page 5
SS-UV40 Installation & Users Manual
FCC Notice
This equipment has been tested and found to comply with the limits for a Class A digital device, pursuant to
part 15 of the FCC Rules. These limits are designed to provide reasonable protection against harmful interfer-
ence when the equipment is operated in a commercial environment. This equipment generates, uses, and can
radiate radio frequency energy and, if not installed and used in accordance with the instruction manual, may
cause harmful interference to radio communications.
Operation of this equipment in a residential area is likely to cause harmful interference in which case the user
will be required to correct the interference at his own expense.
For more information on installing DMX512 control systems, the following publication is available for pur-
chase from the United States Institute for Theatre Technology (USITT), “Recommended Practice for DMX512:
A Guide for Users and Installers, 2nd edition” (ISBN: 9780955703522). USITT Contact Information:
USITT
315 South Crouse Avenue, Suite 200
Syracuse, NY 13210-1844
Phone: 1.800.938.7488 or 1.315.463.6463
www.usitt.org
DMX 512 Additional Resources
Altman Lighting Product Warranty
Altman Lighting, Inc., a subsidiary of Altman Stage Lighting Company, Inc., herein referred to as Altman, war-
rants each new product (except for spare parts or products Altman does not manufacture) for a period of TWO
(2) years from date of shipment to correct by repair or replacement any part defect due to faulty material or
workmanship. Under these same terms products with an LED light source shall be warranted for a period of
FIVE (5) years and One (1) day.
Altman warrants for NINETY (90) days any spare part it manufactures. On spare parts or products Altman does
not manufacture, including, but not limited to, lamps, sockets, lenses, roundels, electronics, ignitors, ballasts,
etc.; Altman will grant the same warranty given Altman by its vendors. Altman assumes no responsibility for
damage or faulty performance caused by misuse, improper installation, careless handling or where repairs have
been attempted by others. This warranty is in lieu of all warranties or guarantees expressed or implied and no
representative or person is authorized to assume Altman any other liability with the sale of Altman’s products.
Altman assumes no responsibility for damage or faulty performance caused by misuse, improper installation,
careless handling or where repairs have been attempted by others.
Warranty Terms

Page 6
SS-UV40 Installation & Users Manual
This warranty is in lieu of all warranties or guarantees expressed or implied and no representative or person is
authorized to assume Altman any other liability with the sale of Altman’s products.
The customer must receive a Return Material Authorization (RMA) number prior to return, return shipment must
be visibly marked with the RMA number and the product must be returned (shipping prepaid) to the factory at:
1400 East. 66th Avenue
Denver, CO 80229 USA
+1-303-500-7072
The return must be within THIRTY (30) days of receiving the RMA from Altman. Altman warrants for NINETY
(90) days any spare part it manufactures. On spare parts or products Altman does not manufacture, such as
lamps, sockets, lenses, roundels, electronics, ignitors, ballasts, etc. Altman will grant the same warranty given
Altman by its vendors.
Warranty Service

Page 8
SS-UV40 Installation & Users Manual
Product Overview
Description
The SS-UV40 LED is comprised of an array of IP65 rated ultraviolet lighting extrusion modules coupled to an
IP65 enclosure with a water resistant power supply cord and male and female DMX-512 data supply cords.
The overall construction of the fixture includes corrosion protected aluminum housing and includes mounting
brackets. All brackets on the LED module can be removed and repositioned if required.
The outdoor power and control box is a powder painted steel enclosure with a gasket hinged cover and
mounting brackets. The mounting brackets can be used with the UV module oriented horizontally or verti-
cally. Individual swivel adjustment of the separate UV modules allows for precise control of beam direction
and overall coverage. The fixture is supplied with a state of the art microprocessor-controlled solid-state LED
light engine incorporating four 365nm LEDs and an on-board power supply. The LED substrate is coupled to a
highly efficient circuit board and convection heat sink cooling system for prolonged life of the LEDs. All com-
ponents and electrical devices are ETL or UL listed or recognized and most are VDE or TUV approved for CE
and RoHs compliance.
The SS-UV40 UV LED light modules are specified with lenses at order. Lenses are not interchangeable and the
modules are sealed from the factory.
Components
The SS-UV40 LED includes the follwing components:
• 4 qty. SS-UV40 extrusion modules
• IP65 rated power and control enclosure box
• Power supply cord with bare end for permanent installation wiring
• DMX input and output with IP65 rated XLR connections
• Installation and Instruction manual
• Mounting brackets

Page 9
SS-UV40 Installation & Users Manual
Installation And Setup
Connecting Data
Connect DMX signal to the fixture using the XLR connections. The DMX signals can be daisy chained from one
enclosure to an adjacent enclosure each with separate connections to a power source.
Access the control board by loosening the three brackets securing the top cover.
Connecting Power & Power Requirements
CAUTION - The power & control enclosure must be wired to a grounded source of power con-
nected to a GFCI circuit breaker for outdoor installations.
CAUTION - Do not use the SS-UV40 on a dimmable circuit.
The SS-UV40 requires 45 watts of power at 120VAC. The fixture is supplied with bare-end power cable is
ready for wiring to permanently installed junctions or can be wired to plugs for temporary use.
Mounting Control Enclosure & Modules
Mounting brackets are provided on the UV LED module for permanent mounting to a wall, floor or ceiling.
Use proper length screws or bolts to mount the module in the desired location using all four mounting holes
provided on the UV LED module brackets. Note that the brackets can be removed and reoriented for easier
access to the mounting holes.
Mounting brackets are also provided on the Electronics power and control box for permanent mounting to a
wall, floor or ceiling. For wall mounting, the box should be oriented so that the hinge is on the top for proper
access to the control board and for better resistance to water splashing. Use proper length screws or bolts to
mount the box in the desired location using all four mounting holes provided on the outdoor enclosure.
Focusing
With the fixture energized and Data connected, point the unit in the direction of the object to be irradiated by
loosening the two screws at either end of the UV LED modules. Adjust the UV LED module to the desired posi-
tion and secure the fixture by tightening the two screw to lock down the UV LED light module.

Page 10
SS-UV40 Installation & Users Manual
Operation
Settings
Spectra Series Products offer three (3) buttons to program the fixture. All settings for Modes, DMX address,
and Personalities can be made by using the three buttons on the back of the unit while power is on. To activate
the three digit display, press any of the three button. After 4 seconds of inactivity, the display will go blank.
All settings can be made by using the three buttons on the back of the unit while power is on. These include:
• DMX Address
• Fixture Personalities
• Stand-Alone Effects
• Local Channel Control
• Lock the Fixture (from unwanted changes after programming)
• Master Control Mode
DMX MODE
This mode is used for setting
• DMX address
• Personalities
• Stand-Alone Effects
STAND ALONE MODE
This mode is used for setting the fixture to a desired intensity.
While in stand-alone mode, the hundreds button cycles through ‘r’, ‘G’, ‘b’, and ‘A’. colors . (r = UV1; G = N/A;
b = N/A; A = N/A). The tens and ones digits select 0-99 values. 99 is actually full. The 0-255 scale is spread
Modes

Page 11
SS-UV40 Installation & Users Manual
evenly over the 0-99 display range.
NOTE: When entering or exiting fixed intensity mode, the display will go blank. Touch any button to
turn on display.
LOCKED MODE
To Lock (or unlock) the buttons:
1. Wait a few seconds until the display goes blank,
2. Press and hold the [ ONES ] button
3. Press and hold the [ HUNDREDS ] button
4. Release the [ ONES ] button
5. Release the [ HUNDREDS ] button.
Display will show LocLoc for a moment and then blink.
Buttons will have no effect until they are unlocked.
PRIMARY & REPLICA MODE
To Turn On (or Off) the PRIMARY:
1. Wait a few seconds until the display goes blank,
2. Press and hold the [ HUNDREDS ] button
3. Press and hold the [ ONES ] button
4. Release the [ HUNDREDS ] button
5. Release the [ ONES ] button.
PERSONALITIES
A total of 8 personalities are available. Each personality is made up of 3 settings: RESOLUTION (8 Bit /16 Bit),
MASTER (On /Off), and SMOOTHING (On/Off). These are displayed in the chart below.
The current active Personality # is displayed for about 1 second during power up. The format is Pxx
where xx is replaced by the active personality #01-08. To set the desired Personality, the fixture must be in
DMX mode.
To select the personality:
Press the buttons until the desired personality address 601-608) appears in the display (see list below).
Wait a few seconds, and a confirmation display will appear that shows a question mark? on the left, followed
by the personality #. This gives you an opportunity to either accept or reject the new setting.
To accept the personality, press the [ONES] button.
To reject the personality, press the [HUNDREDS] button.
Once the new personality is accepted, it is entered into memory and retained even if power is disconnected.

Page 12
SS-UV40 Installation & Users Manual
Once personality is either accepted or rejected, the display will go back to the current DMX
address. The default personality for a new unit is #02.
EXAMPLE: To select personality #05, enter 605 on the display.
After a few seconds the display will show? 05. To confirm, press the [ONES] button
(below the 5), personality #05 is now entered into memory.
PERSONALITY ADDRESS SETTINGS LIST (601-608) 4-COLOR CHANNELS:
601 = Personality #01 8 Bit , Master OFF, Smoothing OFF
4 DMX channels. Channel order is UV1, UV2, UV3, UV4
602 = Personality #02 8 Bit , Master OFF, Smoothing ON
4 DMX channels. Channel order is UV1, UV2, UV3, UV4
603 = Personality #03 8 Bit, Master ON, Smoothing OFF
5 DMX channels. Channel order is UV1, UV2, UV3, UV4, M
604 = Personality #04 8 Bit, Master ON, Smoothing ON
5 DMX channels. Channel order is UV1, UV2, UV3, UV4 M
605 = Personality #05 16 Bit, Master OFF, Smoothing OFF
8 DMX channels. Channel order is UV1 Coarse, UV1 Fine, UV2 Coarse, UV2 Fine, UV3 Coarse, UV4 Fine, UV4 Coarse, UV4 Fine
606 = Personality #06 16 Bit, Master OFF, Smoothing ON
8 DMX channels. Channel order is UV1 Coarse, UV1 Fine, UV2 Coarse, UV2 Fine, UV3 Coarse, UV4 Fine, UV4 Coarse, UV4 Fine
607 = Personality #07 16 Bit, Master ON, Smoothing OFF
10 DMX channels. Channel order is UV1 Coarse, UV1 Fine, UV2 Coarse, UV2 Fine, UV3 Coarse, UV4 Fine, UV4 Coarse, UV4 Fine
Master Coarse, Master Fine
608 = Personality #08 16 Bit, Master ON, Smoothing ON
10 DMX channels. Channel order is UV1 Coarse, UV1 Fine, UV2 Coarse, UV2 Fine, UV3 Coarse, UV4 Fine, UV4 Coarse, UV4 Fine
Master Coarse, Master Fine
PERSONALITY ADDRESS SETTINGS LIST ( 609-612 ) 1-COLOR CHANNELS:
609 = Personality #09 8 Bit, Smoothing OFF
(uses 1 DMX channel )
610 = Personality #10 8 Bit, Smoothing ON
(uses 1 DMX channel )
611 = Personality #11 16 Bit, Smoothing OFF
(uses 1 DMX channel )

Page 13
SS-UV40 Installation & Users Manual
612 = Personality #12 16 Bit, Smoothing ON
(uses 1 DMX channel)
RESOLUTION is selectable as either:
• 8 Bit (one DMX channel per color) this is normal resolution,
• 16 Bit (two DMX channels per color Coarse+Fine high resolution similar to moving lights).
SMOOTHING is selectable as ON or OFF and provides a smooth transition ramp from one level to another in
a similar way to how an incandescent lamp behaves. This helps to eliminate the “steppiness” associated with
LED fixtures that is caused by the instantaneous response of LEDs.
Stand-Alone Effects
This feature will operate the UV40 without the need for a separate control console.
Note: stand-alone effects from a single unit will control other units connected via DMX cable to all
synchronize. Set other units to DMX Channel 001.
UV Fades (700-799):
700 - 709 = 1>4>2>3 fade 700 = faster 709 = slower
740 - 749 = 3>2>4>1 fade 740 = faster 749 = slower
780 - 789 = 1>4>2>3>A fade 780 = faster 789 = slower
790 - 799 = A>3>2>4>1 fade 790 = faster 799 = slower
UV Strobes (800-879):
800 - 809 = ALL STROBE 800 = faster 809 = slower
810 - 819 = 1 STROBE 810 = faster 819 = slower
820 - 829 = (Reserved) 820 = faster 829 = slower
830 - 839 = 2 STROBE 830 = faster 839 = slower
840 - 849 = 3 STROBE 840 = faster 849 = slower
850 - 858 = 1-4-2-3 RAINBOW STROBE 850 = faster 859 = slower
870 - 879 = 3-2-4-1 RAINBOW STROBE 870 = faster 879 = slower
CAUTION - Unless the Primary and Replica mode has been disabled, use of the SS-UV40 Stand-
Alone Effects feature while connected to a control console will result in a conflict. See instruc-
tions below.
Key:
1 = UV1 - UV LED Module One
2 = N/A - Not Available or Dark.
3 = N/A - Not Available or Dark.
4 = N/A - Not Available or Dark.
A = LED Module UV will activate.
Stand-Alone Intensity
While in stand-alone mode, the hundreds button cycles through each pod. (r = UV1; G
= UV2; b = UV3; A = UV4). The tens and ones digits select 0-99 values. 99 is actually full. The 0-255
scale is spread evenly over the 0-99 display range.

Page 14
SS-UV40 Installation & Users Manual
NOTE: When entering or exiting fixed intensity mode, the display will go blank. Touch any button to turn on
display.

Page 15
SS-UV40 Installation & Users Manual
Cleaning And Care
Cleaning
Routine cleaning of the SS-UV40 lighting fixture will provide years of prolonged use. Use a vacuum to
remove any dust and dirt from the lens, electronics and heat sink. For the lens, use a soft lint-free cloth
dampened with water to clean the lens of dust and dirt. Dry off completely with compressed air or a dry lint
free cloth.
Do not use cleaning agents that are reactive to UV light on the lenses. Doing so will risk lens cataract and void
the warranty.
Other manuals for SPECTRA Series
2
This manual suits for next models
1
Table of contents
Other Altman Dj Equipment manuals