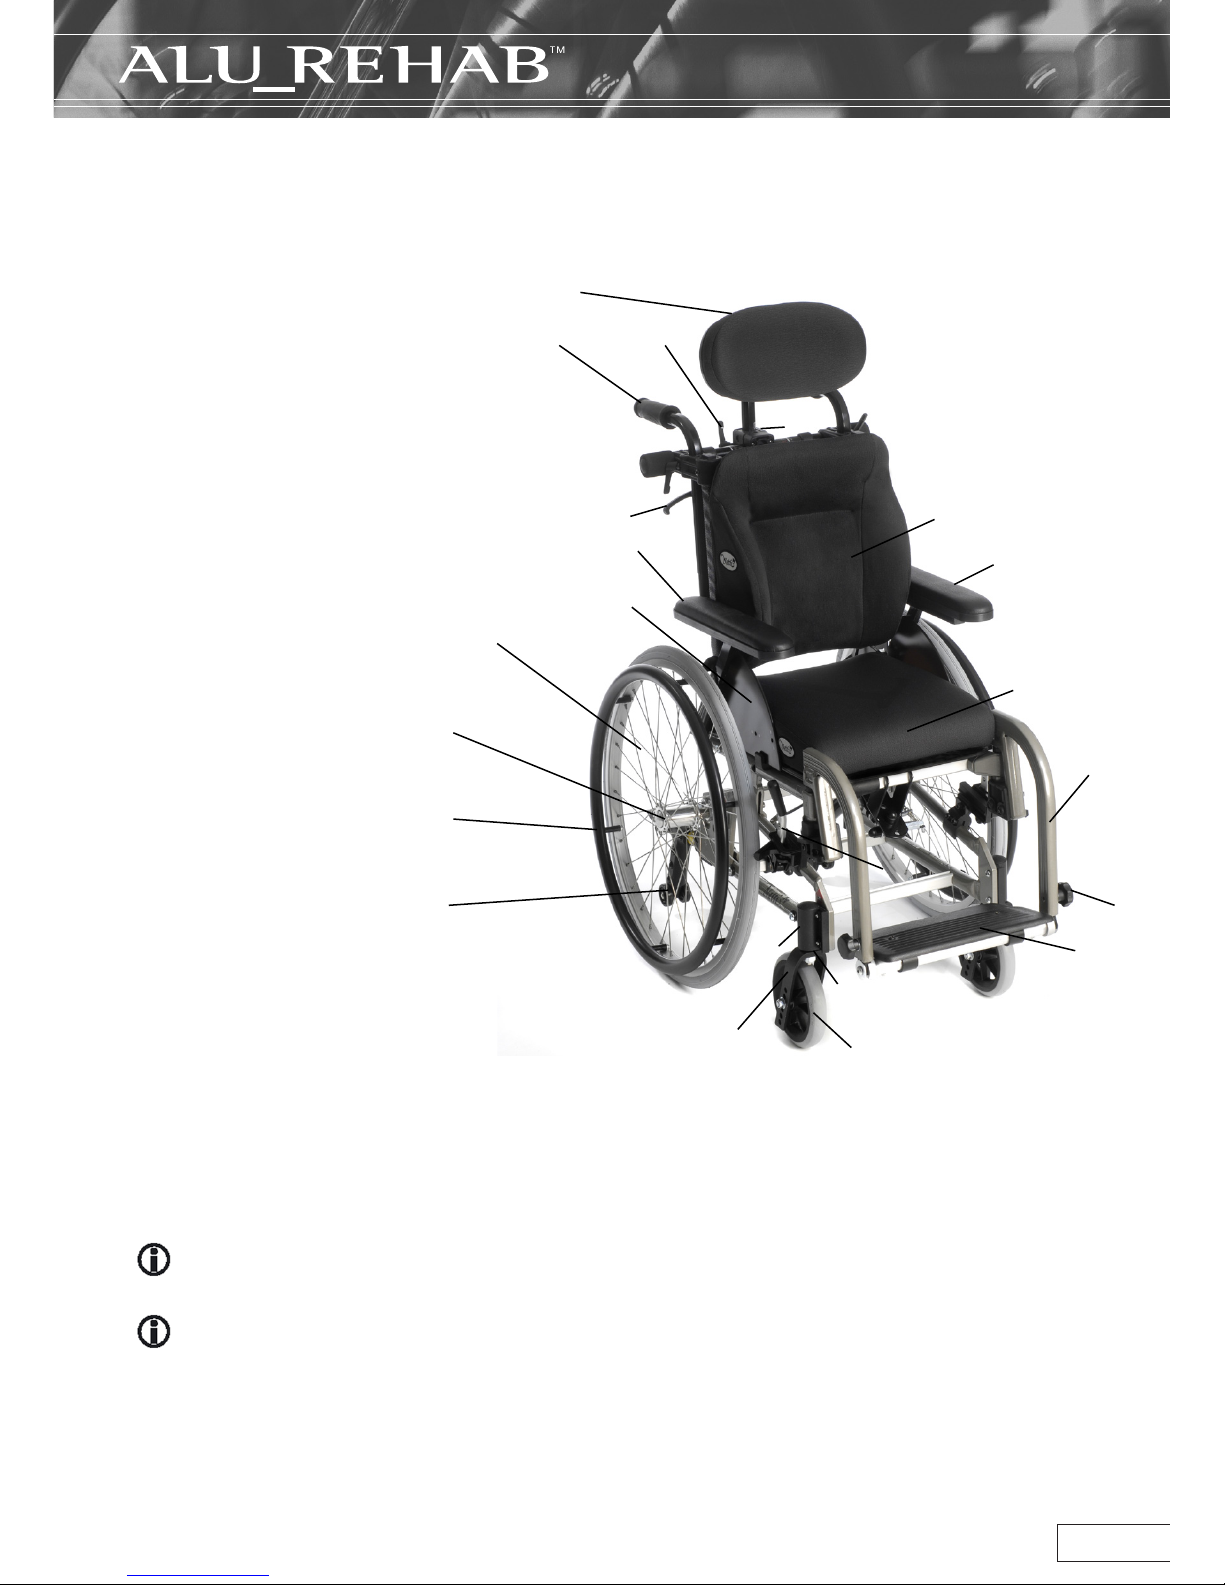
Alu Rehab Netti Mini User manual

Netti Mini
USER MANUAL
This product conforms to 93/42/EEC for medical products.

2Language: English Model: Netti Mini Version: November 2010 Language: English Model: Netti Mini Version: November 2010
Language: English Model: Netti Mini Version: November 2010 Language: English Model: Netti Mini Version: November 2010
Netti Rullestoler
CONTENTS
1. INTRODUCTION 4
1.1 Areas of use/indications for Netti Mini 5
1.2 Quality and durability 5
1.3 Environment and disposal 5
1.4 Information for re-use 6
1.5 About this manual 6
1.6 Vital measurements 7
2. QUICK REFERENCE 8
3. DESCRIPTION 9
4. FEATURES OF NETTI MINI 10
5. ACCESSORIES 11
5.1 Mounting of Hip Belt 13
5.2 Mounting of H-Belt bar 13
6. ASSEMBLING AND ADJUSTING 14
6.1 Unpacking 14
6.2 Main wheels 14
6.3 Front fork 14
6.4 Front castors 15
6.5 Seat height at the front 15
6.6 Seat height at the rear 15
6.7 Backrest 16
6.8 Adjusting seat depth 16
6.9 Adjusting seat depth at the rear 16
6.10 Adjusting seat depth at the front 17
6.11 Anti tip 18
6.12 Adjusting arm supports 18
6.13 Cushions 18
6.14 Adjusting the velcro back 19
6.15 Foot support 19

3
Language: English Model: Netti Mini Version: November 2010 Language: English Model: Netti Mini Version: November 2010
Netti Rullestoler
Language: English Model: Netti Mini Version: November 2010 Language: English Model: Netti Mini Version: November 2010
6.16 Head support 22
6.17 Push handles 23
6.18 Adjusting the brake 23
6.19 Seat angle/tilt 25
6.20 Back rest angle 25
7. TRANSPORT 26
7.1 Folding for transport 26
7.2 Transporting in a car 26
8. MANOEUVRING 27
8.1 Driving - general techniques 27
8.2 Driving - step up 27
8.3 Driving - step down 28
8.4 Driving - slope 29
8.5 Driving - up stairs 29
8.6 Driving - down stairs 30
8.7 Transfer 30
8.8 Point of balance 31
8.9 Lifting the chair 31
8.10 Change of camber angle 32
8.11 Push rim 32
9. MAINTENANCE 33
9.1 Maintenance 33
9.2 Cleaning and washing 33
10. TROUBLESHOOTING 34
11.TESTS AND WARRANTY 35
11.1 Tests 35
11.2 Guarantee 35
11.3 Claim 35
11,4. Spare part guarantee 35
11.5 Special adjustment/adaptations 36
11.6 Combination with other products 36
11.7 Service and repair 36
12. MEASUREMENTS AND WEIGHTS 37

4Language: English Model: Netti Mini Version: November 2010 Language: English Model: Netti Mini Version: November 2010
Language: English Model: Netti Mini Version: November 2010 Language: English Model: Netti Mini Version: November 2010
Netti Rullestoler
1. INTRODUCTION
Netti Mini is a comfort wheelchair for
children meant for both indoor and
outdoor use. It is tested to DIN EN
12183:2009. The tests were carried out
by TÜV SÜD Product Service GmbH in
Germany.
In Alu Rehab we belive that wheelchairs
should be chosen based on a thorough
assessment focusing on the needs of the
user and demands from environment.
Children grow quickly and for that
reason we have created Netti Mini with
many adjustment and adaptation. It is
a wheelchair that is easy to adjust over
time as the child grows, providing an
ergonomical sitting environment for the
child.
Max user weight: 90 kg.
When mounting accessories such as
power kit etc, the weight of the
accessories must be subtracted from
the max user weight.
Specifications varies between
countries

1.1 Areas of use/indications
for Netti Mini
Netti Mini is a multi-function wheelchair
for partially or fully immobile persons with
physical and/or mental disabilities. These
disabilities may have multiple causes. Netti
Mini has an adjustable seat and back angle,
thus facilitating for the user change of
position, mobilisation or posture correction
(stabilisation), wherever the following
functional impediments with their multiple
possible causes are present:
• limited or lacking mobility
• limited or lacking muscle power
• limited movement range
• lacking or limited trunk and body
stability
• craniocerebral injuries
• other neurological disorders.
1.2 Quality and durability
The Netti Mini wheelchair is tested at TÜV
SÜD Product Service GmbH in Germany,
following the European Standard DIN EN
12183:2009. As manufacturer, Alu Rehab A.S
evaluates the test to be equal to 5-6 years
of normal use of the chair. The disability of
the usage as well as the level of maintenance
done foremost decides the durability of the
wheelchair. Thus, the durability will vary
depending on these two factors.
1.3 The environment and
waste disposal
Alu Rehab and its suppliers wish to protect
the environment.
This means:
• That we avoid using
environmentally harmful
substances and processes
to the greatest extent possible.
• That Alu Rehab’s products are
ensured a long service life and a high
degree of flexibility - to benefit the
environment and economy.
• That all packaging can be recycled.
• That the wheelchair was designed to
be separated into its component
materials - to make recycling easier.
• That the wheelchair was designed with
many different auxilary functions - to
improve the working environment for
staff at hospital.
Contact your local recycling agent
to get correct information how to
handle in you area.
5
Language: English Model: Netti Mini Version: November 2010 Language: English Model: Netti Mini Version: November 2010
Netti Rullestoler
Language: English Model: Netti Mini Version: November 2010 Language: English Model: Netti Mini Version: November 2010

6Language: English Model: Netti Mini Version: November 2010 Language: English Model: Netti Mini Version: November 2010
Language: English Model: Netti Mini Version: November 2010 Language: English Model: Netti Mini Version: November 2010
Netti Rullestoler
1.4 Information for re-use
All products from Alu Rehab are designed
to give years of maintenance-free service.
All products can be adapted for re-use by
an authorised dealer. In order to guarantee
performance and safety, Alu Rehab
recommends the following tests prior to any
re-use.
Please examine the following components
for function, integrity etc and replace parts if
necessary:
• Wheels (tyre tread)
• Wheelchair frame
• Cushions
• Hubs
• Brake function
• Directional stability of wheels
• Bearings and front castors
Please also note the contents of Section 9.2
Cleaning and care
Anti-tip
Correctly fitted, the anti-tip will secure the
chair from tipping backwards. We strongly
recommend use of the anti-tips.
1.5 About this manual
In order to avoid damages while using the
Netti Mini wheelchair, please read this
manual carefully before starting to use the
chair.
Symbol of forbidden actions.
No warranty can be claimed
whenever these actions are
implemented.
Symbol of warning.
Whenever this symbol is used,
caution has to be taken.
Symbol for
important
information.
Symbol for
useful tips.
Symbol for
tools.

7
Language: English Model: Netti Mini Version: November 2010 Language: English Model: Netti Mini Version: November 2010
Netti Rullestoler
Language: English Model: Netti Mini Version: November 2010 Language: English Model: Netti Mini Version: November 2010
1.6 Vitale mål
Netti Mini is a comfort wheelchair designed
for both outdoor and indoor use.
Specification varies between countries
Total weight: 25 Kg
Seat width:
250, 300 & 350 mm
Seat depth:
(From back rest cushion to front of seat plate)
325 - 375 mm
Seat height:
(From floor to top seat plate using 22” main
wheel in rear upper hole position)
420 mm*
*By changing position of main wheels it is
possible to achieve seat of 400 - 470 mm.
Backrest height:
(Measured from seat plate to top of backrest
velcro.)
380 mm
Specification min. max.
Overall length with foot
support 850 mm
-
Overall width 590 mm
Folded length 730 mm
Folded width 510 mm
Folded height 495 mm
Total mass 25 kg
Mass heaviest part 2,0 kg
Static stability uphill 0° 28 °
Seat plane angle -7° 23°
Effective seat depth 315 mm 375 mm
Effective seat width 290 mm 390 mm
Seat surface height at front 395 mm 470 mm
Backrest angle 87° 120°
Backrest height 380 mm
Foot support to seat
distance
240 mm 350 mm
Leg to seat surface angle 62° 158°
Arm support to seat
distance
200 mm 260 mm
Front location of arm
support structure 280 mm 325 mm
Push rim diameter 490 mm
Horizontal axle location -60 mm 60 mm
Minimum turning radius 860 mm -
Model width 35 cm
Measured without cushions

8Language: English Model: Netti Mini Version: November 2010 Language: English Model: Netti Mini Version: November 2010
Language: English Model: Netti Mini Version: November 2010 Language: English Model: Netti Mini Version: November 2010
Netti Rullestoler
2.0 QUICK REFERENCE
The content of this page is a summary
of the whole manual. It gives you a brief
introduction to the use and care of the
Netti Mini wheelchair.
The quick reference is not a
replacement for the manual, only a
reminder/check list.
• Unpack the wheelchair (Chapter 6.1)
• Mount the main wheels (Chapter 6.2)
• Mount the front castors (Chapter 6.3)
• Put the backrest back, and mount the
recline gas strut to the backrest using the
locking bolt. (Chapter 6.7)
• Mount the arm supports (Chapter 6.12)
• Mount the cushions (Chapter 6.13)
• Mount the foot supports (Chapter 6.15)
• Adjust the push handles (Chapter 6.17)
• Mount the head support (Chapter 6.16)
• Mount accessory. (See chapter 5. for more
information. Mounting descriptions will
accompany the accessory.)
For troubleshooting, see chapter 10.
For adjustments see chapters 6
Drive carefully!
Be aware that friction against push
rims can create a warm surface.
Salt water can increase risk of
corrosion. Further precautions related
to environmental conditions not
needed.
When the chair is tilted rearwards,
the anti tips and brakes should
always be in use.
Be sure to lock all handles properly.
The anti-tips should always be used
for the safety of the user.
Surface temperature of metal parts in
frame structure might increase when
exposed to direct sunlight.
Never stand on the foot supports due
to risk of tipping forwards.
Never lift the wheelchair by the foot
supports or arm supports.
Product configuration may vary
between different countries.
For visually impaired people,
manuals and catalogues can be
downloaded at www.alurehab.com
If in doubt - contact your dealer!

9
Language: English Model: Netti Mini Version: November 2010 Language: English Model: Netti Mini Version: November 2010
Netti Rullestoler
Language: English Model: Netti Mini Version: November 2010 Language: English Model: Netti Mini Version: November 2010
1
2 3
4
5 6
7 7
8
9
17
10
18
11
21
12 19
13 20
15
14 16
3. DECRIPTION*
1. Head support
2. Push handle
3. Handle for adjusting
head support
4. Head support bracket
5. Release handle
6. Backrest cushion
7 Arm support with pad
8. Cloth protector
9. Main wheel
10. Quick release axle
11. Push ring
12. Anti tip
13. Bearing house/front
fork fastening
14. Front fork
15. Release for fork
16. Front castor
17. Seat cushion
18. Foot support
19. Adjustment screw
20. Foot plate
21. Brake
* Product configuration may vary between different countries
If any of these parts are missing, please contact your dealer.
For complete information, please contact your dealer

10 Language: English Model: Netti Mini Version: November 2010 Language: English Model: Netti Mini Version: November 2010
Language: English Model: Netti Mini Version: November 2010 Language: English Model: Netti Mini Version: November 2010
Netti Rullestoler
4. FEATURES OF NETTI MINI
Standard
SEAT
• Pressure distributive cushion
• Tilt -11° to +14°
• Adjustable seat height from 395 mm to 470
mm with change of main wheel
• Adjustable seat depth: 100 mm
WHEEL
• Main wheel 22” x 1” Puncture proof with
quick release axle
• Push rim: Aluminium
• Front castor: 6” Puncture proof with
quick release axle
• Camber angle: 2°
Standard main wheels may vary between
countries
BACKREST
• Angle: 88° - 120°
• Height: 380 mm
• The back rest cushion has integrated
lumbar support and side support,
• Height adjustable and removeable push
handles
FOOT SUPPORT
• Universal foot support
• Height adjustable whole foot plate
ARM SUPPORT
• Height adjustable and removeable
• Depth adjustable pads
HEAD SUPPORT
• Height adjustable
• Removeable
Accessories
SEAT
• Tray & reading stand for trays (See chapter 5)
• Hip belts and 4 points belts (See chapter 5)
WHEEL
• Puncture proof main wheels (See chapter 5)
• Main wheels with drum brake (See chapter. 5)
• Main wheels with one hand drive (See
chapter. 5)
• Camber angle: 2° or 4°
• Puncture proof front castors (See chapter. 5)
• Spoke protectors (See chapter. 5)
• Push rims (See chapter 5)
BACKREST
• Backrest extender (See chapter 5)
• Lumbar support and Wedge (See chapter 5)
• Backrest cushions
FOOT SUPPORT
• Angle adjustable with foot plate and calf
support
• Amputation support (See chapter 5)
• Knee and thigh support (See chapter 5)
ARM SUPPORT
• Different pads (See chapter 5)
HEAD SUPPORT
• Different models (See chapter. 5)

11
Language: English Model: Netti Mini Version: November 2010 Language: English Model: Netti Mini Version: November 2010
Netti Rullestoler
Language: English Model: Netti Mini Version: November 2010 Language: English Model: Netti Mini Version: November 2010
5. ACCESSORIES
Belts
Several models hip
belts with or without
upholstery and with
plastic lock or car
lock .(See chapter.
5.1 and 5.2 for
mounting)
H-Belte attachment bar
To be mounted onto
the push handles. Comes
in two sizes with telescopic
bar. (See chapter. 5.2)
Trays
3 models
Swingable, lockable and
standard ”push on”
model
Reading stand
Upholstery for tray
Offers a soft base for
the arm resting on the
tray
Wedge
Increases side support
Lumbar support
Increases lumbar
curvature
Vital Base Integral
Pelvic stabilizer
Seat Cushions
Many to choose from
Please contact you
dealer
Back rest Cushion
Many to choose from
Please contact you
dealer
Spoke protectors
For 20”, 22” and 24”.
Black or transparent is
optional
Foot box
Upholstred
Foot support
Angle adjustable
Universal
Adjustable in fixed positions
between 33° to 105° using
an adjustment wheel
Amputations support

12 Language: English Model: Netti Mini Version: November 2010 Language: English Model: Netti Mini Version: November 2010
Language: English Model: Netti Mini Version: November 2010 Language: English Model: Netti Mini Version: November 2010
Netti Rullestoler
Knee/Thigh support
The support reduces
adduction
Abduction block
The block reduces
abduction
Small: 80 mm width
Medium:120 mm width
Large: 140 mm width
Head support
Support C Large
Support A Side support
Support B Small
Hygiene cover
Protect the core of the
head support
Arm support pads
Wide: 415 x 80 mm
Long: 445 x 70 mm
Long/Wide:
525 x 60 mm
Short: 333 x 58 mm
Standard. 38 x 58 mm
Arm support bended
Comfort pads
To be attached to the
skirt guard. Offers a
pressure distributing
effect. 2.5 cm, 3.5 cm
and 4.5 cm
Tool set
Sides support
Depth and height
adjustable
Main wheels
Several models
in 12”, 16”, 20”, 22”
and 24”
Push ring
Aluminium:
20”, 22” and 24”
One hand drive
20”, 22”,og 24”
x 1 3/8”, 20”, 22”
and 24” x 1”. In
addition you must
order a telescopic
connection bar for
the wheels
Front castors
Several models
in 3”, 4”, 5”, 6”, 7” and
8”
Front forks
Standard w/axle
Long w/axle
Short w/axle
Wide w/axle
Long/wide w/axle
Frame extende
Increases distance
between main wheels
and front castors
Reduces tipping risk.

13
Language: English Model: Netti Mini Version: November 2010 Language: English Model: Netti Mini Version: November 2010
Netti Rullestoler
Language: English Model: Netti Mini Version: November 2010 Language: English Model: Netti Mini Version: November 2010
5.1 Mounting of hip belt
Picture 1.
• Pull the belt thorough the hole in the hip
belt bracket.
Picture 1
Picture 2.
• Thread the belt back through the belt
clamp.
Picture 2
Picture 3.
• Fix the hip belt bracket to the rearmost
hole in the back hinge, using the enclosed
screws and nuts.
Picture 3
2 pcs 13 mm open-end spanner
5.2 Mounting of H-Belt bar
Picture 1.
• Remove the push handles, and pull the
H-belt attachment bar onto the push
handles from the lower end.
Picture1
Picture 2.
• Fix the push handles in correct position
and lock firmly. Then fix the bar at the right
position/height. The height should be level
with the shoulders of the user.
Picture 2
Picture 3.
• Thread the belt through the rolls and lock
the belt by pulling the belt through the belt
clamp. Adjust to the requested length of
belt.
Picture 3

14 Language: English Model: Netti Mini Version: November 2010 Language: English Model: Netti Mini Version: November 2010
Language: English Model: Netti Mini Version: November 2010 Language: English Model: Netti Mini Version: November 2010
Netti Rullestoler
6. ASSEMBLING AND
ADJUSTMENT
6.1 Unpacking
1. Unpack all the parts, and check that
everything is there according to the
packing list.
2. Mount main wheels and front castors.
3. Mount backrest, arm supports,
cushions and foot supports.
4. Mount accessories.
Weight of components
Main wheel: 1,9 kg each
Front castors: 0,6 kg each
Foot support: 1,8 kg (with foot board)
Back cushion: 0,5 kg
Sit cushion: 0,6 kg
Head support Mini: 0,7 kg
Necessary tools are described under each
chapter. Accessories described in chapter
5 is a presentation of options, and will be
delivered with separate mounting
descriptions.
6.2 Main wheels
To mount the main wheel remove the quick
release bolt from the hub bushing, lead it
through the centre of the main wheel and
into the hub bushing while pressing the
knob in center.
To check that the main wheel is
properly attached to the hub,
remove the finger from the central
knob and pull the main wheel
If the main wheel doesn’t lock, don’t
use the wheelchair but contact your
dealer.
Sand and sea water (salt used for
gritting in the winter) can damage the
bearings of the main wheels. Clean the
wheelchair thoroughly after exposure.
6.3 Front fork
Front forks come as standard
with quick release axles. The
front fork is easily removed
by pressing the knob in
centre above the wheel
Chek angle of castor
bearing house. (See
chapter 6.5).

15
Language: English Model: Netti Mini Version: November 2010 Language: English Model: Netti Mini Version: November 2010
Netti Rullestoler
Language: English Model: Netti Mini Version: November 2010 Language: English Model: Netti Mini Version: November 2010
6.4 Front castors
To take of
• Press the release button under the front
fork.
To mount
• Lead the quick release axle into the
bearing house. Pull the fork slightly to
ensure that the fork is fully locked.
Sand and sea water (salt used for
gritting in the winter) can damage
the bearings of the front castors.
Clean the wheelchair thoroughly after
exposure
6.5 Seat height at the front
The seat height depends on:
• Size of front castors.
• Size of front fork.
• Check the angle of the castor bearing
house.
In chapter 5 there is several models of
both front castors and front forks to
choose between. For to change the
front castors or front fork - unfix the
wheel and place it in the required
position in the front fork.
Angle of bearing house
Correctly adjusted angle of the front fork is
important to achieve proper manoeuvring
qualities of the wheelchair. Unfix the two
screws on the inside of the frame enough
to adjust the the eccentric nuts. Angle the
bearing house, so that it is 90° relative to the
ground, tighten the screws with 16 Nm
1 pc 5 mm Allen key
The bearing house can not be adjusted
in height.
Check the position of the anti tip.
6.6 Seat height at the rear
The seat height at the rear depends on:
• Size of main wheel.
• Position of main wheel.
Main wheel
Unfix the hub bushing, including washer and
nut, and mount it in required position in the
main wheel bracket.

16 Language: English Model: Netti Mini Version: November 2010 Language: English Model: Netti Mini Version: November 2010
Language: English Model: Netti Mini Version: November 2010 Language: English Model: Netti Mini Version: November 2010
Netti Rullestoler
2 pcs 24 mm open-end spanner
Make sure that the nut on inside of
frame totally wreathes the wheel
bushing
When the seat heights changes ensure
that the main wheels are placed such
that the frame tube is parallel with
the ground.
The risk for tipping increases when the
main wheel is moved forward in the
main wheel bracket.
Check the position of anti tip.
Readjust the brakes. (See chapter 6.17).
Readjust the angle of the bearing
house. (See chapter 6.5)
6.7 Backrest
• Unfold and lift the backrest up and fit the
gas strut into the bracket.
• Secure the backrest by pushing the locking
bolt in from the side, through the bracket
and gas strut head
6.8 Adjusting the seat depth
The seat depth can be adjusted both in
the front and the rear. As a basic rule, we
recommend that major adaptations are done
at the rear and only slight adjustment for
different lenghts of legs etc are done in the
front.
• Remove the foot support and head
support.
• Make sure the seat is in a horizontal
position.
• Open the backrest angle a few degrees to
make it easier for the user to get into the
chair.
• The user needs to get the bottom well
into the chair.
• The backrest cushion is adjusted in height.
Check that the lumbar support is in the
same position as the lumbar region of
the user
If the seat depth is correct, there
should be approximately 3-6 cm
distance between the edge of the
cushion and the hollow of the knee.
When using feet for propelling the
chair there should be minimum 6 cm.
6.9 Adjusting the seat depth
at the rear
• The seat depth can be adjusted in 3
intervals (32.5 - 35 - 37.5 cm) without
change of parts
• Small adjustments are done by adjusting
the straps on the backrest (See chapter
6.14)
Adjustment is done as follows
• Pull out the pin that locks the backrest
and fold the backrest forward in the chair
• Remove the screws for adjusting the seat
depth on both sides and move the back-
rest hinge to the required seat depth. The
backrest hinge should be in the same
positions on both sides.

17
Language: English Model: Netti Mini Version: November 2010 Language: English Model: Netti Mini Version: November 2010
Netti Rullestoler
Language: English Model: Netti Mini Version: November 2010 Language: English Model: Netti Mini Version: November 2010
• Tighten the screws.
• The recline gas spring must change
position so that the backrest angle equals
90° when the recline gas spring is in the
end position.
6 mm Allen key
13 mm open-end spanner
Attaching tha gas spring under the chair
In order to achieve a 90° position of the
backrest the position of the gas spring under
the chair has to be changed when the seat
depth is adjusted.
If special needs of the user demands
a different angle than the recline
function allows, the position of the
gas spring must be adjusted.
When changing seat depth, you also
change the tipping point of the chair.
This can be prevented by changing
the position of the main wheel in the
main wheel bracket. (See chapter
6.6).
6.10 Adjusting seat depth at
the front
It is possible to adjust the seat depth up
to 10 cm at the front. Do the following:
• Unfix the screw holding the pull out piece
for the foot support.
• Set the pull out piece to the required
position.
• Fix the screws, tighten them with 25 Nm
6 mm Allen key
By setting the pull out pieces to
different positions, it is possible to
compensate for a rotated pelvis or
different length of thighs.

18 Language: English Model: Netti Mini Version: November 2010 Language: English Model: Netti Mini Version: November 2010
Language: English Model: Netti Mini Version: November 2010 Language: English Model: Netti Mini Version: November 2010
Netti Rullestoler
6.11 Anti tip
• Adjust the anti tip so that it doesn’t stick
outside the radius of the wheel.
• Pull the anti tip out / rearwards from
chassis.
• Turn it down 180°.
• Lock it in position by moving forwards with
spring tension.
The anti tips are delivered adjusted
according to ordered main wheel size in
standard position. If other adjustments
are carried out, anti-tips have to be
adjusted accordingly.
Adjusting anti tip
The anti tips must be adjusted whenever
position or dimension of main wheels is
changed.
Correctly adjusted anti tips should be
positioned just on the inside of the radius
of the main wheel. Anti tips are adjusted as
follows:
• Unfix the locking clamp on the anti tip bar
using an Allen key.
• Pull or push the bar to required position.
• Fix the locking clamp.
• Do the same procedure on the opposite side
6 mm Allen key.
Check that both anti tips have the
same length. The gap between the
anti tip wheels and the ground
must be max. 3 cm.
If the anti tip is positioned on the
outside of the main wheel radius, it
will interfere with curbs and stairs.
The anti tip should always be used
for the safety of the user.
6.12 Adjusting arm support
• The arm supports are adjusted by using
the adjustment wheel placed under the
arm support at rear next to the backrest.
6.13 Cushions
Cushions are fixed and adjusted
on the wheelchair using the velcro.

19
Language: English Model: Netti Mini Version: November 2010 Language: English Model: Netti Mini Version: November 2010
Netti Rullestoler
Language: English Model: Netti Mini Version: November 2010 Language: English Model: Netti Mini Version: November 2010
It is imperative to correctly set-up the
cushion in order to ensure good
seating comfort
The cushion covers are washable and
thereby reuseable. Follow the
instruction on the back of the cushion
for correct maintenance and washing
of the cushion.
6.14 Adjusting the velcro
back
• Loosen the straps, and place the back
rest cushion so that user gets room for the
bottom and the integrated lumbar support
in correct position.
• Tighten the straps so that they follow the
curvature of the spine and gives a little
extra support at the top of the sacrum.
6.15 Foot supports
Universal foot support with whole foot plate
is standard for Netti Mini. Many prefer angle
adjustable foot support with foot plate and
calf support. Adjusting of both is described
in this User Manual.
Netti Mini has also the following foot
support alternatives
• Amputation foot support (see chapter 5)
• Whole foot box (see chapter 5)
Universal foot support
Mounting of the foot support
• Hold the foot support in the hinge point
on each side. Put the black foot support
lock pins into the foot support locks in
front on each side of the chair
Removing the foot foot support
• Hold the foot support in the hinge point
on each side.
• Pull straight up and the foot support is
removed.
The foot plate is stepless height adjustable
• Unfix the adjustment screws so that the
adjustment bar moves freely.
• Adjust the foot plate to required height
then tighten the screw.
Angle adjustable foot support

20 Language: English Model: Netti Mini Version: November 2010 Language: English Model: Netti Mini Version: November 2010
Language: English Model: Netti Mini Version: November 2010 Language: English Model: Netti Mini Version: November 2010
Netti Rullestoler
Angle adjustable foot supports are swingable
and removeable. It comes with
height- and depth adjustable calf support.
The foot plates are hinged and can be angled
in fixed positions
Mounting of the foot support:
• Raise the support a few degrees.
• Fold the foot plates up.
• Hold the foot support in the angle on top,
and place it in the pull out piece in an
angle as shown in picture below.
• Swing the foot support inwards and push
slightly downwards until it goes into
locked position.
When moving the foot support up or down,
do not put the fingers in the adjusting
mechanism between the moving parts.
Height of foot plate:
The foot plates are stepless height adjustable.
• Unfix the adjustment screw so that the
adjustment bar moves freely.
• Adjust the foot plate to required height,
then tighten the screw.
Angle of foot plate:
• Unfix the screw as shown below using an
Allen key.
• Adjust the foot plate to the required angle
and tighten the screw.
5 mm Allen key.
As accessory an adjustment wheel can
be used instead of a screw.
Other manuals for Netti Mini
1
Table of contents
Other Alu Rehab Medical Equipment manuals
Popular Medical Equipment manuals by other brands

Cegla
Cegla RC-CORNET PLUS NASAL Instructions for use

Integra
Integra Miltex Integrator quick start guide

Beckman Coulter
Beckman Coulter VersaLyse Lysing Solution Ready-for-use manual

FujiFilm
FujiFilm SonoSite iViz user guide

Joerns
Joerns Arise LAL 1000 EX User & service manual

Mega Electronics
Mega Electronics FemiScan Instruction guide