Kingkraft Leit Trolley User manual

Instructions for use
Leit Trolley and Leit Over Bath Changer
PLEASE READ INSTRUCTIONS BEFORE USE

CONTENT
GENERAL DESCRIPTION
IMPORTANT SAFETY INFORMATION
INSTRUCTIONS FOR USE
CLEANING
MAINTENANCE & WARRANTY
STICKERS

GENERAL DESCRIPTION
The Leit Trolley and Leit Overbath Changer are to be used in domestic and commercial prop-
erties. The easy lightweight foldable design means it’s easy to store away when not in use and
travel around with you to make changing and showering easier when you’re not in your normal
environment.
IMPORTANT SAFETY INFORMATION
NEVER LEAVE ANYONE UNATTENDED USING THE CHANGERS FOR ANY REASON
• Make sure the environment in which you intend to use the Leit Trolley and Changer has
enough free space to manoeuvre in and that any steps, inclines, doorways or furniture will not
impede safe use of the Trolley or Changer.
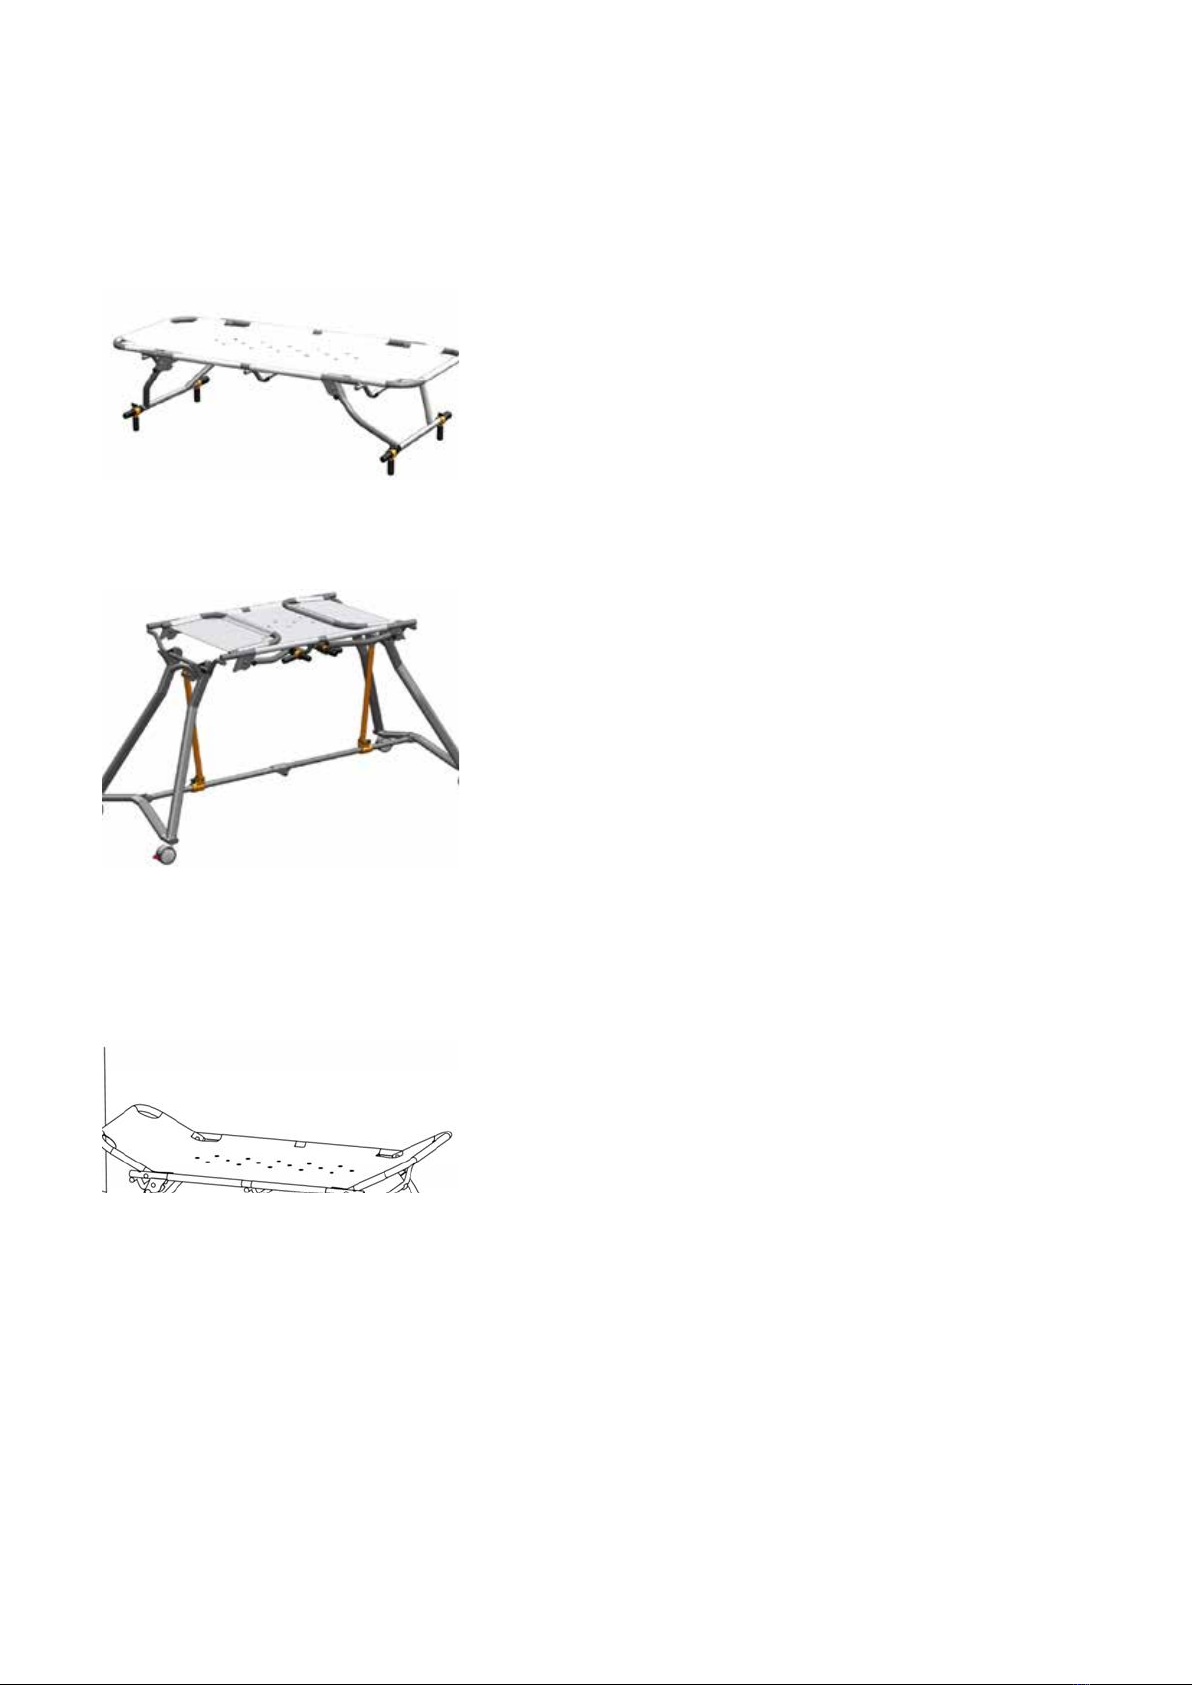
• Never attempt to force an incompatible or unapproved deck to t your wheeled based trolley
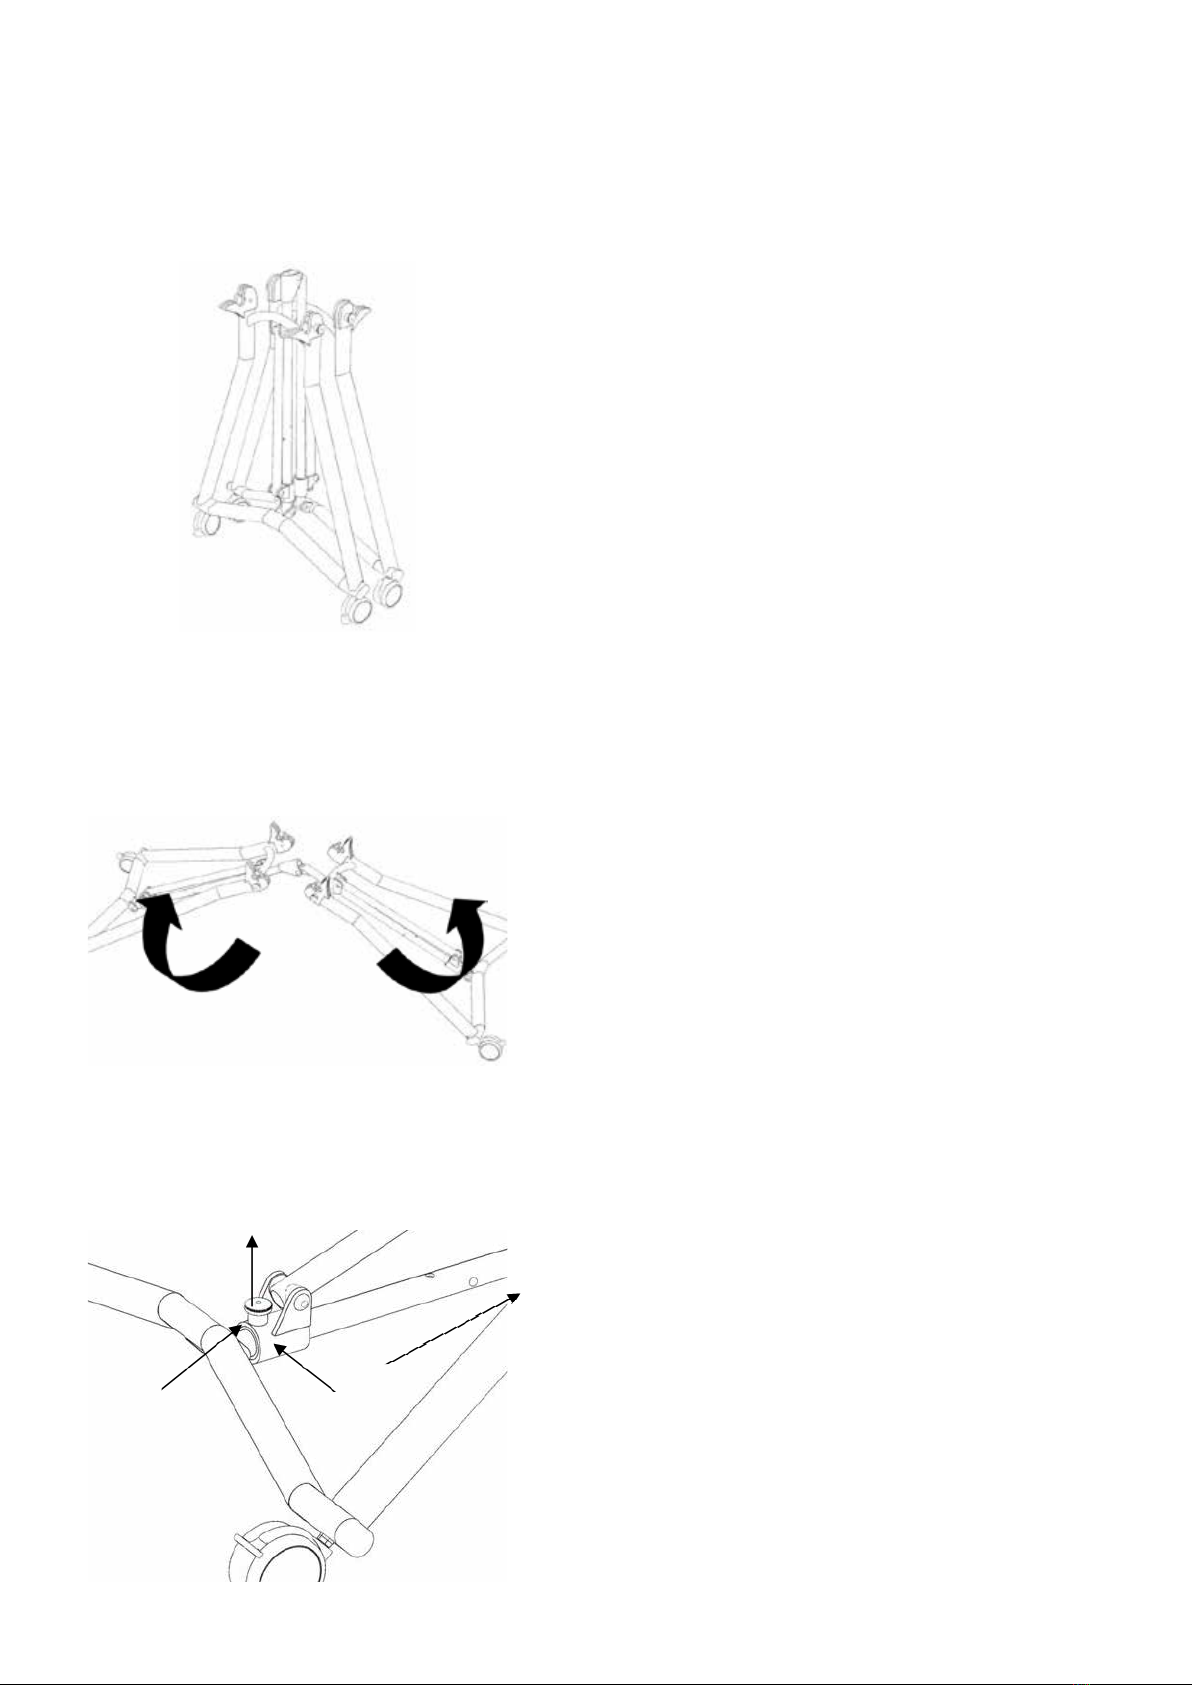
• When folding and unfolding the changer/trolley, be careful not to trap or shear ngers, straps
etc, between frames.
• Your trolley should have been delivered with side rails (additional option on overbath chang
er) It is essential that the side rails are attached and used with the Trolley to ensure safe use.
• Always carry out a risk assessment before placing the user on the Leit Changer/Trolley
• Never sit anybody on the edge of the changer-this could result in tipping
• Never load the head or foot ends of the chnager more than the centre of the changer; doing
so can result in instability and the unit tipping
• Before any user transfer, make sure that the surrounding oor is dry and free of obstructions
• Ensure all 4 brakes are applied before moving a user onto the changer
• Always try to avoid large impacts to the Leit Trolley/Changer. Careless manouevering/push
ing of the trolley/changer into obstructions can damage the paintwork and will shorten the
lifespan of the unit.
• When the trolley/changer is set up, NEVER stand on any part of the deck or frame, in particu
lar the Support Tube
• Never use the trolley/changer on inclines where it may be possible for the carer to lose con
trol of the unit
• Do not attempt to move the unit with ANY of the castor brakes engaged. Doing so can dam
age the castor and/or brakes irreversibly
• Only use parts from Kingkraft. Incompatiable parts can create hazards
• Any faults, defects, damage or excessive wear must be dealt with immediately-if not the trol
ley/changer should be taken out of service
• Never attempt to perform any maintenance. exchange parts or dissamble the Leit with a per
son (or weight) on it

Instructions for use
Setting up your Leit Trolley
Unpack Unit:
Remove the Leit Trolley frame, x2 side rails and
your changer top any any other accessories from
the box. Check everything is present and free
from any damage. If you think that anything is
missing from your order, contact Kingkraft.
Unfold the trolley:
Unfold the trolley as shown in the picture. The
trolley should now be lying at.
Unfold the legs:
1 2 Release leg slide: Pull up catch ‘1’ to release the
slide. Pull the slide as far as it will go towards the
centre hinge, then you should hear it ‘click’ and
lock into place.
Repeat the above procedure for the opposite
legs.
1 2

The Unfolded trolley:
Your trolley should look like this illustration at
this point.
Apply brakes to all 4 castors, and then pull each
of the 4 changer release knobs to ensure
the catches are ready to receive the changers.
Install Changer:
There are two members which locate across
the two latches on each of the trolley legs.
This step will vary slightly depending on which
model you have. If you are unsure seek advice
from Kingkraft.
Keep the ends of the changers folded over so
you can clearly see what you are doing.
Guide on of the changer bars onto one side of
the trolley. You can rest the changer across the
catchers whilst you position the changer.
The changer bar is tted with feet-these should
locate either side of the each catch. This ensures
that the changer is central on the trolley frame.
Once you have positioned one side of the
changer, push it down in to the latches. This will
rotate and lock once the changer bar is in place
-continue to press until you hear both latch
Changer Feet plates ‘click’ into this locked position. Check the
changer is secure in both catches.
Move to the other end of the trolley, repeat the
process and check again that all 4 latches are
locked and the changer is rmly secured.
Not secure Secure

Installing side rails: (if applicable)
Lift the side rail clips (they should stay open) and then
insert the pins on the either end of the side rail into the
locator holes on your trolley frame. The spring clips
must be on the outside of the unit.
If you intend to place the user onto the Changer before
tting the side rail, it is advisable to lift the spring
clips on the safety rail to the open position before
moving the user. This will make locating the side rail
easier and faster.
Once both pins are fully inserted, lower the spring clips
back down. Ensure they locate fully underneath the
tube that the pin passes through. This will prevent
accidental removal.
Fit the side rail on the far side of the deck (furthest
away from you) at this point. Before tting a side rail
on the front of the unit, it is advised that this is done
after the user is placed on the deck, to reduce your
required lifting height. However, this is at the discretion
of the carer.
You should have the side rail ready, and be familiar
withhowtotthesiderailbeforeplacinganyuser
onto the unit.
You should always ensure that the rails are
undamaged,stilltontothechangerandthespring
clips still function correctly each time before placing
anybody onto the unit.
Your Leit Trolley is now fully ready for use!

If your Leit Trolley has an ‘Over Bath Changer Top’
You might have purchased a Leit Trolley that comes complete with additional legs that allows
the changer to be used on top of a bath as well as a trolley (it will look like the picture below). If
so, please follow these instructions for installation.
When using the Over Bath Changer with the trolley,
these additional legs do not to be unfolded.
The changer then needs to be tted to the trolley in the
same fashion as before.
Legs remain folded
Once you are satisifed that the changer is secure to the
trolley and safe to use, unfold both ends so they are
lying at.

Leit Over Bath Changer-Instructions for Use
Unpack Unit:
Remove the Leit Shower Changer (over bath) and any
accessories from the box. Check everything is present
and there isn’t any damage.
Unfold the legs:
Make a note of the front side of the unit; the printed
text on the changer is readable from the front, and the
leg release plungers are only on the front side.
Pull the leg release plunger until the leg becomes free.
Rotate the leg as shown until the leg release ‘clicks’
into its locked position.
Repeat this for the opposite leg. Ensure the legs are
both locked in place before proceeding.
Operation of Bath-Top Adjusters:
Extend the Adjustable Bath Top Rests to their
maximum length; release Thumbscrew ‘1’ which should
allow ‘A’ to slide freely. Pull part ‘A’ as far as it will
go in the direction shown, then tighten thumbscrew ‘1’
Locate the Internal Adjuster Feet out of the way; release
Thumbscrew ‘2’ which should allow ‘B’ to slide
freely. Position part ‘B’ as far as it will move towards
the centre of the Shower Changer (in direction shown)
The tighten Thumbscrew ‘2’. Repeat this with Internal
Adjuster Foot on the oppposite side of the changer.
2
1
2
A
1
B

Place unit on the Bath:
Place the adjustable Bath - Top rest on the edge of the
bath nearest to you, and then lower the unit across the
bath as shown.
Once the unit is resting on the bath, ensure that all the
bath - top rests are supported by at least 50mm (ap
prox 2 inches) on either side of the bath top. These are
not adjusted until the changer is on the bath. DO NOT
USE UNTIL SECURE!
Check for obstructions:
Unfold the deck to check clearance around the unit
before you secure it in place. Check for clearance
above taps and grab - handles, around any shelves
or shower screen, walls and any additional shower
xings.
You must must be able to have all four bath top rests
resting on the bath and the changer fully unfolded
before using the Leit Shower Changer.
If there are any obstructions, fold the changer back up
and secure the unit in place as in the following step.
Secure the Leit Shower Changer:
1
WALL
2
3
4

• Ensure that the xed bath top rest is against a wall (if no wall is present, the rest should
overlap the bath-top by approximately 5mm, or 1/4 inch)
Repeat on other leg
• Loosen the thumbscrew for the Adjustable Bath-top rest, and slide the Rest in until it
overlaps the bath by approximately 5mm, or 1/4 inch. Re-tighten the thumbscrew.
Repeat on other leg
• Loosen the Thumbscrew that secures the nearest Internal Adjuster Foot to you, and po
sition it so it is pressed up against the side of the bath. Re-tighten the thumbscrew.
• NOTE - on some thin-walled baths, it may be necessary to extend the adjustable bath top
foot beyond the bath by more than 5mm approx (1/4 inch) in order for this Internal Foot to
press against the side of the bath.
Repeat on other leg
• Loosen the Thumbscrew that secures the Far Internal Adjuster Foot, and position it so it
is pressed up against the inside of the bath. Re-tigten the thumbscrew.
Repeat on other leg
• Check that the shower changer is secure: re-check all thumbwheels are still tight, all
feet are still tightly pressed up against the bath, and that the unit will not move or slide
around on the bath.
Once you are satisied that the unit is secure on the
bath and safe to use, unfold the changer so both
sides are laying at.
Your Leit Shower Changer is now fully ready for use
and should look like the picture shown.

Cleaning
1. If the changer has been used in a shower environment, rinse o any soap or residue o
the changer and the trolley base. If it has only been used in a dry environment, it may
just need a wipe down with a damp cloth.
2. Remove the side rails and any other accessories.
3. Remove excess moisture from the vinyl with a towel and fold the head/foot ends over.
4. Turn each castor so that the brake pedal is facing away from the centre of the tolley and
apply all brakes.
5. Release the catches on one end of the trolley-the latch plates should spring open, and
the support tube of the changer should still rest on the trolley.
6. Move to the opposite end of the trolley and repeat step 5. You should now easily be able
to lift the changer o the trolley.
7. Store the changer in your bag (if applicable)
8. Lift the slide release on one of the slides, and move the slide as to fold the legs at.
9. Repeat this with the opposite slide and legs.
10. Fold the trolley in half by the centre hinge.
11. Remove any excess moisture from the unit with a towel or a cloth.
12. In order to keep the Trolley and Changer in good working order, it should be kept in a
clean and dry environment. It should be rinsed with warm water after it has been used
in a shower environment, or otherwise simply wiped with a damp cloth and dried with a
towel each time.
13. NEVER use bleach or cleaning agents containing bleach on your Leit Changer or Trolley
14. Don’t use any abrasive substance or cleaning agent. Doing so will damage the surface
nish and reduce product life.
Maintenance and Warranty
Your Kingkraft product comes with a 24 month warranty - we recommend that a visual inspec-
tion is carried out before each use.
The Leit Shower Changer and Trolley should be thoroughly inspected by suitably trained per-
sonnel;
• At least once a year
• After long periods of inactivity
• If a fault or damage has been reported or found with the unit
• If any user raises concerns about the functionality of the unit.
Stickers
Below are the stickers you will nd on your Leit Product, make a note of the serial number for
future reference.

Leit Changer and Trolley - LSC+LT IFU Issue 3 10/19
Kingkraft Ltd 26D Orgreave Crescent, Dore House Industrial Estate, Sheeld, S13 9NQ Phone
This manual suits for next models
1
Table of contents
Popular Medical Equipment manuals by other brands

OLYMPIC VETERINARY
OLYMPIC VETERINARY 50901 owner's manual

Atmos
Atmos E 201 Thorax Short operating instructions

Orliman
Orliman O-105 INSTRUCTIONS FOR USE AND PRESERVATION

Compressana
Compressana SNAPPER Instructions for use and care

Shukla Medical
Shukla Medical Xtract-All Hip Series Surgical Technique Guide

Richard Wolf
Richard Wolf 2303 instruction manual

BodyMed
BodyMed BDMDOORTC instruction manual

Haag-Streit
Haag-Streit IM 900 instruction manual

O-Two
O-Two CAREvent CA-G05 user manual

FIOR & GENTZ
FIOR & GENTZ Locked System Knee Joints Instructions for Use for Patients

Reichert
Reichert Longlife Project-O-Chart Parts and service manual

BOCK
BOCK practico alu 25/80 Assembly and operating instruction