Amana NED5800HW User manual

W11691187A
Use and Care Guide
Guide d’utilisation et d’entretien
Electronic Dryer
Sécheuse électronique
Para obtener acceso
al Manual de uso y
cuidado en español, o para
obtener información adicional
acerca de su producto, visite:
www.amana.com.
For questions about features, operation/performance, parts, accessories, warranty, or service in the U.S.A., call:
1–866–616–2664 or visit our website at www.owners.amana.com/owners/.
In Canada, call: 1–800–807–6777 or visit our website at www.amanacanada.ca/owners/.
Pour des questions à propos des caractéristiques, du fonctionnement/rendement, des pièces, accessoires, garantie, ou
dépannage, composer le : 1–866–616–2664 ou visiter notre site Web au www.owners.amana.com/owners/.
Au Canada, composer le : 1–800–807–6777 ou visiter notre site Web au www.amanacanada.ca/proprietaire.

2
TABLE OF CONTENTS / TABLE DES MATIÈRES
DRYER SAFETY .......................................................................2
INTERNET CONNECTIVITY GUIDE .........................................4
ACCESSORIES ........................................................................5
CONTROL PANEL AND FEATURES.........................................5
CYCLE GUIDE..........................................................................7
USING YOUR DRYER ..............................................................9
ADDITIONAL FEATURES........................................................11
DRYER CARE .........................................................................11
TROUBLESHOOTING ............................................................13
ASSISTANCE OR SERVICE.................................BACK COVER
SÉCURITÉ DE LA SÉCHEUSE ...............................................16
GUIDE DE CONNEXION INTERNET ......................................18
ACCESSOIRES ......................................................................19
TABLEAU DE COMMANDE ET CARACTÉRISTIQUES ..........19
GUIDE DE PROGRAMMES....................................................21
UTILISER LA SÉCHEUSE.......................................................24
CARACTÉRISTIQUES SUPPLÉMENTAIRES..........................26
ENTRETIEN DE LA SÉCHEUSE .............................................27
DÉPANNAGE..........................................................................29
ASSISTANCE OU SERVICE................COUVERTURE ARRIÈRE
DRYER SAFETY

3
IMPORTANT
SAFETY
INSTRUCTIONS
WARNING:
To reduce the risk of fire, electric shock, or injury to persons when using your appliance, follow basic precautions,
including the following:
SAVE THESE INSTRUCTIONS
Read all instructions before using the appliance.
Do not dry articles that have been previously cleaned in,
washed in, soaked in, or spotted with gasoline, dry-cleaning
solvents, or other flammable or explosive substances, as
they give off vapors that could ignite or explode.
Risk of Suffocation and Injury from Entrapment: Do not allow
children to play on or in the appliance. Close supervision of
children is necessary when the appliance is used near children.
Before the appliance is removed from service or discarded,
remove the door to the drying compartment.
Do not reach into the appliance if the drum is moving.
Do not install or store this appliance where it will be
exposed to the weather.
Do not tamper with controls.
Do not repair or replace any part of the appliance or attempt
any servicing unless specifically recommended in the user-
maintenance instructions or in published user-repair
instructions that you understand and have the skills to carry
out.
Do
not use fabric softeners or products to eliminate static
unless recommended by the manufacturer of the fabric
softener or product.
Do not use heat to dry articles containing foam rubber or
similarly textured rubber-like materials.
Clean lint screen before or after each load.
Keep area around the exhaust opening and adjacent
surrounding areas free from the accumulation of lint, dust,
and dirt.
The
interior of the appliance and exhaust duct should be
cleaned periodically by qualified service personnel.
Do not place items exposed to cooking oils in your dryer.
Items contaminated with cooking oils may contribute to a
chemical reaction that could cause a load to catch fire. To
reduce the risk of fire due to contaminated loads, the final
part of a tumble dryer cycle occurs without heat (cool down
period). Avoid stopping a tumble dryer before the end of the
drying cycle unless all items are quickly removed and
spread out so that the heat is dissipated.
Do not use replacement parts that have not been
recommended by the manufacturer (e.g. parts made at
home using a 3D printer).
See the Installation Instructions for grounding requirements
and installation.
Do not install a booster fan in the exhaust duct.
NOTE: The booster fan warning does not apply to clothes
dryers intended to be installed in a multiple clothes dryer
system, with an engineered exhaust duct system that is
installed per the clothes dryer manufacturer's guidelines.

4
INTERNET CONNECTIVITY GUIDE
IMPORTANT: Proper installation of your appliance prior to use is your responsibility. Be sure to read and follow the installation
instructions that came with your appliance.
Connectivity requires Wi-Fi and account creation. App features and functionality are subject to change. Data rates may apply. Once
installed, launch the app. You will be guided through the steps to set up a user account and to connect your appliance.
You Will Need:
■A home wireless router supporting Wi-Fi, 2.4 Ghz with WPA2 security. If you are unsure of your router’s capabilities, refer to the
router manufacturer’s instructions.
■The router to be on and have a live internet connection.
■The 10–character SAID code for your appliance. The SAID code is either printed on a label on the appliance or found on the LCD
screen.
Federal Communications Commission (FCC) Compliance Notice
This device complies with Part 15 of the FCC Rules. Operation is subject to the following two conditions:
1. This device may not cause harmful interference, and
2. This device must accept any interference received, including interference that may cause undesired operation.
Changes or modications not expressly approved by the party responsible for compliance could void the user’s authority to operate
the equipment.
Industry Canada (IC) Compliance Notice
This Device complies with Industry Canada License-exempt RSS standard(s). Operation is subject to the following two conditions:
1. This device may not cause interference.
2. This device must accept any interference, including interference that may cause undesired operation of the device.
Under Industry Canada regulations, this radio transmitter may only operate using an antenna of a type and maximum (or lesser)
gain approved for the transmitter by Industry Canada. To reduce potential radio interference to other users, the antenna type and
its gain should be so chosen that the equivalent isotropically radiated power (e.i.r.p.) is not more than that necessary for successful
communication.
To comply with FCC and Industry Canada RF radiation exposure limits for general population, antenna(s) used for this transmitter must
be installed such that a minimum separation distance of 20 cm is maintained between the radiator (antenna) and all persons at all
times and must not be co-located or operating in conjunction with any other antenna or transmitter.
If this equipment does cause harmful interference to radio or television reception, which can be determined by turning the equipment
off and on, the user is encouraged to try to correct the interference by one of the following measures:

5
CONTROL PANEL AND FEATURES
Not all features and cycles are available on all models.
NOTE: The control panel features a sensitive surface that responds to a light touch of your finger. To ensure your selections are
registered, touch the control panel with your fingertip, not your fingernail. When selecting a setting or option, simply touch the
appropriate button.
1POWER
Touch to turn the dryer on and off. Touch to stop/cancel
a cycle at any time.
CYCLES
Touch a button for the desired drying cycle. See “Cycle
Guide” for cycle details.
START/PAUSE
Touch and hold until LED counts down “3-2-1” and the
dryer starts; then let go to start a cycle, or touch once
while a cycle is in process to pause it.
2
3
MODIFIERS
Use to select available modiers for your dryer. Not all
cycles and options are available on all models.
Temp
When using Timed Dry/Quick Cycle, you may select
a dry temperature based on the type of load you are
drying. Use the warmest setting that is safe for the
garments in the load. Follow garment label instructions.
Dryness
You may adjust the Dryness on Sensor cycles (except
for the Sanitize cycle), if desired.
NOTE: Dryness is for use with Sensor cycles only.
More Time/Less Time Timed Dry Adjust
Touch MORE TIME or LESS TIME with the
Timed Dry/Quick cycle to increase or decrease the
length of the cycle.
4
ACCESSORIES
Accessories designed for your appliance:
INSTALLATION & MAINTENANCE
ACCESSORIES
FACTORY CERTIFIED PARTS – these three
words represent quality parts and accessories
Time tested engineering that meets
FACTORY CERTIFIED PARTS
Customize your new washer and dryer with the following genuine
Whirlpool accessories. For more information on options and
ordering, call 1-866-616-2664, or visit us at:
www.amana.com/help.
In Canada, call 1-800-807-6777 or visit us at:
www.amana.com/help.
15" Pedestal
Color-matched pedestals raise
the washer and dryer to a more
comfortable working height. The
large drawer provides convenient
storage.
Stack Kit
If space is at a premium, the
stack kit allows the dryer to be
installed on top of the washer.
Drying Rack
The Drying Rack provides a
stationary drying surface for items
such as sweaters and tennis shoes.
See the “Additional Features”
section for more information.
123 6
4
45
5

6
NOTE: If you open the dryer door prior to the end of the
Wrinkle Prevent option, the dryer will go into standby.
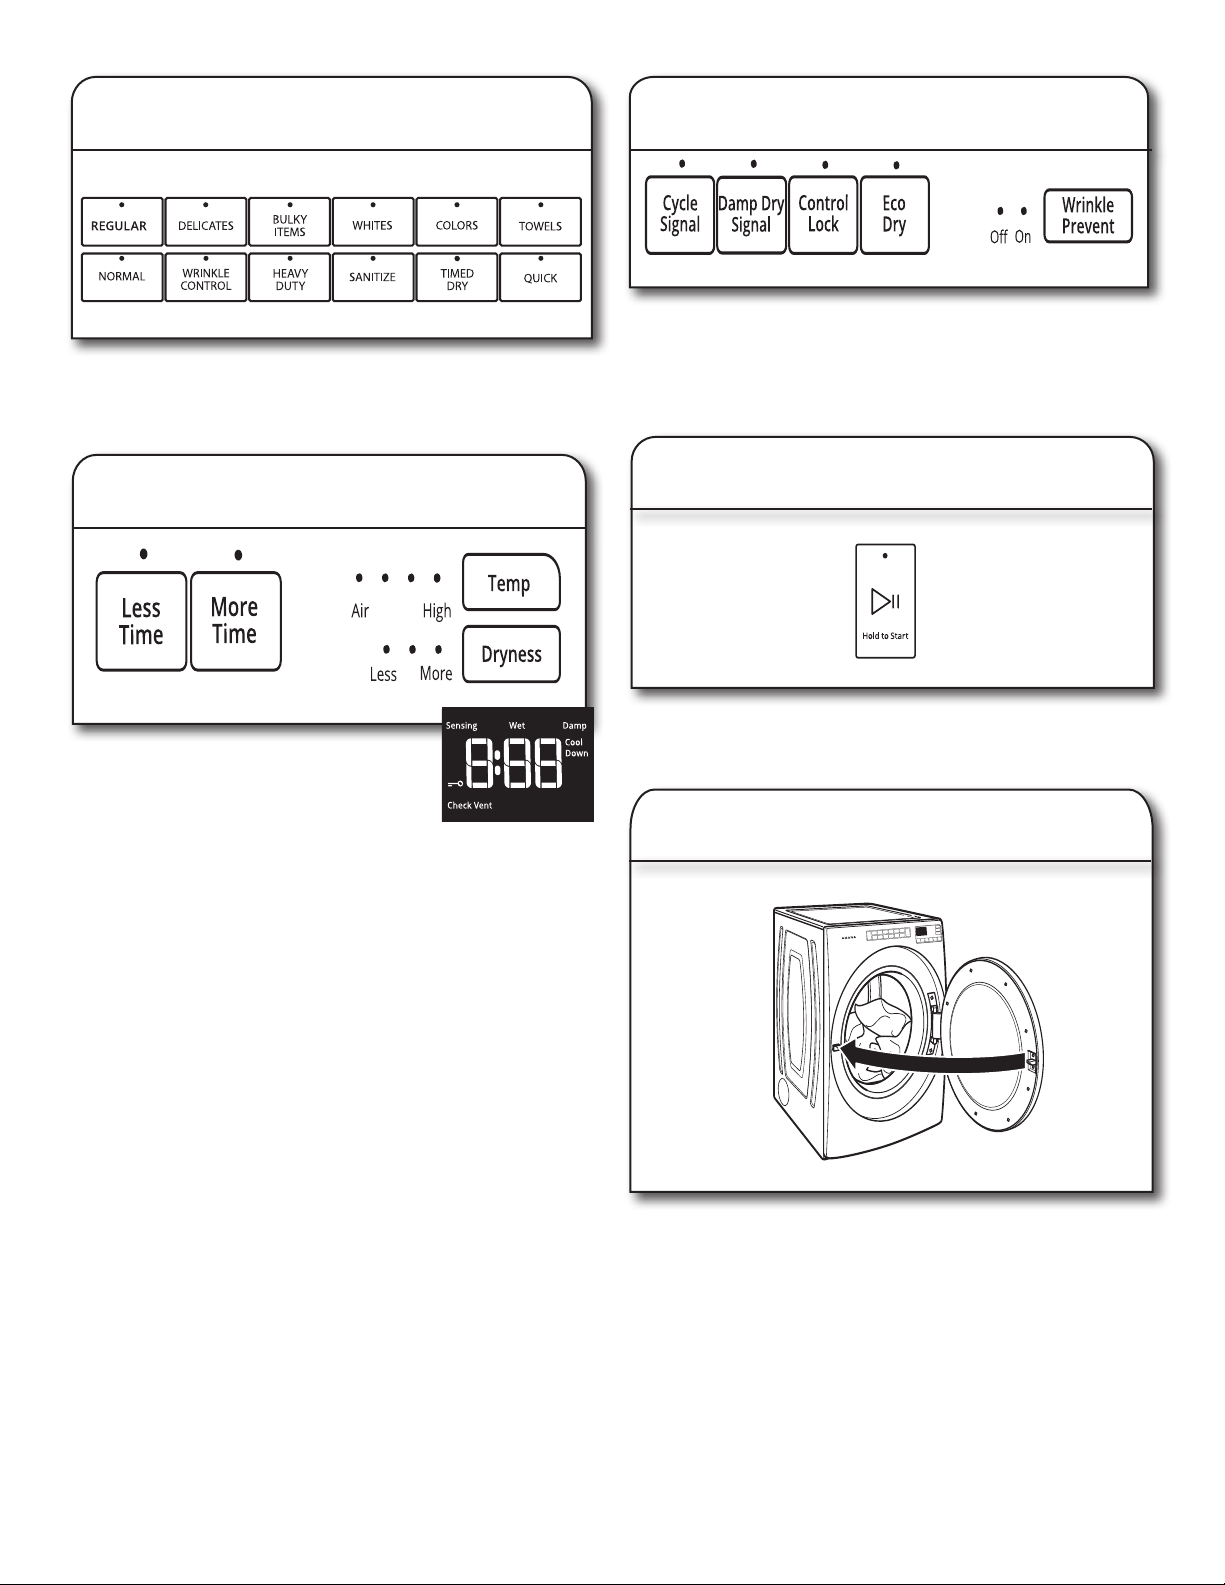
Cycle Signal
Use this option to turn the signal indicating the end of
a drying cycle to low, medium, high, or off. The volume
you select here will also be applied to the Damp Dry
Signal.
NOTE: You may also turn off the tones that sound when
a feature, setting, or option is touched. Touch and hold
CYCLE SIGNAL for about three seconds to turn sounds
to low, medium, high, or off.
Damp Dry Signal
Touch to turn the Damp Dry Signal on or off. When
selected, a series of beeps will sound when the load
is damp, but not completely dry. This will allow you to
take clothes out of the load that do not need to dry
completely. This option is available on some cycles. The
Damp Dry signal is selected as a default for the Bulky
Items/Normal, Bulky Items/Wrinkle Control, and Bulky
Items/Heavy Duty cycles, as a reminder to manually
reposition bulky loads midway through the cycle.
Control Lock
Use this option to lock the controls of the dryer
and avoid an accidental change in cycle options or
preferences during a drying cycle.
Touch and hold CONTROL LOCK for 3 seconds to lock
or unlock the controls of the dryer. During this time, the
LED Display will count down “3-2-1.” Once the controls
are locked, the LED Display will display “Loc.”
NOTE: The Control Lock function may be enabled when
recovering from a power failure. To unlock the control,
touch and hold DAMP CONTROL LOCK for at least
three seconds.
Eco Dry Option
The Eco Dry option will default on only for the Normal
cycle and is only available on that cycle. This option
allows you to increase your energy savings by using a
slightly lower heat level. The Eco Dry option will increase
drying times by approximately 40 minutes, which will be
reflected on the LED Display. If optimal time is desired,
touch ECO DRY to turn off this option.
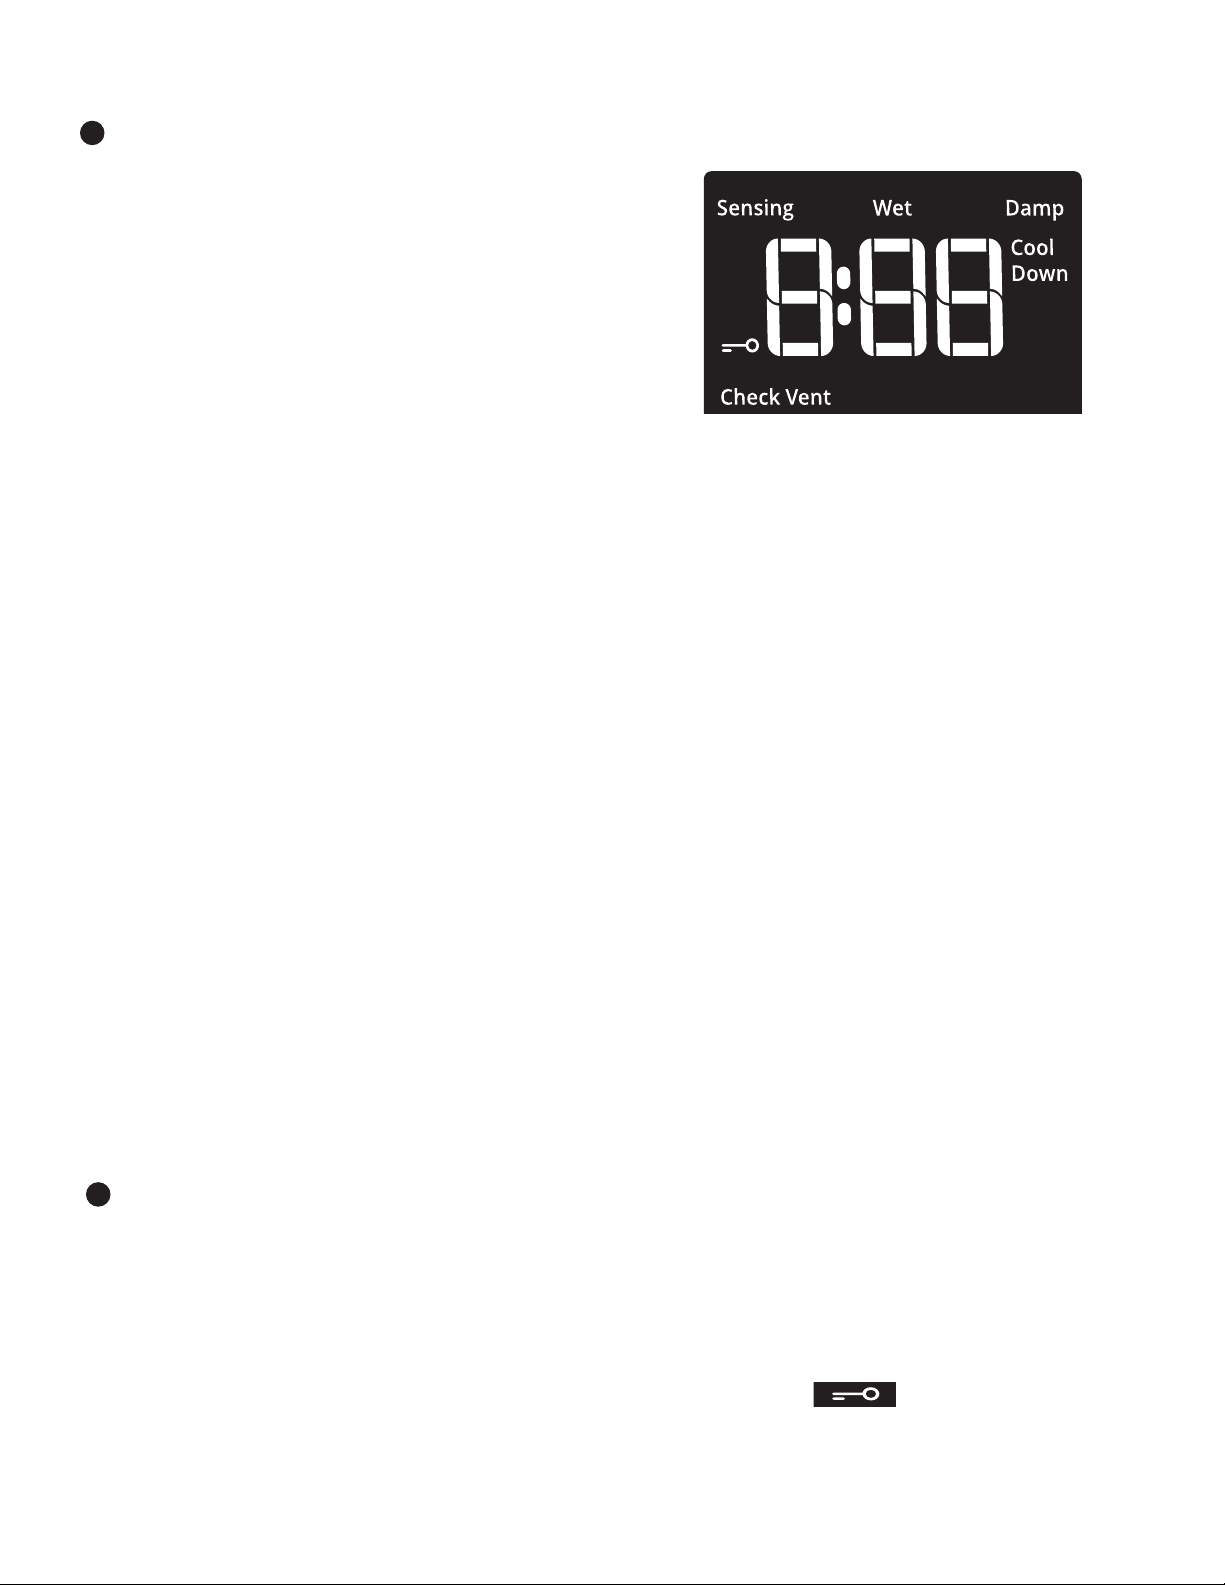
Check Vent
The Check Vent indicator is a feature available for
Automatic cycles only. This indicator will show the status
of airflow through the dryer and the dryer vent system
for the dryer’s life. During the sensing phase at the
beginning of the cycle, the Check Vent light will come on
if a blocked vent or low airflow issue is detected. This light
will stay on for the entire cycle. Should the Check Vent
light illuminate, refer to the “Troubleshooting” section for
potential solutions to the issue.
The light will be cleared upon completion of the cycle,
touching Power, or opening the door. The Check Vent light
will continue to illuminate during the cycle unless the root
cause is resolved.
REMEMBER: The dryer will continue to operate even
while the indicator is lit, but poor airflow can impact dry
times and overall performance. For more information on
maintaining good airflow, see “Check Your Vent System
for Good Airflow.”
NOTE: If there are other error issues during a cycle, the
Clean Check Vent indicator will not light up. See the
“Troubleshooting” section.
End
This will indicate that the selected cycle has ended and
the load may be removed from the dryer. If
Wrinkle Prevent has been selected, the dryer may continue
to tumble the load, even if “End” is displayed.
Control Lock
This will illuminate once the controls are locked
CYCLE STATUS INDICATORS
The Cycle Status Indicators show the progress of a cycle.
Not all indicators are available on all models.
Sensing
The Sensing indicator will light periodically during Sensor
Cycles to indicate that the moisture sensor on the dryer is
operating. This indicator will not light during Timed Cycles
or options such as Wrinkle Prevent.
Wet
The load is still wet and/or the cycle just started.
Damp
This indicator shows that the load is partially dried and
items that you may wish to hang up or iron while still
damp may be removed.
Cool Down
The dryer has finished drying with heat and is now
tumbling the load without heat to cool it down.
OPTIONS
Use to select available options for your dryer. Not all cycles
and options are available on all models.
Wrinkle Prevent Option
If you will be unable to remove a load immediately,
touch WRINKLE PREVENT to add up to 150 minutes of
periodic tumbling to help reduce wrinkling.
5
LED DISPLAY
When you select a cycle, its default settings will light up
and the Estimated Time Remaining (for Automatic Cycles)
will vary depending on the cycle selection, or actual time
remaining for Timed Dry cycles (for Manual Cycles) will be
displayed.
6

7
CYCLE GUIDE - SENSOR CYCLES
Settings and options shown in bold are default settings for that cycle.
If settings are changed, the new settings will be remembered. If there is a power failure, settings will return to the default.
Not all features and cycles are available on all models.
Not all settings and options are available on each cycle.
Use Sensor Cycles for better fabric care and energy savings
The dryer senses moisture in the load or air temperature and shuts off when the load reaches the selected dryness level.
Use the Normal dryness level to provide optimal energy savings.
Items to dry Cycle Drying
Temperature
Dryness
Level
Default
Time
Available
Options Cycle Details
Shirts, blouses,
permanent
press, synthetics,
lightweight items
Regular High
Medium
Low
Air
More
Normal
Less
48 Wrinkle Prevent
Cycle Signal Uses Medium heat to dry large
loads of mixed fabrics and items.
Work clothes,
casual wear,
mixed cottons,
sheets, corduroys
Normal High
Medium
Low
Air
More
Normal
Less
1.25 Wrinkle Prevent
Cycle Signal
Eco Dry
Uses Medium heat to dry large
loads of mixed fabrics and items.
Normal is the most efcient
cycle.
Undergarments,
blouses, lingerie,
performance
wear
Delicates High
Medium
Low
Air
More
Normal
Less
28 Wrinkle Prevent
Cycle Signal Uses Low heat to gently dry
delicate items.
Shirts, blouses,
permanent
press, synthetics,
lightweight items
Wrinkle
Control High
Medium
Low
Air
More
Normal
Less
35 Wrinkle
Prevent
Cycle Signal
Uses a stepped drying
temperature from Medium to
Low for improved moisture
removal and enhanced fabric
care.
Jackets,
comforters,
pillows
Bulky
Items High
Medium
Low
Air
More
Normal
Less
52 Wrinkle Prevent
Cycle Signal Use for drying large, bulky items;
do not overfill dryer drum.
Partway through the cycle, the
signal will sound for 2 minutes to
indicate when it is time to
rearrange items for optimal
drying.
Heavyweight
items such as
towels or heavy
work clothes
Heavy
Duty High
Medium
Low
Air
More
Normal
Less
57 Wrinkle Prevent
Cycle Signal Offers stepped drying starting
with High heat followed by
Medium heat for enhanced fabric
care and energy savings.
White, sturdy
items Whites High
Medium
Low
Air
More
Normal
Less
45 Wrinkle Prevent
Cycle Signal Uses High heat to dry large loads
of white, sturdy fabrics and
items.
Large loads of
heavyweight
items
Sanitize High
Medium
Low
Air
More
Normal
Less
1.30 Wrinkle Prevent This is a long cycle with high
heat which has been proven to
reduce household bacteria. This
cycle is not recommended for all
fabrics. Use for large loads of
heavyweight fabrics.
Bright or darkly
colored cottons,
linens, casual and
mixed loads
Colors High
Medium
Low
Air
More
Normal
Less
53 Wrinkle Prevent
Cycle Signal Uses Medium heat to gently dry
bright or darkly colored items.
Large loads of
cotton towels,
heavyweight
items
Towels High
Medium
Low
Air
More
Normal
Less
1.00 Wrinkle Prevent
Cycle Signal This is a long cycle with high
heat which has been proven to
reduce household bacteria.
This cycle is not recommended
for all fabrics. Use for large
loads of heavyweight fabrics.
Load Size Recommendations
For best results, follow the load size recommendations noted
for each cycle.
Small load: Fill the dryer drum with 3–4 items, not
more than 1/4 full.
Medium load: Fill the dryer drum up to about 1/2 full.
Large load: Fill the dryer drum up to about 3/4 full.
Do not overload. Items need to tumble freely.

8
CYCLE GUIDE — TIMED CYCLES
Settings and options shown in bold are default settings for that cycle.
If settings are changed, the new settings will be remembered (except on Quick). If there is a power failure, settings will return
to the default.
Not all features and cycles are available on all models.
Not all settings and options are available on each cycle.
Adjusting drying time on Timed Cycles
When you select a Timed Cycle, the time
appears in the display. Use More Time
and Less Time to increase or decrease
the time in 5-minute increments.
The maximum dry time is 150 minutes.
Selecting the Drying Temperature
A High heat setting may be used for drying heavyweight items
such as towels and work clothes.
A Low to Medium heat setting may be used for drying
mediumweight items such as sheets, blouses, dresses,
underwear, permanent press fabrics, and some knits.
Use a no heat (air) setting for foam, rubber, plastic,
or heat-sensitive fabrics.
Line dry bonded or laminated fabrics.
NOTE: If you have questions about drying temperatures
for various loads, refer to the care label directions.
Drying Default Available
Items to dry Cycle Temperature Time Options Cycle Details
Any load
NOTE: Select Air
to dry foam,
rubber, plastic,
or heat-sensitive
fabrics.
Timed Dry High
Medium
Low
Air
40 Wrinkle Prevent Use to dry items to a damp
level for items that do not
not require an entire drying
cycle. Select a drying
temperature based on the type
of fabrics in your load. If you
are unsure of the temperature
to select for a load, select the
lower setting rather than the
higher setting.
Small loads
and sportswear
Quick High
Medium
Low
Air
15 Wrinkle Prevent For small loads of 3–4 items.
Load Size Recommendations
For best results, follow the load size recommendations noted
for each cycle.
Small load: Fill the dryer drum with 3–4 items, not
more than 1/4 full.
Medium load: Fill the dryer drum up to about 1/2 full.
Large load: Fill the dryer drum up to about 3/4 full.
Do not overload. Items need to tumble freely.
NOTE: Government energy certifications for this model were based on the Normal Cycle, Highest Temperature Setting, Normal
Dryness Level, Eco Dry On. The as-shipped defaults were the same as the Government Energy Certification Settings except the
default Temperature Setting of Medium was adjusted to the Highest Temperature Setting. Cycles that are available for post-sale
download may use more energy than the Normal cycle, upon which the energy use rating of this dryer is based.

9
USING YOUR DRYER
WARNING: To reduce the risk of fire, electric shock, or injury to
persons, read the IMPORTANT SAFETY INSTRUCTIONS before
operating this appliance.
1. Clean the lint screen
Clean the lint screen before each load. Pull the lint screen
straight up. Roll lint off the screen with your fingers. Do not rinse
or wash screen to remove lint. Wet lint is hard to remove. Push
the lint screen firmly back into place.
For additional cleaning information, see “Dryer Care.”
2. Load the dryer
Open the door by pulling on the handle. Place laundry in the
dryer. Add a dryer sheet to wet load, if desired. Close the door.
IMPORTANT: Do not tightly pack the dryer. Items need to tumble
freely. Tightly packing can lead to poor drying performance and
may increase wrinkling and tangling.
3. Touch POWER
Touch POWER to turn on the dryer.

10
4. Select desired cycle
Select the desired cycle for your load. See the “Cycle Guide” for
more information about each cycle.
5. Adjust cycle modifiers, if desired
You may adjust different settings,
depending on whether you have selected
a Sensor Cycle or Timed Cycle. See the
“Cycle Guide” for detailed information.
NOTE: Not all options and settings are available with all cycles.
Not all cycles are on all models.
Sensor Cycles:
The temperature may be changed by touching Temp until
the desired dry temperature is lit. Once a cycle has started, the
temperature can be changed during the first 5–8 minutes of the
cycle.
You can select a different dryness level, depending on
your load. Touch DRYNESS to scroll from Less to More to
automatically adjust the dryness level at which the dryer will shut
off. Once a dryness level is set, it can be changed during the first
5–8 minutes of the cycle.
Sensor cycles give the best drying in the shortest time. Drying
time varies based on fabric type, load size, and dryness setting.
Drying time is estimated and may change throughout the cycle.
Drying time cannot be changed on Sensor Cycles.
Timed Cycles:
When you select a Timed Cycle, the time appears in the display.
Touch MORE TIME or LESS TIME to increase or decrease the
time in 5-minute increments.
The temperature may be changed by touching Temp until
the desired dry temperature is lit. The temperature cannot
be changed if the temperature is started with Air.
6. Select any additional options
Add additional options such as Wrinkle Prevent and/or Eco Dry
by touching that option. If you will be unable to remove the load
promptly, select Wrinkle Prevent before touching Start/Pause.
NOTE: Not all options and settings are available with all cycles.
7. Touch and hold START/PAUSE to
begin cycle
To begin the cycle, touch and hold START/PAUSE until the
display counts down “3-2-1” and the dryer starts.
8. Remove garments promptly
after cycle is finished
Promptly remove garments after cycle has completed
to reduce wrinkling. If you will be unable to remove the load
promptly, select the Wrinkle Prevent option.

11
ADDITIONAL FEATURES
USING THE DRYING RACK
To purchase a drying rack for your dryer, see “Accessories”
section for more information. You will need your model and
serial number and the purchase date. Remove and discard
any packing material before use.
Use the drying rack for items that you do not want to tumble
dry, such as sweaters and tennis shoes. When you use the
drying rack, the drum continues to turn, but the rack remains
stationary.
The drying rack is intended for use with the Timed Dry cycle
only. The drying rack cannot be used
with Sensor Cycles.
To use the drying rack:
IMPORTANT: Do not remove the lint screen.
1. Open dryer door.
2. Align the two hooks on the front of the drying rack with the
holes in the dryer door opening and press down fully into
holes. Rest the rear support on the dryer back ledge.
3. Place wet items on top of the drying rack. Allow space
around items for air to circulate. The drying rack does not
move, but the drum will rotate; be sure to leave adequate
clearance between items and the inside of the dryer drum.
Make sure items do not hang over the edges or between
drying rack grille.
4. Close the door.
5. Select a Timed Dry cycle. Items containing foam, rubber,
or plastic must be dried on a clothesline or by using the
Air setting.
6. When the cycle is selected, the display shows the default
time. You can change the actual time in the cycle by
increasing or decreasing the cycle time.
7. Start the dryer.
NOTE: Check the lint screen and remove any lint
accumulated from items dried on the drying rack
after the cycle is finished.
DRYER CARE
CLEANING THE DRYER LOCATION
Keep dryer area clear and free from items that would block
the airflow for proper dryer operation. This includes clearing
piles of laundry in front of the dryer.
REMOVING ACCUMULATED LINT
From Inside the Dryer Cabinet
Lint should be removed every 2 years, or more often,
depending on dryer usage. Cleaning should be done
by a qualified appliance servicer.
From the Exhaust Vent
Lint should be removed every 2 years, or more often,
depending on dryer usage.
CLEANING THE DRYER INTERIOR
To clean dryer drum:
1. Use a mild hand dish detergent mixed at a low
concentration with very warm water, and rub with
a soft cloth.
2. Rinse well with a wet sponge or towel.
3. Tumble a load of clean clothes or towels to dry drum
OR
Use a microfiber cloth and hot water in a spray bottle
to clean the drum and a second microfiber towel to dry.
NOTE: Garments that contain unstable dyes, such as denim
blue jeans or brightly colored cotton items, may discolor the
rear of the dryer interior. These stains are not harmful to your
dryer and will not stain future loads of clothes. Dry unstable
dye items inside out to avoid transfer of dye.

12
AS-NEEDED CLEANING
Laundry detergent and fabric softener residue can build up
on the lint screen. This buildup can cause longer drying times
for your clothes, or cause the dryer to stop before your load
is completely dry. The screen is probably clogged if lint falls
off while the screen is in the dryer.
Clean the lint screen with a nylon brush every 6 months,
or more frequently, if it becomes clogged due to a residue
buildup.
To wash:
1. Roll lint off the screen with
your fingers.
2. Wet both sides of lint screen
with hot water.
3. Wet a nylon brush with hot water and liquid detergent.
Scrub lint screen with the brush to remove residue
buildup.
4. Rinse screen with hot water.
5. Thoroughly dry lint screen with a clean towel.
Reinstall screen in dryer.
CLEANING THE LINT SCREEN
Every load cleaning
The lint screen is located in the door opening of the dryer.
Clean the lint lint screen before each load. A screen blocked
by lint can increase drying time.
To clean:
1. Pull the lint screen straight up. Roll lint off the screen
with your fingers. Do not rinse or wash screen to remove
lint. Wet lint is hard to remove.
2. Push the lint screen firmly back into place.
IMPORTANT:
ʍ
Do not run the dryer with the lint screen loose, damaged,
blocked, or missing. Doing so can cause overheating and
damage to both the dryer and fabrics.
ʍ
If lint falls off the screen into the dryer during removal,
check the exhaust hood and remove the lint. See
“Venting Requirements” in the Installation Instructions.
NON-USE, STORAGE, AND MOVING CARE
Non-Use or Storage Care
Operate your dryer only when you are at home. If you will be
on vacation or not using your dryer for an extended period of
time, you should:
1. Unplug dryer or disconnect power.
2. Clean lint screen. See “Cleaning the Lint Screen.”
Moving Care
For power supply cord-connected dryers:
1. Unplug the power supply cord.
2. Gas models only: Close shut-off valve in gas supply line.
3. Gas models only: Disconnect gas supply line pipe and
remove fittings attached to dryer pipe.
4. Gas models only: Cap the open gas supply line.
5. Make sure leveling legs are secure in dryer base.
6. Use tape to secure dryer door.
For direct-wired dryers:
1. Disconnect power.
2. Disconnect wiring.
3. Make sure leveling legs are secure in dryer base.
4. Use tape to secure dryer door.
Reinstalling the Dryer
Follow the Installation Instructions to locate, level, and connect
the dryer.

13
If you experience Possible Causes Solution
Dryer Operation
Dryer will not run Door not closed completely. Make sure the dryer door is closed completely.
START/PAUSE not touched with
fingernail. Touch and hold START/PAUSE with pad of finger.
Household fuse is blown or circuit
breaker has tripped. There may be two household fuses or circuit breakers for the
dryer. Check that both fuses are intact and tight, or that both
circuit breakers have not tripped. Replace the fuses or reset the
circuit breaker. If the problem continues, call an electrician.
Incorrect power supply. Electric dryers require 240 V power supply. Check with a
qualified electrician.
Wrong type of fuse. Use a time-delay fuse.
Dryer will not turn off Dryer door was opened prior to the
end of the Wrinkle Prevent option.
If you open the dryer door prior to the end of the Wrinkle Prevent
option, the dryer will go into the Pause mode. You will need to
touch Power to turn off or touch Start/Pause to continue the
Wrinkle Prevent option.
Dryer will not heat Household fuse is blown or circuit
breaker has tripped. The drum may be turning, but you may not have heat. Electric
dryers use two household fuses or circuit breakers. Replace the
fuses or reset the circuit breaker. If the problem continues, call
an electrician.
Incorrect power supply. Electric dryers require 240 V power supply. Check with a
qualified electrician.
Supply line valve not open. For gas dryers, make sure that the valve on the gas supply line
is open.
Unusual Noise
Thumping noise Dryer hasn’t been used in a while. This is normal. The thumping sound should diminish after a few
minutes of use.
Rattling or vibrating noise A small object caught between the
edges of dryer drum. Check the front and rear edges of the drum for small objects.
Clean out pockets before laundering.
Dryer isn’t properly leveled. The dryer may vibrate if not properly installed. See the
Installation Instructions. All four dryer feet should be in firm
contact with the floor.
Clothing is balled up in dryer. When balled up, the load will bounce, causing the dryer to
vibrate. Separate the load items and restart the dryer.
Clicking noise Gas valve operating. On gas dryers, you may hear the gas valve clicking as it opens
and closes. This is normal.
Dryer Results
Drying times are too
long and clothes are
not getting dry
Lint screen is clogged with lint. Clean lint screen before each load.
Eco Dry option is on. For optimal dry times, turn off the Eco Dry option.
The exhaust vent or outside exhaust
hood is clogged with lint, restricting
air movement.
Run the dryer for 5–10 minutes. Hold your hand under the
outside exhaust hood to check air movement. If you do not feel
air movement, clean exhaust system of lint or replace exhaust
vent with heavy metal or flexible metal vent. See the Installation
Instructions.
The exhaust vent is not the correct
length.
Check that the exhaust vent is not too long or has too
many turns. Long venting will increase drying times.
See the Installation Instructions.
The exhaust vent diameter is not the
correct size.
Use 4" (102 mm) diameter vent material.
First try the solutions suggested here or visit our website at www.amana.com/owners
for assistance and to possibly avoid a service call.
TROUBLESHOOTING

14
If you experience Possible Causes Solution
Dryer Results (cont.)
Drying times are too
long and clothes are not
getting dry (cont.)
The dryer is not level. Clothes not contacting the moisture sensors during Sensor
cycles. See “Level Dryer” in the Installation Instructions.
The load is too large and heavy to dry
quickly.
Separate the load to tumble freely.
Fabric softener sheets are blocking
the grille.
The air outlet grille is just inside the door, behind the lint screen.
Check that it is not blocked by a fabric softener sheet.
Use only one fabric softener sheet, and use it only once.
The dryer is located in a room with
temperature below 45ºF (7ºC).
Proper operation of dryer cycles requires temperatures above
45ºF (7ºC).
The dryer is located in a closet. Closet doors must have ventilation openings at the top and
bottom of the door. The front of the dryer requires a minimum of
1" (25 mm) of airspace, and, for most installations, the rear of the
dryer requires 5" (127 mm). See the Installation Instructions.
Cycle time is too short The load may not be contacting the
sensor strips on Automatic Cycles. Level the dryer. See the Installation Instructions. All four dryer
feet should be in firm contact with the floor.
The Sensor cycle is ending early. Change the dryness level setting on Sensor Cycles. Increasing
or decreasing the dryness level will change the amount of drying
time in a cycle.
Lint on load Lint screen is clogged with lint. Clean lint screen before each load.
Stains on load Improper use of fabric softener. Add dryer fabric softener sheets at the beginning of the cycle.
Fabric softener sheets added to a partially dried load can
stain your garments.
Stains on drum Loose dyes in clothes. Drum stains are caused by dyes in clothing (usually blue jeans).
These will not transfer to other clothing.
Loads are wrinkled The load was not removed from dryer
at the end of the cycle.
NOTE: Refer to garment care label instructions. Dry-clean-only
garments are not recommended.
The dryer was tightly packed. Dry smaller loads that can tumble freely. Results may also vary
depending on fabric type.
Odors Recent painting, staining, or
varnishing in the area where your
dryer is located.
Ventilate the area. When the odors or fumes are gone from the
area, rewash and dry the clothing.
The electric dryer is being used for
the first time.
The new electric heating element may have an odor.
The odor will be gone after the first cycle.
Load too hot Load removed before cooldown
portion of cycle complete. Allow the dryer to complete the cooldown portion of the cycle
before removing the load.
Using Timed Dry cycle with a high
temperature setting. Select a Sensor Cycle with a lower heat setting to avoid
overdrying the load.
First try the solutions suggested here or visit our website at www.amana.com/owners
for assistance and to possibly avoid a service call.
TROUBLESHOOTING

15
First try the solutions suggested here or visit our website at www.amana.com/owners
for assistance and to possibly avoid a service call.
TROUBLESHOOTING
If you experience Possible Causes Solution
Dryer Displaying Code Message or Indicator Is Lit
“PF” (power failure) The drying cycle has been interrupted
by a power failure. Touch and hold START to restart the dryer cycle or touch
POWER to clear the display.
“L2” Diagnostic Code
(low or no line voltage
condition)
There may be a problem with your
home power supply, keeping the
dryer’s heater from turning on.
The dryer will continue to run when this diagnostic code is
present. Touch any pad to clear the code from the display
and return to the estimated time remaining.
NOTE: This error will only show during the initial installation.
Try the following:
Check to see if a household fuse has blown or circuit breaker
has tripped. Electric dryers use two household fuses or breakers.
Replace the fuse or reset the circuit breaker.
Confirm that the power cord is properly installed. Refer to
the Installation Instructions for details.
Select a Timed Dry heated cycle, and restart the dryer.
If the message persists, consult a qualified electrician.
“F# E#” (F1 E1, F3 E1,
etc.) variable service
codes
The dryer is in need of service. If a code beginning with an “F” appears in the display,
alternating between F# and E#, the dryer control has
detected a problem that requires service. Call for service.
Check Vent indicator is lit The lint screen or vent is clogged;
the vent is crushed or kinked or has
too many turns.
The dryer will continue to run when this indicator is lit. Try the
following:
Clean lint screen.
• Check to see if the vent run from the dryer to the wall is
crushed or kinked.
• Confirm that the vent run from the dryer to the wall is free of
lint and debris.
• Confirm that the exterior vent exhaust hood is free of lint and
debris.
• Confirm that your vent system falls within the recommended
run length and number of elbows for the type of vent you
are using. Refer to “Plan Vent System” in the Installation
Instructions for details.
• Select a Timed Dry heated cycle, and restart the dryer.
• If the indicator remains lit, have your entire home venting
run cleaned.
“Loc” The Control Lock is enabled. Touch and hold CONTROL LOCK for 3 seconds to unlock
the controls of the dryer. During this time the LED Display
will count down 3-2-1. When the Control Lock is disabled,
the LED Display will clear.
Other manuals for NED5800HW
1
Table of contents
Other Amana Dryer manuals

Amana
Amana SDE515DAYW Manual

Amana
Amana NED4600YQ User manual

Amana
Amana ALG643RA Series Manual

Amana
Amana LEA30AL User manual

Amana
Amana NGD5800DW User manual

Amana
Amana ALG866SAC Manual

Amana
Amana UPRIGHT FREEZER User manual

Amana
Amana LED20AW-PLED20AW User manual

Amana
Amana NDE7800AZW User manual

Amana
Amana TEA600 User manual

Amana
Amana W10573715A User manual

Amana
Amana ALE230RAW User manual

Amana
Amana NGD7200TW10 User manual

Amana
Amana NGD5800TQ0 User manual

Amana
Amana Dryer User manual

Amana
Amana NED4600Y Manual

Amana
Amana NTW5400T Parts list manual

Amana
Amana NTW4516FW User manual

Amana
Amana W10233410A User manual

Amana
Amana W101611016 User manual