Amazone AMADOS E+S User manual

Operating Manual
az
AMADOS E+S
On-board computer
MG3523
BAG0083.2
11.17
Printed in Germany
Please read this operating
ma
nual before first
commission
ing.
Keep it in a safe place
for future use.
en

2
AMADOS BAG0083.2 11.17
Reading the instruction
Manual and following it should seem to be in-
convenient and superfluous as it is not
enough to hear from others and to realize that a
machine is good, to buy it and to believe that now
everything should work by itself. The person in
question would not only harm himself but also
make the mistake of blaming the machine for pos-
sible failures instead of himself. In order to ensure
success one should enter the mind of a thing,
make himself familiar with every part of the ma-
chine and get acquainted with how it's handled.
Only in this way could you be satisfied both with
the machine and with yourself. This goal is the
purpose of this instruction manual.
Leipzig-Plagwitz 1872.

Table of Contents
AMADOS
BAG0083.2 11.17
3
1User Information..........................................................................................4
1.1 Purpose of the document.........................................................................................................4
1.2 Locations in the operating manual...........................................................................................4
1.3 Diagrams used.........................................................................................................................4
2General Safety Instructions ........................................................................5
2.1 Obligations and liability ............................................................................................................5
2.2 Representation of safety symbols............................................................................................5
3Product description.....................................................................................6
3.1 Intended use ............................................................................................................................6
3.2 Technical data..........................................................................................................................6
4Structure and function ................................................................................7
4.1 Function ...................................................................................................................................7
4.2 Display .....................................................................................................................................7
4.3 Keys .........................................................................................................................................8
5Commissioning..........................................................................................10
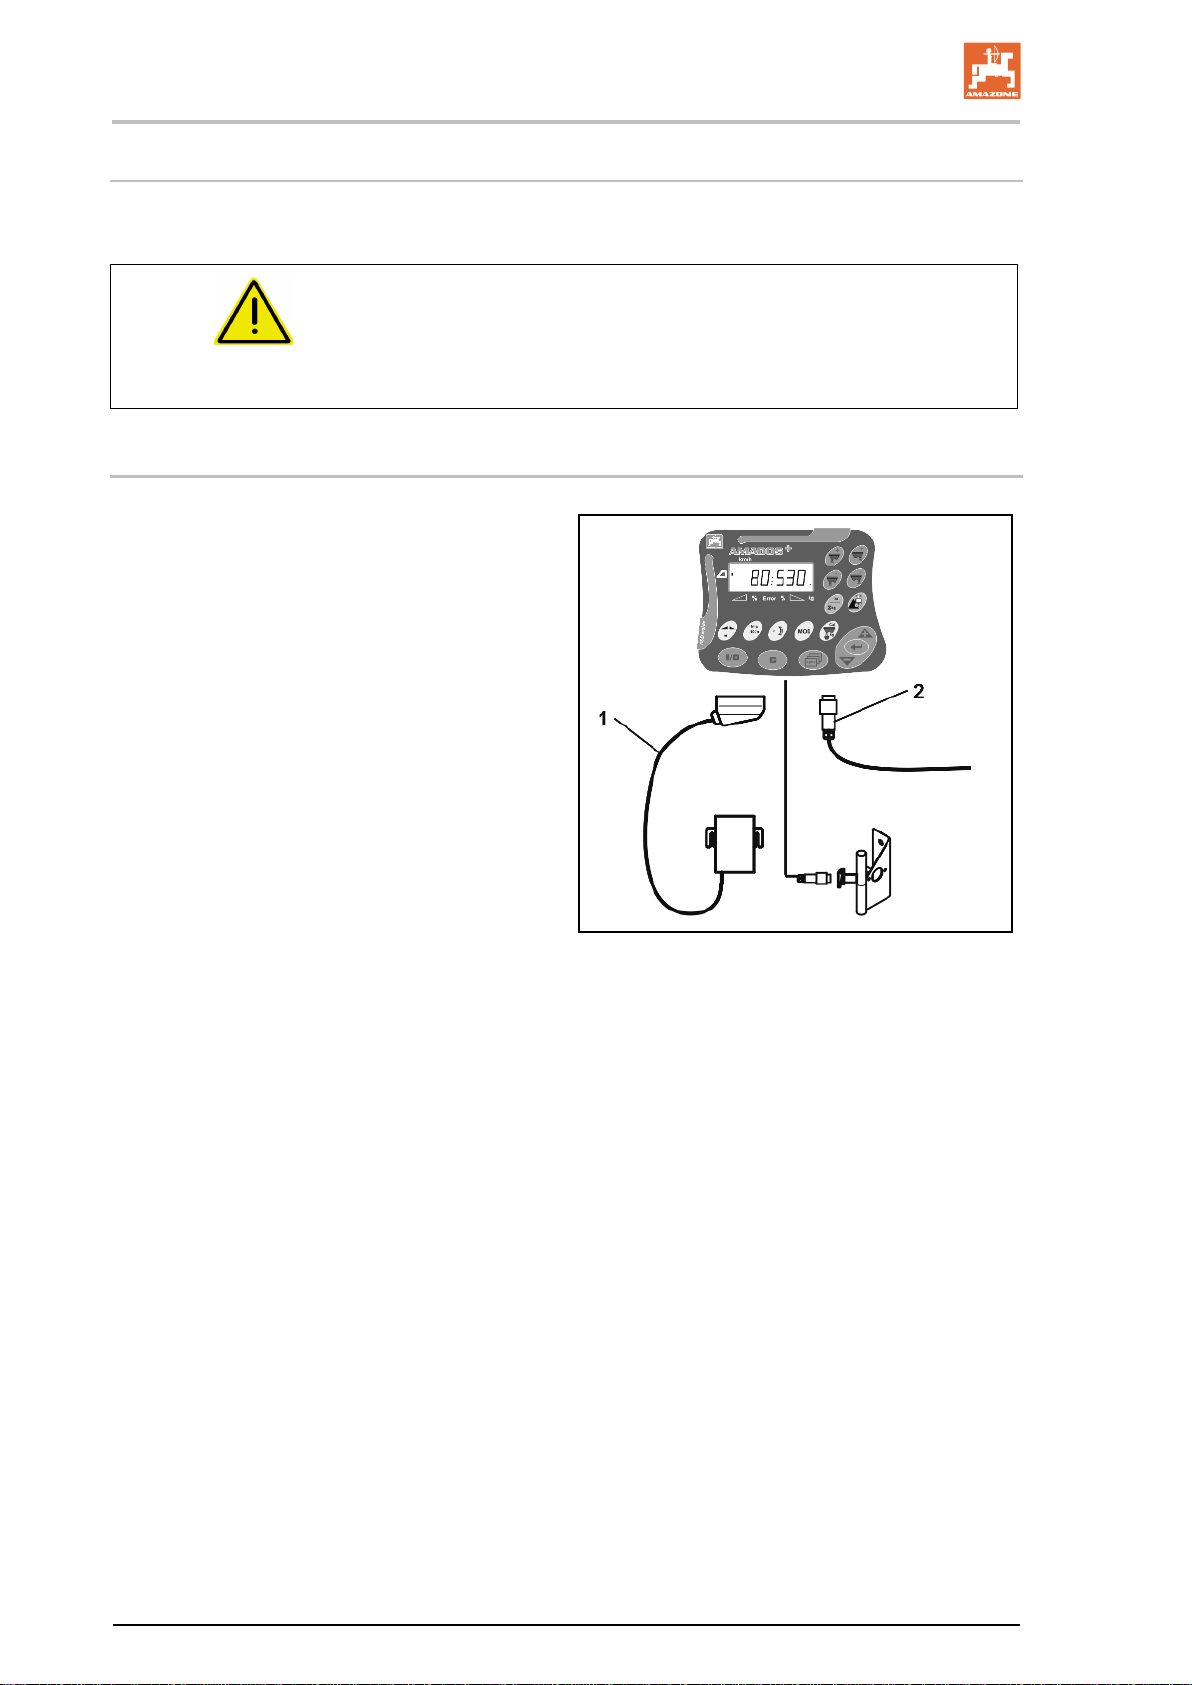
5.1 Connect AMADOS E+S ..................................................................................................10
5.2 Making basic setting (mode 1 to mode 9)..............................................................................11
5.3 Determine impulses per 100m...............................................................................................14
5.4 Enter working width................................................................................................................16
5.5 Entering the spread rate and starting a job............................................................................17
5.5.1 Display of job data .................................................................................................................19
5.5.2 Deleting job data....................................................................................................................20
5.5.3 External job (ASD) .................................................................................................................20
5.6 Carrying out spread rate check..............................................................................................21
6Use..............................................................................................................24
6.1 Predosing...............................................................................................................................25
6.2 Setting the working width via the border spread deflector.....................................................26
6.3 Blockage ................................................................................................................................26
6.4 Changing the spread rate during spreading ..........................................................................27
6.5 Display of the bottom group shutter position .........................................................................27
6.6 Residue draining / cleaning....................................................................................................28
7Faults..........................................................................................................29
7.1.1 Alarm messages ....................................................................................................................29
7.1.2 The true working width and the set spreading width are not identical...................................30
8Cleaning, maintenance and repairs..........................................................31
8.1 Cleaning.................................................................................................................................31
8.2 Storage...................................................................................................................................31
8.3 Service menu.........................................................................................................................31

User Information
4
AMADOS BAG0083.2 11.17
1 User Information
The User Information section supplies information on use of the oper-
ating manual.
1.1 Purpose of the document
This operating manual
•Describes the operation and maintenance of the machine.
•Provides important information on safe and efficient handling of
the machine.
•Is a component part of the machine and should always be kept
with the machine or the traction vehicle.
•Keep it in a safe place for future use.
1.2 Locations in the operating manual
All the directions specified in the operating manual are always seen
from the direction of travel.
1.3 Diagrams used
Handling instructions and reactions
Activities to be carried out by the user are given as numbered instruc-
tions. Always keep to the order of the handling instructions. The reac-
tion to the handling instructions is given by an arrow.
Example:
1. Handling instruction 1
→Reaction of the machine to handling instruction 1
2. Handling instruction 2
Lists
Lists without an essential order are shown as a list with bullets.
Example:
•Point 1
•Point 2
Number items in diagrams
Numbers in round brackets refer to the item numbers in the diagrams.
The first number refers to the diagram and the second number to the
item in the figure.
Example: (Fig. 3/6)
•Figure 3
•Item 6

General Safety Instructions
AMADOS
BAG0083.2 11.17
5
2 General Safety Instructions
This section contains important information on safe operation of the
machine.
2.1 Obligations and liability
Comply with the instructions in the operating manual
Knowledge of the basic safety information and safety regulations is a
basic requirement for safe handling and fault-free machine operation.
2.2 Representation of safety symbols
Safety instructions are indicated by the triangular safety symbol and
the highlighted signal word. The signal word (DANGER, WARNING,
CAUTION) describes the gravity of the risk and has the following sig-
nificance:
DANGER
Indicates an immediate high risk which will result in death or
serious physical injury (loss of body parts or long term damage)
if not avoided.
If the instructions are not followed, then this will result in imme-
diate death or serious physical injury.
WARNING
Indicates a medium risk, which could result in death or (serious)
physical injury if not avoided.
If the instructions are not followed, then this may result in death
or serious physical injury.
CAUTION
Indicates a low risk which could incur minor or medium level
physical injury or damage to property if not avoided.
IMPORTANT
Indicates an obligation to special behaviour or an activity re-
quired for proper machine handling.
Non-compliance with these instructions can cause faults on the
machine or in the environment.
NOTE
Indicates handling tips and particularly useful information.
These instructions will help you to use all the functions of your
machine to the optimum.

Product description
6
AMADOS BAG0083.2 11.17
3 Product description
3.1 Intended use
The AMADOS E+S
•is intended as a display, monitoring and control unit for the
AMAZONE winter service spreader E+S.
The intended use also includes:
•Compliance with all the instructions in this operating manual.
•Execution of inspection and maintenance work.
•Exclusive use of original AMAZONE spare parts.
Other uses to those specified above are forbidden and shall be con-
sidered as improper.
For any damage resulting from improper use:
•the operator bears the sole responsibility,
•AMAZONEN-WERKE assumes no liability whatsoever.
3.2 Technical data
Supply voltage 12 V
3-pin

Structure and function
AMADOS
BAG0083.2 11.17
7
4 Structure and function
The following section provides information on the machine structure
and the functions of the individual components.
4.1 Function
The AMADOS
E+S
can be used on the E+S spreader as an
automatic control unit.
Functions:
•Ground speed-related regulation of the spread rate.
•Remote-controlled setting of spreading width in compliance with
the area-specific spread rate (quantity adjustment).
•Job administration.
4.2 Display
Information on the display:
(1) The current forward speed in [km/h] (during use)
(2) The current spread rate in [g/m2] (during use)
(3) Display: Fault message
(4) Shutter open
(5) Display: Percentage deviation from the specified spread rate
(6) Display:
οPermanently illuminated: Spread area in job [m2]
οFlashing: Total spread area [ha]
(7) Display: Spread distance in job [km]
(8) Display: Spread quantity in job [kg]
(9) Reception of impulses for determining distance travelled
(10) Automatic quantity regulation switched on

Structure and function
8
AMADOS BAG0083.2 11.17
4.3 Keys
Orange keys for operation:
•Switch on and off
•Confirm
•Set 100% spread rate
•Increase spread rate
•Reduce spread rate
•Return to job display.
•Return to work display.
•Select job
•Start / finish automatic quantity regulation
(Open / close shutter)
•Increase working width.
•Reduce working width
•Start predosing
•Eliminate blockage by completely opening
the shutter.
Blue keys Work data:
•Display of the worked area [m2] for the cur-
rent job.
•Second press of key: Display of the spread
distance for the current job.
•Third press of key: Display of the spread
quantity [kg] for the current job.

Structure and function
AMADOS
BAG0083.2 11.17
9
Yellow keys for the basic setting:
•Enter working width
•Enter or determine impulses per 100 m
•Display spread rate as scale value
•Select mode
•Enter/determine calibration factor.
Key combinations
Display of the total worked area
+
Start calibration run for impulses per 100 m
+
Allow change of modes
+
Calibrate product
+
Service menu
+
Adjust offset value in case of varying working
widths
+

Commissioning
10
AMADOS BAG0083.2 11.17
5 Commissioning
This section provides information on putting your machine into opera-
tion.
CAUTION
•Before operating the fertilise spreader for the first time the oper
a-
tor must have read and understood the operating manual.
•See also the operating manual for the fertiliser spreader!
5.1 Connect AMADOS E+S
1. Connect the machine mounted/attached to
the tractor via the machine connector (Fig.
1/1).
2. Connect the signal cable from the tractor
signal socket or the sensor X (Fig. 1/2) to
the AMADOS E+S
Fig.
1

Commissioning
AMADOS
BAG0083.2 11.17
11
5.2 Making basic setting (mode 1 to mode 9)
As soon as the work display appears after switching on, the modes 1
to 9 can be entered.
Display of modes 1-9
•Actuate the key
→Display of mode 2
•Actuate the key several times
→Display of other modes (1-9)
Display of mode 2
•After initial actuation of the key, mode 2 always appears
(product).
•Mode 2 can also be changed without deblocking.
Changing modes 1-9:
1. Actuate the and keys simultaneously
→Deblock the stored modes
2. Actuate the key and select the mode to be changed.
3. Enter the value with the or keys
4. Confirm with the key
5. With the key, select another mode for change, or return
to the work display with the key.

Commissioning
12
AMADOS BAG0083.2 11.17
Mode 1
Select machine type.
1 = E+S 300, E+S 750 (Setting after a reset)
2 = E+S 301, E+S 751 (factory setting)
Mode 2
Select product.
1 = Grit
2 = Sand (not for E+S 01)
3 = Salt (factory setting)
4 = Gravel (not for E+S 01)
5 = Fertiliser (not for E+S 01)
Mode 3
Enter application rate increase in %.
Entry of reduction or increase of spread rate per key press
.
(Factory setting 10%)
Mode 4
Theoretical starting speed for predosing in km/h.
(Factory setting / maximum value 15 km/h)
The higher the starting speed, the greater the spread rate when start-
ing.
Mode 5
Duration of predosing until automatic quantity regulation starts
in seconds.
(Factory setting / maximum value 5 seconds)
Mode 6
Enter maximum number of jobs to be started.
(Factory setting 20, maximum value 99)
Mode 7
Enter planned mean working speed.
AMADOS+requires the entry to determine the fertiliser calibration
factor.
(Factory setting 12 km)
Mode 8
Enter theoretical travel speed for travel simulator.
With defective speed sensor
(Factory setting 0 km/h →Travel simulator off →The speed is deter-
mined from the impulses from the wheel.)
Mode 9
Enter transfer rate of serial interface.
For external job.

Commissioning
AMADOS
BAG0083.2 11.17
13
(57,600 baud / factory setting 19,200 baud)

Commissioning
14
AMADOS BAG0083.2 11.17
5.3 Determine impulses per 100m
The AMADOS E+S requires the calibration value "Impulses per
100m" to determine
•the actual operational speed [km/h].
•the worked area.
If the calibration value is not known, it must be established by way of
an "Impulses per 100 m" calibration run.
The "Impulses per 100 m" calibration value can be manually entered
into the AMADOS E+S, if the precise value is known.
Establish the precise calibration value for "Impulses per 100 m" by
way of a calibration run:
•before commissioning.
•when using a different tractor or after changing to different sized
tractor tyres.
•if there is a discrepancy between the measured and the actual
travel speed / distance travelled.
•if there is a discrepancy between the measured and the actual
worked area.
•with different ground conditions.
The "Impulses per 100 m" calibration value must be established under
the prevailing conditions. If the tractor is to be used with all-wheel
drive switched on, it must also be switched on when establishing the
calibration value.
Determine the impulses per 100m:
1. Measure out a calibration distance of exactly 100m.
2. Mark the start and end points.
3. Actuate the and keys simultaneously.
4. Travel a calibration distance of exactly 100m and stop.
→Do not press any keys during the calibration travel.
Display during calibration

Commissioning
AMADOS
BAG0083.2 11.17
15
5. After 100m, accept the determined value with the key.
6. Confirm with the key.
7. Back to work menu
οautomatically after 10 seconds
οwith the key
Enter the impulses per 100m:
1. With the vehicle at standstill, press .
2. Enter the value with the or keys.
3. Accept with the key.
4. Confirm with the key.
5. Back to work menu
οautomatically after 10 seconds
οwith the key.
The required minimum value for the impulses per 100 m is 200.

Commissioning
16
AMADOS BAG0083.2 11.17
5.4 Enter working width
Display of working width
1. Actuate the key.
→Current value is displayed.
2. Enter the value with the or keys.
3. Confirm with the key.
4. Set the position of the spread deflector with the /
key according to the table below.
Adjustable working widths [m]
Salt
1,5 - 4
Sand, gravel, slag
2 – 5
Fertiliser
1 - 10
Allocation of panel position to working width
Product
1
2
3
4
5
Spread deflector position
Gravel
Sand
Salt
Slag
Fertiliser
90°
5
5
4
5
X
60°
4
4
3
4
45°
3
3
2
3
30°
2
2
1.5
2
Working width [m]
•The smallest adjustable position of the spread deflector is 30°.
•The spread deflector is raised completely (90°) for spreading
fertilizer und is not adjustable via the / keys!

Commissioning
AMADOS
BAG0083.2 11.17
17
5.5 Entering the spread rate and starting a job
•The spread rate is entered for a selected job.
•
A job is started by selecting a job and entering the spread rate or
actuating the key.
•During the spreading,
οthe spread rate entered for the started job is spread.
οthe field plot for the started job, the total area is deter-
mined.
Display of spread rate
1. Actuate the key with the vehicle at standstill.
→The last processed job appears on the display
2. Select a job with the key
3. Use the or key to enter the desired spread rate
[g/m2], e.g. "50" for a spread rate of 50 g/m2.
4. Confirm with the key.
Adjustable spread rates [g/m2]
Salt
5 - 40
Sand, gravel, slag
35 – 300
Fertiliser
1 - 300
Default value
35

Commissioning
18
AMADOS BAG0083.2 11.17
Up to 20 jobs can be created as standard.
If this is insufficient, the number of jobs to be created can be in-
creased to 99.
To do so:
1. Actuate the and keys simultaneously.
2. Select mode 6.
3. Use the / keys to enter the number of jobs to be
created.
4. Confirm with the key.

Commissioning
AMADOS
BAG0083.2 11.17
19
5.5.1 Display of job data
To display the job data for a required job:
Actuate the key (several times if necessary).
→Select job.
Job data for the current job:
1. Actuate the key.
→The worked area in m2is displayed for the job.
Display of area
2. Actuate the key again.
→The distance travelled in km is displayed for the job.
Display of distance
3. Actuate the key again.
→The spread rate in kg is displayed for the job.
Display of quantity indicating kg
4. Actuate the key.
→work display
By actuating the key combination and , the total area
in ha for all jobs can be displayed!

Commissioning
20
AMADOS BAG0083.2 11.17
5.5.2 Deleting job data
Delete the data stored for a job as follows.
1. Actuate the key (several times if necessary).
→Select the job to be deleted.
2. Actuate the and keys simultaneously.
→Job data are deleted.
3. Actuate the key.
→work display
5.5.3 External job (ASD)
Using a PDA computer, an external job can be
transferred to the AMADOS E+S.
This job is always given the designation AE (Fig.
2).
Fig.
2
The data is transferred via the serial interface.
•For this purpose, set the transfer rate of the
serial interface to 19200 or 57600 baud
(mode 9).
•The Y cable is required for this.
Fig. 3/...
(1) Connection for PDA computer
(2) Connection for signal socket or sensor for
impulses per minute.
(3) Connection to AMADOS E+S (4).
The external job is started and ended via the
connected computer.
Emergency termination of the external job on the
AMADOS E+S:
•Actuate the and keys simul-
taneously
Fig.
3
Table of contents
Other Amazone Desktop manuals