manuals.online logo
Brands
  1. Home
  2. •
  3. Brands
  4. •
  5. AMBASSADOR
  6. •
  7. Plumbing Product
  8. •
  9. AMBASSADOR 132-0100-CP User manual

AMBASSADOR 132-0100-CP User manual

132-0100-CP (OEM)
133-0100-CP (Retail)
Stasis
Head Faucet
Chrome
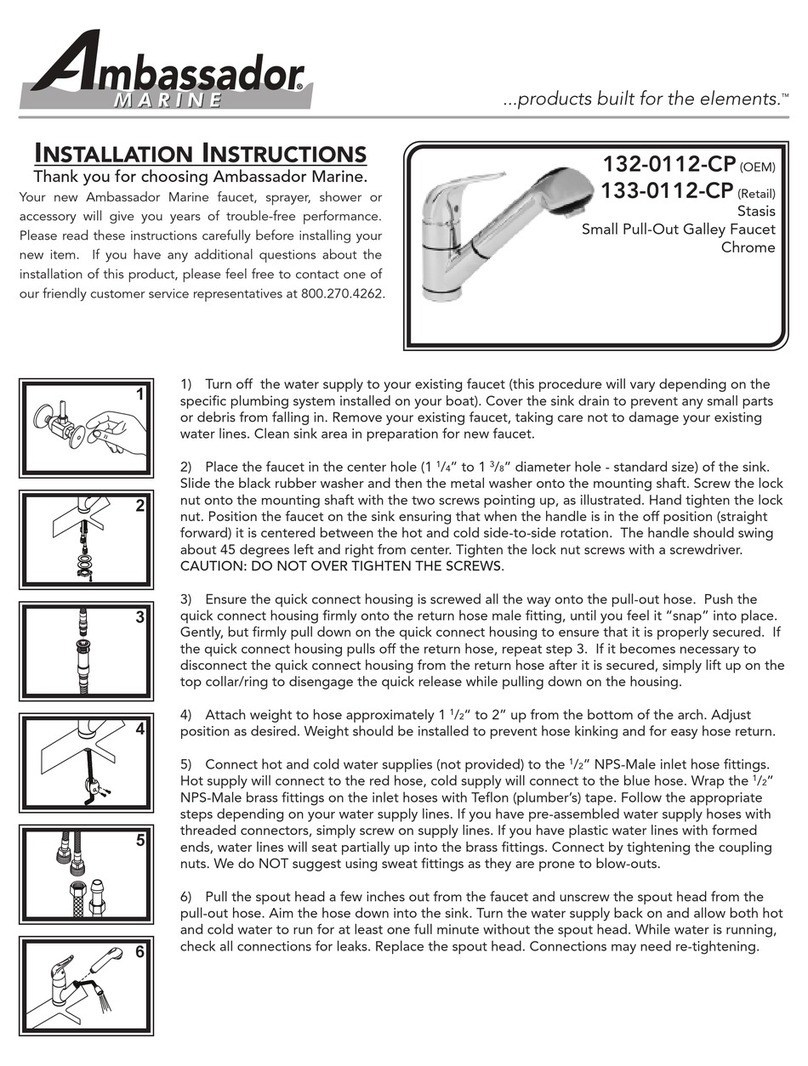
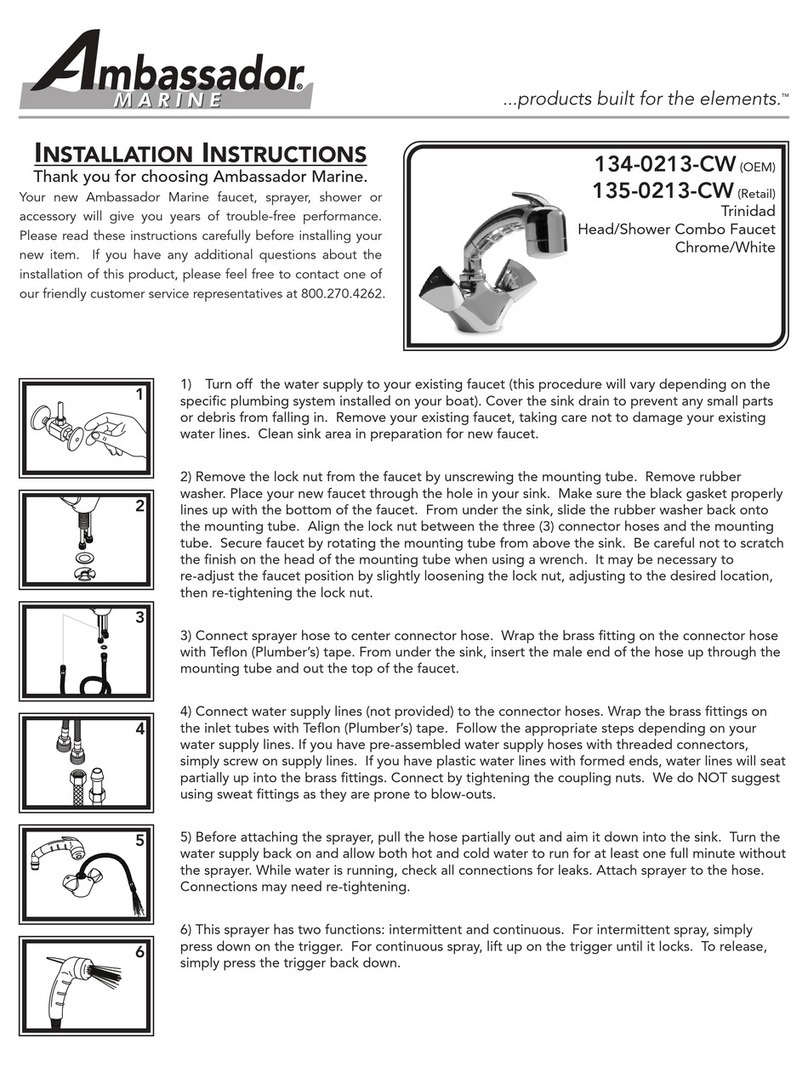
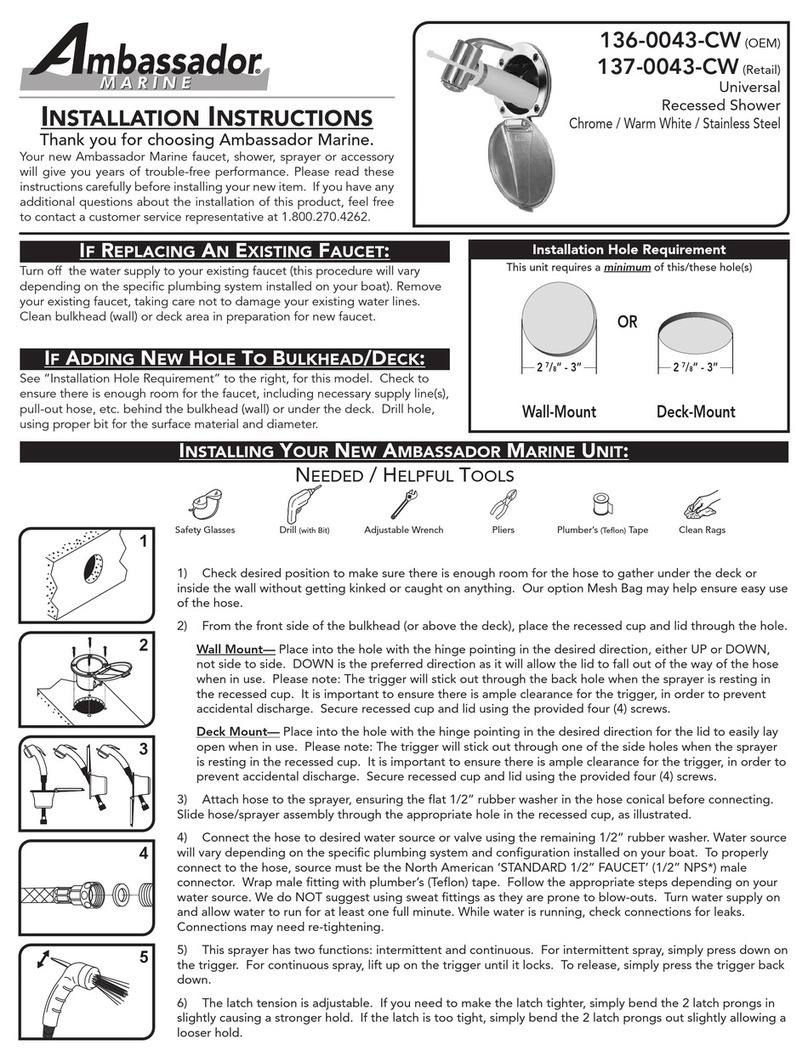
1) Turn off the water supply to your existing faucet (this procedure will vary depending on the
specific plumbing system installed on your boat). Cover the sink drain to prevent any small parts
or debris from falling in. Remove your existing faucet, taking care not to damage your existing
water lines. Clean sink area in preparation for new faucet.
2) Screw the mounting bolts into the bottom of the faucet. One end of the bolt is slotted to
allow the use of a screwdriver to secure. Screw both connector hoses into the bottom of faucet
(note: it is NOT necessary to use Teflon (Plumber’s) tape on this connection as the o-rings will
prevent leaks). Use a wrench or pliers on the hex nut molded into the brass shaft portion of the
hoses. Do NOT attempt to tighten by turning the hose itself.
3) Place your new faucet through the hole (1 1/4” to 1 3/8” diameter hole - standard size) in your
sink. Align the base ring with the bottom of the faucet and make sure the black gasket properly
lines up with the bottom of the base. From under the sink, slide the rubber horseshoe washer
then the metal horseshoe washer onto the mounting bolts. Adjust faucet position on the sink as
desired. Thread the lock nuts onto the mounting bolts and tighten. It may be necessary to
re-adjust the faucet position by slightly loosening the lock nuts, adjusting to the desired location,
then re-tightening the lock nuts.
4) Connect hot and cold water supplies (not provided) to the 1/2” NPS-Male inlet hose fittings.
Hot supply will connect to the left hose, cold supply will connect to the right hose. Wrap the 1/2”
NPS-Male brass fittings on the inlet hoses with Teflon (plumber’s) tape. Follow the appropriate
steps depending on your water supply lines. If you have pre-assembled water supply hoses with
threaded connectors, simply screw on supply lines. If you have plastic water lines with formed
ends, water lines will seat partially up into the brass fittings. Connect by tightening the coupling
nuts. We do NOT suggest using sweat fittings as they are prone to blow-outs.
5) After installation is complete, remove the aerator. Be careful not to scratch the finish. Turn
the water supply back on and allow both hot and cold water to run for at least one full minute.
While water is running, check all connections for leaks. Replace aerator. Connections may need
re-tightening.
2
3
4
5
1
INSTALLATION INSTRUCTIONS
Thank you for choosing Ambassador Marine.
Your new Ambassador Marine faucet, sprayer, shower or
accessory will give you years of trouble-free performance.
Please read these instructions carefully before installing your
new item. If you have any additional questions about the
installation of this product, please feel free to contact one of
our friendly customer service representatives at 800.270.4262.
132-0100-CP (OEM)
133-0100-CP (Retail)
Stasis
Head Faucet
Chrome
1/2”-14 NPS-M
(Standard Faucet)
Parts
1) Blue/Red Cap
2) Handle Screw
3) Stasis Handle
4) Cap
5) Retainer Ring
6) Ceramic Disc Cartridge
7) Body
8) Aerator
9) Lift-Rod Hole Plug
(if pop-up drain and lift-rod are not installed)
10) Base
11) Gasket
12) Mounting Bolts
13) Rubber Horseshoe Washer
14) Metal Horseshoe Washer
15) Lock Nuts
16) Connector Hoses
11
12
13
14
15
16
8
1
5
2
7
10
9
3
4
65 5/8"
(14.3 cm)
6"
(15.2 cm)
1 3/4"
(4.4 cm)
© 2013 Ambassador Marine, All Rights Reserved
Rev. 11/13
PROPER FINISH CARE
Your new faucet or accessory is protected by a
clear-coat. To clean it, you only need to wipe it
with a damp, soft cloth. NEVER use any
abrasive cleaners, steel wool, or chemicals
(including alcohol or ammonia), as they will
harm the finish and void your warranty. If the
item will be installed in a salt-air environment
(boat exterior), regular cleaning with gentle
soap and carnauba wax will prolong the life of
the finish.
Visit our web site at www.ambassadormarine.com
Ambassador Marine reserves the right to update specifications,
change prices, or make substitutions without notice.
LIMITED WARRANTY
Ambassador Marine faucets and accessories are guaranteed to be free from material and workmanship
defects under normal use and service for a period of five (5) years from the date of purchase. This
warranty will not apply to faucets or accessories that were improperly installed, misapplied, or
incompatible with components not manufactured by Ambassador. Faucet failures due to foreign debris
is not covered under the terms of this limited warranty. Ambassador will not warrant any faucet or
accessory that is physically damaged, or altered outside the Ambassador factory.
Returns are to be shipped postage prepaid to Ambassador Marine’s service center at:
1173 Calle Suerte, Camarillo, CA 93012.
A Return Authorization Number is required and must be clearly visible on the the shipping carton.
Absolutely no credit or payment will be allowed for consumers on any item deemed defective.
Ambassador Marine’s obligation is limited to the repair or replacement of the defective item only, at
Ambassador Marine’s sole discretion. All returns will be examined and/or tested under Ambassador
Marine test criteria. Replacements will be shipped freight prepaid.
This limited warranty is in lieu of all other warranties, expressed or implied, and no other person is
authorized to give any other warranty or assume obligation or liability on Ambassador Marine’s behalf.
Ambassador Marine shall not be liable for any labor, damages, or other expenses, nor shall Ambassador
Marine be liable for any indirect, incidental or consequential damages of any kind incurred by the use or
sale of any defective product.
This limited warranty covers Marine Products sold or distributed in the United States and Canada only.
Customers who purchase Ambassador Marine products sold by distributors in other countries must
consult their local distributors for their warranty policy. This warranty is only a representation of the
complete Ambassador Marine warranty outlined on the Ambassador Marine website and/or catalog.
1173 Calle Suerte • Camarillo, CA 93012
800.270.4262 • 805.482.0053 • Fax 805.482.0056
www.ambassadormarine.com • [email protected]

This manual suits for next models

1

Other AMBASSADOR Plumbing Product manuals

AMBASSADOR 136-0043-CW User manual

AMBASSADOR

AMBASSADOR 136-0043-CW User manual

AMBASSADOR 134-0213-CW User manual

AMBASSADOR

AMBASSADOR 134-0213-CW User manual

AMBASSADOR 132-0112-CP User manual

AMBASSADOR

AMBASSADOR 132-0112-CP User manual

Popular Plumbing Product manuals by other brands

Delta Dryden 4551 Series manual

Delta

Delta Dryden 4551 Series manual

Delta 50570 Series manual

Delta

Delta 50570 Series manual

Dreamline AQUA SWING installation instructions

Dreamline

Dreamline AQUA SWING installation instructions

Delta 2578LF Series quick start guide

Delta

Delta 2578LF Series quick start guide

GoldenDesigns GDI-6273 owner's manual

GoldenDesigns

GoldenDesigns GDI-6273 owner's manual

Delta Tommy 6190BG quick start guide

Delta

Delta Tommy 6190BG quick start guide

Delta ISP00011 quick start guide

Delta

Delta ISP00011 quick start guide

Delta Classic 522-A-DST Series parts list

Delta

Delta Classic 522-A-DST Series parts list

Delta T2730 Series installation guide

Delta

Delta T2730 Series installation guide

Delta Kayra 3533LF MPU Series manual

Delta

Delta Kayra 3533LF MPU Series manual

Delta 86T0104 quick start guide

Delta

Delta 86T0104 quick start guide

Delta 51386 Series installation instructions

Delta

Delta 51386 Series installation instructions

Calspas Saunas owner's manual

Calspas

Calspas Saunas owner's manual

infra world TrioSol Unica 3 manual

infra world

infra world TrioSol Unica 3 manual

Delta 10900LF Series installation instructions

Delta

Delta 10900LF Series installation instructions

Delta Dryden 3551 Series Specification sheet

Delta

Delta Dryden 3551 Series Specification sheet

Delta 25960LF quick start guide

Delta

Delta 25960LF quick start guide

THERMA Big Dipper 51k Series Installation & operation instructions

THERMA

THERMA Big Dipper 51k Series Installation & operation instructions

manuals.online logo
manuals.online logoBrands
  • About & Mission
  • Contact us
  • Privacy Policy
  • Terms and Conditions

Copyright 2025 Manuals.Online. All Rights Reserved.