10
48 1/4"
(21.1 cm)
7 1/8"
(18.1 cm)
2 1/4"
(5.7 cm)
1 7/8"
(4.6 cm)
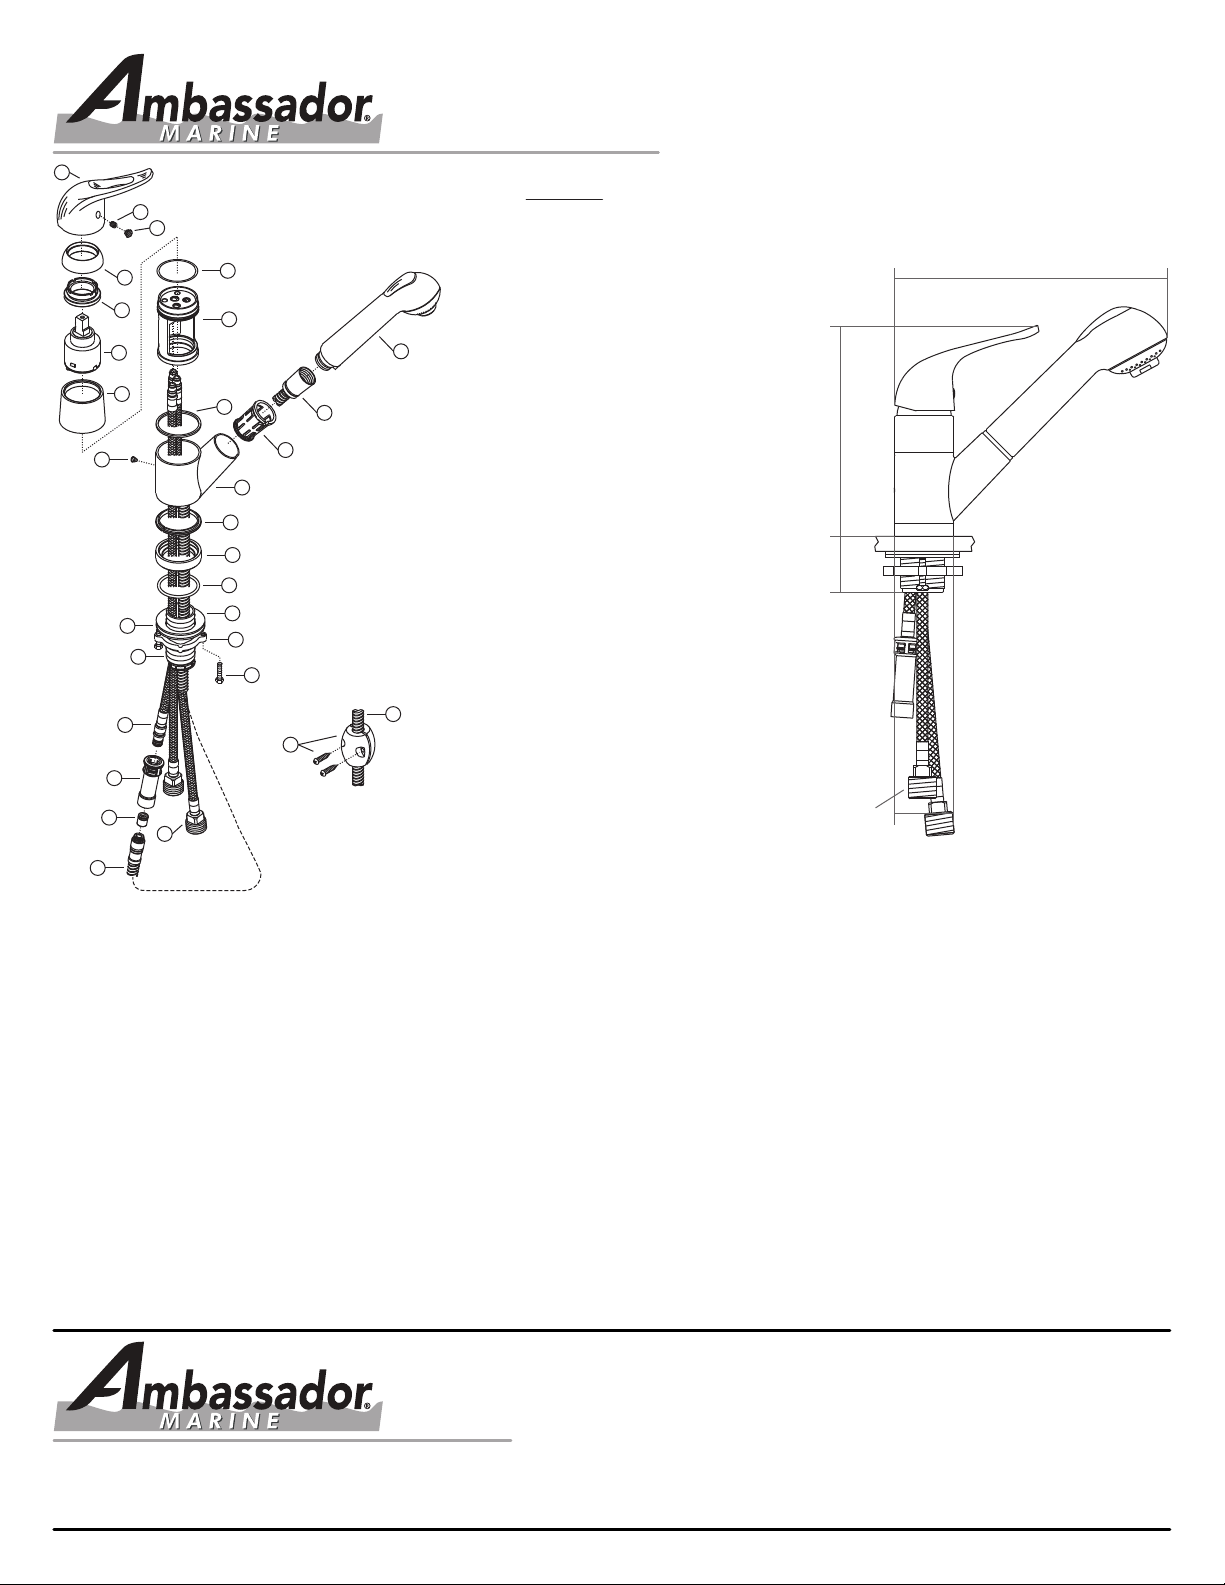
132-0112-CP (OEM)
133-0112-CP (Retail)
Stasis
Small Pull-Out Galley Faucet
Chrome
Parts
1) Stasis Handle
2) Blue/Red Cap
3) Handle Screw
4) Cap
5) Retainer Ring
6) Ceramic Disc Cartridge
7) Sleeve
8) O-Ring
9) Valve Body
10) Packing Ring
11) Spout Hub
12) Hub Set Screw
13) Hose Nest
14) 4’ Stainless Steel Hose
15) Spout Head
16) Packing Ring
17) Base
18) O-Ring
19) Rubber Washer
20) Metal Washer
21) Lock Nut
22) Lock Nut Screws
23) Mounting Shaft
24) Return Hose
25) Quick Connect Housing
26) Back Flow Preventer
27) Inlet Hoses
28) Weight & Screws
1/2”-14 NPS-M
(Standard Faucet)
8
9
1
5
6
7
15
13
14
11
12
16
17
18
22
21
19
20
23
28
26
25
24
14
14
27
2
3
© 2013 Ambassador Marine, All Rights Reserved
Rev. 11/13
PROPER FINISH CARE
Your new faucet or accessory is protected by a
clear-coat. To clean it, you only need to wipe it
with a damp, soft cloth. NEVER use any
abrasive cleaners, steel wool, or chemicals
(including alcohol or ammonia), as they will
harm the finish and void your warranty. If the
item will be installed in a salt-air environment
(boat exterior), regular cleaning with gentle
soap and carnauba wax will prolong the life of
the finish.
Visit our web site at www.ambassadormarine.com
Ambassador Marine reserves the right to update specifications,
change prices, or make substitutions without notice.
LIMITED WARRANTY
Ambassador Marine faucets and accessories are guaranteed to be free from material and workmanship
defects under normal use and service for a period of five (5) years from the date of purchase. This
warranty will not apply to faucets or accessories that were improperly installed, misapplied, or
incompatible with components not manufactured by Ambassador. Faucet failures due to foreign debris
is not covered under the terms of this limited warranty. Ambassador will not warrant any faucet or
accessory that is physically damaged, or altered outside the Ambassador factory.
Returns are to be shipped postage prepaid to Ambassador Marine’s service center at:
1173 Calle Suerte, Camarillo, CA 93012.
A Return Authorization Number is required and must be clearly visible on the the shipping carton.
Absolutely no credit or payment will be allowed for consumers on any item deemed defective.
Ambassador Marine’s obligation is limited to the repair or replacement of the defective item only, at
Ambassador Marine’s sole discretion. All returns will be examined and/or tested under Ambassador
Marine test criteria. Replacements will be shipped freight prepaid.
This limited warranty is in lieu of all other warranties, expressed or implied, and no other person is
authorized to give any other warranty or assume obligation or liability on Ambassador Marine’s behalf.
Ambassador Marine shall not be liable for any labor, damages, or other expenses, nor shall Ambassador
Marine be liable for any indirect, incidental or consequential damages of any kind incurred by the use or
sale of any defective product.
This limited warranty covers Marine Products sold or distributed in the United States and Canada only.
Customers who purchase Ambassador Marine products sold by distributors in other countries must
consult their local distributors for their warranty policy. This warranty is only a representation of the
complete Ambassador Marine warranty outlined on the Ambassador Marine website and/or catalog.
1173 Calle Suerte • Camarillo, CA 93012
800.270.4262 • 805.482.0053 • Fax 805.482.0056


