American Bath Factory Sistine Stone Neo Threshold Shower System User manual

Neo Threshold Shower System Installation Guide
TM
P

IFYOU NEED
ASSISTANCE,
CALL 1-800-454-2284
7:15AM - 4:00PM PST
MON.THRUFRI.
2
Watch our Installation Video on Youtube.com/americanbathfactory
Sistine Stone showers are ideal for experienced “Do-It-Yourselfers.”
Please read through this entire installation guide before beginning your
installation. If you feel you can not confidently install this shower by
yourself hire a licensed contractor, handyman, or professional installer
that can install it for you.

Congratulations on the purchase
of your new shower system.
This guide will give you instructions
on the installation.
Natural Travertine Stone Appearance
All of our stone products are custom made and
hand-crafted to look and feel like authentic
travertine. As you may know, travertine is a form
of limestone that has been under pressure for
thousands of years. The product of long-ago hot
and cold springs and waterfalls, travertine is a
beautifully banded and colored stone with a
unique character. Among its most appealing
characteristics are the interesting craters and
depressions, created by streams of water that
flowed through the stone.
We have taken great care in reproducing the
appearance of genuine travertine stone,
including the craters and depressions to give
it a beautiful and authentic look.
Installation time may vary depending on your experience, complexity of
shower, and “Pre Installation Preparation Work” which may include:
plumbing relocation, drain relocation and bathroom demolition.
Prior to demolition, scheduling a contractor, or building your shower, double check that you
have all parts from the factory. Some applications may require a licensed plumber or
contractor. Do not use any product spec sheets to begin installation before receiving product.
These spec sheets are for reference only. Use actual product measurements only.
The figures throughout this guide illustrate a 36” x 36” shower. Depending on the size
of the shower purchased, actual parts may vary in size from the figures shown.
Our goal is to help you achieve a quick and successful shower installation.
See the clock in each section for estimated installation time.
Missing or damaged hardware and tiles should be reported within 24 hours
of receiving this shipment - Please call 1-800-454-2284 if you need assistance.
3

BASIC PACKAGE PACKING LIST
THRESHOLDS WALLS for 60” width shower WALLS for 36”- 54” width shower
3T 1T 2T
3B 1B 2B
3T 1T
3B 1B
or
GROUT
MISSING OR DAMAGED HARDWARE AND TILES SHOULD BE REPORTED WITHIN 24 HOURS
AFTER YOU RECEIVE THIS SHIPMENT - PLEASE CALL 1-800-454-2284 FOR ASSISTANCE.
4
1CHECK YOUR SHIPMENT AGAINST APPROPRIATE PACKING LIST
Make sure you have received all the items necessary for the installation. This will also
familiarize you with all the parts and hardware you will need to install your shower.
Package contents are dependent upon which package you ordered: Basic, Premium, Supreme or Grand.
PAN DRAIN
OPTIONAL ITEMS
SHAMPOO SHELF
CAUTION: handle glass door and glass panels with care. Glass is heavy and fragile.
SHOWER BENCHES
Store panels on a clean, flat surface only. Leaning panels against a
wall will cause them to bow.
Depending on the size of the shower purchased, actual parts may vary in size from the figures shown.

PREMIUM PACKAGE PACKING LIST
PAN DRAIN
THRESHOLDS
GROUT
5
WALLS for 60” width shower WALLS for 36”-54” width shower
PLEASE REFER TO THE SEPARATE ENCLOSED
FAUCET PACKING LIST FOR FAUCET PARTS

SUPREME PACKAGE PACKING LIST
MISSING OR DAMAGED HARDWARE AND TILES SHOULD BE REPORTED WITHIN 24 HOURS
AFTER YOU RECEIVE THIS SHIPMENT - PLEASE CALL 1-800-454-2284 FOR ASSISTANCE.
6
WALLS for 60” width shower WALLS for 36”-54” width shower
3T 1T 2T
3B 1B 2B
3T 1T
3B 1B
or
PAN
THRESHOLDS SETTING BLOCKS GLASS PANELS & DOOR DOOR SEALS DOOR SWEEP
DRAIN
DOOR HANDLE
HINGES
GLASS HEADERS
GROUT
(Found in
small baggy)
(Glass is tempered and cannot be cut)
(You will have either 2 or 3 pieces depending
on the size of your shower)

GRAND PACKAGE PACKING LIST
7
2TOOLS AND SUPPLIES YOU WILL NEED TO INSTALL YOUR SHOWER
WALLS for 60” width shower WALLS for 36”-54” width shower
3T 1T 2T
3B 1B 2B
3T 1T
3B 1B
or
PAN
DRAIN
DOOR HANDLE
THRESHOLDS SETTING BLOCKS DOOR SEALS DOOR SWEEP
GLASS PANELS & DOOR
GROUT
(Found in
small baggy)
(Glass is tempered and cannot be cut)
PENCIL & MARKER
HAMMER
DRILL WITH 3/16” & 5/8” DRILL BIT
LEVEL
CAULKING GUN
PHILLIPS HEAD SCREWDRIVER
or PHILLIPS DRILL BIT
JIG SAW or ROTO-ZIP
MEASURING TAPE
SPONGE
GROUT FLOAT & BUCKET
1/8” PLASTIC TILE SPACERS
SHEET ROCK SCREWS
WOOD SHIMS
1/4” CEMENT BOARDS
60 GRIT SANDPAPER
CLEAN CLOTH
PLASTIC SHEETING
3” SCREWS
CIRCULAR SAW
COPPER PIPE FITTINGS or
SHARKBITE®FITTINGS
BRACES TO SECURE WALL PANELS
HINGES
GLASS HEADERS
(You will have either 2 or 3 pieces depending
on the size of your shower)
SILICONE FOR CAULKING GUN
(See Silicone Recommendations next page)
HOLE & JIG SAW BLADES
(Diamond Tip Blades are recommended)
PLEASE REFER TO THE SEPARATE ENCLOSED
FAUCET PACKING LIST FOR FAUCET PARTS

SILICONE RECOMMENDATIONS
8
We recommend using GE Silicone II Window and Door 100% Silicone throughout this installation as well as for your wall panel silicone.
During our tests we have found that using this silicone gives the best results. Please use GE Silicone II Window and Door 100% Silicone
whenever the installation guide refers to the use of “silicone”. GE Silicone II Window and Door 100% Silicone can be purchased from any
local Lowes store. Contact the Paint Department for Lowes.
DO NOT USE any Mastic or Mortar based Thin Sets. Mastic will not cure properly between two non-porous surfaces.
The use of a water barrier also negatively affects the bond mastic has with the wall panels and the cement board.
Warranty coverage only extends to the brand and type of silicone we recommend and applied
per the manufacturer’s directions and recommendations.
Recommendations for applying GE Silicone II Window and Door 100% Silicone to Wall Panels
1. Apply a 1/4” thick continuous bead of silicone along the perimeter of the wall panel 1/2” in from the edge.
2. Use a zig-zag pattern to cover the rest of the backside of the wall panels leaving 3”-4” between each 1/4” bead (diagram A).
3. Also apply silicone to the backer board. Apply in the same manner as steps 1 & 2.
It is very important to ensure complete coverage of silicone to ensure the best bond. The above steps are only recommendations and are meant
to supplement the specific manufacturer’s directions. You may be required to brace the wall panels in place while the silicone dries. Also, refer to
the specific manufacturer’s recommendations for coverage of the silicone to determine the proper amount you will need for the project based on
your shower size. Depending on the size and threshold type of your shower you will need from 10-20 9.8 oz. tubes of silicone to complete your
shower installation
Tips for Bracing Wall Panels
If you use the recommended silicone and apply it correctly, the wall panels will stick to the walls without any bracing required. If the studs or cement
board surfaces are not perfectly even or square, the edges of the wall panels may not stay flush with one another. If this happens, we recommend
using a brace to hold it in place as it dries. Your bathroom layout and shower style will determine the method in which you can brace the wall panels.
Below are some tips and recommendations on how to apply bracing to your wall panels.
1. Always protect the wall panel tiles and shower pan floor from damage. Make sure the braces will not scratch the wall tiles. Use a piece of
plywood or 2x4 to distribute the force across a larger surface area.
2. Brace the wall panels using a horizontal brace from one wall to the opposite wall (diagram B). Measure and cut a 2x4 or use an expandable
curtain rod or telescoping painter’s pole. Cut the 2x4 larger so it has to be pushed into position or use shims in order to put pressure on the
wall panels.
3. Brace the wall panel from the shower pan threshold to the wall panel (diagram C). Measure and cut a 2x4 to fit between the shower pan
threshold and the wall panel. Then either apply weight downward on the wall panel side or put a 2x4 vertically between the ceiling and the
top of the brace (diagram C). Push down on the angle brace and then screw it to the vertical 2x4 that is pushing on the ceiling.
4. Leave the braces in place until the Silicone has completely dried. Refer to the Silicone manufacturer’s recommendations for drying time.
(diagram C)(diagram B)(diagram A)

3PRE-INSTALLATION TEAR DOWN
4PREPARING FOR INSTALLATION
TIME REQUIRED
8-16 HRS
TIME REQUIRED
8-16 HRS
11” for shampoo shelf
11”
triple studs
¾” overhang
minimum gap required
for the Shampoo
Shelf
figure 2
9
This shower system is designed to be installed on a bare floor. It is necessary for any existing shower to
be completely removed. Tear out and remove all old material to expose the 2x4 wall studs.
Clean up the shower area, removing all dust and old material from the area.
Warning: when removing old material, be careful not to inhale the dust, it may contain
harmful chemicals. Use the appropriate respirator to keep from inhaling dust and other
hazardous materials. figure 1
figure 1.5
The shower system is designed to be installed on a floor and walls that are straight and square. Please take the time to check how square the walls and
floor are. Make the appropriate adjustments to fix any problems.
1. Add studs where the shower panel and door connect. We recommend triple studs in these areas to make room for the cement board and hinge
attachment. Leave a ¾” overhang outside of the shower pan threshold if possible. Refer to (fig. 2).
2.
Check the location and size of the drain, make sure it is in the correct position, relocate drain if necessary. See section 5 for drain instructions.
3.
Check to make sure that when the pan is installed, you will still be able to access any plumbing that needs to be connected.
To make walls flush between the transition of the shower pan and 2x4 studs, sand to a 1/8” depth the bottom 5” area that the pan
will contact the 2x4 studs. We recommend a 60 grit sand paper and a hand sander (fig. 1.5).
If you purchased the shampoo shelf, or specialized faucet, check that everything fits with clearance between the studs. Measure the studs
to make sure they are 11” apart for the shampoo shelf. See recommended stud locations (fig. 2). Relocate studs if necessary.
4.
5.
3/4” overhang when using triple studs, no overhang when using double studs
(double studs required, triple studs recommended for extra strength)

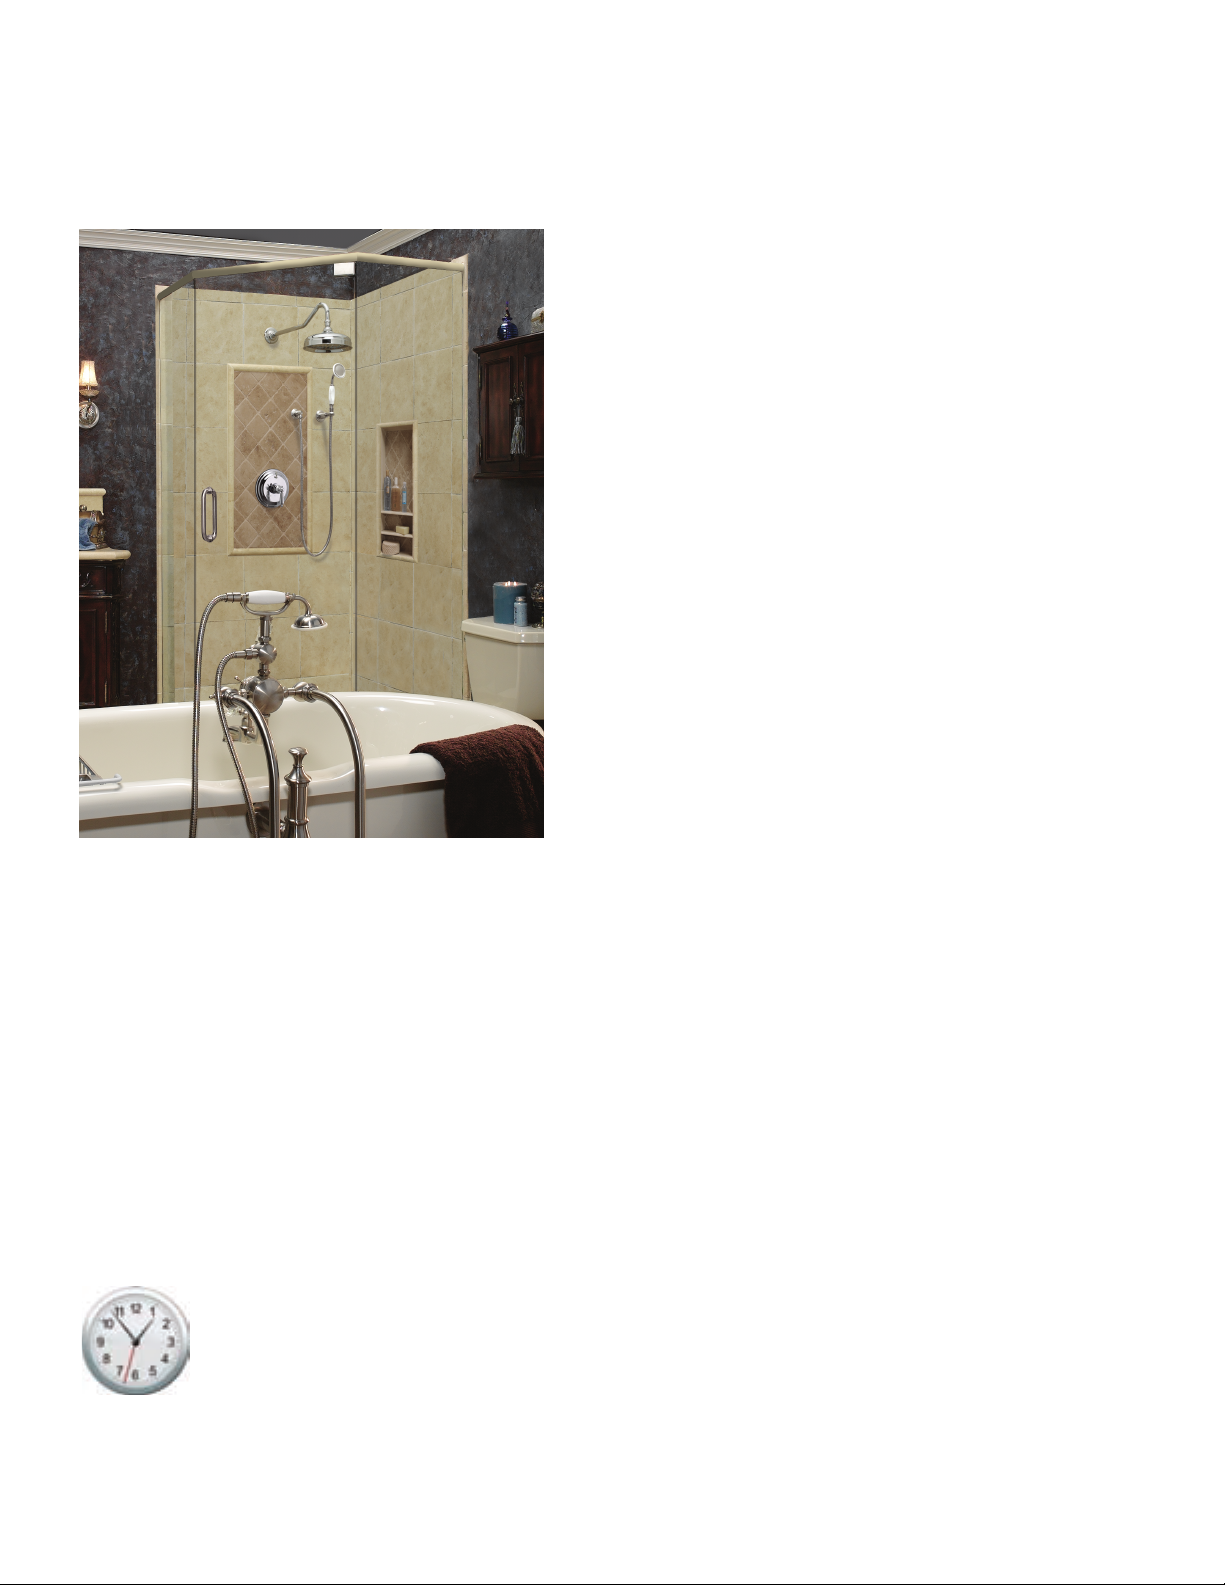
5SHOWER PAN INSTALLATION TIME REQUIRED
1 - 2 HRS
10
BEFORE YOU START - Make sure floor is clean and level. Check to make sure existing plumbing will be accessible after
pan is installed. Check your local building codes before installation.
To ensure that no damage has occurred to your shower pan during shipping, it is important to check your pan for
damage prior to installation in your home. Damage caused by shipping may result in a hairline fracture that could leak
over time.
Move your shower pan to a location that will not be damaged by water run-off. A driveway or patio is suitable for
testing your new shower pan.
Set the pan on blocks high enough to see the underside of the pan. Plug the drain and fill the shower pan with water.
Check for leaks and proper slope of the top pan surface. If there is no damage and no leaks then the shower pan is
ready to be installed.
Be careful while moving the shower pan. Bumping or dropping the shower pan can cause hairline fractures that can
leak over time.
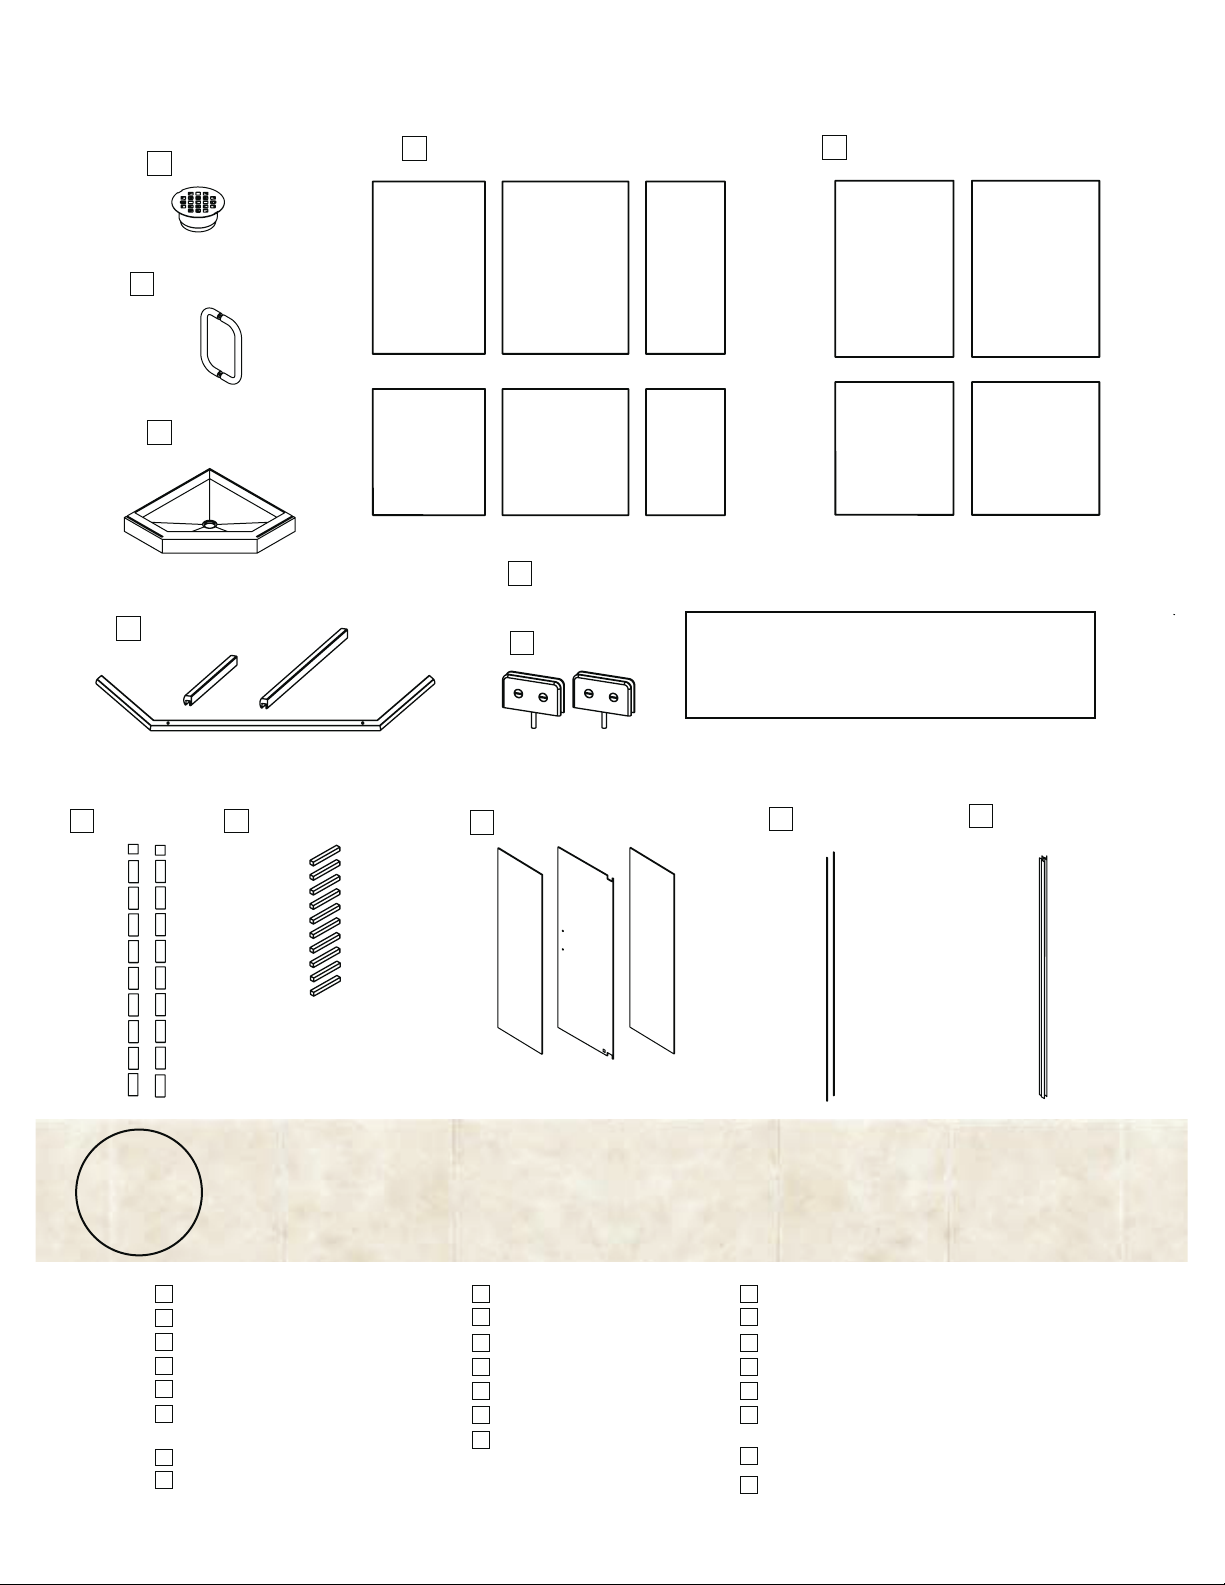
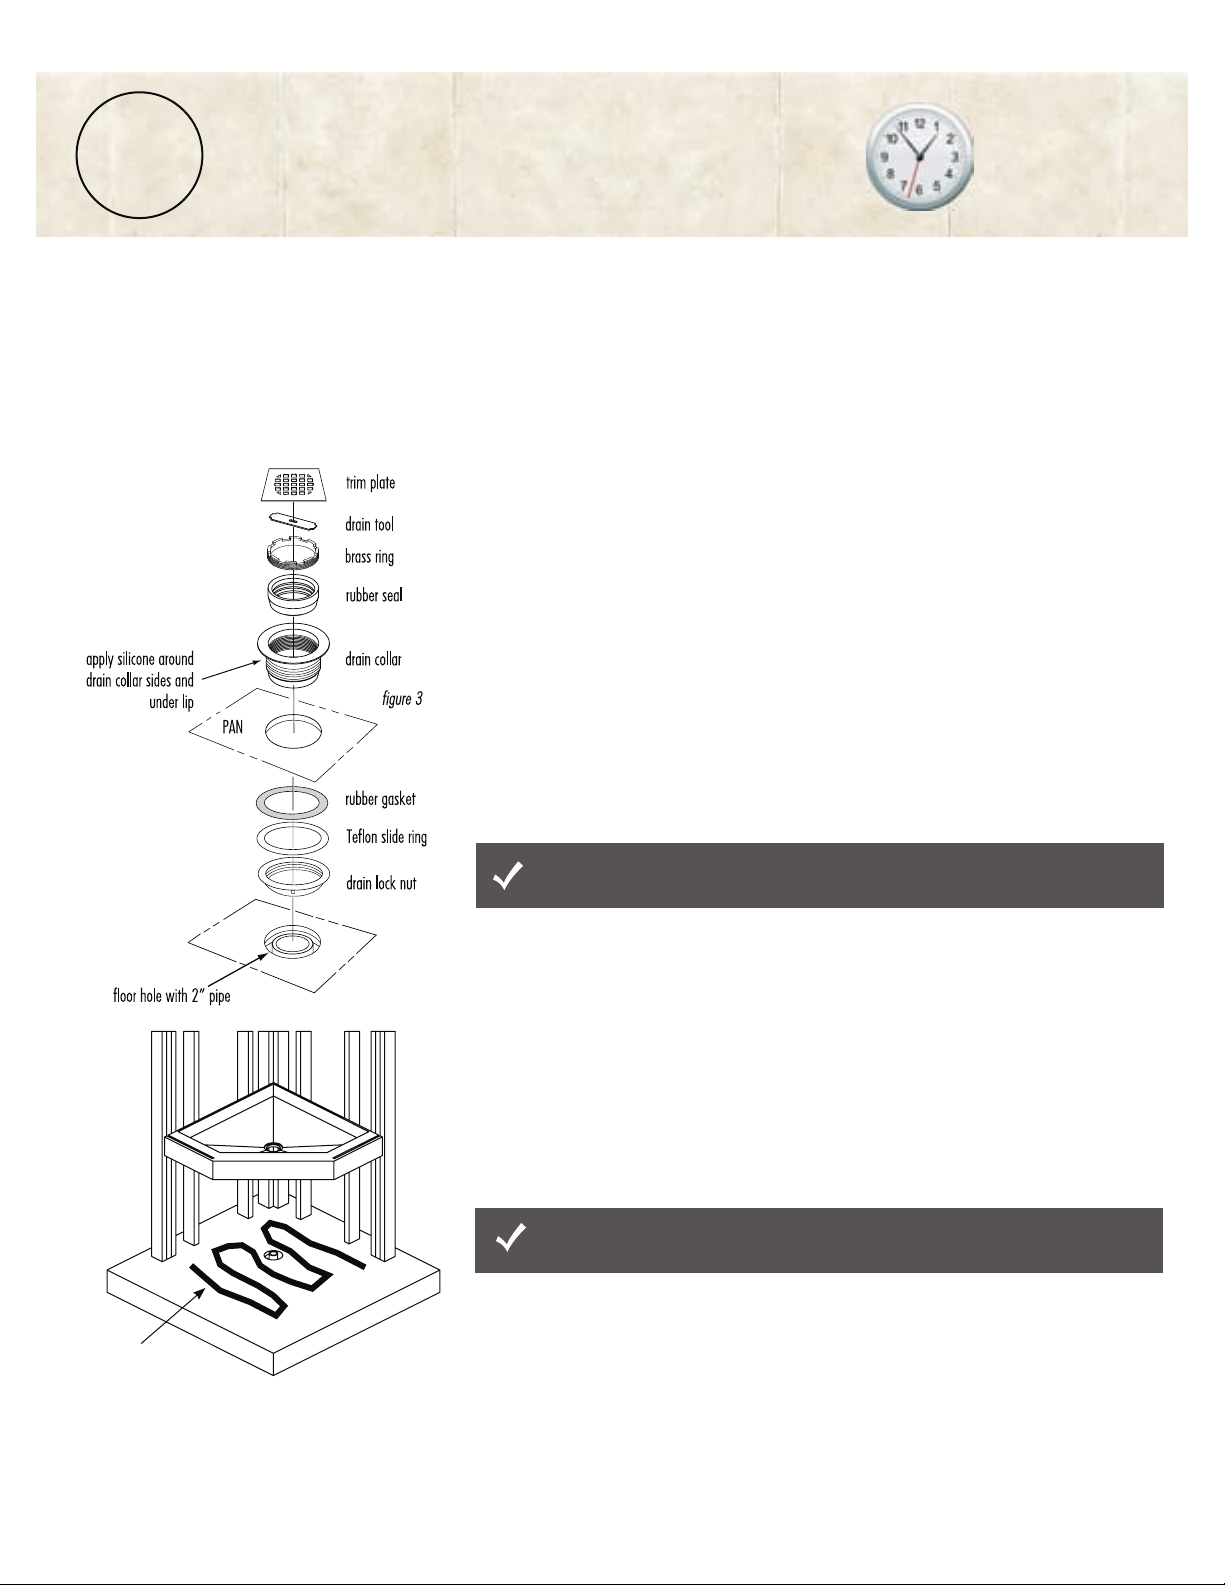
1. The shower pan comes with a 2” drain assembly kit (fig. 3).
2. Measure from the wall studs to make sure your 2” ABS drain is in the correct location. Dry test by resting the
shower pan over the 2” drain pipe. You may want to place 2 x 4’s on the floor to help support the pan from
resting on the drain.
3. Make sure the 2” ABS drain pipe is in the center of the shower pan opening and at the right height (1” above
floor). Dry fit the drain collar. Compare the thickness of the pan with the drain collar, provide proper clearance
for drain to set flush on pan.
4. Place wood shims, if necessary, along the 2 x 4’s to square out the pan. This may cause problems installing
the system if the walls are not straight and if the shower pan is not set against wall studs.
5. Remove the shower pan and any wood shims after checking and verifying the drain hole is in its
correct location.
.
Use a level to make sure the 2 x 4’s for the walls are vertically straight.
Make sure that the shower pan sets flush against the 2 x 4’s on each side.
6. Set the shower pan in a safe location. (fig. 3).
7. Apply a generous bead of silicone around the shower pan drain opening and drain collar, insert the drain collar
into the drain hole.
8. Apply a generous bead of silicone around the drain collar from the underside of the pan.
9. Install the rubber gasket over the drain collar, to the underside of the pan, next install the Teflon slide ring.
10. Screw on drain lock nut and hand tighten. Turn drain nut approximately 1/4 turn with wrench to ensure
water-tight fit. Check for good seal. DO NOT OVERTIGHTEN.
11. Wipe off excess silicone and allow silicone to dry. Follow the manufacturer’s directions for application and
drying time.
12. Apply silicone to the floor area where the pan is to be installed (fig. 4).
See Silicone Recommendations
High quality Thinset may be used on uneven floors.
13. Carefully lift the shower pan and set into place. Make sure the ABS pipe is still centered.
14. Push and secure the rubber seal into the 2” ABS pipe.
15. Thread on the brass pressure ring around the drain with the provided tool. Remove the tool after brass ring
is installed.
16. Test and snap the decorative diamond pattern trim plate into position. (Remove decorative trim plate and
store in secure area until installation is complete, drain will be grouted when shower is grouted.
17. After installing pan, cover with cardboard to protect pan from scuffs.
figure 4
apply silicone

11
6FAUCET INSTALLATION
1. Most customers like flexibility in their faucet mounting locations. Refer to (fig.6) for a recommended
configuration showing approximate dimensions.
2. Please refer to the installation instructions included with your faucet. Also check your local codes for
additional assistance with installation guidelines.
3. Finish wall surface is approximately 3/4” out from the stud. Make sure outer surface of the mud plate
is approximately 3/4” from the stud. This will ensure the trim pieces on the faucet will fit properly (fig. 5) .
3/4”
figure 5
tile/wall panel
cement board
pan
silicone adhesive
wall

+
14
81 7/8”
48 3/8”
39 7/8”
floor of pan
5 15/16”
shower head
pressure
balance
valve
hand
shower
supply
figure 6
Recommended Measurements
1/2” Variance
_

SHAMPOO SHELF CUSTOM PLACEMENT
1. Place the cement board on the wall and rest it on the top of the shower pan;
top back edge. Attach the cement board to the studs with screws (fig.8).
CEMENT BOARD INSTALLATION
8
Check that the shower pan sets flush against the wall studs on each side.
Place wood shims, if necessary, along the length of the 2 x 4’s to square
out the shower pan.
13
7
figure 7
check for proper stud locations
TIME REQUIRED
2 - 4 HRS
TIME REQUIRED
½ -1 HR
SHAMPOO SHELF CUSTOM PLACEMENT
(optional - disregard if not purchased)
CEMENT BOARD INSTALLATION
1. We have not cut the hole in the wall panel for the shampoo shelf so you can
custom place the shampoo shelf where you desire. The shampoo shelf was
designed to be installed in the place of 2 vertical tiles.
2. Select your desired location for the shampoo shelf by looking at the panels in
section 10 .
3. Place the bottom panel that the shampoo shelf will go above into position.
4. Check that the studs are in the proper location and will not interfere with the
shampoo shelf (fig. 7) . These studs should have a minimum gap of 11”.
5. Add a horizontal 2”x 4” brace 1/2” to 1” below the shampoo shelf’s desired height.
This will give you a platform to support the shampoo shelf. After the walls have
been installed place shims between the 2”x 4” and the bottom of the shampoo shelf
in order to add support to the shampoo shelf.
Extend the cement board to at least the outside edge of the shower pan. DO NOT
use any type of water resistant dry wall like “Green Board” for your shower backer.
We recommend the use of 1/4” thick cement board as your shower backer. This is a common backer for stone and tile.
Using this backer will help comply with almost all city codes. A cement-based product like Wonderboard or Hardibacker may also be used if it meets your
local codes. Some codes require a vapor barrier to be installed as well. We recommend a water/vapor barrier of 6 mil. plastic be installed before
installing the cement board. To do this, staple plastic so that it hangs 1” above the pan floor. Roofing nails may be used to attach the cement board
instead of screws, this prevents the plastic from wrapping around the screws.
Set cement board on top of pan here.
figure 8

2. Install the next cement board above the first one placed (fig. 9) .
3. Repeat steps 1-2 until cement board covers all surfaces.
Extend the cement board to at least the outside edge of the pan. If it would
make installation easier you can extend the cement board further outside of the
pan (fig. 10).
4. Check all walls with level and straight edge to make sure they are square and
straight.
5. Use a level to draw a straight vertical line all the way up from the inside edge
of the pan on both sides (fig. 11). This line will be used as a guide for the
placement of the wall panels and thresholds.
6. Apply silicone to the gaps between the cement boards. This will create a water
tight seal between the cement boards. Apply silicone to the corners of the
showers as well. Also, seal the gaps between the bottom of the cement boards
and the shower pan. Use your finger to smooth out the silicone.
Follow the manufacturer’s directions for application and dry time.
14
figure 9
figure 10
Set next cement board on top of
first cement board.
figure 11
Draw line
both sides

9WALL PANEL INSTALLATION
Set A - left faucet
TIME REQUIRED
3-4 HRS
Set B - right faucet
A - Inspecting Wall Panels
Inspecting panels at this point will give you confidence that the wall panels are straight and square from the factory.
When installing wall panels, you may need to make adjustments to the panels to accommodate for unevenness of your existing walls.
During the inspection process and/or dry-fitting process, if you have any concerns about the alignment or fit of the wall panels please call
1-800-454-2284 for customer service and we will gladly assist you with your installation.
1. Begin by determining whether you have a 4 or 6 panel wall set. (Set A) and (Set B) are for 36” to 54”, 4 panel sets.
(Set C) and (Set D) are for 60”, 6 panel sets. The panels are labeled for your convenience.
(Set A) is left faucet and (Set B) is right faucet.
(Set C) is left faucet and (Set D) is right faucet.
2. Find a large area to layout and inspect all panels.
3. Align all panels to check for straightness. Make sure grout lines are straight and square to each other.
4. Sistine Stone wall panels are made to be flexible and may have a slight bow. This condition is normal and wall panels will flatten out when
properly installed. If the wall panels have been stored improperly or have become excessively bowed, they can be easily flattened
before installation. (See Troubleshooting Section on last page for details)
Set C- right faucet
Set D - left faucet
Note: 1B/1T panels always go on the left side of the back wall. 2B/2T panels
always go on the right side of the back wall
Note: 1B/1T panels always go on the left side of the back wall. 2B/2T panels
always go on the right side of the back wall 15

B - Dry Fitting Panels
1. Dry fit the shower wall panel 1B into position. Use 1/8” spacers between the
shower pan and the bottom of the panel (Fig. 12). Center the back wall panels so
the gaps on both sides are equal. The thickness of the side panels will cover these
small gaps.
2. Carefully place wall panel 3B into place, making sure the grout lines are aligned.
Use a 1/8” spacer between the shower pan and the bottom of the panel. Push the
side panels up against the shower pan threshold, any remaining gap between the
side and back panels will be filled with grout after the shower has been installed.
Match the space between the panels with the rest of the grout lines on the panel,
use spacers if necessary.
3. Remember to use the line drawn in (fig. 11).
Finish all bottom panels.
4. Inspect the bottom panels making sure they are square and straight. Due to
variations in your existing walls, you may need to sand the edges of the panels
slightly for proper fit.
5. Continue to install the top panels starting with panel 1T (fig. 14). Place the top
panel above the bottom panel and match the space between the panels with the rest
of the grout lines on the panel, use spacers if necessary.
6. You must drill the holes in the faucet panel 3T for your plumbing fixtures. Take
careful measurements to determine the proper locations. Make a template if
necessary.
7. On panel 3T, mark the locations for the holes. Double check your measurements.
8. Drill small pilot holes first so you can check whether or not the holes are in the right
locations.
9. If the pilot holes are in the proper locations, carefully drill bigger holes that will fit
10. After drilling holes, dry fit the panel.
11. Inspect, making sure all top panels are square and straight. Also make sure faucet
holes are positioned properly (fig. 15).
figure 12
figure 13
figure 14
figure 15
Do not place screws between tiles or through shower pan.
Braces may be required to add pressure to some areas to ensure the walls
are flush. Refer to Silicone Recommendations page 8.
Do not bend wall panels, over bending can cause tiles to pop off.
16
your plumbing fixtures. (Diamond Tip Blades are recommended)

WALL PANEL INSTALLATION (continued)
figure 17
figure 18
apply silicone here
apply silicone here
apply
silicone
here
¼”
¼”
¼”
¼”
9
C - Cutting Hole For Shampoo Shelf (if purchased)
1. With the panels still dry fit, mark the location for the shampoo shelf.
2. Remove that panel and measure the backside of the shampoo shelf. Measure and
mark the rectangle that will need to be cut out using a straight edge (fig. 16).
3. Drill 5/8” holes in the corners of the rectangle. Be sure not to drill outside the lines
of the rectangle.
4. Insert the jigsaw blade in the holes and cut out the rectangle. Use masking tape to
protect the surface of the tiles.
5. Place the shampoo shelf in the hole. Make any adjustments to the cut so the shelf
fits straight and square.
6. Dry fit the panel again into its position and mark the outline of the cut out on the
cement board. Remove all the panels from the shower.
7. Cut the rectangle out of the cement boards. Cut it 1/4” bigger than your mark to
allow for adjustment during installation (fig. 17).
D - Installing Panels
1. Sand the backside surface of the wall panels with 60 grit sand paper. This will
increase the bond with the silicone. Remove all dust and dirt with a clean dry cloth.
2. Start with panel 1B. Apply a generous amount of silicone to the cement board and
to the backside of the wall panel. Refer to the Silicone Recommendations Chart for
applying the silicone. Also refer to the manufacturer’s recommendations for
application and dry time.
3. Press the wall firmly into position. Be sure to use 1/8” spacers between the bottom
panels and the shower pan.
4. Complete steps 1-3 with the remaining panels in the following order: 2B, 3B, 1T, 2T,
3T. Match the space between the panels with the rest of the grout lines on the panel.
Use spacers if necessary. Make sure the walls are square and straight.
E - Shampoo Shelf (if purchased)
1. Dry fit the shampoo shelf in position and check alignment. Make any adjustments to
the cut if necessary. Place shims between the 2”x 4” brace and bottom of the
shampoo shelf to provide added support.
2. Apply a continuous bead of silicone on the back edge of the shampoo shelf (fig. 18).
3. Set the shampoo shelf into position and apply pressure to ensure adhesion.
4. Wipe off any excess silicone with a clean cloth.
5. The glass shelves are designed to be removable for easy cleaning. If you desire you
can silicone the glass shelves in place by running a bead of silicone along the ledges
that hold the glass shelves. Place the shelves in place and wipe away any excess
silicone with a clean cloth.
figure 16
17
box
width
Braces may be required to add pressure to some areas to ensure
the walls are flush.
box
height
(Diamond Tip Blades are recommended)

10 THRESHOLD TRIM & OPTIONAL BULLNOSE EDGE KIT
The threshold trim pieces complete the look of your new shower system. If you
purchased a Basic or Premium package which do not come with glass, your
threshold pieces will be solid with out a channel. If you purchased a Supreme or
Grand package which do come with glass, the threshold pieces will have a channel
for the glass panels (fig. 19). No matter what package you ordered there are 2
special cap trim pieces and 2 special bottom wedges.
1. Locate all the trim pieces and align them on the floor (fig. 19).
2. Apply silicone, using a zigzag pattern, to the wall along the panel’s edge
approximately four inches out: to the far outside of the shower pan
(fig. 20).
3. Starting with the special bottom threshold piece, place the threshold into
position making sure to align the threshold with the vertical line previously
drawn on the cement board. Apply pressure to the trim piece to bond it to
the cement board. The trim piece should be flush with the inside of the
shower pan threshold (fig. 21). Make sure to align the channels in the
thresholds with the channel in the shower pan.
4. Place the remaining trim pieces into position. Make sure to use a level and
the line previously drawn on the cement board to align the trim pieces
vertically.
5. Do not install the small cap trim pieces if your package includes glass.
These are to be installed after the glass and door have been installed.
If you did not purchase a package with glass, you can install them now.
figure 19
figure 20
cement
board
Refer to manufacturer’s recommendations for silicone drying time.
figure 21
cap trim
pieces
TIME REQUIRED
½ -1 HR
18
The wall thresholds should be flush on the inside and outside of the pan.
special bottom wedges

19
OPTIONAL BULLNOSE EDGE KIT INSTALLATION
1. If your package comes with glass and you have not installed the threshold trim cap, dry fit the threshold trim cap in place. Dry fit as many
bullnose pieces as you can until you have obtained the look you want.
2. If you have to cut a piece, measure carefully and clamp the piece down on a solid work surface.
3. Apply silicone to the top edge of the wall panels as well as the back surface of the bull nose piece and place into position. Wipe off any excess
silicone with a cloth.
4. Continue until all the pieces have been installed.
If you like you can purchase the optional Bullnose Edge Kit by calling the number listed on page 2. The kit includes bullnose edge pieces that are 8” long
and are designed to accent the lines of your shower by off setting the tile lines. Order enough pieces to go around your entire shower unit so you can start
and end anywhere you desire. Refer to the table below to see how many pieces you will need for your shower. The following Bullnose Trim Kits are available:
P21-3332P-MD (contains 6 Bullnose pieces in Medium Stone) and P21-3332P-NT (contains 6 Bullnose pieces in Natural Stone).
Single Threshold
12 pieces 14 pieces 16 pieces 18 pieces
Neo/Double Threshold
12 pieces 14 pieces 16 pieces 18 pieces
Size (2 Bullnose Kits required) (3 Bullnose Kits required) (3 Bullnose Kits required) (3 Bullnose Kits required)
Size
Size (2 Bullnose Kits required) (3 Bullnose Kits required) (3 Bullnose Kits required) (3 Bullnose Kits required)
30x60 X
32x36 X
32x48 X
32x54 X
32x60 X
34x48 X
34x54 X
34x60 X
36x36 X
36x48 X
36x54 X
36x60 X
42x42 X
42x48 X
42x54 X
30x60 X
32x36 X
32x48 X
32x54 X
32x60 X
34x48 X
34x54 X
34x60 X
36x36 X
36x48 X
36x54 X
36x60 X
42x42 X
42x48 X
42x54 X
NOTE: Be sure to specify stone color. (MD or NT)

11 GLASS DOOR & PANEL INSTALLATION TIME REQUIRED
2-3 HRS
Note: Two people are required for this installation. Take careful
measurements before cutting or drilling products.
A - Glass Panel Installation
1. Carefully lift the glass panels and set them into position. Make sure the glass panels
are stable (fig. 22).
2. The top of the glass panels should be 79 3/16” from the top of the pan threshold.
The distance between the glass panels should be 28 1/2” from the outside edges
of the glass and 28” from the inside edge of the glass (fig. 23 & fig. 24). Also,
each panel should be the same distance from each wall threshold (fig. 22).
Take all measurements from the outside edges of the glass.
The glass channels in the shower pan and wall thresholds will hold the glass in place
while dry-fitting the panels and door.
Make sure the small wall threshold caps are not installed until after the
glass panels have been installed
Glass is tempered and cannot be cut.
20
28 1/2”
door width
79 3/16”
height of
glass panel
glass
panel
shower
pan
84 1/8”
top of shower pan threshold
glass
panel
figure 23
note: measurement taken from outside
edges of glass
figure 22
xx
figure 24
Glass Panel
Glass Panel
Door
Inside of Shower
Outside of Shower
28” Inside
Edges of Glass
28 1/2”
Outside
Edges of Glass
!CAUTION
Glass is tempered, very strong, and impact resistant, but its weakest point is impact on edges and corners.
Do not rest edges of glass on hard surfaces
Tempered glass cannot be cut
Table of contents
Other American Bath Factory Bathroom Fixture manuals
Popular Bathroom Fixture manuals by other brands

Porcelanosa
Porcelanosa SYSTEMPOOL ICON MIX PRE-INSTALLATION AND INSTALLATION MANUAL

VINNOVA
VINNOVA 314034-WR-MB Installation instruction

Bossini
Bossini V40004 installation instructions

Triton
Triton EXE LEVER Installation and operating instructions

KWC
KWC AQFU0216 Installation and operating instructions

Signature Hardware
Signature Hardware TRADITIONAL 949077 quick start guide