AMERICAN TENT 202103 User manual

20’x20’ Pole Tent
Safety & Set Up Guide
REQUIRED EQUIPMENT
INDEX
PROVIDED EQUIPMENT
Notice
The instructions in this guide cannot cover all possible conditions and situations that can possibly occur. It must be understood by the user that common
sense and caution are factors which cannot be built into this product, but must be supplied by the installer and/or user.
1
Sledge Hammer Drop Cloth 2-6 People 2 Measuring Tapes
Ratchet (12)
Tent Top (1)
Stake (12)
Page 1.............................................Tent & Equipment
Page 2..................................... Safety & Maintenance
Page 3......................................... Terms & Conditions
Page 5............................................................. Set Up
Page 7.........................................Additional Assembly
Page 8............................................................ Striking
12’ Center Pole (1)
7’ Side Pole (8)
2350 E Mason Street, Green Bay, WI 54302920.431.0938

1 Piece Tent Top 20'x20'

AWeather
Weather is very unpredictable; the installer or end user must use their judgment, common sense, and knowledge of
conditions. The installer is responsible for anticipating weather severity for proper time and method of installation. If
inclement weather is predicted with winds that exceed 38 mph with gusts of more than 6 seconds the tent needs to
be evacuated. This is a temporary non-engineered structure.
The end user should be mindful of the following conditions:
Rain
Water can collect on the tent fabric causing ‘ponding’ under
certain conditions, especially if the tent is not installed and
tensioned correctly. Ponding can destroy the tent fabric
and cause poles to sink into the soil. Additionally, saturated
soil can cause stakes to lose their holding power.
Lightning
It is very dangerous to be under a tent during a lighting
storm. Immediately leave the tent until the chance of
lightning is no longer present.
Wind
Wind can cause the tension of the tent to change by
loosening ratchet assemblies, pulling stakes, or causing
poles to shift or sink. It is important to do routine
maintenance checks and maintain proper tension on the
tent top at all times.
Snow
Tents are not designed to carry any type of snow loading.
This product should not be used if snow has been allowed
to accumulate.
BSite Selection
CRITICAL: Before staking, contact your
local utility 811 number and have the
site checked.
Scan the QR code to nd your local number.
Look carefully at the factors below when
selecting a site:
Soil Conditions– Adequate for anchoring
Location– Elevated, level, and clear of debris
Space– Check perimeter for space to anchor the tent
Surface– Grass, Gravel, Concrete, Asphalt, Wood
Site Access– Services and delivery can easily be
achieved
Check Overhead– Look for any electrical lines or
tree branches
Underground Utilities– Utilities must be located
Use the 811 service to schedule a utility locate. If staking, be aware of
underground electric, gas, oil, steam, telephone, CATV, water, sewer
services. Have the site checked prior to staking.
Weather– Monitor for weather conditions and evacuate
if necessary
Emergency Exits– Easily accessible exit routes in case
of emergency
CFire Safety
Our tents come with an NFPA tag conrming the material
meets or exceeds NFPA-701-2.
Safety Checklist:
When building or assembling anything above
shoulder height, wear a hard hat
Steel toe boots are recommended
Inspect the site– look for overhead and underground
obstructions
Call your local utility to have the area marked ahead
of time
Inspect all ropes and tie lines and replace/repair as
needed
Inspect all poles and ttings to make sure there are
no bends or breaks
Replace or repair any items in poor condition
CALL 8-1-1 BEFORE DOING ANY STAKING
The installer must follow local building codes and re
regulations, and evaluate the site for proper securing and
anchoring for the conditions.
SAFETY AND MAINTENANCE
2

DStaking
Drive a stake approximately 5’ away for 7’ legs, 6’ away
for 8’ legs, and so on. Stakes should have 6” or less of the
head exposed. The deeper the stake is driven, the better
the holding strength. Stakes driven vertically have better
holding strength than stakes driven at a angle.
EMaintenance:
• Check and re-tension all ratchets and straps
• Ensure stakes are in place and not pulling from ground
Caring for Your Tent:
The setup and take down process can make or break a
tent--literally. Placing your tent tops directly on the ground
is never a good idea. A tent on the ground is at extreme
risk for pinholes, dirt, and other disasters. Protect your tent
from damage with a drop cloth.
If your tent was supplied with a bag, put your tent top back
into the bag. This will keep it protected from hazardous
situations. To return your tent to the bag, rst be sure it is
clean and dry.
Handle poles with care. Stack them on top of each other,
but be sure to not clang or scrape them together. Use
common sense and treat those poles with respect.
When you are storing your tent for the long term, beware
of extreme temperatures. Too hot and your tent can be
damaged, too cold and your tent could crack. Extreme
cold is especially dangerous for our clear vinyl. Freezing
cold temperatures can cause it to crack. Store tents in
a sheltered place where the temperature will stay above
freezing.
Clean with gentle cleaners like dish soap or powder laundry
detergent. Avoid bleach, abrasive chemicals, and hard
brushes.
Before staking please contact your local utility 811 number and have the
site checked. Please use this link to nd the phone number needed by
simply clicking on your state:
https://call811.com/811-In-Your-State
3
TERMS & CONDITIONS
TERMS AND CONDITIONS OF SALE
1. Terms Control/Rejection of Conicting Terms. All sales are governed by
these terms, and by placing an order, submitting payment, or providing
Seller with a Purchase Order, Buyer agrees to these terms. Seller’s
oer to sell Buyer the Goods is conditioned on this acceptance. All
other terms are rejected, including any terms included on any Purchase
Orders from Buyer to Seller.
2. Payment Terms. Unless otherwise agreed in writing by Seller and
Buyer, all order shall be prepaid in full before Seller ships any product
subject to these Terms and Conditions (the “Goods”). If Buyer pays by
check other than a cashier’s check, Seller may delay shipment for a
reasonable period as determined in Seller’s sole discretion.
3. Taxes. Prices do not include sales, use, VAT, excise and other taxes
or governmental charges with respect to the production, sale,
distribution or delivery of the Goods. The nal invoice amount includes
all applicable taxes or governmental charges. Seller is responsible for
proper remittance of all such taxes or governmental charges.
4. Shipping. Unless otherwise agreed in writing by Seller and buyer,

TERMS & CONDITIONS
shipment terms are F.O.B. Origin, Freight Prepaid and Add. Choice of
carrier shall be in Seller’s sole discretion.
5. Returns/Cancellations. All sales are nal upon pickup or shipment from
Seller’s facility. Seller will not accept returns of any of the Goods except
under certain circumstances as set forth in an authorized Returned
Merchandise Authorization (RMA), which must include pictures of the
tent purchased. RMA forms are available upon request. Seller holds sole
discretion of authorization. Orders for Goods may be canceled at any
time prior to pick up or shipment from Seller’s facility; provided, however,
that any such cancellation shall result in a restocking fee of twenty-ve
percent (25%) of the original purchase price of the canceled Order for
having reserved a spot on our production schedule. This applies even for
those orders that are via PO.
6. Returns. All sales are nal. Seller will not accept returns of any of the
Goods except under certain circumstances as set forth by an authorized
RMA, which must include pictures of the tent erected. RMA forms are
available upon request. Seller holds sole discretion of authorization.
7. Force Majeure. Seller will not be liable for any delay of its performance
hereunder if the delay is directly or indirectly caused by or arises from
res, oods, terrorism, accidents, riots, war, government interference,
embargoes, strikes, shortage of labor, materials or supplies, inadequate
transportation facilities or any other cause beyond Seller’s control.
8. Warranty. All tents are sold as is, and no warranties are given.
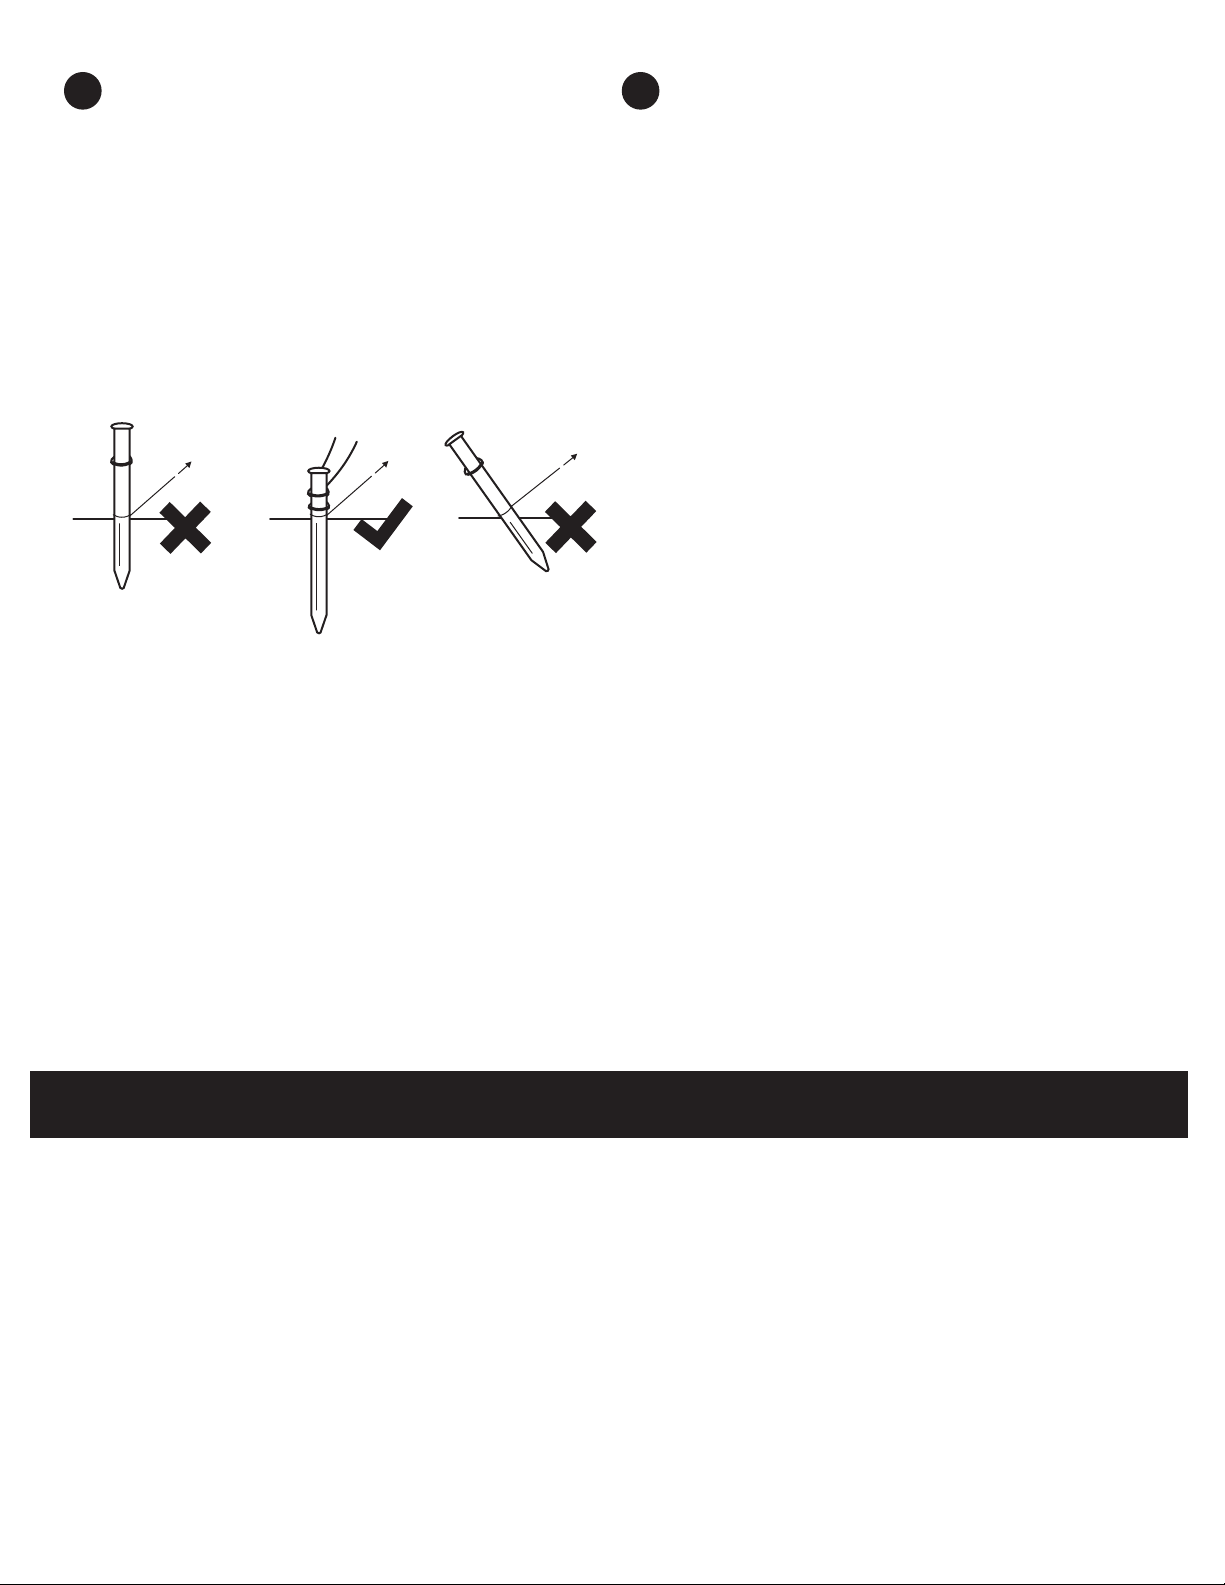
9. Damages. Any damages that occur as a result of improperly ballasted
or improperly staked tents are the sole responsibility of the Buyer.
Buyer acknowledges that tent must be ballasted or staked per the
recommendations made by Seller. Seller will not be responsible for
material, personal, or nancial loss.
10. Commitment to Cure. We are committed to our workmanship and our
customers. We will make right any issues with the tent top and/or parts
prior to their initial use. Customers must bring any and all issues to our
attention within 14 days of receipt of goods. We cannot honor requests
for cure after 14 days of receipt.
11. Limitation of Damages. Seller shall not be liable for indirect, incidental,
consequential, exemplary or punitive damages resulting from or arising
in connection with any act or omission of Seller relating to any breach
of these Terms and Conditions or relating in any way to the design,
manufacture, delivery or use of the Goods. Seller’s liability, regardless
of grounds, shall be limited to the amount paid by Buyer for the Goods.
12. Limitation of Actions. Any statute of limitations notwithstanding, no claim
shall be led or brought against Seller for any breach of these terms and
conditions after two (2) years of the date Buyer receives the Goods.
13. Installation and Service. Seller shall not be required to install, service or
provide any on-site preparation or installation of any of the Goods. If
Seller provides instruction to Buyer generally or specically regarding
any methods of installation, such instruction is gratuitous and is not to
be considered a part of these Terms and Conditions.
14. Nature of Goods as Temporary Structures. Each of the Goods constitutes
a temporary structure or part of a temporary structure that is not intended
to meet any building or other codes. Buyer uses the Goods at his/her/
its sole risk.
15. Modications. These Terms and Conditions may not be amended,
modied, terminated or repudiated, in whole or in part, except in writing
signed by Seller and Buyer.
16. Remedies Not Exclusive. No remedy of Seller provided herein is exclusive
of any other remedy available to Seller.
17. Assignment. Buyer cannot assign any rights, duties or obligations
hereunder without Seller’s prior written consent.
18. Governing Law and Venue. These Terms and Conditions shall be
governed by, and construed in accordance with, the laws of the State
of Wisconsin, and any legal proceeding with regard to these Terms
and Conditions or the Goods shall be brought in the Circuit Court for
Brown County, Wisconsin. Buyer hereby waives any claims of forum non
conveniens or any other similar claims.
19. Cost of Collection. Buyer shall be liable to pay Seller for all costs
associated with any breach of these Terms and Conditions by Buyer,
including Seller’s actual attorney’s fees.
20. Authority of Signers. Each person accepting these Terms and Conditions
represents and warrants that he/she has been duly authorized to do so.
21. Counterparts & Facsimile Signatures. These Terms and Conditions may
be signed in counterparts. Facsimile and electronic signatures shall have
the same eect as originals. Placing and paying for an order online also
acknowledges and agrees to these Terms & Conditions.
22. Pickup Orders: Customers may request to pick up purchased products
from American Tent’s facility in Green Bay, Wisconsin. Upon such
request, the customer must schedule a pick-up time during American
Tent’s regular warehouse hours, which are 7:00 a.m. to 4:00 p.m.,
Monday through Thursday. Loading time will vary based on order size
and method of transportation. Orders that are not picked up within ve
(5) business days of the scheduled pick-up date (Fridays excluded)
may be subject to storage fees. Customers must mark any product
shortages, damages, or other issues with the order prior to departure
from American Tent’s facility. The customer’s signature on an American
Tent acknowledgment receipt conrms that all proper products and
quantities have been received and that such products are free of visible
damage. Unless otherwise agreed in writing, the Customer is responsible
for all product loading and providing or retaining transportation for all
products placed for pick-up.
4

SET UP
1. Check the parts list to make sure every part is
present and accounted for
2. Squaring the stake line---After getting your space
marked by the utility locator service you will need
to square and mark your stake lines
a. Take the “0” end of two tape measures and anchor
themintothegroundattherstcornerofthe
stake line. Call it Point A.
b.Takethersttapemeasure(Tape1)anddrawitout
tothe30’andanchorTape1intotheground.Call
this Point B.
c.TakeTape1andadd30’existingwidthdimension
and turn 90 degrees. Draw the tape measure out to
that measurement.
d. Taking the second tape, Tape 2, already anchored at
position A and draw it out to the diagonal
measurementof42’5”.Wherethismeasurement
and the Tape 1 intersect is Point C
e. Anchor Tape 1 into the ground at Point C then
drawoutTape2to60’andanchoratPointC.
f. Take Tape 2 and draw it toward Point D stretching
Tape2tightandanchoringittothegroundat30’,
Point D, the remainder of Tape 2 should be pulled
to the anchor at Point C.
g. After squaring the tent, go back through and mark
the positions of all the poles and stakes.
Please know that your safety is our priority. Before setting up your tent, be sure to conrm with your utlility locating
service (8-1-1) that it is safe to set up your tent in your desired location. Be aware of potential weather conditions, and
always evacuate your tent during periods of extraordinarily high winds or lightning.
3. Lay the parts out in the approximate position they
will be in once tent is up
4. Drive stakes vertically at all points located
5. Spread a drop cloth on the ground to protect the
tent top from dirt and abrasions; open tent top on
drop cloth
5
Lay Out The Parts
Proper Staking
Tape 2
Tape 2
51525
5
15
25
0
35
45
55
60
30
35 45 55
30
Squaring- Measurement Marking B
Squaring- Measurement Marking A
30’
30’
Tape 1
Tape 1
AD
CB
Tape 2 42’5”
(MeasurementMarkingB)

6
6. If your tent is sectional, lace your tent
a.Lineupeachsection(laceatbottom)sotheyoverlap
b.Startinginthemiddle,pullrstlaceupthroughrst
small grommet. Pull second lace up through second
grommetandthenpullthroughtheloopoftherst
lace and so on.
c.Usethevelcro-likefabrictocloserainap
d. Tie off to secure whole lace line
e.Connectvelcro-likemateriallocatedonvalance
section at end of each lace line
f. Repeat to secure all other lace lines
7. Choke ratchets to stakes loosely
8. Raise your side poles, one at a time, starting at the
corners on the shorter side. Use the wind to your
advantage by starting at the upwind end, allowing
the wind to help pick up the tent top. Insert poles
into the grommet hole making sure the ratchets
are properly tensioned.
9. Raise poles until slightly less than perpendicular.
The bottom of the pole should be leaning out
from the tent top, the top, leaning in. Reference
“Tightening Side Poles” and “Pole Tilt”.
10. Raise center poles, starting with the upwind pole
11. Guide center pole pin through the grommet being
careful not to damage the fabric of the tent top
12. If your model has jumper ropes, tie them once all
center poles are in place.
a.Createaloopandtoss1-3’fromthetenttop
b. Pull down to tighten the loop
c. Take the rope at chest height, wrap and tie
as the picture shows
13. Check and position center poles, corner poles and
side poles to exact locations on the marks from
step 2
14. Starting with the four corners tighten ratchet
straps until all the poles are perpendicular. Move
onto the side poles and repeat.
15. Congratulations! It’s a tent!
Tightening Side Poles
Pole Tilt
20-30
O
Jumper Ropes Attachment
a. b. c.
Ratchet to Stake
Lacing

7
ADDITIONAL PRODUCT ASSEMBLY
1. Take two tents roughly 8in apart from each other
2. Similar to a sidewall, the rain gutter will attach to
the sidewall rope.
3. Take the clips of one side and attaching them to
the rope located on the underside of the rst tent.
4. After attaching the rst side, take the second side
and repeat on the underside of the second tent
Rain Gutter Rain Gutter
SIDEWALLS
RAIN GUTTER
1. Terminate sidewall rope at one end with sidewall
rope clamp, if included
2. Carefully unroll the sidewall so that it is a long, fan
folded piece
3. Pick up the sidewall and carry on one shoulder
while clipping every third clip with the opposite
arm
4. Make sure the open side of the clips are facing in
towards you
5. Once every third clip has been attached, go back
and clip the rest
6. Use clips to either secure around the pole or
attach to next sidewall section
7. Fanfolding is best for storing your sidewalls; be
sure they are clean and dry before fan folding
them and storing them for next time
Sidewall Clips
Sidewall Clips

8
CARE AND MAINTENANCE
STRIKING
1. Be careful! Poles, tent tops, and crew can be
damaged if you don’t use caution
2. Spread your drop cloth
3. Remove any additional accessories
4. Release some tension on ratchets, anything
attached the center pole, so corners and poles
inline with center, just a little
1. How to Store a Tent
Therstthingyouneedtoknowaboutstoringyour
tent is summed up in two words: DROP CLOTH. You
need a drop cloth. You may not think you need a
dropcloth(“Thegroundisdry!”“It’sjustgrass!”“This
parkinglotisclean!”),buttrustus,youdo.Dropcloths
are the literal foundations of good tent husbandry.
Why do you need a drop cloth for your tent? Drop
cloths reduce the likelihood of:
• Pinholes--youknowaswellaswedothattiny
pinholes make huge problems
• Tears--theeasiestwaytokissyourinvestment
goodbye
• Dirt and grass stains
• Mystery residue from a surface you thought was safe
2. Bag It
If your tent was supplied with a bag, put your tent
top back into the bag. This will keep it protected from
hazardous situations. To return your tent to the bag, be
sure to fold it the long way as many times as you can,
then roll it up like a sleeping bag.
5. Detach all jumper ropes
6. Remove center poles and then side poles
7. Remove ratchets
8. Unlace tent top if sectional
9. Make sure tent top is clean and dry before folding
and storing
Storing Sidewalls
While you should still use your drop cloth when setting
upandtakingdownsidewalls,itisn’tascritical.After
all,rainwon’tcomepouringinthroughasmallrip
ortearinyoursidewalls.Evenso,handlewithcare.
Rolling your sidewalls is the best way to store them
andpreventdamage.
3. How to Store Tent Poles
We’veseensomeinspirationalsystemsfortentpole
storage--beautifulstructuresdesignedexclusivelyto
cradlepoleswhiletheywaitfortheirnextassignment.
Butbasicallyallyouhavetodoismakesureyou
handle them with care. Stack them on top of each
other, but be sure to not clang or scrape them together.
Nor should you use your tent poles to reenact famous
momentsinOlympicjavelinhistory.Usecommon
sense and treat those poles with respect.
Tell us how it’s going!
We would love to hear from you.
Address
Contact
Mail
Website
www.americantent.com
2350 E Mason Street
Green Bay, WI, 54302
Please give us areviewon ourwebsite, Facebookpage,or
Google. If you have any questions at all,please do not hesitate
to contact oursales team at 920.431.0938.920.431.0938
Table of contents
Popular Tent manuals by other brands

Coleman
Coleman Phad X3TM installation instructions

PARRY
PARRY ST1050 GUIDELINE FOR THE SELECTION, INSTALLATION, AND OPERATION

Sunjoy
Sunjoy D-GZ215PST-4-3 Assembly instruction

Napier
Napier SPORTZ LINK 51000 instructions

Reimo
Reimo Marina High Air 2.9 Assembly instructions

Awntech
Awntech Santa Fe Owner's Manual & Installation Instructions