Vispronet Event Tent Select 3x4 m User manual

Aufbauanleitung Partyzelt Basic 3x4 m, 3x6 m, 3x8 m
Assembly instructions for Event Tent Basic 3x4 m, 3x6 m, 3x8 m
HINWEISE |NOTE
1.
2.
3.
4.
5.
1
DE230328
Herzlichen Glückwunsch zum Kauf Ihres neuen Zeltes. Bei Fragen oder Anregungen wenden Sie sich gerne
an unser Kundenservice-Team. Beachten Sie bitte die nachfolgenden Hinweise, damit Sie lange Freude an
Ihrem Zelt haben.
Congratulations on the purchase of your new tent. If you have any questions or suggestions, please contact
our customer service team. Please note the following information, so you can enjoy your tent for a long
time to come.
Das Zelt ist nicht auf Wind- und Schneelasten getestet worden. Somit kann hierfür keine Garantie über-
nommen werden. Beachten Sie den Wetterbericht, um im Bedarfsfall das Zelt rechtzeitig zu sichern und/
oder abzubauen.
The tent has not been tested for wind or snow loads. Therefore, no guarantee can be given for service life
and/or performance. Pay attention to the weather forecast in order to secure and/or disassemble the tent
if necessary.
Zelte sind als temporäre Unterkunft gedacht und sollten bei widrigen Witterungsverhältnissen abge-
baut werden.
Tents are intended as temporary accommodation and should be dismantled in adverse weather
conditions.
Bitte achten Sie darauf, das Zelt vorsichtig zu behandeln, um Defekte zu vermeiden.
Please handle the tent with care to avoid defects.
Das Gestänge nicht zu kräftig behandeln, um Beschädigungen zu vermeiden.
Do not handle the struts too forcefully in order to avoid any damages.
Bitte wählen Sie immer einen geeigneten Abstand zu Schläuchen, Gas- oder Elektroleitungen,
um diese nicht zu beschädigen.
Please always choose a suitable distance from hoses, gas or electric lines in order not to damage them.
Beim Einsatz geeigneter Heizgeräte (Auskunft im Fachhandel) ist ein Abstand von mindestens 1,2 m
zu jeglichem Planenmaterial zu beachten. Offenes Feuer sowie Heizgeräte mit offenen Flammen wie
Heizpilze, Terrassenstrahler, Gasheizer etc. sollten auf keinen Fall verwendet werden.
When using suitable heaters (information in specialty shops) a distance of at least 1.2 m to any tar-
paulin material must be observed. Open re and heating devices with open ame sources such as
patio heaters, gas heaters, etc. should never be used.

6.
7.
8.
9.
2
DE230328
HINWEISE |NOTE
Der Aufbauer ist verantwortlich für die angemessene Verankerung und damit für die Sicherheit des
Zeltes. Die Verankerung muss regelmäßig geprüft werden, um stets die Sicherheit des Zeltes zu ge-
währleisten und Schäden zu vermeiden.
The assembler is responsible for adequate anchoring and therefore for safety of the tent.
The anchoring must be checked regularly to always ensure security of the tent and to avoid any
damage.
Tragen Sie beim Aufbau des Zeltes ggf. passende Schutzkleidung wie Handschuhe, stabile Schuhe und
einen Helm.
If necessary, wear suitable protective clothing such as gloves, sturdy shoes and a helmet when setting
up the tent.
Achten Sie darauf, dass der Untergrund für Ihre Nutzungszwecke geeignet ist. Das Zelte sollte auf
ebenen Untergrund gestellt werden. Verwenden Sie nur die mitgelieferten Materialien.
Make sure the surface is suitable for your purposes. The tent should be placed on level ground. Use
only materials provided.
Das Zelt ist auch bei leichteren Minustemperaturen für einen Einsatz geeignet. Die Planen müssen
aber bei mindestens 10 °C lange genug gelagert und entfaltet werden. Ansonsten kann es zu Bruch-
stellen an den gefalteten Stellen kommen.
The tent is also suitable for use in slightly sub-zero temperatures. However, the tarpaulin must be
stored and unfolded at a temperature of at least 10 °C, otherwise breakage may occur in the folded
points.
REINIGUNG UND WARTUNG |CLEANING AND MAINTENANCE
Dach und Seitenteile lassen sich mit Seifenlauge abwaschen. Schimmel und Stockecken entfernen Sie mit
einer milden Chlorlösung. Befolgen Sie die Anweisungen des Herstellers und testen Sie die Chlorlösung an
einer nicht sichtbaren Stelle, um sicherzugehen, dass keine Verfärbungen auftreten.
Achtung! Das Partyzelt muss vor dem Zusammenlegen und Verstauen vollständig getrocknet sein! Bitte
niemals nass zusammenlegen.
The roof and side walls can be cleaned with soapy water. Mold and mold stains can be removed with a mild
chlorine solution. Follow the manufacturer‘s instructions and test the chlorine solution on a small and less
prominent area to make sure there is no discoloration.
Warning! The marquee must be completely dry before folding and storing away. Please never fold the
marquee when wet!
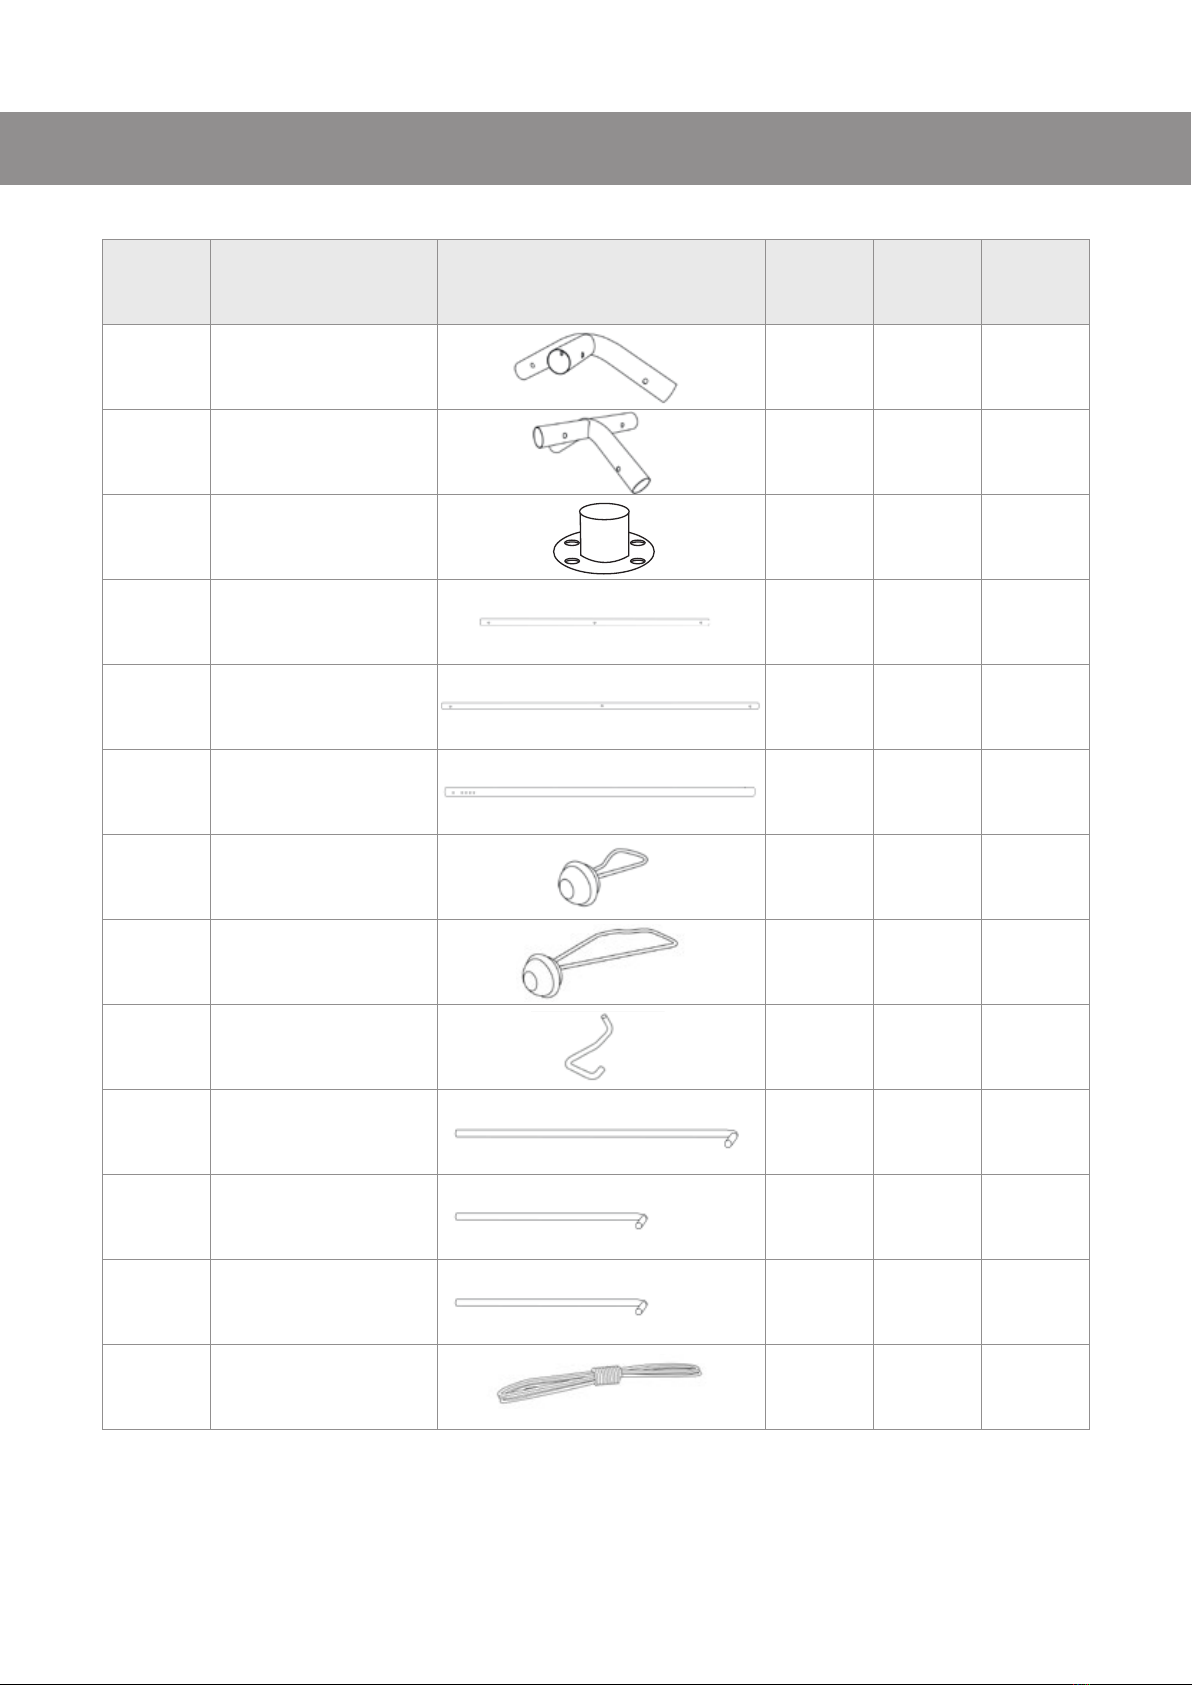
TEILELISTE |LIST OF PARTS
ZIFFER
NUMBER
BEZEICHNUNG
NAME
TEIL
PART
3x4 3x6 3x8
A3-Wege Eckverbinder
3-Way Connector
6 Stk./pcs 6 Stk./pcs 6 Stk./pcs
B4-Wege Eckverbinder
4-Way Connector
3 Stk./pcs 6 Stk./pcs 9 Stk./pcs
FZeltfuß
Foot Plate
6 Stk./pcs 8 Stk./pcs 10 Stk./
pcs
1Rohr 1490 mm
Pipe 1490 mm
6 Stk./pcs 8 Stk./pcs 10 Stk./
pcs
2Rohr 1870 mm
Pipe 1870 mm
6 Stk./pcs 9 Stk./pcs 12 Stk./
pcs
3Standpfosten
1870 mm
Leg Pipe 1870 mm
6 Stk./pcs 8 Stk./pcs 10 Stk./
pcs
4Spanngummi kurz
Short Bungee
14 Stk./
pcs 14 Stk./
pcs 14 Stk./
pcs
5Spanngummi lang
Long Bungee
62 Stk./
pcs 80 Stk./
pcs 98 Stk./
pcs
6Haken
Hook
6 Stk./pcs 8 Stk./pcs 10 Stk./
pcs
7Erdhaken groß
ø 8 x 300 mm
Peg ø 8 x 300 mm
4 Stk./pcs 4 Stk./pcs 4 Stk./pcs
8Erdhaken mittel
ø 6 x 180 mm
Peg ø 6 x 180 mm
6 Stk./pcs 8 Stk./pcs 10 Stk./
pcs
9Erdhaken klein
ø 4 x 180 mm
Peg ø 4 x 180 mm
25 Stk./
pcs 31 Stk./
pcs 37 Stk./
pcs
10 Abspannseil
Rope
4 Stk./pcs 4 Stk./pcs 4 Stk./pcs
3
DE230328

4
DE230328
Prüfen Sie die Lieferung anhand der beiliegenden Teileliste auf Vollständigkeit. Achten Sie darauf, dass
der Untergrund für den Aufbau Ihres Zeltes geeignet ist. Bei kälterem Wetter empfehlen wir, die Zeltplane
vorher auf Zimmertemperatur zu bringen.
Check the delivery for completeness using the enclosed list of parts. Make sure that the ground is suitable
for setting up your tent. In colder weather we recommend bringing the tarpaulin to room temperature
beforehand.
TEILELISTE |LIST OF PARTS

AUFBAU |ASSEMBLY
Legen Sie Stangen und Verbindungselemente für das Dach gemäß der Abbildung auf dem Boden aus
und stecken Sie den Rahmen für das Dach zusammen..
Lay out poles and connectors for the roof as shown on the ground and stick together the frame for
the roof.
1.
A3-Wege Eckverbinder
3-Way Connector
666
B4-Wege Verbinder
4-Way Connector
369
1Rohr 1490 mm
Pipe 1490 mm
6 8 10
2Rohr 1870 mm
Pipe 1870 mm
65 89 113
A A
A A
A
2
B B
B B
B B
22
2 22
2 22
A
1 1 1 1
1 1 1 1
5
DE230328

6
DE230328
Ziehen Sie die Dachplane über das Gestell und montieren Sie die Standpfosten auf der einen Seite am
Dachgestell. Befestigen Sie die Zeltfüße an den Standpfosten und das Dach mit den Spanngummis
am Gestell.
Pull the roof tarpaulin over the frame and mount the support poles on one side to the roof frame.
Fasten the tent legs to the support poles and the roof to the frame with elastic straps.
2.
AUFBAU |ASSEMBLY
5Spanngummi lang
Long Bungee
FZeltfuß
Foot Plate
3Standpfosten 1870 mm
Leg Pipe 1870 mm
33
3
3
F
3
5
6

3Standpfosten 1870 mm
Leg Pipe 1870 mm
666
8Erdhaken mittel
ø 6 x 180 mm
Peg ø 6 x 180 mm
369
F
3
8
3
3
33
3
7
DE230328
Montieren Sie die Standpfosten und Zeltfüße auf der zweiten Zeltseite und sichern Sie die Standfüße
mit den Erdhaken.
Mount the support poles and tent feet to the other side of the tent and secure the feet with ground
hooks.
3.
AUFBAU |ASSEMBLY
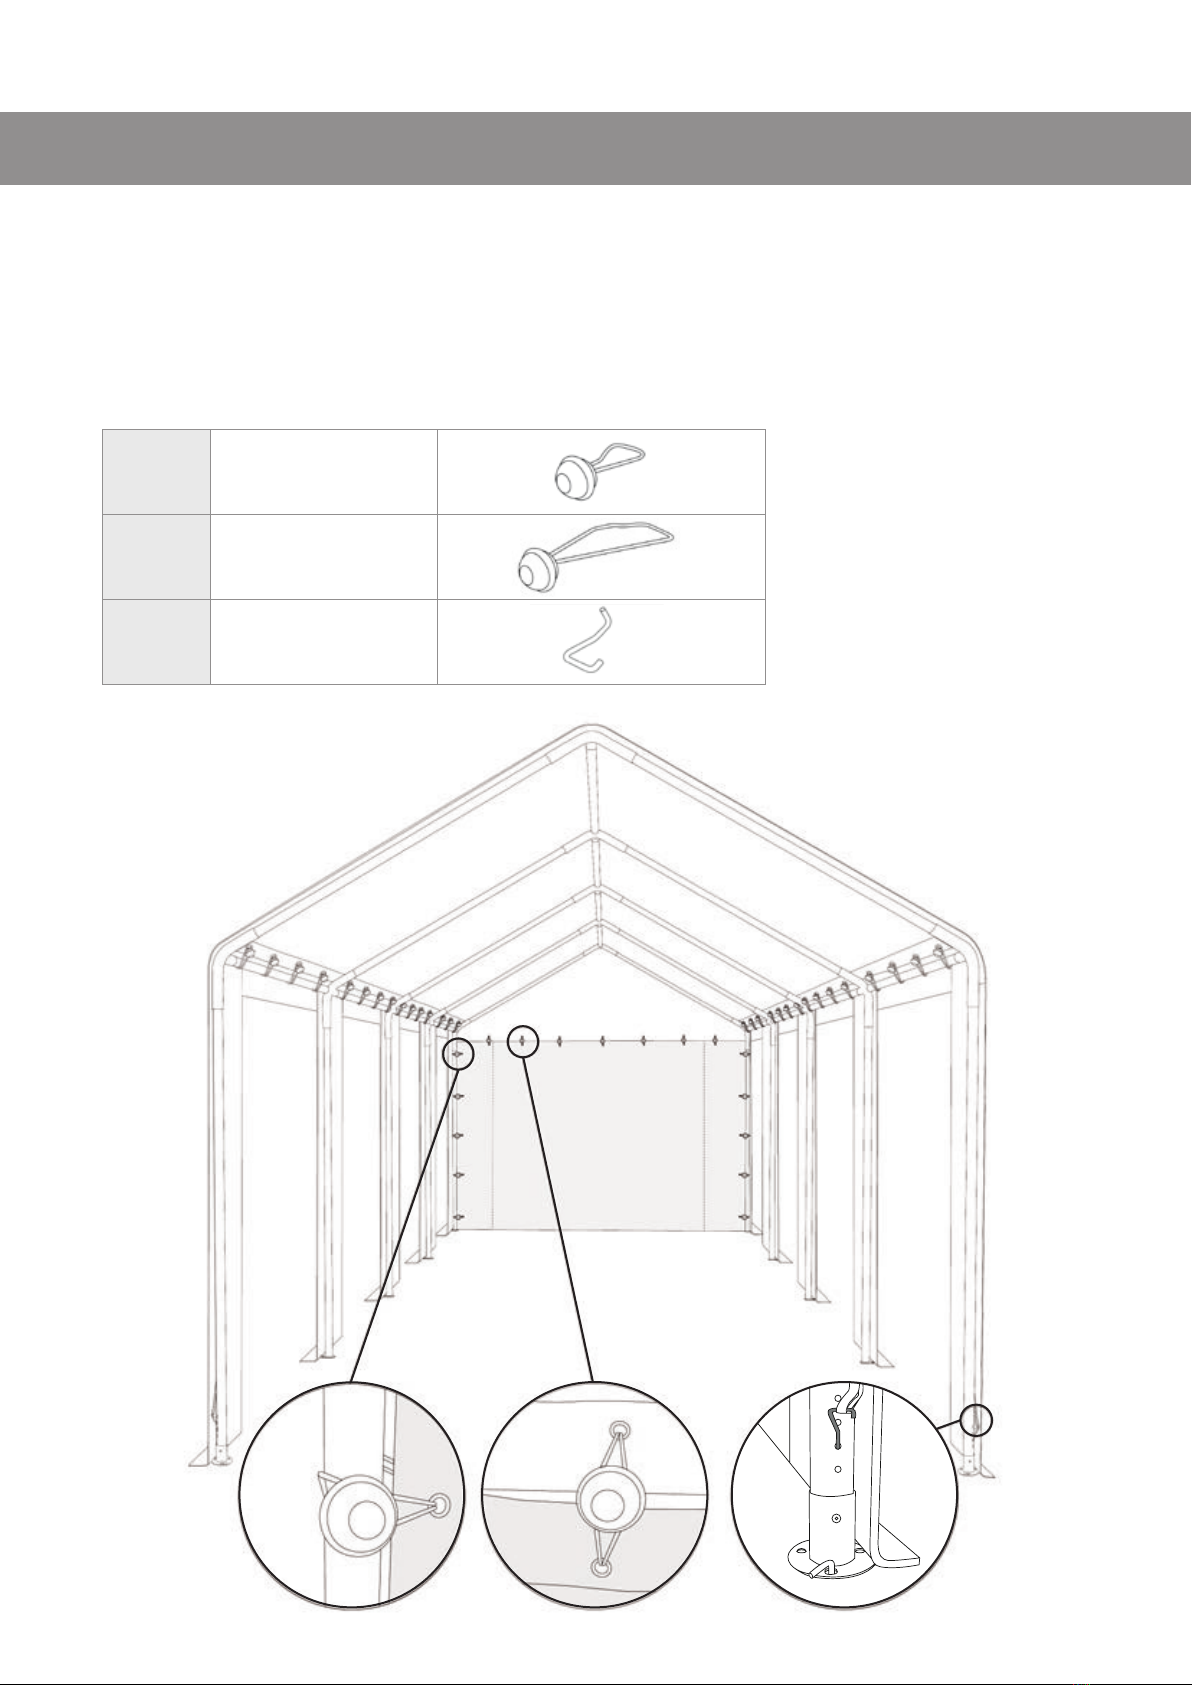
Befestigen Sie die Giebelwände oben mit den Spanngummis an der Dachplane sowie seitlich an den
Standpfosten. Sichern Sie die Dachplane mit den Haken am Zeltpfosten.
Fasten the gable walls to the top of the roof tarpaulin with elastic straps and to the side of the poles.
Secure the roof tarpaulin to the tent pole with hooks.
4.
4Spanngummi kurz
Short Bungee
666
5Spanngummi lang
Long Bungee
369
6Haken
Hook
5
4
6
8
DE230328
AUFBAU |ASSEMBLY

Befestigen Sie die gewünschte Anzahl von Seitenwänden mit den Spanngummis an den Zeltseiten.
Fasten the desired number of side walls to the tent sides with elastic straps.
5.
5Spanngummi lang
Long Bungee
369
1. 2.
3. 4.
9
DE230328
AUFBAU |ASSEMBLY
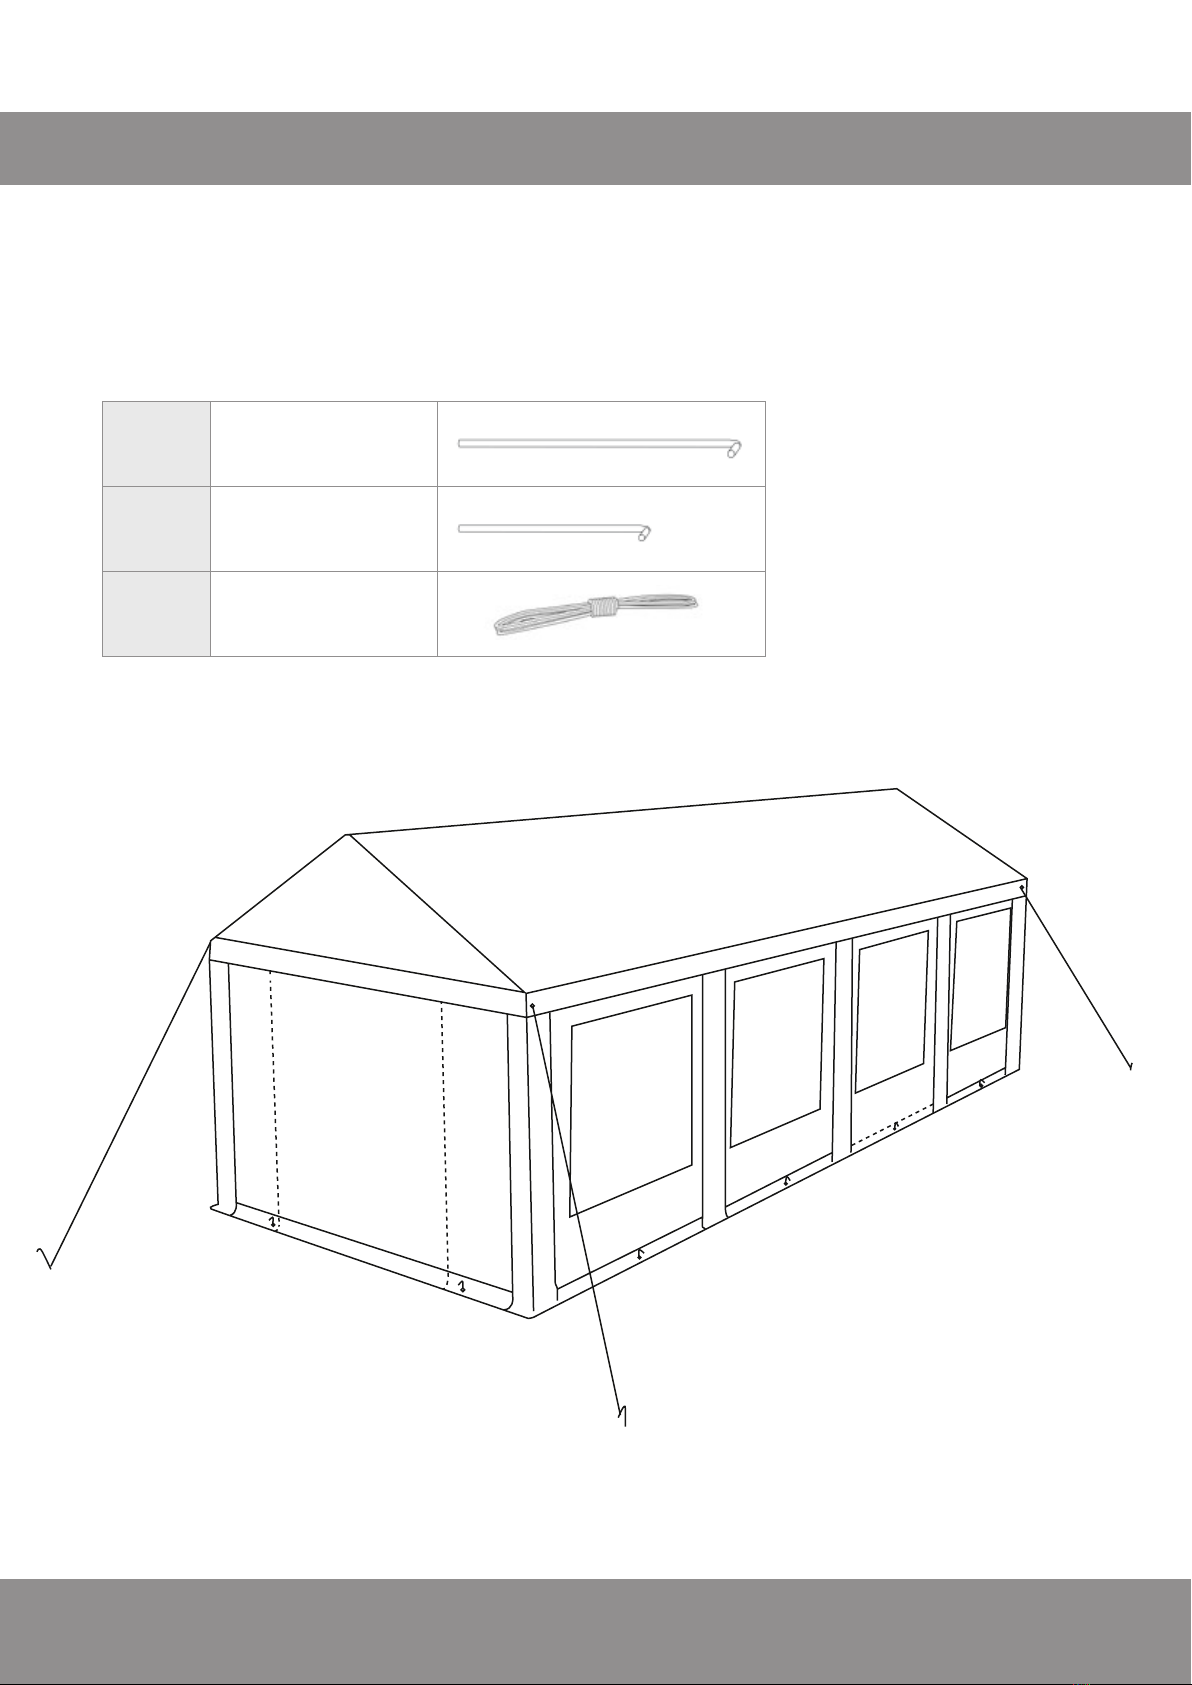
Sichern Sie das Partyzelt mit den Abspannseilen und Erdhaken. Verankern Sie die Zeltplanen mit den
Erdhaken im Boden.
Secure the marquee with the guy ropes and ground hooks. Anchor the tarpaulin in the ground with
the ground hooks.
6.
7Erdhaken groß
ø 8 x 300 mm
Peg ø 8 x 300 mm
369
9Erdhaken klein
ø 4 x 180 mm
Peg ø 4 x 180 mm
10 Abspannseil
Rope
10
10
7
7
7
9
9
9
9
9
9
10
10
DE230328
AUFBAU |ASSEMBLY
Other manuals for Event Tent Select 3x4 m
1
This manual suits for next models
2
Other Vispronet Tent manuals


Popular Tent manuals by other brands

Palram
Palram CANOPIA MILANO How to assemble

KING CANOPY
KING CANOPY Event Tent 20ft x 20ft Assembly instructions

Kampa
Kampa Brean Series Instructions & care manual

MMI
MMI Trek Tents 247 Setup instructions

Kodiak
Kodiak Swag owner's manual

Crivit Outdoor
Crivit Outdoor SHADE SAIL 96533 Assembly and Safety Advice

Konifera
Konifera BW13000 instructions

Coleman
Coleman Evanston 9163-141 installation instructions

Coleman
Coleman CHALET 9 CV 10600B Setup instructions

Burton
Burton BIG AGNES X quick start guide

East Cover
East Cover SSL202012H Assembly instructions

Boutique Camping
Boutique Camping STAR EMPEROR BELL TENT instruction manual


