AMH X5 Manual

MAN-X5L-ENG-01
1
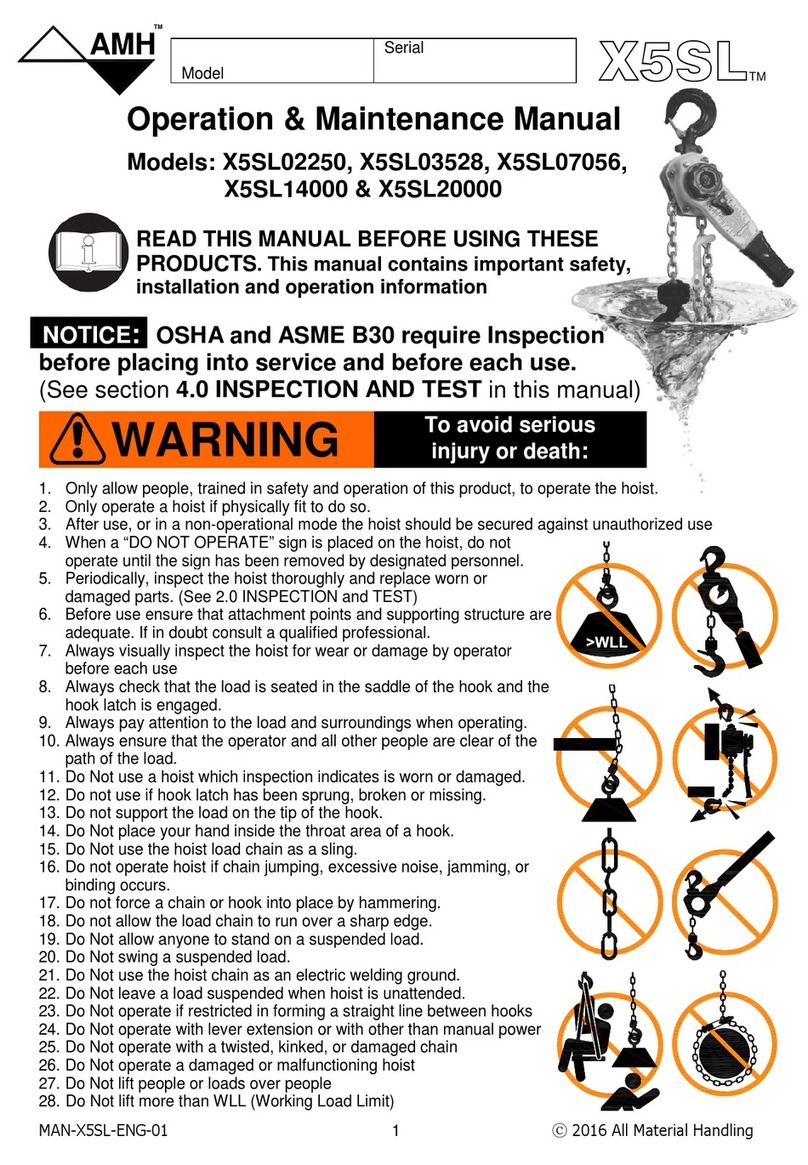
Operation & Maintenance
Models: X5L02250, X5L03528,
X5
READ THIS MANUAL BEFORE USING THESE
PRODUCTS
. This manual contains important
installation and operation information
OSHA and ASME B30 require
before placing into service
and before each use.
section
4.0 INSPECTION AND TEST
WARNING
1.
Only allow people, trained in safety and operation of this product, to operate the hoist.
2. Only operate a hoist if physically fit to do so.
3. After use, or in a non-
operational mode the hoist should be secured against unauthorized use
4. When a “DO NOT
OPERATE” sign is placed on the hoist, do not operate until the sign has been
removed by designated personnel.
5.
Periodically, inspect the hoist thoroughly and replace worn or
damaged parts. (See 4
.0 INSPECTION and TEST)
6. Before use e
nsure that attachment points and supporting structure are
adequate. If in doubt consult a
qualified professional.
7. Always visually
inspect the hoist for wear or damage
before each use
8. Always check that the
load is seated in the saddle of the hook and the
hook latch is engaged.
9. Always pay attention to the load
and surroundings
10. Always ensure that the operator
and all other people
path of the load.
11. Do Not
use a hoist which inspection indicates is worn or damaged.
12. Do not use if hook latch has been sprung,
broken
13. Do not support the load on the tip of the hook.
14. Do Not
place your hand inside the throat area of a hook.
15. Do Not use the hoist load chain as a sling.
16.
Do not operate hoist if chain jumping, excessive noise, jamming, or
binding occurs.
17.
Do not force a chain or hook into place by hammering.
18. Do not allow the load chain to run
over a sharp edge.
19. Do Not
allow anyone to stand on a suspended load
20. Do Not swing a suspended load.
21. Do Not use the hoist chain as an electric
welding
22. Do Not leave a load suspended when hoist is
unattended
23.
Do Not operate if restricted in forming a straight line between hooks
24. Do Not operate with lever extension or wi
th other than manual power
25.
Do Not operate with a twisted, kinked, or damaged chain
26.
Do Not operate a damaged or malfunctioning hoist
27. Do Not lift people or loads over people
28. Do Not lift more than WLL (Working Load Limit)
Model:
AMHTM
NOTICE
:
1
ⓒ 2016 All Material Handling
Operation & Maintenance
Manual
X5
L07056, X5L14000 & X5L20000
READ THIS MANUAL BEFORE USING THESE
. This manual contains important
safety,
installation and operation information
OSHA and ASME B30 require
Inspection
and before each use.
(See
4.0 INSPECTION AND TEST
in this manual)
To avoid serious
injury or death:
Only allow people, trained in safety and operation of this product, to operate the hoist.
operational mode the hoist should be secured against unauthorized use
OPERATE” sign is placed on the hoist, do not operate until the sign has been
Periodically, inspect the hoist thoroughly and replace worn or
.0 INSPECTION and TEST)
nsure that attachment points and supporting structure are
qualified professional.
inspect the hoist for wear or damage
by operator
load is seated in the saddle of the hook and the
and surroundings
when operating.
and all other people
are clear of the
use a hoist which inspection indicates is worn or damaged.
broken
or missing.
place your hand inside the throat area of a hook.
Do not operate hoist if chain jumping, excessive noise, jamming, or
Do not force a chain or hook into place by hammering.
over a sharp edge.
allow anyone to stand on a suspended load
.
welding
ground.
unattended
.
Do Not operate if restricted in forming a straight line between hooks
th other than manual power
Do Not operate with a twisted, kinked, or damaged chain
Do Not operate a damaged or malfunctioning hoist
Serial No.
X5
TM

MAN-X5L-ENG-01 2ⓒ 2016 All Material Handling
HOIST NAMEPLATE with basic warnings and information as required by ASME B30:
It is recommended to copy; Model, and Serial number into the
blocks on top of the cover of this manual. Make a copy of this
manual available to all operators. Note that the “Overload
Protection” label will only appear on units so equipped. Below,
the warnings are translated:
WARNING
To avoid serious injury or death
Read manual before operating
Do Not remove or obscure this label
Do Not operate if restricted in forming straight line between hooks
Do Not operate with lever extension or with other than
manual power
Do Not operate with a twisted, kinked, or damaged chain
Do Not lift people or loads over people
Do Not operate a damaged or malfunctioning hoist
Do Not lift more than WLL
1.0 OPERATION:
The operator must read and understand Warnings and operational
instructions in this manual and as displayed on the hoist.
Set up using free chain mode to pull chain in or out by hand
1. Under no load, move the selector to neutral “N” position.
2. Pull the hand wheel out then counterclockwise (CCW) to hold
position. (Do Not attempt to pull out or rotate when hoist is loaded)
3. Pull chain in or out by hand. (Too quick or fast and the brake
will set and the set up must be repeated.)
4. Attach hook to load.
Set the Brake and prepare to load
5. Quick pull on the tail chain to tighten the chain against the load
or turn the hand wheel clockwise (CW). The hand wheel will then
return to the “in-position” when the chain is snug against the
load. (Without load, hold the chain with bottom hook and turn the
hand wheel clockwise CW)
6. Turn the selector to the up “U” position.
Load the hoist to begin lift or pull.
7. Ratchet the lever in the clockwise (CW) direction to lift or pull.
Move selector to Down “D” and ratchet in the counterclockwise
(CCW) direction to lower the load.
8. Confirm proper operation by Lifting or pulling until the full load
is suspended. Stop and check if rigging and the hoist holds the
load without slipping. If confirmed then continue the lift or pull.
Detaching the Load
9. Secure the load.
10. Release tension on the chain by turning the selector to down
“D” and ratchet the lever in the counterclockwise (CCW)
direction until enough slack to detach the hook. Pull chain out
by hand to provide resistance to allow the lever to ratchet.
Instruction
Label
Hand
Wheel
Selector
Name
Plate
Tail
Chain
Stop
Overload
Protection
Clutch Label
(if equipped)

MAN-X5L-ENG-01
3
Instruction Label, wrapped
around
2.0 SPECIFICATIONS:
These products exceed requirements of ASME B30.21
HST-3
“Performance Standard for Manually Operated Lever Hoist
5 times Working Load Limit (WLL) meeting
structural requirement of ASME HST
in marine and other applications as specified
by US Department of Defense DOD
Operating temperature: -40°F (-
40°C) ~ I40°F (60°C)
APEX rating: II 3 GD c IIB 60
º C X for limited use in Hazardous
Materials:
Load bearing parts are free of cast iron. Brake is asbestos free.
lead and chromate free.
Load chains are high strength grade 10
3.0 OPTIONS AND ACCESSORIES
Hook Option
Part
Numbers
Self Locking
Top or Bottom
1 1/8T HOOK-SL010
1 3/4T HOOK-SL016
3 1/2T HOOK-SL032
PULL OUT in Neutral
TO FREE CHAIN
PULL OUT in Neutral
TO FREE CHAIN
US tons 1 1/8T
1 3/4T
pounds 2,250
3,528
(kg) 1020
1600
Model AMH X5L02250 X5
L03528
Falls No. 1 1
G100 Chain (mm) 5.6*17 7.1*
20
Pull to WLL pounds 52 72
(n) 231
320
125% Proof
Load Test pounds 2813
4410
(tonnes) 1.28
2.00
3
ⓒ 2016 All Material Handling
around
Hand Wheel, translated
These products exceed requirements of ASME B30.21
“Safety Standard for Lever Hoist” and ASME
“Performance Standard for Manually Operated Lever Hoist
. In addition the ultimate strength is
structural requirement of ASME HST
-3 Appendix A, for use
by US Department of Defense DOD
.
40°C) ~ I40°F (60°C)
º C X for limited use in Hazardous
Environments.
Load bearing parts are free of cast iron. Brake is asbestos free.
Paints and coatings are
Load chains are high strength grade 10
0 zinc plated.
Shipyard Hook
Top or Bottom
Shipyard Hook
Latch Kit
P-LA016-31-47SYHK P-LA016-47SYHK
P-LA032-31-47SYHK P-LA032-47SYHK
HOLD CHAIN AND
TURN TO LOAD
HOLD CHAIN AND
TURN TO LOAD
1 3/4T
3 1/2T 7.0T 10.0T
3,528
7,056 14,000 20,000
1600
3200 6350 9070
L03528
X5L07056 X5L14000 X5L20000
1 2 3
20
10*28 10*28 10*28
84 86 88
320
374 383 391
4410
9625 17500 35000
2.00
4.37 7.94 11.34

MAN-X5L-ENG-01 4ⓒ 2016 All Material Handling
Top Hook Extender Kits include adapters to extend the reach of the top hook.
They are available as a bolt on solution. The standard top hook, that is removed
to install, can be utilized + any length of load chain (7) purchased separately.
Extender Kit
Part Number
(Chain and Hook not included)
1 1/8T HOOK-EXT02250
1 3/4T HOOK-EXT03528
3 1/2T HOOK-EXT07056
4.0 INSPECTION AND TEST
Note: Check local and governmental requirements and specifications to insure
compliance in addition to those listed below. If any conflict, utilize the most
stringent requirement.
Inspections required per ASME B30.21 and OSHA
INSPECTION RECORDS (when required)
Inspections are the responsibility of a qualified person designated by the owner. Dated inspection
reports shall be maintained for the service life of the product. They are to be filed by the serial number,
stamped into the name plate, and made available for inspection at any time.
All inspections shall be by a designated person who is competent and qualified to perform the type
inspection being utilized.
If any fault is discovered, during any inspection, then the unit shall be taken out of service and
quarantined. A qualified person shall then make determination of repair or disposition.
PREOPERATION INSPECTION of new unit or a unit that has not been in use for more than 1 month is
required prior to use and must be recorded. The inspection shall consist of:
New Hoists are to be inspected before use and must be recorded. No load test is required if tested
and certified when manufactured. The new hoist test certification supplied with the hoist should be
filed with the initial Preoperation Inspection. The date of this Preoperation Inspection, not the date on
the manufactures load test, will become the start date for entering a new unit into service and
determining timing of future periodic inspections. Units returned to service after inactivity of more
than one month, does not affect the date of the next periodic test as previously scheduled.
See sample PREOPERATION INSPECTION form in back of this manual
Inspect the following:
a) Proper operation and any unusual sounds.
b) Visually inspect hooks for deformation or bending and to verify latches function.
c) Visually inspect load chain for twist, damage or excessive wear between links.
d) Visually inspect the hoist body and lever for damage.
e) Fasteners are in place and tight.
f) Tail chain stop is in place.
g) Nameplate with warnings and operation instruction label are in place and legible.
FREQUENT INSPECTION is required before each use but not required to be recorded. It is to be
performed by the operator or other designated persons and shall consist of:
Inspect for a), through g) items listed in Preoperation Inspection plus the following:
h) Visual inspection to determine that the unit is not compromised by corrosion or debris and
can operate as intended.

MAN-X5L-ENG-01 5ⓒ 2016 All Material Handling
i) Make a trial lift or pull of a few inches and then stop to determine the hoist operates as
intended.
j) Continual observation during use for any damage or change in operation.
PERIODIC INSPECTION is required annually as a minimum and must be recorded. Periodic
Inspection may be required more often as determined by severity of service or as experience dictates.
Consult ASME B30.21 for determination of service and instruction. Periodic inspection is also required for
repaired units. This inspection requires disassembly and load test prior to being returned to service.
See sample PERIODIC INSPECTION form in back of this manual
Inspect for a), through j) items listed in Preoperation and Frequent Inspection plus the following:
k) Disassemble lever end of hoist to expose the brake components. Inspect brake pawls, disc,
springs and ratchet surfaces for contamination or abnormal wear.
l) Inspect; chain, springs and load bearing parts per section 5.0 INSPECTON
MEASUREMENTS as illustrated in this Manual.
m) Disassemble hook blocks and check hooks 100% for any sign of cracks, bending, twist or
stretching and opening measurement per section 5.0 INSPECTON MEASUREMENTS as
illustrated in this Manual.
n) Check chain wheel or wheels for smooth operation and visually for wear.
o) Check chain guide and guards for damage.
p) Load test to Min. of 125% WLL (Max. 150%). During which confirm function is as intended.
After the test load is released inspect again for requirements of a) through g).
5.0 INSPECTON MEASUREMENTS:
Hooks
A
Max.
1⅛US Ton (1t metric)
1.85 in (47mm)
1¾ US Ton (1.6t metric)
2.24 in (57mm)
3½ US Ton (3.2t metric) 2.72 in (69mm)
7 US Ton (6.3t metric) 3.19 in (81mm)
10 US Ton (9t metric) 4.06 in (103mm)
Chain Max.
1⅛US Ton C5.6H17Z G100 3.45 in (87.6mm)
1¾ US Ton C7.1H20Z G100 4.09 in (104mm)
3½, 7 & 10 US Ton C10H28Z G100 5.71 in (145mm)
71
7

MAN-X5L-ENG-01 6ⓒ 2016 All Material Handling
Brake Ratchet Disc DMin. TMin.
1⅛&1¾ US Ton 2.40 in (61mm)
0.28 in (7mm)
3½, 7 & 10 US Ton 2.79 in (71mm)
0.28 in (7mm)
Spring, Ratchet L
1⅛&1¾ US Ton < 1.20 in. (30.5 mm), >1.52 in (38.5mm)
3½, 7 & 10 US Ton < 1.79 in. (45.5 mm), >1.91 in (48.5mm)
Brake Spring, Inner L Min. Dº
1⅛& 1¾ US Ton 1.26 in (32mm)
0º+/- 10º
3½, 7 & 10 US Ton 1.46 in (37mm)
30º+/- 10º
Brake Spring, Outer LMin. Dº
1⅛& 1¾ US Ton 2.17 in (55mm)
180º+/- 10º
3½, 7 & 10 US Ton 2.56 in (65mm)
180º+/- 10º
20
32
D°
L
D°
L
34
25

MAN-X5L-ENG-01 7ⓒ 2016 All Material Handling
Top Hook Pin DMin.
1⅛US Ton 0.45 in (11.4mm)
1¾ US Ton 0.45 in (11.4mm)
3½, 7 & 10 US Ton 0.60 in (15.2mm)
Top Hook Pin Holes D Max.
1⅛US Ton 0.50 in (12.7mm)
1¾ US Ton 0.50 in (12.7mm)
3½, 7 & 10 US Ton 0.66 in (16.7mm)
Chain Pin D Min.
1⅛US Ton 0.28 in (7.1mm)
1¾ US Ton 0.37 in (9.5mm)
3½, 7 & 10 US Ton 0.49 in (12.4mm)
Chain Pin Holes D Max.
1⅛US Ton 0.33 in (8.5mm)
1¾ US Ton 0.43 in (11.0mm)
3½, 7 & 10 US Ton 0.55 in (14.0mm)
6
8
1
75
70
80

MAN-X5L-ENG-01 8ⓒ 2016 All Material Handling
WARNING
To avoid serious Injury wear eye protection
when near where hoist are being worked on
6.0 TOOLS REQUIRED FOR SERVICE
•
External retaining ring pliers (small size)
•Wrenches: 6, 8, 10, 12, 13 and 17 mm
•Socket wrench: 6, 8, 10, 12, 13 and 17 mm
•
6 inch caliper (0.001 in. increments).
•Soft face hammer
7.0 LUBRICANTS REQUIRED FOR SERVICE
•
No 2 lithium grease for gearing & bearings
(temperature -40ºC~120ºC)
•
Gear oil for the load chain (any
viscosity) (Dry lubricant can be
substituted.)
8.0 DISASSEMBLY:
Hoist repair and inspection should not be attempted unless by capable and qualified persons
familiar with this product. (During disassembly, parts should be cleaned and inspected per section
5.0 INSPECTON MEASUREMENTS as illustrated in this Manual.
To access brake, lay the hoist on the gear side for disassembly from the lever side:
Reference the exploded parts illustration drawings in this manual. Begin by loosening nut (36) while
holding down on (35) as it is spring loaded. Slowly remove (35) allowing the spring (34) to release.
Remove hand wheel (33) and spring (32). Remove the lever (27) by loosening bolt (29) and nuts (31).
Remove cam (28) and the brake driver (22) or overload protected brake driver assembly (22C).
Note: If equipped with an overload protection assembly (22C), it is pre-set at the factory to slip if
the hoist is severely overloaded. It is not recommended to disassemble or reset this device.
by other than an AMH authorized service center. If this assembly malfunctions it is
recommended that it be replaced.
Loosen nuts (15) on the lever side and remove lower lever assembly (21) to expose the brake disc (20)
pawls, springs and retaining rings (17).
To access the chain wheel (5), chain stripper (4), chain guards (3), bearings (2) and the top hook
assembly remove the brake side frame plate (1).
To access the gearing: If continuing the disassembly from above, Loosen nuts (15) on the gear side
and remove gear cover (13). Planet gears (9), pinion (12), thrust washer (11) and output gear (10) and
top hook attachment pin (6) can all be removed by hand. If accessing the gearing without first
disassembling from the lever side; the pinion (12), thrust washer (11) and output gear (10) may not be
removed.
To disassemble hooks simply view the parts exploded drawing. The top hook assembly (70) can be
easily detached from the hoist body by removing the gear cover (13) and pin (6) within.
9.0 ASSEMBLY:
Hoist repair and inspection should not be attempted unless by capable and qualified persons
familiar with this product.
To reassemble the power unit: Reference the exploded parts illustration drawings in this manual.
Assemble in the reverse order from section 8.0 DISASSEMBLY above with the additional instruction
provided below:
Assembly of gearing: Assemble gearing with a liberal coating of #2 chassis grease on the roller
bearings (2), hardened bushings, gear teeth (9) (10) & (12) and thrust washer (11). A light coat of
grease should be applied to the entire pinion shaft (12), wipe excess from the spline end before
assembly as it passes into the brake area. Install bearing (2) in the gear side frame plate (8) and chain

MAN-X5L-ENG-01
9
wheel (5) into the bearing.
Install output gear (10) over the chain wheel (5)
(12) through thrust washer (11) and then into the chain w
planet gears (9) to be timed with marks aligned as
per the below
in place then attach gear cover (13)
to the gear side frame plate (8).
Assemble the Chain wheel and chain:
Assemble the chain
stop (16) to one end of the chain.
Before or after assembly,
lubricate chain with any viscosity gear oil. Apply
so that it reaches
contact areas between the links then wipe off excess
(dry lubricant may be substituted).
Lay the gear end assembly on a workbench with
pinion
shaft (12) up. Place the load chain (7
) around the chain
wheel (5). Insure the chain weld is facing
away from
wheel, (see illustration below) and
that the chain stop
(16) is
on the right hand side and perpendicular to the
frame plates without twist in the chain. Looki
ng at the
gear side frame (8), with hook pin (6) at the 12
o’clock
position, insert the stripper (4) at the 7
o’clock position,
and guides (
3) at 4 and 10 o’clock positions. Place the
top hook assembly (70) over the protruding
pin (6).
Position brake
side frame plate assembly (1) over the
parts while aligning; bosses on the stripper and guides,
hook pin (6) and spacer bolts to the mating holes.
Note: X5 hoists are designed to allow the chain
weld to be
assembled in any orientation. However, ASME Stan
dard
4.3.1 (f) implies the chain is to be assembled per this i
nstruction.
9
10
12
9
ⓒ 2016 All Material Handling
Install output gear (10) over the chain wheel (5)
spline. Insert pinion shaft
(12) through thrust washer (11) and then into the chain w
heel (5). Insert top hook pin (6). Insert the
per the below
illustration. Be sure hook pin (6) is
to the gear side frame plate (8).
Assemble the chain
pull
Before or after assembly,
so that it reaches
contact areas between the links then wipe off excess
pinion
) around the chain
away from
that the chain stop
on the right hand side and perpendicular to the
ng at the
o’clock
o’clock position,
3) at 4 and 10 o’clock positions. Place the
pin (6).
side frame plate assembly (1) over the
parts while aligning; bosses on the stripper and guides,
weld to be
dard
B30.21-
nstruction.
16
5
12
8
3
6
4
70
7
3
80
9

MAN-X5L-ENG-01 10 ⓒ 2016 All Material Handling
Assembly of the brake components:
After assembly of all parts, between the gear cover (13) and the
brake side frame plate (1), place the brake seat (19) down on the
pinion shaft (12). Place the brake ratchet disc (20) onto the brake
seat (19). Assemble (17) brake pawls, pawl springs and retainers in
the position shown in the illustration onto the brake side frame plate
(1). If assembled correctly the pawls (17) must snap into the teeth
of the brake disc and stop the disc from rotating in the counter
clockwise direction.
Assembly of control components:
After assembly of the brake components, assemble the lower lever
assembly (21). Install the brake driver (22), or overload protection
clutch kit (22C) if equipped, clockwise over the threaded pinion shaft
(12) until snug against the brake disc (20) while holding the hook
side chain. Attach the lever assembly (27) to the lower lever
assembly (21). Install the brake cam (28) down and over the pinion
spline (12) and index slightly to the right of center per the below
diagram.
Place the inner brake spring (32) into brake driver (22) or (22C) if equipped with overload protection.
Install the hand wheel (33). While holding the hook side chain, turn hand wheel clockwise until snug
with the brake spring (32) then rotate the hand wheel 120º clockwise while pushing in until it drops
down. Continue to push in and rotate clockwise until the hand wheel drops again into home position
and will not rotate further, (see below illustration). Turn the Up-Down selector to the up position to hold
the hand wheel (33) in the home position.
Hold the hook side chain by hand and
ratchet the lever in the up direction to
insure the brake driver (22 or 22C) is
in contact with the brake ratchet disc
(20).
Place the outer brake spring (34) into
the hand wheel cover (35). Place into
the hand wheel (33) and turn
counterclockwise until snug, then rotate
the hand wheel120º counterclockwise and push in until it can engage
the spline on pinion shaft (12) (see illustration). Continue to hold down
on the hand wheel cover (35) until nut (36) is threaded onto pinion shaft
(12). Tighten slotted nut (36) and assemble split pin (37). Check free chain
function by hand at no load to insure assembly is correct. Before returning the hoist to service it must
be load tested and recorded per Periodic Inspection requirements. See section 4.0 INSPECTION AND
TEST in this manual.
1
17
20
17

MAN-X5L-ENG-01 11 ⓒ 2016 All Material Handling
10.0 TROUBLE SHOUTING
Trouble
Cause
Cure
Hand Wheel (33)
does not move in or
out
Selector not in neutral “N” position Move Selector to neutral “N”
Hoist is loaded Never attempt to pull hand wheel
out when the hoist is loaded.
Improper assembly Requires service for repair
Free chain mode
does not allow chain
to be pulled freely
Chain pulled too fast or accelerated
too quickly causing the brake to set Reset the hand wheel (33) and pull
load chain with less force
Assembly of outer brake spring (34)
may be preloaded in excess of 120º Requires service for repair.
Hoist will not lift or
lower at no load
Brake is not set See section 1.0 OPERATION in
this manual: instructions 5 and 6
Lever moves without clicking, chain
does not continue to move in or out
There must be some resistance to
cause the lever to ratchet. Hold or
pull the slack chain by hand while
ratcheting the lever. Or, use the
free chain mode to easily position
the chain.
Improper assembly of brake
components between the hand wheel
(33) and brake driver (22)
Requires service for repair.
Re-assemble components
between the hand wheel (33) and
brake driver (22) per instruction
and illustration in section 9.0
ASSEMBLY in this manual.
Hoist will not lift.
No clicking when
lever is rotated in up
direction
Pawls (17) not engaging the brake
disc (20). Due to spring failure,
corrosion or contamination
Requires service for repair. Clean
and inspect pawl and spring for
proper function.
Up, Dn Selector is not indexed
correctly or spring (25) missing
Requires service for repair. Clean
and inspect parts and assure
proper assembly
Bottom hook (80) and slack end pull
handle (16) are assembled on the
wrong end of the chain.
Requires service for repair.
Looking at the lever end, the
bottom hook (80) should be on the
left side and the Pull handle (16)
on the right.,
Continued on next page

MAN-X5L-ENG-01 12 ⓒ 2016 All Material Handling
10.0 TROUBLE SHOUTING (Continued)
Trouble Cause Cure
Hoist will not lift.
Slight clicking when
lever is rotated in up
direction
Brake disc (20) installed upside
down not allowing the pawls (17) to
engage.
Requires service for repair
improper brake disc installation.
Hoist binds internally
while lifting or
lowering
Gearing improperly installed
Requires service for repair.
Remove gear cover and inspect for
proper gear timing per instruction
and illustration in section 9.0
ASSEMBLY in this manual.
Twisted or kinked chain was allowed
to be ingested into the hoist. Requires service for repair by
disassembly to inspect for damage
Will not descend. Brake is over tightened from shock
load or removing the load by other
than lowering with the hoist.
With the hoist selector in DN
position, exert a hard sharp pull on
the lever in the down direction.
Twisted Chain on
multiple part hoist
Capsized or flipped lower hook
Flip Lower hook block

MAN-X5L-ENG-01 13 ⓒ 2016 All Material Handling

MAN-X5L-ENG-01 14 ⓒ 2016 All Material Handling
#
X5
L
02250
(1 Part)
X5
L
03528
(1 Part)
X5
L
07056
(1 Part)
X5
L
14000
(2 Part)
X5
L
20000
(3 Part)
1
P-L02250-1 P-L03528-1 P-L07056-1
*2
P-L02250-2 P-L03528-2 P-L07056-2
3
P-L02250-3 P-L03528-3 P-L07056-3
4
P-L02250-4 P-L03528-4 P-L07056-4
5
P-L02250-5 P-L03528-5 P-L07056-5
6
P-L02250-6 P-L03528-6 P-L07056-6
7
C5.7H17Z C7.1H20Z C10H28Z
8
P-L02250-8 P-L03528-8 P-L07056-8
9
P-L02250-9 P-L03528-9 P-L07056-9
10
P-L02250-10 P-L03528-10 P-L07056-10
11
P-L02250-11 P-L03528-11 P-L07056-11
12
P-L02250-12 P-L03528-12 P-L07056-12
13
P-L02250-13 P-L03528-13 P-L07056-13
14
P-M8 WASHER LOCK
15
P-M8 NUT ACORN
16
P-L02250-16 P-L03528-16 P-L07056-16
*17
P-L02250-17 P-L07056-17
18
P-L02250-18 P-L07056-18
19
P-L02250-19 P-L07056-19
*20
P-L02250-20 P-L07056-20
21
P-L02250-21 P-L03528-21 P-L07056-21
22
P-L02250-22 P-L03528-22 P-L07056-22
22C
P-L02250-22C P-L03528-22C P-L07056-22C
22CL
P-L02250-22CL
23
P-L02250-23 P-L07056-23
24
P-L02250-24 P-L07056-24
25
P-L02250-25 P-L07056-25
26
P-L02250-26 P-L03528-26 P-L07056-26
27
P-L02250-27 P-L03528-27 P-L07056-27
28
P-L02250-28 P-L07056-28
29
P-M6X12 HEXHD P-M8X12 HEXHD
30
P-M6 WASHER LOCK P-M8 WASHER LOCK
31
P-M6 NUT HEX P-M8 NUT HEX
32
P-L02250-32 P-L07056-32
33
P-L02250-33 P-L07056-33
33L
P-L02250-33L P-L07056-33L
34
P-L02250-34 P-L07056-34
35
P-L02250-35 P-L07056-35
*36
P-M8 NUT SLOTTED-9.5 P-M10 NUT SLOTTED-12
37
P-M1.5X16 COTTER P-M2X20 COTTER
38
P-NPL-X5L02250 P-NPL-X5L03528- P- NPL-X5L07056 P- NPL-X5L14000 P- NPL-X5L20000
39
P-M2.5X6 SCREW DRIVE
*
Recommended Spare Part

MAN-X5L-ENG-01 15 ⓒ 2016 All Material Handling
#
X5
L
02250
(1 Part)
X5
L
03528
(1 Part)
X5
L
07056
(1 Part)
70
P-L02250-70 P-L03528-70 P-L07056-70
71
P-L02250-71 P-L03528-71 P-L07056-71
*72
P-L02250-72 P-L03528-72 P-L07056-72
73
P-M5X18 CSKHD P-M6X22 CSKHD
74
P-M5 NUT LOCK P-M6 NUT LOCK P-M6 NUT LOCK
75
P-L02250-75 P-L03528-75 P-L07056-75
76
P-M6 NUT LOCK P-M8 NUT LOCK P-M10 NUT LOCK
80
P-L02250-80 P-L03528-80 P-L07056-80
*
Recommended Spare Part

MAN-X5L-ENG-01 16 ⓒ 2016 All Material Handling
#
X5
L
14000
(2 Part)
X5
L
20000
(3 Part)
70
P-L14000-70 P-L20000-70
71
P-L14000-71 P-L20000-71
*72
P-L14000-72 P-L20000-72
73
P-M10X30 HEXHD P-M10X35 HEXHD
74
P-M10 NUT LOCK P-M10 NUT LOCK
75
P-L07056-75 P-L07056-75
76
P-M10 NUT LOCK P-M10 NUT LOCK
77
P-L14000-77 P-L14000-77
80
P-L14000-80 P-L20000-80
*
Recommended Spare Part

MAN-X5L-ENG-01 17 ⓒ 2016 All Material Handling
Model: Serial No.: Date:
PREOPERATION INSPECTION
For New hoist and after inactivity of more than one month
in compliance with ASME B30 & OSHA
New Hoist are to be inspected before use and must be recorded. No load test is
required if tested and certified when manufactured. The new hoist test certification
supplied with the hoist should be filed with the initial Preoperation Inspection. The date
of this Preoperation Inspection, not the date on the load test, will become the start date
for entering a new unit into service and determining timing of future periodic inspections.
Units returned to service after inactivity of more than one month, are to be
inspected before use and must be recorded.This inspection does not affect the date of
the next periodic test as previously scheduled.
Owners Name:
Description :
Working Load Limit (WLL):
Evaluated by:
Comments:
Check List.
a) Proper operation and any unusual sounds.
b) Visually inspects hooks for deformation or bending and to verify latches function.
c) Visually inspect Load chain for twist, damage or excessive wear between links.
d) Visually inspect the Hoist body and lever for damage.
e) Fasteners are in place and tight.
f) Tail chain stop is in place.
g) Nameplate and Warnings and operation instruction label are legible.

MAN-X5L-ENG-01 18 ⓒ 2016 All Material Handling
Check List
a) Proper operation and any unusual sounds.
b) Visually inspects hooks for deformation or bending and to verify latches function.
c) Visually inspect Load chain for twist, damage or excessive wear between links.
d) Visually inspect the Hoist body and lever for damage.
e) Fasteners are in place and tight.
f) Tail chain stop is in place.
g) Nameplate and Warnings and operation instruction label are legible.
h) Visual inspection to determine that the unit is not compromised by corrosion or
debris and can operate as intended.
i) Make a trial lift or pull of a few inches and then stop to determine the hoist operates
as intended.
j) Continual observation during use for any damage or change in operation.
k) Disassemble lever end of hoist to expose the brake components. Inspect brake
pawls, disc, springs and ratchet surfaces for contamination or abnormal wear.
l) Inspect; chain, springs and load bearing parts per INSPECTON MEASUREMENTS
as illustrated in the Operation and Maintenance Manual.
m) Disassemble hook blocks and check hooks 100% for any sign of cracks, bending,
twist or stretching and opening measurement per INSPECTON MEASUREMENTS
as illustrated in the Operation and Maintenance Manual.
n) Check chain wheel or wheels for smooth operation and visually for wear.
o) Check chain guide and guards for damage.
p) Load test to minimum 125% of WLL (not more than 150% WLL). During
which confirm function is as intended. After the test load is released inspect
again for requirements of a) through j).
Model: Serial No.: Date:
PERIODIC INSPECTION
in compliance with ASME B30 & OSHA
Required annually as a minimum and must be recorded. Periodic Inspection may be
required more often as determined by severity of service or as experience dictates. Consult
ASME B30.21 for determination of service and instruction. Periodic inspection is also
required for repaired units. This inspection requires disassembly and load test prior to
being returned to service.
Owners Name:
Description :
Working Load Limit (WLL): Test Load:
Evaluated by:
Comments:

MAN-X5L-ENG-01 19 ⓒ 2016 All Material Handling
LIFETIME LIMITED WARRANTY
on Models: X5L02250, X5L03528, X5L07056, X5L14000 and X5L20000
We make every effort to assure that our products meet high quality and durability standards and
we warrant to the original consumer of the product that each is free from defects in material and
workmanship as follows:
This warranty does not apply to defects due directly or indirectly to misuse, negligence or
accidents, repairs or alterations outside our facilities or to a lack of maintenance. The warranty
begins with the date of purchased from an authorized AMH dealer by the original user. Please
retain your dated sales receipt as proof of purchase to validate the warranty. Except as
stated herein, any implied warranties or merchantability and fitness are excluded. AMH shall in no
event be liable for death, injuries to persons or property or for incidental, contingent, special or
consequential damages arising from the use of our products. Some states do not allow the
exclusions or limitation of incidental or consequential damages; hence the above limitations or
exclusions may not apply to you. To take advantage of this warranty, the product must be
returned for examination, postage prepaid to an authorized service station. Proof of purchase
date and an explanation of the complaint must accompany the product. No returns will be
accepted without prior authorization obtained through an AMH dealer. If our inspection
discloses a manufacturing defect we will either repair or replace the product or refund the
purchase price, if we cannot quickly provide a repair or replacement, if you are willing to accept
such a refund. We will return repaired products or the replacement at our expense, but if we find
that there is no defect, or that the defect resulted from causes not within the scope of this
warranty, then the user must bear the cost of returning the product. This warranty gives you
specific legal rights, and you may also have other rights that vary from state to state.
Typical issues caused by misuse that are not covered by warranty:
•Bent, stretched or broken hooks
•Missing or sprung hook latch
•Bent or damaged lever
•Missing parts
•Corrosion
•Worn, deformed or stretched load chain
•Damage to chain guides and other parts from not allowing the hoist to form
a straight line between hooks. Example is binding the hoist function by
contact of the body with a structure.
•Wear from normal use.
AMH products are only sold through authorized dealers. The specifications and dimensions listed
on the AMH website or in printed materials are provided as general information and are not
binding. AMH reserves the right to alter equipment, parts, fittings, or accessories without prior
notice for any reason.
This manual and other product information is available from: www.allmaterialhandling.com
This manual suits for next models
5
Table of contents
Other AMH Chain Hoist manuals
Popular Chain Hoist manuals by other brands

Columbus McKinnon
Columbus McKinnon TIGRIP TBSplus Translated Operating Instructions

EINHELL
EINHELL 22.551.30 operating instructions

Columbus McKinnon
Columbus McKinnon CM 622 Series Operating, Maintenance & Parts Manual

Silverline
Silverline 868692 manual

Tractel
Tractel bravo Operating and maintenance instruction

SPIDER
SPIDER SC1500-GHS quick reference