amiad EBS-10K Flat Lid Filter Manual

AMIAD Water Systems
EBS-10K Flat Lid Filter
Serial number:
Order number:
Catalogue number:
Filtration degree:
Tested by:
Installation, Operation and
Maintenance Instructions
000-910101 595/07.2019

EBS 10K Flat Lid 910101-000595 / 07.2019 Page 2 of 28
AMIAD Water Systems
EBS 10K Flat Lid Filter - User Manual
Disclaimer:
Copyright © 2017 Amiad Water Systems Ltd. All rights reserved.
The contents of this document, including without limitation all information and materials, images, illustrations, data, drawings, names and any other
such materials that appear in this document are the sole property of Amiad Water Systems Ltd., including any intellectual property rights, whether
registered or not, and all know-how contained or embodied therein. Amiad may alter, remove or change the Content without any further notice. You
may not reproduce, copy, modify, create derivative works from, sell or participate in any sale of, or exploit in any way, in whole or in part, any of this
document or its content.
The confidential nature of and/or privilege in the file enclosed is not waived or lost as a result of a mistake or error in this file. If you received this file in
This document does not replace any certified drawing, procedure or information provided by Amiad in reference to a specific customer, site or project.
Amiad assumes that all users understand risks involved within this file and/or its attached materials. This document is given in good faith and is not
intended to impose any obligation to Amiad. While every effort has been made to ensure the information in this manual is accurate and complete, we
would appreciate if you can bring any errors or omissions to the knowledge of Amiad or consult Amiad experts or its authorized representatives if you
have any questions.
Amiad Water Systems Ltd. D.N. Galil Elyon 1, 1233500, Israel Tel: 972 4 690 9500 | Fax: 972 4 814 1159 Email: info@amiad.com

EBS 10K Flat Lid 910101-000595 / 07.2019 Page 3 of 28
TABLE OF CONTENTS
Technical specifications........................................................................................ Page 4
Safety instructions ........................................................................................................ 5
Dimensional and recommended installation drawing................................................... 8
Description and filter operation .................................................................................... 9
Installation................................................................................................................... 10
Commissioning, Start-up and First Operation ............................................................. 11
Maintenance................................................................................................................ 12
Troubleshooting .......................................................................................................... 14
Disassembling and reassembling................................................................................. 15
Parts schedule section 1: Standard EBS 10K OL Filter ................................................. 18
Parts drawing - Section 1: Standard EBS 10K OL Filter ................................................ 20
Parts schedule section 2: Drive Shaft Housing ............................................................ 22
Parts drawing - Section 2: Drive Shaft Housing ........................................................... 23
Parts schedule & drawing section 3: Suction Scanner................................................. 24
Parts schedule & drawing section 3 –SLN Suction Scanner........................................ 25
Limited Warranty......................................................................................................... 26
With any inquiry please quote Filter Serial Number, located on the filter housing.

EBS 10K Flat Lid 910101-000595 / 07.2019 Page 4 of 28
TECHNICAL SPECIFICATIONS
General
Maximum flow rate
800 m3/h
3500 Us gpm
Consult manufacturer for optimum flow depending
on filtration degree & water quality.
Min. operating pressure
2.5 bar
35 psi
Or lower if pressure is increased for flushing.
Max. operating pressure
10 bar
150 psi
16 bar (240 psi) upon request.
Filter area
10,000 cm2
1550 in2
Inlet/Outlet diameter
200,250, 300, 350 mm
8", 10", 12",14"
Flange standards per request.
Filter housing
500 mm
20"
Max. operating temp.
600C
1400F
Weight
200 mm = 411 Kg
250 mm = 414 Kg
300 mm = 427 Kg
350 mm = 451 Kg
08" = 904 lb.
10" = 911 lb.
12" = 939 lb.
14" = 992 lb.
Flushing data
Exhaust valve
80 mm
3"
Flushing cycle time
30 - 40 seconds
30 - 40 seconds
Wasted water per cycle
500 liter
132 gallon
at 2 bar (30 psi)
Minimum flow for flushing
50 m3/h
220 USgpm
at 2 bar (30 psi)
Control and electricity
Control voltage
24V AC / 24V DC
Per request
Electric motor
0.375Kw
18 / 22 Gear output R.P.M.
Rated operation Voltage
3 phase
220 / 380 / 440 VAC, 50 / 60 Hz
Single phase
110 / 220 VAC, 50 / 60 Hz
Current consumption
1.5 Amp.
(with 3 phase 380 / 440 V)
Construction materials
Filter Housing and Lid
Epoxy-coated carbon steel 37-2 (Stainless Steel 316 available on request).
Screens
Stainless Steel 316
Cleaning mechanism
Stainless Steel 316, POM
Exhaust valve
Epoxy-coated cast iron, NBR
Seals
NBR
Control
Brass, Stainless Steel, Nylon
Standard filtration degrees
Stainless steel weave-wire screen
micron
500
300
200
130
100
80
50
25
10
mm
0.5
0.3
0.2
0.13
0.1
0.08
0.05
0.02
0.01
mesh
30
50
75
120
155
200
300
450
600

EBS 10K Flat Lid 910101-000595 / 07.2019 Page 5 of 28
SAFETY INSTRUCTIONS
General Safety Instructions
➢Amiad filtration products always operate as components in a larger system. It is essential for the system designers, installers and
operators to comply with all the relevant safety standards.
➢Prior to installation, operation, maintenance or any other type of action carried out on the filter, read carefully the safety,
installation and operation instructions.
➢During installation, operation or maintenance of the filter all conventional safety instructions should be observed in order to
avoid danger to the workers, the public or to property in the vicinity.
➢Please note: The filter enters into a flushing mode automatically, without prior warning.
➢No change or modification to the equipment is permitted without a written notification given in advance by the manufacturer or
by its representative, on the manufacturer’s behalf.
➢Always observe standard safety instructions and good engineering practices whilst working in the filter’s vicinity.
➢Use the filter only for its intended use as designed by Amiad, any misuse of the filter may lead to undesired damage and may
affect your warranty coverage. Please consult with Amiad prior to any non-regular use of this equipment.
Installation
General
➢Install the filter according to the detailed Installation Instructions provided with the filter by the manufacturer and according to
the description given in this manual.
➢Make sure to leave enough clearance so as to enable easy access for future treatments and safe maintenance operations.
➢The user should arrange suitable lighting at the area of the filter to enable good visibility and safe maintenance.
➢The user should arrange suitable platforms, ladders and safety barriers to enable easy and safe access to the filter without
climbing on pipes and other equipment. The user should verify that any platform, barrier, ladder or other such equipment is built,
installed and used in accordance with the relevant local authorized standards.
➢Check and re-tighten all bolts during commissioning and after the first week of operation.
➢Use only appropriate standard tools and equipment operated by qualified operators when installing, operating and maintaining
the filter.
➢When installation is required in hazardous environment sites, underground or high above ground, make sure that the site design
and the auxiliary equipment are appropriate and that installation procedures are carried out in accordance with the relevant
standards and regulations.
➢Ensure walking areas about the installation are slip free when wet.
Shipment and transporting
➢Shipping and transporting the filter must be done in a safe and stable manner and in accordance with the relevant standards and
regulations.
➢For shipping, lifting and positioning the filter, use only approved lifting equipment and authorized employees and contractors.
Electricity
➢Electric wiring should be performed by an authorized electrician only, using standardized and approved components.
➢Install a lockable main power cut-off switch close to the control panel.
➢If due to site constraints, the control panel is installed without a clear line-of sight of the filter, an additional lockable power
disconnect cut-off switch should be installed near each filter unit.
➢Installation of the filter should be performed so as to avoid direct water splashing on the electrical components or on the control
panel.

EBS 10K Flat Lid 910101-000595 / 07.2019 Page 6 of 28
Pneumatics
➢Install a lockable main cut-off switch, featured with a pressure release mechanism, on the compressed air supply line close to
the control panel.
➢If the control panel is installed far away and there is no eye contact with the filter, a lockable compressed air cut-off switch,
featured with a pressure release mechanism, should be installed near each filter unit.
➢The user should make sure that the compressed air supplied to the filter never exceeds the maximum designated pressure for
this filter. An air-pressure reduction valve should be installed on the compressed air supply line upstream of the filter’s pneumatic
inlet port.
Hydraulics
➢Extra safety devices should be installed on hot water applications to avoid skin burn danger.
➢The user should install a manual Water Cut-off Valve next to the filter’s inlet port.
➢In cases where the downstream piping network downstream of the filter is pressurized an additional manual Water Cut-off Valve
should be installed next to the filter outlet port.
➢The user should make sure that the system includes a Pressure Release / Drainage Valve to enable release of residual pressure
prior to any maintenance procedure performed on the filter.
➢The user should make sure that the filter is never exposed to water pressure exceeding the maximum designated pressure for this
filter, if needed a Pressure Reduction Valve should be installed upstream of the filter’s water inlet port.
➢Please note that the maximum working pressure indicated at the filter’s specifications table includes the pressure caused by fluid
hammer and pressure surge effects.
Civil Engineering
➢Make sure that the filter installation is done by Amiad qualified technicians.
➢Make sure that any civil engineering work at the installation site such as construction, lifting, welding, etc. is done by qualified
workers / technicians / contractors and in accordance with the relevant local standards.
➢While using lifting equipment, make sure that the filter or the lifted part is chained securely and in
a safe manner.
➢Do not leave lifted equipment if there is no necessity. Avoid working below lifted equipment.
➢Wear a safety helmet while using lifting equipment.
➢Make sure that the flooring is sloped for drainage and to avoid accumulation of liquids.
Commissioning
➢Read carefully the Commissioning and the First Start-up Operation instructions prior to any attempt to operate the filter.
➢In order to achieve maximum performance and smooth operation of the filter it is crucial to perform the Startup and First
Operation procedures exactly as described in this manual.
➢Commissioning the filter should be done by an authorized Amiad technician, do not attempt to commission the filter
unaccompanied since this may lead to undesired damage and may affect your warranty coverage.
Operation and Control
➢Do not operate the filter before reading carefully and being familiar with its operation instructions.
➢Observe the safety stickers on the filter and never perform any operation contradicting the instructions given.
➢Never operate or use the filter for purposes other than its original design and operational envelope.

EBS 10K Flat Lid 910101-000595 / 07.2019 Page 7 of 28
Maintenance
Before any maintenance or non-regular operation please read the following:
➢Servicing the filter should be done only by technicians authorized by Amiad.
➢Disconnect the filter from the power supply and lock the Main Power Switch.
➢Disconnect the compressed air supply, release the residual pressure and lock the Pneumatics Main Valve.
➢Disconnect the filter from the water system by closing and securing the Manual Inlet Valve. In cases where the downstream
piping network is pressurized, close and secure the Manual Outlet Valve also.
➢Release the residual water pressure by opening the Pressure Release / Drainage Valve.
➢Empty the filter by opening the Drainage Valve.
➢In hot water systems wait till the filter components cool off to a safe temperature.
➢Place warning signs around the work area as required by the local standards and procedures.
➢Inspect the filter’s safety stickers and replace any damaged or faded sticker.
Mechanical
➢When working on the filter use only appropriate standard tools.
➢Always open and close valves slowly and gradually.
➢Remove grease and fat material residues in order to avoid slipping.
➢Before disconnecting the filter from the water supply, electricity and pneumatics and before releasing the filter’s residual
pressure do NOT:
oloosen or unscrew bolts
oremove any protection cover
oopen any service port flange
➢Avoid splashing and water leakage so as to minimize slippage, electrification or damage to the equipment, caused by moisture.
➢While using lifting equipment, make sure that the filter or the lifted part is chained securely and in
a safe manner.
➢Do not leave lifted equipment if there is no necessity. Avoid working below lifted equipment.
➢Wear a safety helmet, goggles, gloves, and any other personal safety equipment required by the local standards and regulations.
➢Human entry into a filter must be done in accordance with the relevant local safety instructions, standards and regulations for
working in hazardous environment.
➢Manual cleaning of filter media using high water pressure or steam should be performed in accordance with the cleaning system
instructions, the local standards and regulations and without endangering the operator or the vicinity
➢Manual cleaning of filter element using acid or other chemical agents should be performed in accordance with the relevant
material safety instructions, the local standards and regulations and without endangering the operator or his vicinity.
Before returning to regular operation
➢Re-assemble any protection covers or protection mechanisms removed during service or maintenance operations.
➢Make sure that all the tools, ladders, lifting devices, etc. used during the maintenance procedures are taken away from the filter
area and stored
➢In order to return the filter to regular operation, follow the First Start-up Operation instructions as detailed in your user manual.
➢For filters used in potable water systems it is required to disinfect the filter according to the local water authority standards and
regulations before putting it back to service.

DIMENSIONAL AND RECOMMENDED INSTALLATION DRAWING
KEY:
12" INLET MANIFOLD.
1. 12" INLET BUTTERFLY VALVE.2. 12" EBS-10000 FILTER.
3. 3" HYDRAULIC VALVE.
4. NON RETURN VALVE.
5. 12" OUTLET BUTTERFLY VALVE.
6. 12" OUTLET MANIFOLD.
7. 12" BY- PASS BUTTERFLY VALVE.
8.
1
2
3
4
5
6
7
8
83.622
2124
44.17
1122
23.62
600
52.05
1322
113.64
2886

EBS 10K Flat Lid 07.2019 Page 9 of 28
DESCRIPTION OF FILTER OPERATION
Filtering process:
The EBS is a sophisticated yet easy-to-operate automatic filter, with a self-cleaning mechanism driven by an electric motor. The EBS is
designed to work with various types of screens in filtration degrees from 500 to 10 micron, and is available in 8", 10", 12" and 14"
inlet/outlet diameter.
The water enters through the inlet pipe into the fine screen from inside out. The "filtration cake" accumulates on the fine screen
surface and causes head loss to develop.
Self-cleaning process:
The EBS will start the self-cleaning process when the pressure differential across the screen reaches a pre-set value or a predetermined
lapse of time.
Cleaning of the filter element is carried out by the suction scanner, which rotates in a spiral movement while removing the filtration
cake from the screen and expels it out through the exhaust valve.
The scanner rotation is operated by a 2-way (fwd/rev) drive unit which is attached to the scanner by a threaded shaft, providing the
linear movement.
The exhaust valve is activated for the duration of the cleaning cycle by a 3-way solenoid. During the self-cleaning process, which takes
approximately 35 seconds, filtered water continues to flow out of the filter.
Different modes of filtration:
The filtration system may be found in one of the following modes:
1. Filtering mode: This is the normal function condition. Flushing is not occurring and the power light on the control board is lit.
2. Flushing mode: A mode in which the flushing process is in progress. The motor and the exhaust valve are operating according to the
program.
3. Continuous flushing mode: It is possible to activate the self-cleaning mechanism continuously by changing the operation mode on
the HMI.
4. Malfunction mode: During malfunction mode the self-cleaning operation is stopped, the malfunction light on the control board is
turned on and an external output is activated. In case that there is HMI, the relevant fault error will be displayed.
The filtration system may enter a malfunction mode in the following cases:
1st. When there is a continuous signal from the pressure differential switch for duration of more than 15 minutes. This means that
the self-cleaning process is not successful.
2nd. When the motor protector was activated, either manually or due to overload.
3rd. As a result of a malfunction in the limit switches.
Initiation of self-cleaning:
The filter will enter the self-cleaning process as a result of any of the following causes:
1. A signal from the Pressure Differential Switch (PDS) - The PDS which is situated on the filter body, sends an electric signal when the
pressure differential across the screen reaches the pre-set value (usually 0.5 bar =7 psi). The control board registers the signal and
operates the flushing process according to its program.
2. Manually pressing the "TEST" push button at the control board.
3. The TIMER installed in the control board allows operation of self-cleaning process at time intervals that can be set up, independent
from the head loss factor. The timer resets after every flushing cycle.
4. A signal from continual flushing switch - This switch in the control board allows operation in continuous flushing mode; meaning,
the filter is flushing itself all the time regardless of flow rate or water quality.
Stages of cleaning cycle:
Under normal operating condition the electrical control panel operates the "EBS" filter in the following manner;
1. The exhaust valve opens to atmosphere.
2. Five seconds delay.
3. The motor starts rotating the suction scanner shaft upward until it reaches the upper limit switch.
4. The exhaust valve closes.
5. Two seconds delay.
6. The motor starts rotating the suction shaft downward until it reaches the lower limit switch.

EBS 10K Flat Lid 910101-000595 / 07.2019 Page 10 of 28
INSTALLATION
Design recommendations
1. If flow increases and pressure drops dramatically for a long period of time during network filling-up, it is recommended that a
pressure sustaining valve is installed downstream of the filter. The pressure sustaining valve will ensure a controlled filling-up
of the line.
2. If continual water flow is essential even during maintenance period, it is recommended that a manual or automatic by-pass is
installed, and the isolating valves will be used to isolate each filter.
3. In places where there is an expected temporary worsening of water quality, it is possible to operate an emergency flushing
program. In order to do so, a hydraulic controlled valve has to be installed downstream of the filter. For details, please
consult the manufacturer.
Installation instructions
1. Before beginning the installation process, carefully read the safety instructions in chapter 2 of this document and make sure
that all the workers at the installation site are fully aware of and comply with, these and any other local safety instructions.
2. Select a convenient location for the installation of the filter where operation and maintenance will be optimal. It is
recommended that a standard and safe lifting auxiliary is available for maintenance.
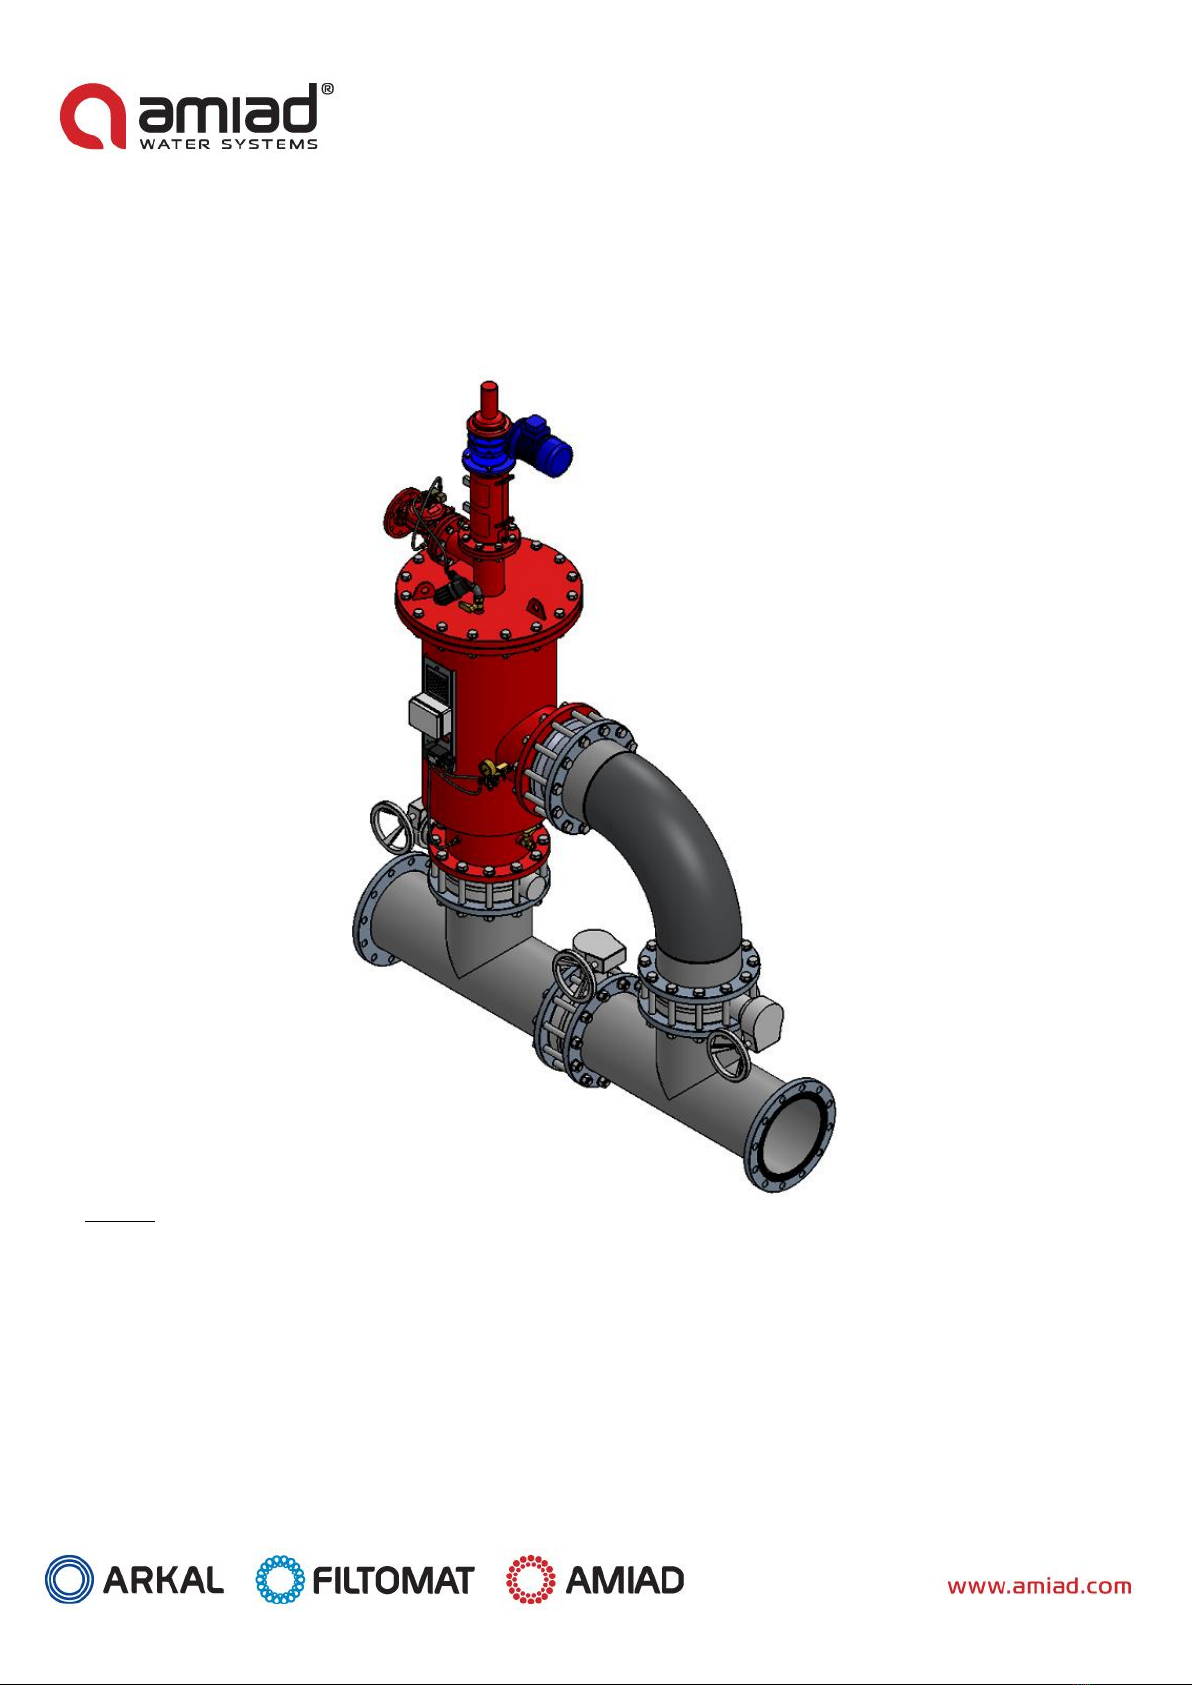
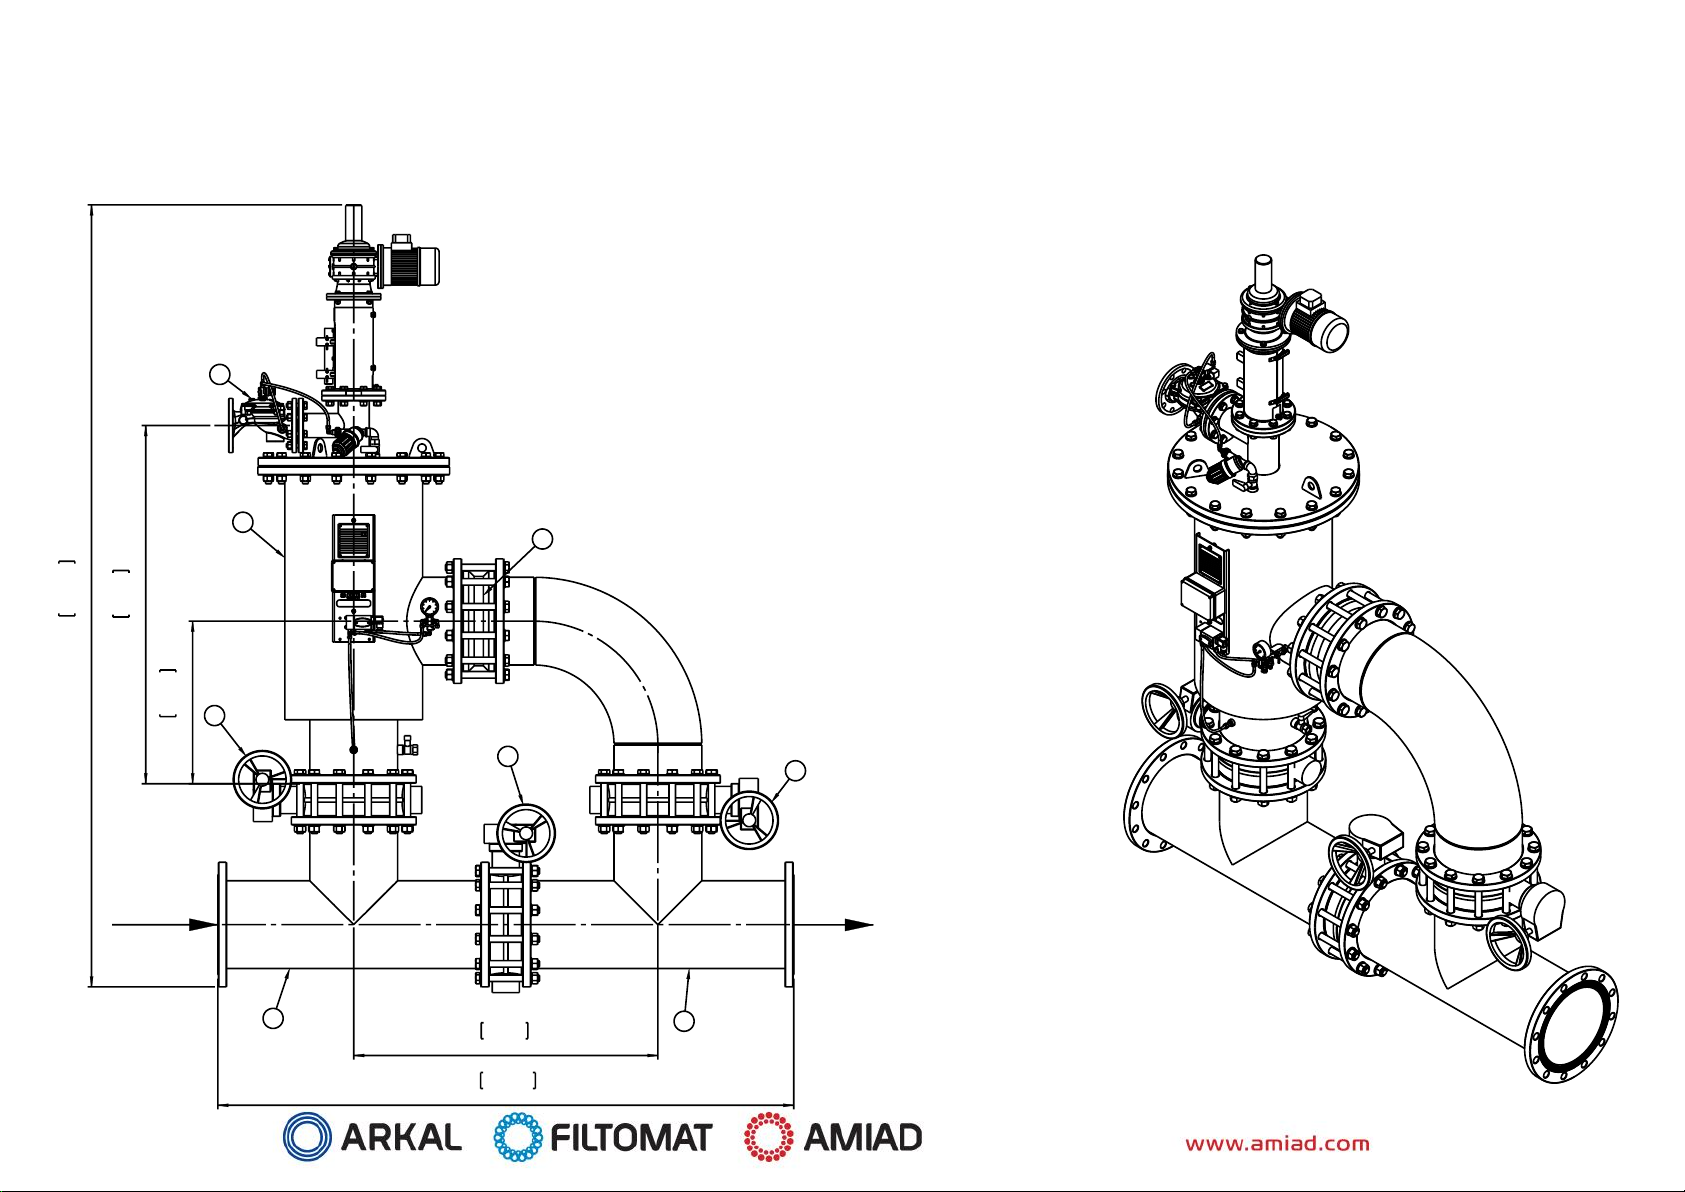
3. Install the filter vertically. Please note that a minimum clearance of 300 mm (12 In.) (Not including a crane) is required in
order to allow disassembly of the unit.
4. Ensure that the direction of flow is aligned with the arrows marked on the filter housing. (Flow outlet will always be from the
side; flow inlet is from the bottom).
5. Installation of a mechanical non-return valve downstream of the filter is required.
6. If possible, prior to installing the filter, thoroughly flush the main line at the connection point in order to remove large objects
that may damage the filter’s internal mechanism.
7. Install a drainage pipe to the exhaust valve. Minimum 3" diameter for a maximum pipe length of 20 meters (60 feet), for
longer drainage, 4" pipe diameter must be used for a maximum length of 40 meters (120 feet). Please note that no restriction
is allowed on the drainage pipe. For special applications, please consult the manufacturer.
8. If the system is designed to operate with working pressure higher than 4 bar (56 psi), it is recommended that a manual
valve is installed on the exhaust pipe, in order to enable regulation of the flushing flow rate & pressure.
9. The user should arrange suitable lighting in the vicinity of the filter to enable good visibility and safe maintenance.
10. The user should arrange suitable platforms and safety barriers to enable easy access to the filter without climbing on pipes
and other equipment. All such equipment should comply with the safety clauses of the relevant local standards.
IMPORTANT!!
Prevent static backpressure or reverse flow through the filter.
Install a non-return valve at the outlet of the filter.
Install a manual or a hydraulic valve downstream of the filter.
Electric wiring
1. All electrical works at the installation site must be done by a qualified and authorized electrician only. Make sure that this
electrician is fully aware of all the relevant safety instructions.
2. Install the control board in a dry and protected place (In out-door installation sites make sure to use a special control board
for out-door installation).
3. Power connection to the control board:
a. Connect a three-phase voltage source through a semi-automatic switch, or 16 Amp. fuse to the L1 L2 L3 inlet at the
terminal strip in the control board.
b. Earth the control board.
4. Power connection to the motor:

EBS 10K Flat Lid 910101-000595 / 07.2019 Page 11 of 28
Connect the drive unit to the control panel by means of a 4 x 2.5 mm (12 or 14 AWG) wire in flex-conduct. Use a long enough
cable to allow the drive unit to be removed and placed near the filter for maintenance, without having to disconnect
it from the cable. (It is recommended that this installation meets or exceeds local or national electrical codes, this is a "high"
voltage connection).
5. Control wiring:
The connection between the control junction box and the control board should be by 6 x 1.5 mm 2 (16 AWG) wire in flex-
conduct. The numbers on the terminals in the board and in the junction box are identical.
COMMISSIONING, START-UP AND FIRST OPERATION
1. Before starting-up the filter read the safety instruction as appear at chapter 2 of this document and pay special attention to
the commissioning safety instructions.
2. Inspect the filter’s installation and make sure that it is installed in accordance with the official installation drawings.
3. Verify (by authorized electrician only) that the electric wiring is correct and complies with the enclosed drawings. Make sure
that the electrical start-up operation is done by an authorized electrician only.
4. Switch ON the control & 24V circuit breakers. Leave the motor OL circuit breaker protector OFF.
5. Toggle all limit switches to verify that they activate the correct inputs on the PLC according to the wiring schematic. Correct
connections, if necessary, before proceeding to the next step.
6. Switch ON the motor protector circuit breaker The motor will start operating.
•Control Board without Homing procedure: The suction scanner shaft should turn clockwise and move downward to
the filter housing until it reaches the lower limit switch. If the motor rotates in the opposite direction, disconnect
the electricity immediately and change the direction of the motor rotation by changing between two phases.
•Control Board with Homing procedure: refer to the Homing section in the control boards operation manual.
The motor must stop when the limit switch plate reaches the lower limit switch and causes it to operate.
7. Operate a "dry" flushing cycle by pressing on the "TEST" push button. Make sure all flushing stages occur as described in the
filter description chapter of this manual.
8. Open the inlet valve to the filter, while the outlet valve remains closed or with an open by-pass valve (This will keep the flow
in the filter at a minimum), and operate a flushing cycle.
Make sure the exhaust valve opens and all stages of the flushing cycle are carried out. Attend to leakage, if any.
9. Gradually open the outlet valve and/or close the by-pass valve. Operate the filter at the designed hydraulic conditions.
10. Set the timer for 6-8 hours.
11. Check and re-tighten all bolts after the first week of operation.

EBS 10K Flat Lid 910101-000595 / 07.2019 Page 12 of 28
MAINTENANCE
Before beginning any maintenance procedure, carefully read the safety instructions in chapter 2 of this document and make sure that
all the workers at the filtration site are fully aware of and comply with, these and any other local safety instructions.
A. General inspection of the filter operation
This is the visual basic general inspection procedure of the filter for proper operation. It should be done regularly and prior to any
scheduled maintenance procedure.
Press the test button, this will initiate the self-cleaning cycle; Check that the exhaust valve opens, that the scanner moves upwards, and
when it reaches the top limit switch - verify that the exhaust valve closes.
B. Weekly maintenance
Visual Check:
1. Check that the filter operates properly by following the General Inspection of the Filter Operation as described above.
2. Visually check that there is grease on the drive shaft, and drive bushing.
3. Visually check the suction scanner for any leakage.
4. Visually check the filter housing, the valves and the check-valves for leakage.
5. Check the filter for loosen bolts.
If Necessary:
1. Disconnect and lock the filter’s power supply.
2. Disconnect and lock the filter’s compressed air supply.
3. Disconnect the filter from the water supply and drain the filter housing.
4. If it is necessary add grease to the filter’s suction scanner shaft.
5. Take care of any leakage from the scanner shaft. If necessary, replace the Sealing flange Internal O-Ring (5 on page 23) as
described at the following list:
6. Reconnect the filter carefully and safely to its water, air and power supply.
7. Perform a General Inspection of the Filter Operation as described above.
Changing the sealing flange internal O-ring
1. Close the inlet valve to the filter and release any residual pressure.
2. Disconnect and lock the filter’s power supply.
3. Disconnect and lock the filter’s compressed air supply and release any residual pressure.
4. Verify that the Suction Scanner is in its lower position. If not remove the electrical motor rear fan-cover, turn the fan
manually till the scanner’s limit switch plate reaches the lower limit switch.
5. Remove the Split pin (23) and pull out the connecting pin (22).
6. Turn the motor-fan till the drive shaft reaches half way of its movement. The drive shaft is now separated from the
Suction Scanner.
7. Unscrew nuts (20 on page 23) and pull the sealing flange (4 on page 23).
8. Remove the used internal O-ring and clean the O-ring seat.
9. Insert a new O-ring (4 on page 23)
10. Apply some grease to the external O-ring and to the shaft.
11. Tighten the sealing flange nuts (4 on page 23).
12. Re-connect the drive shaft to the suction scanner shaft.
13. Reassemble the motor fan cover.
14. Make sure that the filter is correctly reassembled; re-connect the power and the compressed air.
15. Operate the control board and open the filter inlet valve.
C. Maintenance prior to long term cessation of filter operation
The following must be done if the filter will not be operated for more than a month.
1. Operate flushing cycle (If possible, with a closed downstream valve).
2. Disconnect the control board from the power and lock the main switch before the limit switch disc reaches the switch.
3. Release pressure from the filter.

EBS 10K Flat Lid 910101-000595 / 07.2019 Page 13 of 28
4. Disconnect the compressed air supply and lock the main switch.
5. Grease the drive shaft and the drive bushing.
D. Maintenance prior to re-operation
1. Make sure that the filter is disconnected from power, compressed air and water supply.
2. Grease the drive shaft and the drive bushing.
3. Connect the control board to the mains.
4. Connect the compressed air supply.
5. Connect the filter to its water supply.
6. Perform a General Inspection of the Filter Operation as described above.
7. If necessary, change the Sealing flange Internal O-Ring as described above.
E. Every Six Months
Before beginning this maintenance procedure, carefully read the safety instructions in chapter 2 of this document and make sure that
all the workers at the filtration site are fully aware of and comply with, these and any other local safety instructions.
1. Perform a General Inspection of the filter Operation as described above and carefully inspect the filter visually for:
a. Proper operation
b. Any leakage from the filter housing or accessories
c. Abnormal or unusual noises
d. Loosen bolts
e. Non-smooth turning of the suction scanner
f. Unusual load on the filter electrical motor
g. Any sign of corrosion on the filter housing or accessories
h. Unusual vibrations
i. Non-smooth operation of the filter valves, air release valves and check-valves
2. Close the inlet and the outlet valves of the filter. Drain the filter housing and release any residual pressure.
3. Disconnect and lock the filter's power supply.
4. Disconnect and lock the filter's compressed air supply and release any residual pressure.
5. Disassemble the filter as described in the next chapter of this document.
6. Inspect the filter screen and components for any wear and tear.
7. Check the suction scanner and its nozzles.
8. Check the filter bearings.
9. Check the filter housing and lid for any sign of corrosion.
10. Check the filter internal and external coating and pain for damage
11. Replace any damaged component
12. Make sure that your maintenance engineers are aware of even the slightest sign of corrosion in the filter housing, lid or
accessories. In such case consider performing a standard pressure vessel tests as required by your local applicable standards.
13. Re-assemble the filter as described in the next section of this document.
14. Perform a complete COMMISSIONING, START-UP AND FIRST OPERATION as described earlier in this
document.
IMPORTANT!
THE DRIVE SHAFT MUST BE LUBRICATED WITH HEAVY-DUTY, WATER RESISTANT GREASE THAT WILL NOT OXIDIZE. (SHELL,
DARINA EP-2 OR SIMILAR)

EBS 10K Flat Lid 910101-000595 / 07.2019 Page 14 of 28
TROUBLESHOOTING
Before beginning any troubleshooting, carefully read the safety instructions chapter of this document and make sure that all the
workers at the filtration site are fully aware of and comply with, these and any other local safety instructions.
The filtration system may enter a malfunction mode in the following cases:
Symptom
Remarks and Actions
Fault due to continuous signal from the
pressure differential switch for duration of
more than 15 minutes.
The fault indication lamp is lighted in red
This fault means that the self-cleaning process is not successful.
This fault may be caused by one of the following reasons:
•The filter is clogged due to heavy dirt load or too high water flow rate.
Close the filter’s downstream valve.
Press the reset button to reset the fault mode. The fault indication lamp
is turned off.
Perform few consecutive manual flush cycles and monitor the PD signal.
Once the filter is clean gradually open the downstream valve and
monitor the PD and the flow-rate. Make sure that the filter doesn’t
exceed its designated flow-rate.
•The PD switch is faulty.
Ask your qualified electrician to check the PD connections and operation.
Replace the switch if found faulty.
The motor protector was activated
The fault indication lamp is blinking in red
This fault means that the motor was operated under too high load.
Note: All the following checks and actions should be done by a qualified electrician
only.
A. Check the motor power consumption when not loaded.
B. Check the limit switches for correct operation and verify that each one of
them stop the motor at its designated point.
C. Verify 3 phase 380VAC power supply to the control board and the motor.
D. Disconnect the drive unit from the suction scanner shaft and verify free
turning of the suction scanner.
Note: If during this fault a request for flushing is received (Manual, Time or DP) the
blinking lamp switches to constant red.
Malfunctioning limit switches
The fault indication lamp is blinking in red
Faulty limit switch may not stop the motor at the right point and therefore the motor
protection may be activated.
Receiving signal from both limit switches at the same time causes fault
A. Check that the limit switches are not mechanically stuck.
B. Ask your qualified electrician to check the wiring and the functionality of the
limit switched.
Note: If during this fault a request for flushing is received (Manual, Time or DP) the
blinking lamp switches to constant red.

EBS 10K Flat Lid 910101-000595 / 07.2019 Page 15 of 28
DISMANTLING AND ASSEMBLING THE FILTER COMPONENTS
Opening the filter and disassembling its inner components is necessary for changing screens, periodic maintenance and repairs.
Prior to opening the filter it is recommended to initiate a flushing cycle by pressing the "TEST" push button.
Before beginning any maintenance procedure, carefully read the safety instructions in chapter 2 of this document and make sure that
all the workers at the filtration site are fully aware of and comply with, these and any other local safety instructions.
Dismantling:
1. Disconnect the electrical power and lock the main switch.
2. Close off the water and drain the filter housing.
3. Disconnect the compressed air supply, lock the main switch and release the residual pressure.
4. Unscrew the bolts of the exhaust valve, disconnect the air pressure tubes and remove the valve.
5. Unscrew bolts (29) and remove the drive unit (25). Put the drive unit on a dry and protected surface near the filter. If the
electric cable is not long enough, disconnect it from the motor.
6. Pull out the split pin (23) from the connecting pin (22) then pull out the connecting pin. If the connecting pin is not facing one
of the shaft housing windows, turn the drive shaft (3 on page 23) a little. Use 17mm or 11/16 spanners.
7. Turn the drive shaft (3 on page 23) counter clockwise so that it will be separated from the suction scanner shaft (2 on page
24).
8. Unscrew bolts (10 on page 23) and remove the limit switches sling (9 on page 23) without disconnecting and changing the
limit switches position.
9. Unscrew bolts (21) connecting the shaft housing (13) to the filter lid (9).
10. Pull up the shaft housing. Put it near the filter, make sure not to damage the limit switches electric wires. If necessary,
disconnect the wires from the connecting box (37). (Do not forget to mark all wires for proper reconnections).
11. Unscrew the housing bolts (17) and pull the lid using a crane or other lifting device, make sure that it is located exactly above
the lid center. Make sure that the lifting device is a standard device, operated by an authorized operator in accordance to all
relevant safety standards. Never lift any filter component above people or equipment.
Note: the lid must be lifted vertically while maintaining its horizontal position; this prevents damage to the suction scanner
and the upper bearing seals.
12. Pull the scanner (14) and the screen (7) (including screen seals 6); make sure that extracting the screen is done according to
the following description.

EBS 10K Flat Lid 910101-000595 / 07.2019 Page 16 of 28
Extracting the Screen
Before handling the screen, carefully read the safety instructions chapter of this document and make sure that all the workers at the
filtration site are fully aware of and comply with, these and any other local safety instructions.
Please note that the screen is heavy and in order to avoid damage and injury it should be lifted only with Amiad’s standard Extractor
and a standard lifting device operated by an authorized operator.
1. Clean and dry the rubber pads on the Extractor
2. Fold the Extractor upwards (Figure 1).
Figure 1
3. Insert the Extractor into the screen, about a quarter from top. Make sure that the extractor cushions do not touch the stitch
found along the screen interior.
4. Pull the extractor up so that it is firmly set against the inside wall of the Screen (Figure 2)
Figure 2:
5. Attach a lifting device to the ring on the Extractor, and extract. Never lift the screen above people or equipment.

EBS 10K Flat Lid 910101-000595 / 07.2019 Page 17 of 28
Reassembling the "EBS" filter:
Before reassembling, visually check that all components are complete and in good mechanical condition.
Before reassembling, carefully read the safety instructions in chapter 2 of this document and make sure that all the workers at the
filtration site are fully aware of and comply with, these and any other local safety instructions.
1. Install the seals (6) on the screen (7) and insert the screen into the filter housing (1). Make sure to handle the screen
according to the description provided in the “Extracting the Screen” section above.
2. Position the scanner (14) in the filter housing. Make sure the lower shaft goes through the bearing (4).
3. Apply some grease to the suction scanner shaft (2 on page 24) and to the O-rings (3 and 5).
4. Lower the filter lid (9) carefully toward the filter housing (1) in a horizontal position. Make sure the lid is centered with the
suction scanner.
5. For centering the lid properly use the two centering sleeves together with two bolts (17) in opposite positions.
6. Screw the rest of the housing bolts (17). Tightening opposite positioned bolts will achieve proper sealing.
7. Locate the O-ring (12) in its groove under the shaft housing (13). Place the bolts (21) but do not yet tighten them firmly.
8. Turn the drive shaft (3 on page 23) clockwise until it reaches the suction scanner shaft. Insert the connecting pin (22) into the
hole in the drive shaft through the suction scanner shaft hole.
9. Insert the split pin (23) in its original position.
10. Make sure that the drive shaft key (24) is in its place. Apply grease to it and reassemble the drive unit (25).
11. Firmly tighten the shaft housing bolts (21) and the drive unit bolts (29) in a controlled and balanced method.
12. Reassemble the limit switches sling (9 on page 23); make sure the limit switches (22 on page 23) are tight in their place.
13. Reassemble the exhaust valve and air tubes.
14. Make sure that all bolts are tightened.
15. Switch on the compressed air supply and switch on the power. The motor will run until limit plate (2 on page 23) reaches the
lower limit switch.
16. Press the "test" push button and make sure the filter works according to the stages of the cleaning cycle.
17. Slowly turn on the water, watch and eliminate any leaking.

EBS 10K Flat Lid 07.2019 Page 18 of 28
STANDARD EBS 10K ON-LINE FILTER
Parts Schedule Section 1
No.
DESCRIPTION
Qty
.
1
Filter Housing EBS 10K Improved PKPK-3002
1
2
EBS-10 Mega Screen Support Cast-Iron Amerlock ID-7035
1
3
O-Ring Seal (P2-237) Nat
1
4
Lower Bearing EBS-40000/EBS-15000
1
5
O-Ring Seal 71x5 (Upper BeaRing Disc EBS)Nbr "S"
2
6
Shaped Seal Hydraulic AM-04 NR (EBS-10000 Screen)Nbr
2
7
Weavewire St316 10000sq.cm screen for EBS-10K
1
8
O-Ring Seal P 2-471 Nbr
1
9
Lid EBS-10000 Filter Epoxy PKPK-3002
1
10
Upper Bearing (EBS)
1
11
O-Ring Seal P2-041,External Upper Bearing NBR
1
12
O-Ring Seal P2-433 (Drive Unit Adaptor EBS H-SAF)Nbr N/F
1
13
EBS-10K Drive Shaft Housing Assembly, Red
1
14
Suction Scanner Assembly With Internal Filter
1
15
Flat Washer M22 DIN125 Zinc Plated C/ST
32
16
Hex Nut M22 Zinc Plated C/ST DIN934
16
17
Hex Bolt Partial Thread M22X100 Z.PLT C/ST
16
18
Hex Bolt Partial Thread M16X65 Z.PLT C/ST
8
19
Flat Washer M16 DIN125 Zinc Plated C/ST
32
20
Hex Nut M16 Zinc Plated C/ST DIN934
16
21
Hex Bolt Partial Thread M16X60 Z.PLT C/ST
8
22
Connecting Pin EBS
1
23
Split Pin 2X20 DIN 94 S/ST304
1
24
Drive Shaft Key (EBS)
1
25
Drive Unit EBS-10000 3-Ph 0.375Kw 1400RPM RMI70 1/70
1
26
Flat Washer M10 DIN125 Zinc Plated C/ST
8
27
Spring Washer M10 ZINC PL. C/ST
4
28
Hex Nut M10 Zinc Plated C/ST DIN934
4
29
Hex Bolt Full Thread M10X40 Z.Plated C/ST
4
30
EBS Drive Shaft Cover,Red,Gear EPOXY PKPK-3002
1
31
Socket Head Cap Screw M8X30 S/ST316 DIN912
2
32
Drive Shaft Housing Cover Epoxy PKPK-3002
1
33
Bracket Plate For Cast-Iron EBS
1
34
Flat Washer M6 DIN125 S/ST316
2
35
Spring Washer M6 DIN127 S/ST316
2
36
Hex Bolt Full Thread M6X15 S/ST316 DIN933
2
37
Electrical Junction Box EBS
1
38
Phillips Pan Machine Screw M5X16 304
4
39
Flat Washer M5 DIN125 S/ST304
4
40
Hex Nut M5 S/ST304 DIN934
4
41
Aluminum Amiad Nameplate, CE, EN
1
42
Rivet Blind 3x6 DIN7337 S/ST316
4
43
Manometer Valve 1/4" W/Drain
1
44
T-Connector 1/4" FxFxM (Brass)
1
45
Valve 3-Way 1/4"
1
46
Pressure Gauge 1/4" (DI) w/PSI,Bottom Inlet
1
47
L-Connector 5/16"X1/8"
4
48
Connector 5/16"x1/4"
2
49
Flange Gasket 3" 124X92 NBR
1
50
PD Switch Sub-As. Midwest w/o Fitting & Electric Cable
1
51
T-Connector 1/8"/ or /1/4"-5/16"-5/16" Brass
1

EBS 10K Flat Lid 910101-000595 / 09.2017 Page 19 of 28
No.
DESCRIPTION
Qty.
52
3" Bermad (400) Hydraulic Valve Ir-405-G-I-Iso16-Pr
1
53
Ball Valve 3/4" M/F (BRASS)
2
54
L-Connector 3/4" F/M Galvanized
1
55
3/4"Black Filter AC,W/O Valve Nylon Screen 200 Mic
1
56
O-Ring Seal P2-112 NBR
1
57
Raccord Nut 3/4" for 3/4" Filter
1
58
Raccord Nipple 1/4" for 3/4" Filter
1
59
L-Connector 5/16"X1/4"
3
60
Pressure Check Point Connector 1/4"X1/4"
1
61
Solenoid Valve 24VAC,50HZ,No (Gem-Sol)
1
62
Pilot Tube 8 MM Black
1

EBS 10K Flat Lid 910101-000595 / 07.2019 Page 20 of 28
3130
25
29
26
13
24 32
28
27
26
21
19
9
12
17
15
19
20
11
10
5
8
1
15
16
2
3
4
5
6
7
6
14
22
23
STANDARD EBS 10K ON-LINE FILTER
Parts Drawing Section 1 (Page 1)
Table of contents
Other amiad Water System manuals
Popular Water System manuals by other brands

Hellenbrand
Hellenbrand 3000 Series Service manual

Tollco
Tollco WaterFuse Apartment User's manual & installation instructions

GE
GE E2 Series Installation and operation manual

Oase
Oase ProfiClear Premium TF-XL operating instructions

Culligan
Culligan M1 Series Installation, operation and service instructions

Condair
Condair RO-A Service manual