Amica AWM712D User manual

WASHING MACHINE
Please read this instruction manual carefully before using the appliance!
INSTRUCTION MANUAL
IO 00405/3
(02.2011)
AWM712D

2
CONTENTS
Basic Information..............................................................................................3
Notes on Safety....................................................................................................................4
Installing the Washing Machine.................................................................................6
Understanding the symbols on clothes labels.............................................8
Description of the appliance.....................................................................................................8
Description of control panel.....................................................................9
Using the appliance...................................................................................12
Special programs................................................................................13
Table of programmes................................................................................14
Troubleshooting................................................................................16
Maintenance and Cleaning...................................................................18
Practical Hints on Washing..................................................................19
Specification...............................................................................................22
Service and Warranty..........................................................................................22
Technical Description.................................................................................23
In accordance with European Directive 2002/96/EC and Polish legislation regarding
used electrical and electronic goods, this appliance is marked with the symbol of the
crossed-out waste container.
This marking means that the appliance must not be disposed of together with other
household waste after it has been used. The user is obliged to hand it over to waste
collection centre collecting used electrical and electronic goods. The collectors, inclu-
ding local collection points, shops and local authority departments provide recycling
schemes. Proper handling of used electrical and electronic goods helps avoid environ-
mental and health hazards resulting from the presence of dangerous components and the inappropria-
te storage and processing of such goods.

3
DEAR CUSTOMER
From today, washing will be easier than ever before. The Amica washing machine combines
exceptional ease of use with excellent effectiveness. Once you have read the instructions,
operating the washing machine will not be a problem.
Before being packed and leaving the factory, the safety and functions of this washing machine
were carefully tested. These tests may have resulted in some damp or traces of water being
left inside the machine.
We ask you to read the operator’s manual carefully before switching on the appliance. Fol-
lowing the directions in this manual will protect you from any misuse.
Keep this operator’s manual and store it near at hand. The instructions should be followed
carefully to avoid any unfortunate accidents.
Important!
This washing machine is intended for purely domestic use to wash textiles and clothes
which are designed to be machine washed in a detergent bath.
Before plugging the washing machine into the mains, remove the safety packaging and
ensure the machine is level.
The manufacturer reserves the right to introduce changes which do not affect the operation
of the appliance.
Use
lThe machine should only be used after the instructions below have been read carefully.
lNever use the machine outdoors or anywhere the temperature may fall below freezing.
lThe machine should not be operated by children or anyone who has not read the instruc-
tions.
Important! Temperatures below 0°C can damage the washing machine! In the event of the
machine being stored or transported in sub-zero temperatures, it should be left to acclimatise
in a temperature above zero for 8 hours before being used.
Manufacturer’s Declaration
The manufacturer hereby declares that this product meets the requirements of the follo-
wing European directives:
llow voltage directive 2006/95/EEC,
lelectromagnetic compatibility directive 2004/108/EEC
and has thus been marked with the symbol and been issued with a declaration of
compliance made available to market regulators.

4
Use only those cleaning and purifying agents which are designed for
automatic washing machines, particularly on the COTTON 90° setting.
Do not use any agents containing solvents, as these may damage certain
parts of the machine, or cause them to emit poisonous gases. There is
also a risk of ignition and explosion.
Ensure no unwanted objects are allowed inside the machine. Completely
empty all pockets in clothing to be washed and fasten buttons and zips.
Place small, loose objects in a washing bag, or inside a pillow case, as
they may be destroyed or else damage the drum or internal tank. Do not
exceed the recommended maximum load of washing.
NOTES ON SAFETY
lCleaning agents
lLoading the
Machine
lControl Panel
lTransport
lData Plate
Unplug the machine before preparing the machine for transport. Bloc-
king screws must be used when transporting the machine. Fit both the
upper and the lower blocking screws. See the chapter INSTALLING
THE MACHINE (page 6). Keep the machine in a vertical position when
transporting.
On the upper back part of the casing is the data plate indicating basic
information about the washing machine.
Protect the control panel from water spillage.
Do not put washed clothes on top of the machine!

5
Checking stability
Once the washing machine is in position and levelled, it must be checked to ensure it is
standing stably on all four legs.
This is checked by pressing down each corner in turn and seeing if the machine moves.
Safe, long-term and reliable operation of the washing machine depends on it being correctly
positioned and level.
Important! Before switching the machine on wait 3 hours, level it out and remove the
blocking screws.
Important! Incorrect levelling, particularly instability, may cause the washing machine
to move around while operating.
NOTES ON SAFETY
Withdrawal from Use
To ensure safety, the washing machine must be rendered unsuitable for use once it is worn
out. First unplug it and then cut off the power lead. Scrap the machine in line with local rubbish
and waste disposal legislation.
This machine is not intended for use by persons (including children) with physical, mental or
sensory handicaps, or by those who are inexperienced or unfamiliar with the machine, unless
under supervision or in accordance with the instructions as communicated to them by persons
responsible for their safety.
Ensure that children do not play with the machine.

6
INSTALLING THE MACHINE
I. Remove the transport protection (keep the blocking bolts for future use,
e.g. when moving house).
lUnscrew the 4 blocking bolts with a spanner.
lRemove the rubber and plastic transport
brackets from the sockets along with the
washers and bolts.
The safety devices MUST be removed before the washing machine
is used!
lStop up the holes with the stoppers
included in the bag of accessories.
-Do not place the washing machine on a carpet!
-The oor surface should not be either concave or sloping!
-Attention should be paid to the shape of the surface of the oor, so that the
entire weight of the appliance rests on its legs (not its body)!
II. Positioning and levelling the machine
lPlace the washing machine on a solid, even surface.
lLoosen the nuts (1) with a spanner.
lScrew the nuts (1) back in with a spanner.
lLevel the machine by adjusting the legs (2).
After positioning and levelling the machine,
check that it is stable by pressing down each
corner and ensuring it does not move!

7
The outlet hose is at the back of the
machine. Fix the outlet hose so that it
does not move while the machine is
in operation (use the elbow as shown
below). Do not place the hose too deep
into the outlet pipe!
max 100 cm
min 60 cm
III. Connecting the water supply
IV. Water outow
V. Connecting the electric power supply
A supply hose with seals is inside the drum of the machine.
INSTALLING THE MACHINE
Water pressure min 0.1 MPa (1 bar), max 0,8 MPa (8 bar).
Supply the machine with cold water Important points:
lafter connecting, make sure the hose is not twisted
lafter connecting the hose and the valve, check they are sealed tight
lregularly check the condition of the supply hose.
Use the new hoses sup-
plied with the machine.
Do not re-use hoses.
lConnection of the washing machine to the mains (plug-in soc-
ket in the electrical installation) should be at a conspicuous and
accessible place!
lConnect the washing machine only to the correctly installed
and earthed socket
lDo not use an extension cord
lBroken power leads, may be replaced only by authorised se-
rvicemen
lType of the power lead – H05VVF – 3G1.5
lCatalogue number of the power lead: 8017546

8
DESCRIPTION OF THE APPLIANCE
Always pay attention to the symbols on garments’ labels
when choosing a washing setting.
I. Washing
II. Chemical cleaning
III. Spin dryer
boiling temp
90°C
normal temp
60°C
normal temp
40°C
DO NOT
wash!
delicate handwash
all solvents all except TRI petrol only DO NOT
dry clean!
normal low high DO NOT
dry!
IV. Ironing
1100C1500C 2000CDO NOT
iron!
UNDERSTANDING THE SYMBOLS ON CLOTHES LABELS
90
Detergent container
Drum
Pump lter cover
Door
handle
Control Panel

9
DESCRIPTION OF CONTROL PANEL
1. Display
lThe display shows the following symbols: ([PRE], [WASH], [RINSE], [SPIN]) to signal the
appropriate phases of the washing programme.
lApproximate washing time
Time displayed is an estimate only. It can differ from the actual washing time depending on
temperature, water pressure, quantity of laundry loaded, and quantity of washing powder
used. The time is automatically updated during the wash cycle and it is normal for it to stop
or skip.
lThe DELAY symbol is displayed to indicate the selected programme along with the
washing delay time, which denes the time in hours before the programme is activated.
After washing has begun, the REMAIN symbol lights up to show the time left to the end of
the wash cycle.
lThe [CHILD LOCKED] symbol lights up to show this function has been selected.
lThe [DOOR-LOCKED] symbol lights up to show the door is locked. The door can
only be opened when this indicator is off.
1
4 5 6 7 8 9
10
2 3

10
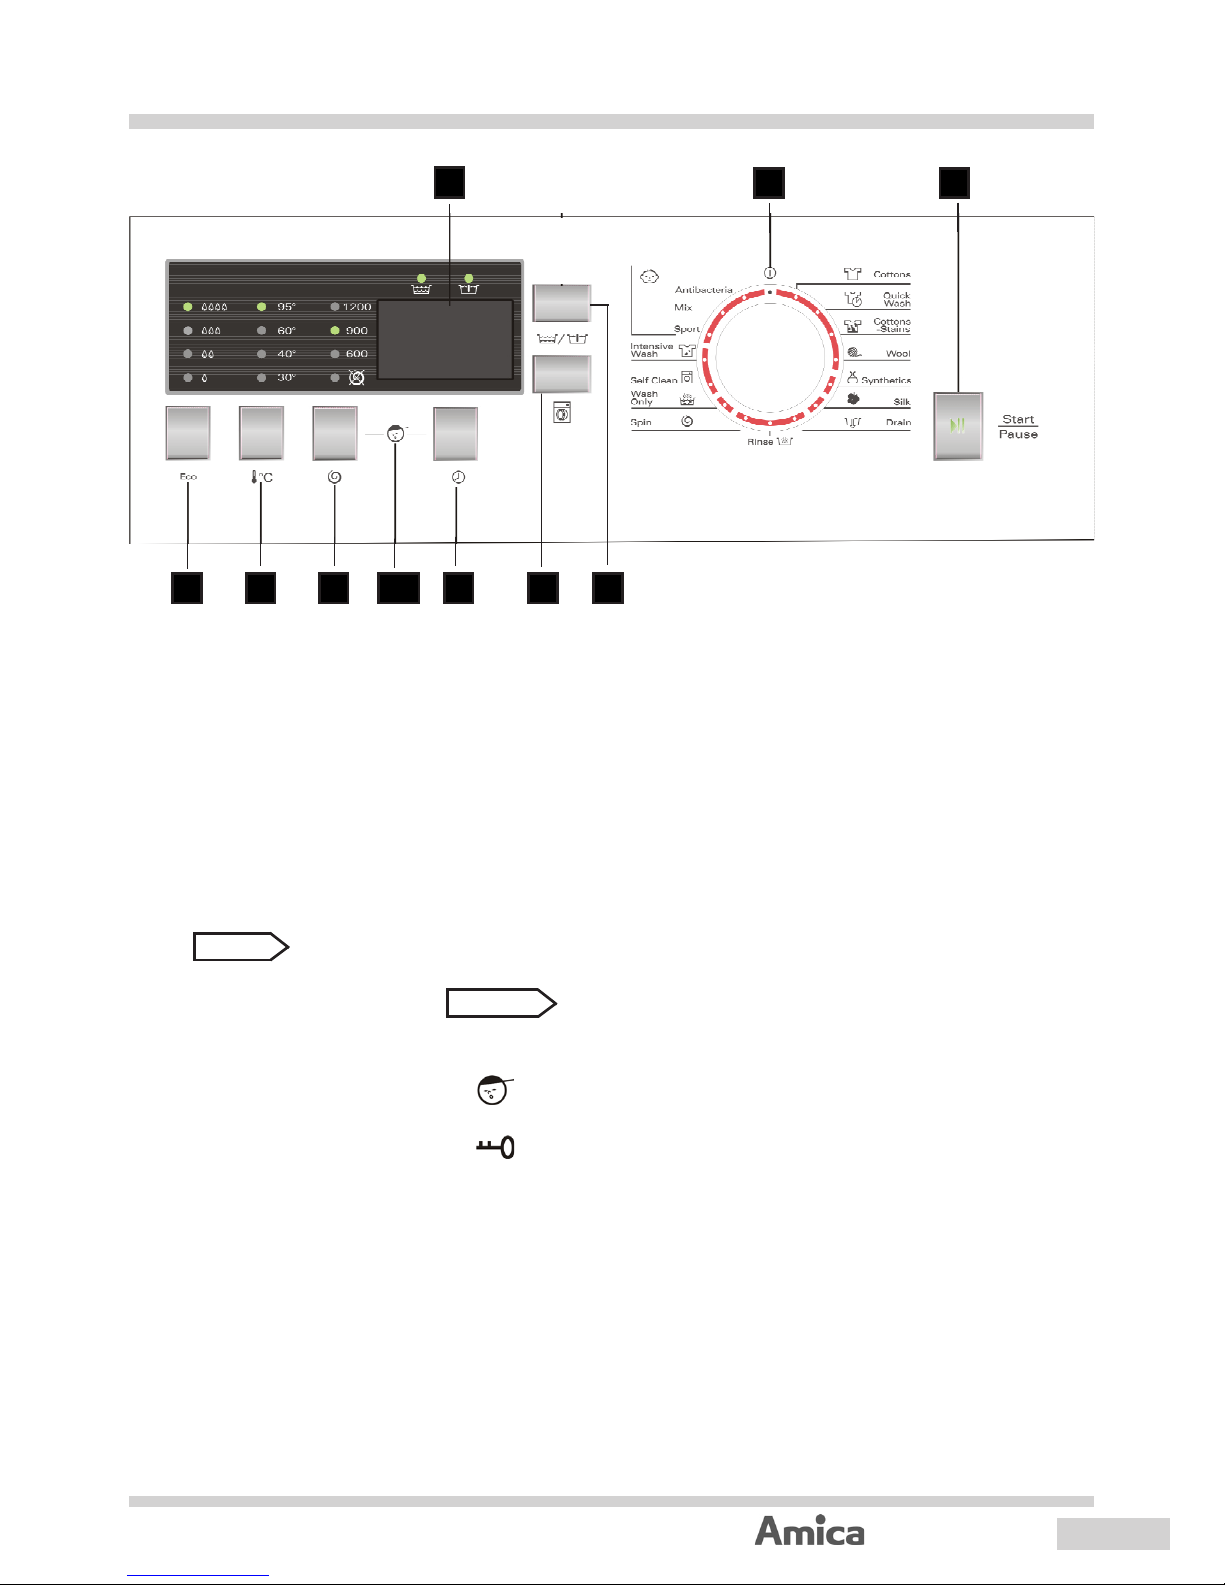
5. Water temperature button
This button allows the washing temperature to be set. Press this button to display water
temperature settings available for a given programme or an option for washing in cold
water (no heating).
6. Spin speed button
Press this button to set the spin speed when water is being pumped out of the washing
machine. Press the button to change the setting.
7. Start delay button
Press this button to set the delay time for starting washing. The setting range available is
from 1-24 hours. Press and hold the button to set the time after which washing is to com-
mence.
Important! If there is a power outage during Delay Time, countdown will resume immedia-
tely after the power is restored.
DESCRIPTION OF CONTROL PANEL
4. Eco function button
The Eco function allows water use to be adapted to the amount of dirt on the clothes being
washed. When a programme is selected, the appliance will indicate optimum water quan-
tity required to wash a given type of laundry. Press the Eco, button to modify the quantity
of water depending on how dirty the laundry is. Increase the quantity of water for a heavily
soiled laundry.
The pause mode can be used to soak the laundry.
Once the selected programme started wait for about 10 minutes and then press the
START/PAUSE button. When the laundry is soaked as required, press the START/PAUSE
button again to resume the program. Soaking will improve washing efciency for heavily
soiled laundry.
2. Programme selector knob
Choose the appropriate cleaning wash programme as required, depending on the degree
of dirt, and type and amount of laundry loaded, which ensures better results and more ef-
fective washing. Once the cleaning programme is started, turning the programme selector
knob to another position is indicated by an acoustic signal however it does not change the
previously selected programme.
3. START/PAUSE button
The [Start/Pause] button is used to start and pause the appliance.
During a wash cycle the relevant symbol is ashing indicating a given wash cycle phase
([PRE-WASH], [WASH], [RINSE], [SPIN]).
In pause mode, the symbols do not ash and are lit up continuously.

11
8. Quick access button
Quick access function allows the door to be opened immediately during wash cycle in
order to add laundry. Press this button to unlock the door within several seconds. After
adding laundry close the door and press the Start button. The appliance will resume a
washing program.
Attention: The door will not unlock when there is too much water in the drum and when
water temperature exceeds 60°C.
DESCRIPTION OF CONTROL PANEL
10. Child Lock function
This function locks the function keys and programme selector knob to prevent settings
being changed or operation interrupted by children. To set the Child Lock during a wash
cycle, simultaneously press and hold the Spin Speed and Start Delay buttons for around 3
seconds (the child symbol will appear on the display along with the words CHILD LOCKED.
To release the Child Lock, hold the same buttons down once more for around 3 seconds.
9. The EXTRA RINSE/PRE-WASH button
Press the button to extra rinse or pre-wash functions or both of these functions
at the same time. Activation of this function is indicted by a LED lighting up above the
function symbol.
Attention: Extra Rinse and Pre-wash functions are not available for all programs (see table
of washing programmes on pages 14 and 15).
Extra Rinse function is especially useful when washing underwear and also clothes for
people with sensitive skin. Select this option to add an extra rinse to wash cycle.
The Pre-wash function extends the wash cycle by approximately 20 minutes. The laundry
is prewashed before the main wash cycle begins. Activation of the Pre-wash function will
allow you to achieve excellent washing results without the need to soak the laundry. Pre-
wash is recommended when washing heavily soiled laundry.
Attention: Pour suitable detergent to detergent drawer marked with symbol before the
Pre-wash function is activated.

12
III. End of the wash cycle
1.When the wash cycle has elapsed, a brief acoustic signal is sounded.
2.Turn off the water valve
3.Set the programme selection knob to OFF
4.Unplug the appliance from the mains.
5.Open the door and remove laundry.
IV. Cancelling and changing settings
Set the programme selector knob to OFF position for several seconds to terminate a
programme. Then select the desired wash programme.
Using the appliance
I. Programme selection
1.Set the programme selector knob to the desired programme (see the table further on).
2.Change the quantity of water, temperature, spin speed or activate available additional
functions to modify the programme to your individual needs.
3.Press the button.
.
II. Start delay setting
The delayed start function may be used when, for example, taking advantage of discoun-
ted energy tariffs.
Procedure:
1.Set the programme selector knob to the desired programme (see the table further on).
2.Select additional functions or wash cycle parameters as required.
3.Press the button
4.Choose the time setting 1-24 hours.
5.Press the [Start/ Pause] button. The appliance will be set in delay mode. Washing will
commence immediately after the delay time has elapsed.
Attention: If a delay time has been set, the display will show only the delay time in hours
and the Delay indicator will be illuminated. Once the delay time has elapsed,
the DELAY indicator is switched off and the REMAIN indicator is illuminated together
with the remaining washing time.

13
Special programs
I. Self Clean programme
High temperature cleaning is a special programme for cleaning the appliance’s drum and
tank. This programme uses 95°C high temperature sterilisation to ensure more effective
washing of clothes during subsequent washing cycles. Do not load any laundry when using
the self-cleaning programme. Greater cleaning efciency is ensured by the use of chlorine
bleach. The cycle may be activated regularly as needed.
II. Intensive Wash programme
This programme, by an optimal set of time and temperature parameters, ensures full use of
the detergent’s active enzymes (pre-wash 40°C, basic wash 60°C - the basic wash tempe-
rature is shown on the display) and is recommended for washing of heavily soiled laundry.

14
TABLE OF PROGRAMMES
Additional functions
available
Prewash
Option
None
Option
None
Option
None
Option
Option
Selec-
tion
Requ-
ired
None
Option
None
None
None
Extra
Rinse
Option
Option
Option
Option
Option
Option
Option
Option
Option
Option
None
None
Option
None
None
Maxi-
mum
load
[kg]
7
3,5
7
2,5
3,5
2
7
3,5
3,5
3,5
-
7
-
-
-
Max.
spin
speed
[rpm]
1200
1200
1200
900
900
600
1200
1200
1200
1200
600
-
1200
1200
-
Max. tem-
perature
C0]
95
40
95
40
60
30
95
40
60
60(do-
myślnie)
95(do-
myślnie)
95
-
-
-
Recom-
mended
tempera-
ture C0]
60
30
60
40
40
Cold
water
60
Cold
water
40
60(do-
myślnie)
95(do-
myślnie)
40
-
-
-
Programme name
Cottons
Quick Wash
Cottons-Stains*
Wool
Synthetics
Silk
Whites
(Antibacterial)
Mix
Heavily soiled
(Sport)
Intensive Wash
Self Clean
Wash only
Rinse
Spin
Drain
Children’s
clothes
* Reference programme complies with PN-EN-60456

15
NB: The washing machine’s operating time is for reference only, and depends on the washing tempe-
rature, load, water pressure, type of outlet and mains voltage.
Use detergent or fabric softener if necessary,
l Detergent required, without which washing will be ineffective
x Do not use detergent or fabric softener
Instructions regarding types of load
Heavily or moderately soiled bed linen, table linen, underwear,
towels, shirts, cotton or linen
A very short programme for lightly soiled laundry
Denim and other cotton fabrics of a similar thickness
Important! Do not machine wash woollen fabrics if the cloth tag
prohibits.
Lightly or moderately soiled synthetics, or synthetic and cotton
compositions
Washing of very delicate fabrics. Water is not discharged after
the programme terminates (STOP WITH WATER - the laundry
is left oating in the last rinse water). Do not leave laundry in the
water for a long time. Activate the Pumping programme before
taking the laundry out of the drum.
Heavily or medium soiled children’s underwear requiring boiling
Lightly and medium soiled cotton and synthetic children’s clothes
Heavily and medium soiled sports clothes
Programme for heavily soiled cotton garments.
It consists of prewash and main wash for better results.
Programme for cleaning the washing machine. The use of
bleach is recommended.
Main wash only, no rinse or spin
Rinsing with improving agents, including. anti-static or softening
additives. Reduce the spin speed when treating very delicate
fabrics.
Spin-drying after hand washing.
Water discharge only - no spinning.
Time
[h:min]
1:37
0:28
2:54
0:58
1:11
0:42
1:52
1:07
1:38
2:16
1:12
0:32
0:21
0:12
0:01
Detergent drawer
Fabric
softener
x
x
x
Basic
wash
l
l
l
l
l
l
l
l
l
l
l
l
x
x
x
Pre-
wash
x
x
x
l
x
x
x
x

16
TROUBLESHOOTING
Problem Probable cause/Solution
The washing machine is not
working
-Turn the tap on.
-Clean the mesh lter on the supply hose.
-Close the door of the appliance.
-Press the [Start/ Pause] button.
Water leaks -Properly connect the water intake.
The load in the appliance has not
been spun
-Replace the load evenly in the drum, clean the pump lter.
Unpleasant smell in the drum -Activate the self-cleaning cycle without a load (see the washing
table).
No water in the drum -Water error is shown on the display . Turn on the tap with
the water supply.
There is water left in the fabric
softener container
-Firmly press the button in the middle container
Washing not properly rinsed -Dose the cleaning agent correctly, depending on how dirty the
washing is and the hardness of the water (see the instructions on the
cleaning agent’s packaging).
-Clean the pump lter
The appliance does not ll with
water
-Turn on the water valve
-Check the programme setting
-Check the water pressure
-Properly connect the water intake.
-Close the door of the appliance.
-Check the water intake is not bent or blocked.
Simultaneous intake and draining
of water
-Check that the end of the outlet hose is higher than the level of the
water in the appliance (the hose should be at a height of 0.6m-1m).
Improper water outow -Check the pump lter
-Check the outlet lead
-Check the height of the outlet hose, which should be 0.6-1 m from
the bottom of the washing machine.
Appliance vibrating -Check the transport safety devices have been removed.
-Level the appliance.
-Secure the legs (tighten the nuts).
Foam from the detergent drawer -Reduce the dose of detergent used.
-Check the water hardness and amount of detergent used, as well as
the type of detergent used in the drum
The operation of the appliance is
interrupted before the programme
has nished
- Check power supply, water supply and water outlet
Noise caused by operation of
the outlet pump after water is
removed
-The water has been removed from the drum, but small amounts
remain in the pump and outlet lead. Constant operation of the outlet
pump causes air to be sucked in leading to the characteristic noise,
which does not mean that anything is wrong
Short breaks during the wash
cycle
-The water in the appliance is being automatically relled.
-Pause caused by removal of excess foam.

17
The Fault Indicator Lights
The washing machine has a system of CODES shown on the display, which helps to locate
minor operating faults and identify their cause. Fault is indicated by the symbols:
Display
indication
Reason Solution
Low pressure, no
water in the
Unscrew the water valve, check the water inlet hose and
lter, check the water pressure.
Improper water
outow
Check the outlet pump and lter.
Door ajar Check that the door is locked; check that laundry is not
jammed in the door.
Others Try to restart or contact the SERVICE CENTRE tel 0844
815 8880 / 0818 46 46 46
TROUBLESHOOTING

18
MAINTENANCE AND CLEANING
I. Cleaning the pump lter (Fig. 1-5)
II. Cleaning the water supply valve
Clean the pump lter every 20 wa-
shes or so. Neglecting to clean the
lter causes difculties in emptying
the machine of water!
lUnplug the appliance from the
mains,
lTurn off the water valve,
lUsing a at screwdriver to
open the lter cover
lTurn on the water supply hose,
lUse forceps to grasp the lter mesh plunger,
lRemove and clean the lter (using a brush).
lTurn and remove the cap
with hose
lRemove the stopper from the
hose,
lPour the remaining water into the
shallow vessel
lRemove the lter and clean the lter.
Replace the lter
– repeat in reverse
order.
III. Cleaning the detergent drawer – this should be cleaned at least once a month.
lRemove the drawer (while pressing the
stop).
lClean in running water (or using a
brush or piece of cloth).
lReplace the drawer.
Never clean the product’s casing or plastic parts using solvents or strong, abrasive cleaning
agents (e.g. washing powders or creams)! Only use delicate liquid cleaning agents and soft
cloths. Do not use sponges.
Pump
lter
Pump lter Plug hose
lUnscrew the lter,
Replace the lter
– repeat in reverse
order.
1. 2.
4. 5.
3.

19
PRACTICAL ADVICE REGARDING WASHING
Cleaning agents
lFollow the manufacturer’s instructions.
lPour the cleaning agent into the container chamber marked
lPour the pre-wash cleaning agent into the container chamber
marked
Fabric softeners added to the rinse
lFollow the manufacturer’s instructions.
lPour the fabric softener into the container chamber
marked
lDo not exceed the maximum level marked on the container
chamber. This agent will be used for the nal rinse.
Before washing for the rst time, put it through one high tempera-
ture cycle without a load, according to the following procedure:
lConnect the washing machine to the electricity mains.
lTurn on the water valve
lSet the programme selector knob to high temperature wash.
lAdd the appropriate detergent and press the [Start/Pause]
button.
I. Cleaning and
purifying agents
II. First wash
Power and water
Garments which are only slightly dirty should be washed on the
ULTRASHORT WASH setting.
Extra rinsing is not necessary when the optimum amount of cleaning
agent has been used.
IV. Conservation
Stubborn stains
Before washing garments, apply an additional stain remover ac-
cording to the instructions for use.
Heavy dirt
lOne-off washing of smaller amounts of clothes.
lAdd more cleaning agent.
lAfter washing very dirty clothes (e.g. working clothes) or garments
which are shedding bres, it is recommended that the washing ma-
chine is rinsed out by running a programme cycle at a temperature
of 60°C, without a load.
COTTON or SYNTHETICS
Light dirt
lSee pt. „Conservation”.
III. Dirt

20
PRACTICAL ADVICE REGARDING WASHING
Hard water causes stone sediment to form.
Information about water hardness is available from the nearest
water works.
It is advised that water softeners are used for every wash.
V. Water hardness
VI. Power cut
(programme
memory)
Power outage or unplugging the machine does not cancel the
setting. This has been memorised and the cycle will continue
once the power is restored. Do not open the doors of the wa-
shing machine during a power cut.
VII. Loading Maximum drum capacity 7.0 kg: Load the washing into the drum
according to the following instructions:
lcotton, denim, children’s clothes – max full drum (do not force clo-
thes into the drum as this will reduce the quality of the wash!).
lsynthetics - max ½ drum
lwool, silk, delicate fabrics - max. approx. 1/3 of the drum.
Important! Do not overload the machine! Overloading the machine
may cause damage to the clothes being washed!
The exact load amounts depending on the programme are
given on pages 15 and 15.
VIII. Door
interlock
The washing machine is equipped with an interlock which prevents
the door from being opened during washing.
Once a washing cycle is complete, the door interlock is automati-
cally released. To open the door while washing activate the
Quick access function
.
IMPORTANT! If the temperature inside the drum is high, the
door may remain blocked until the water temperature has
dropped below 60°C.
IX. Delicate
fabrics
Setting
lSelect the appropriate wash programme (SYNTHETICS ,
WOOL , SILK ).
Loading
Do not overload the machine, max 1/3 of the drum, see Loading
Table of contents
Other Amica Washer manuals

Amica
Amica AWB510LP User manual

Amica
Amica AWI912DB User manual

Amica
Amica WMA712 User manual

Amica
Amica WA 14690-1 W User manual

Amica
Amica WMA612 User manual

Amica
Amica WME610 User manual

Amica
Amica WA 14681 W User manual

Amica
Amica WA 14662 W User manual

Amica
Amica AWB610L User manual

Amica
Amica WA 484 090 User manual

Amica
Amica WA 14789 User manual

Amica
Amica AWT714S User manual

Amica
Amica AWI612L User manual

Amica
Amica WA 14 Ex User manual

Amica
Amica AWI814L User manual

Amica
Amica AWN712D User manual

Amica
Amica WME610/1 User manual

Amica
Amica AWB612L User manual

Amica
Amica WA 474 020 User manual

Amica
Amica AWN912DJ User manual