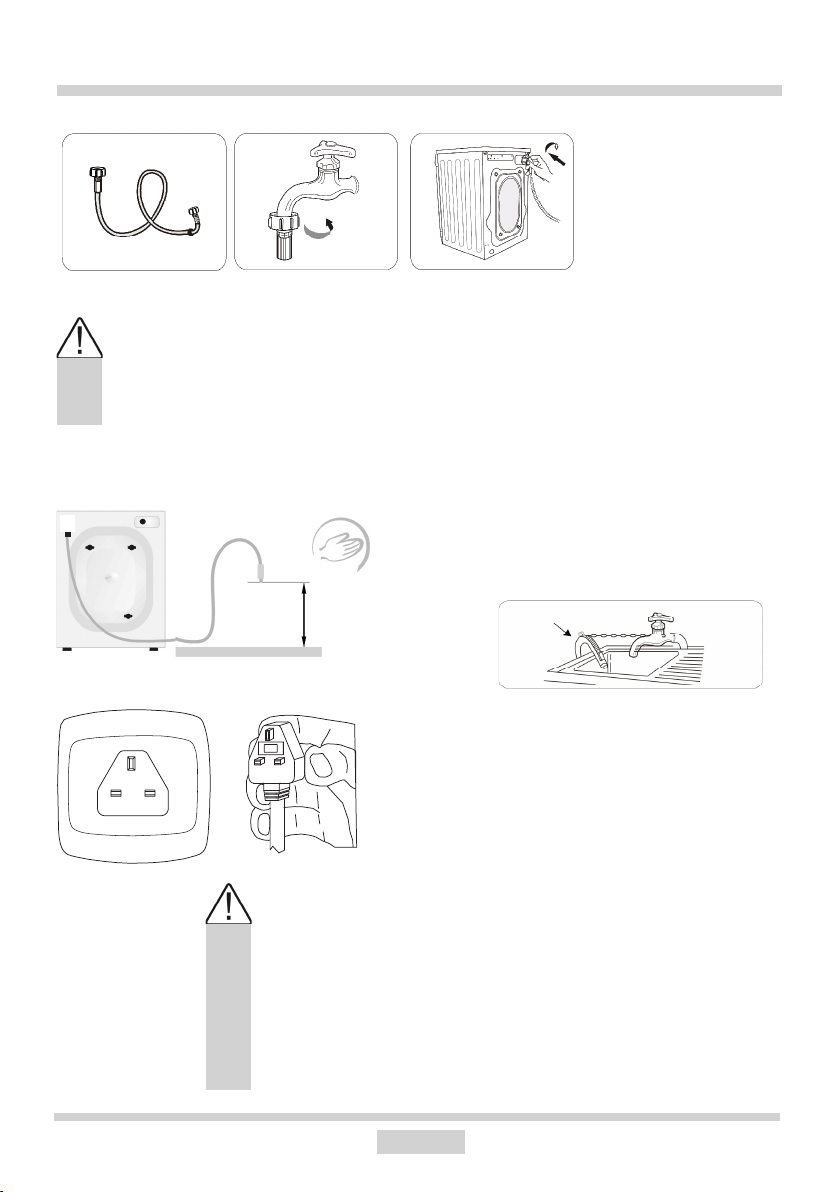
Amica AWI612L User manual

IO 01228/1
(10.2014)
AWI612L
WASHING MACHINE
Please read this User Manual carefully before using the appliance!
INSTRUCTION MANUAL

2
CONTENTS
Basic Information.......................................................................................................................3
Notes on Safety..............................................................................................................4
Installing the Washing Machine...................................................................................................6
Understanding the symbols on clothes labels................................................................8
Description of control panel..........................................................................................9
Using the appliance................................................................................................13
Table of programmes.........................................................................................14
Troubleshooting..................................................................................................................15
Maintenance and Cleaning.......................................................................................17
Practical tips on washing.....................................................................................................18
Specification......................................................................................................21
Service and Warranty..................................................................................................21
Product Fiche........................................................................................................22
In accordance with European Directive 2002/96/EC and Polish legislation regarding
used electrical and electronic goods, this appliance is marked with the symbol of the
crossed-out waste container.
This marking means that the appliance must not be disposed of together with other
household waste after it has been used. The user is obliged to hand it over to a waste
collection centre collecting used electrical and electronic goods. The collectors, inclu-
ding local collection points, shops and local authority departments provide recycling
schemes. Proper handling of used electrical and electronic goods helps to avoid
environmental and health hazards resulting from the presence of dangerous components and the
inappropriate storage and processing of such goods.

3
BASIC INFORMATION
From today, washing will be easier than ever before. The Amica washing machine combines
exceptional ease of use with excellent effectiveness. Once you have read the instructions,
operating the washing machine will not be a problem.
Before being packed and leaving the factory, the safety and functions of this washing machine
were carefully tested. These tests may have resulted in some damp or traces of water being
left inside the machine.
We ask you to read the User Manual carefully before switching on the appliance. Following
the directions in this manual will protect you from any misuse.
Keep this User Manual and store it near at hand. The instructions should be followed carefully
to avoid any unfortunate accidents.
Important!
This washing machine is intended for purely domestic use to wash textiles and clothes
which are designed to be machine washed in a detergent bath.
Before plugging the washing machine into the mains, remove the safety packaging and
ensure the machine is level.
The manufacturer reserves the right to introduce changes which do not affect the operation
of the appliance.
Use
lThe machine should only be used after the instructions below have been read carefully.
lNever use the machine outdoors or anywhere the temperature may fall below freezing.
lThe machine should not be operated by children or anyone who has not read the instruc-
tions.
Important! Temperatures below 0°C can damage the washing machine! In the event of the
machine being stored or transported in sub-zero temperatures, it should be left to acclimatise
in a temperature above zero for 8 hours before being used.
Manufacturer’s Declaration
The manufacturer hereby declares that this product meets the requirements of the follo-
wing European directives:
lLow Voltage Directive 2014/35/EC,
lElectromagnetic Compatibility (EMC) Directive 2004/30/EC
lErP Directive 2009/125/EC
and has thus been marked with the symbol and been issued with a declaration of com-
pliance made available to market regulators.

4
Use only those detergents and additives which are designed for automatic
washing machines, especially when using the TOWELS programme.
Do not use any agents containing solvents, as these may damage certain
parts of the machine, or cause them to emit poisonous gases. There may
also be a risk of ignition and explosion.
Ensure no unwanted objects are put inside the appliance. Completely
empty all pockets in the clothing to be washed and fasten buttons and
zips. Place small, loose objects in a washing bag, or inside a pillow case,
as they may be destroyed or else damage the drum or internal tank. Do
not exceed the recommended maximum load of washing.
NOTES ON SAFETY
lDetergents
lLoading the
Machine
lControl Panel
lTransport
lData Plate
Unplug the machine before preparing the machine for transport. Do not
transport the washing machine if drum locking bolts are not in place. See
the chapter INSTALLING THE MACHINE (page 6). Keep the appliance
in upright position when transported.
Data plate indicating basic information about the washing machine is
located at the top part of the rear casing.
The door glass of your washing machine is hot during operation. Do not
allow children in the vicinity of the appliance.
Protect the control panel from water spillage.
Do not put washed clothes on top of the machine!
lBurns

5
Checking stability
Once the washing machine is in position and levelled, it must be checked to ensure it rests
rmly on all four legs.
In order to check this, press down each corner of the appliance in turn to see if it moves.
Safe, long-term and reliable operation of the washing machine depends on it being correctly
positioned and level.
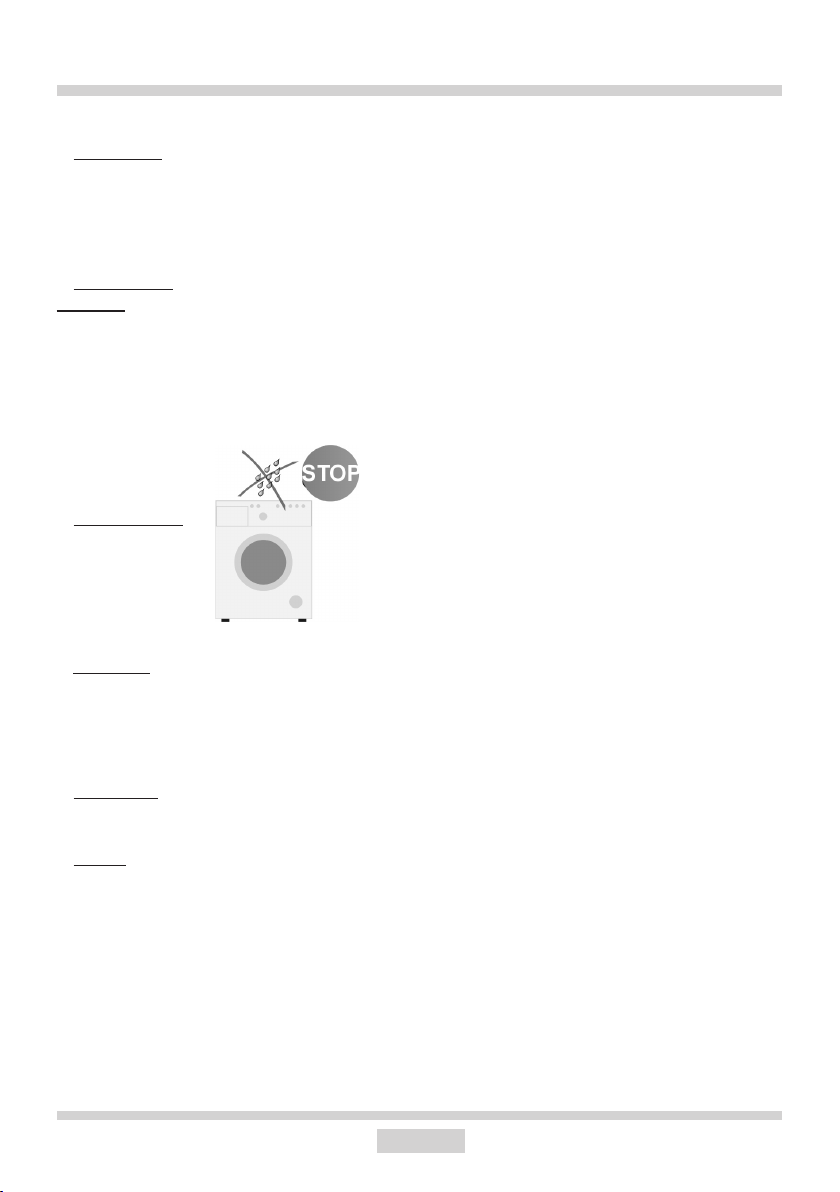
Important! Level the appliance, remove the drum locking bolts and wait 3 hours
before using the appliance for the rst time.
Important! Incorrect levelling, especially instability, may cause the washing machine
to move around during operation.
This appliance can be used by children aged 8 years and
older or by persons with physical, mental or sensory handi-
caps, or by those who are inexperienced or unfamiliar with
the appliance, provided they are supervised or have been
instructed how to safely use the appliance and are familiar
with risks associated with the use of the appliance.
Ensure that children do not play with the appliance.
Cleaning and maintenance of the appliance should not be
performed by children unless they are 8 years or older and
are supervised by a competent person.
NOTES ON SAFETY
DISPOSAL OF THE APPLIANCE
To ensure safety, the washing machine must be rendered unsuitable for use once its useful
life comes to an end. First unplug it and then cut off the power lead. Scrap the appliance in
line with local waste disposal legislation.
This appliance is not intended for use by persons (including children) with physical, mental
or sensory handicaps, or by persons inexperienced or unfamiliar with the appliance, unless
under supervision or in accordance with the instructions as communicated to them by persons
responsible for their safety.
Children shall not play with the appliance.

6
INSTALLING THE MACHINE
I. Remove the protection used for transporting the appliance (keep the locking bolts
for future use, e.g. when moving house).
lUnscrew the 4 locking bolts with a spanner.
lRemove the rubber and plastic transport
brackets from the sockets along with the wa-
shers and bolts.
The locking bolts MUST be removed before the washing machine is used!
lStop up the holes with the stoppers
enclosed in the accessories bag.
lDo not place the washing machine on a carpet!
lThe oor surface should not be either concave or sloping!
lAttention should be paid to the shape of the surface of the oor, so that the
entire weight of the appliance rests on its legs (not its body)!
II. Positioning and levelling the machine
After positioning and levelling the machine,
check that it is stable by pressing down each
corner and ensuring it does not move!
lPlace the washing machine on a solid, even surface.
lLoosen the plastic washer (2)
lLock with washers (2)
lLevel the machine by adjusting the legs (1)

7
The drain hose is at the back of the
machine. Fix the drain hose so that it
does not move while the machine is
in operation (use the elbow as shown
below). Do not place the hose too deep
into the outlet pipe!
max 100 cm
min 60 cm
III. Connecting the water supply
IV. Water drain
V. Connecting the electric power supply
A water supply hose with seals is inside the drum of the machine.
lOnly plug the machine into a properly installed socket
with an earth pin!
lDo not connect to an adaptor or an extension cord!
lIn the event of the power lead being damaged, it must be
replaced by an authorised technician.
lThe electrical system to which the appliance is to be
connected must be protected with a 10 A fuse.
INSTALLING THE MACHINE
Water pressure min. 0,1 MPa (1 bar), max.1 MPa (10 bar). Supply the machine
with cold water
lafter connecting, make sure the hose is not twisted
lafter connecting the hose and the valve, check they are sealed tight
lregularly check the condition of the supply hose.
Use the new hoses sup-
plied with the machine.
Do not re-use old hoses.
lThe appliance’s mains connection (electrical wall socket)
should be in a visible and accessible place!

8
Detergent Drawer
Drum
Pump lter
cover
Door
handle
Control panel
■■
■■
■
DESCRIPTION OF THE APPLIANCE
UNDERSTANDING THE SYMBOLS ON CLOTHES LABELS
Always pay attention to the symbols on garments’ labels
when choosing a washing setting.
I. Washing
II. Chemical cleaning
III. Spin dryer
boiling
temp. 900
normal
temp 600C
normal
temp 400C
DO NOT
wash!
delicate handwash
all
solvents
all
except TRI
petrol
only
DO NOT
dry clean!
normal low high DO NOT
dry!
IV. Ironing
1100C1500C 2000CDO NOT
iron!
90

9
DESCRIPTION OF CONTROL PANEL
1
■
2
■
8
79
3 4 5 6
10 11
910
+
■■■■■
■■ ■ ■
■
1. Programme selector knob
2. Display
3. Temperature indicator (60°C, 40°C, 30°C, cold water )
4. Spin speed indicator
5. Rapid Wash indicator
6. Anti Allergic indicator
7. Temperature button
8. Spin speed button
9. Rapid Wash button
10. Anti Allergic button
11. START/PAUSE button
9+10. Child Lock

10
DESCRIPTION OF CONTROL PANEL
1. Programme selector knob
Choose the appropriate wash programme as required, depending on the degree of soil,
and type and amount of laundry loaded, which ensures better results and more effective
washing. Once the wash programme is started, turning the programme selector knob to
another position (except ) does not change the previously selected programme.
2. Display
a). user selected spin speed
b). user selected temperature
c). user selected additional function

11
DESCRIPTION OF CONTROL PANEL
3. Temperature selector button
This button allows the washing temperature to be set. Press this button to display water
temperature settings available for a given programme or an option for washing in cold
water (no heating). Depending on the programme selected, the display shows the follo-
wing temperatures - - °C (cold water) - - 30°C - 40°C - 60°C.
NOTE 1: For the Cotton 90°C programme, the 60°C indicator lights up.
NOTE 2: For the Eco 20 programme the 30°C indicator lights up and you can select
the, you can select the „cold water ” option (no heating).
4. Spin speed button
Use this button to set the spin speed when water is being pumped out of the washing
machine. Available spin speeds: Spin off - - 600 - 800 - 1000 - 1200.
NOTE: The maximum spin speeds depending on the programme are given
in table of programmes.
ADDITIONAL FUNCTIONS:
5. Rapid Wash
The Rapid Wash function reduces the total wash time saving money while reducing
energy consumption and water consumption.
Pre-wash is recommended when washing lightly soiled laundry.
NOTE: The Rapid function is not available for all programmes
(see Table of wash programmes).
6. Anti Allergic
The Anti-Allergic programme is especially recommended for washing children’s clothing
and for people with sensitive skin. Select this option to add an extra rinse to wash cycle.
Additionally, during all stages of rinsing water is heated to 30°C.
START/PAUSE button
Press START/PAUSE to start or pause a programme. When the washing machine ope-
rates, START/PAUSE indicator light is on. When you PAUSE a programme, START/
PAUSE indicator ashes.
The PAUSE mode can be used to soak the laundry.
Once the selected programme started wait for about 10 minutes and then press the
START/PAUSE button. When the laundry is soaked as required, press the START/
PAUSE button again to resume the program. Soaking will improve washing results for
heavily soiled laundry.

12
SPECIAL PROGRAMS
1. Daily 60’:
A daily wash programme with a duration of 60 minutes, the temperature setting of 60°C
and a single rinse cycle and a maximum spin speed. Use this programme to wash colo-
ured fabrics, cotton and linen.
2. Shirts programme:
The temperature of 60°C and spinning between the rinse phases. There is a three-step
spin sequence at speeds of 400, 500 and 600 rpm at the end of the wash programme.
This program can be used for simultaneous washing of cotton shirts and blouses toge-
ther with synthetic and mixed fabrics.
3. Quick Wash 15’:
Use this programme to refresh clothes. Includes all three wash stages:
- Main wash
- Rinse
- Spin
4. Eco 20°C:
Use this programme to wash clothes at 20°C.

13
USING THE APPLIANCE
II. End of the wash cycle
1. Indicator lights to indicate wash cycle has ended.
2. Turn off the water valve
3. Set the programme selection knob to .
4. Unplug the appliance from the mains.
5. Open the door and remove laundry.
III. Cancelling and changing programme
Set the programme selector knob to position for several seconds to terminate a
programme. Then select the desired wash programme.
NOTE: When you cancel a programme when there is water in the drum and turn
the programme selector knob to a different position, the appliance will drain
the water. Then select the desired wash programme.
I. Select Programme
1. Set the programme selector knob to the desired programme
(see the table further on).
2. Change temperature, spin speed or activate available additional functions to
modify the programme to your individual needs.
3. Press the [Start/ Pause] button

14
TABLE OF PROGRAMMES
Programme name Max.
temp.
[°C]
Max. spin
speed
[rpm]
Max. load
[kg]
Additional
functions
available
Detergent drawer Time
[h:min]
Energy
con-
sumption
(kWh)
Water
con-
sumption
(l)
Number
of rinses
Type of laundry
Rapid
Wash
Prewash Basic
wash
Fabric
softener
Towels 90° 1200 6,0 Option
xl
3:14 2,22 69 3
Heavily soiled clothing, or an moderately
soiled cotton and linen for children that requ-
ires boiling.
Cottons +
Prewash
60° 1200 6,0 Option
l l
2:40 1,23 75 3 Moderately or heavily soiled cotton
clothes, bed linen, table linen, linen,
towels.
Cottons 60* 60° 1200 6,0 Option
xl
3:20 0,95 49 2 Moderately or heavily soiled cotton
clothes, bed linen, table linen, linen,
towels.
Cottons 40* 40° 1200 6,0 Option
xl
3:10 0,72 43 2 Moderately soiled cotton or linen
clothes.
Eco 20°C 20° 1200 3,0 -
xl
1:38 0,19 38 2 Lightly soiled, sweaty cotton and
linen clothes. Wash at 20°C.
Easy Care 40° 1200 3,0 Option
xl
1:29 0,49 39 2 Very dirty clothes, clothing made from
synthetic fabrics or natural-synthetic
fabric blends (nylon, shirts, blouses,
synthetics).
Wool 30° 600 2,0 -
xl
0:40 0,14 40 3 Note: Do not machine wash woollen
fabrics if the cloth tag prohibits.
Rinse - 1200 6,0 -
x x
0:36 0,09 39 3 Rinsing with laundry additives, inclu-
ding anti-static or softening additives.
Reduce the spin speed when washing
very delicate fabrics.
Spin - 1200 6,0 -
x x x
0:15 0,05 - - Spin-drying after hand washing.
Hand Wash/
Delicate
30° 600 2,0 -
xl
1:31 0,32 65 3 Very delicate fabrics.
Sportswear 30° 800 3,0 Option
xl
1:20 0,26 37 2 Sportswear.
Jeans 30° 800 3,0 Option
xl
1:24 0,28 48 2 Dirty cotton, synthetics, coloured
laundry, linen fabrics.
Shirts 60° 600 3,0 Option
xl
1:46 0,83 35 2 Dirty cotton, clothing made from
synthetic fabrics or natural-synthetic
fabric blends (nylon, shirts, blouses,
synthetics).
Daily 60’ 60° 1200 3,0 Option
xl
1:00 0,86 31 1 Dirty cotton, coloured laundry, linen
fabrics.
Quick Wash 15’ 30° 800 2,0 -
xl
0:15 0,12 28 1 Lightly soiled, sweaty cotton clothes
and linen.
NOTE: Above mentioned time is an estimate and may differ from actual wash cycle time, depending on temperature, water pressure,
load size, etc. The time is automatically updated during wash cycle. Displaying the same time for an extended period or abrupt changes
are normal.
* - standard programmes for washing cotton fabrics at 60°C and 40°C.
These programmes are suitable for washing normally soiled cotton fabrics. These are the most effective programmes for washing these type
of fabrics, taking into account the total energy and water consumption.
Note: Real water temperature may differ from the declared wash cycle temperature.
Use detergent or fabric softener if necessary,
l Detergent required, without which washing will be ineffective,
x Do not use detergent or fabric softener.

15
TROUBLESHOOTING
Problem Probable cause/Solution
The washing machine is not
working
- Turn the tap on
Clean the mesh lter on the supply hose.
- Close the door of the appliance.
Press the [Start/ Pause] button.
Water leaks - Connect the water intake properly.
The load in the appliance has not
been spun
- Replace the load evenly in the drum, clean the pump lter.
Unpleasant smell in the drum - Activate the Autoclean cycle without a load
(see the washing programme table).
No water in the drum - Turn on the tap with the water supply.
There is water left in the fabric
softener container.
- Firmly press the button in the middle container
Washing not properly rinsed - Use the correct amount of cleaning agent, depending on how dirty
the washing is and the hardness of the water (see the instructions on
the cleaning agent’s packaging).
- Clean the pump lter
The appliance does not ll with
water
- Turn on the water valve
- Check the programme setting
- Check the water pressure
- Reconnect the water supply hose.
- Close the door of the appliance.
- Check the water intake is not bent or blocked.
Simultaneous intake and draining
of water
- Check that the end of the outlet hose is higher than the level of the
water in the appliance (the hose should be at a height of 0.6m to 1m).
Water outow problems - Check the pump lter
- Check the outlet lead
- Check the height of the outlet hose, which should be 0.6m to1m
from the bottom of the washing machine.
Appliance is vibrating - Check that the transport safety devices have been removed.
- Level the appliance
- Secure the legs (tighten the nuts).
Foam from the detergent drawer - Reduce the amount of detergent used.
- Check the water hardness and amount of detergent used, as well
as the type of detergent used in the drum.
The operation of the appliance is
interrupted before the programme
has nished
- Check power supply, water supply and water outlet.
Noise caused by operation of
the outlet pump after water is
removed
- The water has been removed from the drum, but small amounts
remain in the pump and outlet lead. Constant operation of the outlet
pump causes air to be sucked in leading to the characteristic noise,
which does not mean that anything is wrong.
Short breaks during the wash
cycle
- The water in the appliance is being automatically relled.
- Pause caused by removal of excess foam.

16
TROUBLESHOOTING
The fault indicator lights
The washing machine has a system of CODES shown on the display, which helps to locate
minor operating faults and identify their cause.
Fault is indicated by the symbols:
Display
indication
Reason Solution
E02 Low pressure, no
water in the machine
Unscrew the water valve, check the water inlet hose and
lter, check the water pressure.
E03 Improper water
outow
Make sure that drain hose is not clogged, check the
pump and water lter.
E01 Door ajar Check that the door is locked; check that laundry is not
jammed in the door.
E04 Others Try to restart or contact the SERVICE CENTRE
tel. 0844815 8880 / 0818 45 46 46

17
Pump
lter
MAINTENANCE AND CLEANING
I. Cleaning the pump lter
Clean the pump lter every 20 washes
or so.
Neglecting to clean the lter causes dif-
culties in emptying the machine of water!
Never clean the product’s casing or plastic parts using solvents or strong, abrasive cleaning
agents (e.g. washing powders or creams)! Only use delicate liquid cleaning agents and soft
cloths. Do not use sponges.
lUnplug the appliance from the
mains,
lTurn off the water valve,
lOpen the lter cover by hand
or using a at-head screwdriver.
lUnscrew the lter. lRemove and clean the lter.
To replace the lter
following the pro-
cedure in reverse
order.
II. Cleaning the water supply valve
lTurn on the water supply hose,
lUse forceps to grasp the lter mesh plunger,
lRemove and clean the lter (using a brush).
III. Cleaning the detergent drawer (at least once a month).
lRemove the drawer (while pressing
the stop).
lClean in running water (or using a
brush or piece of cloth).
lReplace the drawer.
To replace the lter
following the pro-
cedure in reverse
order.

18
It is recommended to use powder or liquid general purpose
detergents for all temperatures in a range as per the deter-
gent Producer’s recommendations indicated on the product
packaging.
Detergents
lPour the detergent into the drawer compartment marked
lPour the pre-wash detergent into the drawer compartment
marked
Liquid detergents
lInstall the supplied partition in the compartment (gure
below).
lPour liquid detergent into the drawer compartment marked
Fabric softeners added to the rinse
lPour the fabric softener into the drawer compartment marked
lDo not exceed the maximum level marked on the drawer com-
partment. This detergent will be used for the nal rinse.
Before washing for the rst time, put it through one high tempera-
ture cycle without a load, according to the following procedure:
lConnect the washing machine to the electricity mains
lTurn on the water valve
lSet the programme selector knob to high temperature wash.
lAdd the appropriate detergent and press the [Start/ Pause]
button.
I. Cleaning and
purifying agents
II. First wash
Reducing energy and water consumption
Garments which are only lightly soiled should be washed using the
appropriate wash programme, i.e. ULTRA SHORT The washing
machine detects partial load. For partial load, when using the To-
wels and Cotton programmes, washing machine will reduce water
and energy consumption and shorten the wash cycle.
IV. Conservation
Stubborn stains
Before washing garments, apply an additional stain remover ac-
cording to the instructions for use
Heavily soiled:
lOne-off washing of smaller amounts of clothes
lAdd more detergent
lAfter washing heavily soiled clothes (e.g. working clothes) or
garments which are shedding bres, it is recommended that the
washing machine is rinsed out by running a programme cycle
at a temperature of 60°C, e.g. COTTON, without a load. Lightly
soiled:
lSee pt. „Conservation”.
III. Soil
PRACTICAL ADVICE REGARDING WASHING

19
PRACTICAL ADVICE REGARDING WASHING
Hard water causes sediment to form.
Information about water hardness is available from your nearest
water works.
It is advised that water softeners are used for every wash.
V. Water hardness
VI. Power cut
(programme memory)
Power cuts or unplugging the machine does not cancel the set-
ting. This has been memorised and the cycle will continue once
the power is restored. Do not open the doors of the washing
machine during a power cut.
VII. Loading Maximum drum capacity 6 kg:
Load the washing into the drum according to the following in-
structions:
lcotton, denim, children’s clothes – max full drum (do not force clo-
thes into the drum as this will reduce the quality of the wash!).
lsynthetics - max 1/2 drum
lwool, silk, delicate fabrics - max. approx. 1/3 of the drum.
Important! Do not overload the machine! Overloading the machine
may cause damage to the clothes being washed!
The maximum load amounts depending on the program are
given in table of programs.
VIII. Even load
distribution control
The electronic control device includes a load distribution control
system. In the event that the system detects uneven distribution
of load in the drum, the washing machine will try to relocate it.
Sometimes the trials will not be sufcient for the proper location of
the clothes (in the case of frotte dressing gowns washed with other
types of clothes, ball-shaped sheets which closes several objects
inside it). The system may react in the following way:
lit may accept the uneven distribution of clothes but will decrease
the spin speed
lit may not allow spinning as the clothes are distributed
unevenly.)
In both cases, after the wash is over, open the door of the washing
machine, place the laundry manually, close the door and select the
spin programme again.

20
PRACTICAL ADVICE REGARDING WASHING
XI. Dosing According to the cleaning agent manufacturer’s instructions.
Too little cleaning agent
lThe washing turns grey.
lLumps of grease form, sediment builds up.
Too much cleaning agent
lStrong foaming.
lIneffective washing, detergent incompletely rinsed from fabrics.
X. Delicate
fabrics
Programme:
lSelect the appropriate wash programme (WOOL, HAND
WASH)
Loading:
Do not overload the machine, max 1/3 of the drum, see Loading.
IX. Door
interlock
The washing machine is equipped with an interlock which prevents
the door from being opened during washing. Once a washing cycle
is complete, the door interlock is automatically released.
In order to open the door during the wash program, press PAUSE
button and wait to unlock the door.
IMPORTANT! If the temperature inside the drum is high, the
door may remain blocked until the water temperature has
dropped below 60°C.
IMPORTANT! Before opening the door of the washing machine
check whether there is water in the drum.
Table of contents
Other Amica Washer manuals

Amica
Amica WA 14661 W User manual

Amica
Amica WA 474 030 User manual

Amica
Amica WA 462 030 User manual

Amica
Amica WMA712 User manual

Amica
Amica WME610 User manual

Amica
Amica WT 473 710 User manual

Amica
Amica WMA612 User manual

Amica
Amica AWI814D User manual

Amica
Amica AWB510LP User manual

Amica
Amica AWI912DB User manual

Amica
Amica AWSN 10DA User manual

Amica
Amica AWT714S User manual

Amica
Amica WME610/1 User manual

Amica
Amica WMS714 User manual

Amica
Amica WA 484 081 User manual

Amica
Amica WA 474 020 User manual

Amica
Amica AWM712D User manual

Amica
Amica AWI912D User manual

Amica
Amica WA 484 020 User manual

Amica
Amica AWI712S User manual