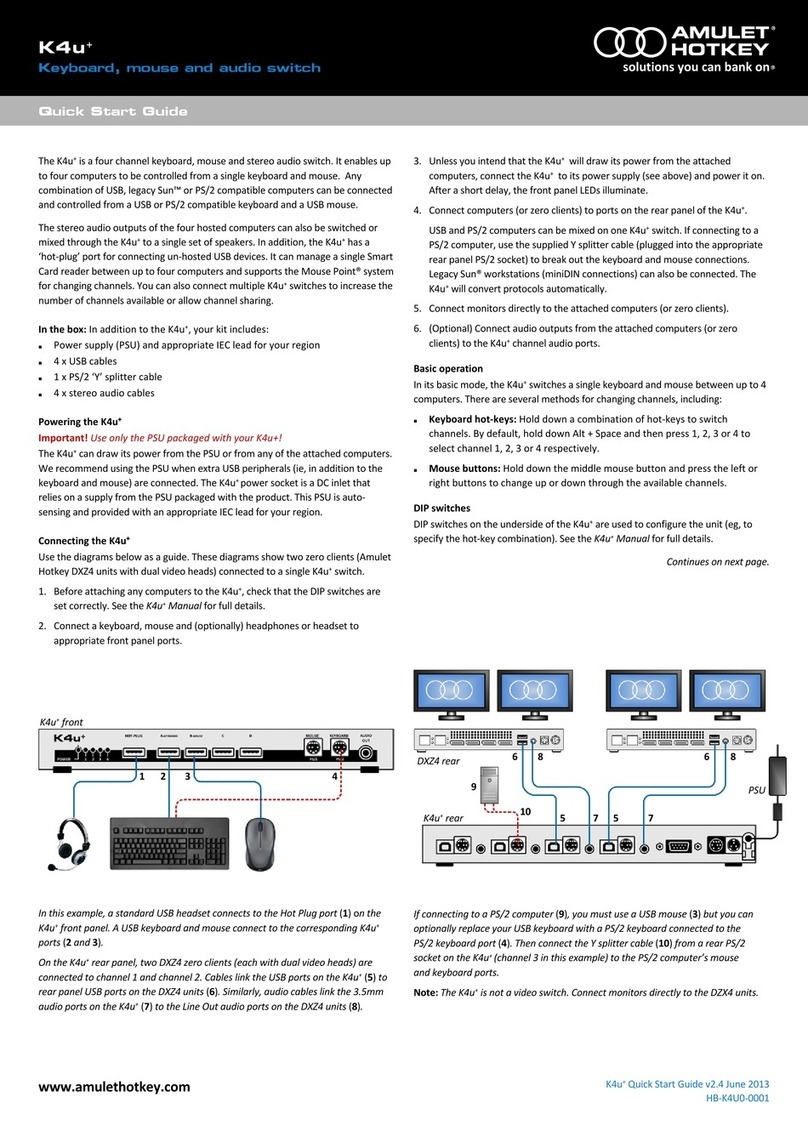
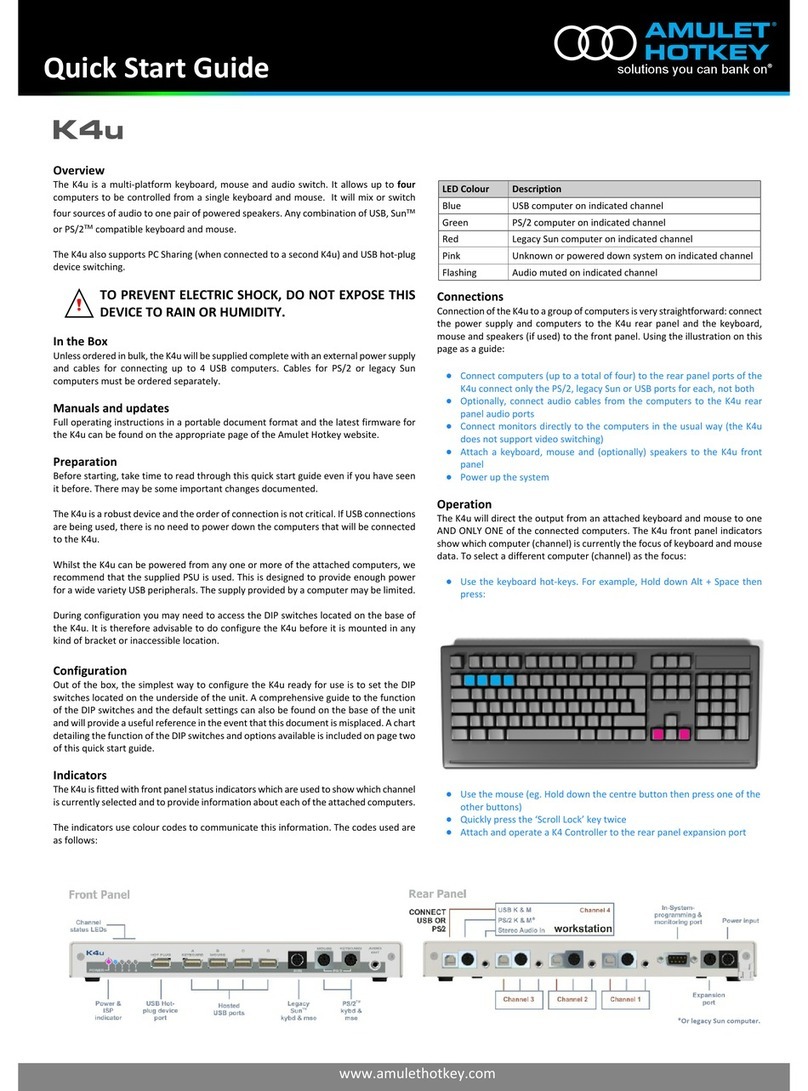
Amulet Hotkey K4u User manual

®
Revision 2.5
October 2014
K4u+MANUAL

www.amulethotkey.com | 2
Amulet Hotkey K4u+Manual
Caution
To reduce the risk of electric shock, do not remove any circuit
board or power supply covers. There are no user serviceable
parts inside; refer to qualified personnel.
Warning
To reduce the risk of fire or electric shock, do not expose this
appliance to rain, moisture, dripping or splashing. Do not place
objects filled with liquid on or near the appliance.
Detailed safety instructions
Read and keep these instructions. Also:
1. Take notice of our warnings.
2. Follow the instructions.
3. Clean the product only with a dry cloth.
4. Keep the product away from liquids.
5. Install in accordance with these instructions.
6. Do not install near significant sources of heat.
7. Ensure the product is properly grounded.
8. Only use attachments and accessories approved
by Amulet Hotkey.
9. Refer all servicing to qualified personnel.
Shipment
YourK4u⁺andcableswerecarefullypackedpriortodespatchto
guarantee safe transit. However, we recommend that you
thoroughly examine all packaging and contents for signs of
physical damage before use.
If any damage has occurred, please notify the shipping company
and your supplier immediately otherwise claims for damage or
replacement may not be granted.
Retain the original packaging for use in the event that the
equipment has to be stored, shipped or returned for service.
If you choose to dispose of the packaging, please do so in an
environmentally friendly fashion.
Technical support
ThismanualincludesanoverviewoftheAmuletHotkeyK4u⁺
plus detailed explanations on how to install, configure and use it.
If you have further questions, please do not hesitate to contact
technical support at Amulet Hotkey for expert assistance.
You can do this by phone or by email:
UK: +44 (0)20 7960 2400
US: +1 (212) 269 9600
European Tech. Support:
US Tech. Support:
Asia Tech. Support:
Thank you
Thank you from everyone at Amulet Hotkey for purchasing this
product. Much time and energy has gone into making this the
best and most reliable solution available.
With over 20 years’ experience working around the world in a
variety of installations, we are confident we have provided a
state-of-the-art unit that will provide you with long and reliable
service regardless of the application.
To get the best from this product, please take time to study this
manual carefully, even if you are familiar with other Amulet
Hotkey products.
©2014 Amulet Hotkey Ltd. All rights reserved.
The information contained in this document represents the current view of Amulet Hotkey® as of the date of publication. Because Amulet Hotkey must respond to
changing market conditions, it should not be interpreted to be a commitment on the part of Amulet Hotkey, and Amulet Hotkey cannot guarantee the accuracy of
any information presented after the date of publication. Sections of this document are reproduced with the kind permission of Teradici®Corp. This document is for
informational purposes only. Amulet Hotkey make no warranties, express, implied or statutory, as to the information in this document. Complying with all
applicable copyright laws is the responsibility of the user. Without limiting the rights under copyright, no part of this document may be reproduced, stored in or
introduced into a retrieval system, or transmitted in any form or by any means (electronic, mechanical, photocopying, recording, or otherwise), or for any purpose,
without express written permission from Amulet Hotkey. Amulet Hotkey may have patents, patent applications, trademarks, copyrights, or other intellectual
property rights covering subject matter in this document. Except as expressly provided in any written license agreement from Amulet Hotkey, the furnishing of this
document does not give you any license to these patents, trademarks, copyrights, or other intellectual property. Teradici, PC-over-IP, and PCoIP are registered
trademarks of Teradici Corporation. VMware and View are registered trademarks of VMware Corp. Amulet Hotkey and ‘solutions you can bank on’ are trademarks
of Amulet Hotkey Ltd. The names of actual companies and products mentioned herein may be the trademarks of their respective owners.

www.amulethotkey.com | 3
Amulet Hotkey K4u+Manual
Contents
1. Introduction................................................................4
1. 1 Terminology.........................................................4
1. 2 KVM switches must be secure.............................4
1. 3 TEMPEST versions of the K4u+............................4
2. Your K4u+at a glance..................................................5
2. 1 Front panel...........................................................5
2. 2 Rear panel............................................................6
3. DIP switches................................................................8
4. Hot Keys....................................................................10
4. 1 General hot keys................................................10
4. 2 Hot keys for legacy Sun computers ...................10
5. Installing Mouse Point...............................................11
5. 1 Requirements for host PC..................................11
5. 2 Run the Mouse Point installer ...........................11
5. 3 Command line installations with install.cfg.......12
5. 4 Mouse Point menu.............................................14
5. 5 Disable Mouse Point menu items .....................14
5. 6 Mouse Point registry values...............................15
6. Setting up the K4u+...................................................16
6. 1 Attach computers to the K4u+...........................16
6. 2 Set up channel changing by mouse pointer.......16
6. 3 Set up SaverSync™ and Remember Last Channel
...........................................................................17
6. 4 Set up a cascade of multiple switches...............18
6. 5 Set up channel sharing.......................................20
6. 6 Check the K4u+status........................................21
6. 7 Log files..............................................................22
7. Using the K4u+ ........................................................23
7. 1 How to change channels..................................23
7. 2 Hot plugging USB devices.................................24
7. 3 Audio switching and mixing.............................25
7. 4 Synchronize screen savers ..............................25
7. 5 Support for smart cards...................................26
7. 6 Control extra computers by cascading multiple
K4u+switches ..................................................27
7. 7 Share a computer between two K4u+ switches
.........................................................................27
8. Updating the firmware ...........................................28
8. 1 Firmware updates over a USB connection.......28
8. 2 Local manual updates (USB).............................28
8. 3 Remote manual updates (USB)........................29
8. 4 Remote scheduled firmware updates (USB)....30
8. 5 Firmware updates over a serial connection.....31
8. 6 Firmware update failures.................................32
9. Using the K4u+with trading keyboards....................33
9. 1 Amulet Hotkey AHK3000D keyboard...............33
9. 2 Bloomberg keyboards......................................35
10. Specifications........................................................36

www.amulethotkey.com | 4
1
1. Introduction
The K4u+is a four channel keyboard, mouse and stereo audio
switch. It enables up to four computers to be controlled from a
single keyboard and mouse. The stereo audio outputs of the
four hosted computers can also be switched or mixed through
to a single set of speakers.
Any combination of USB, legacy Sun™ or PS/2 compatible
computers can be connected and controlled from a USB or PS/2
compatible keyboard and a USB mouse.
In addition, the K4u+has a ‘hot-plug’ port for connecting
un-hosted USB devices. You can also connect a K4u+to other
K4u+switches to increase the number of channels available or
allow channel sharing. These features are described later in this
manual.
The K4u+is configured by two banks of DIP switches on the
underside of the case. For more information on DIP switches,
see section 3.
1. 1 Terminology
This manual uses ‘KVM switch’ as a generic term when referring
to keyboard and mouse switches, regardless of whether they
support video and audio switching.
This manual often refers to keyboard and mouse focus. When
several computers are attached to the channels on a K4u+
switch, the focus identifies the computer currently being used
by a user. Similarly, the terms active channel or selected channel
also refers to the currently selected computer.
1. 2 KVM switches must be secure
The Amulet Hotkey K4u+switch is designed for use in mission-
and business-critical environments such as trading floors,
command and control centres, and government. Security is
essential in these environments, especially when a KVM switch
is used with sensitive or secure workstations. In particular:
■It must not be possible for a password destined for one
hosted computer to be sent through the KVM switch to
another hosted computer.
■It must not be possible for data to be exchanged from
hosted computers using the KVM switch as a conduit.
■The switch must not log sensitive data such as passwords for
later unauthorised use.
■A switch must not stop working if someone inadvertently
pulls out the power.
■Key codes passing through a KVM switch must not be
corrupted or misread; the firmware must be completely
accurate and error free.
The Amulet Hotkey K4u+is designed to meet and exceed these
requirements.
1. 3 TEMPEST versions of the K4u+
TEMPEST level B versions of the K4u+are available by special
arrangement. These K4u+versions are TEMPEST modified and
tested by our partner, OSPL Nederland B.V., who operate and
maintain a NATO- and NSA-certified TEMPEST test and
production facility.
K4u+KVM Switch

www.amulethotkey.com | 5
2
2. Your K4u+at a glance
The K4u+has various LEDs and connections on the front and
rear panels. These are described below.
2. 1 Front panel
1 Power LED
This LED illuminates when power is applied to the unit.
Power can be drawn from the supplied PSU or from any of
the connected computers. For best performance, especially
when using USB peripherals with a high power requirement,
or the Bloomberg Keyboard 4 (STB100), always use the
external PSU. It is also good practice to power a KVM switch
from a UPS.
2 Channel status LEDs
These are multi-coloured LEDs. If a channel LED is:
Blue The computer on this channel is connected using
the USB protocol.
Green The computer on this channel is connected using
the PS/2 protocol.
Red The computer on this channel is connected using
the legacy Sun™ protocol.
Pink The computer on this channel is powered off, or
No computer is attached to this channel, or
The computer on this channel is using an
unknown protocol, or
No protocol has been detected yet on this
channel.
Flashing The audio feed from this channel is muted.
3 Hot-plug port
Use this port to connect un-hosted USB devices (such as a
printer or memory stick) to an attached computer. This
connection passes through the K4u+to the rear panel USB
socket for the selected channel, where it is merged with any
keyboard and mouse data present. Support for the hot-
plugged device is provided directly by the attached
computer, which loads the appropriate drivers when the
device is detected and identified. You can configure the
hot-plug port for automatic or manual channel switching.
For example, you can set it up to automatically follow the
keyboard and mouse focus.
Note:
The hot-plug port can only connect to one K4u
+
channel at a time.
4USB keyboard socket
Use this socket to connect a USB keyboard. Most types are
supported but be aware that some devices have unusual
special function keys that only work with custom drivers.
These devices are not fully supported. Always test the
keyboards you intend to use during the POC stage.
Note:
This socket is switched to a selected channel. It can
never connect to more than one channel at a time.
5 USB mouse socket
Use this socket to connect a USB mouse. Most types are
supported but be aware that some devices have unusual
special buttons that only work with custom drivers. These
are not fully supported. Always test the mice you intend to
use during the POC stage.
Note:
This socket is switched to a selected channel. It can
never connect to more than one channel at a time.
3
5
1
2
4
7
6
8
K4u+Front Panel

www.amulethotkey.com | 6
Amulet Hotkey K4u+Manual
6 General purpose USB sockets
These two sockets can support other USB devices, such as
hubs or a DXR2. These sockets follow the keyboard and
mouse focus and can never connect to more than one
channel at a time.
7PS/2 keyboard and mouse sockets
Use the keyboard socket to connect a PS/2 keyboard. You
can use a PS/2 keyboard with a USB mouse.
The PS/2 mouse socket is inactive in the current version of
the K4u+, but it may be re-activated in future versions.
Note:
If you connect both PS/2 and USB keyboards, the
K4u
+
only references the USB keyboard.
8Audio output
Use this socket to connect desktop speakers or headphones.
The K4u+can take the audio output of the attached
computers and either switch or mix it through to this socket.
When switched, only audio from the current channel is
routed to this socket. When mixed, audio inputs from all
channels are mixed and fed to this socket.
You specify audio switching or mixing by setting a DIP switch
A4; for details, see section 3. You can also mute a selected
audio feed by using a hot-key combination; for details, see
section 7. 3.
2. 2 Rear panel
1 Channel 4 connections
USB, legacy and audio connections for channel 4:
1a USB type B output: This socket connects a computer to
channel 4 on the K4u+. It carries USB keyboard and
mouse data sent to this channel. Data from the hot-plug
port is also merged if the port is switched to this channel.
1b PS/2 & legacy Sun®output: This socket is provided for
support of legacy systems, including PS/2 computers and
Sun computers.
For connection to PS/2 computers, a splitter cable is
available (CL-XX01-4021) that connects this port to the
PS/2 keyboard and mouse sockets of the computer.
For connection to legacy Sun computers, a cable is
available (CL-XX01-0011) to connect this port to the
keyboard and mouse socket of the Sun computer.
The K4u+automatically detects which protocol is present
and translates keyboard and mouse data accordingly.
1c Audio input: This 3.5mm stereo jack socket connects to
the audio output of the computer on channel 4.
2 Channel 3 connections
USB, legacy and audio connections for channel 3. For
descriptions, see Channel 4 connections above.
3 Channel 2 connections
USB, legacy and audio connections for channel 2. For
descriptions, see Channel 4 connections above.
4 Channel 1 connections
USB, legacy and audio connections for channel 1. For
descriptions, see Channel 4 connections above.
5 Serial Connection
This RS232 port provides a method for updating firmware on
the K4u+. Amulet Hotkey provide a utility to manage
firmware updates. You can run this utility on any Windows
computer with an appropriate serial port. See section 8. 5 for
details about serial updating.
Note:
You can also update the K4u+ firmware using a USB
port connected to one of the attached computers. This
method is more suited to enterprises with a large number
of switches because the update process can be managed
centrally. See section 8. 1.
2
6
1
5
8
1a
3
4
7
1b
1c
K4u+Rear Panel

www.amulethotkey.com | 7
Amulet Hotkey K4u+Manual
7Power socket
Use this socket to connect power to the K4u+. This is a DC
inlet and relies on a supply from the PSU (CA-XX01-0002)
packaged with the product. This power supply is auto-
sensing and provided with an appropriate IEC lead for the
region.
Important!
Use only this PSU with the K4u
+
.
8Power cable clip
A clip is provided to help secure the power supply cable to
the K4u+if necessary.
6Feature connector
This socket supports the following features:
●K4 Controller (CA-HKCT-0004)
The K4 Controller provides an alternative method for
changing channels. It comprises four illuminated
push-buttons in a compact case that can be placed next to
a keyboard. It allows you to locate the K4u+out of reach
under a desk while still being able to see which channel
has focus.
K4 Controller
●Focus indicator LEDs (CL-HK04-0001)
The K4u+is a keyboard and mouse switch; it does not
switch video. Screens for each attached computer remain
connected directly to the associated computer.
Focus indicator LEDs show which screen is currently the
focus of keyboard and mouse activity. The focus indicator
attaches to a screen and illuminates when the associated
computer is being used:
LEDs identify the computer and screen currently being
addressed by the keyboard and mouse.
Note:
Focus indicator LEDs are only available to special
order. Four LEDs are combined in a single pack.
Minimum quantities apply.
●Sharing indicator LEDs
When a computer is shared between two K4u+ switches,
sharing LEDs can indicate to both users the status of the
shared channel. See section 7.7.2 for details.
Note:
You cannot use sharing LEDs and focus LEDs
together. Because both LEDs plug into the Feature
Connector port, the K4u+ can only support one set of LEDs
at a time.

www.amulethotkey.com | 8
3
3. DIP switches
The K4u+has a two sets of DIP switches fitted to the underside
of the case. A label alongside these switches indicates the
function of each switch. This section describes the individual
switches.
A1 and A2: Set Hot-key Combination
Factory default: A1=OFF, A2=OFF
These switches define the hot-key combination. This is two
pre-assigned keys which, when held down together with a
third key, activate a special feature of the K4u+switch. The
factory default hot-key combination is Alt + Space. Three
alternative combinations are listed on the configuration label
on the underside of the unit.
Hot keys are described in section 4.
A3: Mouse Channel Changing
Factory default: A3=ON
When A3 is ON, users can change channel focus by clicking
the mouse buttons.
To change channels, hold down the centre mouse button.
Then click the left or right mouse buttons to scroll around
the channels. See section 7.1.3.
A4: Audio Mix / Switch
Factory default: A4=ON
When A4 is ON, the K4u+mixes all four stereo audio inputs
through to the single output on the front of the unit,
regardless of the focused channel. When A4 is OFF, the audio
output follows the keyboard and mouse focus, switching
channels when the focus changes.
Audio switching and mixing are described in section 7. 3.
A5: Active Sensing
Factory default: A5=ON
When A5 is ON, the K4u+only switches to channels that have
an active computer attached (ie, connected and powered). It
will not switch to empty channels and skips them when a
user changes channels using the mouse.
A6: Confirmation Beeps
Factory default: A6=ON
When A6 is ON, the K4u+gives a confirmation beep
whenever there is a change of state (eg, a channel change or
some other hot-key function has been invoked).
Even when A6 is OFF and confirmation beeps are disabled,
the switch still gives warning beeps eg, when the unit resets
or when a new keyboard is plugged into the front of
the K4u+.
A7 and A8: Sun™ / USB Keyboard Country Layout
Factory default is country specific.
For users with a Sun workstation but a non-country layout
reporting keyboard (this includes PS/2 and most USB
keyboards), these switches inform the Sun workstation of
the layout of the attached keyboard.
B1 and B2: Shared Channel Selection
Factory default: B1=OFF, B2=OFF
If a computer is shared between two K4u+switches, use B1
and B2 to specify which channel is shared.
When a K4u+(with keyboard and mouse attached) detects
that a second K4u+has been connected to one of its front
panel USB ports (A to D), it automatically enables sharing
mode. This allows two users to share the computer on the
channel specified by B1 and B2.
Channel sharing is described in section 7. 7.
B3 and B4: Sharing Timeout
Factory default: B3=OFF, B4=ON
If a computer is shared between two K4u+switches, use B3
and B4 to specify the sharing timeout. The timeout can be
from zero to 10 seconds.
When a shared computer is being controlled by a user,
the other user is automatically blocked from accessing it.
If the shared computer is left unused, it remains locked to
the controlling user until the timeout expires. The shared
computer then becomes available to either user. See
section 7. 7 for details.

www.amulethotkey.com | 9
Amulet Hotkey K4u+Manual
B5: Focus or Sharing Indicator Selection
Factory default: B5=OFF
The K4u+can be fitted with two types of optional indicator.
These are fixed in position near the users’ monitors. The
choice of indicator depends on user preference and
operating mode.
●Focus Indicators give a visual indication of which channel
has the keyboard and mouse focus.
●Sharing Indicators show the current status of the shared
channel, regardless of the keyboard and mouse focus.
Contact your local Amulet Hotkey sales team for more
information about sharing indicators. See item 6 in section 2.
2 for details.
B6: Reserved for future use
B7: Hot-Plug Device Switching Mode
Factory default: B7=OFF
Ahot-plug device can be any un-hosted USB device (such as
a printer or memory stick) connected to the hot-plug port.
DIP switch B7 controls how the hot-plug device follows the
channel focus.
●When B7 is ON, the hot-plug device follows the keyboard
and mouse focus after a three second delay. (This delay
allows the K4u+to ignore quickly retracted changes to
the ‘wrong’ channel.)
●When B7 is OFF, the USB hot-plug device remains
switched to one channel, regardless of keyboard and
mouse focus, until the user explicitly switches the
hot-plug port to the active channel by pressing the
hot-keys + U.
Note:
For a description of hot-key operations and options,
see section 4. Hot plugging is described in section 7. 2.
B8: Force In-System-Programming (ISP)
Factory default: B8=OFF
(Only needed in the unlikely event of a failed switch
firmware update.) The K4u+is fully flash programmable.
When B8 is ON, the K4u+is forced into programming mode.

www.amulethotkey.com | 10
4
4. Hot Keys
The K4u+uses hot-key combinations to invoke various functions.
Typically, you hold down two predefined hot-keys and then
press a third key ie, you press all three keys together. For
example, you can switch channels on the K4u+by holding down
the two hot-keys, then pressing 1, 2, 3 or 4.
The default hot-key combination is Alt + Space. But you can
specify a different combination with DIP switches A1 and A2;
for details, see section 3.
4. 1 General hot keys
Press and hold down the hot keys. Then press:
1 (QWERTY only) Selects channel 1.
2 (QWERTY only) Selects channel 2.
3 (QWERTY only) Selects channel 3.
4 (QWERTY only) Selects channel 4.
4 (NUMPAD only) Switches down to the next channel.
6 (NUMPAD only) Switches up to the next channel.
C Emulates smart card removal and insertion on the active
channel.
U Switches the hot-plug port to the active channel.
* (NUMPAD only) Toggles exclusive mode when a computer is
shared between two K4u+switches.
0 (QWERTY only) Toggles ‘mute all audio’. Use this
combination to mute all audio output.
Backspace
Toggles mixed audio mode for the selected channel. Use this
combination to mute a single channel.
Scroll-Lock
Disables channel changing with the Scroll Lock key. (When
enabled, two quick key presses switches up to the next
channel.)
Esc
(Sun USB keyboards only) Disables channel changing with the
single ‘channel’ keys. See section 7.1.5.
Note:
You must apply this hot-key combination every time
the switch is reset or power cycled.
S Re-reads DIP switch settings and reconfigures the K4u+.
I Initiates the serial port In System Programming mode. You
must press I twice; see the note below.
H (Available for USB and legacy Sun computers only)
Transmits ‘Stop-A’. Press H twice; see the note below.
R Resets the main processor and warm boots the switch. You
must press R twice; see the note below.
Note:
For I, R and H hot-key combinations, press the third
hot-key twice. This means you must hold down the hot keys,
then press and release the third key twice while still holding
down the hot keys. Do not press any other keys during the
sequence. For example, to reset the main processor, the hot-
key combination is Alt+Space+R, R.
4. 2 Hot keys for legacy Sun computers
P Toggles the channel’s keyboard power line.
Q Transmits LH shift & keyboard power key.
N Emulates holding down ‘Stop-N’ as part of a Basic Assurance
Test (BAT) while the keyboard is booting up.
F Transmits ‘Front’ key.
T Transmits ‘Stop’ key.
G Transmits ‘Again’ key.

www.amulethotkey.com | 11
5
5. Installing Mouse Point
The Mouse Point utility enables users to switch channels on the
K4u+using their mouse. For convenience and ease of
maintenance, Mouse Point also incorporates features for
updating the firmware on K4u+switches and managing
screensavers on attached computers. (Administrators can
specify which features are available to ordinary users.)
5. 1 Requirements for host PC
You must install Mouse Point on at least one PC attached to the
K4u+. This your host PC. You can then run the Mouse Point
Configuration utility on the host PC to create a configuration file
that you upload to the K4u+.
Note the following requirements:
■Operating System: For Mouse Point 2.10, the host PC must
be running Windows XP or later. 32-bit and 64-bit systems
are both supported.
■Attaching and removing the host PC: The Mouse Point host
PC does not need to be permanently attached to the K4u+.
You can remove the host PC after uploading the Mouse Point
configuration file to the K4u+. For example, you may find it
convenient to use a laptop as your host PC, temporarily
attaching it to K4u+units as required.
5. 2 Run the Mouse Point installer
1 Download the zip file containing the Mouse Point installer.
The zip file is available on the Support > Downloads page of
the Amulet Hotkey website, www.amulethotkey.com.
2 Extract the Mouse Point installer from the zip file. The
installer is contained in an executable:
Mouse_Point_2_10.exe
3 Copy the Mouse Point installer to the host PC.
4 On the host PC, run Mouse_Point_2_10.exe.
5 Step through the various installer screens.
6 In the Choose Components screen, confirm that the
following components are selected:
●System Tray Application: You must install this
component. It enables you to configure Mouse Point
features, including channel changing with a mouse,
firmware updates, and screen saver management.
●Configuration GUI: This component installs the Mouse
Point Configuration utility. Use this utility to specify how
a user’s screens are arranged in relation to each other.
This utility also allows you to enable SaverSync, a screen
saver management feature, and the Remember Last
Channel feature, which enables the K4u+to remember
the last active channel and the hot-plug focus after the
unit is reset or power cycled.
Mouse Point installer, Choose Components screen
7 In the Choose Registry and Service Options screen, verify
that the following options are selected:
●Ignore K4u serial numbers…
You do not normally need to change this setting. Unless
instructed otherwise, keep this check box selected.
By default, Mouse Point host PCs do not check K4u+
identifiers. This allows users to reattach computers to
K4u+units without triggering unnecessary mouse and
keyboard driver operations. This check box cancels the

www.amulethotkey.com | 12
Amulet Hotkey K4u+Manual
default Mouse Point behaviour and switches on K4u+
identifier checking.
●Configure the Remote Registry service…
This service enables remote users to modify registry
values on the host computer. If you intend to run remote
firmware updates to the K4u+, ensure this check box is
selected. See section 8. 3.
Mouse Point installer, Registry and Service Options screen
5. 3 Command line installations with install.cfg
For scheduled, unattended installations, you can run the
following command:
Mouse_Point_2_10.exe /S
This command reads a configuration file, install.cfg, for firmware
update settings.
Note:
The /S option must be an upper case ‘S’.
5.3.1 About install.cfg
The Mouse Point installer reads values from a configuration file,
install.cfg, when you run a command line installation. This file
must be in the same folder as Mouse_Point_2_10.exe.
Each setting in install.cfg takes an optional value. Use a single
space to separate settings and their value. Values are not case
sensitive. If no value is assigned to a setting, a default value
is used.
Typically, your Amulet Hotkey contact will provide a template
install.cfg file that you can edit as required. An example file is
shown in section 5.3.3.
5.3.2 Supported settings for install.cfg
Install.cfg supports the following settings and values:
UsbStatusUploadDisabled <Yes or No>
Default value is to No. If set to Yes, this setting disables the
Read Switch Status via USB item in the Mouse Point menu.
See section 5. 5.
usbPackageDownloadDisabled <Yes or No>
Default value is to No. If set to Yes, this setting disables the
Update Switch Firmware and FPGA via USB item in the
Mouse Point menu. See section 5. 5.
remoteLogFilePath <folder path>
This setting specifies a UNC path to the remote folder where
you want to save K4u+log files. For example:
\\UNX-NY-01\AmuletHotkey\switches\logs
Log files are described in section 6. 7.
forceFocusForUpdates <Yes or No>
Defaults to No. If set to Yes, this setting forces the K4u+to
switch channels to the Mouse Point host computer before
running a scheduled firmware update. See section 8. 4.
oneShotUpdateFilename <file name>
Specifies the full UNC path and file name of the firmware
package for the next one-shot firmware update. For
example:
\\UNX-NY-01\Amulet Hotkey\Test\k4u0P333.pkg
Remote manual ‘one-shot’ firmware updates are described
in section 8. 3.
enableScheduledUpdates <Yes or No>
Defaults to No. If set to Yes, this setting enables scheduled
firmware updates; Mouse Point runs a daily firmware
update at the time specified by ScheduledUpdateTime.
See section 8. 4.
scheduledUpdateTime <time>
Specifies the time (in 24 hour format) for scheduled
firmware updates. Leading zeroes for hours and a colon
separator between hours and minutes are both optional.
Valid examples are:
01:45, 1:45, 0145 and 145.
See section 8. 4 for details.
remoteUpdatePath <file path>
Specifies the full UNC path of the folder containing the
package file for scheduled firmware updates. For example:
\\UNX-NY-01\Amulet Hotkey\Switch Firmware
See section 8. 4 for details.

www.amulethotkey.com | 13
Amulet Hotkey K4u+Manual
installPath <folder path>
Specifies a default installation folder when the Mouse Point
installer runs (see section 5. 2). This setting defaults to :
$PROGRAMFILES\Amulet Hotkey\Mouse Point
noConfigApp <Any non-zero value>
Defaults to no value. If you set this setting to any non-zero
value (such as ‘1’ or ‘True’), the ‘Configuration GUI’ check
box in the Mouse Point installer is clear (unchecked) by
default when the installer runs. See section 5. 2).
noTrayApp <Any non-zero value>
Defaults to no value. If you set this setting to any non-zero
value (such as ‘1’ or ‘True’), the ‘System Tray Application’
check box in the Mouse Point installer is clear (unchecked)
by default when the installer runs. See section 5. 2.
doNotIgnoreK4uSerialNumbers <Any non-zero value>
Defaults to no value. If you set this setting to any non-zero
value (such as ‘1’ or ‘True’), the ‘Ignore K4u serial numbers…’
check box in the Mouse Point installer is clear (unchecked)
by default when the installer runs. See section 5. 2).
doNotConfigureRemoteRegistryService
<Any non-zero value>
Defaults to no value. If you set this setting to any non-zero
value (such as ‘1’ or ‘True’), the ‘Configure the Remote
Registry service…’ check box in the Mouse Point installer is
clear (unchecked) by default when the installer runs. See
section 5. 2).
5.3.3 Example install.cfg file
The following example shows a typical installer setup. For
example, scheduled firmware updates run at 3 a.m. and,
because the relevant Mouse Point menu item is disabled, the
end user is not allowed to run local manual firmware updates:
usbStatusUploadDisabled no
usbPackageDownloadDisabled yes
remoteLogFilePath \\MyServer\AHK\logs
forceFocusForUpdates yes
enableScheduledUpdates yes
scheduledUpdateTime 0300
remoteUpdatePath \\MyServer\AHK\updates
installPath c:\AHK\mousepoint
noConfigApp yes
noTrayApp
doNotIgnoreK4uSerialNumbers
doNotConfigureRemoteRegistryService

www.amulethotkey.com | 14
Amulet Hotkey K4u+Manual
5. 4 Mouse Point menu
After installing Mouse Point, a Mouse Point icon is displayed in
the system tray (Windows XP) or taskbar notification area
(Windows 7) of the host PC. Right-click this icon to display the
Mouse point menu.
Mouse Point icon (1)in taskbar notification area
5.4.1 Menu items
The Mouse Point menu gives you access to various configuration
and firmware update options. It includes the following items:
About
Displays the About dialog. See section 6. 6.
Read Switch Status via USB
Displays the Status dialog. See section 6. 6.
To optionally disable this menu item, see section 5. 5.
Update Switch Firmware and FPGA via USB
Manually updates the K4u+firmware. See section 8. 2.
To optionally disable this menu item, see section 5. 5.
Launch Mouse Point Configuration
Opens the Configuration utility. Use this utility to set up
channel changing with your mouse pointer and to enable
SaverSync. See section 6. 2 and section 6. 3.
Customize Monitor Arrangement
Allows administrators to specify non-standard screen
arrangements. Only choose this menu item under the
guidance of Amulet Hotkey technical staff.
Update Mouse Point Configuration
Uploads a Mouse Point configuration file from the host PC
to the K4u+. See step 4 in section 6. 2.
Read Mouse Point Configuration
Downloads the current Mouse Point settings from the K4u+
to a .k4c configuration file. You can then edit the settings
using the Configuration utility or, if required, upload the
configuration file to a different K4u+.
Close
Closes the Mouse Point application in the system tray
(Windows XP) or taskbar notification area (Windows 7).
5.4.2 Icon colour
The Mouse Point icon colour indicates its status:
Green: This PC has the K4u+focus.
Gray: This PC does not have the K4u+focus. Or this
PC is not attached to a K4u+.
Red: There is a major problem with the USB
connection to the attached K4u+.
Blue: A manual firmware update (initiated on this
PC) is underway on the K4u+. See step 8. 2.
Cyan: A remote firmware update is underway on
the K4u+. This may be a manual update (step 8. 3)
or a scheduled update (step 8. 4).
5. 5 Disable Mouse Point menu items
The Mouse Point menu includes items for launching firmware
updates on the attached K4u+. However, ordinary users can
access this menu, so you may prefer to disable the following
menu items:
■Read Switch Status via USB
This menu item displays the Status dialog. This dialog shows
status and firmware details for the attached K4u+. This data
is primarily of interest to administrators.
■Update Switch Firmware and FPGA via USB
This menu item allows users to manually update the K4u+
firmware. However, you can disable this item to ensure that
any firmware updates are managed in a controlled and
co-ordinated manner.
You can configure the Mouse Point installer to disable these
menu items automatically. Alternatively, you edit the registry on
the host PC to manually disable these menu items after
installing Mouse Point.
5.5.1 Configure the Mouse Point installer to disable
menu items automatically
To configure the Mouse Point installer to disable these menu
items automatically, add the following lines to install.cfg. Then
run the installer from a command line:
usbStatusUploadDisabled Yes
usbPackageDownloadDisabled Yes
5.5.2 Manually disable menu items on the host PC
To disable the Mouse Point menu items:
1 Log on to the Mouse Point host computer as an
administrator.
2 Locate the following registry key:
HKLM\SOFTWARE\Amulet Hotkey\USB updating config
1

www.amulethotkey.com | 15
Amulet Hotkey K4u+Manual
3 Within this registry key, set the following values to Yes:
usbStatusUploadDisabled=Yes
Disables the Read Switch Status via USB menu item.
usbPackageDownloadDisabled=Yes
Disables the Update Switch Firmware and FPGA via USB
menu item.
Note:
Set these values to No to re-enable the menu items.
5. 6 Mouse Point registry values
The Mouse Point installer creates the following registry values
on the host PC.
Note:
Administrator permissions are needed to modify these
registry values.
5.6.1 Firmware updates and monitoring
Locate the following registry key:
HKLM\SOFTWARE\Amulet Hotkey\USB updating config
Within this key, the following registry values configure Mouse
Point operations, including firmware updates.
enableScheduledUpdates=Yes or No
Defaults to No. Specifies whether scheduled firmware
updates are enabled. If this registry value is set to Yes,
Mouse Point runs a daily scheduled update at the time
specified by ScheduledUpdateTime. See section 8. 4.
forceFocusForUpdates=Yes or No
Defaults to No. Specifies whether to force the K4u+to switch
channels to the Mouse Point host computer before running a
scheduled firmware update. See section 8. 4.
oneShotUpdateFilename=<file name>
Specifies the full UNC path and file name of the firmware
package for the next one-shot firmware update. For
example:
\\UNX-NY-01\Amulet Hotkey\Test\k4u0P333.pkg
One-shot firmware updates are described in section 8. 3.
remoteLogFilePath=<file path>
Specifies specifies a UNC path to the remote folder where
you want to save K4u+log files. For example:
\\UNX-NY-01\AmuletHotkey\switches\logs
Log files are described in section 6. 7.
remoteUpdatePath=<file path>
Specifies the full UNC path of the folder containing the
package file for scheduled firmware updates. For example:
\\UNX-NY-01\Amulet Hotkey\Switch Firmware
See section 8. 4 for details.
scheduledUpdateTime=<time>
Specifies the time (in 24 hour format) for scheduled
firmware updates. Leading zeroes for hours and a colon
separator between hours and minutes are both optional.
Valid examples are 01:45, 1:45, 0145 and 145.
See section 8. 4 for details.
usbPackageDownloadDisabled=Yes or No
Defaults to No. Specifies whether to disable the Update
Switch Firmware and FPGA via USB item in the Mouse Point
menu. See section 5. 5 for details.
usbStatusUploadDisabled=Yes or No
Defaults to No. Specifies whether to disable the Read
Switch Status via USB item in the Mouse Point menu.
See section 5. 5 for details.
5.6.2 Firmware update results
Locate the following registry key:
HKLM\SOFTWARE\Amulet Hotkey\USB updating results
Within this key, the following registry values indicate the results
of the recent firmware updates.
OneShotUpdateResult=<result>
Indicates the result of the most recent one-shot firmware
update. You also use this registry value to trigger a firmware
update. Possible values are:
0 No firmware update performed yet
1 Triggers a one-shot firmware update. See section 8. 3
for details.
2 Firmware update not needed
3 Firmware update successful
4 Firmware update failed
5 User cancelled firmware update before it started
scheduledUpdateResult=<result>
Indicates the result of the last scheduled firmware update.
Possible values are:
0 No firmware update performed yet
2 Firmware update not needed
3 Firmware update successful
4 Firmware update failed
5 User cancelled firmware update before it started

www.amulethotkey.com | 16
6
6. Setting up the K4u+
This section describes how to set up the K4u+. In particular, it
explains how to:
■Set up channel changing with a mouse pointer
■Synchronize screen savers on attached computers
■Cascade K4u+switches to control additional computers
■Share a computer between two K4u+switches
■Check the K4u+status
6. 1 Attach computers to the K4u+
You can attach up to four computers to the connection sockets
on the rear of the K4u+. Each channel (1 to 4) supports a USB
type B port socket and a PS/2 & legacy Sun socket. Note that
only one socket can be active per channel at one time. See
section 2. 2 for socket details. Follow these steps:
1 Before attaching any computers to the K4u+, check that the
DIP switches are set correctly. See section 3.
2 Connect a keyboard and mouse to appropriate front panel
ports. See section 2. 1 for details.
3 Unless you intend that the K4u+will draw its power from the
attached computers, connect the K4u+to its power supply
and power it on.
After a short delay, the front panel LEDs illuminate.
4 Connect computers to appropriate ports on the rear panel of
the K4u+. (You do not need to power down the computers
while connecting them.)
6. 2 Set up channel changing by mouse pointer
Mouse Point enables you to change channels on the K4u+by
dragging your mouse pointer. See section 7. 1.
Use the Mouse Point Configuration utility to set up channel
changing with a mouse pointer. This utility saves a graphical
representation of how your computer screens are arranged in
relation to each other. The K4u+uses this information to
determine when and how to switch channels when you drag the
mouse pointer from one screen to another.
Follow these steps:
1 Right-click the Mouse Point icon in the system tray
(Windows XP) or taskbar notification area (Windows 7) and
choose Launch Mouse Point Configuration.
Mouse Point icon (1)in taskbar notification area
2 When the Configuration utility starts, use the monitor matrix
to define the relative position of the screens associated with
channels A, B, C and D.
In the example below, the screens are arranged in a simple
row. Dragging your mouse pointer across screen A onto
screen B triggers a corresponding K4u+focus switch from A
to B, and so on.
Mouse Point Configuration utility with Save button (1)and
monitor matrix (2)
1 2
1

www.amulethotkey.com | 17
Amulet Hotkey K4u+Manual
3 Click the Save button to save the Mouse Point configuration
to a .k4c file. This file records how your screens are
arranged. It is saved on the computer hosting the
Configuration utility.
4 Now upload the configuration file to the K4u+.
a. Ensure that the computer where you saved the .k4c
configuration file is the live channel on the K4u+.
b. Right-click the Mouse Point button (see step 1) and
choose Update Mouse Point Configuration.
c. Select the .k4c configuration file that you created in the
previous step.
If required, you can specify any alternative screen arrangement.
For example, if your four screens are arranged in a 2x2 grid, you
can save a Mouse Point configuration like the one below. Here,
you trigger a focus switch when you drag the mouse down from
screen A to B, or down from screen C to D. In fact, you can
switch focus by dragging the mouse up, down, left or right
between screens.
Note:
In the monitor matrix, two or more adjacent cells for
the same channel represent a single computer screen.
Likewise, if screens A and B are arranged vertically in portrait
mode but screens C and D are in conventional landscape mode,
you can save a Mouse Point configuration like this. Here, a
B-to-C focus switch is only triggered if you drag your mouse
from the lower half of screen B across to screen C.
If horizontal wrapping is enabled in the above example, you can
trigger an A-to-D focus switch by dragging your mouse left from
screen. The focus wraps automatically back to D.
Note: Mouse Point also supports vertical wrapping.
6. 3 Set up SaverSync™ and Remember Last Channel
The SaverSync feature prevents screen savers on all
attached USB computers from activating until all keyboard
and mouse activity through the K4u+has stopped. For details,
see section 7. 4.
The Remember Last Channel feature enables the K4u+to
remember the last active channel after the unit is reset or
power cycled. This feature also enables the K4u+to remember
which channel the hot-plug port is connected to.
Note:
SaverSync and
Remember
Last Channel are not
Mouse Point features, but you must use the Mouse Point
Configuration utility to configure these features on a K4u+.
6.3.1 Requirements
Note the following requirements:
■Mouse Point version: SaverSync and Remember Last Channel
require Mouse Point v1.61 or above. You can download the
Mouse Point applet from the Support > Downloads page of
the Amulet Hotkey website, www.amulethotkey.com.
■Host PC: Verify that Mouse Point is installed on a computer
attached to the K4u+. The Mouse Point host PC does not need
to be permanently attached to the K4u+. You can remove the
host PC after uploading the Mouse Point configuration file to
the K4u+. For example, you can use a laptop as your host PC,
temporarily attaching it to K4u+units as required.
6.3.2 Activate SaverSync and Remember Last Channel
You activate SaverSync and Remember Last Channel by selecting
check boxes in the Mouse Point Configuration utility.
1 Change channels on the K4u+ to the Mouse Point host PC.
2 Right-click the Mouse Point icon in the system tray
(Windows XP) or taskbar notification area (Windows 7) and
choose Launch Mouse Point Configuration.
3 When the Configuration utility starts:
●Select the SaverSync check box.
●Select the ‘Remember last chan’ check box.
4 Click Save to save the updated Mouse Point configuration to
a .k4c file.
5 Close the Configuration utility.
6 Right-click the Mouse Point button (see step 1) and choose
Update Mouse Point Configuration.
7 Select the .k4c file that you saved in step 4.
8 When the update is complete, SaverSync and Remember
Last Channel are active.

www.amulethotkey.com | 18
Amulet Hotkey K4u+Manual
6. 4 Set up a cascade of multiple switches
Cascading two or more K4u+switches allows you to increase the
number of computers that you can control with a single
keyboard and mouse.
In fact, you can even combine a K4u+with K4u or K4vu switches
in a single cascade. For simplicity, this guide only refers to K4u+
switches when describing cascade deployments.
Note:
When you cascade K4u
+
units, you must use hot keys or
a keyboard with dedicated channel keys (such as the Amulet
Hotkey AHK3000E) to change channels. You cannot use
Mouse Point or mouse buttons to change channels.
6.4.1 Cascades with two switches
You can daisy-chain a secondary K4u+to a master K4u+with a
USB cable, allowing you to control up to 7 computers from a
single keyboard and mouse:
■Three computers are attached to channels 2, 3 and 4
respectively on the master K4u+.
■Four computers are attached to channels 1, 2, 3 and 4
respectively on the secondary K4u+.
■Channel 1 on the master K4u+gives access to channels on
the secondary K4u+.
To set up the cascade:
1 Plug a USB cable into the channel 1 USB port on the rear of
your master K4u+and into any hosted front panel USB port
(A to D) on the secondary K4u+.
2 Disable channel changing with a mouse. To do this, set DIP
switch A3 to OFF on both K4u+units.
3 Specify different hot-key combinations on the master and
secondary K4u+units. For example, if the master K4u+uses
Alt + Space, set the secondary K4u+to use Caps Lock + Alt.
To change channels using hot keys:
■For channels 2, 3 or 4 on the master K4u+, press Alt+Space
plus 2, 3 or 4 as required. (Hold down all three keys
together.)
■For channel 1, 2, 3 or 4 on the secondary K4u+, press
Alt+Space plus 1. Then press Caps Lock + Alt plus 1, 2, 3, or 4
as required.
For example, to connect to channel 2 on the secondary K4u+,
press Alt+Space+1 followed by Caps Lock+Alt+2.
Cascading two K4u+units: Channels 2, 3 and 4 on the master K4u+are accessible directly. Channels 1, 2, 3 and 4
on the secondary K4u+are accessible indirectly through channel 1 on the master K4u+.
Channels on master K4u+
Channels on secondary K4u+
1 2 3 4
2
3
4
Master K4u+
Secondary K4u+
USB cable
Optional AHK3000E keyboard
(with CN202 applied)
1
2
3
4
1
2 3 4

www.amulethotkey.com | 19
Amulet Hotkey K4u+Manual
6.4.2 Cascades with multiple switches
You can connect up to four secondary K4u+switches to a master
K4u+(five switches in total), allowing a user to control up to 16
computers from a single keyboard and mouse.
Note:
When cascading multiple K4u
+
units, we strongly
recommend that you use a keyboard with dedicated channel
keys (such as the Amulet Hotkey AHK3000E) to change
channels.
In the example below, a master K4u+connects to three
secondary K4u+units (A, B and C), giving access to 13 channels
in total. To set up the cascade:
1 Using USB cables, connect:
●The channel 1 port on the rear of the master K4u+to any
hosted front panel USB port (A to D) on K4u+A.
●The channel 2 port to any hosted front panel USB port
(A to D) on K4u+B.
●The channel 3 port to any hosted front panel USB port
(A to D) on K4u+C.
●The channel 4 port directly to a computer
2 Disable channel changing with a mouse. To do this, set DIP
switch A3 to OFF on all the K4u+units.
3 Specify different hot-key combinations on the master and
secondary K4u+units. Use the same hot-key combination on
all secondary K4u+units. For example, if the master K4u+
uses Alt+Space, set all secondary K4u+switches to use
Caps Lock + Alt.
If you need to change channels using hot keys:
1 Connect to the required secondary K4u+switch:
●Press Alt+Space plus 1 to connect to K4u+A.
●Press Alt+Space plus 2 to connect to K4u+B.
●Press Alt+Space plus 3 to connect to K4u+C.
2 Press Caps Lock + Alt plus 1, 2, 3 or 4 to connect to the
required channel on the secondary K4u+.
For example, to connect to channel 3 on K4u+B press
Alt+Space+2 followed by Caps Lock+Alt+3.
Cascading multiple K4u+units: On the Master K4u+,channel 1connects to channels on K4u+A; channel 2connects to
channels on K4u+B; channel 3connects to channels on K4u+C; channel 4connects directly to a single PC.
Channels on K4u+C
Channels on K4u+BChannels on K4u+A
1 32 4
K4u+C
K4u+A K4u+B
1 32 4 1 32 4
Master K4u+
USB cable
AHK3000E keyboard
(with CN202 applied)
2
3
1
4

www.amulethotkey.com | 20
Amulet Hotkey K4u+Manual
6. 5 Set up channel sharing
You can connect two K4u+switches to allow two users to
control a single shared computer. You can share any supported
computer type (USB, legacy Sun or PS/2).
In fact, you can even share a computer between a K4u+switch
and a K4u or K4vu switch. For simplicity, this guide only refers to
K4u+switches when describing how to share a channel.
Access to the shared computer is restricted on first-come,
first-served basis. Only one user can control the shared
computer at any time.
To take control of the shared computer, a user simply switches
channels as normal. The computer remains assigned to that user
until they relinquish control.
A user relinquishes control of the shared computer
automatically when they stop using it and the K4u+detects no
further mouse or keyboard activity.
A pair of optional LEDs can indicate which user has control of
the shared computer; see section 6.5.2.
6.5.1 Share a computer
In these instructions, the master K4u+is attached directly to the
computer that you want to share. The secondary K4u+is
attached to a hosted front panel USB port (A to D) on the
master K4u+.
Follow these steps:
1 Attach the computer that you want to share to any channel
port on the rear of the master K4u+. This channel becomes
the shared channel.
2 Use DIP switches B1 and B2 on the master K4u+to specify
the shared channel:
For DIP switch details, see section 3.
To share B1 B2
Channel 1 OFF OFF
Channel 2 ON OFF
Channel 3 OFF ON
Channel 4 ON ON
Sharing one computer between two K4u+units: In this example, channel 4 on the master K4u+connects to the shared
computer. Channel 1 on the secondary K4u+connects to the master K4u+and enables sharing mode. Indicator LEDs
show that, in this example, the user connected to the master K4u+currently has control of the shared computer.
Shared computer
2
3
4
Secondary K4u+
Master K4u+
USB cable
1
2
3
4
1
LED
LED
Other manuals for K4u
2
Table of contents
Other Amulet Hotkey Switch manuals
Popular Switch manuals by other brands

Brocade Communications Systems
Brocade Communications Systems A7533A - Brocade 4Gb SAN Switch Base Administrator's guide

Digitus professional
Digitus professional DS-72210 manual

Grizzly
Grizzly T20550 instruction sheet

Miranda
Miranda PresStation user manual

Allied Telesis
Allied Telesis AT FS708LE AT-FS708LE AT-FS708LE installation guide

Gigaset
Gigaset Elements Button quick start guide