Anchor-Caddie TMB101 User manual

Trolling Motor Bracket Adapter Kit (TMB101)
Page 1of 6
™2021 Anchor-Caddie
Thank you for choosing Anchor Caddie and this adapter kit! It is specifically designed to be mounted on the top plate of
the most common quick release brackets by Minn Kota and Motorguide but may fit others.
Please note, if you do not have your bow mount trolling motor on a Minn Kota or Motorguide quick release bracket, you
will need 2 quick release brackets of the same exact type. 1 for your bow mount trolling motor and the other for this
adapter kit and anchor nest.
If you do already have a quick release bracket on your boat, you will need 1 more additional quick release bracket of the
same exact type for this adapter kit and anchor nest.
You can also watch the installation video on our website at www.anchor-caddie.com/support
Before attempting to install this adapter kit, please make sure that you have all the parts on the list below. If you are
missing something or have a question, please contact us immediately at 888-405-3930.
What’s Included
What’s NOT Included
•Minn Kota or Motorguide quick release bracket and hardware
•Anchor Caddie anchor nest
Tools Needed
Base Bracket (1)
Top Mounting
Plate (1)
Bottom Mounting
Plate (1)
¼-20 x ¾”
Screw (7)
¼” Lock Washer (7)
¼” Flat Washer (7)
5/16-18 x 1-1/4”
Screw (2)
5/16-18 x 3/4”
Screw (4)
5/16-18 Lock Nut (5)
•3/16” allen wrench
•5/32” allen wrench
•7/16” combination wrench
•1/2” combination wrench
•Phillips screwdriver
•Drill
•1/8” & 5/16” drill bit
•Center punch
Step 1 Hardware
Step 2, 6 & 8 Hardware
Not shown, 1 tube of anti-seize compound

Trolling Motor Bracket Adapter Kit (TMB101)
Page 2of 6
™2021 Anchor-Caddie
Step 1 of 8
Mount your Anchor Caddie anchor nest to the Top Mounting Plate.
Use the diagram below to choose which holes you will mount your Anchor Caddie anchor nest to.
Step 2 of 8
Mount your Bottom Mounting Plate to your Base Bracket.
At this point, you just want to put in 1 screw with flat and lock washer in the center of your Base Bracket and the center
hole of your Bottom Mounting Plate as shown below. Just hand tighten so you can adjust your angle later.
Original
Anchor
Caddie
Anchor
Caddie
PRO
Anchor
Caddie
Cadet
You will use the hardware
labeled “Step 1”.
If you are installing the
Original, you will use the 2
longer screws in the back that
has the black impact plate.
This is where you want to use the anti-seize
compound. Put a little dab inside the nuts. It
doesn’t take much but will keep the stainless steel
hardware from seizing up to where you can’t
complete the tightening or remove it if necessary.
Once you have this done, it’s time to dry fit everything on the bow of
your boat, including your Minn Kota or Motorguide quick release
bracket.
This is where you make the necessary angle and overhang adjustments
to get your anchor nest centered on the bow.
Let’s go out to the boat.
5/16-18 x 3/4”
Screw (3)
5/16-18 x 1-
1/4” Screw (2)

Trolling Motor Bracket Adapter Kit (TMB101)
Page 3of 6
™2021 Anchor-Caddie
Step 3 of 8
Dry Fit all pieces of the adapter kit, including your chosen quick release bracket.
This step is probably the most important step of all the processes. Although it’s not difficult, you want to make sure you
take the time to get the best alignment possible to have your anchor nest as centered on your bow as you can.
Our adapter kit has so much adjustment possibilities that you have several different positions and adjustments that can
be made to get it as centered as possible, if not perfectly centered.
If you already have a quick release bracket installed, you will not dry fit with the whole quick release bracket, you will
just dry fit the adapter kit over that installation using your new quick release bracket Top Plate.
Looking at the pictures below, you can see the different options to get your proper angle and overhang.
If this is a new installation,
you need to get your quick
release bracket base
mounted on the bow of
your boat. In this example,
we start by setting it close
to the corner of the bow.
Now, set the adapter kit
on the quick release
bracket to see where your
center will end up. Now
let’s slide the adapter kit
forward to see if we can
get it aligned.
But since this is a new
install, I’m going to Flip the
adapter kit 180 degrees
and pull the quick release
bracket back a bit.
As you can see, sliding
the Base Bracket
forward, we can get
good center alignment
but with more overhang
of the Base Bracket.
As you can see, by pulling
the quick release bracket
back, I can also get good
center alignment with a
more compact installation
reducing overhang of the
Base Bracket.
Now that you have the location to mount the quick release bracket, it’s time to mount the base plate of your
quick release bracket.
If you already have your quick release bracket installed from a previous installation, skip to step 5.
Set your anchor nest on to
the adapter kit as a last
verification to make sure
it is centered and that
when you have your
anchor stowed, it doesn’t
touch your bow.

Trolling Motor Bracket Adapter Kit (TMB101)
Page 4of 6
™2021 Anchor-Caddie
Step 4 of 8
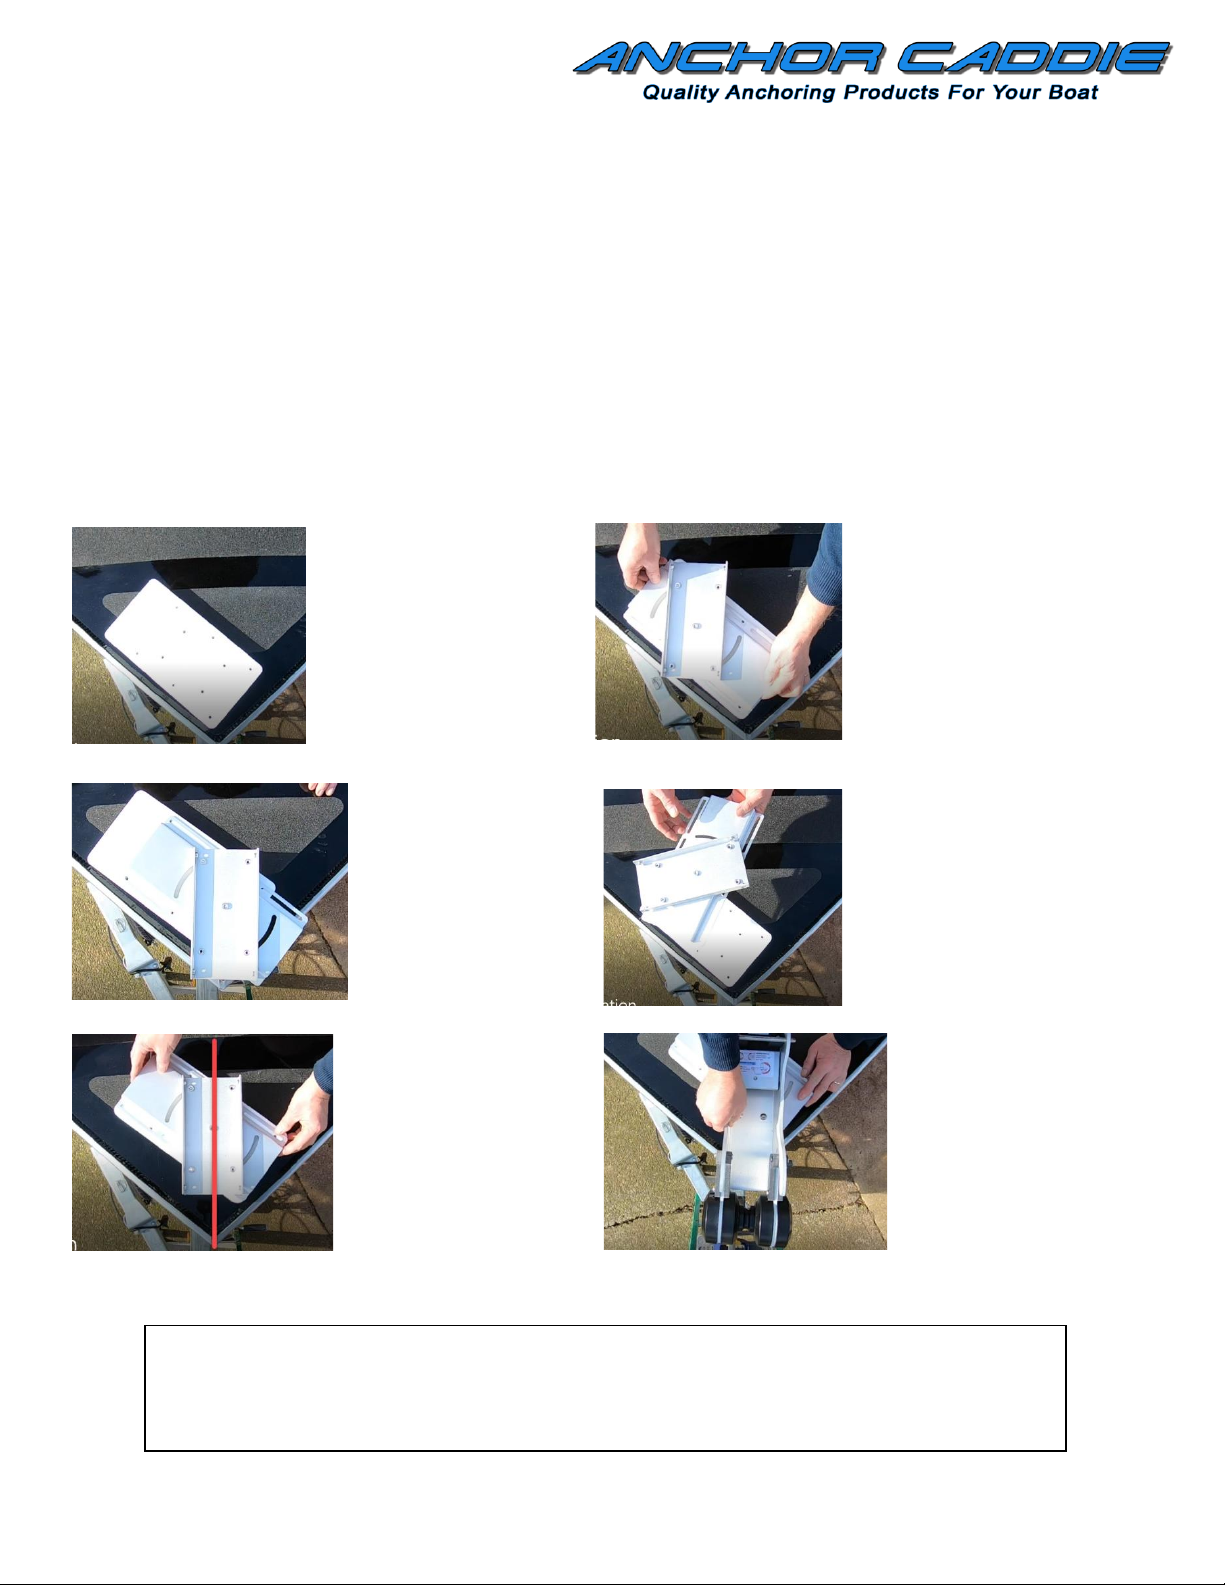
Mount the base plate of your quick release bracket to the bow of your boat
I recommend using a punch
instead of just drilling on your
pencil mark, it will help keep the
drill from moving off your mark.
I used a spring loaded punch,
but any punch and hammer will
work.
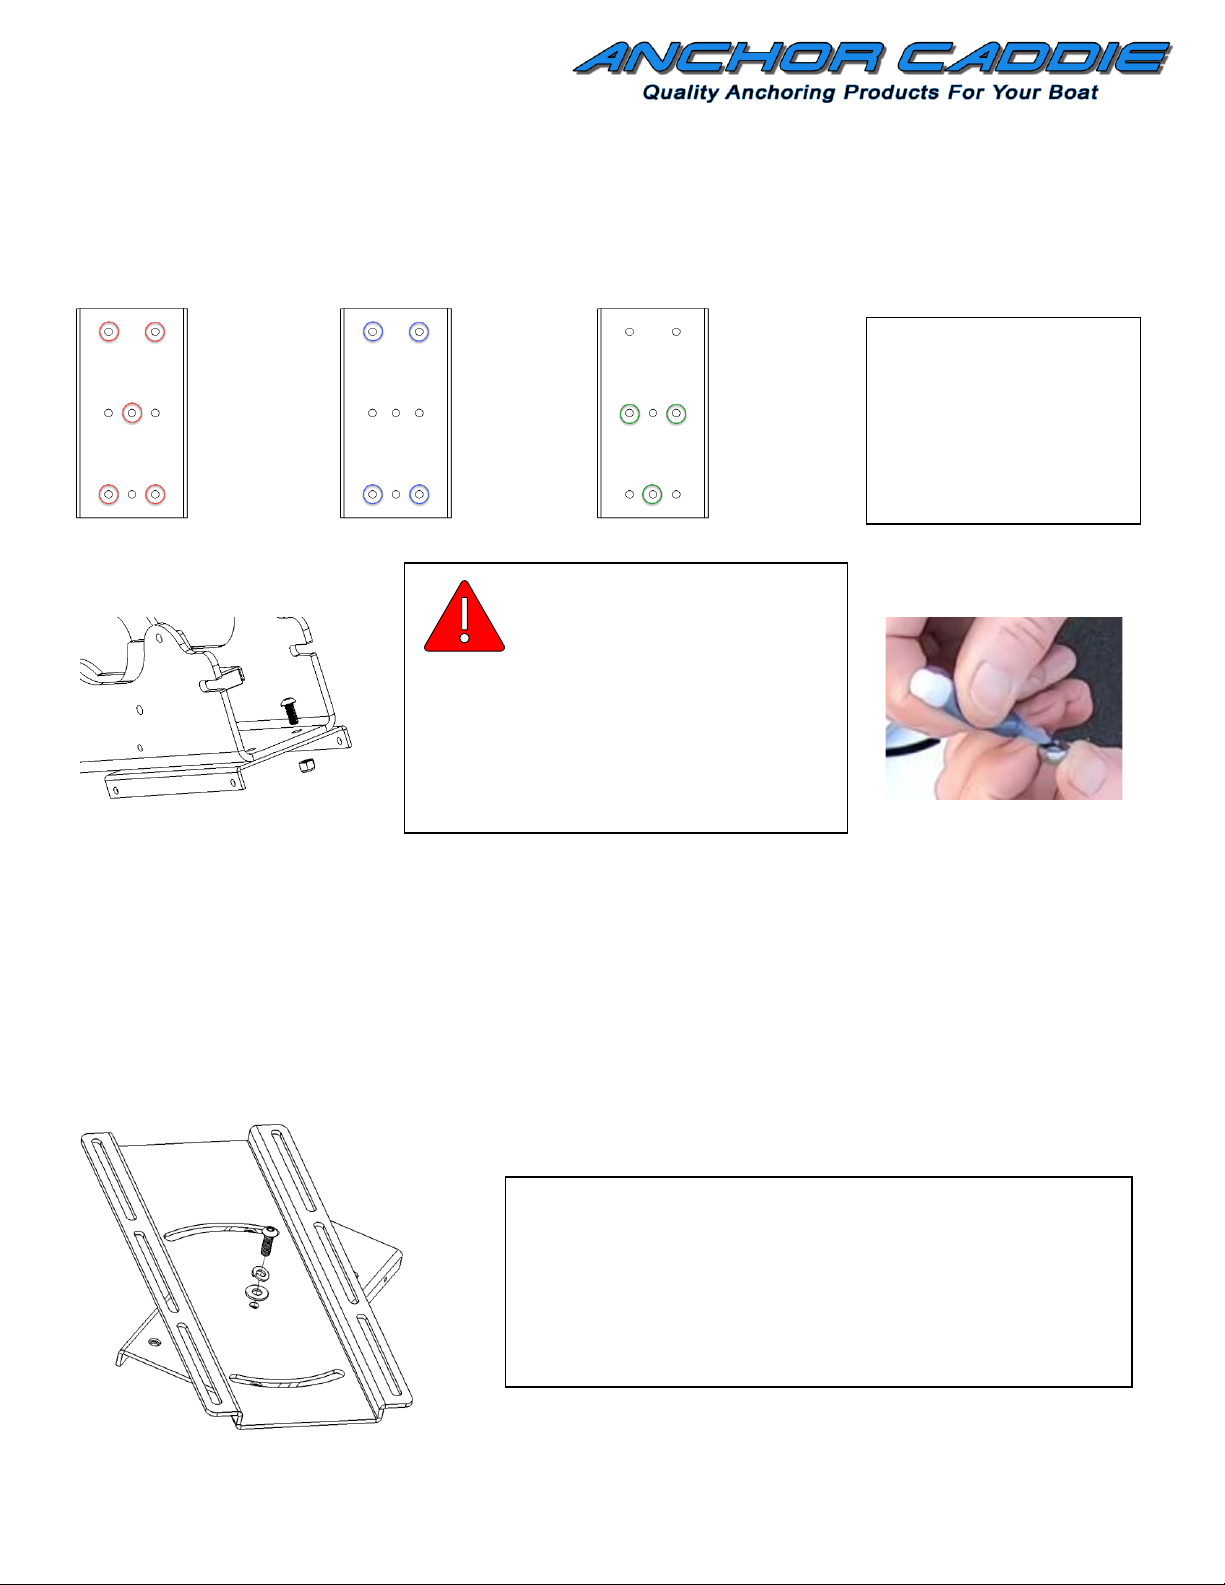
Start by carefully removing the anchor nest, adapter kit and top plate of your quick release bracket, trying not to disturb the
location of your quick release bracket.
You will use the hardware that came with your Minn Kota or Motorguide quick release bracket and follow their instructions for
mounting the base plate.
But I will outline what I did on this installation as far as marking and drilling the mounting holes.
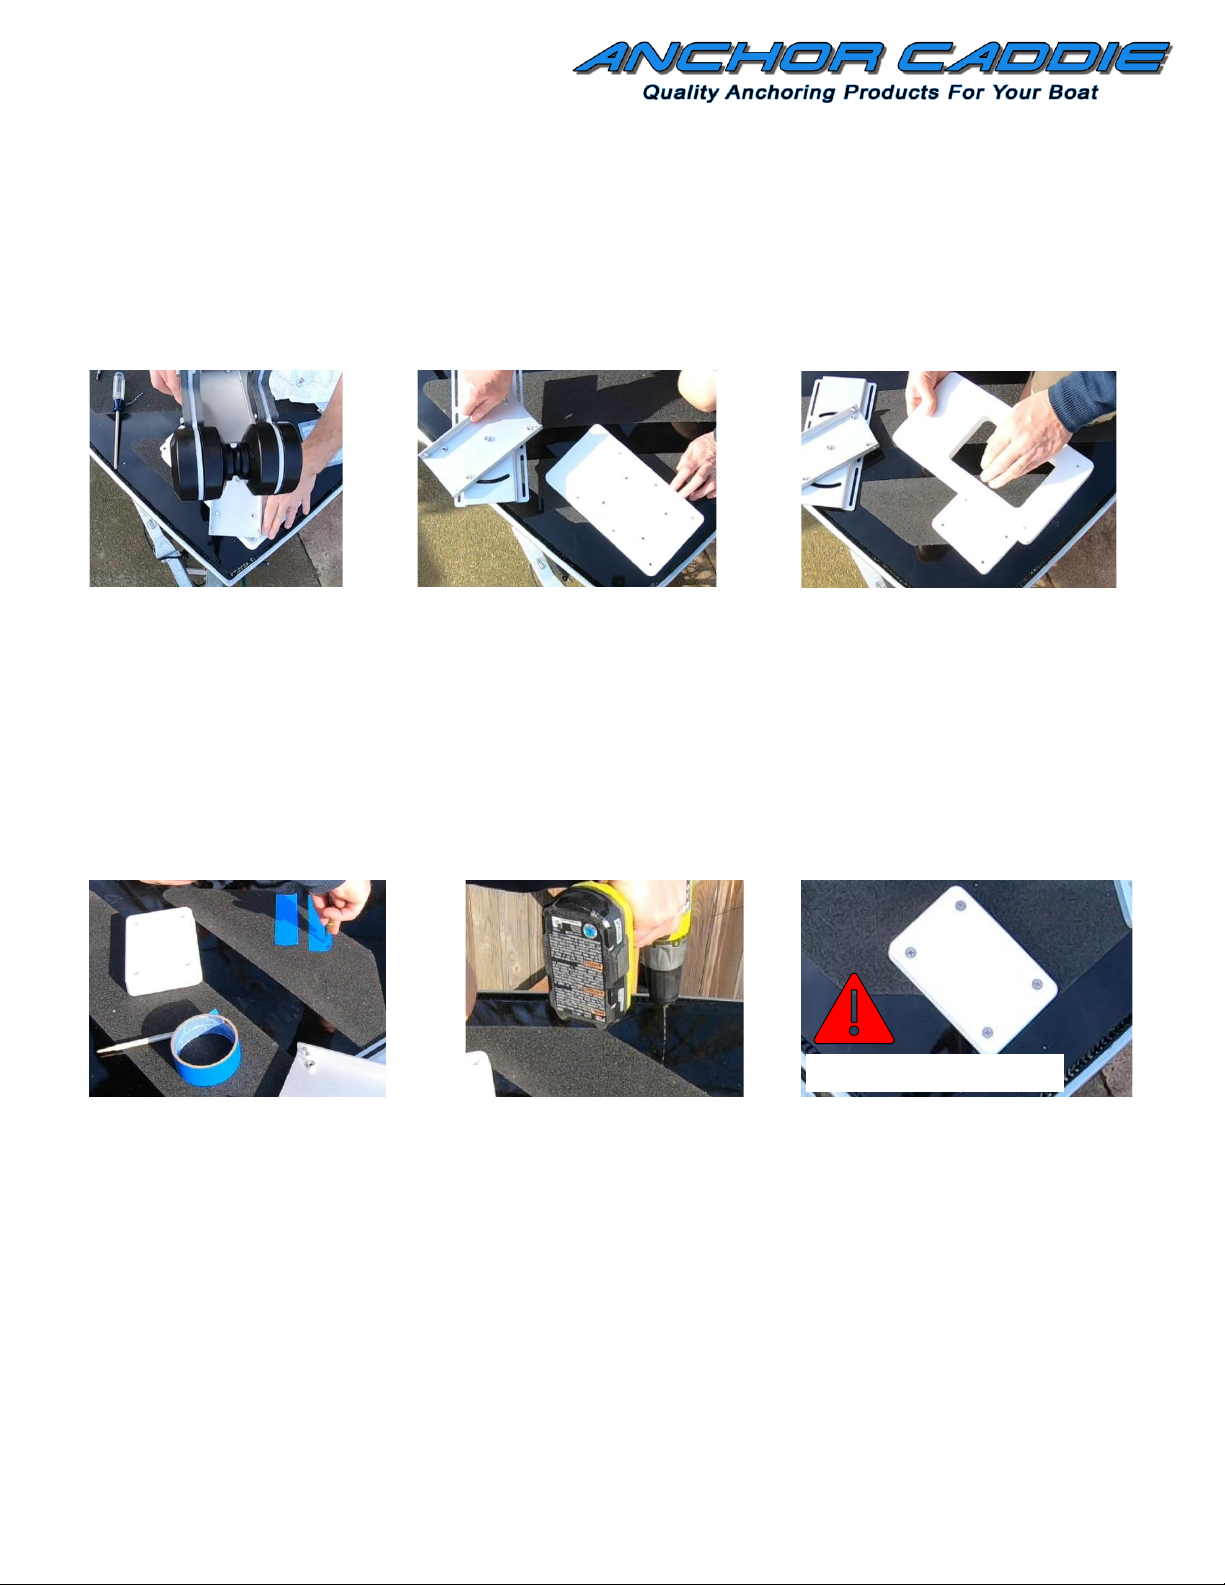
TIP: I was just going to use the punch with the base plate in place, but the punch wasn’t long enough to get through the
plate, so I had to use a pencil first to mark it. But my pencil wouldn’t fit either, so I had to shave the pencil to get in the
holes. Since I was mounting it on a black colored bow, I could not see the pencil mark, so I laid out some blue tape, so I
could see the marks.
I also recommend starting with a
smaller drill bit, again to help
prevent the drill bit from moving
off your mark. I used a 1/8”drill bit
to start, then used a 5/16”bit to
finish.
The screws that go into the base
plate are ¼”, but I wanted to have a
little wiggle room in case my holes
were off a little.
Use the manufacturer’s
hardware and instructions to
mount the base plate to your
bow. Use anti-seize in this step.
For my installation, I found that
their screws were too long, and I
didn’t want to have to drive the
locknut that far, so I installed
shorter screws. Your installation
my vary.
Use anti-seize in this step!

Trolling Motor Bracket Adapter Kit (TMB101)
Page 5of 6
™2021 Anchor-Caddie
Step 5 of 8
Make final angle adjustments on your adapter kit
Step 6 of 8
Install the remaining 2 screws and tighten all 3
Now that you have the base plate
of the quick release bracket
mounted, set your quick release
bracket top plate and adapter kit in
place. Start by dropping the screws
from your Minn Kota or
Motorguide quick release bracket
hardware into the 6 holes of the
quick release bracket temporarily
through the Base Bracket from the
top. This keeps the adapter kit
inline with the quick release
bracket.
Set your anchor nest on to the adapter
kit and tweak it if necessary, to get a
good center alignment, then carefully
remove your anchor nest, trying not to
disturb the angle you have just set.
Adjust the Bottom
Mounting Plate to get a
good center alignment.
You may have to slide your
Base Bracket forward or
back to get that good
center alignment, which we
will tighten later.
Carefully remove the adapter
kit from your quick release
bracket and the screws you
temporarily placed, trying not
to disturb the angle you just
set and tighten the center
screw.
Insert the other 2 screws
with flat and lock washer as
in step 2.
Tighten all 3 screws.
Your angle is now set.

Trolling Motor Bracket Adapter Kit (TMB101)
Page 6of 6
™2021 Anchor-Caddie
Step 7 of 8
Mount the Base Bracket to your quick release bracket top plate
Step 8 of 8
Mount your Anchor Caddie with the Top Mount Plate onto the Bottom Mounting Plate
You will want to use the anti-seize compound in this step.
Using the hardware that came
with your Minn Kota or
Motorguide quick release
bracket, insert the 6 screws
from the underside of your
top plate through the Base
Bracket, insert the flat washer
and loosely screw the nuts on.
If your quick release
bracket has the latch
post, make sure you
insert that before
putting that screw in or
you will be taking that
out to insert it. Don’t
ask me how I know that
Make any final adjustment by
moving your adapter kit
forward or back to maintain a
good center alignment.
Remove it and tighten down
all 6 screws.
Set your quick release top
plate on the base plate and
secure per the manufacturer’s
instructions.
Set your Anchor
Caddie onto the
Bottom Mounting
Plate.
Using the supplied
hardware, install the 4
screws, flat and lock
washers.
Tighten down all 4 screws and the
installation is complete,
congratulations!
Thanks again for choosing Anchor Caddie!
Popular Boating Equipment manuals by other brands

Wilderness Systems
Wilderness Systems Helix MD quick start guide

DAVIS
DAVIS Mark 3 manual

Geonav
Geonav 11 Sun User and installation guide

Attwood
Attwood 4201 installation instructions

Eaton
Eaton Deckhand Assembly, installation and operation instructions

Taco Marine
Taco Marine GS-850 Installation instruction guide

Velocitek
Velocitek Prostart manual

Ultraflex
Ultraflex UFLEX ZTF Tiller System KIT QU1 installation manual

Goiot
Goiot Cristal Series Fitting instructions

Suprod
Suprod ET200 installation manual

Schenker
Schenker ZEN 150 Installation, use and maintenance manual

Big Jon Sports
Big Jon Sports Band Buster owner's manual