AND TALKING PREMIUM+ User manual

TALKING
PREMIUM+
BLOOD PRESSURE MONITOR
UPPER ARM
UA-1030T
Instruction Manual
ORIGINAL

Greetings
Congratulations on purchasing a state-of-the-art A&D blood pressure
monitor. Designed for ease of use and accuracy, this monitor will facilitate
your daily blood pressure regimen. We recommend that you read through
this manual carefully before using the monitor for the rst time.
Intended Use
• The monitor is designed for use on adults only. Do not use on newborns
or infants.
• Environment for use. The monitor is intended for use in the home
healthcare environment.
• This monitor is designed to measure blood pressure and pulse rate of
people for diagnosis.
Precautions
• Precision components are used in the construction of this monitor.
Extremes in temperature, humidity, direct sunlight, shock or dust should
be avoided.
• Clean the monitor and cuff with a dry, soft cloth or a cloth dampened with
water and a neutral detergent. Never use alcohol, benzene, thinner or
other harsh chemicals to clean the monitor or cuff.
• Avoid tightly folding the cuff or storing the hose tightly twisted for long
periods, as such treatment may shorten the life of the components.
• The monitor and cuff are not water resistant. Prevent rain, sweat and
water from soiling the monitor and cuff.
• Measurements may be distorted if the monitor is used close to televisions,
microwave ovens, cellular telephones, X-ray or other devices with strong
electrical elds.
• When using the monitor, conrm that the monitor is clean.
• Used equipment, parts and batteries are not treated as ordinary
household waste, and must be disposed of according to the applicable
local regulations.

Precautions
• When the AC adapter is used, make sure that the AC adapter can be
readily removed from the electrical outlet when necessary.
• Do not modify the monitor. It may cause accidents or damage to the
monitor.
• To measure blood pressure, the arm must be squeezed by the cuff hard
enough to temporarily stop blood ow through the artery. This may cause
pain, numbness or a temporary red mark to the arm. This condition will
appear especially when measurement is repeated successively. Any pain,
numbness, or red marks will disappear with time.
• Do not apply the cuff on an arm in which another medical device is
attached. The equipment may not function properly.
• People who have a severe circulatory decit in the arm must consult a
doctor before using the monitor, to avoid medical problems.
• Do not self-diagnose the measurement results and start treatment by
yourself. Always consult your doctor for evaluation of the results and
treatment.
• Do not apply the cuff on an arm with an unhealed wound.
• Do not apply the cuff on an arm receiving an intravenous drip or blood
transfusion. It may cause injury or accidents.
• Do not use the monitor where ammable gases such as anesthetic gases
are present. It may cause an explosion.
• Do not use the monitor in highly concentrated oxygen environments, such
as a high-pressure oxygen chamber or an oxygen tent. It may cause a re
or explosion.
• Take care to avoid accidental strangulation of babies or infants with the
hose and cable.
• Do not twist the air hose during measurement. This may cause injury due
to continuous cuff pressure.
• Wireless communication devices, such as home networking devices,
mobile phones, cordless phones and their base stations, walkie-talkies
can affect this blood pressure monitor. Therefore, a minimum distance of
30 cm (12") should be kept from such devices.

• Measuring blood pressure too frequently may cause harm due to blood
ow interference. Check that the operation of the monitor does not result
in prolonged impairment of blood circulation, when using the monitor
repeatedly.
• Clinical testing has not been conducted on newborn infants and pregnant
woman.
• If you have had a mastectomy, please consult a doctor before using the
monitor.
• Do not let children use the monitor by themselves and do not use the
monitor in a place within the reach of infants. It may cause accidents or
damage.
• There are small parts that may cause a choking hazard if swallowed by
mistake by infants.
• Do not touch the batteries, the DC jack and the patient at the same time.
That may result in electrical shock.
• Unplug the AC adapter when not in use during the measurement.
• Use of accessories not detailed in this manual may compromise safety.
• Should the battery short-circuit, it may become hot and potentially cause
burns.
• Allow the monitor to adapt to the surrounding environment before use
(about one hour).
• Do not inate without wrappping the cuff around the upper arm.
Precautions

Contents
Parts Identication E-6
Symbols E-7
Using the Monitor E-10
Taking your Blood Pressure E-16
Measurements E-17
About Memory E-21
What is an Irregular Heartbeat E-22
About Cuff Ination Meter E-22
AHA Classication Indicator E-23
About Blood Pressure E-24
Troubleshooting E-26
Technical Data E-27
Warranty E-32

E-6
Parts Identication
Battery Compartment
Display
Air Hose
AC Adapter Jack
STARTButton
Air Connector Plug
Air Socket
Pressure Rating Indicator
and Cuff Inflation Meter
Memory
Systolic
Pressure
Diastolic
Pressure
Pulse Rate
Battery Indicator
Heart Mark
1.5V Batteries
(AA, LR6 or R6P)
Clock Display
Set Button
Button
Button
Battery Cover
I.H.B. Symbol
(Irregular heartbeat symbol)
AM / PM Mark
Movement Error Symbol
Cuff Fit Error Symbol
Average Pressure Settings
TriCheckTM Symbol
Button
Volume
Arm Cuff
Speaker
Display

E-7
Symbols
Symbols that appear on the display
Symbols Function/Meaning Recommended Action
Appears while measurement is
in progress. It blinks when the
pulse is detected.
Measurement is in progress.
Remain as still as possible.
Irregular Heartbeat symbol
(I.H.B.)Appears when an
irregular heartbeat is detected
during measurement
––––––––––––––––
TriCheck mode
Takes three consecutive
measurements automatically
and displays the average
values of the three
measurements.
––––––––––––––––
Appears when a body or arm
movement is detected.
The reading may yield an incorrect
value. Take another measurement.
Remain still during measurement.
Appears during measurement
when the cuff is applied
loosely.
The reading may yield an incorrect
value. Apply the cuff correctly, and
take another measurement.
Previous measurements stored
in memory ––––––––––––––––
Average data ––––––––––––––––
The battery power indicator
during measurement. ––––––––––––––––
The battery is low when it
blinks.
Replace all batteries with new ones
when the mark blinks.
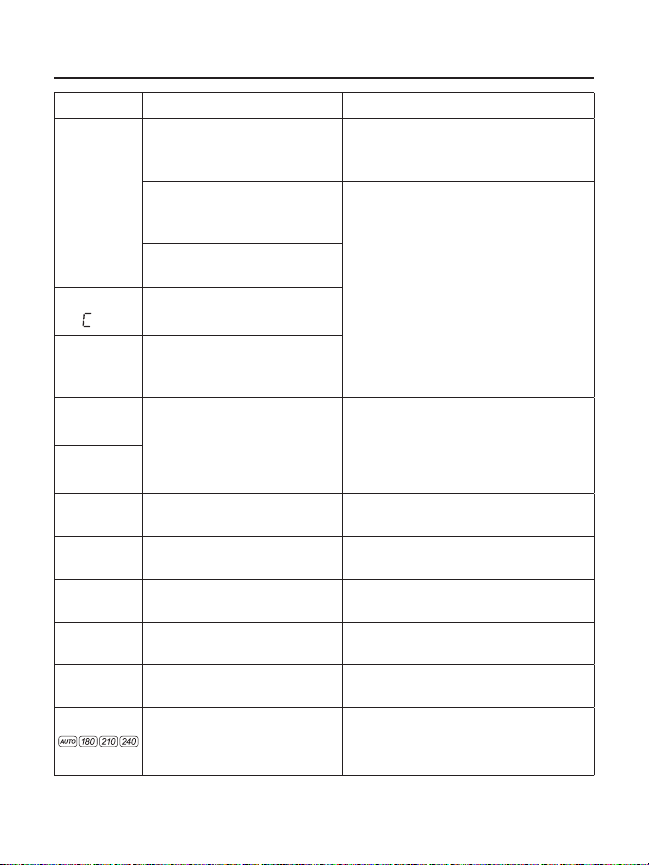
E-8
Symbols Function/Meaning Recommended Action
ERR
Unstable blood pressure
due to movement during
measurement.
Take another measurement. Remain
very still during measurement.
The systolic and diastolic
values are within 10mmHg of
each other.
Apply the cuff correctly, and take
another measurement.
The pressure value did not
increase during the ination.
ERR
VF
The cuff is not applied
correctly.
E
PUL DISPLAY ERROR
The pulse is not detected
correctly.
ERR
EBlood pressure monitor
internal error
Remove the batteries and press
the START button, and then install
the batteries again. If the error still
appears, contact the dealer.
ERR
9
SYS Systolic blood pressure in
mmHg –––––––––––––
DIA Diastolic blood pressure in
mmHg –––––––––––––
PUL/min Pulse per minute –––––––––––––
AM Data taken in the AM –––––––––––––
PM Data taken in the PM –––––––––––––
Pressure settings
Indicates the pressure value
as set by the user.
–––––––––––––
Symbols

E-9
Symbols
Symbols that are printed on the device case
Symbols Function/Meaning
Standby and Turn the device on.
R6(LR6,AA) Battery installation guide
Direct current
Type BF: Device, cuff and tubing are designed to provide special
protection against electrical shocks.
SN Serial number
Refer to instruction manual/booklet
Polarity of DC jack
IP International Protection Symbol
Keep dry
Symbols that are printed on the AC adapter
Symbols Function/Meaning
Alternating current
Direct current
Polarity of DC jack
Class II device
For indoor use only
UL/cUL certication device label
Energy efciency level VI certication device label
International protection symbol
E-10
Using the Monitor
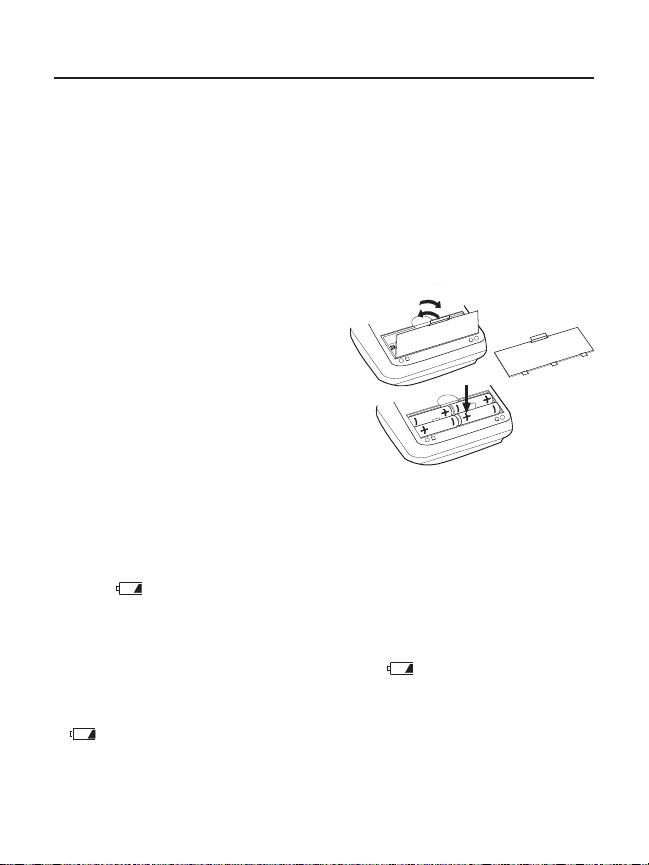
Installing/Changing the Batteries
You must install 4 type A (1.5 volt) batteries (alkaline batteries
recommended), or use the AC Adapter and attach the cuff to the monitor
before using it. To install batteries (or replace them if the "Low Battery"
symbol appears on display), proceed as follows:
1. Remove battery compartment cover by gently pushing down on arrow
and sliding cover forward.
2. Put in bottom row of batteries rst. Place the batteries in compartment
with positive (+) and negative
(–) terminals matching those
indicated in the compartment. Be
sure batteries make contact with
compartment terminals.
3. Replace cover by sliding it into the
compartment and gently pressing
into place.
Note: Rechargeable batteries are not recommended
for use with this monitor. Please dispose of batteries
following local regulations.
CAUTION
• Insert the batteries as shown in the battery compartment. If installed
incorrectly, the device will not work.
• When (LOW BATTERY mark) blinks on the display and the device
announces that the battery needs to be replaced, replace all batteries
with new ones. Do not mix old and new batteries. It may shorten the
battery life, or cause the device to malfunction.Replace the batteries two
seconds or more after the device turns off. If (LOW BATTERY mark)
appears even after the batteries are replaced, make a blood pressure
measurement. The device may then recognize the new batteries.
• (LOW BATTERY mark) does not appear when the batteries are
drained.
Step 3
Step 1
Step 2

E-11
• The battery life varies with the ambient temperature and may be
shorter at low temperatures. Generally, four new LR6 batteries will last
approximately for one year when used twice for measurement each day.
• Use the specied batteries only. The batteries provided with the device
are for testing monitor performance and may have a limited life.
• Remove the batteries if the device is not to be used for a long time.The
batteries may leak and cause a malfunction.
Connecting the AC adapter to the monitor
Gently insert the AC adapter plug into a 120V AC
outlet. Connect the AC adapter plug into the jack on
the back of the monitor
Disconnecting the AC adapter from the
monitor:
1. Turn the unit off by pressing the START button.
2. Disconnect the plug from the jack of the monitor quickly.
3. Gently remove the AC adapter from the outlet
Note: If monitor has batteries and an AC adapter connected, the measurements stored in memory
may be lost if AC adapter is unplugged from the wall rst. To ensure that measurements remain in
memory, make sure the unit is off and that the jack plugged into the monitor is removed quickly before
unplugging adapter from the wall.
Connecting the Air Hose
Insert the air connector plug into the
air socket rmly.
Using the Monitor
Jack
AC Adapter Plug
Air Hose
Air Connector Plug
Air Socket
E-12
Using the Monitor
Adjusting the Clock
The UA-1030T blood pressure monitor has a built-in clock that gives you
the time and date and can tell you when a blood pressure reading stored in
memory was taken. We recommend that you adjust the clock prior to use.
To adjust the clock, follow these simple steps:
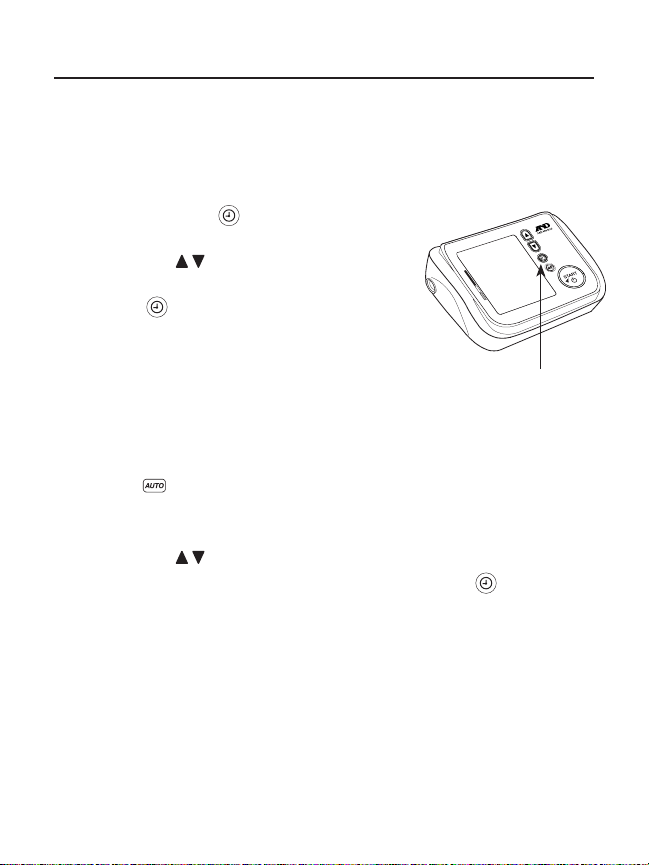
1. Press the set button located to the
right of the display.
2. Use the arrow buttons to set the year.
3. After reaching the desired year, press the
set button again.
4. Repeat the process for the month, day
and hour.
5. The next setting will be for pressure.
Adjusting the Pressure
1. After setting the year, month, day and hour, the next mode is the
pressure setting.
2. Default is , which stands for automatic.
3. For even more rapid readings, you can adjust the default to about
30 mmHg or more above your expected systolic pressure.
4. Use the arrow buttons to set the pressure.
5. After reaching the desired pressure, press the set button again.
6. The next setting will be for TriCheck™ Mode.
Set Button

E-13
Using the Monitor
Note: Pressing will toggle between volume setting → language setting → instruction setting →
original state (standby) .
Adjusting the Speaker Volume
1. Press the button to enter the volume setting mode.
2. There will be a conrmation tone and the current volume will be
displayed by the pressure bar (volume off, 1, 2, 3, 4, 5, 6). If it is off ,
the LCD will display “ oFF ”.
3. Change the volume value with the ▲▼ buttons.
Selecting the Language
1. Press to enter the language setting mode. L1, L2 or L3 will be
displayed.
L1: English
L2: French
L3: Spanish
2. Change the language with the ▲▼ buttons.
Instructions On / Off
1. Press to enter the instruction setting mode.
2. Turn the audio ON and OFF with the ▲▼ buttons.

E-14
Using the Monitor
Tricheck™ Mode
The UA-1030T blood pressure monitor has an optional feature to
automatically take three consecutive readings one minute apart and then
provide you with the average. This complies with the American Heart
Association's recommended measuring method.
1. After setting the year, month, day, hour and pressure, the next mode is
the TriCheck™ Mode.
2. Default is off.
3. To turn on, use the arrow buttons.
4. To turn off again, use the arrow buttons.
5. After reaching the desired setting, press the set button again.
6. This will end your settings session.
7. To adjust any values, push the set button and begin again.

E-15
Using the Monitor
Selecting the Correct Cuff Size
Using the correct cuff size is important for an accurate reading. If the
cuff is not the proper size, the reading may yield an incorrect blood pressure
value.
• The arm size is printed on each cuff.
• The index and proper t range, on the cuff, tell you if you are applying the
correct cuff. (Note: the SmoothFit Cuff, UA-392A, does not have the index
symbol)
• If the index points outside of the range, contact your local dealer to
purchase a replacement cuff. The arm cuff is a consumable. If it becomes
worn, purchase a new one.
Catalog Number Recommended Cuff Size Arm Size
UA-289A Small Cuff 16-24cm
UA-290A Medium Cuff 23-37cm
UA-291A Large Cuff 31-45cm
UA-392A SmoothFitTM Cuff 23-37cm
Applying the arm cuff
1. Wrap the cuff around the upper arm,
about 1-2 cm above the inside of the
elbow, as shown in the gure to the right.
2. Place the cuff directly against the skin.
Clothing may cause a faint pulse,
and result in a measurement error.
Constriction of the upper arm, caused
by a tightly rolled up shirtsleeve, may
prevent accurate readings.
Do not roll up shirtsleeve tightly
Cuff 1-2 cm
Air Hose
Artery position mark
Secure the fabric
fastener firmly
Index and proper fit range

E-16
Taking your Blood Pressure
This blood pressure monitor is designed to detect the pulse and to inate
the cuff to a systolic pressure level automatically.
Tips for Taking Blood Pressure
Before Your Measurement:
• For 30 minutes prior to taking your blood pressure
»Do not exercise
»Do not drink coffee, caffeinated soda or alcohol
»Do not smoke
• Sit quietly for 5-10 minutes
• Ensure you are using the right size cuff
During Your Measurement:
• Do not talk
• Sit with your back straight and supported
• Uncross your legs and place feet at on oor
• Rest arm on a table so that the cuff is at heart level
• Measure two times a day, in the morning and evening
Notes for Accurate Measurement
• This monitor bases its measurements on the heartbeat. If you have a very
weak or irregular heartbeat, the monitor may have difculty determining
your blood pressure.
• Should the monitor detect a condition that is abnormal, it will stop the
measurement and display an error symbol. Refer to the section "Symbols"
for the description of the symbols.
• If you have emotional stress, the measurement will reect this stress as
a higher (or lower) than normal blood pressure reading and the pulse
reading will usually be faster than normal.
• An individual's blood pressure varies constantly, depending on what you
are doing and what you have eaten. What you drink can have a very
strong and rapid effect on your blood pressure.
E-17
Measurements
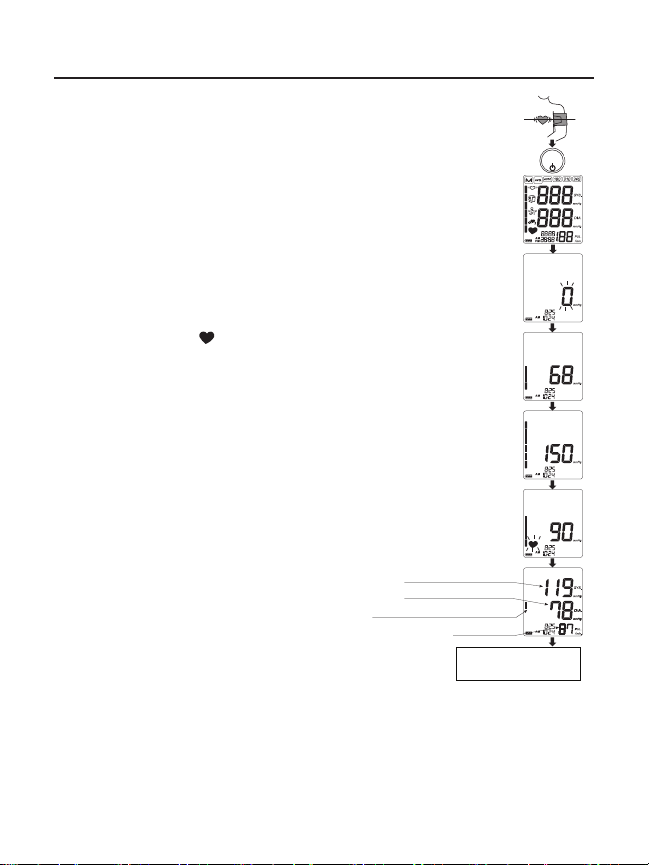
1. Press the START button. All of the
display segments are displayed. Zero (0)
is displayed blinking briey. The display
changes, as indicated in the gure at
the right, as the measurement begins.
The cuff starts to inate. It is normal for
the cuff to feel very tight. A pressure bar
indicator is displayed, on the left edge of
the display, during the ination.
Note: If you wish to stop ination at any time, press the
START button again
2. When ination is complete, deation starts
automatically and blinks, indicating that
the measurement is in progress. Once
the pulse is detected, the mark blinks with
each pulse beat.
Note: If an appropriate pressure is not obtained, the device
starts to inate again automatically. To avoid re-ination,
see “Measurement with Set Pressure”.
3. The display measurement is complete, the
systolic and diastolic pressure readings
and pulse rate are displayed. The device
announces the measurement results.
The cuff exhausts the remaining air and
deates completely
4. Press the START button to turn the
device off. After one minute of non-
operation, the device will turn off
automatically.
5. The reading is then stored into
memory. See "About Memory" for more
information.
START
Measurement
in progress
Systolic pressure
Diastolic pressure
Pressure Rating Indicator
Pulse rate
Exhausts remaining
air automatically
Press
Pressurizing
Zero display
At heart level
Starts inflation
All of the display
segments displayed

E-18
Measurements
Measurement using TriCheck
1. Press the START button. All of the
display segments are displayed. Zero (0)
is displayed blinking briey and the rst
measurement starts.
2. When the measurement is complete, the
systolic and diastolic pressure readings
and pulse rate are displayed, then a one-
minute countdown starts for the second
measurement.
3. After one minute, the second
measurement starts.
4. When the measurement is complete, the
average readings of the rst and second
measurements are displayed, then a
one-minute countdown starts for the third
measurement.
5. After one minute, the third measurement
starts.
6. When the measurement is complete,
the average readings of the three
measurements are displayed and stored
in memory.
Notes: During the measurement, the TriCheck
symbol is displayed.
To cancel the measurement, press the START button. In this case, no data is stored in memory.
When the cuff t error symbol appears during the rst measurement, cancel the measurement,
reapply the cuff correctly and start a new measurement.
After measurement, the average data of the three measurements is stored in memory. No data will be
stored, when canceling the measurements, or before completion of the third measurement.
START
At heart level
Press
All of the display
segments displayed
First measurement
Second measurement
Third measurement
Results of the
first measurement
Average of the first and
second measurements
Average of the
three measurements
One minute after
One minute after
E-19
Measurements
Measurement with Set Pressure
The UA-1030T is designed to detect the pulse and to inflate the cuff to a
systolic pressure level automatically. If re-inflation occurs repeatedly, use
the following methods. During the blood pressure measurement, re-inflation
may occur. A fixed pressure value can be set to avoid re-inflation.
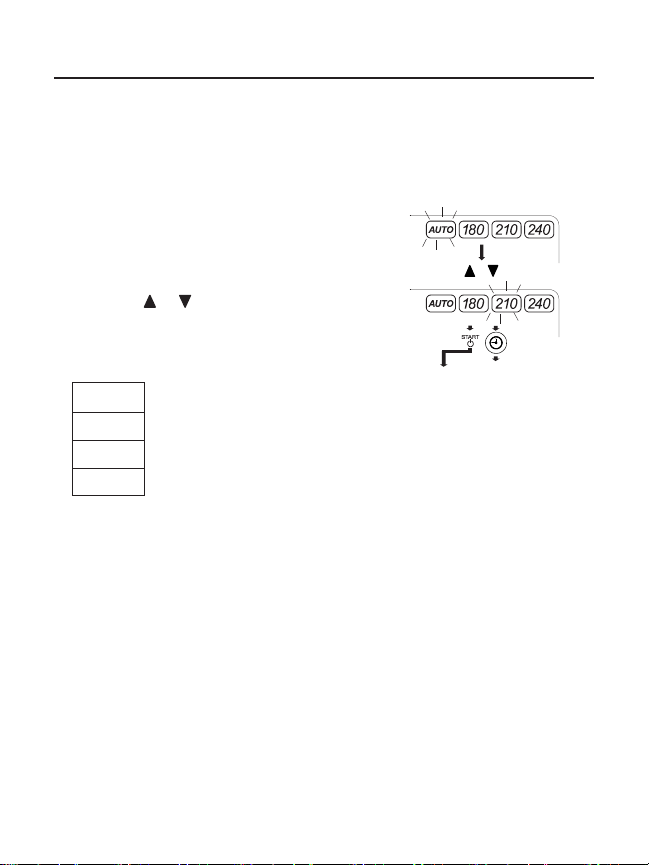
1. At step 5 of the clock adjustment
procedure (see page E-12), press the
set button to go to the pressure setting
mode. The current setting blinks.
2. Press the or button to select a
pressure value about 30mmHg or more
above your expected systolic pressure
from the following.
AUTO : Automatic pressurization (default value)
180 : Pressure value of 180mmHg (fixed)
210 : Pressure value of 210mmHg (fixed)
240 : Pressure value of 240mmHg (fixed)
3. Press the set button to go to the TriCheck setting mode.
Press the START button to turn the device off. After three minutes of
non-operation, the device will turn off automatically. The next
measurement will be performed with the new pressure value.
Turn off TriCheck
setting mode
or
START
Refer to E-17
for measurement
Press and hold the button
At heart level
Release the button
at the desired
systolic pressure

E-20
Measurements
Measurement with desired Systolic Pressure
Use this method when re-ination occurs repeatedly even if the pressure
value is set to 240 in the procedure above or when the results are not
displayed even if the pressure decreases to 20mmHg or less.
1. Place the cuff on the arm (preferably the left arm).
2. Press and hold the START button until
a number about 30 to 40mmHg higher
than your expected systolic pressure
appears.
3. When the desired number is reached,
release the START button to start
measurement. Continue to measure
your blood pressure as described on
the E-17.
Turn off TriCheck
setting mode
or
START
Refer to E-17
for measurement
Press and hold the button
At heart level
Release the button
at the desired
systolic pressure
This manual suits for next models
1
Table of contents
Languages:
Other AND Blood Pressure Monitor manuals


