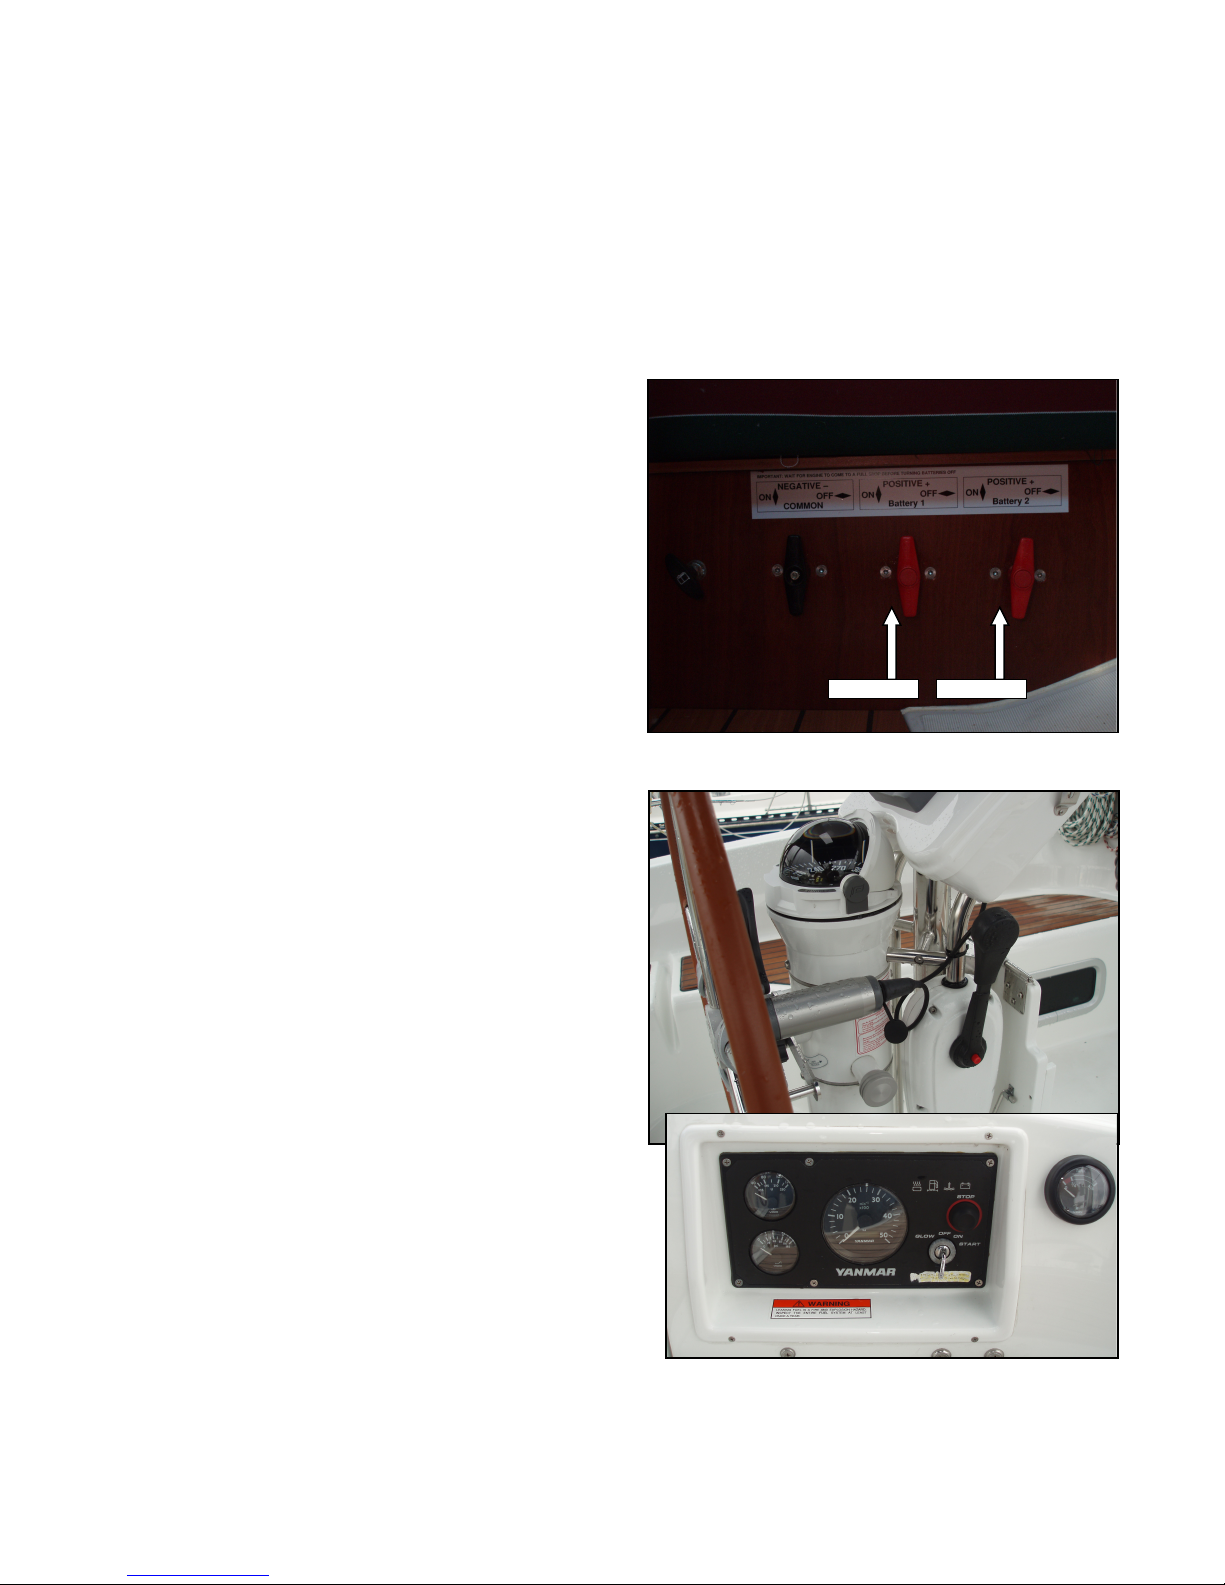
ANDIAMO 2007 Moorings Beneteau 32.2 User manual

OPERATIONS MANUAL
ANDIAMO
2007 Moorings Beneteau 32.2
Revised: April 2010

Welcome aboard
We are happy you have chosen Andiamo for your sailing vacation. Andiamo is a Moorings Beneteau 32.2. She was
built at Beneteau USA Inc. in Marion, South arolina in 2006 and launched in Anacortes in 2007.
It is our hope your time aboard Andiamo is both safe and enjoyable. We are sure you will enjoy cruising the lovely
islands of the Pacific Northwest aboard Andiamo.
The information summarized in this manual is intended to assist all skippers, crew and guests aboard, in feeling mor
comfortable with the basic systems and how they work. If something isn't familiar to you, please check thes
notes. If the information is unclear, incomplete, confusing, or otherwise less than helpful, please help us to add
change, or restate the information so that it conveys the desired results. Please feel free to add your suggestions fo
other information or clarifications at the end of this manual, or simply add a comment or two in the margin a
appropriate. Your suggestions will be incorporated into future revisions. In addition to the information contained i
this manual, you will find a “Moorings Beneteau” pouch aboard. This pouch contains information from manufacturer
on various systems and items aboard Andiamo. Feel free to consult these manuals if the need arises. Please feel free
temail us if you would like to make any other comments or suggestions as well. We are interested iensuring
Andiamo is not only well maintained, but also improved over time. We look forward to hearing from you
You will see this is posted as a no-smoking vessel. We ask that you restrict smoking to the cockpit or decks and/o
dockside in order to maintain a pleasant sailing environment for all guests. Your co-operation is appreciated
If you have questions about the boat or about places to visit, please do not hesitate to ask us in the AY office.
Have great sailing adventure, and again thanks for choosing Andiamo
.
.

ANDIAMO
2007 Moorings Beneteau 32.2
USCG Do umentation: 1203525
Hull Number: BEYN4215B707
L.O.A. 32' 10”
L.W.L. 29' 2”
Displacement 8,448 Lbs.
Beam 10' 8”
Draft 5' 11”
Sail Area 564 square feet
Engine 20 HP Yanmar 3YM-20
ruising RPM 2600
Fuel apacity (Diesel) 17 gallons
Fresh Water apacity 42 gallons
Holding Tank apacity 13 gallons

TABLE OF CONTENTS
Boat Operation
Page
ENGINE INFORMATION........................................................................ 1
Engine Inspection......................................................................... 1
Start-Up........................................................................................ 2
Shifting......................................................................................... 3
Shutdown...................................................................................... 3
Fueling.......................................................................................... 3
Troubleshooting Engine................................................................ 3
GETTING UNDERWAY........................................................................... 4
SAILS AND RIGGING............................................................................. 4
Troubleshooting Sails and Rigging............................................... 5
DINGHY................................................................................................... 5
DO KING.................................................................................................5
MOORING ANS (BUOYS)....................................................................5
AN HORING........................................................................................... 6
Boat Systems
ELE TRI AL SYSTEMS........................................................................ 6
110 Volt A System...................................................................... 6
12 Volt D System........................................................................7
Troubleshooting Electrical Systems.............................................. 7
SANITATION SYSTEMS......................................................................... 8
Marine Head (toilet)......................................................................8
Holding Tank................................................................................ 8
WATER SYSTEMS................................................................................... 9
Fresh Water Tank.......................................................................... 9
Fresh Water Pump......................................................................... 9
Water Heater................................................................................. 9
Shower........................................................................................ 10
GALLEY SYSTEMS...............................................................................10
Propane Stove/Oven....................................................................10
Refrigeration............................................................................... 10
Barbeque..................................................................................... 11
HEATING SYSTEMS............................................................................. 11
Diesel Forced Air Furnace...........................................................11
Space Heater (110 Volt A )........................................................ 11
ELE TRONI S SYSTEMS....................................................................12
VHF Radio..................................................................................12
Depth Sounder/Boat Speed......................................................... 12
hart Plotter/Global Positioning System (GPS)..........................12
Autopilot..................................................................................... 12
AM/FM Radio/ D Player........................................................... 12
BILGE PUMPS....................................................................................... 13
THRU-HULL SEA O KS.................................................................... 13
DODGER AND BIMINI......................................................................... 13
SAFETY EQUIPMENT.......................................................................... 13
First Aid Kit................................................................................ 13

Fire Extinguishers....................................................................... 13
Signaling Flares.......................................................................... 13
Life Jackets................................................................................. 13
Steering gear failure.................................................................... 13
Engine Spares/Tools....................................................................13

PAGE 1
BOAT OPERATION
ENGINE
Andiamo has a Yanmar 20 horsepower auxiliary engine (Model – 3YM-20). The engine drives a two-blade
propeller forward and reverse. There is a single control lever that operates both the throttle and
transmission. On the engine control panel there are gauges for RPM, fuel, ammeter, oil pressure, engine
hour counter and water temperature. A sound alarm is provided to indicate high fresh water temperature and
low oil pressure. The engine will propel Andiamo at about 6.5 knots in calm water at 2600 RPM. We ask
that you maintain engine RPM between 2300 and 2800 for cruising. Higher throttle settings will only
minimally increase speed, but will greatly increase fuel consumption and wear on the engine. Please limit
higher throttle settings for emergency situations. Andiamo has noticeable prop-walk to port in reverse.
When in reverse, be careful to keep a firm grip on the wheel and use only low RPM's.
Engine Inspection Each day you are planning to use the engine, you should run through your
W O B B S check the WATER (coolant), OIL, BILGE, BELTS, and. SEA STRAINER
Engine Oil:
heck the oil level in the engine with the
dipstick located on the starboard side of the
Engine. The oil level should be anywhere
between the high and low marks. Spare oil is
kept on board, and should be located during
your orientation. The companionway ladder
must be removed to access the engine to add
oil. If you need to add oil, please use great
care not to overfill. Running the engine with
too much oil will cause damage.
Engine Coolant:
heck the level of coolant in the expansion
tank. Engine coolant is a mixture of 50%
antifreeze and 50% water. There is coolant
kept on board and should be located during
your orientation.
Belts:
heck the general condition of the belts, hoses, and fuel lines.
Bilges:
Remove the largest cabin sole panel under the dinette table to check the bilges. There is normally a small
amount of water in the bilge. heck for debris, oil, or anything unusual. There is also normally some water
in the bilge aft of the engine, below the prop shaft. This does not drain to the main bilge, to prevent oil from
being pumped overboard by the bilge pump.
Cooling System:
The Yanmar engine is cooled by a heat exchanger. The engine pumps sea water through a sea water strainer,
then through a heat exchanger that cools the coolant fluid, thus cooling the engine. The sea water is then
pumped overboard.
Coolant
Sea strainer
Dip Stick

PAGE 2
The sea water strainer is the plastic cylinder with hoses, located aft and above the engine under the wood
pull out panel in the aft stateroom, starboard side. It should be checked daily, as it can clog with seaweed
and other debris. To check the strainer, shine a flashlight through the plastic housing. If debris is visible it
will have to be removed.
To clear debris from the strainer, close the thru-hull valve located aft of the strainer under the mattress.
Unscrew the plastic lid on the cylindrical housing holding the strainer. Be careful not to lose the rubber O-
ring. Rinse the strainer and plastic lid and replace them with the O-ring in place. Do not fully tighten
initially because the air needs to be removed. Slowly
open the thru-hull valve and allow the air in the plastic
bulb to escape. When the air has escaped, tighten the
plastic lid by hand and observe for leaks. The continued
supply of seawater is critical to the operation of the
engine.
Startup
Set both battery selector switches to the ON position.
(See battery section for additional information related
to the battery selector switch). The battery selector
switch is located in the aft cabin.
Place the throttle/shift lever in low/neutral (straight up
and centered). Push in the red button located on the
throttle lever to disengage the linkage to the transmission, then move the throttle forward about one third.
There is a natural stop at this setting. Turn the start
switch to the ON position. You will hear the audible
alarm sound. Turn the switch to the start position until
engine starts.
When starting cold, allow the engine to warm up at an
idle for TEN MINUTES prior to applying a load. If
load is applied before the engine warms it may seize.
Normal idle speed is 800 to 1000 RPM.
Be sure the audible alarm is not sounding. It should
stop when the engine starts.
NOTE: Do not hold the switch for more that FIFTEEN
SE ONDS at a time. If the engine does not start the
first time, wait a few seconds before trying again.
Please remember NEVER TURN THE KEY OFF
WHILE THE ENGINE IS RUNNING! You will do
serious alternator damage. It should always remain on
when the engine is running. Engine alarms will not work
when the key is off.
While the engine is warming, check for water exiting the
exhaust, aft starboard hull. You may not be able to see the
water, but you should be able to hear it exit with the
exhaust.
Engine
House

PAGE 3
Shifting
To engage the transmission, move the throttle/shift lever to the low/neutral (straight up) position until the
red button pops back out. Push throttle forward for forward propulsion, or back for backward propulsion.
Shutdown
Place the throttle/shift lever in neutral and run the engine at idle to allow the engine to cool down for several
minutes. Usually this is about the amount of time it takes to secure your lines and plug into shore power.
Push the STOP button until the engine stops. The audible alarm will sound until the switch is turned off.
Fueling Up
You will need to fuel up before returning to the slip at the end of your charter. The fuel tank holds 17
gallons of diesel fuel. Before refueling, have an “oil/fuel sorbs” handy to soak up spilled fuel. You should
have a rough idea of the number of gallons you will need by the fuel gauge and by the hour meter. Andiamo
uses approximately ½ gallon per hour.
The fuel filler cap is located on the starboard deck aft. HE K THAT YOU HAVE THE ORRE T DE K
OPENING! Do not add water or pump-out at the same time you are fueling. Use only DIESEL FUEL!
Place the diesel fuel nozzle into the tank opening, pump slowly and evenly, and note the sound of the fuel
flow. Pumping too fast may not allow enough time for air to escape, which may result in spouting from the
tank opening. As the tank fills, the sound will rise in pitch or gurgle. Pay attention to the tank overflow
vent. The sound may indicate that the tank is nearly full. Top off carefully, and be prepared to catch spilled
fuel. Spillage may result in a fine from law enforcement. Replace deck cap.
Caution – Clean up splatter and spillage immediately for environmental and health reasons. Wash hands
with soap and water thoroughly.
Trouble Shooting Engine Problems
Engine Overheating:
1. Immediately shut engine down The most likely cause is clogging of the sea water strainer. This
condition may be preceded by black smoke from the exhaust. Follow procedure above to clear the strainer.
heck to be sure water is exiting with the exhaust. If water is not exiting with the exhaust, then check the
sea strainer. If it is full of sea weed or eel grass, close the raw water intake then open the sea strainer and
clean out, replace cover and open the raw water intake valve.
2. If seawater is getting to the engine, the next likely cause is low coolant level. heck the coolant level by
observing the expansion tank. If coolant level is low, add coolant from the pre-mixed jug. Never open the
radiator cap when the engine is hot, as this could cause severe burns.
Raw Water Intake Valve
Sea Strainer

PAGE 4
Low Oil Pressure:
1. Immediately shut engine down
2. heck oil level. Add oil if necessary. Use care not to overfill oil.
3. If the engine oil level is not low, DO NOT RESTART. ontact AY or other personnel listed on the
emergency contact list in the gray manual.
Alternator Failure:
You may keep running the engine, but be aware the batteries are not being charged.
onserve on engine and battery use. ontact AY immediately.
Engine Dies And Won’t Restart:
ontact AY immediately.
GETTING UNDERWAY
lose the portholes, windows, and forward hatch. Disconnect shore power and store cord. Once outside the
marina, idle the engine while the crew brings in fenders and lines. Assign one crew member to be in charge
of securing ports and assign one crew member to be in charge
of the dinghy, if towing. Shorten the line on all close quartering
maneuvers.
Steering Wheel
The steering wheel can be rotated on the pedestal to make it
easy to move back and forth in the cockpit when NOT
underway. To rotate the wheel pull the large knob on the side of
the pedestal out and move the wheel to the left out of the way
or right to use.
SAILS AND RIGGING
The fully battened, mainsail is the main driver under sail in this sloop rig sail plan. It is this feature that
allows for great sailing in light air. This sail plan however requires early reefing in stronger winds. 15 knots
would not be too early for the first reef. This rig has swept back spreaders and a double backstay. This
allows free access to the swim platform. It also means that dead downwind sailing places the sail on the
spreaders. A broad reach, with close attention to keeping the sail off the spreaders, is recommended. As
there is no “preventer,” take care with jibing – for your sake, and for the protection of the gear. The jib is
furled. The furling line is led aft to the cockpit. To unfurl the headsail, (a) uncleat the furling line, (b) wrap
the sheet around the appropriate winch, (c) pull the sheet aft while maintaining tension on the furling line,
(d) cleat when desired reefing level has been achieved. To furl the jib, apply slight tension on the jib sheet
while pulling on the furling line until it is fully furled. Place three or so wraps of the jib sheets to hold the
sail.
Jib sheets are led to the cockpit to the winches. Use the jib sheet cleats as little as possible as they tend to
fray the lines. The jiffy (slab) reefing has two reefs. To apply a reef, go head to windward, lower the
mainsail halyard, hook the tack cringle for the chosen reef over the reefing hook at the forward end of
boom, raise the mainsail halyard, snug the associated reef line, and resume sailing. Jib sheets, mainsheet,
halyards, and traveler are all operated from the cockpit. There is a soft boomvang. A lazyjack type system
with sail cover on the boom simplifies sail handling. There is no
Release Knob

PAGE 5
whisker pole, and no spinnaker. There is a topping lift, which needs to be released after raising the mainsail.
Reset the topping lift before lowering the mainsail. A “Boomkicker” prevents the boom from dropping onto
the bimini even if the topping lift breaks.
Troubleshooting Sails and Rigging
1. Mainsail resists being raised: heck all lines. Both reefing lines should be loose and flopping. The
boomvang should be loose. The battens should not be stuck on the lazyjack. If they are, lower the sail and
be sure to be head to wind on raising the sail again. heck the sail is not caught on the reefing hooks.
2. Furling line gets stuck partway through the furling process: This is usually due to not applying proper
tension on lines in furling and unfurling process. Try letting the jib out and repeating the process. Be sure
you are headed into the wind to reduce pressure on the rig. If this fails you could have an over-ride in the
furling drum that needs to be fixed.
3. Unable to point with reef in place: Probably have not snugged the reef line sufficiently. Repeat process
and be sure line is snug before raising the halyard.
DINGHY
When towing the dinghy, pull the painter up tight to the boat when maneuvering in the marina to avoid
getting the line wrapped around the propeller. The line may be lengthened when underway. onsider
assigning oen of your crew “dinghy duty” to monitor the status of the dinghy. In rough weather, lift the
dinghy with a halyard onto the foredeck and tie down upside down or deflate and compress. If dinghy is tied
onto the foredeck, please place a cockpit throw cushion under the dinghy transom to prevent scratching of
the forward hatch or cabin top.
Be sure when towing your dinghy, that someone is always keeping an eye on the painter when slowing
down or stopping. When rowing your dinghy to shore, use EXTREME AUTION. hoose an area free of
any large rocks that might cause harm in beaching. Lift up and carry the dinghy to bring it up to higher
ground. Please never drag it. Secure it when leaving as the tides come up quickly. The foot pump for the
dinghy is stored in the starboard cockpit locker. There is a patch kit onboard if the dinghy is ruptured.
DOCKING
Have your crew make ready the lines and fenders, and give clear instructions on how you will be docking.
Have bow, stern, and spring lines ready. Often times it is best to lead dock lines to the mid section of the
boat where your crew member can easily step off and secure either line. As you are coming in to dock, have
your best communicator midships to give you distances from the dock. It is often hard to judge how close
the dock is. alling out distances (i.e. 20 feet, 10 feet, 4 feet, etc.) will only add to a successful docking.
If you find you are too far off the dock, BA K OFF and re-approach. It is better to re-approach than to lose
crew over the side.
MOORING CANS (BUOYS)
The Washington State Parks sticker on Andiamo allows you to use the mooring cans in the marine parks for
free. You only need to register at the kiosk, usually located at the head of the docks. Mooring cans have a
metal triangle at the top, upon which is a metal ring. The metal ring is attached to the chain which secures
your boat. IT IS VERY HEAVY. The strongest member of your crew should be chosen for this job. ome up
to the mooring can into the wind as you would for anchoring. Have crew members on the bow, one with a
boat hook and one with a mooring line secured like a bow line. As you are coming slowly up to the can,
have the crew holding the boat hook point at the can with the hook so the skipper always knows where it is.
Hook the can and bring the ring up to the boat to allow the second crew member to thread the ring with the

PAGE 6
line. Release the boat hook. If your mooring line is led out the starboard cleat, bring the end of the line back
to the port side cleat. You will essentially create a bridle with about 10 feet of slack from the cleats to the
can.
ANCHORING
Andiamo carries a plow type anchor on the bow attached to 50 feet of chain and 200 feet of 5/8-inch rode.
There is a windlass which is controlled by a pendant in the forward cabin.
Setting the anchor:
Let out sufficient anchor rode (chain and line) before setting the anchor. olor markers are placed every 30
feet on the chain and nylon rode. If the anchorage is crowded, put down at least a 3 to 1 scope (60 feet of
rode for 20 feet of water at highest tide). Back the anchor in with a short burst in reverse from the engine.
Then let out additional scope dependent upon conditions. If the anchorage is less crowded, more scope is
always a better option. The holding power of the anchor increases greatly as more scope is added. There is a
second anchor in the starboard cockpit lazarette. This can be set off the bow or the stern as needed. Be sure
to secure the bitter end, as it is not secured in the lazarette.
Raising the anchor:
oordinate the maneuver with the helmsperson to remain steady above the anchor as it is raised. As the
anchor rises, be careful not to allow it to swing against the hull.
BOAT SYSTEMS
ELECTRICAL SYSTEMS
Andiamo has two electrical systems, 110 volts A and 12 volts
D . It is important to understand these two systems are
completely separate and isolated from one another. There is no
inverter. Both A and D systems are controlled at the electrical
panel at the navigation station.
110-Volt AC System
Andiamo is equipped with the capacity to plug into dockside shore power (110 volt A ) using the heavy
yellow shore power cord. This system powers everything on the A circuit breaker panel:
110 volt A wall outlets
Battery charger
Water heater
Connecting to shore power:
heck the power rating/plug size of the nearest dock receptacle (that is 30 amps, 20 amps, or 15 amps). If
necessary, add a shore power cord adapter located in the compartment forward of the navigation station. The
procedure to hook up to shore power is as follows:
1. Make sure the “A Main” circuit breaker is off.
2. Turn off the circuit breaker located at the shore side outlet on the dock.
3. onnect the plug to the shore side outlet. Give the plug a small twist clockwise to lock.
4. Turn on the circuit breaker at the dock.

PAGE 7
5. Turn on the “A Main” circuit breaker and any of the
circuit breakers for the 110 volt A systems desired.
The shore power cords coming off the bow can be wrapped
loosely around the bowline.
On shore power, the electrical outlets will be functional under the
110 volt A system.
They will not work under the 12-volt D system.
12 Volt DC System
This system is powered by the marine batteries aboard Andiamo,
and powers everything onboard not powered by the 110 volt A
system. The House battery is Battery #2 and is located in front of
the engine under the companionway stairs. The engine start battery is Battery #1 and is in the engine
compartment just aft of the engine. Make sure “BOTH” batteries are ON when under power, or when
connected to shore power for recharging. When at anchor and/or not on shore power turn Battery #1 off.
This way even if the House battery is low you will still have power to start the engine.
Note -- Do not hange the position of the battery swit hes while the engine is running, or the alternator
diodes will be damaged. Change positions with the engine off.
The running, steaming, and anchor lights are all controlled from the electrical panel above the navigation
table. Interior lights are also powered from a circuit breaker on this panel. Each interior light also has an
individual switch at each fixture.
There are two 12 volt auxiliary plugs (cigarette lighter plugs). One located on the electrical panel, and the
other on the binnacle in the cockpit.
When not connected to shore power, the house battery is providing all power. Avoid draining the batteries
by using power sparingly at anchor:
1. Turn the refrigerator off at night, as it will still stay cold.
2. Use only one or two lights at a time.
3. Turn off systems not in use such as instruments, VHF, autopilot, running lights, steaming
lights, tank indicators, stereo, etc.
If you do not need the diesel forced air heater, it may be turned off as well. Monitor the use of onboard
electricity carefully with your voltmeter located at the navigation station.
Voltage (Wet Cell Battery) Battery State
12.65 volts 100%
12.47 volts 75%
12.25 volts 50%
11.95 volts 25%
11.70 volts 0%
Troubleshooting Electrical Systems
1 Battery running low. Signs of this are lights dimming, stereo not working. Immediately start engine and
run for a period of time at 1600 RPM with both battery switches “ON”.
2 Unable to start the engine due to low battery. Retry. If engine starts, recharge as above. If it does not
work, see engine troubleshooting or contact AY for instructions.

PAGE 8
SANITATION SYSTEM
Marine Head (toilet)
The head contains a vanity with sink, a showerhead, and
a marine toilet with hand operated pump for flushing.
Heads are easily plugged by 2-ply tissue, Kleenex, hair,
tampons, or paper towels. The only things that goes into
the head are body waste and a small amount of special
marine toilet paper. The person who plugs a head is
responsible for unplugging it.
To operate the head:
1. Move the lever to the “wet” position and pump
to wet the bowl.
2. Use the head – minimal or no toilet paper
(marine only).
3. Pump the bowl again in the “wet” position until
the bowl is clear.
After the bowl is clear pump several more times to clear the lines.
4. Move the lever to “dry” and pump the bowl empty.
5. IMPORTANT: Always leave the lever on “dry” when not in use to
prevent water from flooding back into the boat. Should the toilet pump handle squeak or stick, it
needs to be lubricated. Put a couple of squirts of ‘pump lube’ into the toilet. Pump the toilet dry
slowly, to draw the lube into the handle unit.
Pump is under vanity.
Holding Tank
Head contents go to the holding tank. Unfortunately,
the holding tank needs to be emptied frequently. It has
a capacity of only 13 gallons. Figure about 1 gallon
per use. With an overfilled tank, it is possible to break
a hose, clog a vent, or burst the tank. The result will
be indescribable catastrophe and an expensive fix.
Empty the tank every other day to avoid this problem.
Pumping out:
1. Locate the nearest pumpout station and
consult the directions there.
2. The holding tank cap is located on the starboard deck.
3. Apply tight seal with the pump nozzle and remove effluent.
4. Rinse the tank with hose water and repeat the pumpout.
5. Flush the pumpout hose with sea water and replace.
6. Place ½ cup of holding tank deodorant in the toilet bowl and flush through. Deodorant located under
vanity.
7. Tighten the holding tank cap on the boat.
DO NOT ONFUSE THE HOLDING TANK AP AND THE DIESEL FUEL TANK FILLER AP. BOTH
ARE LABELLED. READ BEFORE USING EVERY TIME.

PAGE 9
Overboard Discharge:
The holding tank is above the water line and may also be
emptied overboard when NOT in U.S. Waters. By law,
NO overboard pumpout into sea water is allowed within
U.S. Waters. To empty the holding tank open the thru-hull
valve located in the lazarrett. It is important that every
member of the crew be informed on the proper use of the
marine toilet. The valves, openings, and pumps are small
and may clog easily. If the toilet clogs, it is YOUR
RESPONSIBILITY! Always pump the head for children,
so you can make sure nothing foreign is being flushed.
aution – Never put paper towels, tampons, Kleenex,
sanitary napkins, household toilet paper, or food into the
marine toilet. Use only the special dissolving marine toilet tissue provided by AY .
WATER SYSTEM
Fresh Water Tank
The fresh water tank holds 42 gallons in a single tank located under the forward stateroom mattress. Be
mindful of the amount of water you use while washing dishes and taking showers. To refill the tank, remove
the filler cap located on the port side forward. Attach the hose to the dock spigot and let run for a minute
before inserting into deck fitting. Avoid flushing debris from the deck into the tank opening. Please DO
NOT fill water and diesel at the same time!
Waste water from the sinks in the galley and head drains overboard through various thru-hulls located under
the sinks. The shower drain is pumped overboard by two 12 volt pumps with in-line fine mesh strainer.
Fresh Water Pump
The fresh water pump is located under the starboard
settee. Activate the pump at the electrical panel by
turning on the circuit breaker. If the water pump
continues to run for more than a few seconds, you are
either out of water or might have an air lock and need
to bleed the system by opening a faucet. If you run
out of water, SHUT OFF THE WATER HEATER on
the electrical panel, as serious damage can occur!
Water Heater
The water heater has a 6 gallon capacity tank, and
heats when connected to shore power or from the heat
exchanger when the engine is running. To use in the A mode, turn on the water heater circuit breaker on
the electrical panel. The water will heat automatically when the engine is running.
Do not use the water heater if the water tank level is very low.
Water Pump
Bildge Pump

PAGE 10
Shower
To conserve water, take only very short “boat” showers by turning off water between soaping and rinsing.
To keep shower tidy and the boat dry, wipe down the shower stall and floor when finished. heck for
accumulation of hair in the shower and sink drains. An additional fresh water shower is located in the
swimstep area. Ensure that the faucets and nozzle are completely off after use.
GALLEY SYSTEMS
Propane Stove/Oven
The galley has a two burner gimbaled propane stove with oven. It is fueled from a propane tank located aft
of the starboard lazarette. The manual valve on the top of the tank should be kept closed whenever the stove
is not in use. When opening the valve, turn until it is all the way open and just snug, otherwise gas may seep
around the valve stem. Propane is heavier than air, so the gas will collect in the bilge. Therefore, the tank
valve should be turned off prior to retiring for the evening, while cruising, and upon returning the boat at the
end of your charter.
To turn the propane on:
1. heck to see burners and oven are turned off.
2. Turn on the propane tank valve.
3. Turn on the circuit breaker switch marked “Gas Valve” on the electrical panel. The orange light over
stove will come on.
To light the burners:
1. Turn burner knob on and continue to hold the knob in while pushing the spark button or clicking the
handheld butane lighter to light the burner. (Should the burner not light, be certain that you push the
knob in as you turn it back off).
2. ontinue to hold the knob in for a few seconds, as it needs to warm the thermo-coupler before it will
stay lit to avoid gas leakage.
To light the oven or broiler:
Push and turn the oven/broiler knob to the desired position. Hold the button in while clicking the handheld
butane lighter to light the broiler or oven. Hold the button in for 10 to 15 seconds, as it needs to warm the
thermo-coupler before it will stay lit to avoid gas leakage. Should the broiler or oven not light, be certain
that you push the knob in as you turn it back off.
For cooking underway, the stove is gimbaled. Un-latch the base of the stove to allow it to swing freely. Re-
latch upon returning to dock.
After using the stove or oven:
1. Turn the propane solenoid switch off. Light over stove goes out.
2. Turn the “Gas Valve” switch off on the electrical panel.
3. lose the valve on the propane tank before retiring for the evening, and at the end of your charter.
A full tank of propane normally lasts a little more than two weeks.
Refrigeration
Turn on refrigeration circuit breaker at the electrical panel and set the desire temperature inside the
refrigerator. Tupperware containers are left aboard for help in organizing supplies. Ice cube trays are also
aboard. They can be left in the freezer area, or that area can be used to keep meat frozen until use. There is a
deep cold storage space in the bottom. This area is hard to get to, so plan ahead.For the most efficient use of
the refrigerator, place one or two bags of ice in the base of the refrigerator. This will allow turning off the

PAGE 11
refrigerator at night to conserve batteries. Turn the refrigerator on while motoring, or when connected to
shore power.
Barbeque
The barbecue is normally kept mounted on the stern rail, although high winds may require its temporary
storage below. Attach a propane bottle to the regulator (found with the barbecue or in the cabin locker
above, and forward of, the navigation station). arefully light the unit, preferably with a handheld butane
lighter. The barbecue generates a lot of heat and cooks hot and fast. If necessary to store the barbecue unit,
do so only when it has cooled. Please wipe with a paper towel before storing to prevent grease and dirt from
soiling the boat.
Note: Propane bottles are not sto ked by AYC. You will need to pur hase one if extras are not found on
board.
aution -- For safety reasons, do not store an opened propane bottle within the salon or engine
compartment. hances are these will leak slightly once opened and propane gas could settle into low spaces.
Store these bottles in the propane locker in the cockpit. Ensure flammable materials are not near the
barbecue.
HEATING SYSTEMS
Forced Air Diesel Furnace
Andiamo is equipped with a Webasto diesel forced air furnace. The furnace provides heat in the same way
as a household furnace. The air outlet vents are in the aft stateroom and salon. The forced air furnace
operates on the 12 volt D system.
To turn on furnace:
Turn on the toggle switch located at the navigation station. Set the thermostat to the desired temperature.
heck the furnace exhaust located on starboard side of the transom for any obstructions such as fenders or
lines. Do not block this opening when operating the furnace, as the exhaust heat will damage fiberglass or
rubber.
When using the forced air furnace, you may hear a slight clicking sound from under the mattress in the aft
stateroom. This is a small fuel pump. Monitor fuel level and battery charge more often if forced air furnace
is being used. Turn the forced air furnace off by turning the switch off.
Space Heater (110 Volt AC)
A 110 volt A space heater is available when connected to shore power. This heater should be located
during your orientation. Be sure to place this heater away from flammable materials when it is turned on.

PAGE 12
ELE TRONI S SYSTEMS
All electronics manuals are located in the locker above
and forward of the navigations station.
VHF Radio
Andiamo is equipped with a marine VHF radio. The
Federal ommunications ommission (F ) licenses
it as a ship station. This radio can be an extremely
valuable source of information, such as weather and
tides. In an emergency, it is a vital source of assistance.
It can also provide telephone contact with people on
shore through the marine operator. The operation of this
station is strictly controlled by Part 80 of the F rules
and regulations, and the ommunications Act of 1934.
You should review the communications section of
hapman’s Piloting to familiarize yourself with these
rules before using the transmitter.
Depth Sounder/Boat Speed
These instruments are Raymarine ST60 series mounted
on the binnacle. Each has a cover which should be in
place when not in use. When removed, store them below
in the locker forward of the navigation table. The depth
sounder should provide reliable readings in shallow
waters. If in doubt, switch it off. Then turn it back on to reset. If your reading is blinking, it is a false
reading. False readings can occur in depths of more then 200 feet, or in areas of strong currents or tides.
Chart Plotter/Global Positioning System (GPS)
A fixed mount Raymarine GPS hartplotter is also mounted on the binnacle. Refer to the onboard
Raymarine manual for operating instruction. The GPS does integrate with the Raymarine autopilot.
Autopilot
Andiamo is equipped with a Raymarine ST4000+ Autopilot. Refer to the onboard Raymarine manual for
operating instructions.
GPS is considered a navigation aid. Do not rely on it. Compasses, charts, and dividers are
the tools to plot position, course, and speed.
AM/FM Stereo Radio/CD Player
The AM/FM stereo radio D player is located at the navigation station. It operates like a normal car radio.
Turn the stereo on and off at the electrical panel with the “Instruments” switch. Switching to “Aux” input
allows you to plug in an iPod by means of the cable with 3.5mm connector in the chart table.

PAGE 13
BILGE PUMPS
Andiamo is equipped with a 33 GPM bilge pump with a separate automatic float switch. The pump master
switch located on the electrical panel will turn the pump on for testing, however the pump is permanently
wired for automatic operation. You may occasionally hear the pump operate due to condensation. An
auxiliary, hand operated, bilge pump is operated in the cockpit using the handle provided for that purpose.
The handle is stored under the lid of the starboard cockpit lazarette. This is used only in emergency
situations.
THRU-HULL SEA COCKS
Sea cocks are open when their handles are in line with plumbing (typically vertical), and closed when
perpendicular to plumbing (typically horizontal). All sea cocks (except as noted herein) are normally left
open while cruising. Please leave all open when returning the boat.
Below water line sea cock locations (also refer to thru-hull diagram):
• Raw water engine intake (under aft stateroom mattress)
• Prop shaft intake (under aft stateroom mattress)
• Galley sink drain (under sink)
• Head sink drain (under head sink)
• Head seawater intake (under head sink)
• Depth sounder (V berth sole)
• Holding Tank overboard discharge (starboard lazarette)
DODGER AND BIMINI
Andiamo is equipped with a dodger and bimini .The dodger windshields may be cleaned with “Mirror
Glaze lear Plastic leaner 17,” and a soft cloth found aboard. Please do not use regular window cleaner
and/or paper towels, as they will scratch the material. Please do not fold the bimini or remove the bimini or
dodger canvas.
SAFETY EQUIPMENT
First Aid Kit
The ship’s first aid kit is located in the head behind the mirror or on the shelves about the toilet. Please
notify AY of any items used from this kit during your trip so they may be replaced.
Fire Extinguishers
There are four fire extinguishers aboard. One is located in the V-Berth. The second is located in the aft
stateroom locker on the bulkhead that adjoins the galley. One is in the lazarette and one is in the salon.
Signaling Flares
The emergency flares are in the compartment forward of the Navigation table.
Life Jackets
Personal flotation devices (life jackets) are stored in the yellow lifejacket bag in the starboard lazarette.
Steering Gear Failure
In the event of steering gear failure, remove the round cover located under the helm seat and insert the
emergency tiller. The emergency tiller is stowed in the starboard cockpit lazarette.
Engine Spares/Tools
The engine spares box is stowed under the starboard settee. This includes oil filter, raw water impeller,
pump parts, and other small parts. There are various tools stored in the starboard settee.
Table of contents
Popular Boat manuals by other brands

Bayliner
Bayliner 285 Cruiser owner's manual

HSR
HSR S4 Standup 2007 Service manual

PURSUIT
PURSUIT LS 265 owner's manual

SKEETA FOILING CRAFT
SKEETA FOILING CRAFT SKEETA Rigging guide

Horizon Yacht Charters
Horizon Yacht Charters Bavaria 37 2017 Jitterbug Operation manual

Zodiac
Zodiac CADET ROLL UP 200 owner's manual