manuals.online logo
Brands
  1. Home
  2. •
  3. Brands
  4. •
  5. Andrew James
  6. •
  7. Oven
  8. •
  9. Andrew James AJ000186 User manual

Andrew James AJ000186 User manual

This manual suits for next models

1

Other Andrew James Oven manuals

Andrew James Mini Oven with hobs User manual

Andrew James

Andrew James Mini Oven with hobs User manual

Andrew James 12L Convector Halogen Oven User manual

Andrew James

Andrew James 12L Convector Halogen Oven User manual

Andrew James AJ000548 User manual

Andrew James

Andrew James AJ000548 User manual

Andrew James AJ000215 User manual

Andrew James

Andrew James AJ000215 User manual

Andrew James 33L Mini Combi Oven User manual

Andrew James

Andrew James 33L Mini Combi Oven User manual

Popular Oven manuals by other brands

Brandt FC 222 user manual

Brandt

Brandt FC 222 user manual

aumate TOA20M04N-1E instruction manual

aumate

aumate TOA20M04N-1E instruction manual

Maytag CWE4100AC - 24" Single Electric Wall Oven Dimension Guide

Maytag

Maytag CWE4100AC - 24" Single Electric Wall Oven Dimension Guide

Kernau KBO 1076 S PT B instruction manual

Kernau

Kernau KBO 1076 S PT B instruction manual

Bosch HB 37 N Series User manual and installation instructions

Bosch

Bosch HB 37 N Series User manual and installation instructions

Electrolux EOD5420AA user manual

Electrolux

Electrolux EOD5420AA user manual

Mx Onda MX-HC2183 instruction manual

Mx Onda

Mx Onda MX-HC2183 instruction manual

Daewoo F6EV19SM2 Service manual

Daewoo

Daewoo F6EV19SM2 Service manual

Blodgett MT3870 Specifications

Blodgett

Blodgett MT3870 Specifications

GE ZET2F owner's manual

GE

GE ZET2F owner's manual

GE JK3000DF3WW owner's manual

GE

GE JK3000DF3WW owner's manual

eka EKF 523 NT Operating and instruction manual

eka

eka EKF 523 NT Operating and instruction manual

AEG Electrolux E3191-5 user manual

AEG Electrolux

AEG Electrolux E3191-5 user manual

Pratica Rocket Express quick start guide

Pratica

Pratica Rocket Express quick start guide

Viking Professional VGSO260T user guide

Viking

Viking Professional VGSO260T user guide

FM RX203 instruction manual

FM

FM RX203 instruction manual

Bosch HBN331 9B Series instruction manual

Bosch

Bosch HBN331 9B Series instruction manual

NEFF B95M42N0MK Instructions for use

NEFF

NEFF B95M42N0MK Instructions for use

manuals.online logo
manuals.online logoBrands
  • About & Mission
  • Contact us
  • Privacy Policy
  • Terms and Conditions

Copyright 2025 Manuals.Online. All Rights Reserved.

1
Please read the manual fully before using the appliance and keep the
manual safe for future reference.
12L Premium Halogen Oven
2
Safety Instrucons
When using any electrical
appliance, basic safety
precauons should always be
followed, including:
• This appliance can be used
by children aged from 8
years and above and
persons with reduced
physical, sensory or mental
capabilies or lack of
experience and knowledge if
they have been given
supervision or instrucon
concerning use of the
appliance in a safe way and
understand the hazards
involved. Children shall not
play with the appliance.
Cleaning and user
maintenance shall not be
made by children unless
they are older than 8 and
supervised. Keep the
appliance and its cord out of
reach of children less than 8
years old.
• Always ensure the voltage
on the rang label
corresponds to the voltage
in your home.
• Check the power cord and
plug regularly for any
damage. If the cord or the
plug is damaged, it must be
replaced by a qualied
electrician or a service
repair centre. If in doubt
please contact our customer
service team.
• The appliance is intended
for domesc use only.
Industrial or commercial use
will void the warranty. The
supplier cannot be held
responsible for injury or
damage if the appliance has
been used for anything
other than its intended use.
• Incorrect operaon and use
can damage the appliance
and cause injury to the user.
• Do not use the appliance if it
has been dropped or
damaged in anyway. If the
unit has been damaged take
the unit for examinaon and
or repair by an authorised
service agent.
• Do not immerse or expose
the motor assembly, plug or
the power cord in water or
any other liquid for any
reason.
• If the supply cord is
3
damaged, it must be
replaced by the
manufacturer or by
someone who is suitably
qualied to avoid a potenal
hazard.
• Do not let the cord hang
over the edge of a table or
counter. Ensure that the
cord is not in a posion
where it can be pulled or
tripped over accidentally.
• Do not allow the cord to
touch hot surfaces and do
not place the cord near hot
gas, electric burners or in a
heated oven.
• Use of an extension cord
with this appliance is not
recommended. However if it
is necessary to use an
extension cord, ensure that
the extension cord is equal
to or greater than the power
consumpon of the
appliance to avoid
overheang of the appliance
and extension cord. Do not
use any other appliance on
the extension cord. Do not
place the extension cord in a
posion where it can be
pulled on by children or
animals or be tripped over.
• Always operate the
appliance on a smooth, even
and stable surface. Do not
place the unit on a hot
surface.
• Always remove the plug of
the appliance safely. Do not
pull on the appliances cord
to remove the appliance
plug from the electrical
socket.
• Never handle or operate the
appliance with wet hands.
Appliance specic safety
advice
• Only use the appliance
indoors.
• Place the appliance on a
level, sturdy and heat
resistant surface.
• Do not move the appliance
when in use.
• Do not place the appliance
close to other objects when
it is in use.
• Only use the handle to li
the lid.
• Posion the mains cable so
4
that it does not come into
contact with hot surfaces or
objects.
• Do not use the appliance in
the oven, on a stove top or
near a gas source.
Posioning the appliance
• Do not place the appliance in
the immediate vicinity of a
naked ame or a heat source
such as hot plates, oven etc.
• Protect the appliance from
spray and drops of water.
Damage to the appliance
• If the appliance is defecve,
do not aempt to carry out
repairs yourself. In the event
of damage, contact
customer services.
• If water gets into the
appliance or if it is damaged
in any other way, it will need
to be checked by a qualied
electrician or service agent.
• Always li the halogen oven
lid by the handle located on
the front of the control
panel.
• Do not allow the lid to get
wet. Do not immerse the
appliance in water or any
other liquid for any reason.
• Always leave the top in the
“up” posion whenever the
bowl is removed.
Warning!
All surfaces of the
halogen oven will get
very hot during the
cooking process, avoid
touching these surfaces
before the oven cools as this
may cause an injury.
Do not touch any part of the
oven other than the handles
unl it has cooled down. Aer
the glass bowl has cooled
down, hold the bowl with a
dry cloth or a suitable oven
glove to avoid the risk of
burning.
Please note: The stainless
steel extender ring comes
packaged around the glass
bowl. To use it, li the bowl
out of the ring, and place the
ring on top of the glass bowl.
The halogen oven head can
be raised as outlined in the
instrucons
5
Components Diagram and accessories
1. Base with plasc handles for glass oven dish
2. Glass oven dish
3. Lid with me and temperature dials built-in heang element and mains cable
4. High food grill
5. Tongs
6. Low food grill
7. Baking tray
8. Lid holder
9. Extender ring
10. Steam tray
Rice dish– Sold Separately
1.
2. 3.
4.
5.
6.
7.
8. 9. 10.
Rice dish
6
Controls Diagram
11. Handle
12. Operaon light
13. Safety switch
14. Heat control light
15. Time-seng dial
16. Temperature control dial
7
Before rst me use
Before using the appliance for the rst
me please ensure that:
• The appliance is unpacked and
checked for damage during transit.
• The appliance and all the accessories
are cleaned before use.
• The unit is standing on a sturdy, level
and heat resistant surface.
• The mains cable cannot come into
contact with hot surfaces or objects
• The glass oven dish (2) is correctly
posioned in the base (1).
• The correct food grid (4/6) is inserted.
• Please ensure you only use re-
resistant cookware (e.g. made of
glass, ceramic or metal).
Unpacking the appliance
• Unpack the appliance and accessories.
Check all components are present and
inspect them for any damage that
may have occurred during transit.
• If you do nd any damage which has
occurred during transit, contact
Customer Services.
Cleaning the appliance before rst me
use
• There is a risk to health if the
appliance is not cleaned. Clean the
appliance components thoroughly .
• Appliance components may be
contaminated with producon
residues.
• Improper cleaning may damage the
appliance.
• Base (1) lid (3) high food grill (4) low
food grill (6) baking tray (7) extender
ring (9) and steam tray (10) are
unsuitable for dishwasher cleaning.
• Base (1) and accessories
(4/6/7/9/10) should be thoroughly
cleaned with mild detergent and
warm water.
• Leave all the appliance components
to dry out thoroughly.
Assembling the appliance
 Place the base (1) on a at, sturdy
and heat resistant surface.
 Place the glass oven dish (2) in the
base.
 Insert the food grids (4/6) into the
glass oven dish. If necessary, insert
the food grids with the handle (5).
 Carefully place the lid (3) on the
glass oven dish.
Using the appliance
Risk of re from hot surfaces! The
appliance gets very hot during
operaon wear oven gloves when
handling the appliance.
8
• The appliance features a safety switch
(13). The appliance can only be
switched on when the handle is
clipped down. As soon as the handle is
raised, the appliance switches o.
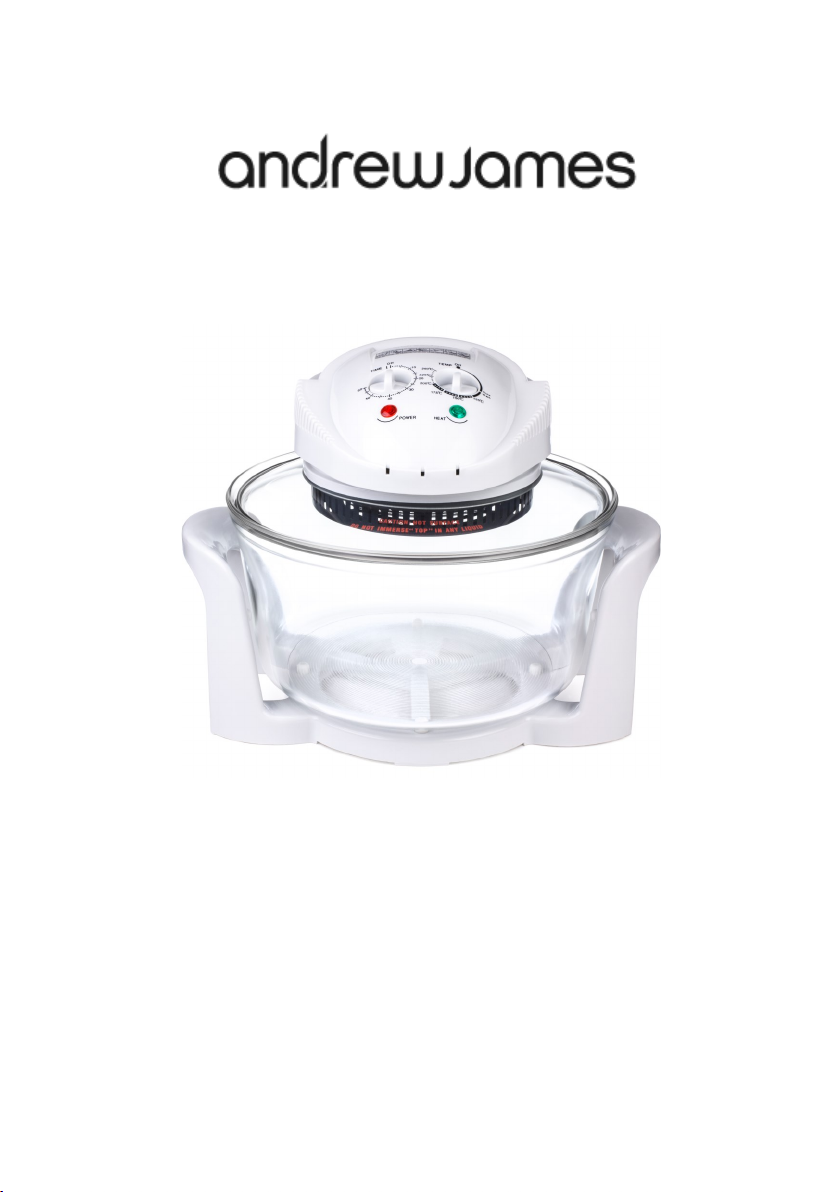
• Use the temperature-control dial (16)
to switch the appliance on or o and
adjust the temperature. When the
heang element in the lid (3) is
heang up, the heat control light
comes on (14).
• You can use the me-seng dial (15)
to select the cooking me. When the
appliance is on, the operaon light
(12) remains lit.
Seng the cooking me
• Turn the me-seng (15) clockwise
only.
• The me-seng dials mechanism can
be damaged if it is turned in an an-
clockwise direcon
• A cooking me of between 0 and 60
minutes can be set using the me
seng dial (15).
• Turn the me (15) clockwise to the
desired me. At the end of the set
me, an audible signal sounds and the
appliance switches itself o.
Seng the temperature
A cooking temperature of between 0˚c
and 250˚c can be set using the
temperature-seng dial (16).
1. Turn the temperature-control dial
(16) to the selected temperature.
The heang element heats up unl
the selected temperature is reached,
at which point the heang element
switches o automacally. If the
temperature decreases in the
appliance, the heang element
switches back on again.
Please be aware that the me seng
dial (15), heat seng dial (16) must be
turned on and the handle (11) must be
down for the halogen oven to operate.
The bulb will switch o when it reaches
the required temperature, and will
switch back on again when it needs to
heat the Halogen Oven up.
Seng the defrost funcon
The appliance features a defrost
funcon. The defrost funcon is set
using the temperature-control dial (16).
1. Turn the temperature control dial to
the thaw seng.
2. Set the desired me.
Recipes
Chips
Potatoes
Olive oil
Seasoning
9
1. Place the airfryer aachment in the
rim of the Halogen Oven bowl.
Preheat the Halogen Oven at 200°C.
2. Peel and cut the chips to the required
thickness. Drizzle in olive oil and mix
unl all coated. Season to taste.
3. Place an even layer of chips onto the
airfryer and set the me to 30
minutes.
4. Turn chips halfway through cooking
for even colour.
Root vegetables
1. Cut the root vegetables (e.g. parsnips,
carrots & turnip) into chunks.
2. Take a piece of n foil large enough to
hold the vegetables.
3. Place the vegetables in the middle of
the n foil and fold the sides of the n
foil up creang a parcel.
4. Add 2 tablespoons of water to the
vegetables before sealing the n foil
parcel.
5. Place the parcel of vegetables onto
the steamer tray on a low rack in the
halogen bowl, replace the lid and
place the handle down. Set the
temperature to 250°C for 26 minutes.
6. Before removing parcels from the
Halogen Oven, test with a knife to
ensure they are cooked as required.
Tips for steaming vegetables
• So vegetables should be cooked for
around 15-20 minutes.
• Hard vegetables should be cooked
for around 30 minutes.
• Potatoes with a skin on should be
pierced with a fork and placed in the
oven for 35-40 minutes.
Bake Pizza
1. Turn the me dial and preheat the
oven at the temperature
recommended on the pizza
packaging.
2. Place the pizza on the steamer tray,
onto the low rack in the Halogen
Oven bowl.
3. Turn the mer dial and cook the
pizza for 15 minutes, unl golden
and crispy.
4. Remove from the oven and serve.
Please note: The me and temperature
may need to be adjusted according
the size and topping of the pizza.
Crumpets and Toasng Muns
Method
 Prepare crumpets/toasng muns
as required.
 Place the crumpets/toasng muns
on the high rack.
 Turn the temperature dial to 250°C.
10
 Turn the me dial to 5 minutes.
 Aer 3 minutes, turn the crumpets/
toasng muns over.
 Cook for a further 2 minutes.
 Remove and serve.
The following aachments can also be
purchased separately from our website:
www.andrewjamesworldwide.com
Airfryer Aachment
Breakfast Rack
Cake/Rice Dish
Airfryer Aachment Recipes
Roasted Vegetables
Ingredients
2 Sweet potatoes
1 red pepper
1 yellow pepper
1 red onion
Olive oil
Mixed herbs
Method
1. Place the airfryer aachment in the
rim of the Halogen Oven bowl.
Preheat the Halogen Oven at 180°C.
2. Peel the sweet potatoes and cut into
chunks. Coat in a drizzle of olive oil
and sprinkle with mixed, dried herbs.
3. Lie the sweet potato chunks on the
airfryer mesh evenly, in one layer.
4. Cook the sweet potato for 13
minutes.
5. Prepare the peppers and onion.
Drizzle in oil and sprinkle with mixed
herbs.
6. Lie the peppers and onion on the
airfryer mesh evenly, in one layer.
7. Cook all of the vegetables together
for a further 15 minutes.
8. Once cooked, remove from oven and
serve.
Scky Honey Chicken Wings
Ingredients
12 chicken wings
3 tbsp. honey
3 cloves of garlic
25ml soy sauce
50g brown sugar
3 tbsp. cornour
Sesame seeds
Method
1. Place the airfryer aachment in the
rim of the Halogen Oven bowl.
2. Half the chicken wings at the joint.
3. Crush the garlic .