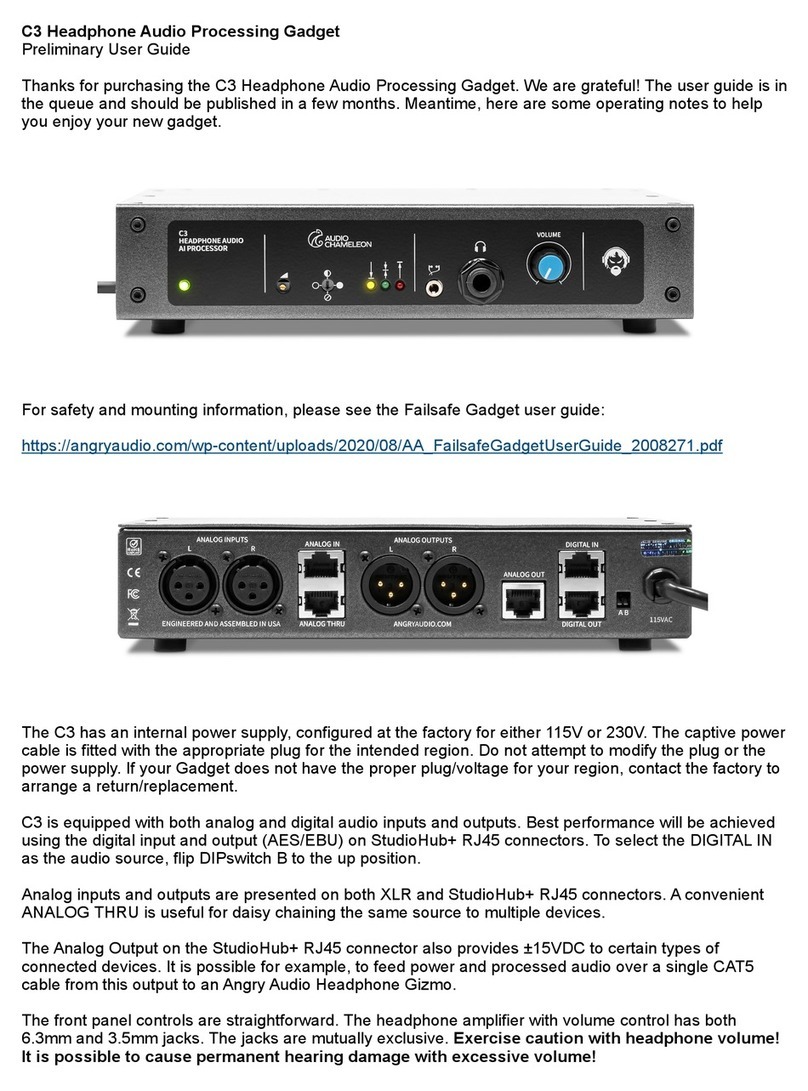
Angry Audio AUDIO CHAMELEON C3 User manual

ANGRY AUDIO
PHONE
+1 (615) 763-3033
WEB
answers@angryaudio.com
www.angryaudio.com
ADDRESS
128 HOLIDAY CT STE 118
Franklin TN 37067 USA
USER GUIDE
P/N 991035
Revision 1.0
Chameleon C3
Headphone Audio Processor

1 Welcome! Safety First 2
Welcome to the world of Angry Audio,
home of Audio Chameleon.
Since the beginning of time, man has sought to control the sounds of his
environment. Cave-dwellers needed to eliminate echo, hunter/gatherers
wanted low-pass lters for mastodons, and early settlers of Peru’s high
mountains had a deep desire for eective peak control (get it?).
Seriously though – engineers from the dawn of broadcasting have sought to
tame the dynamics of their content with ever-improving technology. The rst
analog limiting ampliers gave way to multi-band processing, which in turn
was supplanted by DSP. But getting the basics right and sweating the details –
those things will never be obsolete.
A good studio is built by including components that make it a convenient and
enjoyable place to create the content that dazzles your listeners, drives trac
to your advertisers, and lets you keep the summer place in Jackson Hole.
Accordingly, every Angry Audio product – including this Chameleon audio
processor – is designed to solve common yet critical problems, and is
meticulously engineered with performance and longevity in mind to deliver
pristine audio and reliable performance for many years.
Our promise and guarantee.
Folks who install Angry Audio products generally think they’re the bee’s knees,
and we hope you’ll feel the same. That’s why we give you 30 days to laugh, cry,
and hug it out with your Chameleon audio processor. If you nd you lack the
emotional attachment you were hoping for, we’ll buy it back.
Every Angry Audio product is warrantied to be free from defects in parts and
workmanship for two full years after you purchase it. If it fails within this time
period, Angry Audio, at its discretion, will repair or replace it so long as you
let us know of the failure within the warranty period and can provide proof of
purchase in the form of a dated sales receipt. You can call us at +1 615-763-
3033, or reach us online at www.angryaudio.com/contact.
Making a good rst impression.
When you unbox your Chameleon audio processor, we hope it makes a good
rst impression and you take a moment to appreciate the lengths we’ve gone
to in order to create a “built for broadcast” product. All of our products are
over-engineered to provide long-term reliability and guaranteed RFI immunity.
Some of this is apparent – such as the durable powder-coated steel enclosure
- but much of this goodness is invisible, like the premium components within.
Even if you can’t see it, you’ll hear it!
A word or two about safety.
The fact that you’ve purchased an Angry Audio product proves without doubt
that you’re an intelligent person – not the sort who would intentionally re up
a kerosene heater in the house, or drop a frozen turkey into a vat of boiling
oil. Nevertheless, our legal eagles tell us we must provide some boilerplate in
order to guard against the unexpected.
Audio gadgets aren’t nuclear generating stations or air trac control consoles,
but they are still intended for use by qualied personnel. To avoid electric
shock, do not open the unit or attempt to perform any servicing unless you
are qualied to do so.
Chameleon audio processors have an internal 120VAC / 240VAC power supply.
Hazardous voltages are present whenever the unit is plugged in and may still
be present on certain components even when the unit is unplugged.
The power cord is the primary disconnect device and so the outlet providing
power to the unit should be easily accessible. In other words, make sure you
can pull the plug in case of emergency. Use only a properly grounded outlet
for power. Do not cut the ground pin or use a ground-lifting adapter, and do
not defeat the polarized plug. Do not overload outlets.
Do not expose your Chameleon to rain or moisture. Do not block any
ventilation openings, as lack of airow could damage the unit or create a re
hazard. Any electronic device can fail without warning; do not use this product
in applications where a life threatening condition could result due to failure.
Exercise caution with headphone volume. Permanent hearing damage
may result from excessive volume.
Never operate your Chameleon audio processor while driving; a car is a
dangerous weapon. Do not attempt to feed raccoons by hand unless you
think the nickname “Stumpy” will bu your status within your social circle. And
for heaven’s sake, throw out those powder-blue Sansabelt slacks you got in
1979. You’re never going to get down or boogie-oogie-oogie in those again.

3 Rack Mounng Wall Mounng 4
Mounting your Chameleon in a rack.
Your Chameleon audio processor sits on four rubber feet that ensure it won’t
slide o the edge of your Lucite desk when your yacht heels over too hard.
If you prefer to rack mount your Chameleon, you’ll need the optional Rack
Mount Kit which allows one or two units to be installed side by side in a
standard 1RU rack space.
Each Rack Mount Kit consists of a custom rack panel with cutouts for all front
panel controls and displays. A blank ller panel is also provided if you are
mounting only one unit.
When rack mounting, remove the four rubber feet (“A”) from the bottom of the
gadget with a #1 Phillips screwdriver.
Remove the four front panel 3/32” hex screws (“B”). You can rummage around
your toolbox for your own hex key, or use the one we thoughtfully provide in
the mounting kit.
Line up the Chameleon so that the
holes exposed after removing the
socket head screws line up with the
mounting holes (“C”) in the rack panel.
Attach the rack panel to the front of
your unit with the same screws you
just removed. If you dropped one and
it immediately got lost in the shag
carpet (as these things always do),
don’t panic – we’ve included spares in
the kit.
Finally, use the provided rack screws
(all four, please) to mount your
Chameleon.
Attaching your Chameleon to a wall.
We can’t for the life of us image why you’d want to wall-mount an audio
processor, but hey – you might. And if you prefer to secure your unit to the
inside of a rack, cabinet, or other at surface, the optional Wall Mount kit
comes in handy.
Each Wall Mount Kit includes two brackets, four No. 6 screws, and four cup
washers.
Remove the four rubber feet (“A”) from the bottom of the gadget with a #1
Phillips screwdriver, being careful to save the screws.
Align the bracket holes with
the holes in the bottom of
the gadget, then attach the
brackets using the screws
removed from the rubber feet.
Use the four No. 6 screws
(“B”) and the four cup washers
(“C”) to secure the gadget to
a plywood surface. Drilling
pilot holes is recommended to
reduce the risk of splitting the
wood.
Dierent hardware (not
supplied) will be required if
you are mounting the gadget
to a drywall (or other) surface.
Remove 4 rubber feet (A) from bottom of gadget using #1 phillips screwdriver.
Remove 4 socket head screws (B) from front of gadget using 3/32IN hex key.
Line up gadget so that the holes exposed after removing socket head screws
line up with the mounting holes (C) in the rack panel. Use 4 socket head
screws (B) to secure the gadget to the rack panel.
A
Remove 4 rubber feet (A) from bottom of gadget using #1 phillips screwdriver.
Retain the screws. Align the holes in the wall brackets with the holes in the
gadget bottom. Attach the brackets using the screws removed from the rubber
feet. Use four No.6 screws (B) and four cup washers (C) as shown to secure
gadget to a plywood surface. Different hardware (not supplied) will be needed
if the mounting surface is drywall.
A
A
A
A
B
C

5 Under Counter Mounng Desktop Mounng 6
Mounting your Chameleon under a counter.
Your Chameleon can be mounted under a counter, desk, or table using the
optional Under Counter Mount Kit.
This kit includes two brackets, four No. 6 wood screws, and four cup washers
suitable for mounting to a plywood surface. Dierent hardware (not supplied)
may be needed if the mounting surface is a dierent material.
Remove the four rubber feet (”A”) from the bottom of the unit using a #1
Phillips screwdriver, being careful to save the screws.
Line up the brackets (“C”) so that their
mounting holes line up with holes exposed
after removing the rubber feet. Orient the
brackets as shown in the diagram to the
right so that the deeper at side supports
the gadget and the “notched” side faces the
under-mount surface.
Use the pan-head screws (“B”) removed from
the rubber feet to secure the brackets to the
gadget.
Use the four provided No. 6 screws
(“D”) and the four cup washers (“E”)
as shown in the diagram to the left
to secure the gadget to the plywood
underside of the counter, desk, or
table.
Drilling pilot holes is recommended
to reduce the risk of splitting the
wood.
Using your Chameleon on a desktop.
If you like the idea of using the Chameleon on a desktop but prefer a more
permanent installation along with the convenience of having it angled up
toward the user, we’ve got you covered with the optional Desktop Bracket Kit.
This kit includes two brackets, four No. 6 wood screws, and four cup washers
suitable for mounting to a plywood surface. Dierent hardware (not supplied)
may be needed if the mounting surface is a dierent material.
Remove the four rubber feet (“A”) from the bottom of the unit using a #1
Phillips screwdriver, being careful to save the screws.
With the bottom of the Chameleon
facing up and the front panel facing
toward you, line up bracket “C” with
the holes exposed after removing the
feet on the right side of the gadget.
Orient the bracket as shown in the
diagram to the right so that the at
side is attached to the unit, and the
“notched” side sticks up with the notch
facing outwards. Use the pan-head
screws (“B”) removed from the rubber
feet to secure the brackets to the unit.
Use the four provided No. 6 screws (“E”)
and cup washers (“F”) as shown in the
diagram above to secure the gadget to
a plywood surface.
Drilling pilot holes is recommended to
reduce the risk of splitting the wood.
Remove 4 rubber feet (A) from bottom of gadget using #1 phillips screwdriver.
Line up brackets (C) so their mounting holes line up with the holes
exposed after removing feet. Orient the brackets as shown in the drawing.
Use 4 panhead screws (B) to secure the brackets to the gadget.
Use four No.6 screws (D) and four cup washers (E) as shown to secure gadget to a plywood surface.
Dierent hardware (not supplied) will be needed if the mounting surface is of a dierent material.
B
C
C
A
D
E
GADGET BOTTOM
GADGET BOTTOM A
Remove 4 rubber feet (A) from bottom of gadget using #1 phillips screwdriver.
Line up brackets (C) and (D) so their mounting holes line up with the holes
exposed after removing feet. Orient the brackets as shown in the drawing.
Use 4 panhead screws (B) to secure the brackets to the gadget.
B
C
D
E
F
Use four No.6 screws (E) and four cup washers (F) as shown to secure gadget to a plywood surface.
Dierent hardware (not supplied) will be needed if the mounting surface is of a dierent material.

7 The Chameleon C3 Back Story Controls & Connecons 8
“What do you mean, I can’t monitor o-air?”
Back in the analog days, when dinosaurs roamed the earth and promo 45s
were thick on the ground, on-air personalities jacked their headphones right
into a receiver tuned to their station. The station’s audio processing made
everything sound bigger and louder; they could hear everything the way the
listeners did and so adjust their voice and mic technique to achieve the sound
they wanted.
Unfortunately, when radio stations transitioned to digital audio processing,
delay was introduced into the signal chains. So much delay, in fact, that you
could almost do your rap, go get a burger and fries, and come back to the
station before the audio came out of the radio. It became impossible for talent
to listen live to processed station audio, and monitoring the dry, unprocessed
Program bus left talent feeling at.
To combat this problem, resourceful engineers sometimes rigged up a spare
analog processor for the talent, but not everyone had one lying around. Some
modern digital processors have a low-latency monitor tap, which is a good
solution if your processor lives in the studio with the talent — but processors
are usually located at the transmitter site, making that “fast” HP feed about as
useful as a screen door on a submarine.
The solution: Chameleon C3, a low latency multi-band audio processor plus
high-performance headphone amplier combined into a compact, easy to use
half-rack gadget.
To get that great “On the air!” sound, Chameleon uses a form of A.I. (a
benevolent form, not the evil Skynet kind) to continuously adjust its
parameters to t the content of your program audio. It does this far faster
than the threshold above which the human brain can detect latency.
When we say “easy to use”, we mean it. There are only 3 controls on the front
panel, and the air talent can only use one of them. Calibrate the output,
choose the level of processing, then sit back and let the jocks start thanking
you for giving them back their “air sound”.
Lights, controls and connectors, oh my!
Ah, that new gear smell. Let’s take a look at the tools at hand.
AB
Output volume control.
Adjusts output level
of both front-panel
headphone jacks.
Output level control.
Adjust this to calibrate
levels to other system
devices.
Activity LEDs indicate
processing, gating and
clipping activity.
Density control. Choose from
3 processing density options,
plus bypass.
¼” and 3.5mm
headphone jacks
supported.
Don’t make him angry.
You wouldn’t like him
when he’s angry.
AB
AES/EBU inputs and
outputs on StudioHub+
connectors.
Stereo analog inputs
provided in both XLR
and StudioHub+ format.
Stereo analog
outputs on XLR
connectors.
Analog pass-through on
StudioHub+ connector
lets you send input signal
to other devices.
Analog output on
StudioHub+ connector
delivers audio + power
to compatible devices.
DIP switches activate
active phase rotation
and select between
digital and analog
inputs.

9 Setup Operaon 10
Select your input source.
Chameleon C3 is equipped with both analog and digital audio inputs and
outputs on XLR and StudioHub+ RJ-45 connectors. A DIP switch on the rear
panel selects which input feed to use.
As shipped from the factory, analog is selected as the default input, but best
performance will be achieved by using the digital input and output (AES/EBU)
on StudioHub+ RJ45 connectors.
AB
To change the audio source, nd the DIP switches on the rear panel, adjacent
to the line cord. For ANALOG input, leave DIP switch B in the “down” position.
To select DIGITAL input, ip DIP switch B to the “up” position.
Feed other devices.
AB
The Analog section of the rear panel hosts two items to take note of. The
ANALOG THRU connector is useful for daisy chaining the same input source to
multiple devices. Let your imagination run wild!
The ANALOG OUT StudioHub+ RJ-45 connector provides audio and ±15VDC
to certain types of connected devices. For example, you could use this to feed
both power and processed audio over CAT5 from your Chameleon C3 to one
or more Angry Audio Headphone Gizmos (shameless plug) at guest positions
in your studio as illustrated below.
Processing controls.
Most audio processors are meant for on-air heavy lifting, and have so many
controls, knobs and displays that a PhD in Advanced Tweakage is required.
Chameleon C3, on the other hand, is so easy to use that there’s hardly any
tweaking to do. In fact, there’s only one processing adjustment. Put your
Craftsman Heavy-Duty Titanium Tweak Tool back in the cabinet with the tape
head demagnetizer to keep it from getting lonely.
Choose your desired audio processing mode using the selector switch on the
front panel:
The 6 o’clock position (🛇 symbol) is Bypass mode. This allows you to
compare processed audio with unprocessed audio during setup.
The 9 o’clock position (○ symbol) selects Open processing. This is the
lightest processor setting; it delivers good dynamic range with a light
amount of smoothing.
The 12 o’clock position (◐ symbol) selects Medium processing. This gives a
good amount of audio density, and is probably the setting most users will
prefer.
The 3 o’clock position (● symbol) selects Dense processing mode. It is the
most processed setting, and delivers consistent loudness to the user.
The recessed Calibration screw to the left of the processing selector
adjusts the output levels of the C3. This aects the headphone output as
well as rear-panel outputs. Use to calibrate the C3 to other output devices
in your studio.
Headphone controls.
Well, only one control really – the Volume knob at the far right of the front
panel. Thanks to its high-performance amplier design, the Chameleon
C3 delivers plenty of oomph to power even the most insensitive cans with
extremely clean sound, even at high output levels. Oomph is expensive these
days, but we didn’t skimp. The two jacks provided (¼” and 3.5mm) are mutually
exclusive.
AB

11 Operaon Specicaons 12
Phase rotation.
Chameleon C3 has a selectable phase rotator which may be enabled if
desired. Phase rotation keeps the highest peaks in the audio content positive,
which allows more modulation and helps content (especially voices) sound
fuller; phase rotation in the station’s audio processing was common back in
the day and was responsible for some of that “Boss Jock” sound. Switching this
on recreates this eect.
AB
The C3 Phase Rotator can be engaged or bypassed using rear panel DIP switch
“A”. Place switch A in the UP position to engage phase rotation; disengage by
setting the switch in the DOWN position.
The Activity Display.
The three LEDs found on the front panel tell you what’s going on inside
Chameleon C3’s processing engine.
AB
The Amber LED at left is the “Gain Lock” indicator. This indicates that
processing is frozen and that gating is active.
The Green LED at center tells you that the processing section is engaged
and audio is actively being processed.
The Red LED at right tells you that your audio is overdriving the C3’s inputs
and that clipping is occurring. Reduce input gain until the LED darkens.
Specications.
Part Numbers
North America: p/n# 991035
Australia: p/n# 991035A
Europe: p/n# 991035E
United Kingdom: p/n# 991035U
Included in the box: Chameleon C3 Processing Gadget
Pocket trimpot adjustment tool
Connections
Analog Input: Balanced +4dBu Stereo XLRF connectors
Balanced +4dBu Stereo RJ45F connector
(StudioHub+ pinout)
Analog Through: Parallel to Analog Input (StudioHub+)
Analog Output: Balanced +4dBu Stereo XLRM connectors
Balanced +4dBu Stereo RJ45F connector
(StudioHub+ includes ±15VDC)
Digital Input: Transformer isolated, AES/EBU, RJ45F connector
(StudioHub+) ASRC, 44.1kHz to 48kHz sampling rate
Digital Output: Transformer isolated, AES/EBU, 48kHz S/R,
RJ45F connector (StudioHub+)
Power and Environmental
Power Input: 115VAC 50/60Hz (North America Version)
230VAC 50/60Hz (Australia, Europe, U.K Versions
Power Consumption: 15VA
Operating Temp.: 0° to 40° C (32° to 104° F)
Storage Temp.: -20° to 45° C (-4° to 113° F)
Relative Humidity: 0% to 90% non-condensing
Cooling: Venting chassis (fanless)
Product Dimensions
Product Dimensions: 8.5 x 6.25 x 1.7 inches (21.6 x 16 x 4.32 cm)
Product Weight: 3.5 pounds (1.59 kg)
Shipping Weight & Dimensions
Shipping Dimensions: 12 x 9 x 6 inches (30.5 x 22.9 x 15.3 cm)
Shipping Weight: 5 pounds (2.27 kg)

13 Compliance Problem Solving 14
Compliance in the U.S.
In the U.S., this Gadget complies with the limits for a Class A computer device
as specied by FCC Rules, Part 15, Subpart J, which are designed to provide
reasonable protection against such interference when this type of equipment
is operated in a commercial environment.
…and in Canada.
In Canada, this Gadget does not exceed the Class A limits for radio noise
emissions set out in the Radio Interference Regulations of the Canadian
Department of Communications.
…and in Europe.
This Gadget complies with the requirements of the EEC Council Directives
93/68/EEC (CE Marking), 73/23/EEC (safety – low voltage directive), and
89/336/EEC (electromagnetic compatibility). Conformity is declared to
standards EN50081-1 and EN50082-1.
...and in Wonderland.
This Gadget complies with any and all directives set forth by the Red Queen
relating to audio electronic devices, pursuant to the All Ways Are My Ways Act
of 1865. No hedgehogs are harmed by the operation of this device.
Because who would want to harm an innocent hedgehog?
Studio Equipment Maintenance Decision Tree
It never fails: you’re headed to another jobsite or home for the weekend, and
there’s a maintenance call from the on-air booth. Here’s a handy owchart to
help determine your course of action.
Yes No
Is it the end
of the day?
Leave it alone
and
tell the jock to
keep an eye on it.
Does the stupid
thing actually
work?
Yes
Was it operator
error?
No
No
Did the jock mess
with it?
Did YOU mess
with it?
No
No
Did the jock SEE
you mess with it?
Yes
Can you blame it
on the jock?
Blame it on
the jock.
Yes
No
You dummy. Lucky!
Can you blame it
on management?
Yes Order parts.
Yes
Tell the P.D.
management didn't
spend enough on
maintenance.
Yes
Go home and wait
for parts to arrive.
When parts arrive,
fix the dang thing!
Call it a day.
Yes
Look professional
and say you've
fixed it.

15 Schemac 1 Schemac 1 16

17 Schemac 2 Schemac 2 18

19 Schemac 3 Schemac 3 20
Other manuals for AUDIO CHAMELEON C3
1
This manual suits for next models
1
Table of contents
Other Angry Audio Computer Hardware manuals
Popular Computer Hardware manuals by other brands

Shugart
Shugart SA810 owner's manual

Enclustra
Enclustra 103 Getting started guide

Analog Devices
Analog Devices EVAL-ADN4650EB1Z user guide

ST
ST STM32W-RFCKIT user manual

Konica Minolta
Konica Minolta SRX-101A Service manual

National Instruments
National Instruments Compact FieldPoint Mounting Accessories... quick start guide