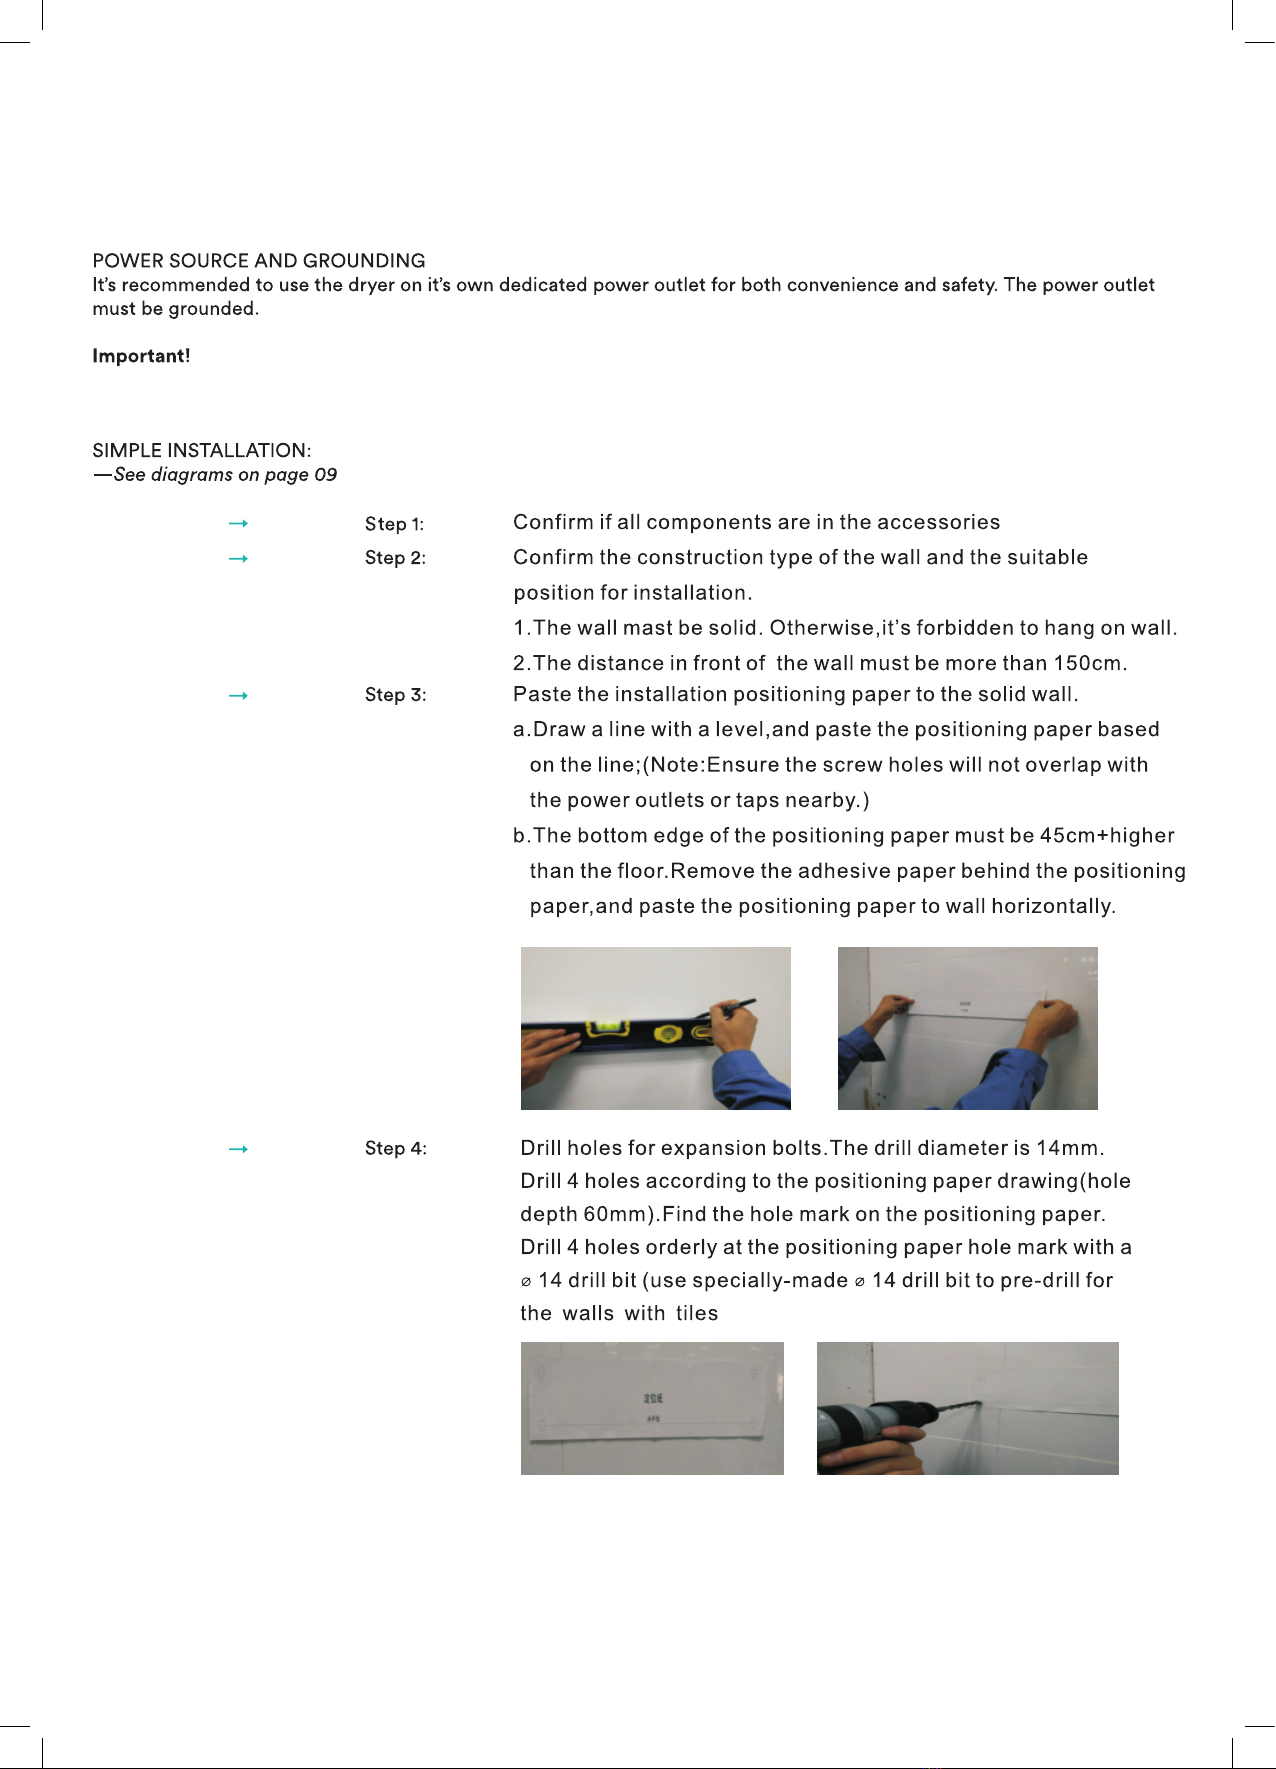
anko AVD7 User manual

Vented Clothes Dryer
7kg Capacity
Instruction Manual
Model no: AVD7
Rev: 01
To ensure proper operation of this device, please
read this instruction manual carefully before using
the device and keep it for future reference.

2
For future reference, please record the following information which can be found on the rating plate
and the date of purchase which can be found on your sales invoice.
STORE DETAILS
STORE NAME
|
ADDRESS
|
TELEPHONE
|
PURCHASE DATE
|
PRODUCT DETAILS
MODEL NO.
|
SERIAL NO.*
|
Purchase Details

3
Contents 2 Purchase Details
4 Safety Instructions
5 Before First Use
6 Your Vente Dryer
7 Control Panel
8 Installation
11 Accessory Kit Contents
12 Quick Start Guide
13 Operating Your Vented Dryer
15 Cleaning and Maintenance
16 Troubleshooting
18 Warranty

4
• This appliance is only intended for
use indoors only within a domestic
environment.
• This appliance is not intended for use by
persons (including children) with reduced
physical, sensory or mental capabilities,
or lack of experience and knowledge,
unless they have been given supervision or
instruction concerning use of the appliance
by a person responsible for their safety.
• Children should be supervised to ensure that
they do not play with the appliance.
• The dryer is not to be used with any clothing
articles which have had industrial chemicals
used for cleaning.
• The lint trap must be cleaned frequently—we
recommend after each use.
• Adequate ventilation must be provided.
• Never dry unwashed items with your clothes
dryer.
• Items that have been soiled with substances
including cooking oils, alcohol, petrol, waxes,
etc, should be thoroughly washed in hot
water with detergent before being dried
within your clothes dryer.
• Never use your clothes dryer to dry items
such as latex, foam rubber, waterproof
textiles, rubber backed articles, or pillows
fitted with foam.
• The final cycle of your clothes dryer
programs is a cool down cycle to reduce
the temperature of your clothes. This is
incredibly important to ensure that your
clothing items won’t be damaged. NEVER
stop your clothes dryer before the end of its
drying program unless all items are quickly
removed and spread out to ensure the heat
is dissipated.
• Ensure all objects are removed from pockets.
• If the power cord is in any way damaged it
must be replaced by the manufacturer, its
service agent or a qualified and licensed
electrician.
UNPACKING
• During transportation, protective packaging
was used to protect the appliance against
any damage. After unpacking, please
dispose of all elements of packaging
in a way that will not cause damage to
the environment. All materials used for
packaging the appliance are environmentally
friendly; they are 100% recyclable and are
marked with the appropriate symbol.
Caution! During unpacking, the packaging
materials (polythene bags,
polystyrene pieces, etc.) should be
kept out of reach of children.
DISPOSAL OF THE APPLIANCE
• Old appliances should not simply be
disposed of with normal household waste,
but should be delivered to a collection and
recycling centre for electric and electronic
equipment. A symbol shown on the product,
the instruction manual or the packaging
shows that it is suitable for recycling.
• Materials used inside the appliance are
recyclable and are labeled with information
concerning this. By recycling materials
or other parts from used devices you are
making a significant contribution to the
protection of our environment.
• Information on appropriate disposal centres
for used devices can be provided by your
local authority.
Safety Instructions

5
STEP 1. POWER SOURCE AND GROUNDING
The dryer employs alternative current with the rated voltage and frequency. When
the voltage fluctuates between 6% of rated voltage, the dryer can work normally.
Your clothes dryer should be on a dedicated power socket for both convenience and
safety.
STEP 2. PRECAUTIONS
• Ensure all packaging, user manuals, paper and plastic are removed from within the
clothes dryer before operation.
• Ensure the vents aren’t blocked and adequate air-flow exists.
• Always check your clothing articles care instructions to ensure they are suitable
for use
within a clothes dryer. Not all clothes are suitable for use within clothes dryers. The
table below explains common symbols on care instructions for clothing:
Before First Use

6
KEY
1. Top-board 2. Control Panel 3. Door 4. Front Panel
5. Side panel 6. Filter 7. Power Plug 8. Door lock/switch
9. Tumbling Drum 10. Front vent
Your Vented Dryer

7
PANTONE BLACK 90% PANTONE COOL GRAY 4 C
1 Hour
Synthetic
Cotton
Mix
Extra
Regular
Light
Program
Child Lock
Anti-Crease
Anti-Crease Dryness Start/Pause
Power
Program Anti-CreaseDryness
Start/Pause
Power
Child Lock
Anti-Crease
Extra
Regular
Light
1 Hour
Synthetic
Cotton
Mix
GUIDE ONLY DO NOT PRINT
1
235 46
KEY 1. Power button
2. Start or Pause drying program
3. Drying program selector: 1 Hour, Synthetic, Cotton, Mixed Items
4. Child Lock (Dryness & Program button combination)
5. Dryness level selector: Light, Regular, Extra
6. Anti-Crease mode
Control Panel

8
INSTALLATION INSTRUCTIONS
Installation Instructions
If the power chord is damaged, it must be replaced by an authorised service
representative. Please contact 1300 00 ANKO (2656) and ensure the appliance is
completely disconnected from the power supply.

9
INSTALLATION INSTRUCTIONS
Installation Instructions (Continued)

10
INSTALLATION INSTRUCTIONS
Installation Instructions (Continued)

11
ACCESSORY KIT CONTENTS
Accessory Kit Contents
PANTONE BLACK 90% PANTONE COOL GRAY 4 C
1 Hour
Synthetic
Cotton
Mix
Extra
Regula r
Light
Program
Child Lock
Anti-Crease
Anti-Crease Dryness Start/Pause
Power
Program Anti-CreaseDryness
Start/Pause
Power
Child Lock
Anti-Crease
Extra
Regula r
Light
1 Hour
Synthetic
Cotton
Mix
GUIDE ONLY DO NOT PRINT

12
QUICK START:
1. Ensure the dryer is switched on at the power outlet and add your wet clothes into the
tumble drum.
2. Press the “Power” button to switch the dryer on.
3. Press the “Program” button to select your desired drying program. The LED light will
indicate which program you select.
4. Press the “Dryness” button to select your desired level of dryness for your clothes.
5. Press the “Anti-Crease” button to add the optional mode.
6. Press the “Start/Pause” button to begin your selected drying program.
7. If you would like to activate the Child Lock safety feature, simply press both the
“Program” and “Dryness” button simultaneously for 3 seconds. The LED indicator next to
the lock symbol will alight.
8. When your dryer completes its last heating cycle, a buzzer will sound for 1 second and
then begin the cooling cycle. Once this cooling cycle is complete, the dryer’s buzzer will
sound once more.
9. Remove your clothes from the dryer, Press the “Power” button to turn the dryer o and
for safety reasons, remove the power cord from the power outlet.
10. Clean the filter and inner tumble drum.
Quick Start Guide

13
DETAILED OPERATION:
1. PREPARATION BEFORE DRYER
• Clothes should be washed before use within the dryer.
• Always ensure the same types of clothes are dried together.
• Try to sort your clothes to be dried into load that take a similar time to dry (for example
heavier items separate from light items).
• Make sure any decorations or buttons on your clothing items are safe for high temperatures
and well protected.
• It is recommended to turn your clothes inside-out.
• Please ensure that the power cord is in perfect condition before use. Should there be any
damage to the power cord or plug, please immediately isolate the dryer from power and
contact us on 1300 11 HELP (4357).
2. CHECK THE FILTER
• Make sure that the filter is always clean and in the correct position.
• The filter must be cleaned regularly.
3. LOAD THE DRYER
• For faster drying results, load the dryer to 1/2 → 2/3 capacity of the drum. This will allow the
clothes and air to circulate evenly.
• When drying a small load of clothes or even expensive clothes, it’s best to add some towels
that won’t lose fibers, as this will help the wet clothes to dry more evenly.
• To avoid creases or static charges on your clothes, it’s important to ensure you don’t over-
dry your items.
Reference weights of clothing (when dry):
4. CLOSE THE DRYER DOOR
5. SET YOUR DESIRED DRYER PROGRAM
Operating Your Vented Dryer

14
PROGRAM FUNCTIONS:
Note: At the completion of a drying program, the clothes dryer will circulate cold air.
This ensures that your clothing is left at a temperature and that your clothes aren’t
damaged. The Anti-Crease function adds a short amount of time at the end of your
drying program to shake the clothes and reduce creasing.
Note: The energy rating was calculated using the Cotton program and Extra dryness level
WARNING! Always follow the care instructions on each of your garments.
6. END OF THE DRYING PROGRAM
• At the completion of the program, an audible tone will sound to remind you to remove the
clothes from the dryer.
7. TAKE OUT THE PLUG
• Just to be safe, always unplug the dryer after each use.
8. CLEAN THE FILTER AND INNER DRUM
• Accumulated dust and fibers will eect the air circulation inside the dryer and will cause longer
drying times.
• Always ensure the dryer is switched o and unplugged before cleaning.
Operating Your Vented Dryer (Continued)

15
By ensuring proper cleaning and maintenance of your Vented Dryer, you can ensure that it will
have a long and fault free operation.
WARNING! To avoid an electric shock, always unplug your dryer before cleaning.
CLEANING THE FILTER
• Remove the lint filter, located within the door opening.
• Clean the filter by wiping it with a damp cloth.
• Once dry, re-fit the lint filter into the door opening.
Important! Clean the filter after each use.
CLEANING THE INNER DRUM
• Use a soft damp cloth to wipe the inner drum and cabinet.
• Ensure that the cloth is only slightly damp and never use excessive amounts of water.
• Do not use scouring pads or other abrasives as these will cause damage to your dryer.
• Do not use alcohol wipes or harsh cleaning chemicals.
Cleaning and Maintenance

16
OPERATION IN CASE OF EMERGENCY
In the event of an emergency you should:
• Switch o the clothes dryer using the Power button
• Switch the clothes dryer o at the power point and unplug the unit. If the power point isn’t
accessible, switch the relevant circuit o at your fuse box/switch board.
• Call the Kmart Customer Service Centre on 1800 124 125 (Australia).
Some minor faults can be fixed by referring to the instructions given this Troubleshooting
section.
Troubleshooting

17
SAFETY RESET
1. These dryers have a safety cut out switch which is activated by temperature.
2. The safety reset button is on the backboard. If your dryer not heating this button must be
reset before the dryer will operate again. You may need to wait 10 minutes for cooling to
occur.
3. The most common reason for the dryer to overheat is a blocked filter. Clean the lint filter
after each load to prevent overheating of the dryer.
It will only be necessary to press the safety reset button if the dryer not heating. Allow the
dryer at least 10 minutes to cool down before pressing the button .Press the white button in
until you feel the reset click. Cleaning the filter after each load will avoid repetitive operation
of the safety cut out switch.
The cut out switch may operate for the following reason:
1. Lint filter is blocked.
2. Exhaust outlets blocked at the back of the dryer.
3. Poor ventilation in the laundry or room-open a window or door
4. Lightweight garment eg. Handkerchief, sucked over the filter.
Safety Reset Button:
Use your finger or a pencil to press the button in until you feel it click.
Troubleshooting (Continued)

18
Warranty
24 Month Warranty
Thank you for your purchase from Kmart.
Kmart Australia Ltd warrants your new product to be free from defects in materials and
workmanship for the period stated above, from the date of purchase,
provided that the product is used in accordance with accompanying recommendations
or instructions where provided. This warranty is in addition to your rights under the
Australian Consumer Law.
Kmart will provide you with your choice of a refund, repair or exchange (where possible)
for this product if it becomes defective within the warranty period. Kmart will bear the
reasonable expense of claiming the warranty.
This warranty will no longer apply where the defect is a result of alteration, accident,
misuse, abuse or neglect.
Please retain your receipt as proof of purchase and contact our Customer Service
Centre on 1800 124 125 (Australia) or alternatively, via Customer Help at Kmart.com.au
for any diculties with your product.
Warranty claims and claims for expense incurred in returning this product can be
addressed to our Customer Service Centre at 690 Springvale Rd, Mulgrave Vic 3170.
Our goods come with guarantees that cannot be excluded under the Australian
Consumer Law. You are entitled to a replacement or refund for a major failure and
compensation for any other reasonably foreseeable loss or damage.
You are also entitled to have the goods repaired or replaced if the goods fail to be of
acceptable quality and the failure does not amount to a major failure.

19
This page is intentionally left blank

Model no: AVD7 Rev: 01
Other manuals for AVD7
1
Table of contents
Other anko Dryer manuals