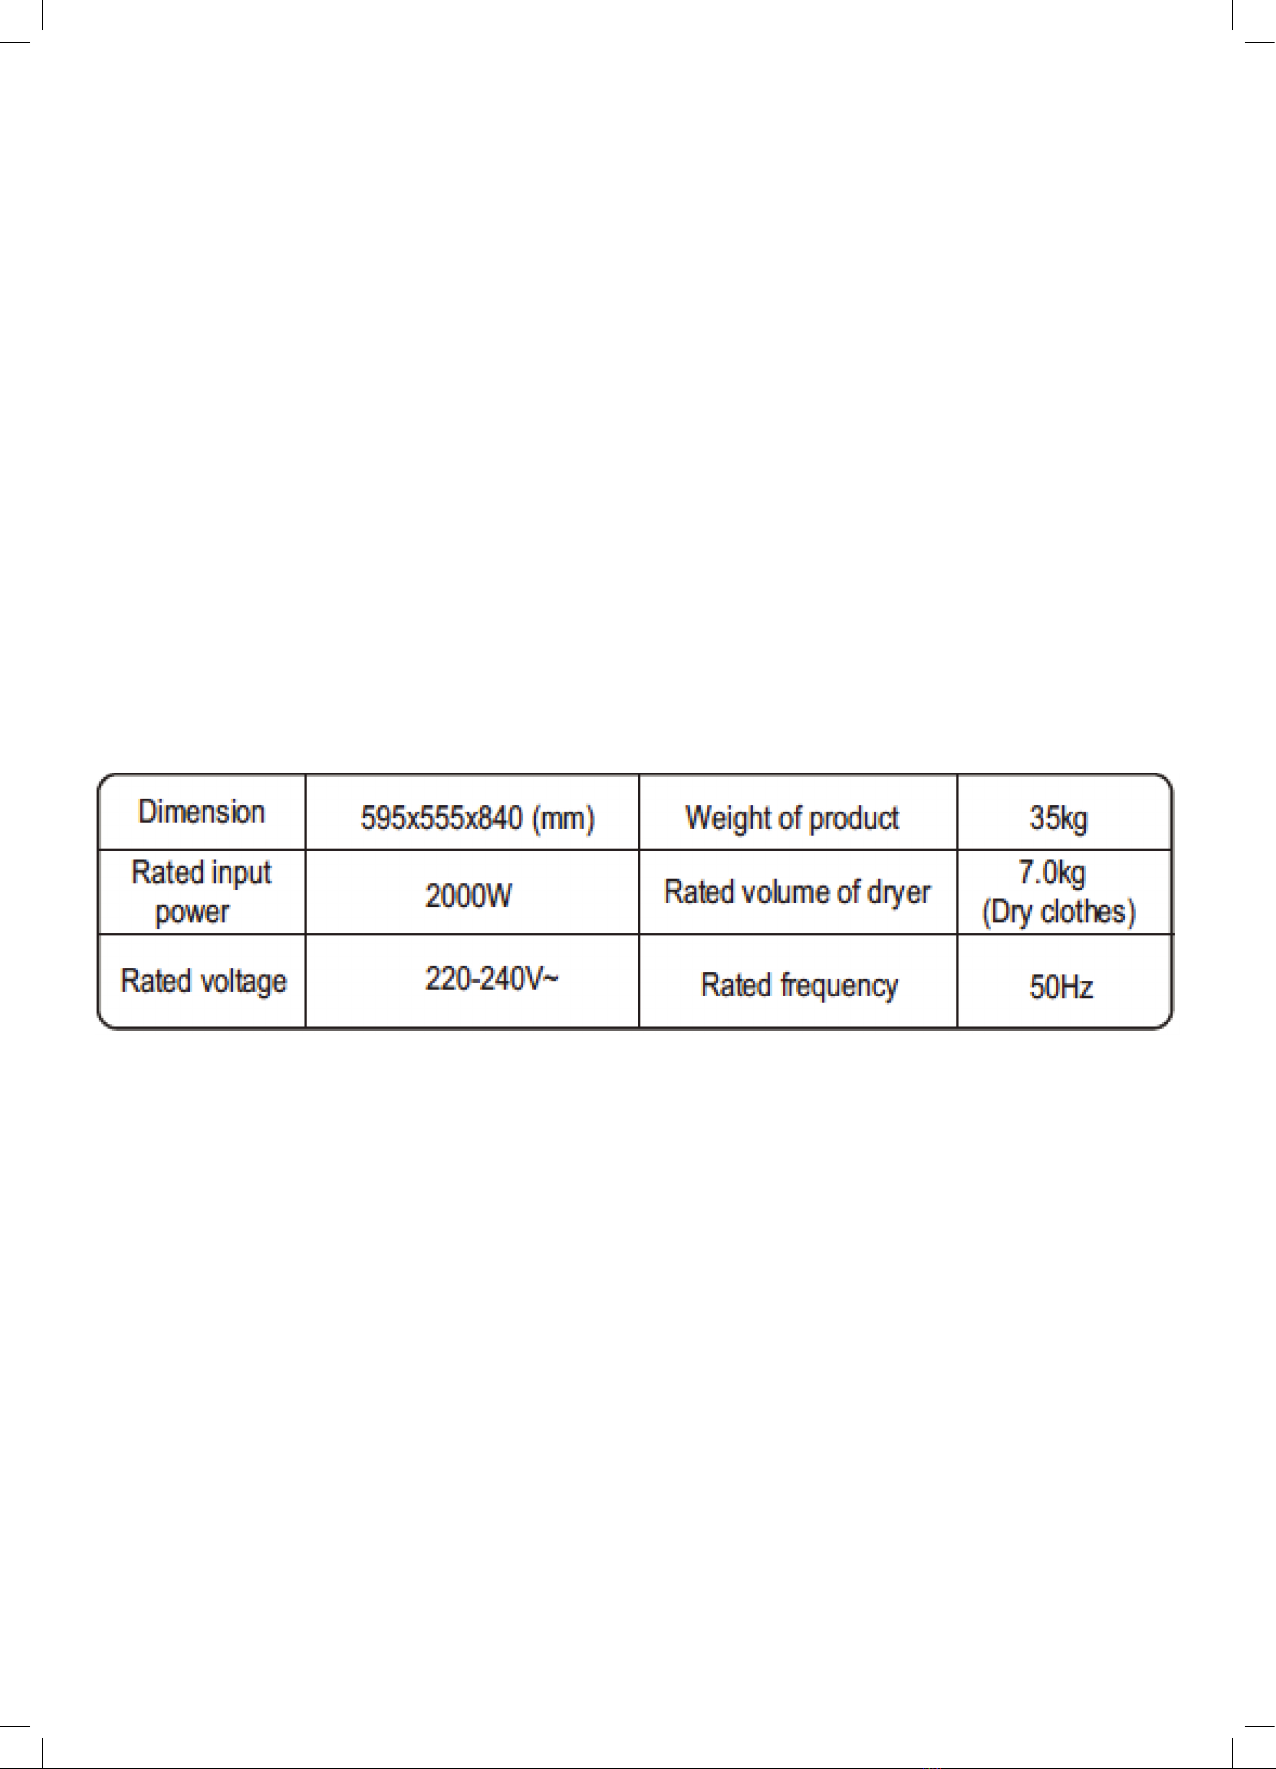
anko AVD7 User manual

Vented Clothes Dryer
7kg Capacity
Instruction Manual
Model no: AVD7
Rev: 05
To ensure proper operation of this device, please
read this instruction manual carefully before using
the device and keep it for future reference.

2
For future reference, please record the following information which can be found on the rating plate
and the date of purchase which can be found on your sales invoice.
STORE DETAILS
STORE NAME
|
ADDRESS
|
TELEPHONE
|
PURCHASE DATE
|
PRODUCT DETAILS
MODEL NO.
|
SERIAL NO.*
|
Purchase Details

3
Contents 2 Purchase Details
4 Safety Instructions
8 Your Vented Dryer
9 Control Panel
10 Before First Use
10 Technical Specifications
11 Accessory Kit Components
12 Installation Instructions
15 Operating Your Vented Dryer
19 Cleaning and Maintenance
20 Troubleshooting
22 Warranty

4
Safety Instructions
GENERAL SAFETY INSTRUCTIONS
Dryer Safety
WARNING! Failure to follow these safety instructions could damage the clothes dryer or your
clothes. You may then not be covered by warranty for this damage.
Only plug this appliance directly into an AC power supply which is properly earthed and had the
correct voltage. Refer to the appliance rating plate (located on the rear of your clothes dryer) for
the voltage information.
Caution! If this appliance is supplied from an extension cord, power-board or other power adapter,
the extension cord/power-board must be positioned so that it is not subject to moisture or risk
of moisture. For safety reasons, we strongly advise against the use of double adaptors, power-
boards, extension leads or other similar devices.
This appliance is not intended for use by persons (including children) with reduced physical,
sensory or mental capabilities, or lack of experience and knowledge, unless they have been given
supervision or instruction concerning use of the appliance by a person responsible for their safety.
Children should be supervised to ensure that they do not play with the appliance.
Important!
• If the electrical cord of this appliance is damaged, it must be replaced by the Manufacturer,
Authorised Service Agent or similarly qualified person in order to avoid a hazard. Damage to
the appliance, including the power cord, is not covered under the manufacturer’s warranty and
a fee for service may be payable.
• These dryers are for drying clothes, towels and linen at home. They are not designed or
intended for use in Commercial environments. Do not use them for any other purpose.
• The dryer is not to be used with any clothing articles which have had industrial chemicals used
for cleaning.
• This appliance is only intended for use indoors only within a domestic environment.
• The lint trap must be cleaned frequently- we strongly recommend this is done after each use.
• Adequate ventilation must be provided.
• Never dry unwashed items with your clothes dryer.
• Never use your clothes dryer to dry items such as latex, foam rubber, waterproof textiles,
rubber backed articles, or pillows fitted with foam.
• Ensure all objects are removed from pockets.
• Lint must not be allowed to accumulate around the tumble dryer.
• Do not dry unwashed items in the tumble dryer.
• Always check your clothing items care labels to ensure they are suitable for use within your
dryer.
WARNING! The final cycle of your clothes dryer programs is a cool down cycle to reduce the
temperature of your clothes. This is incredibly important to ensure that your clothing items won’t
be damaged. Never stop a tumble dryer before the end of the drying cycle unless all items are
quickly removed and spread out so that the heat is dissipated.
WARNING! The appliance must not be supplier through an external switch device, such as a timer,
or connected to a circuit that is regularly switched on and o by a utility.

5
Fire Hazards
• Some fabrics are not suitable for tumble drying. The following MUST NOT be placed in your
dryer due to the risk of a fire or an explosion:
• Item(s) that have been spotted or soaked with vegetable oil, cooking oil, suntan oil, linseed
oil, salad oil, lubrication oil or grease. Oil aected items can ignite spontaneously, especially
when exposed to heat sources such as in a tumble dryer. The items become warm, causing
as oxidation reaction in the oil. Oxidation creates heat. If heat cannot escape, the items can
become hot enough to ignite. Pilling, stacking or storing oil-aected items can prevent heat
from escaping and create a fire hazard. If it is unavoidable that fabrics that contain vegetable
or cooking oil or have been contaminated by hair care products be placed in a tumble dryer,
they should first be washed is hot water with extra detergent - this will reduce, but not eliminate
the hazard. The final part of tumble dryer cycle occurs without heat (Cooling cycle) to ensure
that the items are left at the temperature that ensures that the items will not be damage.
• Item(s) that have previously been cleaned in, washed in, or spotted with petrol/gasoline,
industrial chemicals used only for cleaning, dry-cleaning solvents or other flammable or
explosive substances are highly flammable. Highly flammable or explosive commonly found
around the house include acetone, (nail polish remover) denatured alcohol, petrol/gasoline,
kerosene, some spot removers, turpentine, waxes and wax removers should not be put in the
dryer. Items containing foam rubber (also known as latex foam) or similarly textured rubber-like
materials. Foam rubber materials can produce fire by spontaneous combustion when heated.
• Rubber-backed articles, clothes fitted with foam rubber pads, pillows, rubber boots and
rubber-coated sports shoes.
For your safety, and to reduce the risk of fire or an explosion, DO NOT store or use petrol or other
inflammable vapours and liquids near your dryer.
CLEANING THE LINT FILTER
WARNING! LINT BUILD-UP IS A FIRE HAZARD.
A clean lint filter greatly improves your dryers eciency and reduces drying times, saves energy
and avoids overheating. Overheating may also damage your clothes.
Tip! If your lint filter isn’t emptied between drying loads, we estimate the drying time can double
after 4-5 cycles and triple after 8 cycles. Aside from creating a risk of fire, this results in a
significant increase in energy consumption to dry your clothes.
You must empty your lint filter after each and every load.
The lint filter is located on the inside of the door- shown below (Figure 1).
Figure 1- Lint filter location within your vented dryer.
Safety Instructions (Continued)

6
To remove the lint filter, open the dryer door and simply lift the plastic filter out from its housing.
You can click the lint filter open to allow easy access to remove the lint. Ensure that the plastic
filter is clicked closed again before replacing into your clothes dryer.
Tip! The lint filter can only be inserted into its housing in one way.
Important!
• Never operate your dryer without the lint filter in its correct position.
• Do not allow lint to build up around the dryer (on the door itself, inside the drum,
around the lint filter itself, etc).
• A torn or damaged lint filter must be replaced immediately- cease use until this is replaced.
• Do not overload your dryer. Overloading can increase lint build-up because the airflow
is reduced.
Tip! To avoid potential fire hazards, we recommend that you pay for a qualified appliance
technician to inspect and clean your dryer periodically.
Operating your Dryer
Your dryer is rated to 7kg of dry clothing. Loads must not exceed this rated capacity.
Important! Always check your clothing’s care label information to ensure they are suitable for use
within dryers.
Excessive drying is one of the most damaging things we do to our laundry. International drying
symbols (Figure 2 below) help you select a dryer cycle and a temperature.
Figure 2- International drying symbols used on your clothing care labels.
If the care label has a circle inside a square, your item can be tumble dried.
The more dots on the iron symbol suggests the temperature of heat that can be applied:
• 1 dot = low temperature
• 2 dots = medium temperature
• 3 dots = high temperature
• If there is a cross over the tumble dry symbol, you should not tumble dry the item. It’s
recommended for air-drying only.
Safety Instructions (Continued)

7
Some guidelines for various fabric types:
• Permanent press and synthetics - take out as soon as the dryer stops to reduce wrinkles.
• Woollen articles - not recommended. Pull them to their original shape, then dry them flat.
Vented dryers can shrink woollen articles.
• Woven and loop knit materials - may shrink, by varying amount, depending on their quality.
Do not use the “Extra” Dryness setting for these fabrics, Always stretch them out immediately
after drying.
• Fibre or leather materials - always check the manufacturer’s instructions.
• Baby clothes and night gowns - acrylic clothing or sleepwear use only on the “Light”
Dryness setting.
• Rubber and plastics - Do not dry any items made from or containing rubber or plastics, such as
aprons, bibs, babies’ water proof napkins, curtains, tablecloths, shower caps, clothes fitted with
foam rubber pads, pillows, galoshes, or rubber coated tennis shoes.
• Fibreglass - not recommended, glass particles left in the dryer could be picked up by your
clothes the next time you use the dryer and irritate your skin.
Caution! Fabric softeners or similar products should not be used in a tumble dryer to eliminate the
eects of static electricity unless this practice is specifically recommended by the manufacturer
of the fabric softener or product.
Note We strongly advise against the use of fabric conditioners of the sheet type that are added to
the clothes in the drum. These products may lead to rapid blockage of the lint filter and inecient
operation of your dryer.
Unpacking
During transportation, protective packaging was used to protect the appliance against any
damage. After unpacking, please dispose of all elements of packaging in a way that will not cause
damage to the environment. All materials used for packaging the appliance are environmentally
friendly; they are 100% recyclable and are marked with the appropriate symbol. Check with your
local council on which packaging elements can be recycled kerbside and which may need to be
disposed of at your local recycling drop o centre.
Tip! Soft plastics can be recycled at most major grocery retailers. Polystyrene (EPS) foam may
not be accepted by your local council for recycling- check http://epsa.org.au/ for details of your
local EPS recycler.
Caution! During unpacking, the packaging materials (polythene bags, polystyrene pieces, etc.)
should be kept out of reach of children.
DISPOSAL
Old appliances should not simply be disposed of with normal household waste but should be
delivered to a collection and recycling centre for electric and electronic equipment. A symbol
shown on the product, the instruction manual or the packaging shows that it is suitable for
recycling.
• Materials used to manufacture the appliance are recyclable and are labelled with information
concerning this. By recycling materials or other parts from used devices you are making a
significant contribution to the protection of our environment.
• Information on appropriate disposal centres for used devices can be provided by your local
council or authority.
Safety Instructions (Continued)

8
KEY 1. Top-board
2. Control Panel
3. Door
4. Front Panel
5. Side panel
6. Filter
7. Flex Tube (only to rear vent)
8. Power Plug
9. Door lock/switch
10. Tumbling drum
11. Front vent
Your Vented Dryer
Figure 3 - A diagram showing the main components of your vented dryer.

9
1
235 46
KEY 1. Power button
2. Start or Pause drying program
3. Drying program selector: 1 Hour, Synthetic, Cotton, Mixed Items
4. Child Lock (Dryness & Program button combination)
5. Dryness level selector: Light, Regular, Extra
6. Anti-Crease mode
Control Panel
Figure 4- The control panel for your vented dryer

10
Before First Use
Technical Specifications
Step 1. Power source and grounding
The dryer employs alternative current with the rated voltage and frequency. When the voltage
fluctuates between 6% of rated voltage, the dryer can work normally. Your clothes dryer should
be on a dedicated power socket for both convenience and safety. Refer to safety notes in section
1.1 of this manual.
Step 2. Precautions
• Ensure all packaging, user manuals, paper and plastic are removed from within the clothes
dryer before operation.
• Ensure the vents aren’t blocked and adequate airflow exists with your chosen location.
• Always check your clothing articles care instructions to ensure they are suitable for use
within a clothes dryer. Not all fabric types/clothing articles are suitable for use within
vented clothes dryers.

11
Accessory Kit Components
Figure 5- Contents of the Accessory Kit included with your vented dryer for wall hanging
installation.
ACCESSORY KIT CONTENTS
PANTONE BLACK 90% PANTONE COOL GRAY 4 C
1 Hour
Synthetic
Cotton
Extra
Regular
Light
Program
Child Lock
Anti-Crease
Anti-Crease Dryness Start/Pause
Power
Program Anti-CreaseDryness
Start/Pause
Power
Child Lock
Anti-Crease
Extra
Regular
Light
1 Hour
Synthetic
Cotton
Mix
Mix
GUIDE ONLY DO NOT PRINT
PART NAME QTY IMAGE/DIAGRAM

12
Installation Instructions
POWER SOURCE AND GROUNDING
It’s recommended to use the dryer on its own dedicated power outlet for both convenience and
safety. The power outlet must be grounded.
Important! If the power cord is damaged, it must be replaced by your local distributor or one of its
authorised service representatives. Please contact your local Customer Care team and ensure the
appliance is completely disconnected from the power supply.
INSTALLATION
Refer to the diagram on page 8 of this manual.
Your Dryer should be placed in a ventilated area with a minimum of 80mm between the top of
the dryer and ceiling and with no less than 10cm distance from the wall or cabinetry. It is also
recommended that there are no obstacles within 1.5m of the dryers’ front, to ensure ease of
operation and ventilation.
WALL HANGING INSTALLATION
Step 1: Confirm the following components are all within the included accessories:
• 2 × Hooks
• 2 × Holders
• 4 × Expansion bolts
• 1 × Installation positioning paper.
Step 2: Determine a location to mount the dryer and confirm that the construction type of the
wall and location is suitable for installation.
• Do not hang the dryer on the wall if the wall is not solid.
• The distance in front of the wall must be more than 150cm.
Tip! Ensure power cord and plug is accessible and reaches a power source.
Wall Hanging Installation Manual
1. Accessories include components:
hooks (2), holders (2), expansion bolts (4), installation
positioning paper (1), and installation manual (1).
Hook Holder Expansion
Bolt
Installation
Positioning Paper
When hang
straight,Hang the
hooks into the
two holes.
When hang
upside down,
Hang the hooks
into these two holes.
When hang upside
down, Fix the holder
at the position of the
two screws.
When hang straight,
Fix the holder at the
position of the two
screws.
(Applicable to 6kg and 7kg models)

13
Step 3: Paste the installation positioning paper to the solid wall.
• Draw a line with a level, and paste the positioning paper based on the line.
Note: Ensure the screw holes will not overlap with the power outlets or taps nearby.
• The bottom edge of the positioning paper must be 45cm+ higher than the floor.
Remove the adhesive paper behind the positioning paper, and paste the positioning paper
to the wall horizontally.
Step 4: Drill holes for expansion bolts. The drill diameter is 14mm. Drill 4 holes according to
the positioning paper drawing (hole depth 60mm). Find the hole mark on the positioning paper.
Drill 4 holes orderly at the positioning paper hole mark with a Ø 14 drill bit (use specially-made
Ø 14 drill bit to pre-drill for the walls with tiles).
Step 5: Fix the hook to wall. Fix the hook with an expansion bolt to the wall.
• Take out the expansion bolt from the accessories. Insert the bolt and expansion tubular into
the drilled holes. Insert one nut into the bolt. To prevent the thread being damaged, don’t
expose the end-thread of the bolt. Then hammer the 4 bolts into the holes orderly;
• After the bolts are hammered into the wall, screw o the nuts and expose the bolts.
Then insert one auxiliary tube to the bolt, and hammer the tube until the expansion tubular
is flush with the wall surface. The expansion tubular is totally expanded then, and the
expansion tubular installation is finished.
• After finishing the expansion procedure, take out the hook and insert it to the bolt.
Fasten the hook with a socket or a wrench.
Installation Instructions (Continued)
Wall Hanging Installation Manual
1. Accessories include components:
hooks (2), holders (2), expansion bolts (4), installation
positioning paper (1), and installation manual (1).
Hook Holder Expansion
Bolt
Installation
Positioning Paper
When hang
straight,Hang the
hooks into the
two holes.
When hang
upside down,
Hang the hooks
into these two holes.
When hang upside
down, Fix the holder
at the position of the
two screws.
When hang straight,
Fix the holder at the
position of the two
screws.
(Applicable to 6kg and 7kg models)

14
Step 6: Fix the holder to the dryer machine. Place the unpackaged dryer machine on the floor.
Unscrew the two screws at the back of the machine with a cross screwdriver. Take out the holder
in the kit. Press the screws into the holes on the holder and then fasten them into the original
screw holes. When hang upside down, Fix the holder at the position of the two screws.
Step 7: Lift the dryer machine with two persons and direct the slots at the back of the washing
machine to the hooks. Then insert the hooks with some force to the slots.
Installation Instructions (Continued)
Wall Hanging Installation Manual
1. Accessories include components:
hooks (2), holders (2), expansion bolts (4), installation
positioning paper (1), and installation manual (1).
Hook Holder Expansion
Bolt
Installation
Positioning Paper
When hang
straight,Hang the
hooks into the
two holes.
When hang
upside down,
Hang the hooks
into these two holes.
When hang upside
down, Fix the holder
at the position of the
two screws.
When hang straight,
Fix the holder at the
position of the two
screws.
(Applicable to 6kg and 7kg models)
Wall Hanging Installation Manual
1. Accessories include components:
hooks (2), holders (2), expansion bolts (4), installation
positioning paper (1), and installation manual (1).
Hook Holder Expansion
Bolt
Installation
Positioning Paper
When hang
straight,Hang the
hooks into the
two holes.
When hang
upside down,
Hang the hooks
into these two holes.
When hang upside
down, Fix the holder
at the position of the
two screws.
When hang straight,
Fix the holder at the
position of the two
screws.
(Applicable to 6kg and 7kg models)
Step 8: When all installation procedures are finished,
test the machine by powering it on.
Important! Please ensure that the dyer is only ever installed
in an internal environment only (and not outside), or an
environment where the dryer could become wet. Never
place the dryer near combustible surfaces (such as curtains)
and ensure the dryer isn’t operating near gas or other
flammable materials. Refer to section 1 of this user manual.
Caution Weight Hazard. Two or more people
required to lift and install the dryer.

15
Operation Instructions
QUICK START
1. Ensure the dryer is switched on at the power outlet and add your wet clothes
into the tumble drum.
2. Press the “Power” button to switch the dryer on.
3. Press the “Program” button to select your desired drying program. The LED light will indicate
which program you select.
4. Press the “Dryness” button to select your desired level of dryness for your clothes.
5. Press the “Anti-crease” button to add the optional mode.
6. Press the “Start/Pause” button to begin your selected drying program.
7. If you would like to activate the Child Lock safety feature, simply press both the “Program”
and “Dryness” button simultaneously for 3 seconds. The LED indicator next to the lock
symbol will alight.
8. When your dryer completes its last heating cycle, a buzzer will sound for 1 second and then
begin the cooling cycle. Once this cooling cycle is complete, the dryer’s buzzer will sound
once more.
9. Remove your clothes from the dryer, Press the “Power” button to turn the dryer o and for
safety reasons, remove the power cord from the power outlet.
10. Clean the filter and inner tumble drum.
Caution! Do not overload the dryer: the maximum amount of dry textile material that can be
dried in one load is 7kg.

16
Operation Instructions (Continued)
DETAILED OPERATION
Step 1: Preparation before drying
• Clothes should be washed before use within the dryer.
• Always ensure the same types of clothes are dried together.
• Try to sort your clothes to be dried into load that take a similar time to dry (for example
heavier items separate from light items).
• Make sure any decorations or buttons on your clothing items are safe for high temperatures
and well protected.
• It is recommended to turn your clothes inside-out.
• Please ensure that the power cord is in perfect condition before use. Should there be any
damage to the power cord or plug, please immediately isolate the dryer from power and
contact our After Sales Service Team.
Step 2: Check the filter
• Make sure that the filter is always clean and in the correct position.
• The filter must be cleaned regularly, after each use.
Step 3: Loading the dryer
• For faster drying results, load the dryer to ½ → 2/3 capacity of the drum. This will allow the
clothes and air to circulate evenly.
• When drying a small load of clothes or even expensive clothes, it’s best to add some towels
that won’t lose fibres, as this will help the wet clothes to dry more evenly.
• To avoid creases or static charges on your clothes, it’s important to ensure you don’t over-dry
your items.
Tip! Refer to the Reference weights of clothing articles (when dry) in the table below, to assist with
avoiding overloading your dryer.
Figure 9- Reference weights for various clothing articles when they are dry
Step 4: Close the dryer door.
• The door will click when fully closed.
Step 5: Select your settings.
• Set your desired dryer Program, relevant to your load type, along with your preferred Dryness
level. The various drying programs and the Dryness level options for each program, are
outlined in the table on the following page.

17
Operation Instructions (Continued)
DETAILED OPERATION (CONTINUED)
Program Functions
Note: Maximum capacity for loads is based on the clothing when dry.
Tip! At the completion of a drying program, the clothes dryer will circulate cold air. This ensures
that your clothing is left at a temperature and that your clothes aren’t damaged.
Note: the energy rating was calculated using the Cotton program and Extra dryness level.
Step 6: End of the drying program
• At the completion of its last heating cycle, a buzzer will sound for 1 second and then begin the
cooling cycle. Once the cooling cycle is complete, the dryer’s buzzer will sound one more time.
• Remove your clothes from the dryer.
Step 7: Take out the plug
• Just to be safe, always unplug the dryer after each use.
Step 8: Clean the filter and inner drum
• Accumulated dust and fibres will eect the air circulation inside the dryer and will cause longer
drying times.
Important! Always ensure the dryer is switched o and unplugged before cleaning.
OTHER OPTIONAL FUNCTIONS
Anti-crease Function
The Anti-Crease function adds a short amount of time at the end of your drying program to shake
the clothes and reduce creasing. Press this button to add the function to your selected drying
program/settings. The LED light above the Anti-Crease button will alight to indicate that it’s active.
Child Lock
Your dryer has the ability to lock the controls to prevent accidental operation or changing
of settings. If you would like to activate the Child Lock safety feature, simply press both the
“Program” and “Dryness” buttons simultaneously for 3 seconds. The LED indicator next to the lock
symbol will alight to indicate that the Child Lock is active.

18
Operation Instructions (Continued)
GENERAL HINTS
• Never tumble dry the following: Delicate items such as net curtains, woollen, silk, fabric with
metal trim, nylon tights, bulky materials such as blankets, eiderdown, sleeping bags, feather
quilts and any item containing rubber foam or materials similar to foam rubber.
• Do not directly place undergarments such as bras and corsets that contain metal
reinforcements, into your dryer. Your dryer may be damaged if a metal part were to come
loose from the garment. Place such items in a bag designed for this purpose.
• Check and empty pockets. Clip, pens, nails and pins can damage both the dryer and your
clothes. Other item such as matches or cigarette lighters will cause a fire.
• Close all press studs, hooks, eyes and zips that may catch on something else. Tie all belts and
aprons string to prevent tangling.
• Drying time will depend on fabric type and construction, load size and wetness. Save time and
money and always spin the load as dry as possible your washing machine.
• Always clean the lint filter-this will reduce drying time and save you money.
• The laundry must be thoroughly spun before tumble drying. Do not place hand washed items
that have not been spun, into the dryer.
• To avoid static charge when drying is completed, use either a fabric softener when you are
washing the laundry or a fabric conditioner specifically for tumble dryers.
• Remove the laundry when the dryer has finished drying.
• Do not over-dry laundry, this avoids creasing and saves energy.
• Clothes or towels containing sand or grit should be washed first.
• Due to variations in dryer load fabric texture and thickness it is possible that not all items will
be dried evenly. If you experience uneven dryness on the Standard program please use the
Extra Program but be mindful of the type of fabric being dried to avoid over drying certain
types of fabric. Always follow drying instructions attached to the items intended to be dried in
a clothes dryer.
• Drying time will also be eected by voltage fluctuations, room temperature and humidity.
Clothes will dry more slowly on a cool or humid day.
• For best results, sort the load according to fabric. Such as heavy items which may take longer
to dry (i.e. towels, flannelette sheets, etc) than ones which dry quickly (i.e. cotton shirts and
sheets).
• Avoid drying dark clothes with light coloured items such as towels as lint will show on the dark
clothes.
• Some fabrics will collect lint from other clothes and items. Separate those articles prone to
causing lint and those prone to collecting lint, to minimise this problem. Clothes that give lint
include towels, nappies, chenille. Clothes that collect lint include corduroy, synthetics and
permanent press garments.
• If individual items are still damp after drying, you may need to run another program, or allow
the items to finish drying naturally outside the dryer. This will be necessary particularly for
multi-layered items (i.e. collars, pockets, etc).

19
By ensuring proper cleaning and maintenance of your Vented Dryer, you can ensure that it will
have a long and fault free operation.
WARNING! To avoid an electric shock, always unplug your dryer before cleaning.
CLEANING THE FILTER
• Remove the lint filter, located within the door opening (refer to Figure 1 within this manual).
• Clean the filter by wiping it with a damp cloth.
• Once dry, re-fit the lint filter into the door opening.
Important! Clean the filter after each use.
CLEANING THE INNER DRUM
• Use a soft damp cloth to wipe the inner drum and cabinet.
• Ensure that the cloth is only slightly damp and never use excessive amounts of water.
• Do not use scouring pads or other abrasives as these will cause damage to your dryer.
• Do not use alcohol wipes or harsh cleaning chemicals..
Cleaning and Maintenance

20
BASIC TROUBLESHOOTING
Check the points listed here before you call for help, and make sure that you have followed the
Important safety Instructions within this manual.
PROBLEM POSSIBLE CAUSES
My dryer will not start - Plug is not firmly in its power socket, or the power outlet is
not switched on.
- You have blown or tripped a fuse. Check the power point
using another portable appliance (i.e. a clock, fan, etc). Check
your fuse box to ensure a safety switch hasn’t been tripped.
- The door on the dryer hasn’t been completely closed. If the
door isn’t closed fully, the dryer will not operate for safety
reasons.
My clothes are still wet at the
end of the program
- The selected drying time was insucient. Select a longer
time setting.
-Longer time may be needed when the room temperature is
12ºC or less.
- Check that the lint filter is not blocked.
- Check to see that you have read all the instructions
carefully.
- Contact your local Customer Care team if you are still
having problems. Write down the model and serial numbers
and the date of purchase before you call
Important! To operate all vented clothes dryers eciently, the clothes dryer must have an
unrestricted air supply and exhaust ventilation. Service calls resulting from installation where
ventilation is restricted are not covered by warranty. The cost of this type of service call will be
charged to the customer. Should you require further instructions in the use and care of your
clothes dryer please contact your local Customer Care team.
Troubleshooting
Other manuals for AVD7
1
Table of contents
Other anko Dryer manuals
Popular Dryer manuals by other brands

Candy
Candy GOC 560B Instruction book

Asko
Asko T783C operating instructions

Maytag
Maytag MGDB850WQ1 installation instructions

Siemens
Siemens WT45M232GB Installation and operating instruction

Siemens
Siemens WT43N200 Installation and operating instructions

Sharp
Sharp Home Appliances KD-HHH8S8EW3-FR user manual