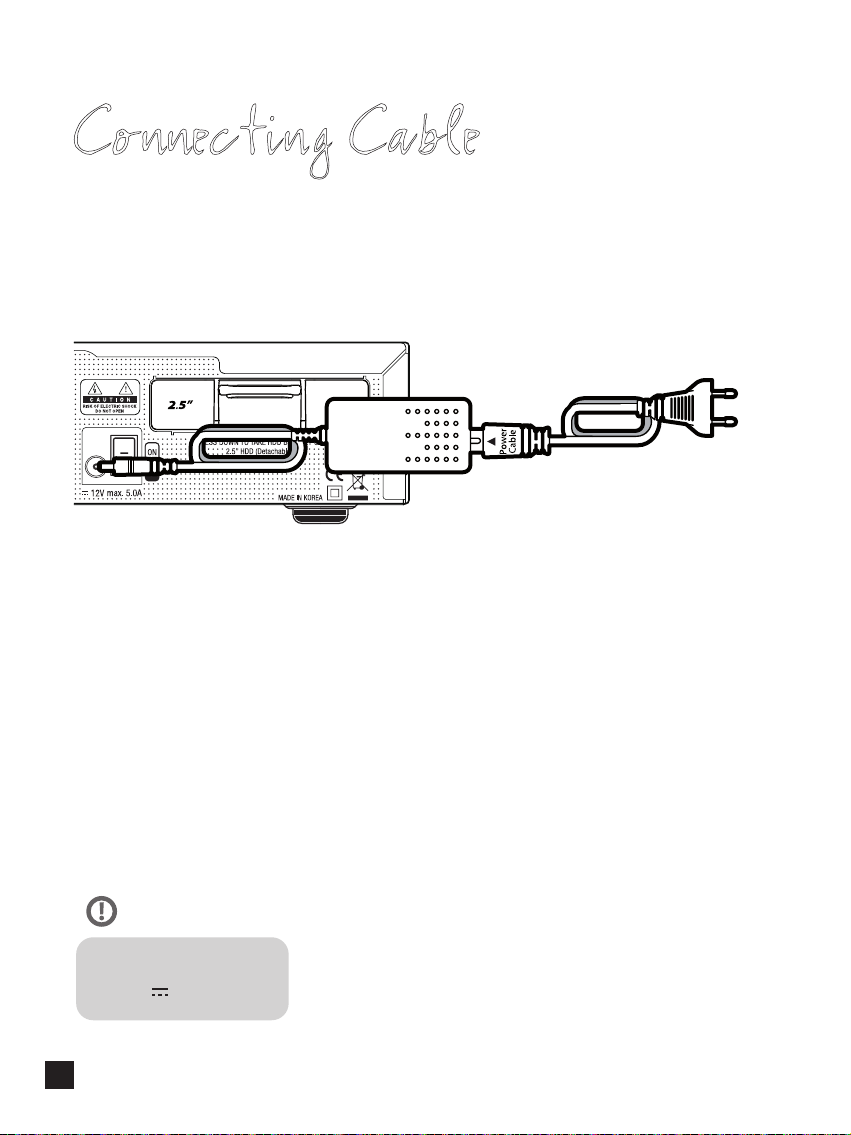
Antenex Vu+ DUO 4K SE Quick start guide

English │Slovensky │Polski │Česky

English

HDD BRKT
What's included ?
Easy Setup Guide HDMI
Cable
Power
Cord
Power
Adapter
RCURCU Battery
HDD
Screw
11

Front Panel
Mini TV
Displays TV streaming, graphic logo of channels
and uploaded user`s favorite images on 3.5”LCD.
Door
open
USB Host
Connects to the USB memory stick
or external HDD.
Smartcard reader slot
One Smartcard slots are provided.
Touch Button
CI Module slot
Two CI module slots are provided.
Standby LED Indicator
Channel / v
Touch button for
navigating through
channel list.
Volume + / -
Touch button for adjusting the audio volume.
v
22

Rear Panel
RS232
2x USB 3.0
S/PDIF
Connects to a digital audio
system using S/PDIF cable.
HDMI In/Out
Connects to TV by HDMI Cable
for both audio and video signals, also for using
other devices connected to HDMI In port.
On/O Switch
Power Adaptor Input
Enables you to enjoy with variety channels up to 16 signals.
(Supports FBC DVB-S/S2X or FBC DVB-C/C V2 or Dual DVB-T2(MTSIF).)
FBC Pluggable Tuner Slots
Detachable 2.5”
HDD BRKT (15mm)
Gigabit Ethernet
Use CAT6 FTP(STP) Ethernet cable.
33

Remote Control
TV Power
Navigation Keys
Navigates up/down and left/right
on the menu options.
Up/down keys are used to call up
the channel list.
Teletext
Displays the teletext information of
the current channel if the channel
provides subtitles.
Subtitle
Displays the subtitle of
the current channel
if the channel provides subtitle.
AV
This button is used
when selecting video source of TV.
EPG
Displays the Electronic Program
Guide (EPG) information
if provided.
CHANNEL+/-
Color Keys
• Red – mainly used for REC,
Cancel, etc.
• Green – mainly used for OK
• Yellow
• Blue
Volume+/-
EXIT
Numeric Keys
STB Power
Mute
44

Precaution!!!
1. Connecting Power
• This product operates only in the range of AC100-240V and 50Hz/60Hz. Please check rst your power
supply to see if it ts this range.
• Please be noted that you need to disconnect from the mains before you start any maintenance or
installation procedures.
• Make sure that the power cord is placed in a position where it is easy to unplug it from the mains in an
emergency.
2. Overloading
• Do not overload a wall outlet, extension cord or adapter as this may cause electrical re or shock.
3. Liquid
• This product is not water-proof and should not be exposed to dripping, splashing, or any type of liquid.
• No objects lled with liquid such as base shall be placed on the product.
• Please do not clean the product with wet cloth, which may cause a short circuit.
• No wet objects should be placed near the product.
4. Ventilation
• Allow a sucient space between the product and other objects to make sure air ventilation of the product.
• Do not block the top or rear of the product with an object, which will close the ventilation holes and lead to
a high temperature of the system. This may cause a failure of the product.
• Do not stack other electronic devices on top of the product.
• Do not insert any kind of pointed objects like screw, gimlet, etc. into the ventilation holes of the product.
This will damage the product.
5. Connecting the Satellite Cable.
• Disconnect the power of the product before you connect the satellite cable to the product.
Otherwise, it may cause damage to the LNB.
6. Grounding
• The LNB must be earthed to the system earth for the satellite dish.
7. Location
• Place the product indoor.
• Do not expose the product to rain, sun or lightening.
• Do not place the product near any heat appliances as a radiator.
• Ensure that there is more than 10 cm distance from any electrical devices and wall.
8. Lightening, Storm or Not In Use.
• Unplug the product and disconnect the antenna cable during a thunderstorm or lightening, especially
when left unattended and unused for a long period of time. This will prevent possible damages from
power surges or lightening.
9. Replacement of Parts
• Unauthorized part replacements, especially by one who is not a qualied technician may result in
damage to the product.
• Ensure that when part replacements are necessary qualied technicians perform the task using the
components specied by the manufacturer.
10. Hard Disk Drive
• Do not move the product or turn the power o suddenly while the Hard Disk Drive (HDD) is still running.
This may result in damage to the HDD and thus the system.
• The company shall not be liable for any corruption of data on the HDD caused by careless use or misuse of users.
11. Battery
• There is danger of explosion if batteries are incorrectly replaced.
• Replace batteries only with the same or equivalent type.
This Product has been designed and manufactured in compliance with EU consumer safety requirements (CE).
Please read the following safety precautions carefully.
55

Connecting Cable
2. Connect DUO 4K SE to the TV
One HDMI cable is included in the accessory box. Connect one end of the cable to the HDMI
input of TV. Connect the other end to the HDMI output of DUO 4K SE.
1. Connect Satellite/Cable/Terrestrial Signal cable to DUO 4K SE
Vu+ DUO 4K SE has pluggable FBC tuner slot which you can choose FBC-S2X or
FBC-C/C V2 or Dual T2(MTSIF) tuner.
1) Combination FBC-S2X Tuner
2) Combination FBC-C/C V2 Tuner
3) Combination Dual T2(MTSIF) Tuner
66

Connecting Cable
DC input condition
• 12V 5A
NOTE
3. Power Up
A power cord and an adapter are provided in the accessory box.
Plug the round end of the adapter power cord into the power input of DUO 4K SE.
77

Run First Time Installation
Step 1. Video Input Selection
HDMI
Video input selection
Please press OK if you can see this page on your TV or
select a dierent input port.
The next input port will be automatically probed in 20 seconds.
Step 2. Video Mode Selection
720p
1080i
1080p
2160p
576p
480p
576i
Video mode selection
88

Run First Time Installation
Step 3. Language Selection
Step 4. Conguring Satellite Connection
Welcome.
This start wizard will guide you through the basic setup
of your STB.
Press the OK button on your remote control to move to the
next step.
English
German
Catalan
Croatian
Please use the UP and DOWN keys to select your language.
Afterwards press the OK button.
99

Run First Time Installation
Using LEFT/RIGHT keys, you can choose one of the following Conguration Modes:
• Nothing connected
• Simple
• Loop-through to
• Equal to: mode to use the same conguration as that of Tuner A.
• Advanced: for an advanced user conguration.
Use the up/down keys on your remote control to select
an option. After that, press OK.
Use wizard to set up basic features
Exit wizard
Use the left and right buttons to change an option.
Conguration Mode not congured
1010

Run First Time Installation
Besides satellite, various tuner types including cable and T2 can be used.
For more information regarding cable and T2, please refer to the user manual of DUO 4K SE.
Mode
Port A
Port B
Set Voltage and 22KHz
Send DiSEqC only on satellite change
If you choose 'Simple' conguration mode, the following picture will appear.
Use the left and right buttons to change an option.
Please set up tuner A.
Conguration Mode
DiSEqC A/B
Astra(19.2E)
Hotbird(13.0E)
yes
no
Simple
No
Here you will be asked whether you want to install the default satellite lists. Press OK and
the following image appears:
Do you want to install default sat lists?
Yes
1111

Step 5. Channel Scan
(Selecting Scan Mode - Automatic Scan / Manual Scan)
• Automatic Scan
If you choose Automatic Scan, you will be asked whether to erase all the existing channels
before scanning.
Run First Time Installation
What do you want to scan?
Yes, ScanTuner A(DVB-S2)
No, scan later manually
Yes, Clear before scan
• If you press 'No', following image will appears.
Channel scanning is possible either in 'Automatic Scan' mode or 'Manual Scan' mode.
Do you want to do a service scan?
Yes, do a manual scan now
No, scan later manually
Yes, do an automatic scan now
1212

Run First Time Installation
Press OK to initiate the channel scan.
• Channel Scanning
The scanned channels will be displayed if the previous congurations have
been done correctly.
scan done! 2 services found!
ANIXE HD
ASTRA HD+
Service Scan
Step 6. Install Default Service List
Please choose the default services lists you want to install.
Astra(19.2E)
Hotbird(13.0E)
no
no
1313

Step 7. Parental Control Option
Here you can choose whether to enable the parental control option. If you press OK,
you will be asked to enter PIN number.
New PIN
Reenter new PIN
****
****
Change pin code
Do you want to enable the parental control feature
on your STB?
No
Yes
You need to set a PIN code and hide it from your children.
Do you want to set the pin now?
No
Yes
1414

Step 8. Wireless LAN Setup
Here you can set up 'Wireless LAN' for your convenient network connection.
Press OK button on 'ScanWireless AP' and the list of available wireless network services
that you can choose will appear.
Wireless LAN Setup
Crashlog Reporting
System
Scan Wireless AP
Network test
Restart network
Adapter setting
Wireless Network Setup Menu...
Close Select
1515

For more information about DUO 4K SE
By long pressing 'Help' button, you can also access to On-Screen Manual page.
The content in this Easy Setup Guide is subject to change without notice.
1616

Slovensky
Rýchly sprievodca inštaláciou

Mini TV
Na 3,5“ LCD zobrazuje vysielanie TV,
gracké logo kanálov a obľúbené obrázky,
ktoré nahral používateľ.
Door
open
USB rozhranie
Slúži na pripojenie pamäťového USB kľúča
alebo externého pevného disku.
Čítačka smart karty
Dostupná jedna čítačka smart kariet.
Dotykové tlačidlo
Slot na CI modul
Zariadenie disponuje dvoma slotmi na CI modul.
LED indikátor pohotovostného režimu.
Program / v
Slúži na zmenu programov
v zozname programov.
Hlasitosť+ / -
Dotykom tlačidla nastavíte hlasitosť zvuku.
v
Predny Panel
HDD Držiak
Obsah balenia ?
Rýchly sprievodca
inštaláciou HDMI
kábel
Napájací
kábel
Napájací
adaptér
DOBatérie
do ovládača
HDD
skrutky
1818
Table of contents
Languages:
Popular Receiver manuals by other brands

Marantz
Marantz Slim-line NR1601 specification

Sony
Sony STR-KS2000 - Blu-ray Dvd Receiver Component Service manual

Lectrosonics
Lectrosonics CR175 Operating instructions and troubleshooting guide

Teac
Teac AG-D9300 owner's manual

Maximum
Maximum S-2000 FTA PVR user manual

DAITEM
DAITEM SH710AX installation manual