Anthos SMART TOUCH R7 User manual

R7
SMART TOUCH
97050649
rev.006
10/2016
EN


33EN
R7
- OPERATING INSTRUCTION
TABLE OF CONTENTS
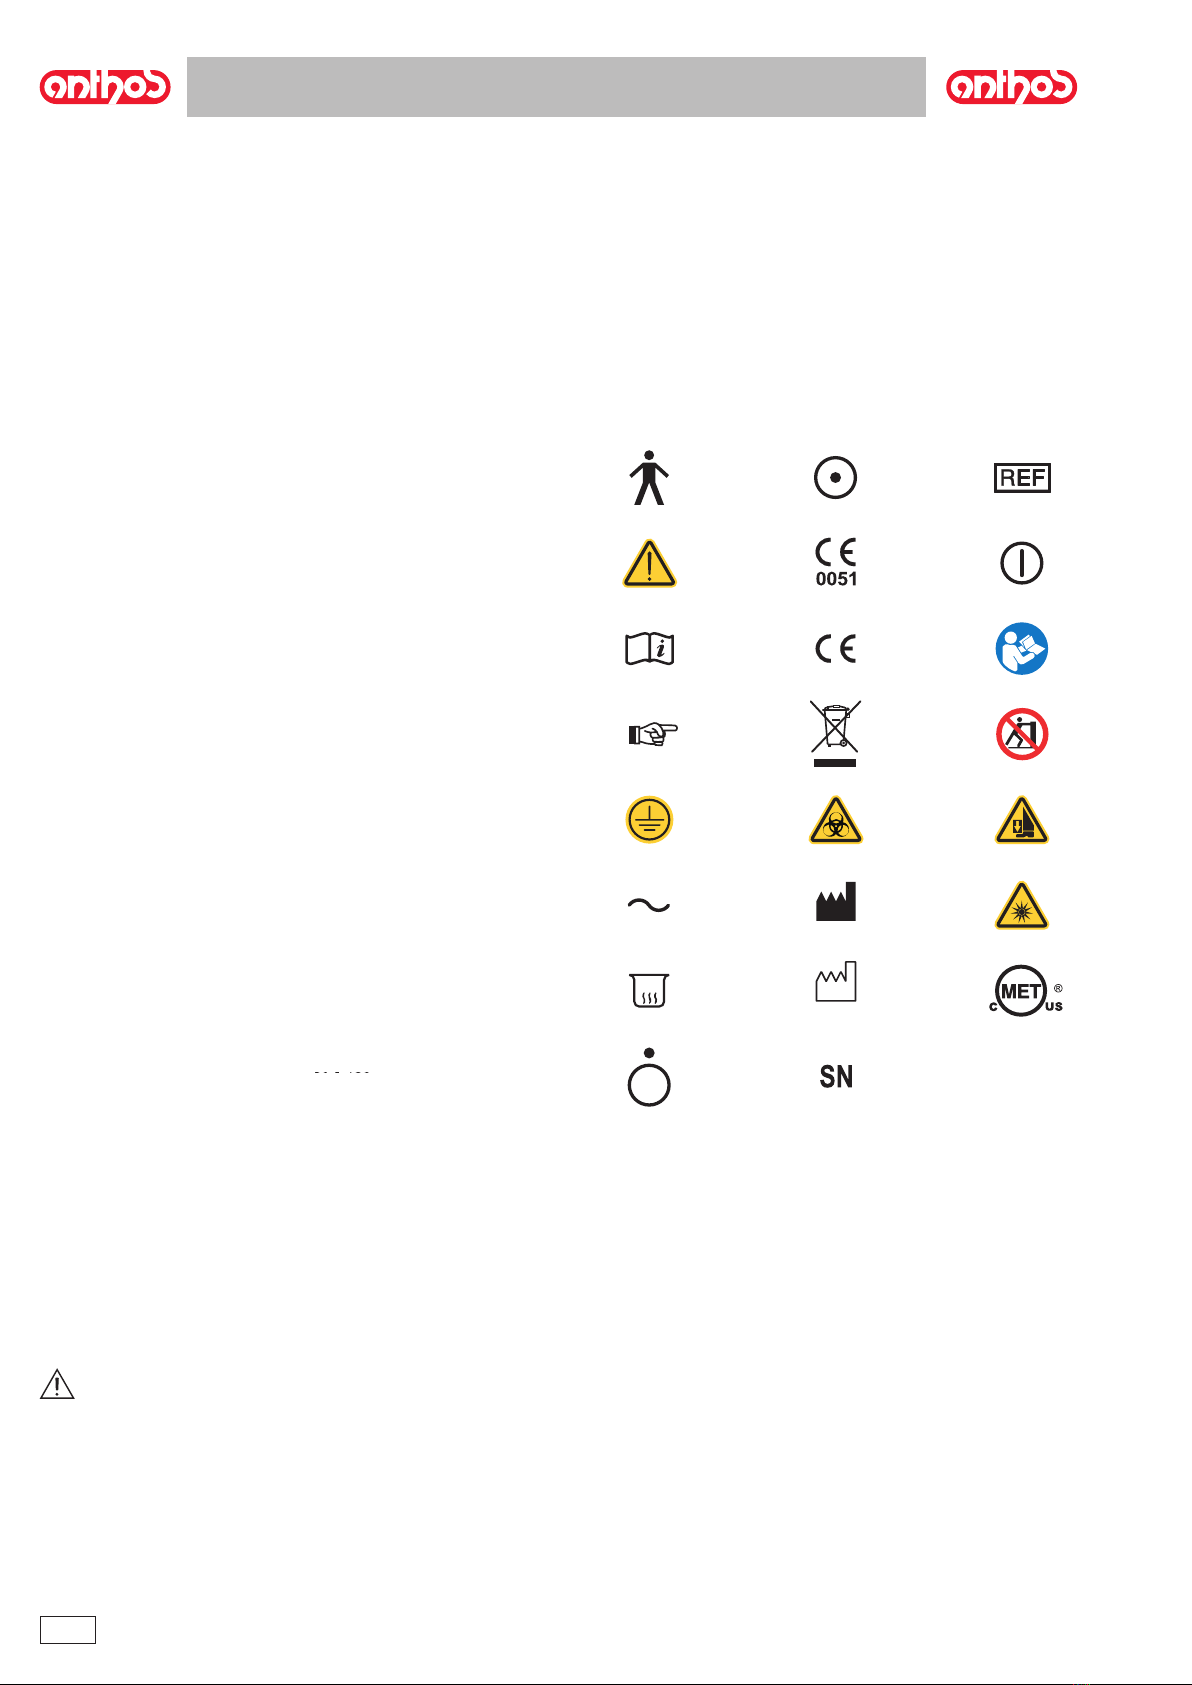
1. Safety guidelines.......................................................... 4
............................................................ 4
................................................................... 4
.......................... 5
............................................... 5
............................... 5
......................................................................... 5
............. 5
.................................................................... 6
............................................... 7
..................................................................... 8
2. Description of the CLASSE R devices ....................... 9
...................................................................... 9
.................................................................. 10
.................................................................. 13
................................... 13
3. Warnings for models R7 CART and R7 M CART...... 13
................................. 14
............................. 15
4. Dental chair operation ................................................ 15
.............................................................. 15
...................................................... 16
...................................................... 16
............................................. 17
......................................... 17
................................................. 17
5. Instrument board operation ...................................... 18
............................................... 20
............................................................... 22
........................................................ 23
........................................................... 23
............................................. 24
.......................... 24
......................................... 25
........................................................ 26
........................................... 26
............................................ 27
................................ 27
............................................... 28
......................................... 28
............................................................... 29
.................................................. 29
............................................................... 30
.................................. 30
..................................................... 31
.................................................. 31
.......... 32
................................................ 32
....................... 32
.................................................................. 33
............................................ 33
.............................................. 34
............................................ 36
..................................................... 38
......................................................................... 40
......................................................................... 41
................................................................... 43
.................................. 46
................................... 46
........................................................................... 48
........................................................ 51
51
..................................................... 54
............................................ 58
6. Assistant’s board operation...................................... 59
.................................................... 59
........................................ 60
................................. 60
.......................... 60
................................................................ 61
6.6. r ............................................... 62
7. Hydrogroup operation ............................................... 63
........................................................... 63
......65
7.3. ..................................................... 66
..................... 67
................. 68
........................................................... 70
.. 71
................. 72
8. Accessories ................................................................ 73
8.1. ............................................................ 73
.................................................... 73
........................................ 73
........................ 73
...................................................... 74
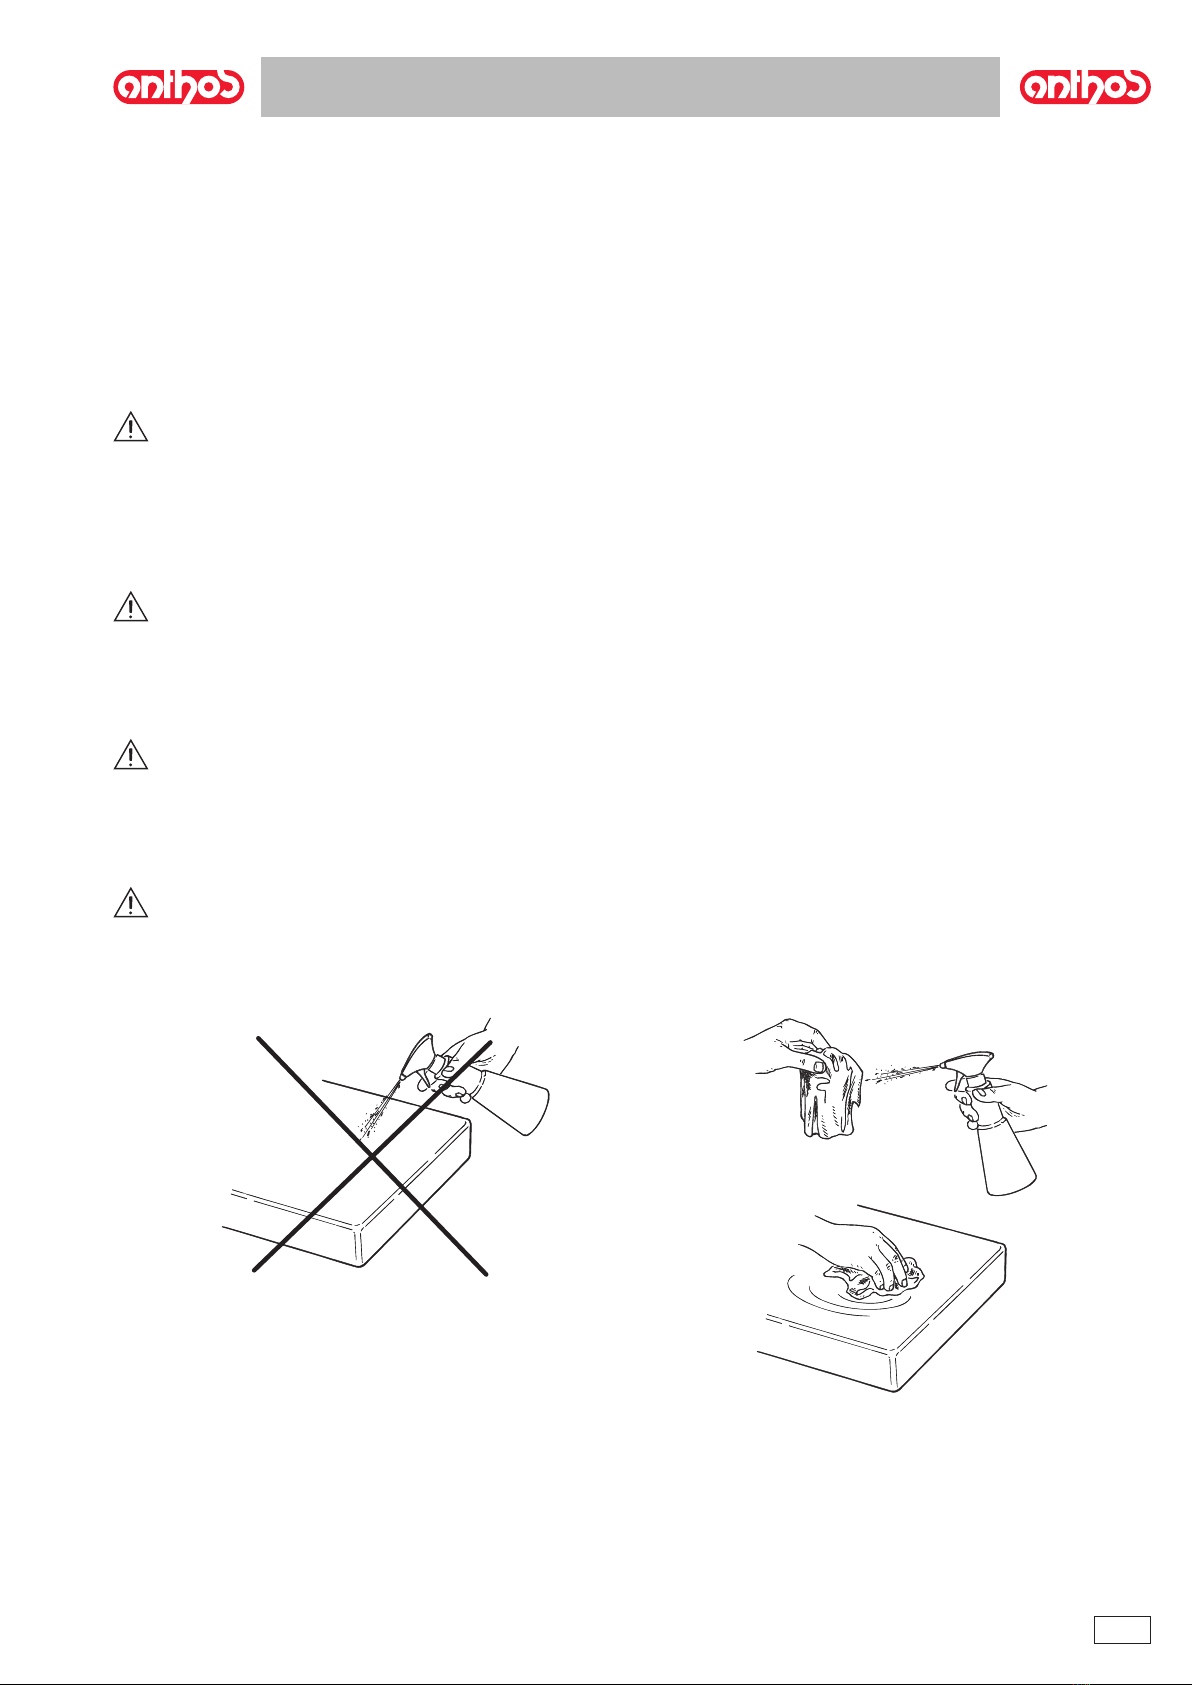
9. Maintenance ............................................................... 75
............................................... 75
.................................................... 75
................................ 75
...................................................................76
......................................... 77
.............................. 78
.................................... 78
........................................... 78
9.9. .................................................................. 78
10. Fault messages .......................................................... 79
............................................................. 80
..................... 81
.................. 82
R7 CART..................................... 83
................. 84
.............. 85
R7 M CART.................................. 86
R7 P............................................. 87
..... 88
12. Dental Unit maintenance plan................................... 89

4
4EN
R7
- OPERATING INSTRUCTION
1. Safety guidelines
• These instructions explain how to correctly use the following dental units:
Carefully read and become familiar with the content of this manual before using the equipment.
•
Class I.
Type B.
1.2. Intended use
non-continuous operation
WARNING! (only for the American and Canadian markets)
Federal law restricts the sale of this device exclusively to dentists.

55EN
R7
- OPERATING INSTRUCTION
•
Class IIa.
•
IECClass I - Type B.
•
EN 1717
•
Class I.
1.2.2. Environmental conditions
1.2.2.1. Transport and packaging conditions
1.2.3. Warranty
2
WARNING!
The color of the three wires (POWER, NEUTRAL and EARTH) should satisfy the requirements of current standards.
by ANTHOS.
1.2.4. Disposing the equipment when no longer used
WARNING!
The crossed out wheeled bin placed on the equipment indicates that the waste equipment must be collected separately from other waste.

66 EN
R7
- OPERATING INSTRUCTION
1.3. Safety rules
WARNING!
• All equipment is permanently installed.
CEFLA s.c. shall not be held liable for any personal injury or equipment damage resulting from failure to heed the precaution given above.
• Floor condition
260 daN.
CEFLA s.c. shall not be held liable for any personal injury or equipment damage resulting from failure to heed the precaution given above.
• Dental chair
• Tray holders
• Connections to external instruments
• Electromagnetic interferences.
• Replacing the chucks
• Patients with pace makers and/or hearing aids.
• Implants.
• Quality of the water delivered by the dental unit.
NOTE: Contact your local dealer or Dental association for more detailed information about national laws and requirements.
• Applied Parts.
• WARNING! Moving the dental chair.

77EN
R7
- OPERATING INSTRUCTION
1.4. Cleaning and disinfecting
• Coated surfaces and plastic parts.
• Upholstery.
WARNING!
Any splashes or spots of mordant will stain the MEMORY FOAM upholstery. Immediately rinse with plenty of water if acid spatters on the
upholstery.
• Uncoated metal surfaces.
• Ethanol.
• 1-propanol (N-propanol, propyl alcohol, N-propyl alcohol).
• Combination of ethanole and propanole.
WARNING!
• Do not use products containing isopropyl alcohol (2-propanol,iso-propanol).
• Do not use products that contain sodium hypochlorite (bleach).
• Do not use cleaners that contain phenol.
• Do not spray the selected products directly on the surfaces.
• All products must be used as directed by the manufacturer.
• Do not mix the STER 1 PLUS disinfectant with other products.
WARNING!
The products suggested are compatible with the materials of the equipment, however damages may occur to surfaces and materials re-
Cleaning and disinfecting instructions.
WARNING!
• All material used to clean and disinfect must be thrown away.

88 EN
R7
- OPERATING INSTRUCTION
1.5. Sterilization

99EN
R7
- OPERATING INSTRUCTION
2. Description of the CLASSE R devices
•
•
•
2.1. Nameplate
Models: R7 CONTINENTAL, R7 INTERNATIONAL and R7 SINGLE
HYDRO GROUP.
Models: R7 M CONTINENTAL and R7 M INTERNATIONAL.
Models: R7 CART and R7 M CART.

10
10 EN
R7
- OPERATING INSTRUCTION
Model R7 P.
2.2. Dental units
Model R7 CONTINENTAL
a
b
c
d
e
f
g
h
i
l
m
n
o
u
z
Model R7 INTERNATIONAL
a
b
c
d
e
f
g
h
i
l
m
n
o
r
u
z
Model R7 CART
a
c
d
f
g
h
i
l
m
o
p
r
u
z

11
11EN
R7
- OPERATING INSTRUCTION
R7 SINGLE HYDRO GROUP
a
b
e
f
g
h
i
l
m
n
o
r
u
z
Model R7 M CONTINENTAL
b
c
d
e
f
g
h
i
n
o
q
u
z
Model R7 M INTERNATIONAL
b
c
d
e
f
g
h
i
n
o
q
r
u
z

12
12 EN
R7
- OPERATING INSTRUCTION
Model R7 M CART
b .
c
d
e
f
g
h
i
n
o
p
q
r
u
z
Model R7 P
b .
e
f
g
h
i
n
o
q
r
u
z

13
13EN
R7
- OPERATING INSTRUCTION
2.3. Dental chair
Description of the chair
a
b
c
d
e
Operating times
Maximum weight capacity.
WARNING!
Do not exceed this value.
Warnings for use.
WARNING: FOOT CRUSHING HAZARD
(on both sides).
2.4. Turning on the dental operatory
f1
•
•
WARNING!
The main switch must be pressed by hand.
3. Warnings for models R7 CART and R7 M CART.
WARNING!
While moving the cart, pay attention to steps and/or horizontal obsta-
cles as the cart may become unstable and/or overturn.

14
14 EN
R7
- OPERATING INSTRUCTION
3.1. R7 line operating unit conversion
WARNING!
accidentally be turned on, creating hazardous situations.
a
k
NOTE: slightly move arms on their pivot points so as to
make element release easier.
WARNING!
During this operation, avoid extending the arms of the
operating lamp, if any, to the outside so as to prevent any
excessive imbalance of the equipment.
b
WARNING!
Be extremely careful not to pinch the suction tubes and
instrument cords while performing this operation.
NOTE: make sure that element ( k) is correctly locking short
arm in the new position.
c
WARNING!
If the stop pin is not used, the arm may bang against the
hydrogroup damaging it during regular operation.
a
WARNING!
Before attempting to turn on the operatory unit, verify all
the equipment is in the correct work condition.

15
15EN
R7
- OPERATING INSTRUCTION
4. Dental chair operation
a
b
c
Dental chair movement shutdown
A
3.2. R7 M line operating unit conversion
c
c
4.1. Safety devices
l
m
n
o

16
16 EN
R7
- OPERATING INSTRUCTION
4.2. Emergency devices
WARNING!
Use the devices below when movement of the equipment
needs to be blocked:
• Dental chair control buttons (a), (c) or (d).
• Foot control ( b)
4.3. Adjustable headrest
1
2
Adjusting headrest height.
• 1
• with pneumatic locking 2
u
u
Adjusting the cushion:
1 k
2 u
u
Proper positioning of the headrest.
WARNING!
Important information.
WARNING!
• Maximum on-headrest load: 30 Kg.
• Do not attempt to move cushion while patient is resting against it.
•
releasing the lock mechanism.
• The pneumatic locking device is active only when the air circuit is
pressurized and the dental unit is on.

17
17EN
R7
- OPERATING INSTRUCTION
4.4. Dental chair control panel
Description of the buttons:
4.5. Movable armrests (optional)
WARNING!
• Maximum weight supported by armrest: 68 kg.
4.6. Seat rotation (optional)
NOTE: a buzzer rings intermittently and an icon ( A ) appears on
the top right side of the display screen to signal the seat is released. When
released, all the controls used to move the dental chair are disabled.
NOTE: operation of the foot control can be modied so that when
pressing the "Automatic chair return" button for at least 2 seconds (see
paragraph 5.2), chair seat release/locking is activated.
To activate this function, call Technical Service.
WARNING!
Be extremely careful not to accidentally bang the hydrogroup when
performing this operation.
WARNING!
Before attempting to lower the patient, always verify that the seat is
actually blocked.

18
18 EN
R7
- OPERATING INSTRUCTION
5. Instrument board operation
Layout of instruments.
Starting the instruments.
Simultaneous use of the instruments.
Putting the instrument board place.
a
NOTE (only for pantograph arm with pneumatic brake): to
adjust the height of the dentist’s instrument board, you rst need to press
the brake release button .
NOTE model R7 CART / R7 M CART: o adjust the height of
the dentist’s instrument board, you rst need to press the brake release
button .
Pantograph arm.
Adjusting the pantograph arm with manual brake.
b
Instrument return arm stopping device (only for CONTINENTAL ver-
sion instrument boards).
B
Tray holder module for CONTINENTALversion dentist’s instrument board.
f
WARNING!
Maximum permitted load on the tray holder module ( f ): 2 kg distri-
buted.
Tray holder module for INTERNATIONALversion dentist’s instrument board.
e
WARNING!
Maximum permitted load on the tray holder module ( e ): 2 kg distri-
buted.

19
19EN
R7
- OPERATING INSTRUCTION
Inverting the console unit position for left-handed operators
WARNING!
BEFORE CARRYING OUT THIS OPERATION, TURN OFF THEDENTAL
UNIT. DO NOT REMOVE THE CONSOLE FROM THE DENTIST’S MO-
DULE IF THE DENTAL UNIT IS ON.
To invert the position of the console unit on the dentist’s module,
operate as follows:
g
s
NOTE: to prevent the dentist’s module from slipping out on the
opposite side during this operation, it is advisable to beforehand turn it
about 90° with respect to its support arm (see gure).
WARNING!
During the console cleaning operations do not exert excessive pressure
on the pushbutton panel to prevent damaging stress on the connection.
Cleaning the dentist’s instrument board.
NOTE for CONTINENTAL version dentist’s instrument boards:
the instrument holder ( x) can be removed to facilitate the cleaning ope-
rations; to remove it, simply pull it out of its seat as it is only secured with
magnets.
The silicone instrument holder ( u ) can also be sterilized in an autoclave
at 121°C (see paragraph 1.5.).
Removable instrument cords
NOTE for CONTINENTAL version dentist’s instrument boards:
to remove the tubings you rst need to remove the instrument holder and
then unscrew the relative plastic fastening ring nuts.
NOTE for INTERNATIONAL version dentist’s instrument bo-
ards: to remove the tubings, unscrew the relative plastic fastening ring
nuts below the dentist’s instrument board.
WARNING!
pressing and holding down the relative air and water buttons directly
on the bowl until water spray is no longer present.
• The cords of the TURBINE, MICROMOTOR and SCALER contain
water, therefore hold the end of the cord on the handpiece side over
the bowl when removing the cord.
• When putting a cord back on, make certain the contacts are perfectly
dry and the plastic ring nut is tight.
• Each cord may be remounted only in the position for the correspon-
ding instrument.
WARNING!
The instrument cords are NOT suitable for autoclave or cold disin-
fection.

2020 EN
R7
- OPERATING INSTRUCTION
5.1. Doctor’s control console
R7 CONTINENTAL
R7 M CONTINENTAL
R7 INTERNATIONAL
R7 M INTERNATIONAL
R7 CART
R7 M CART
Description of the buttons:
NOTE: Operation of dental chair buttons:
•
•
Table of contents
Other Anthos Dental Equipment manuals
Popular Dental Equipment manuals by other brands

3M ESPE
3M ESPE Elipar FreeLight operating instructions

SILMET
SILMET SECURApplier Instructions for use

Tiger Dental
Tiger Dental Mini Mold Instructions for use

B.A. International
B.A. International BA Ultimate LED Instructions for use

LM
LM ProPower CombiLED quick guide

Belmont
Belmont Clesta II operating instructions