manuals.online logo
Brands
  1. Home
  2. •
  3. Brands
  4. •
  5. Anywhere Cart
  6. •
  7. Outdoor Cart
  8. •
  9. Anywhere Cart AC-SLIM User manual

Anywhere Cart AC-SLIM User manual

Other Anywhere Cart Outdoor Cart manuals

Anywhere Cart AC-GO User manual

Anywhere Cart

Anywhere Cart AC-GO User manual

Anywhere Cart AC-SYNC User manual

Anywhere Cart

Anywhere Cart AC-SYNC User manual

Popular Outdoor Cart manuals by other brands

Gearwrench 83167 user manual

Gearwrench

Gearwrench 83167 user manual

Costway TH10057 manual

Costway

Costway TH10057 manual

Vivo CART-PC02S instruction manual

Vivo

Vivo CART-PC02S instruction manual

Ergotron STYLEVIEW SV42-3162-1 quick reference

Ergotron

Ergotron STYLEVIEW SV42-3162-1 quick reference

VEVOR SC01 quick start guide

VEVOR

VEVOR SC01 quick start guide

Vivo CART-PC01 instruction manual

Vivo

Vivo CART-PC01 instruction manual

Carts Vermont 20 manual

Carts Vermont

Carts Vermont 20 manual

Westward 2CZY4 Operating instructions and parts manual

Westward

Westward 2CZY4 Operating instructions and parts manual

Numatic EcoMatic EM-5 Assembly

Numatic

Numatic EcoMatic EM-5 Assembly

Bosch XL-Cart Operating/safety instructions

Bosch

Bosch XL-Cart Operating/safety instructions

Tennsco Modular Cart Top Component Assembly Assembly Instructions/Parts Manual

Tennsco

Tennsco Modular Cart Top Component Assembly Assembly Instructions/Parts Manual

Clam POLAR TRAILER HD MAX manual

Clam

Clam POLAR TRAILER HD MAX manual

Costway TL0400 user manual

Costway

Costway TL0400 user manual

Trinity 1569839 owner's manual

Trinity

Trinity 1569839 owner's manual

Outsunny 845-340 manual

Outsunny

Outsunny 845-340 manual

XPOtool 30261 user manual

XPOtool

XPOtool 30261 user manual

Westfalia 94 59 66 Original instructions

Westfalia

Westfalia 94 59 66 Original instructions

Gorilla Carts GCR-10P quick start guide

Gorilla Carts

Gorilla Carts GCR-10P quick start guide

manuals.online logo
manuals.online logoBrands
  • About & Mission
  • Contact us
  • Privacy Policy
  • Terms and Conditions

Copyright 2025 Manuals.Online. All Rights Reserved.

STOP
Inspect thoroughly
for damage &
DO NOT discard
packing material.
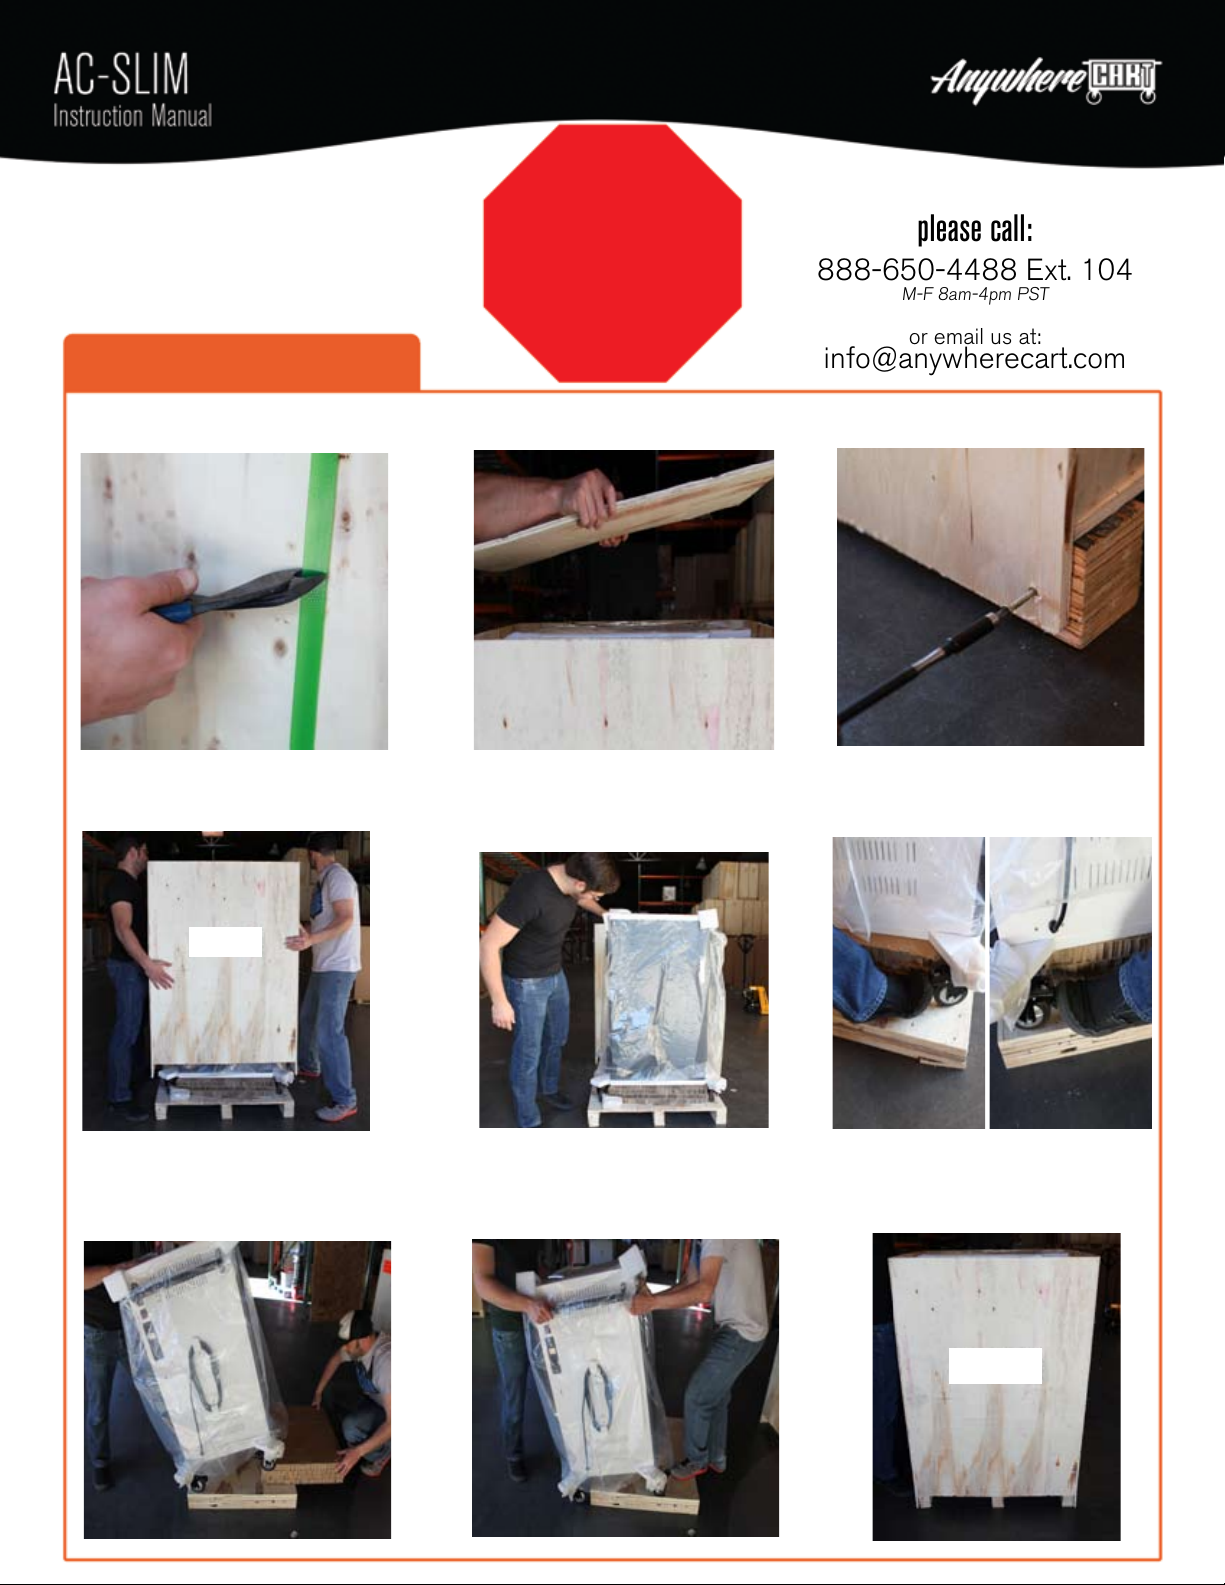
Step 1: Unboxing your cart
1. Wearing protective eye wear,
use wire cutter to cut green straps.
2. Locate & remove screws on lid,
then remove lid & set aside.
3. Locate & remove screws on each
corner at base of pallet.
4. With an assistant, carefully lift
container upward & set aside.
Recommended Items:
- Protective eye wear
- Wire Cutters
- Drill
- Phillips Drill Bit
5. Inspect cart thoroughly for any
shipping damage or defects.
NOTE: Any shipping damage claim must be
submitted within 5 business days of delivery.
6. Apply brakes to both front wheels.
In case of shipping damage,
please call:
888-650-4488 Ext. 104
M-F 8am-4pm PST
or email us at:
[email protected]
7. With an assistant, slowly tilt cart
forward while removing cardboard
cart support from underneath.
8. Set cart back down, unlock all
wheels & slowly roll cart off of pallet.
9. Put all packing materials together
and retain for any warranty claims.
AC-SLIM
AC-SLIM
Cable Pass-thru Slots
Retaining Strip &
Thumbscrews Locking ER Wheels
Adjustable Dividers
Main Power Switch
Optional Sync PortCycle Timer
Removable Adapter
Baskets
225_b_v2
© 2015 NSX Technologies, Inc | 42400 Winchester Rd Temecula, CA 92590 888-650-4488 | FAX 951-699-9000 | info@anywherecart.com
2. If your device is thicker than 1”, locate &
remove thumbscrew by turning counter clockwise.
3. Slide Retaining Strip forward & out of the way.
Strip can be removed if needed.
4. Pulling forward, then up, remove divider panel.
5. Adjust spacing as needed in 1/2” increments. 6. Slide retaining metal strip into place &
replace thumbscrew.
Device slots come set at 1” wide and are adjustable
in 1/2” increments to fit any device width.
Step 2: Adjusting Dividers
1. Using a ruler, measure the thickest part of
your device. If it is less than 1” thick, skip
to Step 3: Power Adapter Setup.
Step 3: Power Adapter Setup
1. Remove basket by pulling forward first,
then pull upward.
3. If your device power adapters are “brick”
style, feed power cables thru holes on
bottom & add up to 6 adapters per basket.
4. Hook basket(s) back in place & plug
power cables into outlets.
5. Feed 6 device cables thru each slot. 6. Working up front, weave device cables
into divider tabs.
2. If your device power adapters are “wall wart”
style, plug into outlets & skip to step 5.
In Timer Mode, 1 LED illuminates at a time for 5 min. In ON Mode, 4 LED illuminate at the same time.
Step 4: Timer Operation