Aobosi FC-J23 User manual

User Manual
MULTI CHOPPER
PLEASE READ INSTRUCTIONS CAREFULLY BEFORE ASSEMBLY
RETAIN THIS MANUAL FOR FUTURE REFERENCE
FC-J23
120V 60Hz 350W

Contents
Chapter I. Important Safety Instructions..............................................................4
Chapter II. Know Your Food Chopper.................................................................6
Chapter III. Use Your Device................................................................................7
Chapter IV. Technical Data.................................................................................9
Chapter V. Cleaning and maintenance...............................................................9
Chapter VI. Troubleshooting..............................................................................10
Chapter VII. Warranty........................................................................................11
2

Parts and Functions
Attention: Product pictures according with packing in prevail
3
12
3
6
7
8
4
5

ChapterⅠImportant Safety Instructions
1.This product is input voltage : 120V~60Hz
, please confirm before use.
2. Before install and disassemble any parts of the product, please disconnect
the power.
3.If the supply cord is damaged, it must be replaced by the manufacturer, its service
agent or similarly qualified persons in order to avoid a hazard.
4. Please don't repair by yourself in order to avoid the danger.
5. Before add ingredients, please make sure the blade assembly has installed and
operate freely.
6. It is required that ingredients cannot exceed the guide.
7. It is forbidden the bowl is idling (the bowl without food) or overload to use.
8. This product cannot be used for machining hard and more moisture ingredients,
such as beans, soybeans, donkey-hide gelatin, rice or frozen meat and so on.
9. Do not let the cord hang over the edge of a table or counter or touch a hot surface.
10.Do not place on or near a hot gas or electric burner or in a heated oven.
11.Avoid contacting moving parts.
12.Keep hands and utensils away from the cutting blade while chopping food to
reduce the risk of severe injury to persons or damage to the food chopper. A
scraper may be used but only when the food chopper is not running.
13. The continuous working time do not exceed 30 seconds. If the ingredients do not
reach the required effect within 30 seconds, release the switch.Interval for 2
minutes and processing again.This method is helpful to extend the product life.
14. After processed, please wait until the motor and blades stop running.Disconnect
the power supply and remove the main part again.
4

15. If the product stop working during operation, this might be caused by temperature
protection of the motor. Please release the switch, disconnect the power supply, let
the machine to cool for 20-30 minutes.
16. The components of this product are not allowed to use more than 140 / 60 °C
hot water
or microwave sterilization, and also cannot be used in
the refrigera tor frozen,avoiding heat or low temperature deformation damage.
17. All the parts which contact with the food materials are conformed to the
requirements of the food-grade certification. Clean, health, and reliable.
18. Do not put the main body into the water or other liquid,also not rinse under water
or other liquid.
19. Do not clean the parts with steel wool, abrasive cleaners or corrosive liquid
( Such as gasoline or acetone).
20.Do not put any components of the product into the dishwasher for cleaning.
21.This appliance is not intended for use by persons (including children) with
reduced physical, sensory or mental capabilities, or lack of experience and
knowledge, unless they have been given supervision or instruction concerning
use of the appliance by a person responsible for their safety.
22.Children should be supervised to ensure that they do not play with the appliance.
23.Do not use the appliance for other than intended use.
24.This product is only use for personal or family.
25.Close supervision is necessary when any appliance is used by or near children.
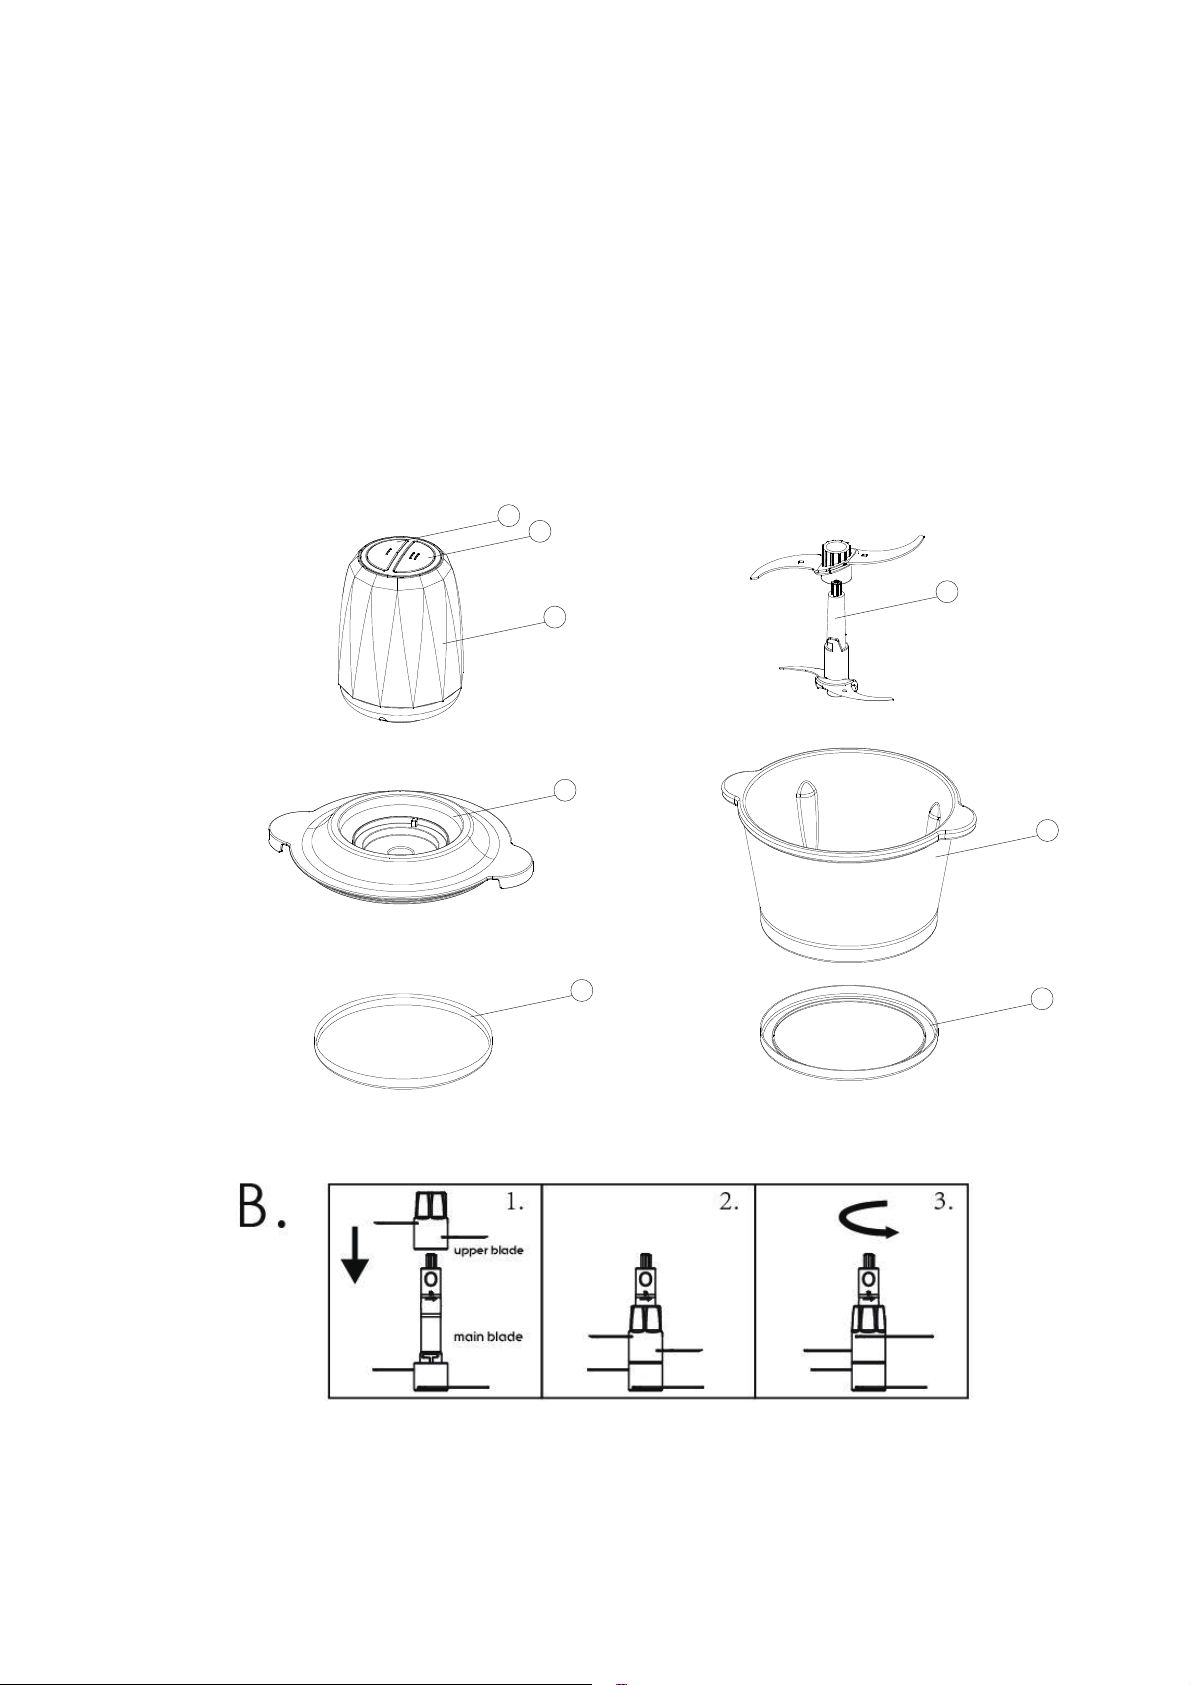
26. Care shall be taken when handling the sharp cutting blades,emptying the bowl
and during cleaning.
27. Switch off the appliance and disconnect from supply before changing accessories
or approaching parts that move in use.
28. Always disconnect the blender from the supply if it is left unattended and
before assembling, disassembling or cleaning.
°F
5

ChapterⅡKnow Your Food Chopper
1. Component function
No Part name Function
①
switchⅠ
Low speed setting
②
switchⅡ
High speed setting
③
main body Including housing, a motor and other parts
④cover lid The lid on glass bowl for safety protection.
⑤sealing ring Attach to the cover lid
⑥two blades Include main blade and upper blade
⑦
glass bowl Use for contain food material.
⑧non-slip
rubber ring
It is installed under the glass bowl to prevent
slippery while at work. It is removable.
2.Product features
1)."S" shape blade design makes chopping effect outstanding.
2). 2-speed switch design. SwitchⅠis in low speed, switchⅡis in high speed.
3).Overheating protection for motor, safe and reliable.
4). Food grade glass bowl, health and easy tor cleaning.
5).Removable parts, easy to install and disassemble
6).Planetary gearbox transmission structure ensures smooth operation, low noise and
high efficiency.
6

ChapterⅢUse Your Device
1. Before the first use
1. Remove the appliance from the package.
2. Remove all packaging material such as films, filler, cable holders and cardboard
3. Should the package contents be incomplete or damages be found, do not take the
appliance into operation. Immediately contact the dealer.
4.Check whether the power supply that you want to use coincides with that of the
appliance. This information can be found on the nameplate.
Note:
1.Dust or production residues can be located on the appliance. We recommend to
clean the appliance as described under “Cleaning”.
2.The motor unit is equipped with a safety switch
3.If the appliance does not start, check if the motor housing, safety cover and knife
are correctly filled.
2. Operation
1.Prepare the dish.
2.Place the rubber ring on a level surface. Install the container on the rubber ring
3.Carefully pull off the knife guard.Assemble the knife referring to figure B on page 4.
4.Place the knifes in the container.
5.Add ingredients into the container, align the cover with the container and position it in
place.
6.Position the motor onto the container, lining up the motor locking tabs to the container
locking slots till the motor unit locks. Connect it to power outlet.
7.Select switchⅠor switchⅡ, gently press and hold the switch.
8.Release the switch when the ingredients have reached desired
consistency.Disconnect the device,wait for the knife stopped spinning. Remove the motor
and safety cover and carefully remove the knifes.
9.Remove the ingredients.
Note:①.Continuous working time can't more than 30 seconds at a time.
②.Work for 30 seconds and then rest for 2 minutes.
③.If the ingredients stick on the bowl, please release the switch,
disconnect the power supply. After using a spatula or chopsticks to
scraping and then process again.
7

④.If food material is uneven distribution, please release the switch
and disconnect the power supply. Distribute the food material evenly in the
bowl, and then open the power supply again.
⑤.If the ingredients do not reach the required effect within 30 seconds,
release the switch.Interval for 2 minutes and processing again.This method
is helpful to extend the product life.
⑥Use only one knife or both knifes depends on the quantity and consistency of
your food.
⑦Always fit the knife first and then fill in the food
⑧The safety cover is equipped with 1 silicone ring. Make sure that the silicone
rings are correctly positioned.
3. Chopping guide
Food Type Weight or
quantity
The longest chop
time
Preparation Tips
Meat
500g/1.1lb
(About 1/3
bowl)
30 seconds
1. Use the main blade only or both.
2. Remove the ribs, bone and skin contained in
meat.
3. Cut the meat into 0.4-0.8inch(1-2cm)
cm block and put into the bowl
4. Meat quantity can't be more than the max limit
line on the bowl.
Meat
250g/0.55lb
(About 1/3
bowl)
30 seconds
1.Use the main blade only or both.
2. Remove the ribs, bone and skin contained in
meat.
3. Cut the meat into 0.4-0.8inch(1-2cm)
cm block and put into the bowl
4. Meat quantity can't be more than the max limit
line on the bowl.
Carrot、
Cucumber
、Garlic
About 1/2
bowl
5-10seconds
batch operation
1.Use the main blade and upper blade.
2.Cut materials into strips or block (strip : 0.4-0.8inch
(1-2cm) wide,2-4inch (5-10cm) long ), the block
ingredients is not more than 0.8-1.2inch(2-3cm)
3.Materials quantity total can not exceed 1/2 of
8

the bowl.
Dry chili、
Pepper
About 1/3
bowl
5-10seconds
batch operation
1. Use the main blade only or both.
2. The total amount is not more than the max
limit line on the bowl, otherwise it will affect the
chopping effect and service life of the machine.
Chinese
Cabbage、
Cabbage、
Celery
About 4/5
bowl
5-10seconds
batch operation
1.Use the main blade and upper blade.
2.Cut materials into strips or block (strip:0.4-0.8
inch(1-2cm) wide,2-4inch(5-10cm)
long ),the block
ingredients is not more than 0.8-1.2inch(2-3cm)
3.Materials quantity total can not exceed 1/2 of
the bowl.
Note:This machine can't be used to chop dry grinding soybean,donkey-hide
gelatin,rice,frozen meat and food materials with more moisture.
ChapterⅣTechnical Data
Product Name
MULTI CHOPPER
Model
Rated Power
Rated Voltage/
Rated Frequency
Product Category Class II
Continue Action Time ≤30S
Interval Time ≥1mins
This machine is a class II appliance, do not need a grounding device.
ChapterⅤCleaning and Maintenance
1.Always disconnected the appliance from the power outlet before cleaning.
2.After used, disassemble the main body, cover lid and blades. Please immediately
clean the glass bowl, blade assembly and the cover lid. Main body and
120V~60Hz
9
FC-J23
350W

switch can't wash with water, do not put into the water or other liquid, you need to
clean with the soft wet cloth.
3.Disassembling the blade: Grasp the main blade holder with left finger ,and then
grasp the top part of the upper blade with right finger, lift the upper blade and
rotate it clockwise to unlock, lift the upper blade upwards to remove.
Note:The blade is very sharp and do not contact with the hand directly.
4.After clean, please wipe all the parts dry with soft cloth or air-dry, assemble
again and store in a cool and dry place.
NOTE:1).It is prohibited the components of this product for high temperature
disinfection.
2).Do not use chemical, steel, wooden or abrasive cleaners to clean the
unit to prevent the gloss loss.
ChapterⅥTroubleshooting
Problem Possible Reason Solution
After connect power,the
product does not work
1. The cover lid is not
installed well.
Please install the cover lid properly.
The motor would have
a bad smell when usin
g
it at the first few times.
For a new motor, it is
normal phenomenon.
After using several times, the product
still has a bad smell, please contact our
service department
Stop working during
operation
1. Low voltage
2. Overheating protection
for motor.
1 .Check whether the voltage is too low.
2.Let the chopper to cool for 20-30
minutes.
10

Remark:
This is common failure analysis and elimination method above, , please contact the
customer service department of our company for other malfunction, or go to the
company designated service center to repair directly, please do not remove or repair
by yourself.
Abnormal vibration or
loud noise
1 .Blade assembly is not
installed in place
2.Product is placed on
uneven surface.
3.High voltage
4.Food materials is too
much.
1.Install the blade assembly in pl
details on”operation”section.
2.Please place the product on a even
surface.
3.Please check whether the voltage is
too high.
4.Release the switch, disconnect the
ly,remove the excessive food
The blades get stuck.
T
he blade was entangled or
jammed by food materials
Release the switch, disconnect the
power supply, take out the ingredients
and cut into small pieces.
11

ChapterⅦ GUARANTEE
12
Thank you for purchasing our product, which has been made to meet high
quality standards. The manufacturer's warranty covers a period of 12 months f
rom the date of purchase against manufacturing faults.
All Aobosi warranties are automatically kept tracking in our system, so there is
no need to register your product.
For an extra 6-month free of charge warranty, please register at website
www.iaobosi.com or fill in following Warranty Card, take picture and
You will be served within 12 hours. We do make every effort to ensure
you are 100% satisfied.
Please fill in the table and email it within 10 days from the date of purchase
Warranty Card
Item name:
Model:
Serial No.:
Store name:
Purchase date:
Buyer's name:
Email:
Address:
Tel.:
Table of contents
Popular Food Processor manuals by other brands

Moulinex
Moulinex AAT5 manual

Continental Refrigerator
Continental Refrigerator CE-FP009 user manual

Prince Castle
Prince Castle Dice Witch 910-A Series Specifications

Kogan
Kogan KA15FPCSLVA user guide

Kenwood
Kenwood CCC20 instructions

Black & Decker
Black & Decker HANDY SHORTCUT II HMP60 Series Use and care book