Apex Digital APXBASE User manual

OPERATING MANUALOPERATING MANUAL
Base Station
Model No. APXBASE
Before attempting to connect or operate this product,
please read these instructions carefully and save this manual for future use.
All-in-One Headset
Model No. APXHS

OPERATING MANUAL
1
Battery Charger ……………………………….......................................................2
Power On/O Headset …………………….......................................................2
Replace the Battery ......................................................................................
Headset Volume Up/Down ………………......................................................3
Logging into Base Station …………………....................................................4-5
Register Headsets ……………………………......................................................5-7
Push to Talk/Hands Free ………………….......................................................7-8
Auto Hands Free …………………………….........................................................8-9
Single Lane ………………………………………......................................................9-10
Dual Lane Cross Lane ………………………......................................................10-11
Dual Lane Team Mode ……………………........................................................11-12
Dual Lane Configuration …………………........................................................12-13
Tandem Operation …………………………........................................................13
Dual Lane Home Screen …………………........................................................14-15
Auto Greeter …………………………………..........................................................15-17
Alerts ……………………………………………..........................................................17-19
Reminders ………………………………………........................................................19-20
Inbound/Outbound Volumes …………........................................................20-22
Noise Suppression ………………………….........................................................22-23
Lane Settings ………………………………….........................................................23-25
Manager ………………………………………...........................................................25
Import/Export Settings ……………….…........................................................26
Engineer Settings ………………………..…........................................................26
System Help ……………………………….….........................................................26
Specifications ………………………………………….……...........................................27
FCC …..……………………….….............................................................................28
Industry Canada ……………………….……..........................................................28
2
2
2-3
3
4-5
5-7
7-8
8-9
9-10
10-11
11-12
12-13
13
14-15
15-18
18-20
20-21
21-23
23-24
24-26
26
27
27
27
28-30
31
31
Table of Contents

OPERATING MANUAL
2
Battery Charger
Charging Status
Blue RF Logo Illuminated - Power is on, the unit is receiving power from
the outlet through the power supply.
Green Light - Battery is charged, battery housed in the
corresponding charging slot is at or above
95% charging capacity.
Yellow Light - Battery is charging, battery housed in the
corresponding charger slot is below 95%
charging capacity.
Flashing Yellow Light - Battery fault indicator, follow instructions
under the battery fault.
Power On/O
Insert battery into headset until the battery clicks in. A blue
light will appear below the RF logo on the front of the headset
and a light will appear on the microphone tip.
Note: Battery will only insert one way. Do not force the battery in.
Replace The Battery
Press the red battery latch down towards
the ear pad and the battery will eject.

OPERATING MANUAL
3
If a battery is already in the headset, pick the headset up to
turn on. A blue light will appear underneath the RF logo
and green light on the microphone tip will appear.
Note: If the light on the microphone boom is blinking red,
this indicates the headset needs to be registered.
Power OFF: Headset will turn o automatically after
10 minutes of no movement.
Volume Up and Down
Volume Up: Press the “V” switch. Each time the switch is pressed, a
short beep is heard and gets louder with each press of the switch.
Volume Down: After pressing the “V” switch six times,
the headset will return to the lowest volume setting.

OPERATING MANUAL
4
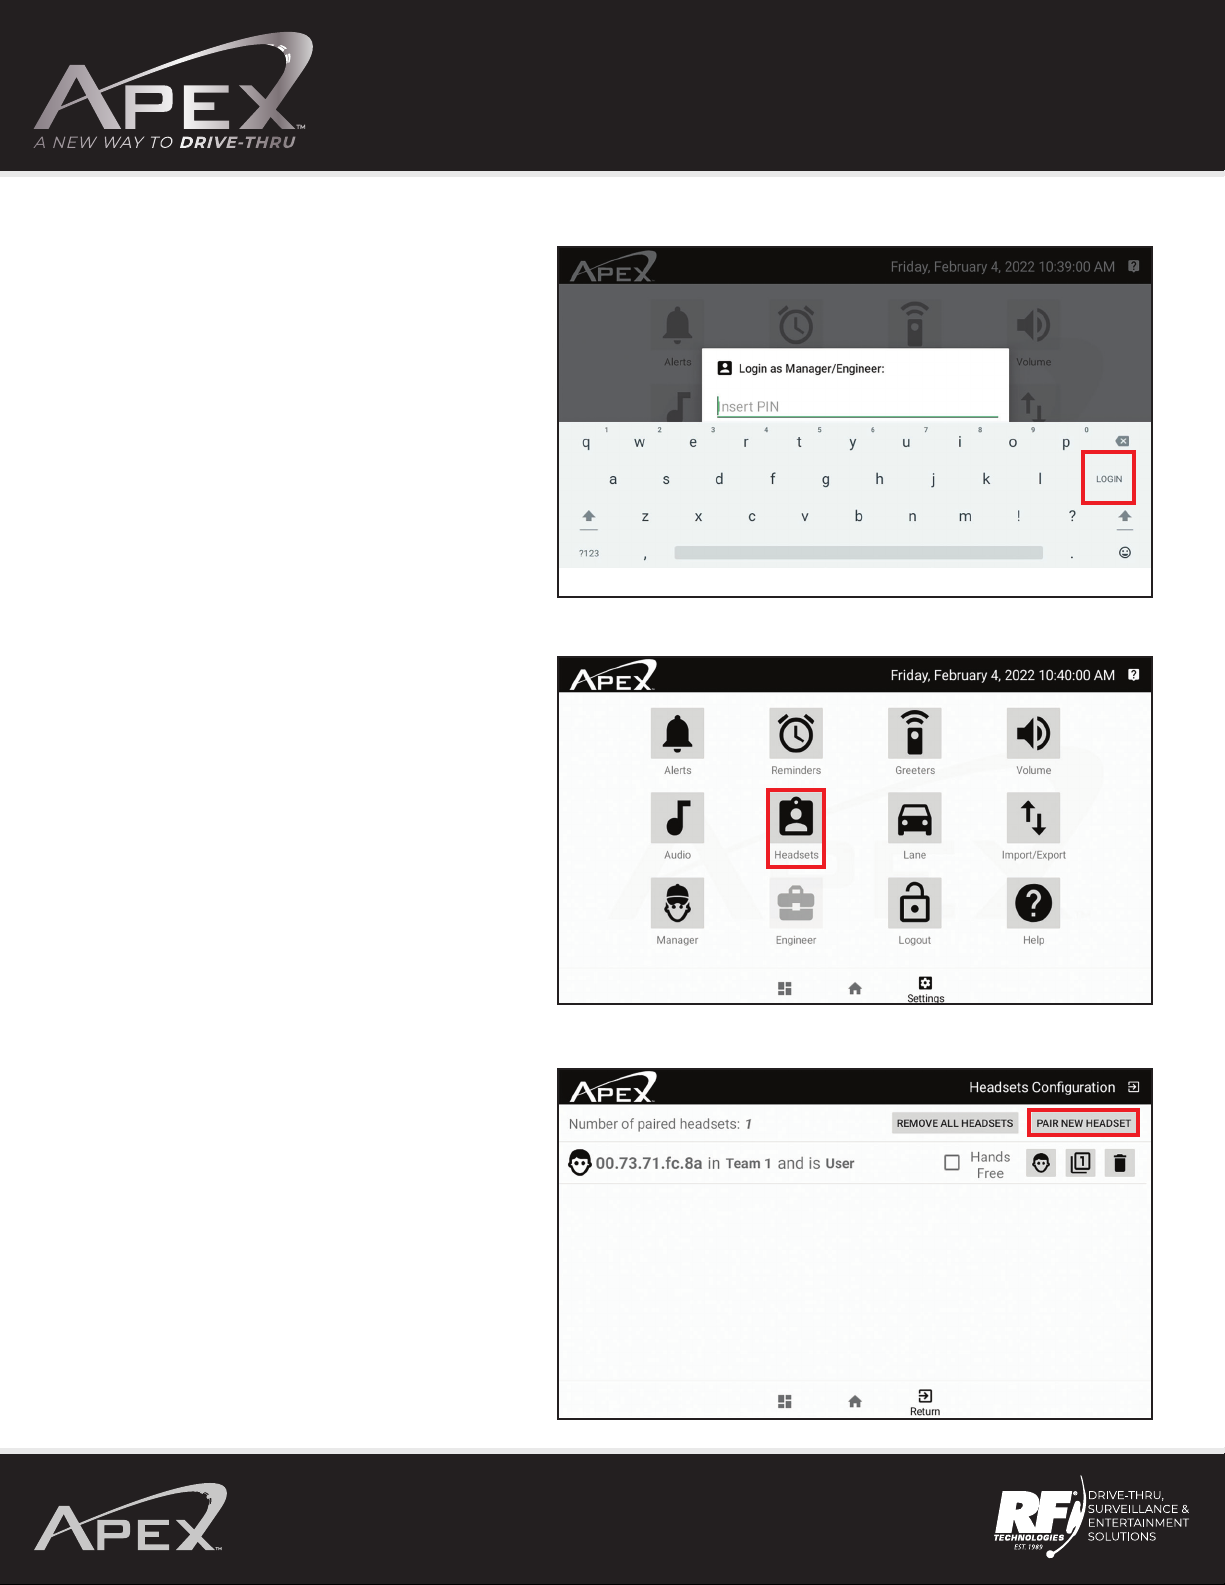
Press the LOGIN icon.
Logging Into the Base Station
Press the SETTINGS icon on the base station.
OPERATING MANUAL
5
Type in password RF1989 (default) and then press LOGIN.
Register Headset
Turn on a headset by picking up or inserting a battery.
After logging in, press the HEADSETS icon.
Press PAIR NEW HEADSET.
OPERATING MANUAL
6
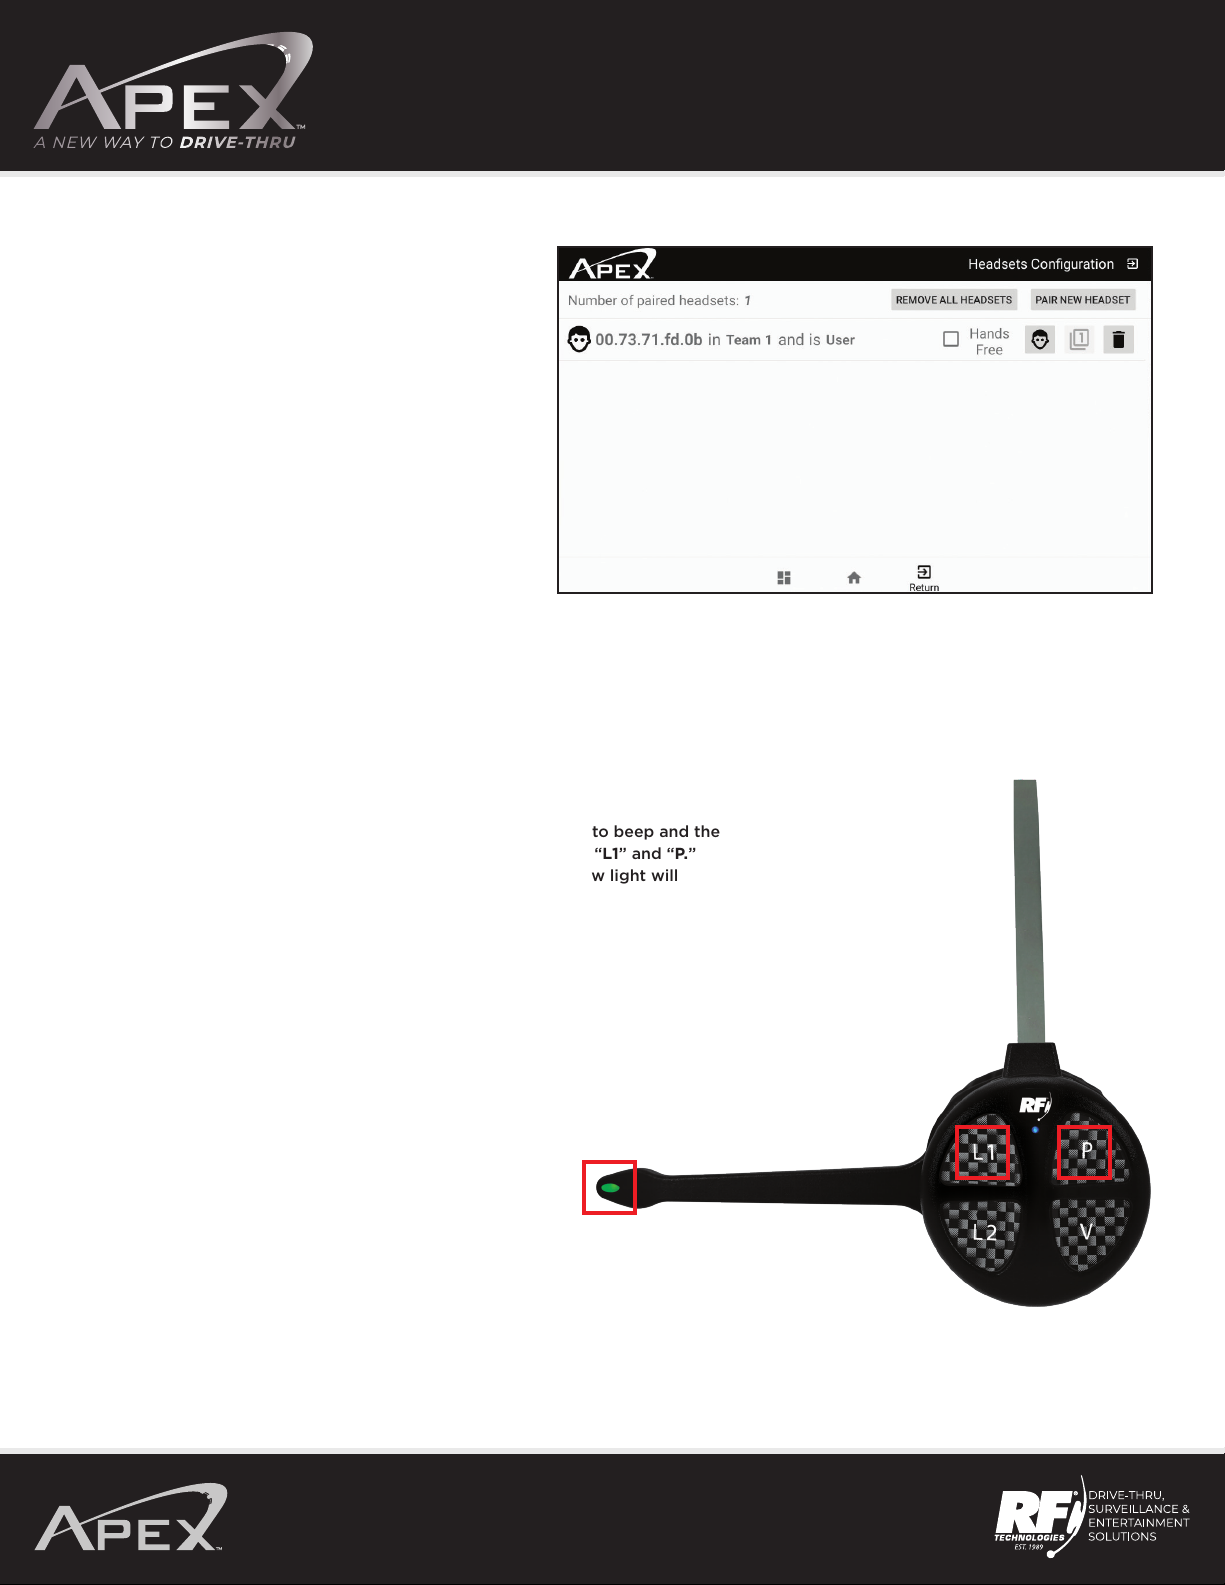
Pair headsets message, you can now register headset(s).
Register to Base Station
Press and hold the “L1”and “P” switches until the headset starts to beep and the
light on the microphone boom flashes green and yellow. Release “L1” and “P.”
A long beep will be heard in the headset and the green and yellow light will
stop flashing.
Note:
• Can register up to 32 headsets.
• Can register multiple headsets at the same time.
• If the system is Dual Lane, follow the instruction above
but press and hold “L2” and “P” switches.
• When headsets are registered, press
exit then press the HOME icon.
OPERATING MANUAL
7
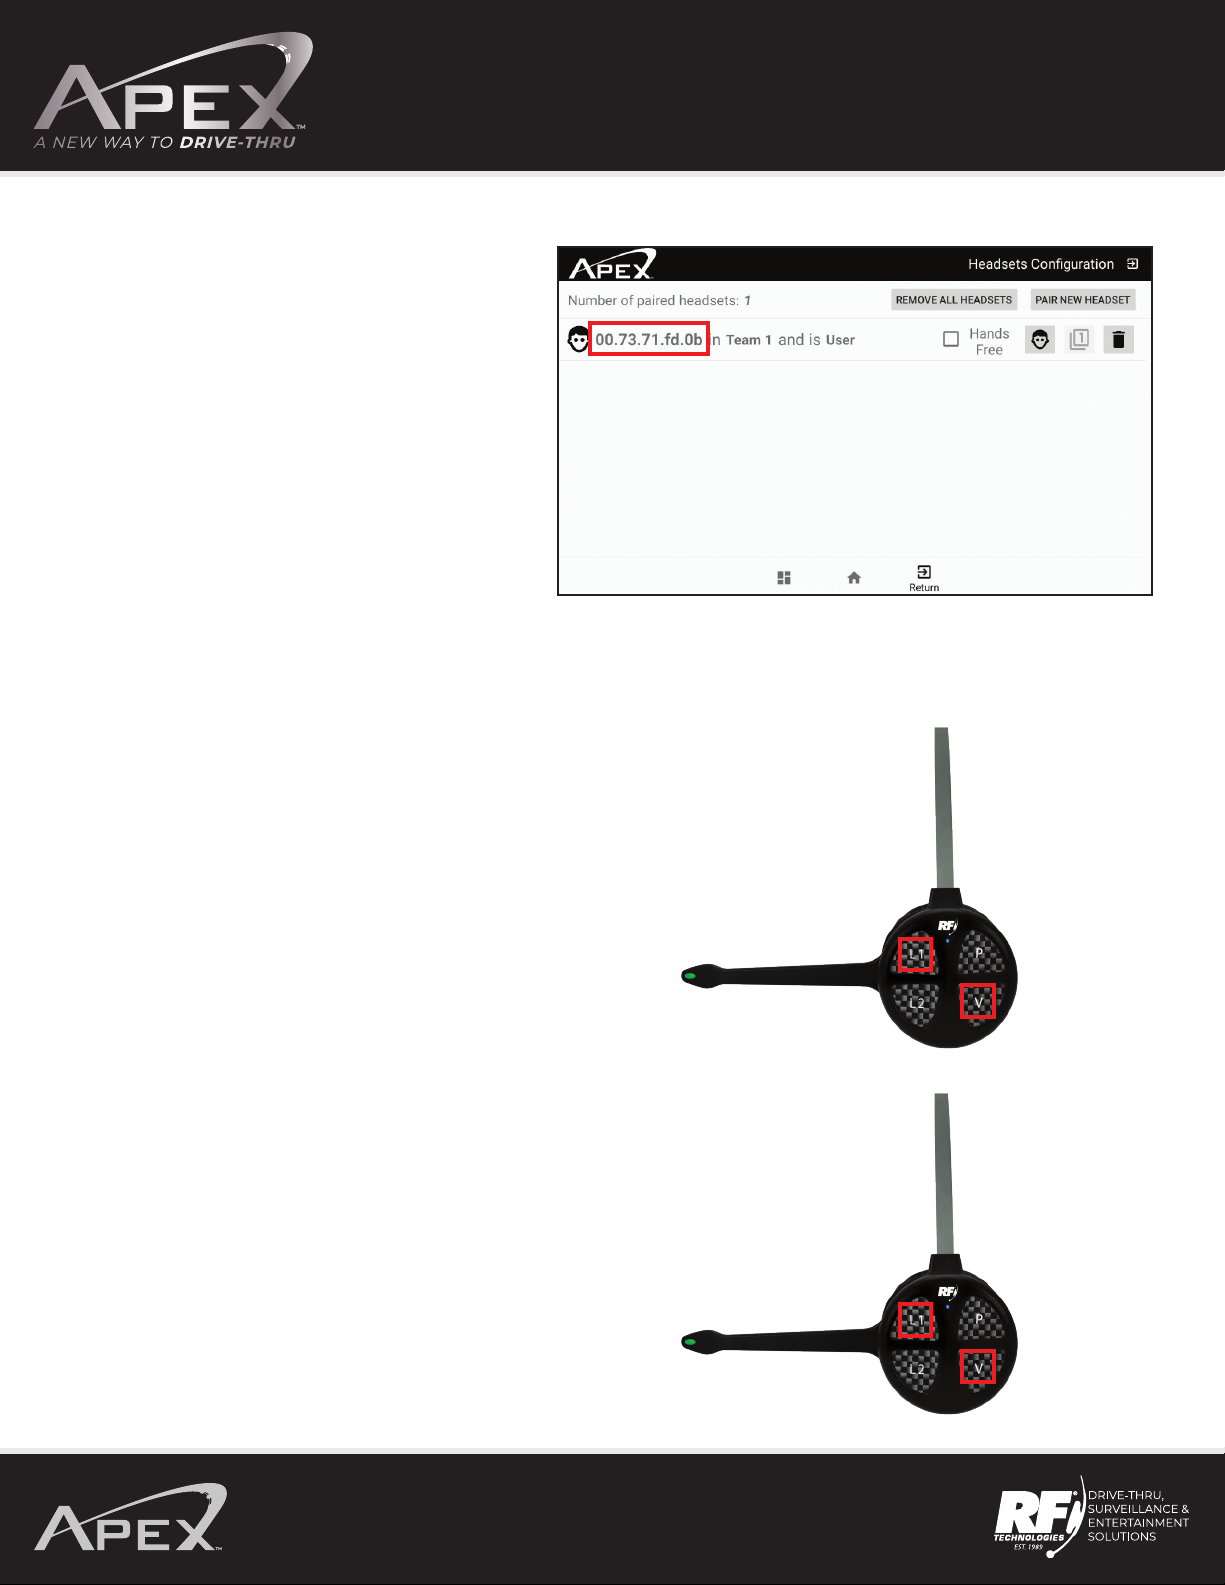
After programming a headset, the serial number
will appear.
Program Headset for Push to Talk or Hands Free (Talk Lock)
Hands Free (Talk Lock)
Press and hold “L1” and “V” switches
until the voice prompt says, “Lane Talk Lock ON.”
Turn O Hands Free (Talk Lock)
Press and hold “L1” and “V” switches
until the voice prompt says, “Talk Lock OFF.”
OPERATING MANUAL
8
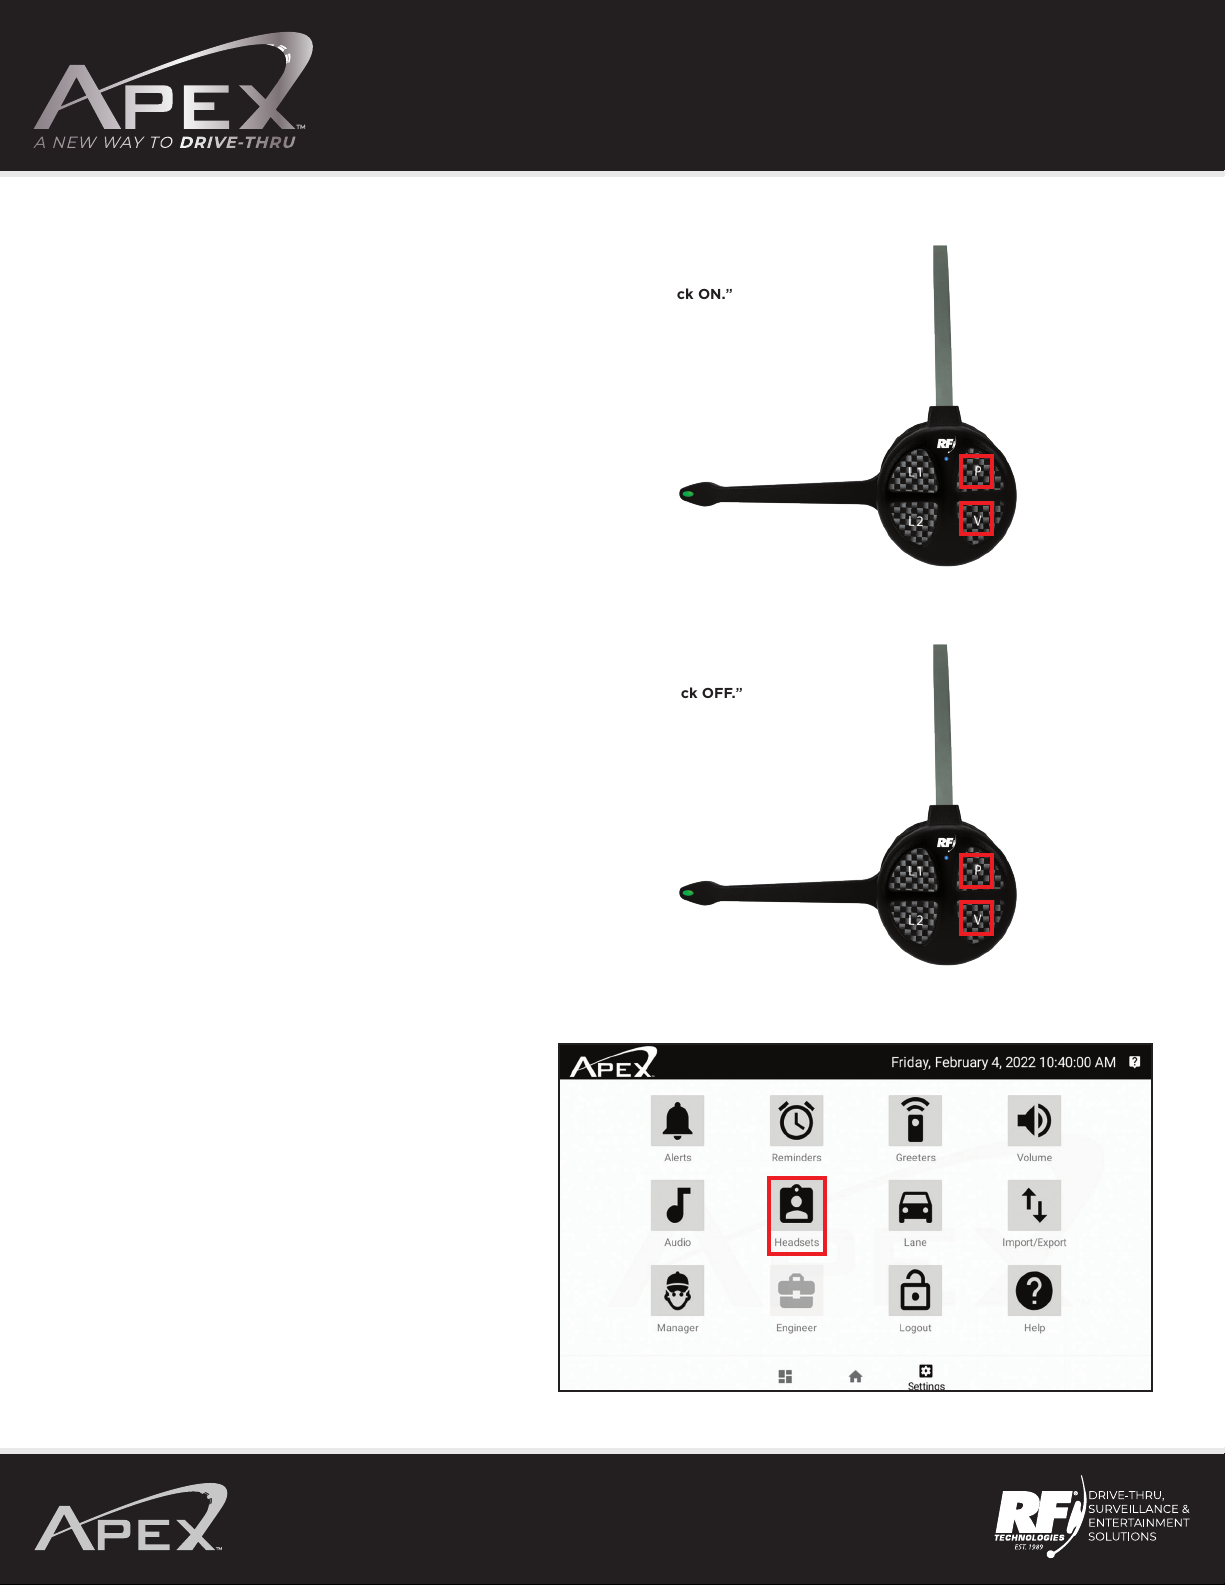
Turn On Page Hands Free (Talk Lock)
Press and hold “P” and “V” switches until the voice prompt says “Lane Page Talk Lock ON.”
Turn O Page Hands Free (Talk Lock)
Press and hold “P” and “V” switches until the voice prompt says, “Lane Page Talk Lock OFF.”
Turning on Auto Hands Free
After logging in to the base press the HEADSET icon.

OPERATING MANUAL
9
Touch and activate the Hands-Free option next to
each headset you wish to put into this mode.
Note: When activated, green check mark will
appear next to Hands Free.
Single Lane
Single Lane Drive-Thru Push to Talk Mode (PTT)
• A single beep is heard in the headset alerting the user a car is present at the speaker post.
• Press and hold either L1 or L2 switch to speak to the customer. The microphone boom tip will flash green.
• Speak into the microphone to communicate with the customer.
• After the customer leaves the speaker post, the headset will stop transmitting and the green light on the
microphone boom tip will stop flashing.
Single Lane Drive-Thru Hands-Free Mode (Talk Lock)
• A single beep is heard in the headset alerting the user a car is present at the speaker post.
• Press and release either L1 or L2 switch to speak to the customer. The microphone boom tip will flash green.
• Speak into the microphone to communicate with the customer.
• To mute the microphone during the order, press either L1 or L2 once. The light on the microphone tip will stop flashing.
• Press and release either L1 or L2 to speak with the customer again. The microphone boom tip will flash green.
• After the customer leaves the speaker post, the headset will stop transmitting and the green light on the
microphone boom tip will stop flashing.

OPERATING MANUAL
10
Dual Lane Cross Mode
Note: In Cross Lane mode one headset will take orders for Lane 1 and Lane 2.
Push To Talk (PTT)
• A single beep (for Lane 1) and a double beep (for Lane 2) is heard in the headset alerting
the user a car is present at the speaker post or menu board.
• Press and hold L1 to speak to the customer in Lane 1. The microphone boom tip will flash green.
• Press and hold L2 to speak to the customer in Lane 2. The microphone boom tip will flash yellow.
• Speak into the microphone to communicate with the customer.
• After the customer leaves the speaker post or menu board, the headset will stop transmitting and
the green or yellow light on the microphone boom tip will stop flashing.
Hands Free Mode (Talk Lock)
• A single beep (for Lane 1) and a double beep (for Lane 2) is heard in the headset alerting the user
a car is present at the speaker post or menu board.
• Press and release L1 to speak to the customer in Lane 1. The microphone boom tip will flash green.
• Press and release L2 to speak to the customer in Lane 2. The microphone boom tip will flash yellow.
• Speak into the microphone to communicate with the customer.
• To mute the microphone during the order, press L1 for Lane 1 and L2 for Lane 2. You will see the light
on the microphone tip will stop flashing.
• To speak with the customer again press and release L1 for Lane 1. The microphone boom tip will flash green.
• To speak with the customer again press and release L2 for Lane 2. The microphone boom tip will flash yellow.
• After the customer leaves the speaker post, the headset will stop transmitting and the light on the
microphone boom tip will stop flashing.
Single Lane Drive-Thru with Auto Hands Free
• A single beep is heard in the headset alerting the user a car is present at the speaker post or menu board.
• Do not press either T1 or T2. The microphone boom tip will flash green.
• Speak into the microphone to communicate with the customer.
• If you would like to mute the microphone during the order, press either L1 or L2 once.
The microphone boom tip will stop flashing.
• Press and release either L1 or L2 to speak with the customer again. The microphone boom tip flashes green.
• After the customer leaves the speaker post or menu board, the headset will stop transmitting
and the green light on the microphone boom tip will stop flashing.

OPERATING MANUAL
11
Dual Lane Team Mode
Note: In Team mode one headset will take orders for Lane 1 and the other headset will take orders Lane 2.
Dual Lane Drive-Thru Push to Talk (PTT)
• A single beep (for Lane 1) and a double beep (for Lane 2) is heard in the headset alerting the user
a car is present at the speaker post or menu board.
• Press and hold L1 to speak to the customer in Lane 1. The microphone boom tip will flash green.
• Press and hold L2 to speak to the customer in Lane 2. The microphone boom tip will flash yellow.
• Speak into the microphone to communicate with the customer.
• After the customer leaves the speaker post or menu board, the headset will stop transmitting
and the green or yellow light on the microphone boom tip will stop flashing.
Dual Lane Drive-Thru Hands-Free Mode (Talk Lock)
• A single beep (for Lane 1) and a double beep (for Lane 2) is heard in the headset alerting the user
a car is present at the speaker post or menu board.
• Press and release L1 to speak to the customer in Lane 1. The microphone boom tip will flash green.
• Press and release L2 to speak to the customer in Lane 2. The microphone boom tip will flash yellow.
• Speak into the microphone to communicate with the customer.
• To mute the microphone during the order, press L1 for Lane 1 and L2 for Lane 2. The microphone tip will stop flashing.
• To speak with the customer again press and release L1 for Lane 1 or L2 for Lane 2.
The microphone boom tip will flash green for Lane 1 and yellow for Lane 2.
• After the customer leaves the speaker post, the headset will stop transmitting and the green light
on the microphone boom tip will stop flashing.
Auto Hands Free
• A single beep (for Lane 1) and a double beep (for Lane 2) is heard in the headset alerting the user
a car is present at the speaker post or menu board.
• Speak to the customer without pressing any switch.
• Speak into the microphone to communicate with the customer.
• To mute the microphone during the order, press L1 for Lane 1 or L2 once.
The light on the microphone tip will stop flashing.
• To speak with the customer again press and release L1 for Lane 1. The microphone boom tip will flash green.
• To speak with the customer again press and release L2 for Lane 2. The microphone boom tip will flash yellow.
• After the customer leaves the speaker post, the headset will stop transmitting and the light on the
microphone boom tip will stop flashing.
OPERATING MANUAL
12
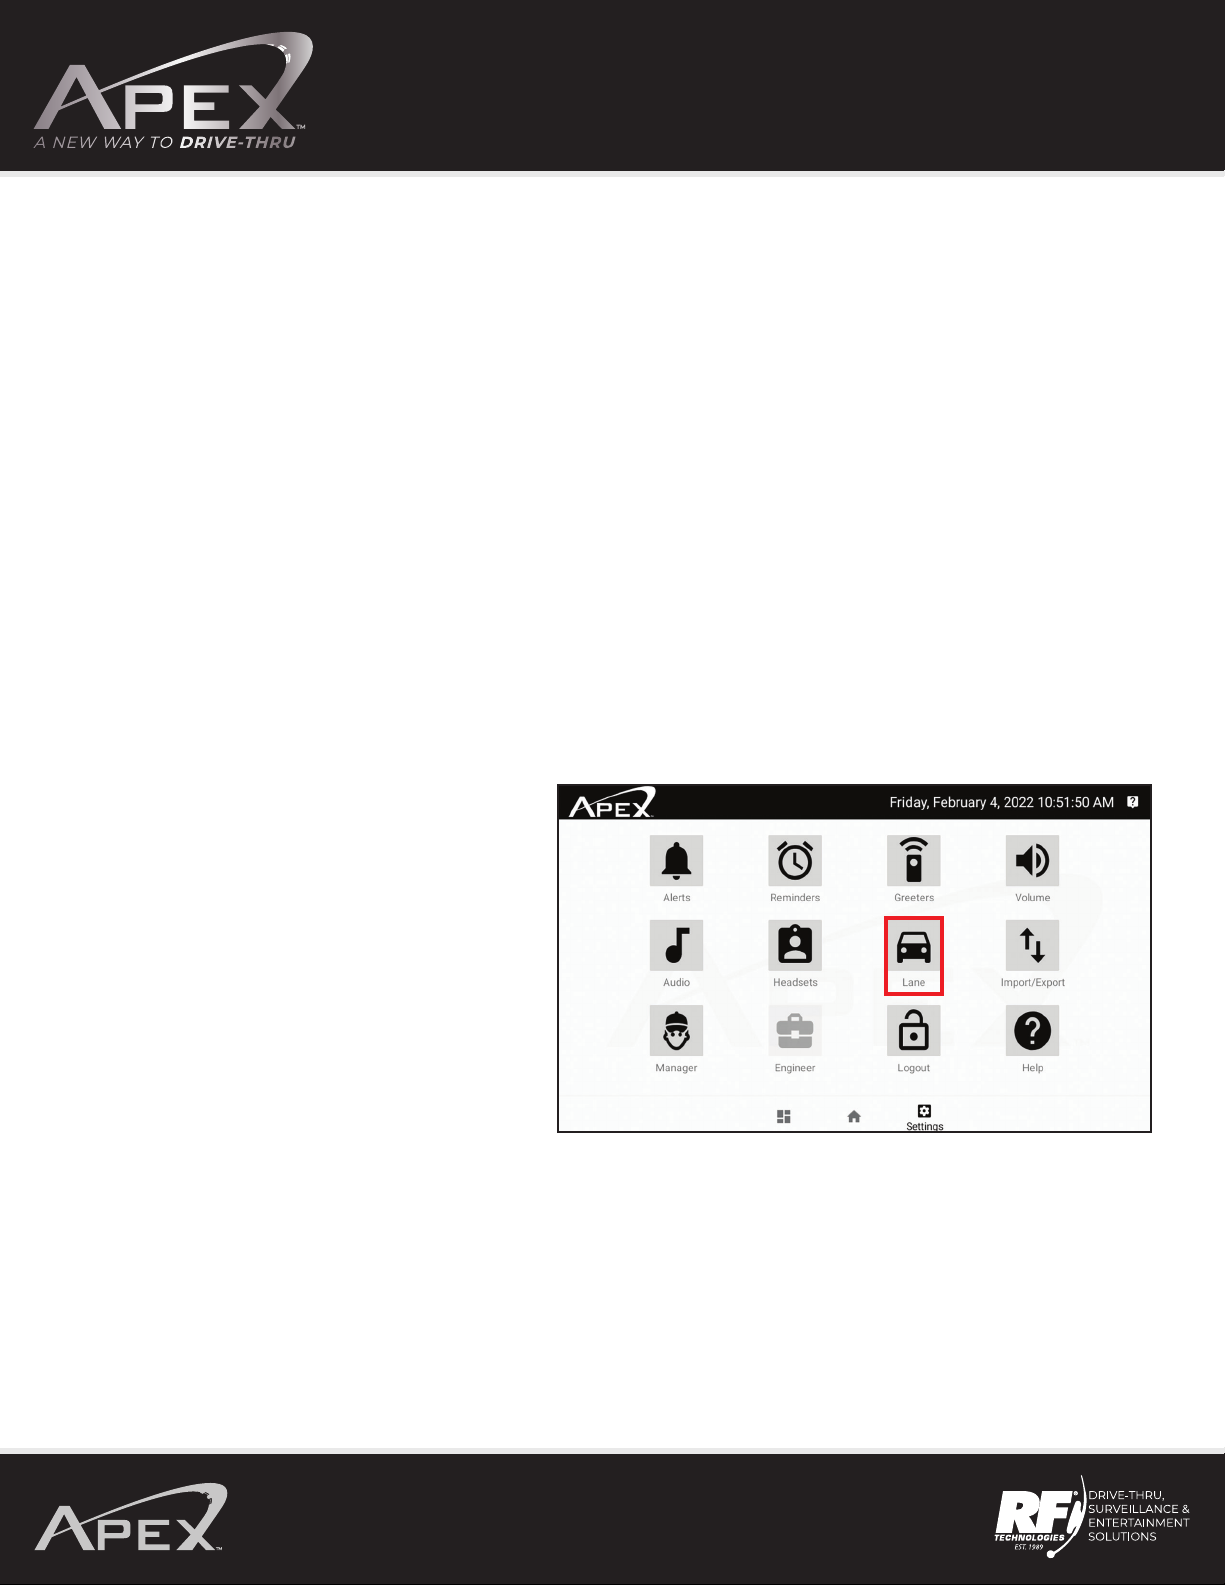
Selecting Your Dual Lane Configuration
After logging in, press the LANE icon.
Dual Lane Drive-Thru with Auto Hands Free
• A single beep (for Lane 1) and a double beep (for Lane 2) is heard in the headset alerting the user
a car is present at the speaker post or menu board.
• Speak to the customer without pressing any switch. The microphone boom tip will flash green.
• Speak into the microphone to communicate with the customer.
• If you would like to mute the microphone during the order, press either L1 or L2 once.
You will see the light on the microphone tip will stop flashing.
• Press and release either L1 or L2 to speak with the customer again. You will see the microphone boom tip flash green.
The microphone boom tip will flash green for Lane 1 and yellow for Lane 2.
• After the customer leaves the speaker post or menu board, the headset will stop transmitting and the green light
on the microphone boom tip will stop flashing.
OPERATING MANUAL
13
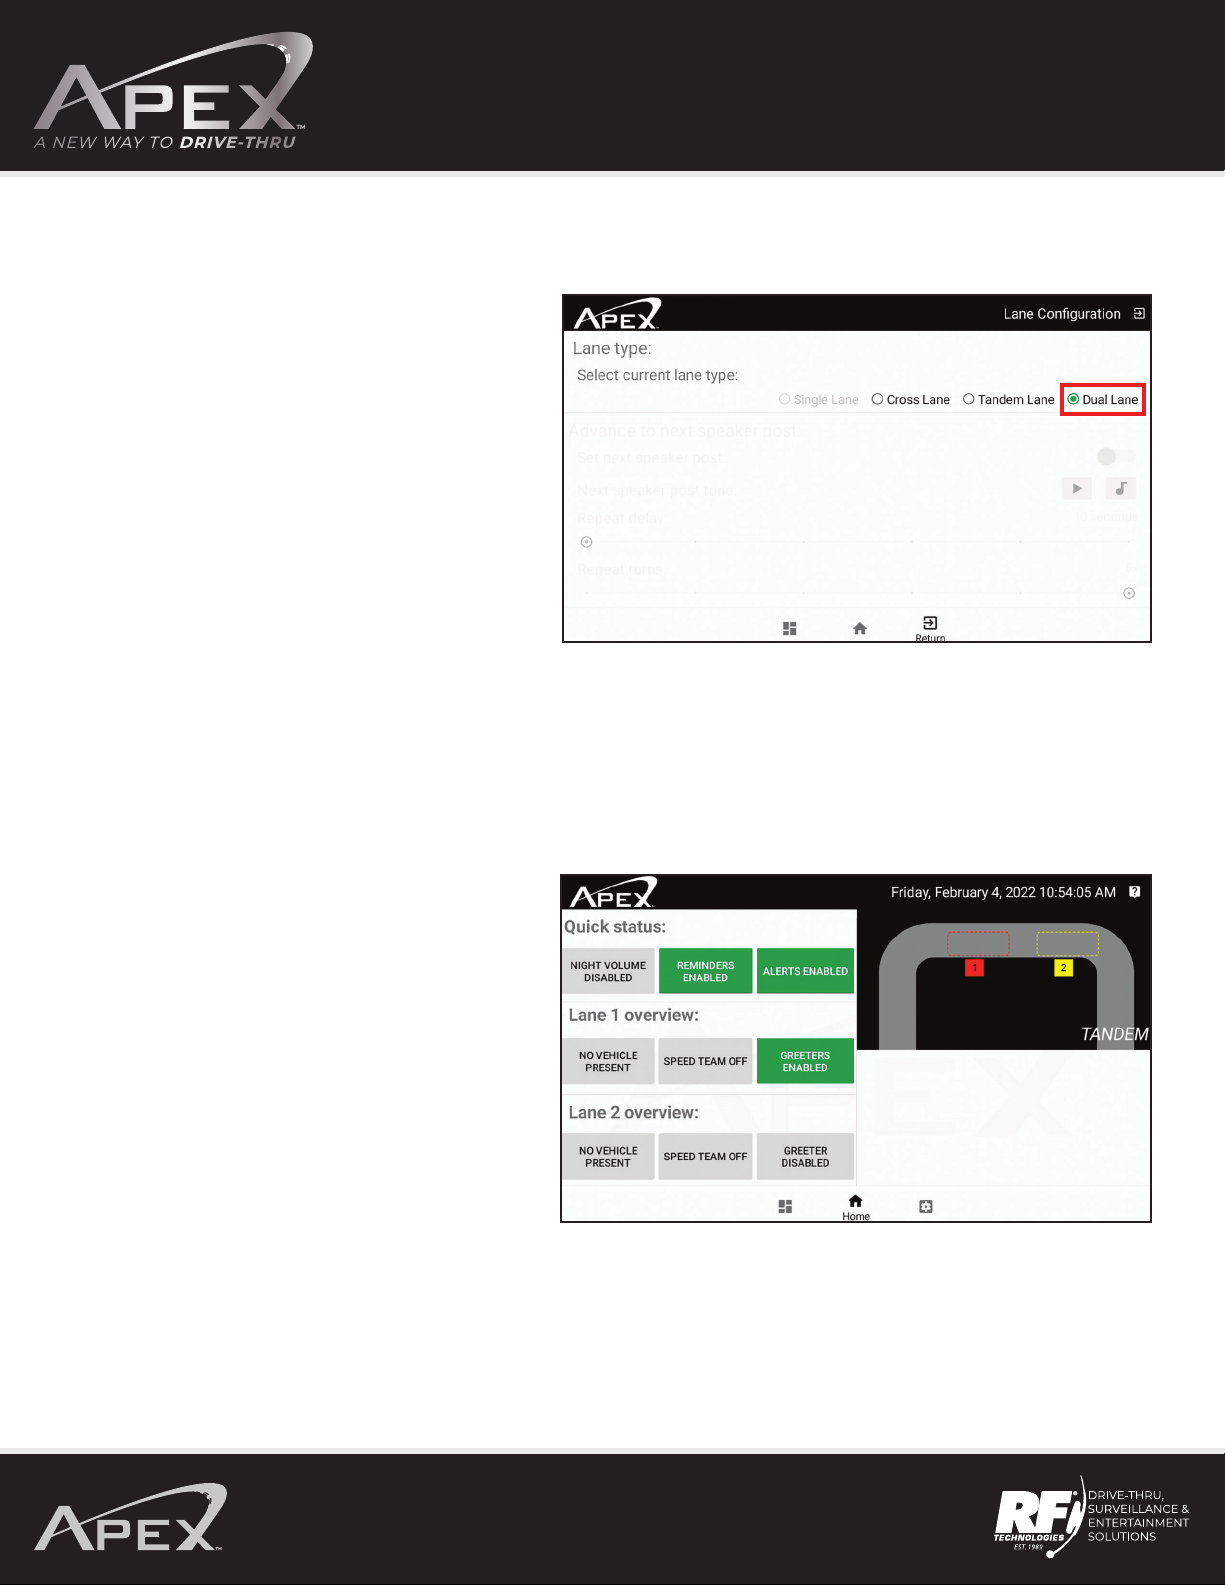
Dual Lane Configuration
If your system's second lane is active you can adjust
the lane configuration to match your existing setup.
Note: Current activated lane configuration
is indicated by a green dot.
Tandem Operation
Note: Tandem is one drive thru lane with multiple
order points. If a car isn’t present at Order point #1
and a car arrives at Order point #2, a message can
play, “Please pull forward.”
Headset operation is the same as dual lane operation.

OPERATING MANUAL
14
Dual Lane Home Screen
When a function is enabled, it will appear green.
If a function is disabled it will appear gray.
When a car is present at Lane 1 or Lane 2
speaker post/menu board.

OPERATING MANUAL
15
Dual Lane Home Screen In Cross Lane
System will alert when the headsets
are setup for Cross Lane.
Auto Greeter
After logging in, press the GREETERS icon.
OPERATING MANUAL
16
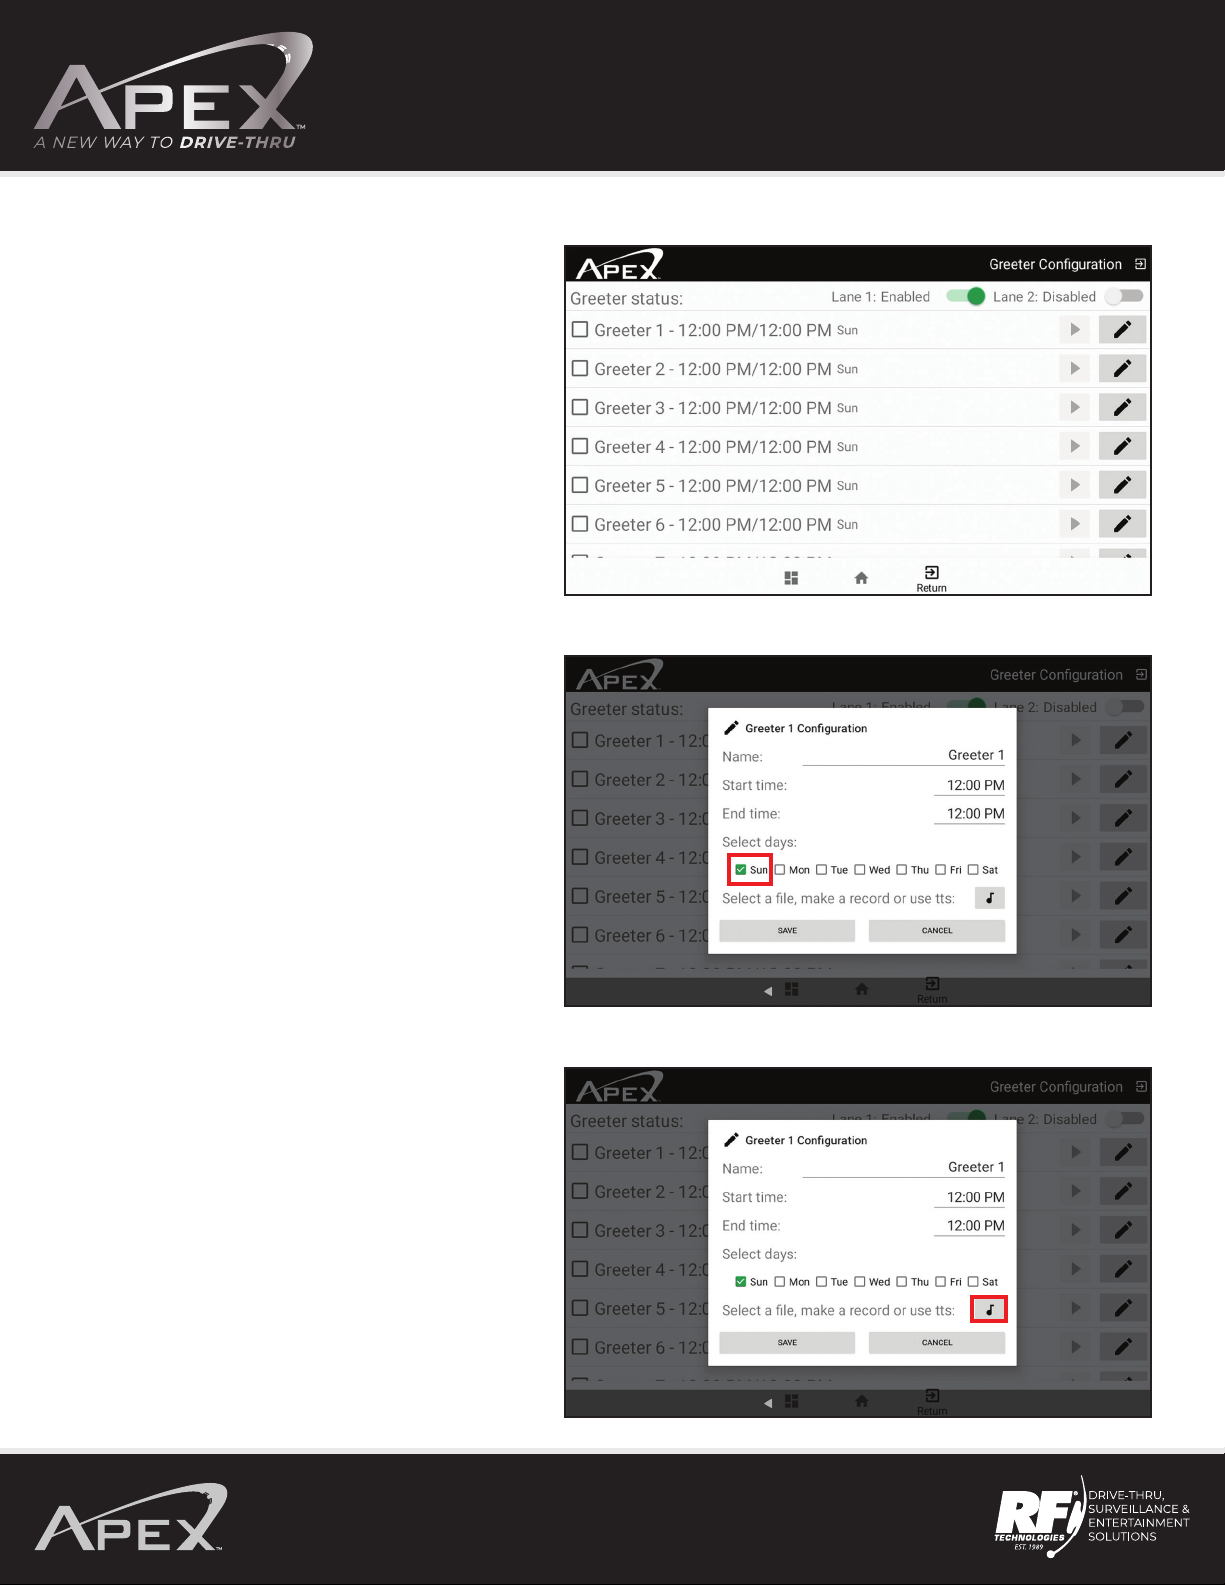
Select which Greeter to program,
then press the pencil icon.
Note: There are 15 dierent Greeters you can use.
Name Greeter, select start time, end time, and
select days to play.
Note: To select certain days to play a Greeter, press the
day and a green check mark will appear. If the Greeter
is to play everyday, press Sun, Mon, Tue, etc. and
this will check mark each day.
Press the musical note icon to select to upload
a message.

OPERATING MANUAL
17
Select how you would like to add a message.
Note:
If File Picker is selected, a message can be
uploaded via USB.
If the Record File is selected, a message can be
recorded with a headset.
If Text to Speech is selected, a message can
be typed in.
After a message is added, press SAVE.

OPERATING MANUAL
18
Select which Greeter to use and enable for
Lane 1 or Lane 2.
Alerts
After logging in, press the ALERTS icon.
Program an Alert, press the pencil icon.
Note: To use alerts a door contact is needed.
Contact R.F. Technologies, Inc. for more information at
800.598.2370 or support@rftechno.com
OPERATING MANUAL
19
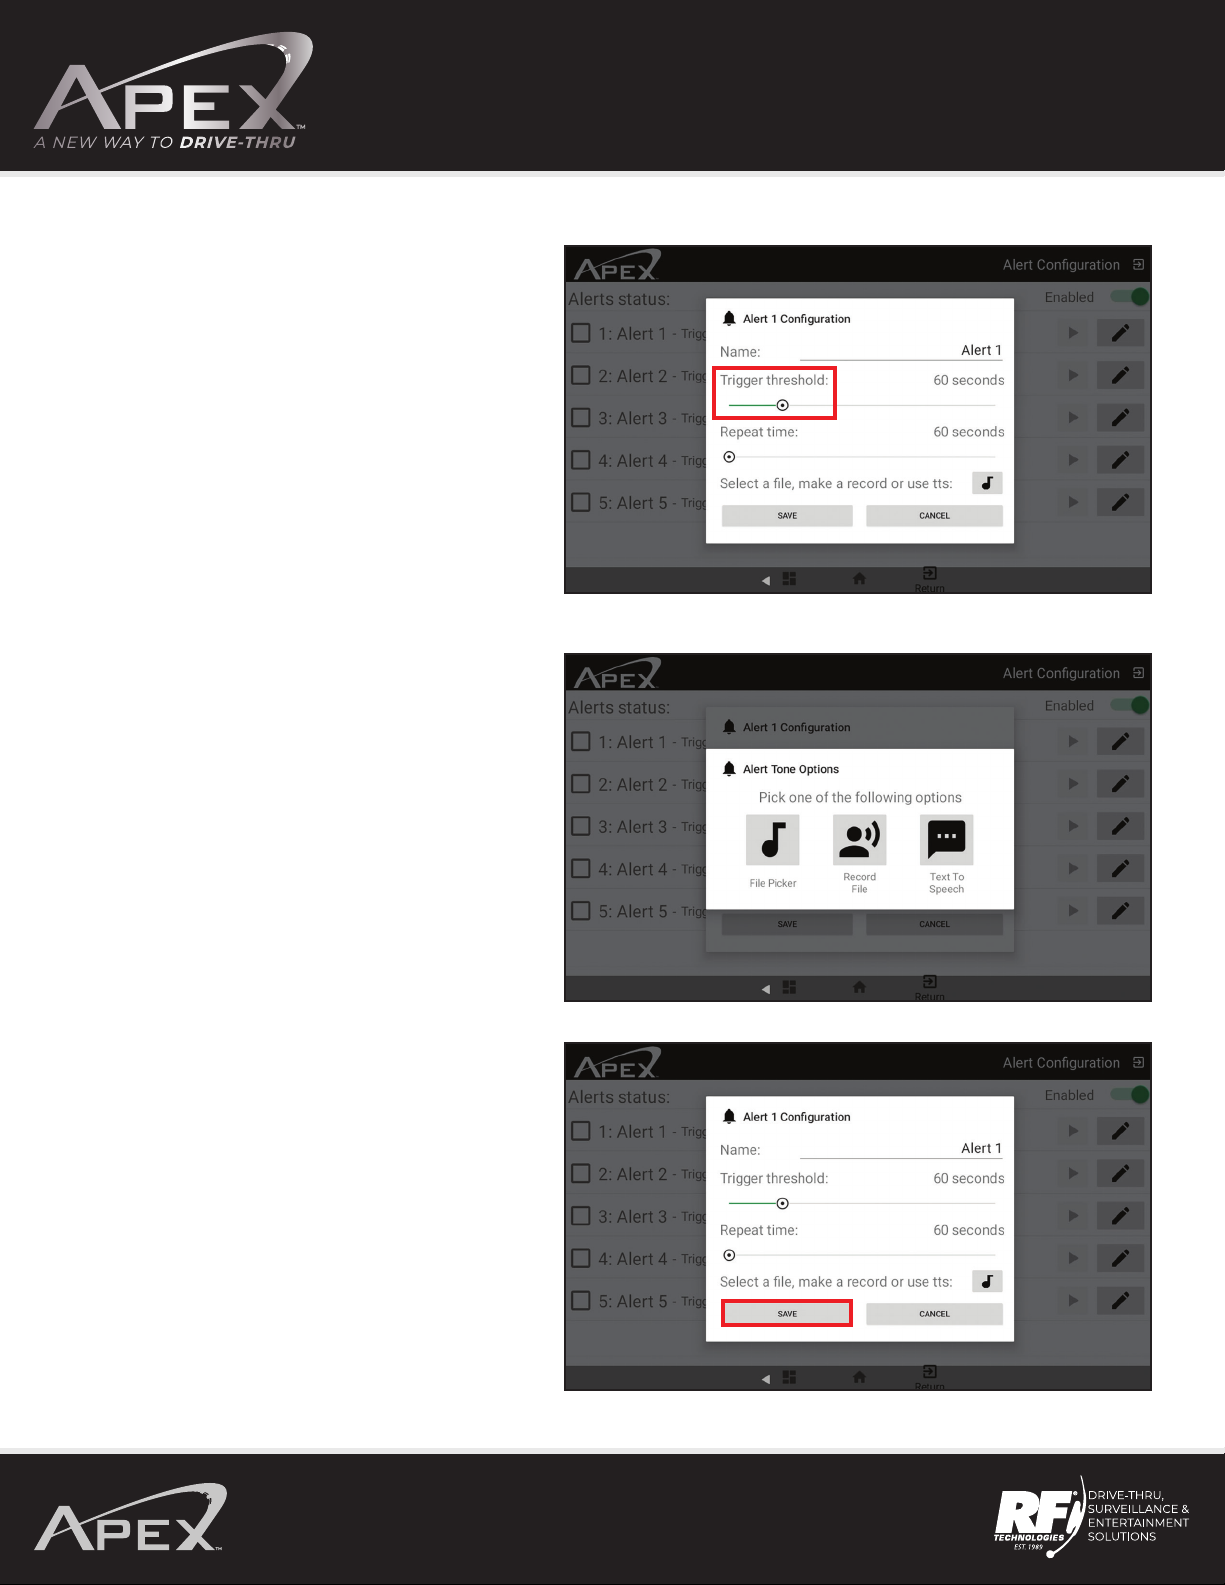
Name the Alert.
Note:
Trigger threshold – The amount of time the
enclosure is open before the alert will go o.
Repeat time – How many seconds before the alert will
repeat in the headset until the alert is taken care of.
Three ways to select a message for the alert.
Note:
If File Picker is selected, a message can be
uploaded via USB.
If Record File is selected, a message can be
recorded with a headset.
If Text to Speech is selected, a message can be
typed in. After programming Alerts, press SAVE.
Other manuals for APXBASE
2
This manual suits for next models
1
Table of contents
Other Apex Digital Headset manuals


