Apollo ReGen User manual

APOLLO ReGen
BATHTUB
INSTRUCTIONS MANUAL

Thank You for Your Purchase of the Bathtub!
We value your trust in our brand and are thrilled that you have chosen our
product to enhance your bathing experience.
We would like to extend our heartfelt thanks for your support and for
making us a part of your home. It is our goal to provide you with a
luxurious and relaxing bathing experience, and we are confident that our
bathtub will meet and exceed your expectations.
Our team has put great effort into designing and manufacturing a
high-quality product that combines functionality, comfort, and durability.
We genuinely hope that you enjoy all the features and benefits that our
bathtub has to offer.
If you have any questions or require any assistance regarding the
operation, maintenance, or any aspect of your bathtub, please do not
hesitate to reach out to our dedicated customer support team. We are
here to ensure that your experience with our product is nothing short of
exceptional.
Once again, thank you for your purchase. We truly appreciate your
business and look forward to serving you in the future. We are confident
that our bathtub will bring you countless moments of relaxation and
rejuvenation.
Wishing you many blissful and soothing baths!
APOLLO BATHTUB INSTRUCTIONS MANUAL

1
1
2
3
4
5
16
29
31
35
36
Product Overview
Package Includes
Technical Specifications
Introduction
Features
Installation Instructions
Operation Instructions
Care And Maintenance
Safety Instructions
Warnings
Warranty
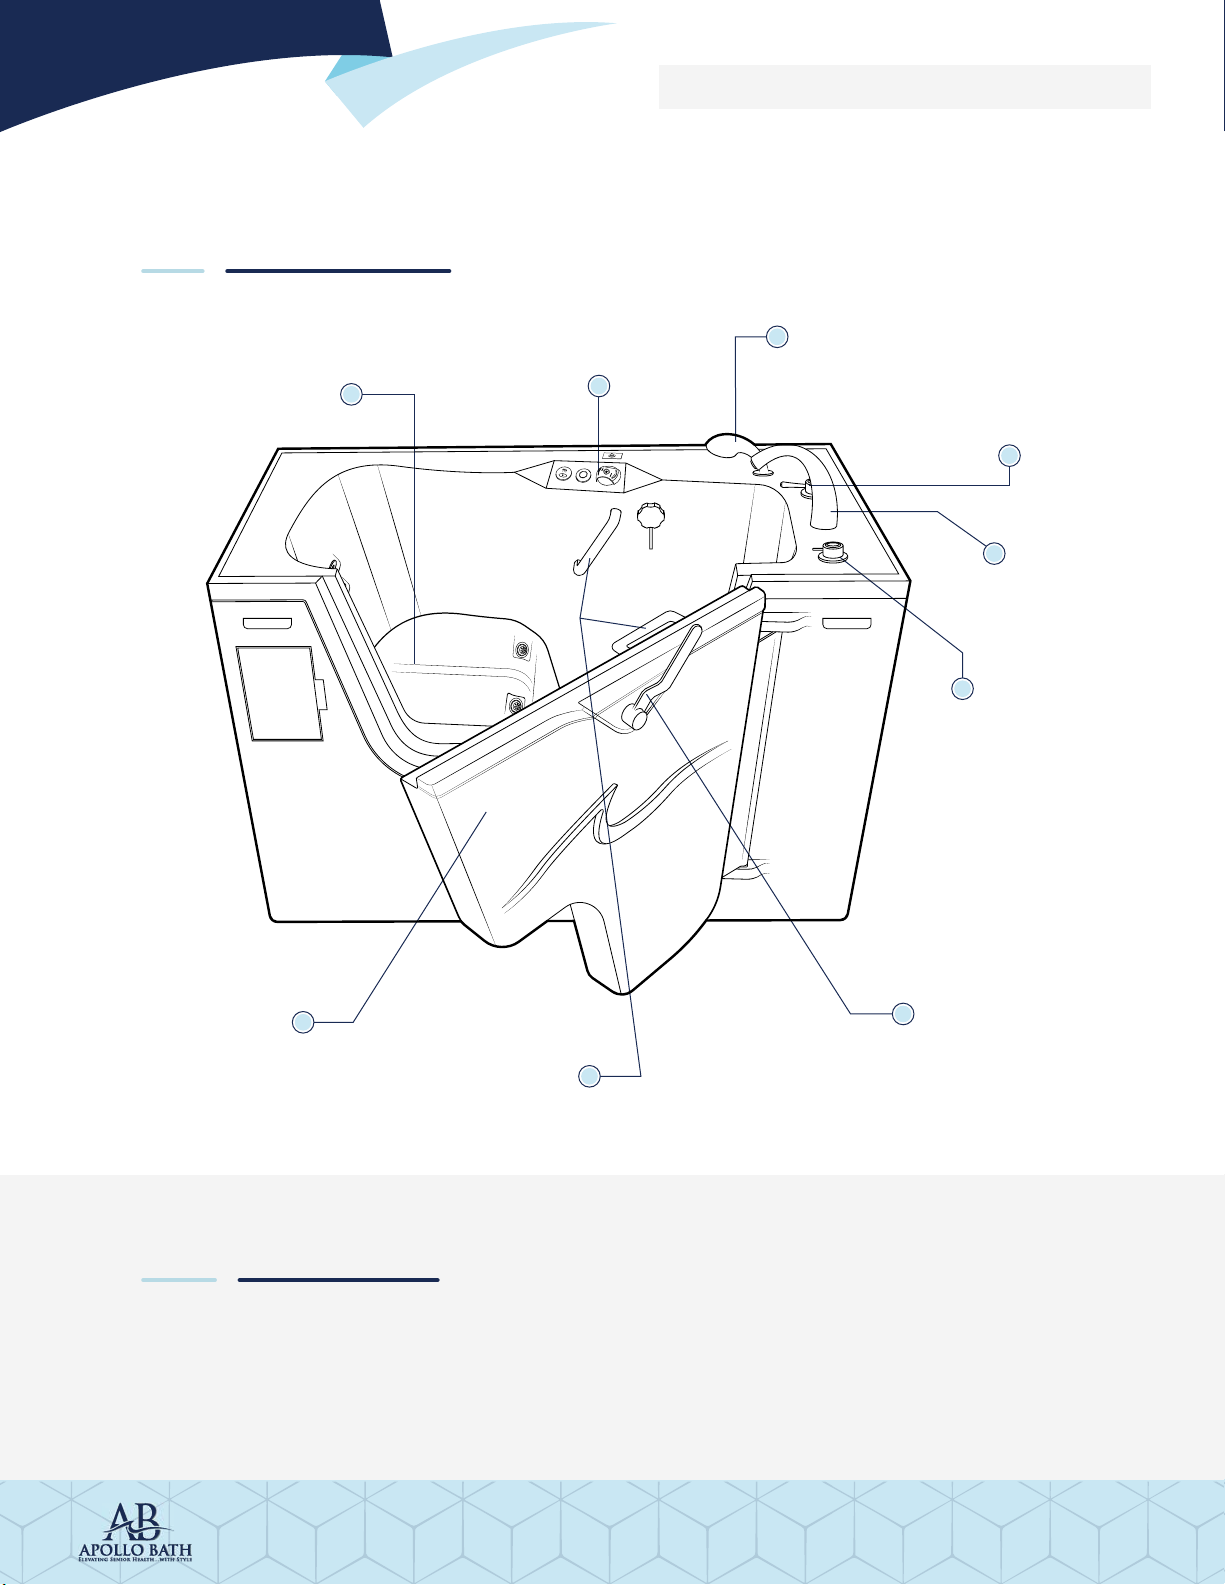
Product Overview:
Control Panel Shower Hand
Thermostatic
Valve
Diverter
Faucet
Door Handle
APOLLO BATHTUB INSTRUCTIONS MANUAL
1
Package Includes:
• Apollo ReGen Bathtub x 1
• Instruction Manual x 1
Grab Bar
Tub Door
Bathing Seat

Introduction
APOLLO BATHTUB INSTRUCTIONS MANUAL
2
Our Apollo ReGen Bathtub is designed with advanced technology for providing
an innovative and modern take on traditional bathing experiences. It offers a
blend of luxury, relaxation, and convenience. They provide a rejuvenating
bathing experience with customizable features, hydrotherapy benefits, and
advanced technology. Whether you seek a therapeutic soak or simply want to
indulge in a spa-like experience our bathtub can elevate your bathing routine to
new heights.
It has a unique combination of the soothing properties of a regular bathtub
with the convenience and functionality of a spa-like experience. Due to its
advanced technology and unique design, bathtub offers a luxurious and
customizable bathing experience.
Our bathtub has a hydrotherapeutic key feature which is equipped
with built-in jets or air bubbles that can release streams of water or air, creating
a gentle and relaxing massage effect. These hydrotherapy features can help
alleviate muscle tension, promote blood circulation, and enhance overall
relaxation and well-being.
In addition to hydrotherapy, our Bathing System comes with adjustable settings
and controls, allowing users to personalize their bathing experience. It has an
adjusting feature for water temperature, water flow, and the intensity of the jets
or bubbles according to your preferences.
It is typically equipped with control panels that allow you to operate various
functions with just a touch of a button which controls temperature, water flow,
and other features without having to manually adjust faucets or valves.
Our bathtub is designed with built-in safety measures, such as
automatic shut-off mechanisms and temperature controls, to ensure a secure
bathing experience. It also includes non-slip surfaces and grabs bars to prevent
accidents and provide stability while entering or exiting the tub.

Dimensions:
Total Shipping Weight:
Water Supply: Requires (2) 0.75 in NPT wall-mounted faucets.
A minimum of 30 PSI (2.1 bar) for hot and cold is required.
Waste: 1-1/2 in PVC schedule 40 pipes. Outside diameter 1.9 in
(6.1 cm).
Surface Heater: Seat and Back Surface Heaters with safety timer and
thermostat to prevent scalding.
Tub Fill: ASSE 1070 or 1016 certified Thermostatic mixing valve.
Shower: Handheld with 84 in (213.4 cm) ASME A112.18.1 hose
Tub Entry: 38.9” Outswing Door
Gasket: D-shaped, ASTM D2000, EPDM extrusion;
Whirlpool Pump Motor: 1.5 HP, 110-120VAC, 60 Hz, 13 A, 125 GPM max flowrate
In-Line Water Heater: Maintains water temperature up to 105°F.
Water Connection:
Provided with (2) 24 in (152.4 cm) Braided Stainless Steel
Hoses with 0.75 in NPT ends. Extension hoses are
available upon request.
Whirlpool Jets:
(6) Aerated hydromassage jets, (8) high airflow
hydromassage jets, (2) low-velocity high water flow
hydromassage jets.
Electrical:
Without In-Line Water Heater: 1 Dedicated 115 VAC 15A
GFCI circuit breaker
With In-Line Water Heater: 2 Dedicated 115 VAC 15A
GFCI circuit breakers
Technical Specifications:
APOLLO BATHTUB INSTRUCTIONS MANUAL
Length
59.6 in (190.0 cm)
400 lb. (272 kg)
Width
59.6 in (190.0 cm)
Height
59.6 in (190.0 cm)
3

Germicidal UV Lamps: (2) 20W, 425 mA lamps producing a UV output of 6.4W
each. 10,000 hr. rated effective life.
Whirlpool Water
Requirement:
65 gal minimum required to run whirlpool jets without
bather.
APOLLO BATHTUB INSTRUCTIONS MANUAL
4
Expected Service Life: 10 years.
Features
Below are some features of Our bathtubs:
• Easy-To-Install
• Ergonomic Design
• Slip-Resistant Flooring
• Textured Bottom for Non-Slip
• Adjustable Water Jets
• Overflow Drain
• Handheld Showerhead
• Adjustable Height
• Faucet Options
• Automated Cleaning Features
• Soothing And Therapeutic Effects
• Massaging Whirlpool Jets
• Heat Therapy
• Air Massage
• Targeted Massage Zones
• Remote Control
• Ultraviolet Water Disinfecting
• Integrated Cleaning and
Disinfecting System
• A thermostatic valve is used to
control the temperature of the
bathtub

APOLLO BATHTUB INSTRUCTIONS MANUAL
5
Installation Instructions
Inspection and Unpacking:
1. Once you receive your bathtub crate, inspect it for any damage or harm.
Note: If any damage is found, reject shipment and contact our customer
support.
2. After inspecting the product, remove the plastic wrap.
3. Remove all screws attaching the wood frame to the pallet and carefully
remove from the bathtub with the help of a companion.
GETTING STARTED:
1.

APOLLO BATHTUB INSTRUCTIONS MANUAL
6
Choosing A Suitable Location:
1. Select a space in your bathroom or another area where you plan to install the
water bathtub.
2. Ensure that there is enough room for the bathtub and any necessary
plumbing connections.
3. Allow adequate space in front of the door for easy access.
Preparing The Area:
1. Clear the installation area of any obstacles or debris.
2. Make sure the floor is clean and level.
Gathering The Necessary Tools and Materials:
1. Gather the tools you will need for installing the bathtub.
2. The tools that are needed during installing the water bathtub are usually a
adjustable wrench, screwdriver, hammer level, and the installation manual
provided.

1. Make sure the place where the bathtub is going to be installed is level.
2. Panels before carrying the bathtub to prevent them from
falling off.
3. Hold the bathtub by the frame and lift and carry it to its installation place.
1. Connect the building drain pipe to the drain outlet on the tub.
APOLLO BATHTUB INSTRUCTIONS MANUAL
7
PLACING AND MOVEMENT OF BATHTUB:
2.
INSTALLING THE DRAIN:
3.
Other Apollo Bathtub manuals


Popular Bathtub manuals by other brands


Lyons
Lyons Elite ETLxx663219 Series manual

Woodbridge
Woodbridge BJ500 Installation and care guide

Whirlpool
Whirlpool Ariel ARL-702 installation manual

TEIKO
TEIKO EXCELLENT DUO user manual

American Standard
American Standard Colony 5-1/2' x 32" Specification sheet

American Standard
American Standard 3052OD.X0X Installation instructions and owner's manual


