WI-FI SETUP
The 8840 can be connected to a Wi-Fi network either at the thermostat or another Wi-Fi
device with a web browser.
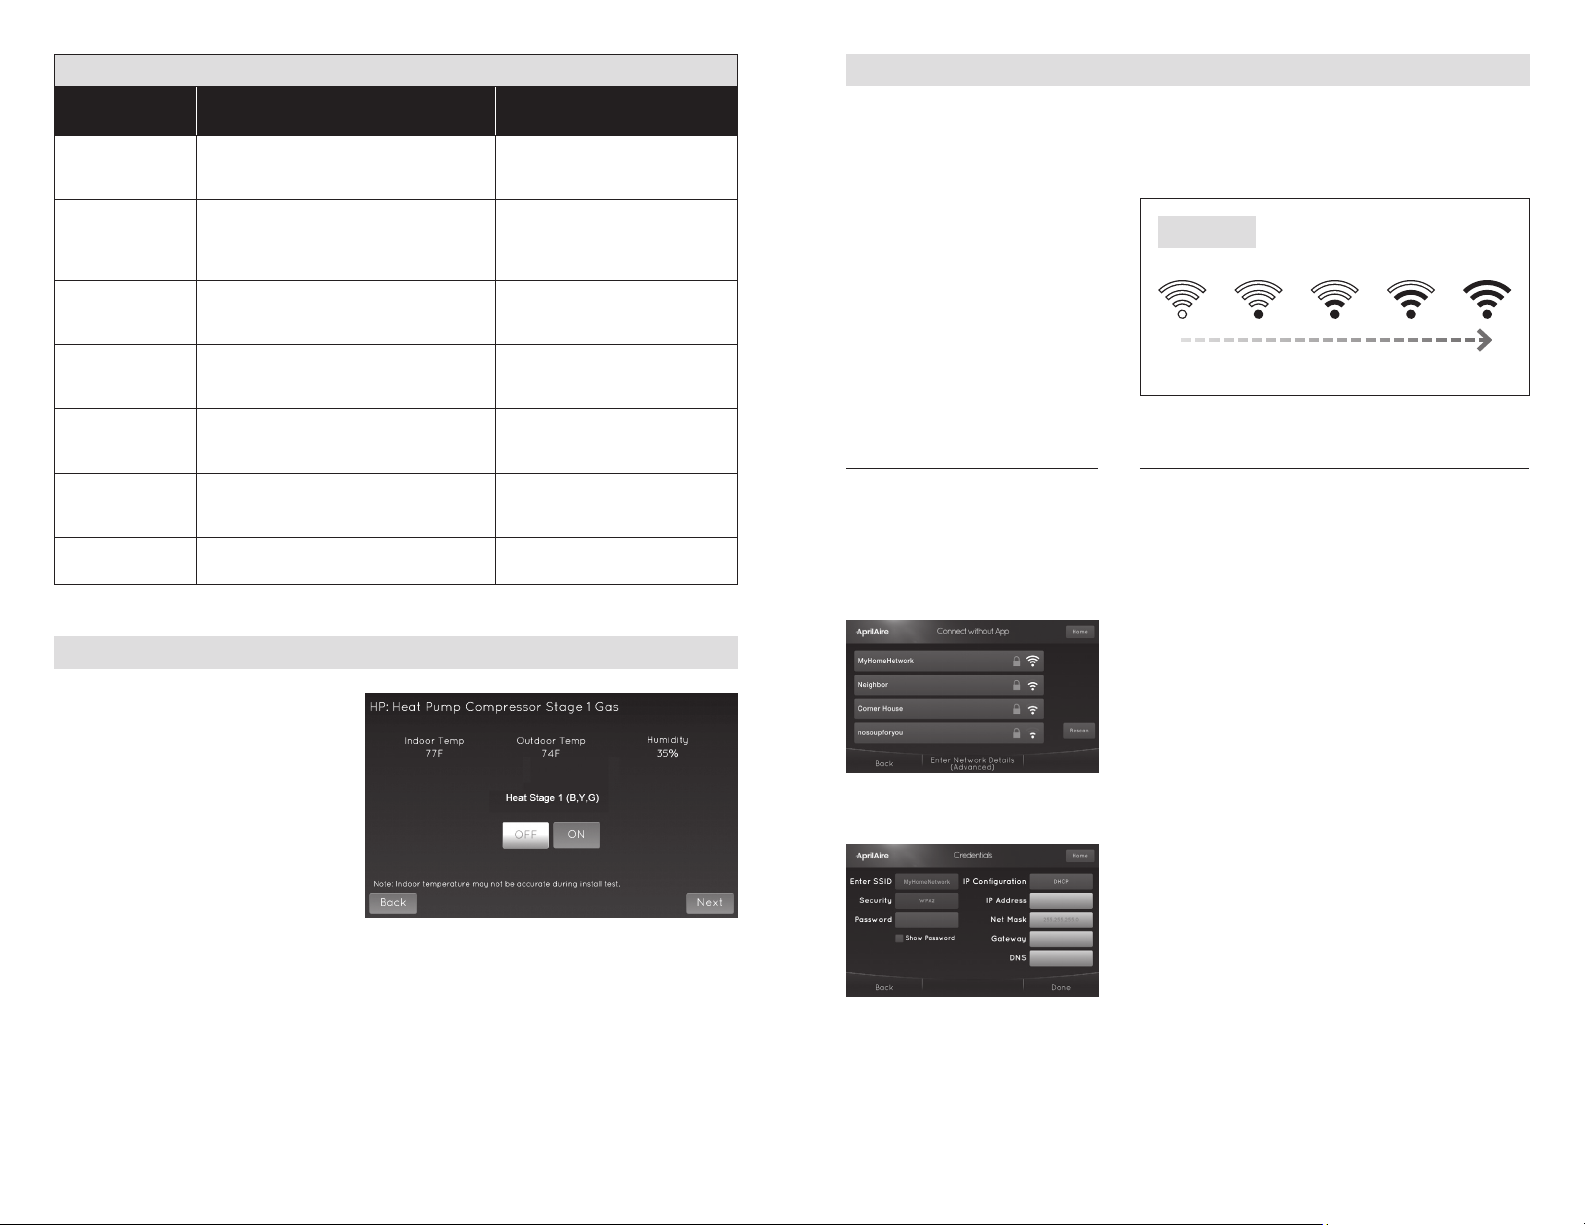
STEP 1: Verify the thermostat is in Wi-Fi Connection Mode.
The thermostat by default will be in
Wi-FiConnectionMode.Toconrm
that the thermostat is in Wi-Fi
Connection Mode, verify that the
radio bars on the thermostat are
strobing as shown in FIGURE 20.
NOTE: If the thermostat is not in
Wi-Fi Connection Mode, refer to the
online owner’s manuals found at
aprilaire.com.
FIGURE 20
TABLE 6 – FRESH AIR SYSTEM SETTINGS
System setting Description Factory default setting (bold)
and setting range
Low Vent
Temperature
Limit
Sets low ventilation temperature lockout
limit. (Only available if Enable Low Vent
Temperature Limit is set to Yes.)
10°F (-12°C)
-10°F to 40°F (-24°C to 6°C)
HVAC Fan with
Vent
Selects if ventilation forces the fan on.
(Yes with high and low limits is only
available if Outdoor Sensor is set to
Installed or Automation.)
Yes
Yes with high and low limits
No
Enable
High Mixing
Temperature
Enables high mixing temperature. (Only
available is HVAC Fan with Vent is set to
Yes with high and low limits.)
No
Yes
High Mixing
Temperature
Sets the high mixing temperature.
(Only available if Enable High Mixing
Temperature is set to Yes.)
80°F or (26°C)
60°F to 105°F (14°C to 41°C)
Enable Low Mixing
Temperature
Enables low mixing temperature. (Only
available is HVAC Fan with Vent is set to
Yes with high and low limits.)
No
Yes
Low Mixing
Temperature
Sets the Low mixing temperature.
(Only available if Enable Low Mixing
Temperature is set to Yes.)
40°F (6°C)
0°F to 50°F (-18°C to 12°C)
Fresh Air Service
Reminder
The period for displaying the SERVICE
FRESH AIR message.
OFF
1 to 12 months or OFF to disable
CONNECT TO A NETWORK
USING THE THERMOSTAT
STEP 2: Navigate to the Connect
without App screen: Menu > Wi-Fi
Settings > Advanced > Connect
without App.
STEP 3: Select a network from the
list of scanned networks.
STEP 4: Enter a password and press
Done.
STEP 5: Press Done on the
Credentials screen to connect.
CONNECT TO A NETWORK USING A BROWSER
STEP 2: Connect to the thermostat using a computer or
mobile device.
On your computer or mobile device, scan for
available networks. The thermostat should appear
asAPRILAIRE8840followedbyauniqueidentier,
corresponding to the last 6 digits of the MAC address.
Connecttothethermostatyouwanttocongure.
If you are installing multiple thermostats, the MAC
address of each thermostat will be displayed on the
Wi-Fi Settings screen, and can be found on the back of
the thermostat.
STEP 3:CongurethethermostattoconnecttotheWi-Fi
network.
Open a web browser on your computer or mobile device.
In the browser enter: http://192.168.1.99/index.html
In the web browser interface select the network you want
to connect the thermostat to, and enter the network’s
security credentials.
STEP 4: Verify the thermostat is connected to the Wi-Fi
network.
Once all the required information is entered in the
web browser interface, the thermostat will connect to
the Wi-Fi network you selected. After the thermostat
is connected to the Wi-Fi network, the thermostat will
display the radio bars based on the Wi-Fi signal strength.
NOTE: If you are not using the thermostat with a home
automation system, but are instead using an AprilAire
account to communicate with the thermostat, refer to
Wi-Fi Thermostat App User Guide and then Start Up
Guide on aprilaire.com for instructions on connecting to
Wi-Fi and registering to an AprilAire account.
INSTALLER SYSTEM TEST
The Installer Test can be accessed
from the Installer Menu. All equipment
outputsthatareconguredinthe
installer settings can be turned
on and off for testing equipment.
Minimum on and off times are not
enforced while in this mode.
1918