AQ Audio Smart Speaker User manual

1
OWNER’S MANUAL
AQ Smart Speaker
with AirPlay

2
AQ Audio Limited
Unit 5 Leestone Road
Manchester
M22 4RN
www.aqaudio.com
©2011 AQ Audio. All rights reserved.
Features, specifications and appearance are subject to change without notice.
AQ Audio is a trademark of AQ Audio Limited, registered in the UK
AirPlay, Apple, Mac, iPhone, iPod, iPod Nano, iPod Classic, iTunes and iPod Touch are
trademarks of Apple Inc., registered in the U.S. and other countries. iPad is a trademark of
Apple Inc. iPod/iPhone/iPad not included. “Made for iPod” and “Made for iPhone” mean that an
electronic accessory has been designed to connect specifically to iPod and iPhone,
respectively, and has been certified by the developer to meet Apple performance standards.
Apple is not responsible for the operation of this device or its compliance with safety and
regulatory standards.
Wi-Fi is a registered trademark of the Wi-Fi Alliance.

3
Table of Contents
Important Notices................................................................
4
Introduction........................................................................
4
Unpacking Your AQ Smart Speaker........................................
5
AQ Smart Speaker Controls..................................................
5
AQ Smart Speaker Connections.............................................
6
Charging Your AQ Smart Speaker..........................................
7
AQ Smart Speaker Status LEDs.............................................
8
Connecting Your AQ Smart Speaker To Your Wireless Network.. 9
Setup Option 1 – Using The AQ Connect App......................
9
SetupOption2– Manual Wireless
Setup............................
12
Using Your AQ Smart Speaker With AirPlay.............................
15
Using More Than One AQ Smart Speaker................................
16
System Upgrade .................................................................
17
System Reset......................................................................
18
Troubleshooting Your AQ Smart Speaker................................
19
Looking After Your Smart Speaker.........................................
22
Specification.......................................................................
23

4
Important Notices
Important Note: Turn off the unit before inserting or unplugging
audio cables from a source device’s headphone or line-level output
jacks. Doing so will prolong the life of your unit, help protect your
device from static electricity and prevent potential damage.
WARNING: The USB Update port is designed to allow connection
of a USB memory stick for firmware updates or Apple iPhone, iPod
Touch or iPad for Network Setup only. DO NOT connect it to a
computer or any other USB device, as damage may occur. For
instructions, see pages 9 and 18 for more information.
Introduction
The AQ Smart Speaker is a totally wireless and totally portable audio system - it can play your
audio and media anywhere around the house and garden direct from your Smartphone using
your existing Wi-Fi network.
The AQ Smart Speaker works with Apple’s AirPlay technology. It is able to wirelessly stream
music from iTunes 10 on your Mac or PC, or from an iPhone, iPod Touch or iPad device with
iOS 4.2 or later.
Throughout this manual, when you see the term “iOS device”, it refers to any iPod, iPhone or
iPad which is running Apple Operating System iOS 4.2 or later.
With its leading edge and patented ultra-efficient high powered digital amplifier, the AQ
Smart Speaker is able to deliver superb high quality sound from a 24W unit, giving up to 20
hours before recharge when using the Aux In connection, and over 10 hours in AirPlay mode.
To conserve power, the Speaker also powers down after 10 minutes of inactivity (when in
Airplay mode, and running on battery power).
With more than one AQ Smart Speaker, you can build a stereo pair, or even an entire
multi-room sound system.

5
Unpacking Your AQ Smart Speaker
Carefully unpack your AQ Smart Speaker and confirm that all the items shown here are
included. Please charge the Speaker before using it for the first time.
AQ Smart Speaker Controls
VolumeDown Power/Mode VolumeUp
Power/Mode button: Press this button briefly to turn the AQ Smart Speaker on. Press
and hold for 2 seconds to put it into the Standby mode. While in the Standby mode, the unit
will still show the battery status. When the Power is on, briefly pressing the power button
will switch between AirPlay and Aux In Mode. The Wi-Fi LED will switch off in Aux In mode.
Volume Down button: Press this button to lower the volume. Press this button for more
than 2 seconds to mute the sound, The power LED will flash whilst the sound is muted.
When the sound is muted, press either the Volume Up or the Volume Down button to
restore the sound.
Volume Up button: Press this button briefly to raise the volume one step. Press this
button for more than 0.5s to continuously raise the volume.

6
AQ Smart Speaker Connections
1
2
3
4
5
1. Update port: The USB Update port is designed to allow connection of a USB memory
stick for firmware updates or Apple iPhone, iPod Touch or iPad for Network Setup only.
DO NOT connect it to a computer or any other USB device, as damage may occur. For
instructions, see pages 9 and 18 for more information.
2. Aux In connector: For direct connection to an audio player or other audio device.
Briefly press the power/mode button whilst the Speaker is switched on to switch between
Aux In and Airplay mode. Playing music to the speaker from an Airplay device will
automatically override Aux In mode and return the speaker to Wi-Fi operation.
3. Audio Mode Switch: Set to M if it is the only Speaker or if you are using it as part of a
multi-room setup. Use L and R if you are using two Speakers as a stereo pair.
4. DC Power Connector: Connect to a mains power socket using the supplied power
adaptor to charge the internal battery. The socket-outlet shall be installed near the
equipment and shall be easily accessible.
5. Reset Button: This button will force the Speaker to switch off and on again if it becomes
unresponsive. It will not affect any network settings. To perform a full reset which
clears all settings, refer to System Reset on page 18

7
Charging Your AQ Smart Speaker
The battery status is indicated by a White LED which is visible through the Speaker grille just
above the AQ Audio logo. It flashes at various speeds depending on the charge available in
the battery.
The Speaker incorporates a Lithium-Ion battery, which does not have to be
charged/discharged consistently, as with older technology, simply plug it in to charge it
whenever you want. It is recommended to allow the Speaker to run until it switches off
occasionally; this will help maintain the accuracy of the battery management circuit and get
the best out of the available battery capacity.
LED status Meaning
Off When Plugged In: the battery is fully charged.
When Running on Battery: The battery is OK.
Blinking Slow When Plugged In: The Battery has a good charge
level but is not completely full, it is being charged.
Blinking Normal When Plugged In: The battery is low. It is being
charged.
Blinking Fast When Running on Battery: The battery is low and
needs to be charged.
Note: If there is nothing connected to the AUX input and there is no audio received over
AirPlay for 10 minutes and the Speaker is not plugged into the mains power, the Speaker will
automatically switch off to conserve battery life.

8
AQ Smart Speaker Status LEDs
The power button on the top of the AQ Smart Speaker has two built-in LEDs. These indicate
the power and network status of the AQ Smart Speaker.
The Power LED
The power LED is white, and will be on whenever the AQ Smart Speaker is switched on. The
Power LED will flash when the Speaker is on but the sound is muted.
The Wi-Fi LED
This LED is a colour LED which shows information about the Wi-Fi connection status.
LED Status Description
Green Connected to wireless network.
Red, flashing slowly Not connected to network.
Signal strength may be too low or Speaker network
configuration may be wrong.
Red, flashing quickly Speaker is Starting Up.
If the Speaker persists in this state, see the
Troubleshooting section for more information
Red and green
flashing alternately
This shows the unit is in Network Configuration
mode. See the next page for details.
Orange This confirms a reset action has been received and
will be performed, it will only appear briefly. See
the following sections for more details.
Orange, Flashing
slowly
There is a problem with the firmware. To resolve
the problem, reset the speaker, or perform a
firmware upgrade.
Off If the Power LED is on, but the Wi-Fi LED is Off, The
Speaker is in Aux In mode. Briefly press the
Power/Mode button to switch between Airplay and
Aux In mode.

9
Connecting Your AQ Smart Speaker to Your Wireless
Network
You need to connect the AQ Smart Speaker to your wireless network in order to use AirPlay.
Before you start, ensure that the wireless network router is at least capable of wireless ‘g’
standard performance. Make sure that the router is switched on and that you know what the
network name (SSID) and password (Network Key) are (note that the password or network
key is likely to be case-sensitive).
If you have just unpacked the Speaker, or you know it is low on charge, it is a good idea to
connect the Speaker to the mains whilst following this process to prevent it being interrupted
by the battery running out.
There are two ways of connecting the AQ Smart Speaker to your wireless network. If you
can, use Option 1.
If you do not have access to an iPod Touch, iPad or iPhone, or you are unable to download the
App from the App Store, you will need to manually connect to the Speaker to enter your
network settings. Setup option 2 can be found on page 12.
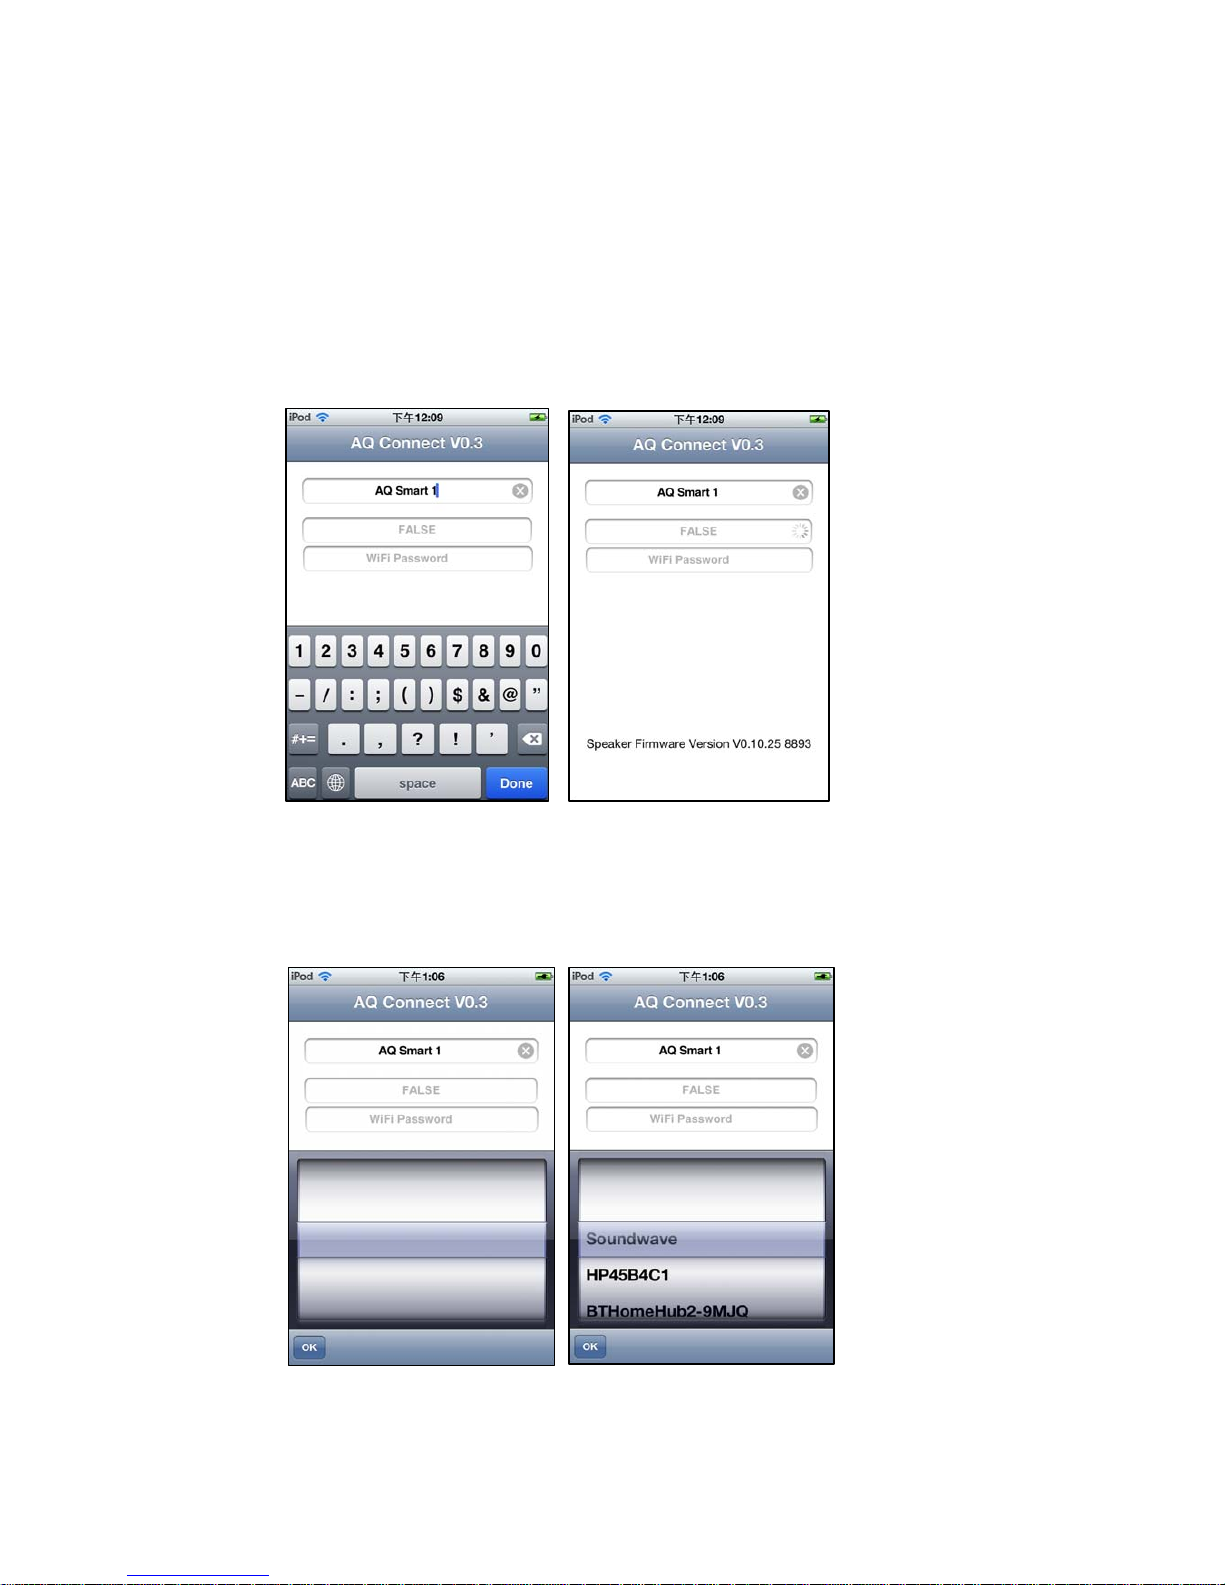
Setup Option 1 - Using the AQ Connect App
Before connecting your AQ Smart Speaker to the network, you will need to install the AQ
Connect App, which is a free App available from the Apple App Store. Simply search for “AQ
Connect” and install the App in the normal way.
Step 1
Turn on the AQ Smart Speaker by briefly pressing the power button. Wait until the Wi-Fi LED
changes to slow flashing red or steady green. (The LED will only go green if the speaker
already has settings for a network, and that network is in range.) Connect the Smart
Speaker to your iPod Touch, iPad or iPhone using your Apple USB dock connector cable
(supplied with your Apple device). A Message will appear asking if you want to allow the
Speaker to connect, select allow, and the App should start automatically.
Wait whilst the App communicates with the speaker, this should take 10-15 seconds.
Note: If the screen is locked, or you are using another App, the App may not start
automatically. If this happens, you can still start it manually by tapping the AQ Connect
App’s icon.

10
Step 2
Give your Speaker a memorable name by entering it in the first box. Once you are
happy with the name, click “Done”. (See Fig. 1)
Note: You do not have to change the name in this box if you are happy with the current name;
however you still have to select the box and click “Done”.
Fig.1 Fig.2
Fig.3 Fig.4

11
Step 3
Select the second box to search for your wireless router (Fig. 2). This may take a few
seconds. If the network list doesn’t show any networks (Fig. 3), the App may be having
trouble finding your router. Check that you are in range of the router and select the middle
box again to re-start the search.
Once your router appears in the list, select it and press OK. (Fig. 4)
Step 4
Enter the password into the bottom box then press “Join” (Fig. 5). This will upload the
network settings to the AQ Smart Speaker and then restart the Speaker.
Fig.5 Fig.6
Step 5
Once the upload is complete, the App will display the completion screen (Fig. 6). Wait for the
Speaker to restart. The Speaker’s Wi-Fi light will cycle through a series of different colours.
It will flash alternately red and green for a short time, and then it will flash red only whilst it
restarts. Once it has restarted, it will flash red slowly whilst searching for the router. If you
have entered the settings correctly, it will change to green to show it is connected.
Wait until the Wi-Fi LED flashes red slowly or turns green before disconnecting the USB cable
from the Speaker. The App will quit automatically.
Once the AQ Smart Speaker is connected, you can then start to play music through the
Speaker using the AirPlay function.

12
Setup Option 2 – Manual Wireless Setup
In order to manually enter your network settings into the AQ Smart Speaker, you can create
a temporary wireless network between a computer and the Speaker. The computer must
have wireless capability, and must connect to your network wirelessly. If the computer also
has a wired connection to a network, you will need to temporarily disconnect this whilst you
set up the speaker. If you use Skype, you will also need to completely close it before starting
the setup procedure.
Step 1
Press and hold both the Volume Up and the Volume Down buttons on the Speaker
simultaneously for 5 seconds until the Wi-Fi LED turns Orange. The AQ Smart Speaker will
then restart. The Wi-Fi LED will flash red as it does when starting up. After a minute or two
the Wi-Fi LED will start flashing red and green alternately.
The AQ Smart Speaker is now in Configuration mode.
Fig.7
Step2
On your computer, search for the Wi-Fi
Networks available. You should find one
called “AQ Smart Speaker Setup”. Select it
and connect to it. How you do this will depend
on your operating system; for example the
screenshot in Fig. 7 is from Windows 7.
Note: You can also do this using your iPod
Touch, iPhone or iPad. In this case, use
Safari for the next steps.
Step 3
Wait until the network is connected (it may show no Internet access, this is normal), then
open a Web Browser such as Internet Explorer, Firefox or Safari. Type the IP address
192.168.1.12 in the address bar and press return. The AQ Smart Speaker information
page should now load (Fig. 8).

13
Fig. 8
Note: You may need to refresh the page several times to allow the computer to find the
Speaker on the new network. If the information page still does not load, see the
troubleshooting section for more information.
Step 4
Click on Speaker Setup on the left to go to the Network Setup page. (Fig. 9)
From the Speaker Setup page you can change the name of your Smart Speaker. You may find
this useful if you have more than one Speaker. Press the Apply button next to the name to
confirm.
Note: if you do change the name of the speaker, you will need to go back to the setup page
again by clicking on Speaker Setup.
Step 5
Choose the wireless network that you want to connect the Speaker to. Enter the password.
(There may be a password already in the box – you will need to delete this first
before entering yours) Be careful because if you get it wrong, you will need to start back at
step 1. Click on Apply at the bottom then click OK to confirm the settings.

14
Fig. 9
A Dialog Box will appear explaining the next step. If you are sure the network settings are
correct, Click OK to confirm this, the Speaker will then begin updating the settings.
Depending on your browser, you may also be asked if you want the password to be stored by
the browser – If you click yes, your browser will remember the wireless key you entered and
automatically fill in this box the next time you go to the setup page.
The AQ Smart Speaker will automatically disconnect and start to update its settings. Once
the Speaker has disconnected, the webpage will stop responding, so you can close the web
browser and reconnect the computer to your normal wireless network.
Step 6
The Wi-Fi LED will continue to flash red and green alternately until the settings have been
updated it will then flash red quickly for a while and then change to red slow flashing. Once
the Wi-Fi Led turns to green, the AQ Smart Speaker is connected to your network. If it does
not go to steady green after a minute, press the reset button on the back. The Speaker will
restart and should connect, if it still does not connect, check that your configuration was
correct.

15
Using Your AQ Smart Speaker
From Your Computer
Your AQ Smart Speaker can play audio files or an Internet radio station that is streaming from
iTunes 10 or later on a computer which is connected wirelessly to the same network as the
Speaker. (iTunes 10 is a free download for Mac computers and Windows PCs, available at
www.apple.com/iTunes.)
To initiate streaming from the computer, launch iTunes 10, click on the button that appears
at the bottom of the iTunes window and select the AQ Smart Speaker in the pop-up list that
appears. (Fig. 10)
Fig. 10
From your iPhone, iPod Touch or iPad
To initiate streaming from an iPod, iPhone or iPad device,
running iOS 4.2 or later, tap the AirPlay button on the screen
and select your Speaker from the list (Fig. 11) (note that the
name of the Speaker you set during network configuration is
the name that appears here)
Note: When you begin AirPlay streaming, the AQ Smart
Speaker will default to the volume level that is set in the
iTunes application. Use the “Volume Up”/”Volume Down”
buttons on the AQ Smart Speaker to adjust the volume.
Volume can also be controlled direct from your iOS devic
Fig.11

16
Using More Than One AQ Smart Speaker
Currently, you can only use multiple Speakers to listen to the same source from iTunes on a
computer which is wirelessly connected to the same network as all the Speakers. The iPod
or Music function on the iPod Touch, iPhone or iPad only supports one Speaker at a time.
The AQ Smart Speaker incorporates technology which enables any individual speaker to be
connected through the same Wi-Fi network to a different dedicated iOS device, so one iOS
device can control multiple AQ Smart Speakers throughout the house using the Remote App,
and another separate iOS device can control another AQ Smart Speaker using the iPod (or
Music) App.
It is also possible to use the Remote App (free from the Apple App Store) on your iPod Touch,
iPad or iPhone to control iTunes on your computer, and you can even control the sound output
to individual Speakers in this way.
To use the AQ Smart Speaker with the iTunes function, you need to make sure all of your
Speakers are connected to the same network, and that your computer running iTunes is also
connected wirelessly to the same network.
Make sure all of the Speakers are switched on. Wait for them to connect to the network (the
Wi-Fi light will go green)
Open iTunes and wait for it to detect the Speakers. The AirPlay logo will appear in the
bottom right hand corner of the iTunes window (Fig. 12).
Fig. 12
Click the AirPlay icon and Select the Multiple Speakers option. This will bring up a new
window with details for all of the Speakers you have on the network (Fig. 13).
Fig. 13

17
Select several Speakers by clicking their checkboxes. The Main iTunes window will show the
current number of connected Speakers next to the AirPlay logo, which will light up blue once
there are Speakers connected (Fig.14) Fig. 14
On the back of each Speaker, you can select Left (L), Right (R) or Middle (M) for each Speaker.
(See Page 6 for a diagram and description of this switch)
You will get the best results by choosing one Left and one Right if you are using two Speakers
in the same room. If you are using more than two Speakers, or they are in different rooms,
using them in Middle may be more appropriate.
If you are switching back to using a single Speaker, check that it is in Middle mode, otherwise
you will only get the left or right half of the track.
System Upgrade
Occasionally, firmware updates may be released.
Check aqaudio.com to download any updates then
follow the instructions below to install the update.
Before you start the firmware upgrade, you will need to
prepare a USB memory stick.
Make sure there are no files on the memory stick, and
then format it as per the options in Fig. 15. It is
important to ensure that the Volume Label box is left
empty.
In Windows, you can format the disk by right-clicking it
from My Computer and selecting the Format option.
On A Mac, You will find Disk Utility in the Utilities folder
within Applications.
1. Copy the update file (<update_filename>.bcd) to the USB memory stick, but DO NOT
connect the memory stick to the Speaker at this stage.
Fig. 15

18
2. Connect the AQ Smart Speaker to the mains using the power supply and switch on the
Speaker.
3. Locate the reset button on the back of the AQ Smart Speaker, and ensure that you have
something to press it with, but do not press it yet.
4. With one hand simultaneously press and hold the volume up and volume down buttons on
the top of the Speaker and then with the other hand press the reset button on the back.
The Wi-Fi LED will turn orange and flash quickly.
5. Plug the USB memory stick containing the firmware update into the update port on the
back of the Speaker. The Wi-Fi LED will stop flashing and turn steady orange.
6. Briefly press the ON/OFF key to confirm. The upgrade will then be installed. Once
complete, the power and orange Wi-Fi LED on the top and the battery LED on the front
should all start flashing simultaneously if successful.
If the lights do not start flashing as described above within 10 minutes, the firmware update
has failed, please return to step 1 and try again.
Note: If the power light remains on steady for more than 10 seconds, this indicates that the
firmware update was not completed. Please return to step 1 and try again.
7. Press the reset button to restart the AQ Smart Speaker.
8. Depending on the update, the Network Settings may be lost. If the speaker fails to
connect to the network after the update, you will need to re-enter the settings. (See
page 9)
IMPORTANT: The USB Update port is designed to allow connection of a USB memory stick
for firmware updates or Apple iPhone, iPod Touch or iPad for Network Setup only. DO NOT
connect it to a computer or any other USB device, as damage may occur.
System Reset
To recall the Factory Setting, press and hold Volume Down/Power button/Volume Up for
5seconds. Once the Reset is confirmed the Wi-Fi LED will turn orange, and then go back to
normal operation.

19
Troubleshooting Your AQ Smart Speaker
General Problems
Problem Possible Solutions
Wi-Fi LED flashes
quickly
•This is normal behaviour when the Speaker is first
switched on. It should not persist for more than a
minute. If this continues, there may be a problem with
the firmware. Try resetting the Speaker using the reset
button. If that does not resolve the issue, contact
support.
No Sound (when
using AUX-IN
Connection
•Ensure that the cable is plugged in fully and the Speaker is
switched on (white power light only)
•Check the volume setting on the source device and on the
Speaker. When not using AirPlay, the volume controls
operate independently.
•Check that the Speaker is in Aux In Mode (The Wi-Fi LED
should be off; See page 5)
•Check that the speaker has not been muted (The Power
LED will flash when the speaker is muted; See page 5)
No Sound (when
using AirPlay)
•The Speaker may be out of range of the network, or not
connected to a network. Check to make sure that the
Wi-Fi LED is green.
•The iPod, iPad or iPhone may be out of range of the router.
•Make sure that the volume control on the iPod, iPhone or
iPad is not set too low or muted.
•Try selecting the internal speaker and then re-selecting
the AQ Smart Speaker from the AirPlay device list.
•Try quitting the iPod App and re-starting it.
•Try switching off the Speaker and re-starting it.
•Check that the speaker has not been muted (The Power
LED will flash when the speaker is muted; See page 5)
Sound is Too
Quiet
•Try changing the volume on the AQ Smart Speaker.
iTunes will automatically reset this volume when it
connects to the Speaker.
•Sound Check may be switched on. This limits the volume
output of your iPod Touch, iPad or iPhone. Turn it off
from Settings>Music>Sound Check.

20
Speaker stops
responding
(pressing buttons
doesn’t do
anything)
•Press the reset button on the back of the AQ Smart
Speaker to force it to restart. NOTE: Pressing the reset
button won’t affect your settings. If you need to reset
your settings, see the System Reset section of this
manual.
Problems Connecting Using AQ Connect App
Problem Possible Solutions
Configuration
page stops
responding or
disappears after
applying settings.
•This is normal - the Speaker has accepted the settings and
is now restarting in order to connect to your wireless
network, but the computer is still connecting to the
Speaker configuration network. Close the browser
window and re-connect your computer to your normal
wireless network.
Wi-Fi Light is
flashing red
slowly
•The Speaker is not connected to the network. Either the
Speaker is not in range of the network, or there is a
problem with the configuration settings.
•If you have just applied the settings, you may need to
press the reset button on the back of the Speaker to finish
applying the new settings.
Problems Connecting Using Manual Connection
Problem Possible Solutions
Unable to load to
the Speaker
configuration
page
•Try disconnecting from any other networks your computer
is connected to whilst loading the page, including wired
networks.
•Try disconnecting from the Speaker network and
reconnecting to the same network.
•Close all open web browser windows (and quit the
application on an Apple machine) and restart the browser.
•Pressing the reset button on the Speaker will force it to
restart.
Note: after doing this you will need to start from step one
of the connect procedure.
Unable to connect
to temporary
network
•Try disabling and re-enabling your wireless network
connection.
•Ensure you are not connected to any other wireless
Table of contents
Other AQ Audio Speakers manuals