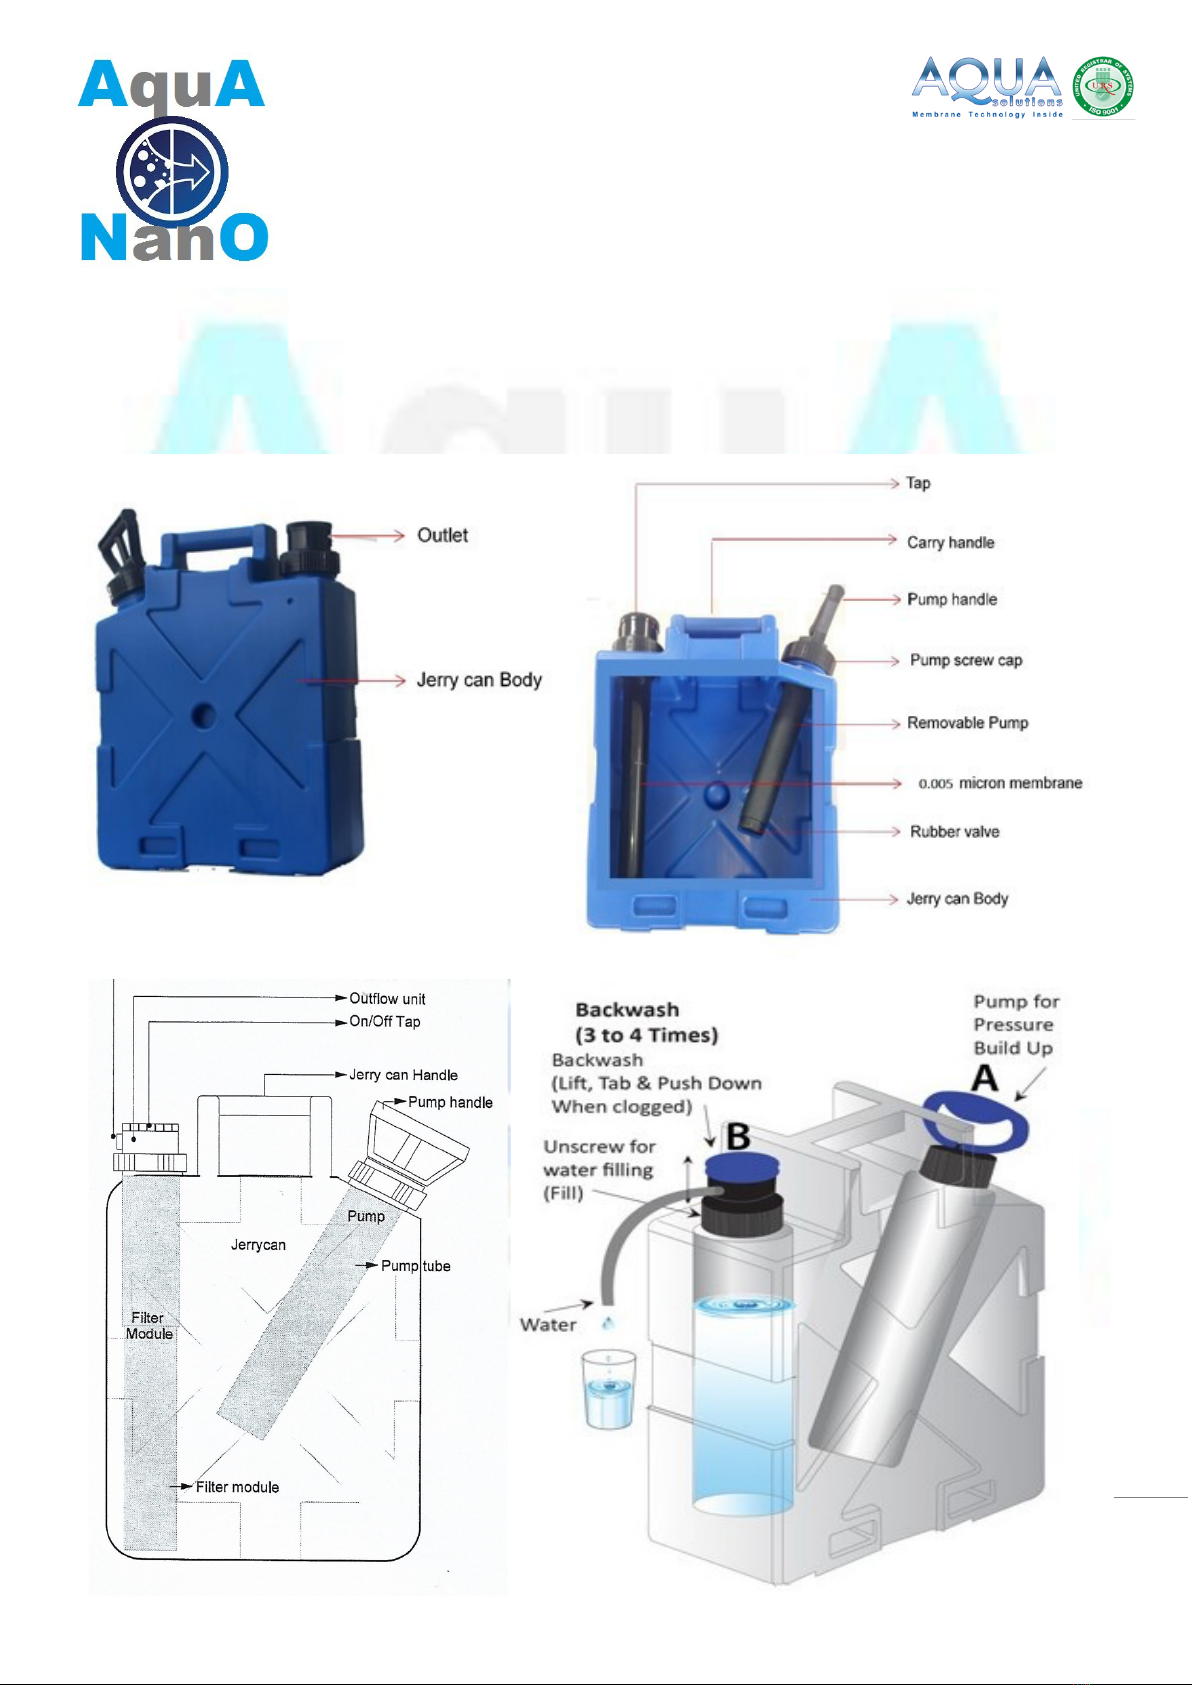
AquA NanO LIFEFILTA Instruction Manual

L I F E F I L T A
by
AquaNano Water Filters
Operation & Manual Sheets
LFJC Jerry Can Nano Water Pump Filter
Mini
Water
Factory
1

Content
1.
OPERATING & MAINTENANCE INSTRUCTIONS page 3
a.
OPERATING INSTRUCTIONS page 3
b.
FILTER MODULE BACKWASHING page 3
c.
FILTER MODULE STORAGE, STERILIZATION AND DISINFECTION page 4
d.
MAINTENANCE OF LFJC PUMP page 4
e.
REPLACING OR CHANGING THE LFJC FILTER MODULE (complete filter unit) page 5
2.
MORE TECHNICAL INFORMATION page 5
3.
WARRANTY page 5
4.
WARRANTY EXCLUSIONS page 6
5.
DISCLAIMER page 7
6.
WARNINGS page 7
7.
IMPORTANT
INFORMATION page 7
2

1.
OPERATING & MAINTENANCE INSTRUCTIONS AND WARRANTY
The LFJC is fitted with a special membrane which uses ‘Low Pressure’ Nanofiltration hollow fiber membrane
technology @ 5 nanometer retention and is suitable to protect against water borne bacteria and virus and all other
pathogen organisms found in untreated clear water in lakes, rivers, brooks or tap water of many countries.
When used in accordance with this operating and maintenance instructions, it filters out up to 99.99999% of all
waterborne bacteria (7 Log) and up to 99.999% of all waterborne viruses (5 Log).
The capacity of the LFJC to filter water depends on the quality of water to be filtered.
a.
OPERATING
INSTRUCTIONS
For optimum results, follow carefully the instructions below
1.
Unscrew and remove the pump and fill the Jerry can with untreated water.
2.
Screw the pump back in place while checking if the rubber joint of the pump is in place and firmly lock the pump in
clockwise position (bayonet lock).
3.
Ensure that the outlet arrow is in open position and start pumping several times by turning the lever in anti-clockwise
position of the bayonet lock to get the rod in pumping position: check whether there is no air coming out of the pump or
out of the filter module.
4.
When the Jerry can is fully filled with water (20 liters), only 6 – 8 times pumping is needed before the filtered water
comes out of the outlet of the filter module. When the flow is reducing, perform a few pump actions to increase the
flow again to the initial flow. When the flow is returned to the maximum or initial flow, stop pumping!
5.
To finish, unscrew the pump to release the pressure and close the tap of the outlet of the filter module by placing the
arrow NOT towards the outlet.
REMARKS:
1.
Do not ‘over pump’ or make too much pressure on the system because this can cause damage to the filter or other parts
of the LFJC Jerry can system.
2.
The LFJC Jerry can does not remove salt out of salty water or seawater or high concentrations of chemicals.
3.
Do not use hot water (>45°C) or frozen water because this will damage the filter module.
4.
Ensure that the LFJC system is stored dry and outside direct sunlight
5.
Ensure that the system is de-pressurized by unscrewing the pump and with the outlet arrow in open position and that
the filter module has been ‘BackWashed’ after every use or after one complete Jerry can filling or after 20 liters of
filtering water or when the flow is reduced at maximum pressure (Jerry can is minimum for ½ filled with water).
6.
The flow and capacity to filter water from the LFJC depends of the quality of the untreated water.
b.
FILTER MODULE BACKWASHING
The membranes in the filter module will become blocked or clogged after having been in operation for some time. Filtered water
flow reduces and pumping becomes more difficult. When this happens, the filter needs a backwash! The filter module with
hollow fiber membranes act as nano-porous sieve that filters out micro-biological organisms and particles. To dislodge these
particles, follow the instructions below:
1.
Turn the tap of the outlet with the arrow to open position so the air can enter via the outlet
2.
Push the outlet unit slightly down and turn the unit for a quart turn in anti-clockwise direction to unlock the unit
(bayonet) and lift up the outflow unit. This device is now acting as the back-wash pump.
3.
Unlock the pump of the Jerry can by turning the handle in anti-clockwise direction and push the pump handle of the
Jerry can down slowly: pump a few times so the water flows out the outlet unit.
4.
Turn the tap arrow in closed position once the water starts flowing from the tap; any position of the ‘arrow’ is closed
when the arrow is non-open position!
5.
Unscrew the pump to release the pressure from the LFJC
3

6.
Push & Tap 5 – 10 times until the back-wash device is in down position: the outlet is now acting now as the
Back-Wash unit. The flow is now reversed, and the filtered water combined with compressed air will flush
the dirt from the membranes.
7.
Open the tap with the arrow again in open position and lift the outlet / Back-Wash unit slowly in ‘up’
position and close the tap with the arrow. Push & Tap a few times on the outlet / Back-Wash unit till the unit is in ‘down’
position. Repeat this action 5 times to ensure the filter module is flushed and cleaned by Back-Wash.
8.
After Back-Wash cleaning, push the outlet / Back-Wash unit in ‘down’ position and turn in clockwise direction to lock
unit back in normal position.
9.
Repeat step 1 – 8 if the filter is still clogged/blocked. Fil the Jerrycan once again with (visible clean) tap water and start
with normal filter action. Wait until the filtered water comes out of the output unit and release the pressure for an extra
Back-Wash action (repeat step 1 – 8). If the system is still blocked, this means the maintenance & service instructions are
not carefully followed: minimum every 6 months a special Back-Wash is recommended by using a
a.
disinfection solution: prepare 10 liters of clean water to make a 0.5% (500 ppm) disinfection or sterilizing
solution with hydrogen peroxide (H2O2) and filtered water in case of bio-film. Practical: Add 200 ml of 5% to 2
liters of water and put the disinfection solution into the LFJC Jerrycan, shake well and perform a Back-Wash.
b.
anti-scaling solution (citric acid: common household biological vinegar) in case of chemical blockage or scaling:
prepare 2 liters of water solution using a 200 ml kitchen biological household vinegar (max. 5% concentration)
or any other citric acid that is used for household applications. Practical: Add 2 liters of water and put 200 ml
of vinegar into the LFJC, shake well and perform a special Back-Wash. Remark: after performing step a
‘disinfection and cleaning’, always rinse the water filter system with tap water before performing step b ‘anti-
scaling’.
In extreme situations and / or in case of no results with Back-Wash & special Back-Wash, the module might need to be replaced.
c.
FILTER MODULE STORAGE, STERILIZATION AND DISINFECTION
The membrane in the filter module of the LFJC will need to be disinfected before and after storage for a long time,
or when the LFJC is used intensively, or when the LFJC shows reduced flow … this procedure is called ‘special Back-
Wash’. To perform this special Back-Wash, repeat the process described in FILTER MODULE BACK-WASHING and
follow carefully the instructions below:
1.
Unscrew and remove the pump of the LFJC container – Jerry can and empty & rinse out any debris with clean water.
2.
Fill up half of the LFJC with 10 liters of clean water and add 50 ml of Silver Stabilized Hydrogen Peroxide (Huwa-San)
fluid to make a disinfection solution of 0.5 % to sterilize the complete system of the Jerry can.
3.
Screw the pump back in the vessel and start pumping with the outlet unit arrow in open position and agitate the
disinfection fluid by shaking the Jerry can several times from side to side and up & down to make a proper sterilizing
fluid.
4.
Start pumping with open tap outlet till approx. 1 liter of water flows out of the tap and close the tap outlet while
maintaining the sterilizing fluid in the complete system for 60 minutes.
5.
After 60 minutes, perform a normal Back-Wash. PS: you can also wait 5 minutes between each of the 5 Back-Wash
cycles
6.
Unscrew the pump and remove it from the LFJC container and discard all remaining sterilizing fluid.
7.
Perform a complete Back-Wash cycle as described before and discard the fluid to dry store the LFJC system. The LFJC is
now ready to be stored.
8.
When the LFJC is to be used again, first fill up the Jerry can with clean water and flush the system by pumping approx. 1
liter through the outlet unit. The Jerry can is now ready to be used again.
d.
MAINTENANCE OF LFJC PUMP
1.
Unlock & unscrew and remove the pump from the LFJC.
2.
Lift up the round section (screw of the pump) by carefully sliding the screw of the grey plastic part.
3.
Note that the sealant rubber under the screw can obstruct the sliding on the pump rod.
4.
Rotate the grey plastic section in open direction to release the rod of the pump
5.
Pull out the rod of the pump out of the pump tube by lifting the handle.
6.
Inspect the rubber piston and apply a small amount of silicone-based grease around the rubber piston cup.
4
7.
Replace the rubber piston O-rings if needed (by damage or worn down) and re-assemble the pump
8.
Re-assemble the pump tube and pump handle: ensure that the grey plastic section locks into the pump screw of the
pump tube and screw the pump back into the LFJC.

e.
REPLACING OR CHANGING THE LFJC FILTER MODULE
(complete filter unit)
1.
Unscrew and remove the filter module from the LFJC Jerry can
2.
Remove the new filter module LFJC from its packaging
3.
Insert the new filter module into the Jerry can and screw it firmly to the LFJC
NOTE
1.
The
LFJC
does not remove high concentrations of chemical contaminants or salt water.
2.
The
LFJC
must not be used to filter hot or ice water – that is to say water having a temperature exceeding
45°C or be frozen otherwise damage to its special filter membrane will occur.
2. MORE TECHNICAL INFORMATION
Hollow Fiber Membrane Material
m-PES
MWCO
30 – 40 °A (~ 5 nano)
Potting material Polyurethane
Plastic sections ABS, PP
Jerry can section MDPE polymer
Wall thickness
3,5 mm (Av.)
Weight
2,5 kg (Av.)
Dry Weight
2.7 kg
Minimum operating Temperature
> 3 °C
Maximum operating Temperature
< 45 °C
Minimum storage Temperature
> 3 °C
Maximum storage Temperature
< 45 °C
3.
WARRANTY
Provided operating and maintenance instructions are observed and the LFJC (“product”) is used for its intended purpose,
the product is warranted for a period of 12 months from the date of purchase to be free from defects in materials and
workmanship. If there is a breach of this warranty, return the product to the distributor from which it was purchased
together with the sale receipt to verify the date of purchase. The distributor is not authorized to replace the product but
to return it to AquaNano (or an authorized dealer).
AquaNano, at its discretion and cost, can then either repair or replace the defective product or component.
5

To the full extent permitted by law, all other warranties and conditions are excluded including
warranties and conditions implied by statutes as to fitness or purpose and merchantability. Save for
the warranty contained in this leaflet, AquaNano and the distributor from which the product was
purchased are released from and are not to be liable for costs, expenses, damages, or liabilities which
are incurred or sustained as a result of or in connection with use and operation of the product
irrespective of how these costs, expenses, damages or liabilities arise and irrespective of whether they
are direct, indirect or consequential in nature.
This warranty is the only warranty applicable to the product and, to the maximum extent permitted by law, is expressly
in lieu of any other conditions or warranties expressed or implied in relation to the product.
AquaNano does not authorize any person to create for it any other obligation or liability in connection with this product.
This warranty covers only conditions resulting directly from defects in workmanship or material under normal use and
service. Because of the many particular factors which are outside our knowledge and control and affect the use of the
product, no warranty is given or is to be implied with respect to either such information or the product itself, in
particular the suitability of the product for any particular purpose. The purchaser should independently determine the
suitability of the product for the intended application.
4.
WARRANTY
EXCLUSIONS
The warranty specifically does not cover:
1.
Conditions resulting from misuse, use of incompatible fluids, exceeding product specifications including overloading,
impact damage, negligence, accidental damage or failure to perform recommended maintenance services.
2.
The replacement of moving and maintenance items such as filter, o-rings, rubber washers, pump rubber piston cup, etc.
3.
Loss of time, inconvenience, loss of use of the product liability to third parties or any other consequential damages.
4.
Incidental costs associated with a warranty repair including any travel costs, out of hour’s labor charges, cleaning costs,
transportation costs, freight costs or any communication costs.
5.
DISCLAIMER
All information contained herein is presented in good faith and subject to change, errors, and omissions at any time.
6.
WARNINGS
Before operating this product read the following safety instructions. Failure to comply with these warnings may result in
serious injury;
1.
This product is designed and manufactured solely for the purpose of filtering water. Under no circumstances may it be
used for any other purposes.
2.
Before using this product, all operators and users must have read and understood the contents of this manual and any
other manual supplied with the product. Never allow inadequately trained personnel to operate this product.
3.
Before use of sterilization chemical refer to the chemical manufacturer’s label and safety instructions for safe handling
procedures and use.
4.
Keep the product out of the reach of children at all times.
5.
Never stand with face or body over the top of the tank (Jerry can) when loosening the pump.
6.
Do not leave the Jerry can in pressurized state, specifically in the hot sun or for prolonged periods of storage.
6

7.
IMPORTANT
INFORMATION
Keep these instructions for future reference. If you do not understand these instructions or have any
questions,
please contact the Distributor or AquaNano via [email protected]
It is recommended to clean the LFJC filter by Back-Wash after every use or at the end of
the day or when stored away or by reduced flow or after every 20 Liter of filtered
water.
always protected * no power required * easy installation * ecological & sustainable * no chemicals Involved
……………………………………………………………………………………………………………………………………………………………………………………….
7
info@aqua-solutions.sk
www.aqua-solutions.sk
Aqua Solutions, s.r.o.
Jiráskova 23
940 01 NOVÉ ZÁMKY
SLOVENSKÁ REPUBLIKA
Table of contents
Popular Water Dispenser manuals by other brands

Kenmore
Kenmore 625.384600 owner's manual

Autotrol
Autotrol LOGIX 255-760 Meter Installation & start-up instructions

Taylex
Taylex ABS1500 installation manual

Franklin Electric
Franklin Electric PTS1 Series Installation instructions and owner's manual

Brita
Brita Wave BPA-Free Water Pitcher user guide

Osmio
Osmio Duo Hydrogen instruction manual