Aqua Quip Twister Operating instructions

1
FULLY READ THIS OWNER’S MANUAL BEFORE
INSTALLING TWISTER.
The specific instructions regarding your particular pool cleaner and
connection method may differ from the general installation instructions shown
below. See inside for more details or visit www.solarsunrings.com/twister.
Installation &
Owner’s Manual
1) Switch off your pool pump and check that your baskets and filter are clean, and that your
pool cleaner hoses are not leaking from splits, cracks or abrasion.
2) If you have an In-Line Leaf Canister fitted to your pool hose, read the appropriate section
inside before cutting hose and installing Twister.
3) If there is no In-Line Leaf Canister, then follow the instructions below.
If pool cleaner hose connects to skimmer box:
Cut your pool hose 2 feet (60 cm) from the skimmer box.
If pool cleaner hose connects to dedicated suction line:
Cut your pool hose 6 inches (15 cm) from the pool wall.
4) Submerge Twister and bleed all air until full of water. Fit Twister between these two cut
sections of hose. Twister must be installed with the correct side facing upwards and the
correct end facing the pool cleaner. Refer to the arrows and markings on the Twister to
ensure correct orientation and refer to Diagram 1. Additional installation photos appear in
this Instruction Manual and on the outside of the box.
5) If your pool hose exits the skimmer box too high, then Twister will sit too high in the water
and may suck air. If adjustments are required to the skimmer box connections to keep your
hose and Twister at the correct height, then contact your local pool professional or Twister
dealer. Hose weights may be required to achieve this.
6) Fit the Angled Adaptor between your pool cleaner and your hose, as per Diagram 2. Place
the pool cleaner back in the pool, fill the hose with water so that all air is removed.
7) With the Twister, hoses, Angled Adaptor and cleaner fitted and free of air, switch on your
pool pump. Twister’s internal paddle wheel will spin, now watch your pool cleaner reach
places it never reached before. Your installation is now complete.
Important Information:
1) Twister is only suitable for suction style pool cleaners.
2) Twister will not fix a pool cleaner’s performance if the pool cleaner has defective or worn
components, or if the hoses are kinked, cracked or otherwise need replacing. Also ensure
that the pool cleaner and/or flow control device have been installed correctly. Please refer to
the owners manual that was supplied with your pool cleaner or visit the manufacturer’s web
site for installation tips and troubleshooting for your particular model of pool cleaner.
3) Twister is not a fully sealed unit and will suck air if it floats above the pool water level.
In addition to following the pool cleaner manufacturer’s recommendations, it may be
necessary to add an additional hose weight in front of Twister to keep it submerged.
AQ Twister Instructions Translat1 1 21/6/09 11:12:14 PM

2 3
Simply cut existing
hose 2ft (60cm)
away from the
skimmer box.
1 2 3
Simply cut existing
1
2
3
Fit the Twister,
correctly oriented,
between the two
cut sections of
hose.
Fit the supplied
Angled Adaptor
between your
cleaner and your
hose.
If you have:
A Hayward Navigator or Pool Vac Ultra
Install Twister as per instructions. However, do not install the blue-colored Angled Adaptor
that is supplied with Twister. It is not necessary for these self-steering types of pool cleaners.
A Baracuda X7 Quattro
Install Twister as per instructions. Fit Twister’s blue-colored Angled Adaptor firmly over the
two lugs on the Flex-Connector (P/N X77039). Cut the Twist-Lock end from the hose and
insert small end of Angled Adaptor into the hose. If cleaner still sticks in sharp corners
of pool, remove the Flex-Connector and fit Twister’s Angled Adaptor directly to the Outer
Extension Pipe (P/N X77027).
An In-Line Leaf Canister
Twister should be located between the leaf canister and the pool cleaner, 6 inches (15cm)
away from the canister. If your Leaf Canister continually fills with air then this will cause the
hose and Twister to rise up and suck air. Solve the air problem with your cleaner or hose to
stop this occurring.
Any cleaner that climbs too high and sucks air
A suction pool cleaner that regularly climbs to the pool surface and sucks air can result in
damage to your pool pump, and will also adversely effect the operation of Twister. Follow
manufacturer’s recommendations to stop this happening. This usually involves the addition
of extra hose weights. For Kreepy Krauly, use the Wall Climb Adjuster (P/N K12065).
1
Illustrations appearing on Page 3
DIAGRAM 1 DIAGRAM 2
A = To Pool Cleaner D = Angled Adaptor
B = This side UP E = To Twister
C = To Skimmer Box or Suction Line F = Twister installed and operating
2
A
B
C
E
D
F
Refer to www.solarsunrings.com/twister for additional illustrations.
AQ Twister Instructions Translat2-3 2-3 21/6/09 11:12:42 PM

2
3
Simply cut existing
hose 2ft (60cm)
away from the
skimmer box.
1 2 3
Simply cut existing
1
2
3
Fit the Twister,
correctly oriented,
between the two
cut sections of
hose.
Fit the supplied
Angled Adaptor
between your
cleaner and your
hose.
If you have:
A Hayward Navigator or Pool Vac Ultra
Install Twister as per instructions. However, do not install the blue-colored Angled Adaptor
that is supplied with Twister. It is not necessary for these self-steering types of pool cleaners.
A Baracuda X7 Quattro
Install Twister as per instructions. Fit Twister’s blue-colored Angled Adaptor firmly over the
two lugs on the Flex-Connector (P/N X77039). Cut the Twist-Lock end from the hose and
insert small end of Angled Adaptor into the hose. If cleaner still sticks in sharp corners
of pool, remove the Flex-Connector and fit Twister’s Angled Adaptor directly to the Outer
Extension Pipe (P/N X77027).
An In-Line Leaf Canister
Twister should be located between the leaf canister and the pool cleaner, 6 inches (15cm)
away from the canister. If your Leaf Canister continually fills with air then this will cause the
hose and Twister to rise up and suck air. Solve the air problem with your cleaner or hose to
stop this occurring.
Any cleaner that climbs too high and sucks air
A suction pool cleaner that regularly climbs to the pool surface and sucks air can result in
damage to your pool pump, and will also adversely effect the operation of Twister. Follow
manufacturer’s recommendations to stop this happening. This usually involves the addition
of extra hose weights. For Kreepy Krauly, use the Wall Climb Adjuster (P/N K12065).
1
Illustrations appearing on Page 3
DIAGRAM 1 DIAGRAM 2
A = To Pool Cleaner D = Angled Adaptor
B = This side UP E = To Twister
C = To Skimmer Box or Suction Line F = Twister installed and operating
2
A
B
C
E
D
F
Refer to www.solarsunrings.com/twister for additional illustrations.
AQ Twister Instructions Translat2-3 2-3 21/6/09 11:12:42 PM

4 5
How does Twister work?
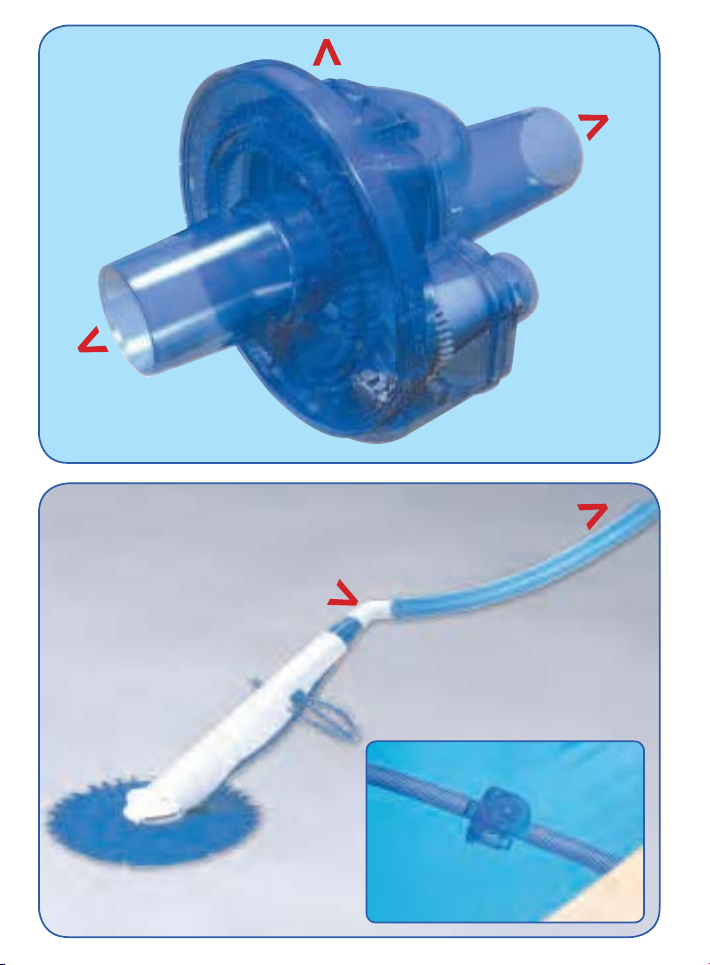
Twister is powered by the constant flow of water through the pool cleaner hose. A
paddle wheel spins inside the Twister and transfers drive to the pool hose, counter-
rotating the hose about 3 times per hour.
This counter-rotation swivels the Angled Adaptor on the pool cleaner, thus continually
changing the direction of the hose. Most suction cleaners move around the pool by
following the hose, therefore with Twister changing the direction of the hose, the
pool cleaner will be steered out of awkward corners to ensure a constantly varied
cleaning pattern.
Troubleshooting
1) If Twister’s paddle wheel stops spinning, please check the basics: Clean the filter,
empty all leaf baskets, check the pool cleaner for obstructions and adjust the pool
cleaner’s flow controller.
2) Like your suction cleaner, on occasions, some debris may get stuck in the Twister.
This can be easily dislodged by removing the hose from the inlet end and washing it
through with your garden hose.
3) If your pool cleaner has an inbuilt swivel on top of the cleaner (like Kreepy Krauly or
Baracuda), then ensure it rotates freely. If the swivel is jammed, replace it. Cleaners
such as Hayward Navigator and Pool Vac Ultra do not have a swivel on top, therefore
their hose connection point does not swivel freely, this is normal.
4) If your Twister is installed correctly and your pool cleaner still remains stuck in a tight
corner, then add a hose weight half way between Twister and your pool cleaner.
Refer to www.solarsunrings.com/twister for additional support.
Distributed in North America by:
42210 Roick Drive. Suite #10,Temecula, California 92590
Twister is warranted for 12 months against faulty parts and workmanship.
Fill out the following details and attach your receipt to this sheet in case of warranty claim.
Please contact Twister warranty department at (951) 296-6077.
Twister Purchased From:
Date of Purchase:
Manufactured in Australia by:
www.aquaquip.com.au www.pooltwister.com
VEUILLEZ ATTENTIVEMENT LE MANUEL D’UTILISATION AVANT
D’INSTALLER LE ROBOTTWISTER.
Les consignes particulières concernant votre nettoyeur de piscine et la méthode de
raccordement peuvent différer des consignes générales d’installation. Voir le présent
document pour de l’information détaillée ou visiter le site www.solarsunrings.com/twister.
Manuel d’installation
et d’utilisation
1) Vous devez fermer la pompe de votre piscine et
vérifier que les paniers et le filtre sont propres,
et que les boyaux du nettoyeur de votre piscine
n’ont aucune fuite provenant d’une fissure,
d’une déchirure ou d’une abrasion.
2) S’il y a un panier à feuilles raccordé en ligne
au boyau de la piscine, veuillez lire la section
appropriée du présent document avant de
couper le boyau et d’installer le robot Twister.
3) S’il n’y a aucun panier à feuilles, veuillez suivre
alors les consignes ci-dessous :
Si le boyau du nettoyeur de piscine est
raccordé à l’écumoire :
Coupez le boyau de votre piscine à 2 pieds
(60 cm) de l’écumoire.
Si le boyau du nettoyeur de piscine est
raccordé à une conduite d’aspiration
spécialement conçue à cette fin :
Coupez le boyau de votre piscine à 6 pouces
(15 cm) de la paroi de la piscine.
4) Vous immergez le robot Twister et vous purgez
tout l’air jusqu’à ce qu’il soit rempli d’eau.
Vous raccordez le robot Twister entre les
deux sections de boyau qui ont été coupées.
Le robot Twister doit être installé avec le bon
côté vers le haut et la bonne extrémité vers le
nettoyeur de la piscine. Veuillez vous référer
aux flèches et aux marqueurs sur le robot
Twister pour avoir la bonne orientation et voir
également le schéma 1. Il y a également des
photos d’installation dans le présent manuel
d’installation et sur l’extérieur de la boîte.
5) Si le boyau de votre piscine est trop haut à la
sortie de l’écumoire, le robot Twister sera trop
haut dans l’eau et aspirera peut-être de l’air. Si
des réglages sont nécessaires aux points de
raccordement avec l’écumoire pour garder le
boyau et le Twister à la bonne hauteur, veuillez
communiquer avec votre spécialiste local de
la piscine ou le détaillant de robot Twister.
Certaines corrections à la hauteur pourront
être apportées.
6) Vous raccordez l’adaptateur angulaire entre
le nettoyeur de votre piscine et votre boyau,
tel qu’il est indiqué sur le schéma 2. Vous
remettez le nettoyeur de piscine dans l’eau,
vous remplissez le boyau d’eau de manière à
ce que tout l’air soit purgé.
7) Dès que le robotTwister, les boyaux, l’adaptateur
angulaire et le nettoyeur auront été installés et
que tout l’air aura été évacué, vous mettez la
pompe de votre piscine en marche. La roue à
palettes commencera à tourner; vous verrez
que votre nettoyeur de piscine ira dans des
endroits où il n’y allait pas auparavant. Votre
installation est maintenant complétée.
Information importante:
1) Le robot Twister convient uniquement aux
nettoyeurs de piscine de style à aspiration.
2) Le robotTwister n’améliorera pas le rendement
de votre nettoyeur de piscine si ce dernier
comporte des éléments défectueux ou usés
ou que les boyaux sont déformés, fissurés
ou qu’ils doivent de toute évidence être
remplacés. Vous devez également vous assurer
que le nettoyeur de piscine et/ou le dispositif
de régulation du débit ont été installés
correctement. Veuillez vous référer au manuel
d’utilisation qui est fourni avec votre nettoyeur
de piscine ou consulter le site Web du fabricant
pour des conseils quant à l’installation et au
dépannage de votre modèle particulier de
nettoyeur de piscine.
3) Le robot Twister n’est pas complètement
scellé et aspirera de l’air s’il flotte au-dessus
du niveau de l’eau de la piscine. En plus des
recommandations suivantes du fabricant du
nettoyeur de piscine, il se peut que vous ayez à
ajouter un poids sur le devant du robot Twister
pour le garder immergé.
AQ Twister Instructions Translat4-5 4-5 21/6/09 11:12:44 PM
Rainbow Pool Products
PO Box 2388, Mansfield Qld 4122
Telephone STD 61-7-3849 5385
Facsimile STD 61-7-3849 5384
Email: [email protected]
Web: www.rainbowpoolproducts.com.au
Table of contents
Other Aqua Quip Swimming Pool Vacuum manuals
Popular Swimming Pool Vacuum manuals by other brands

Aqua Products
Aqua Products JetMAX Junior operating instructions

WaterTech
WaterTech Pool Blaster Aqua Broom Operator's manual

Clearpond
Clearpond Turbo-Vac manual

WaterTech
WaterTech Pool Blaster Aqua Broom Operator's manual

WaterTech
WaterTech Pool Blaster Aqua Broom XL Ultra Operator's manual

Bestway
Bestway 58212 owner's manual

Kreepy krauly
Kreepy krauly Kreepy Krauly SandShark Installation and user guide

Xtreme Power
Xtreme Power 75036-XP Owner's manual and safety instructions

T.I.P.
T.I.P. TSS 1600 K manual

Zodiac
Zodiac Baracuda G3 installation guide

Polaris
Polaris Vac-Sweep 380 owner's manual

Hayward
Hayward AquaNaut troubleshooting guide