7
Installing the Soft Shield Elite
New systems come with the cartridges and outlet connector pre-installed. Installer
should verify this during installation. When changing cartridges reverse installation
procedure and note items 6 & 7.
1. Please conrm that all items required are included in the kit ready for
assembly and remove from carton
2. Find a suitable location for the installation keeping in mind access to the
incoming water supply and the treated supply to the home, restaurant or
foodservice equipment.
3. The system must stand upright in the desired location and secured using
the wall mounting bracket provided where possible.
4. Take the two threaded Adapters (Item 5) and insert them into the inlet and
outlet of the Soft Shield Housing (Item 1) as shown in Diagram A.
5. Secure these adapters with the two red adapter Locking Pins (Item 6) as
shown in Diagram A.
6. Take the Sediment/Carbon Filter cartridge (Item 7) and place it within the
Softshield Housing (Item 1) as shown in Diagram B.
7. Take the Aquablu Scale Elimination cartridge (Item 8) and secure it within
the centre of the Sediment/Carbon Filter cartridge (Item 7) as shown in
Diagram C.
8. Take the Outlet Connector (Item 4) and install it as shown in Diagram D.
9. Take the Head Assembly (Item 2) and screw this onto the Housing (Item 1)
as shown in Diagram E.
10. To tighten take the Multifunction Tool (Item 9) and tighten the Head
Assembly as shown in Diagram E by tightening in a clockwise direction –
DO NOT OVER TIGHTEN.
11. Using PTFE tape connect incoming water supply to the inlet of the Soft
Shield Elite system and connect to the outlet as required to service the
property.
12. Turn on water supply and check for leaks. Open rst cold water tap on the
system to release any air, and run the system for 5 minutes before putting
into service.
Introduction
Thank you for your purchase of the TurboTAC salt-
free limescale prevention and water ltration system.
This water treatment system has been designed and
tested to provide you with high quality drinking water
and limescale prevention for years to come.
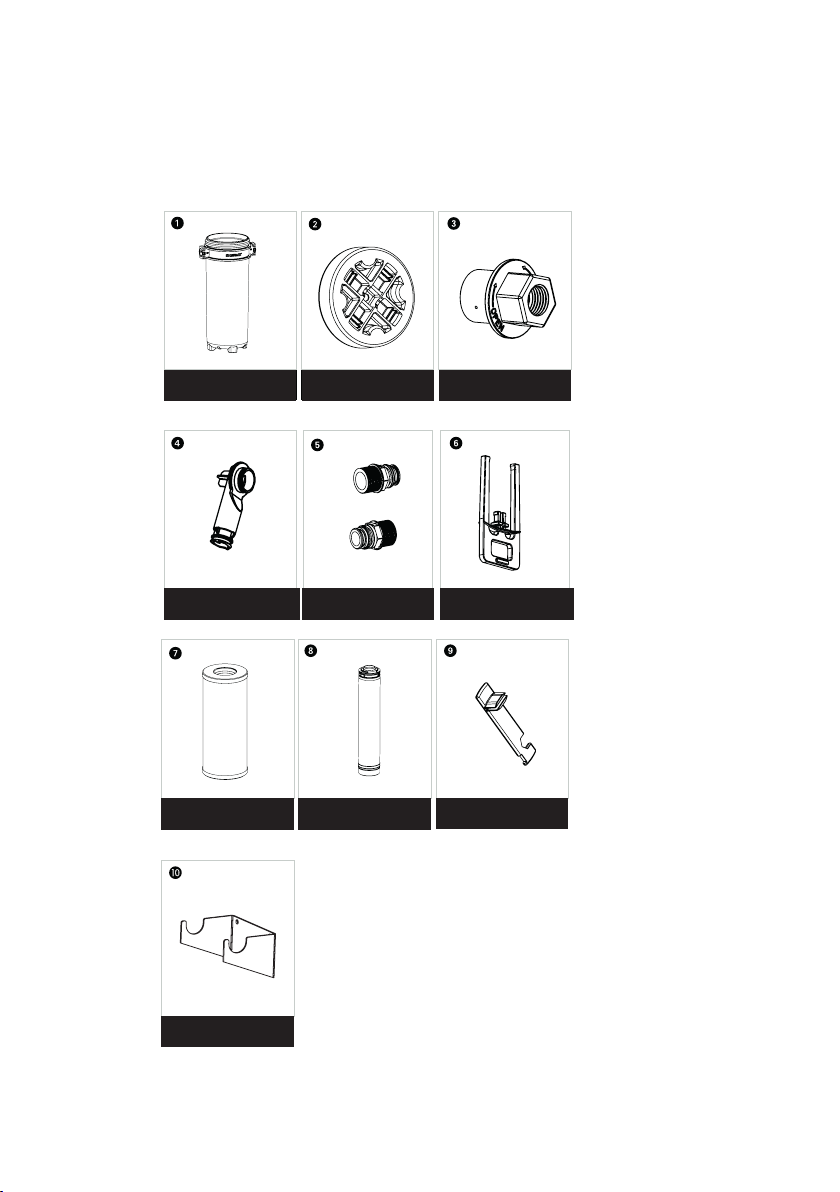
System Parts
Installation Instructions
OneFlow+ Housing
Outlet Connector
OneFlow+ Head Assembly
1 MPT Threaded Inlet /
Outlet Adapters (x2)
Pressure Relief Valve
Inlet / Outlet red Adapter
Locking Pins (x2)
Sediment / Carbon Filter
Cartridge (20 microns)
OneFlow+ Scale Reduction
(TAC) Cartridge Multifunction Tool
Mounting Bracket
2
Introduction
Thank you for your purchase of Watts OneFlow+ salt-free scale
prevention and water ltration system. This Watts water treatment
system has been designed and tested to provide you with high qual-
ity drinking water fand scale prevention for years to come.
Installation Instructions
New systems come with the cartridges and outlet connector pre-installed. Installer
should verify this during installation.
1. Please confirm that all items required are included in the kit ready for assembly
and remove from carton.
2. Find a suitable location for the OneFlow+ system keeping in mind access to the
water supply and delivery to the home, restaurant or foodservice equipment.
3. The system can stand upright in the desired location without the need to affix
to a wall with a mounting bracket. However, a mounting bracket is available as a
separate part (Item 10)
4. Take the two 1”MPT Threaded Adapters (Item 5) and insert them into the inlet and
outlet of the OneFlow+ Housing (Item 1) as shown in Diagram A.
5. Secure these adapters with the two red adapter Locking Pins (Item 6) as shown in
Diagram A.
6. Take the Sediment/Carbon Filter cartridge (Item 7) and place it within the One-
Flow+ Housing (Item 1) as shown in Diagram B.
7. Take the OneFlow+ Scale reduction cartridge (Item 8) and secure it within the
centre of the Sediment/Carbon Filter cartridge (Item 7) as shown in Diagram C.
8. Take the Outlet Connector (Item 4) and install it as shown in Diagram D.
9. Take the OneFlow+ Head Assembly (Item 2) and screw this onto the OneFlow+
Housing (Item 1) as shown in Diagram E.
NOTICE
10. To tighten take the Multifunction Tool (Item 9] and tighten the Head Assembly as
shown in Diagram E by tightening in a clockwise direction – DO NOT OVER TI GHTEN
11. Using plumbing tape connect water supply to the inlet of the OneFlow+ system
and connect to the outlet of the OneFlow+ System as required.
12. Turn on water supply and check for leaks.
Diagram A
Diagram B
Diagram C
Diagram D
CLOSE
Diagram E
Diagram F
OPEN
Diagram G
Diagram H
OneFlow+ System Parts
NOTICE
IOM-WQ-OneFlow+.indd 2 10/15/2015 11:22:12 PM
Housing Head Assembly Pressure Relief Value
Outlet Connector Threaded Inlet / Outlet
Adapters (x2)
Inlet / Outlet Red Adapter
Looking Pins (x2)
Sediment / Carbon Filter
Cartridge (20 micorns)
Scale Reduction
(TAC) Cartridge Multifunction Tool
Mounting Bracket
New systems come with the cartridges and outlet connector pre-installed. Installer
should verify this during installation. When changing cartridges reverse installation
procedure and note items 6 & 7.
1. Please conrm that all items required are included in the kit ready for assembly and
remove from carton.
2. Find a suitable location for the installation keeping in mind access to the incoming
water supply and the treated supply to the home, restaurant or foodservice
equipment.
3. The system must stand upright in the desired location and secured using the wall
mounting bracket provided where possible.
4. Take the two threaded Adapters (Item 5) and insert them into the inlet and outlet of
the TurboTAC Housing (Item 1) as shown in Diagram A.
5. Secure these adapters with the two red adapter Locking Pins (Item 6) as shown in
Diagram A.
6. Take the Sediment/Carbon Filter cartridge (Item 7) and place it within the TurboTAC
Housing (Item 1) as shown in Diagram B.
7. Take the Next TAC Scale reduction cartridge (Item 8) and secure it within the centre
of the Sediment/Carbon Filter cartridge (Item 7) as shown in Diagram C.
8. Take the Outlet Connector (Item 4) and install it as shown in Diagram D.
9. Take the Head Assembly (Item 2) and screw this onto the Housing (Item 1) as
shown in Diagram E.
10. To tighten take the Multifunction Tool (Item 9] and tighten the Head Assembly as
shown in Diagram E by tightening in a clockwise direction – DO NOT OVER TIGHTEN
11. Using PTFE tape connect incoming water supply to the inlet of the TurboTAC
system and connect to the outlet as required to service the property.
12. Turn on water supply and check for leaks. Open rst cold water tap on the system
to release any air, and run the system for 5 minutes before putting into service.
OneFlow+ Housing
Outlet Connector
OneFlow+ Head Assembly
1 MPT Threaded Inlet /
Outlet Adapters (x2)
Pressure Relief Valve
Inlet / Outlet red Adapter
Locking Pins (x2)
Sediment / Carbon Filter
Cartridge (20 microns)
OneFlow+ Scale Reduction
(TAC) Cartridge Multifunction Tool
Mounting Bracket
2
Introduction
Thank you for your purchase of Watts OneFlow+ salt-free scale
prevention and water ltration system. This Watts water treatment
system has been designed and tested to provide you with high qual-
ity drinking water fand scale prevention for years to come.
Installation Instructions
New systems come with the cartridges and outlet connector pre-installed. Installer
should verify this during installation.
1. Please confirm that all items required are included in the kit ready for assembly
and remove from carton.
2. Find a suitable location for the OneFlow+ system keeping in mind access to the
water supply and delivery to the home, restaurant or foodservice equipment.
3. The system can stand upright in the desired location without the need to affix
to a wall with a mounting bracket. However, a mounting bracket is available as a
separate part (Item 10)
4. Take the two 1”MPT Threaded Adapters (Item 5) and insert them into the inlet and
outlet of the OneFlow+ Housing (Item 1) as shown in Diagram A.
5. Secure these adapters with the two red adapter Locking Pins (Item 6) as shown in
Diagram A.
6. Take the Sediment/Carbon Filter cartridge (Item 7) and place it within the One-
Flow+ Housing (Item 1) as shown in Diagram B.
7. Take the OneFlow+ Scale reduction cartridge (Item 8) and secure it within the
centre of the Sediment/Carbon Filter cartridge (Item 7) as shown in Diagram C.
8. Take the Outlet Connector (Item 4) and install it as shown in Diagram D.
9. Take the OneFlow+ Head Assembly (Item 2) and screw this onto the OneFlow+
Housing (Item 1) as shown in Diagram E.
NOTICE
10. To tighten take the Multifunction Tool (Item 9] and tighten the Head Assembly as
shown in Diagram E by tightening in a clockwise direction – DO NOT OVER TI GHTEN
11. Using plumbing tape connect water supply to the inlet of the OneFlow+ system
and connect to the outlet of the OneFlow+ System as required.
12. Turn on water supply and check for leaks.
Diagram A
Diagram B
Diagram C
Diagram D
CLOSE
Diagram F
OPEN
Diagram G
Diagram H
OneFlow+ System Parts
NOTICE
IOM-WQ-OneFlow+.indd 2 10/15/2015 11:22:12 PM
Innovative purication solutions
www.aquablu.com